- Zenoti Help
- Release Notes
- Release Notes - March 03, 2026
Release Notes - March 03, 2026
We’ve enhanced the structure of our release notes to better serve your needs. Updates are now categorized under clear headings based on Add-ons, Core Product, Product Edition, Personas, and Modules.
This new format ensures you can quickly find updates most relevant to your role, understand the value each change delivers, and seamlessly adopt new features or enhanced workflows.
This Release Notes contains the following sections:
Announcements: Key updates and important information related to the release.
New Features: Newly introduced functionalities designed to enhance the product experience.
Enhancements: Improvements made to existing features for better usability and performance. Categorized features as Core Product, Product Editions, and Add-ons.
Additional Resources: Links to supporting materials such as guides, training, and documentation. This also includes references to the release notes for the patches included in this update.
Icon | Description |
|---|---|
![]() | Automatic update for all users. |
![]() | Employee: Enhancements or features for employee and payroll. |
![]() | Admin: Features specifically enhanced for admin users who manage the system configuration, including user roles, permissions, and system integrations. |
![]() | Business Owner/Center Manager: Updates implemented for the business owners or managers who are responsible for overall business strategy, growth, and decision-making. |
![]() | Front Desk Operator/Service Provider: Features that enhance the usability for front-desk staff who handle appointments, customer queries, payments, and guest interactions. |
![]() | Guests: Improvements made for the end-users or customers of the business who interact with Zenoti through online booking systems, self-service kiosks, and branded mobile apps. |
Release Snapshot
The following table provides a consolidated list of new features, announcements, and updates included in this release. Use this section to quickly scan all major changes before exploring detailed descriptions in the following sections.
Type | New Feature/Enhancement |
|---|---|
Announcements |
|
Enhancements |
|
Announcements
Module: Lead Management
Business Owners, Center Managers
We’re excited to announce the launch of Lead Management System in Zenoti—a unified module designed to help businesses capture enquiries, manage follow-ups, and track conversions more effectively.
Lead Management brings lead configuration, daily lead operations, automation, and performance insights together in one place, giving teams full visibility into their sales pipeline and customer journey.
Key highlights
Centralized capture and management of customer enquiries
Customizable lead types, stages, sources, and priorities
Automated lead stage progression based on bookings and sales events
Real-time dashboards to monitor pipeline health, conversions, and revenue
Agent performance tracking with conversion and response insights
Seamless reporting for day-to-day lead tracking and analysis
Platform integrations for automatic lead capture from advertising channels
With Lead Management, teams can respond faster, stay organized, and make data-driven decisions to improve conversion rates and sales performance—all within Zenoti.
Note
This feature is currently in closed beta and available to a limited number of users.
Learn More: For more information, refer to the Lead Management article.
Module: AI Scribe
AI Scribe lets providers record guest conversations and automatically generate structured clinical insights, transcripts, and summaries. These AI-powered charting summaries help reduce manual documentation and can be used to quickly fill forms, saving time while improving accuracy.
Key highlights:
Record conversations directly from appointments
Get instant AI-generated charting summaries and transcripts
Consolidate insights across multiple recordings
Automatically fill forms with AI, with full editing control
Seamlessly manage user licenses and access associated with AI Scribe
Create and customize charting layouts to use when generating insights from recordings.
This feature is not enabled by default. Reach out to your Zenoti representative to enable this feature for your organization.
Note: AI Scribe is available only on the Zenoti Mobile App (ZMA) for tablets and mobile phones.
Learn more: For more information, refer to the Set Up and Manage AI Scribe and Generate Smart Clinical Insights Using AI Scribe articles.
Enhancements
Core Product
Module: Appointments
Business Owners/Center Manager
The redesigned Appointment Book can now be enabled by organizations and centers that use Classes or Workshops.
With this enhancement, businesses that offer classes can seamlessly adopt the redesigned Appointment Book without restrictions. This expands eligibility, simplifies rollout decisions, and enables more organizations to benefit from a consistent, future-ready appointment management experience.
How to Use:
At the organizational level, go to Configurations.
Search for and select Enable redesigned appointment book.
Turn the toggle on and onboard centers into the redesigned Appointment Book as required.
Organizations and centers using Classes or Workshops can now enable and use the redesigned Appointment Book without limitations.
Business Owners/Center Manager
This enhancement allows staff to email all upcoming appointments to a guest in a single click, reducing manual effort and ensuring guests have clear, accurate appointment information.
Business Scenario: Front desk teams often need to resend or clarify multiple upcoming appointments for guests, which can be time-consuming and error prone. This feature enables them to email all upcoming appointments in one click, improving guest experience while reducing manual coordination and follow-ups.
How to Use:
At the organization or center levels, navigate to Guests > Manage Guests.
From a guest profile, go to Appointments.
Click the envelope icon under Upcoming appointments.
Zenoti sends an email listing up to 20 upcoming appointments.
Learn More:For more information, refer to the Redesigned Guest Profile article.
Business Owners, Center Managers
Timed add-ons, including duration and price, can now be added to segmented services, bringing consistency with how add-ons work for non-segmented services. The add-on’s time and price are applied to the first servicing segment, following the same scaling rules as that segment.
Business scenario:
Previously, segmented services did not support add-ons with duration, limiting flexibility during booking and increasing manual effort for front-desk teams. This resulted in inconsistent behavior across booking channels and made it difficult to offer time-based enhancements for segmented services.
With this update, timed add-ons can now be added to segmented services in the same way as other services. The add-on duration and pricing are consistently tied to the first servicing segment, ensuring predictable scheduling, accurate scaling, and a smoother booking experience.
How to Use:
Navigate to Master Data and click on Services.
Select a segmented service from the list of services and go to the Add-ons tab of that service.
Add or associate add-ons with duration to the segmented service, just as you would for a non-segmented service.
![]() |
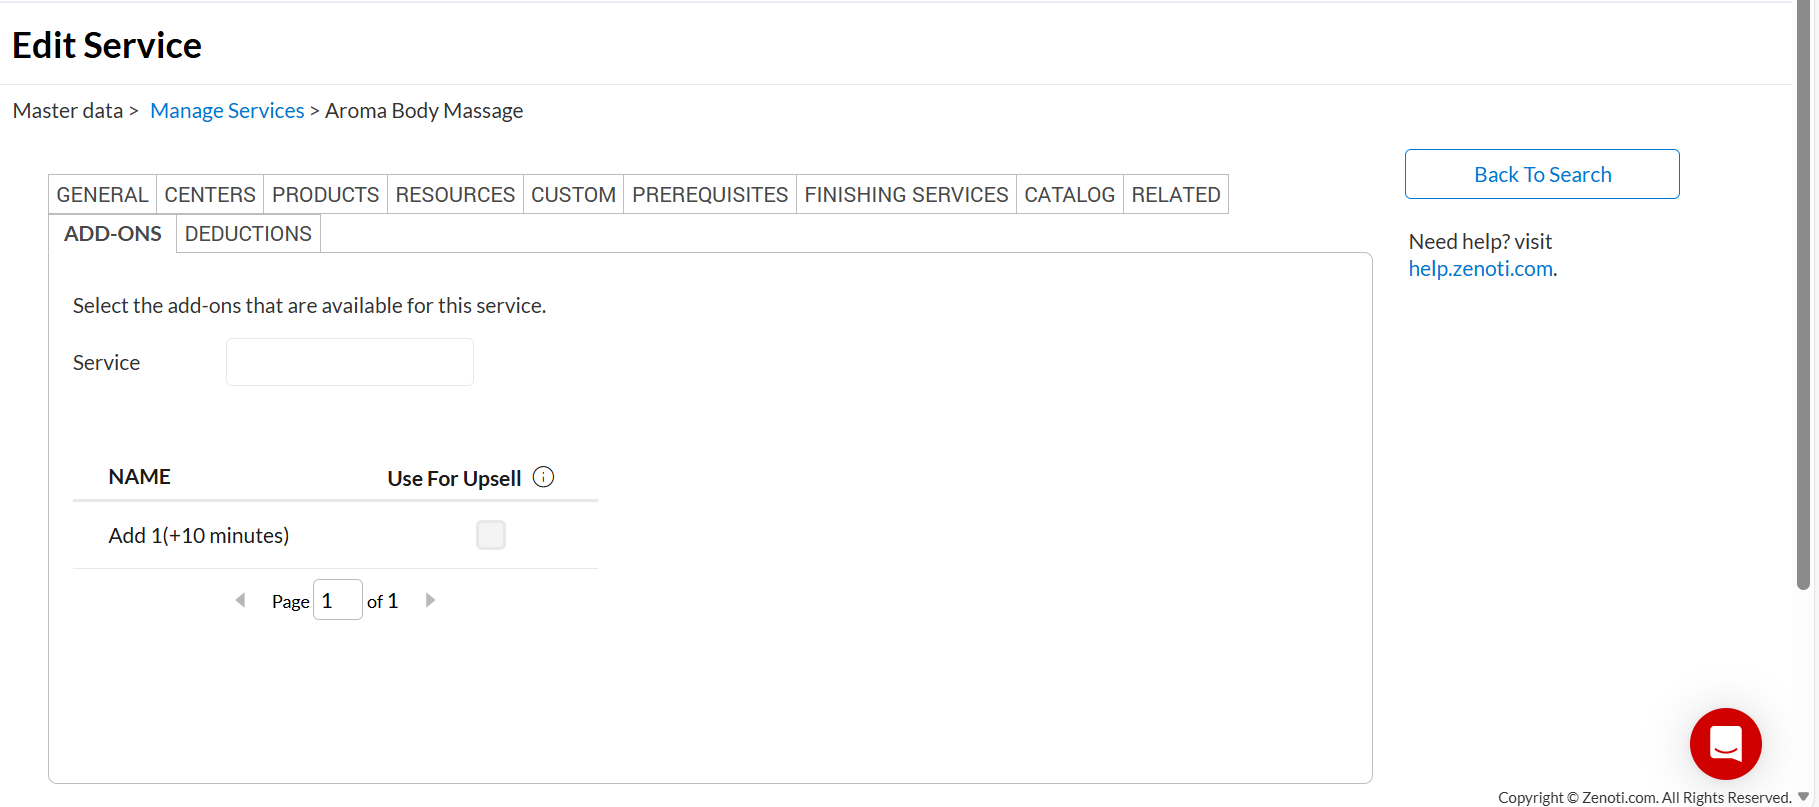
Once configured, these timed add-ons become available across all booking channels for that service.
Learn More: For more information, refer to the Add Timed Add-Ons to a Segmented Service in the Appointment Book article.
Business Owners/Center Manager
As organizations adopt the new front desk experience, it’s important to maintain consistent usage across all centers. This enhancement allows organizations to centrally control whether centers can disable new front desk experiences, helping reduce operational variation and ensuring alignment across locations.
With this enhancement enabled, all centers within an organization can be kept on the latest front desk experiences, including:
Redesigned Appointment Book (Web)
Redesigned Appointment Book (Zenoti Mobile App)
New Guest Profile
New Register Management
Note
This feature is not enabled by default. Reach out to your Zenoti Representative to enable it for your organization.
Business Owners/Center Manager
This enhancement improves readability, consistency, and visual balance across the Appointment Book, helping teams scan schedules faster, reduce confusion, and manage time more effectively.
Block-out time cards now match appointment cards in padding and margins, providing more room for names, icons, and details.
How to Use:
Open the Appointment book.
Navigate to any view (Therapist, Room, or Employee).
Review unscheduled hours, now shown with a clean gray background.
Add or view block-out times.
Details now align visually with appointment blocks.
Learn More: For more information, refer to the Redesigned Appointment Book article.
Module: Booking Wizard
Front Desk Operator/Center Manager
Zenoti has enhanced the new Booking interface to support flexible group scheduling and confirmation of additional guests. Front-desk staff can now create group and bulk appointments more efficiently, with the ability to proceed even when full guest details are not available. When enabled, Zenoti automatically creates virtual guests for additional attendees, ensuring a smooth and uninterrupted booking experience.
This enhancement supports both small groups (2–6 guests) and bulk booking (more than 6 guests), while simplifying scheduling, service selection, and real-time updates.
What’s new:
Switch between Single Guest and Group Appointment modes
Choose a group size of 2–6 guests or more than 6 guests
Select or update the group host, and add existing guests to the booking
Confirm additional guests by automatically creating Virtual Guests when guest details are not available
View shared or staggered time slots, with clear slot counts and tags
Display guest names, tags, and virtual guests in a compact view for easier tracking
Add or edit services for individual guests, or apply a service to all guests with one click
Make real-time changes to time slots or services without restarting the booking
Key benefits:
Supports fast, accurate scheduling for groups of any size
Reduces manual steps and improves booking accuracy
Enables quick booking even when not all guest details are known
For more information, refer to the Book group appointments using the new booking experience article.
Front Desk Operator/Center Manager
Zenoti has redesigned the Packages experience to make everyday tasks simpler and faster for front desk teams. Both Slim view and Expanded mode now clearly display available and purchased benefits in one place. Staff no longer need to switch screens to answer guest questions about remaining sessions.
The package overview screen now mirrors the package setup structure. Services, products, and day packages appear upfront, while other benefits are neatly organized on the details page. This cleaner layout reduces clutter and helps teams find information instantly.
Payment history now uses an accordion layout for better visibility. Teams can expand individual transactions only when needed, making it easier to review payments without scrolling through crowded rows.
These improvements reduce confusion, speed up checkout conversations, and help teams serve guests with greater confidence during busy hours.
Module: Kiosk
Front Desk Operator/Center Manager
Zenoti now enables guests to complete their checkout independently using the Zenoti Kiosk application. This enhancement supports contactless payment flows, reduces front desk load, and improves guest convenience, especially during busy hours or in high-volume centers.
Key Capabilities:
Access checkout using a phone number or email after service completion
Review invoices and add tips or donations before payment
Split tips across service providers at the invoice level
Pay using saved cards, new card entries, or tap/swipe methods
For more information, refer to the Zenoti Kiosk App article.
Module: Inventory
Many businesses rely on Neill as a distributor for professional product brands. Manual ordering workflows are time-consuming, error-prone, and lack visibility once an order is sent.
With Neill Electronic Ordering, Zenoti helps businesses:
Submit purchase orders directly to Neill from Zenoti
Reduce manual errors caused by missing vendor codes or location IDs
Track submission status and item-level failures in one place
Support multiple Neill-fulfilled brands with separate vendor handling
A salon or spa places frequent inventory orders for brands fulfilled by Neill. Each brand may require different fulfillment identifiers, and incorrect product codes or location IDs can cause order failures.
Previously, teams relied on manual ordering and email confirmations with limited feedback. With this enhancement, Zenoti provides a structured, electronic ordering flow with clear validation and submission outcomes.
How to use:
In Admin > Integrations, enable Neill Electronic Ordering at the organization level.
In Admin > Vendors, set Export Orders To setting to Neill Corp and configure supported vendors.
For each center, enter the required Neill Location ID for the selected vendor.
Create a purchase order in Zenoti, select the appropriate Neill vendor, and add products mapped with Neill Product Codes.
Click Send to Neill to submit the order and track its status and logs directly in Zenoti.
Learn more: For more information, refer to the Neill Electronic ordering article.
Module: Integrations
In resort spas, group visits are common. Guests often arrive together under the same room or reservation, but services and purchases may apply to different individuals.
With this update, Zenoti helps businesses:
Attribute appointments and charges to the correct guest
Avoid posting everything under the primary guest by default
Improve billing accuracy, guest history, and loyalty tracking
Reduce manual corrections and front desk errors
Previously, Zenoti synced only the primary guest from Opera reservations. In group spa or salon bookings, this made it difficult when secondary guests booked treatments or made purchases, leading to:
Charges being incorrectly assigned to one guest
Confusion at checkout and during invoice posting
Gaps in guest profiles, reporting, and reconciliation
Now, Zenoti syncs the full guest list from the reservation so staff can confidently select the right guest during booking and billing.
Zenoti can now automatically post collected surcharge amounts to QuickBooks Online using Miscellaneous Journal Entries, ensuring surcharge revenue is recorded separately without altering invoice totals. Surcharges collected on customer payments should be reflected in accounting, but they should not change invoice-level or transaction-level totals.
With this update, Zenoti helps businesses:
Record surcharge revenue accurately in QuickBooks Online
Maintain clean reconciliation by keeping invoices unchanged
Follow the same accounting approach already used for digital payment fees
Support scalable daily posting without manual adjustments
Previously, surcharge amounts collected in Zenoti were not posted to QBO in a consistent or structured way. Posting surcharges directly on invoices or payments could lead to:
Modified invoice totals
Reconciliation issues
Inconsistency with existing accounting workflows
Now, Zenoti posts surcharges independently through daily journal entries, ensuring accounting accuracy without affecting customer billing flows.
Zenoti now allows Shopify integration to be configured at the center level, enabling businesses to connect individual Shopify stores directly to specific centers.
This capability is ideal for franchise and multi-location organizations where each center operates its own Shopify store. When configured at the center level, Shopify data — including customers, products, sale orders, inventory updates, and invoices — syncs only to the mapped center.
Organizations can continue using organization-level configuration if preferred. If a Shopify store is already mapped to a default center through organization-level setup, it cannot be configured again at the center level. This enhancement gives businesses greater flexibility in structuring their e-commerce operations, ensuring that invoices, inventory deductions, and payment tracking align with the intended store and location setup — while maintaining existing workflows and reporting consistency.
Learn more: For more information, refer to the Shopify article.Shopify Integration at Center Level
Module: Gift Cards
Business Owners/Center Manager
Customers can send digital gift cards by text message from the webstore or consumer mobile app. This delivery option lets buyers send gift cards directly to a recipient’s phone number, making it easier for recipients to access and redeem the gift card through the webstore or mobile app.
Business Scenario: A customer purchasing a gift card may want to send it directly to someone else without downloading or forwarding the gift card themselves. With text message delivery, the gift card is sent directly to the recipient’s phone, where they can open the link and redeem it through the webstore or mobile app.
How to use:
Login to the Webstore.
Click Gift Cards and select an appropriate gift card.
From Select Gift Card Type, choose eGift cards – SMS.
Enter the recipient’s name and phone number, then click Proceed.
Choose the occasion, add an optional message, select Send now or Send later, and click Preview and buy.
Once purchased, the recipient receives a text message with a link to view and redeem the gift card through the webstore or mobile app.
Learn More:For more information, refer to the Guest Tasks for Purchasing and Using Gift Cards Online article.
Module: Reports
Business Owners, Center Managers
Aveda salons can now identify how guest requests impact service delivery while clearly distinguishing retail-driven revenue from mixed invoices. The guests served metrics have been split to separately track guests with specific provider requests and those without any requests.
Key capabilities
Guest service KPI segmentation
New and existing guest KPIs now split into With Request and No Request segments for sharper demand insights.
New retail KPI: RPRT
Measures average retail value per retail-only invoice, giving a clean, comparable view of retail performance.
How to use:
At the organization or center level, click the Reports icon.
On the Reports page, search for and select the Aveda Benchmark Report.
Note
If you do not see this report, reach out to your Zenoti representative.
Review the data in the columns related to number of guests serviced and the RPRT column.
Learn more: For more information, refer the Aveda Benchmark Report article.
Businesses can clearly view the surcharge amount and the tax on surcharge, in the Collections report, without manual calculations or reconciliation workarounds. This enhancement improves tax accuracy, simplifies reconciliation, and reduces compliance risk.
How to use:
At the organization or center level, click the Reports icon.
On the Reports page, search for and select the Collections report.
Review the data in the Surcharge Amount and Tax on Surcharge columns.
Learn more: For more information, refer to the Collections report (v2) article.
Module: ZIP
Administrators
Smarter, more flexible leave accruals - automatically aligned with employee tenure. You can now configure PTO accrual logic by tenure directly within a Leave Policy, enabling differentiated accruals as employees grow with the company - without changing or reassigning policies.
With this enhancement:
PTO accruals automatically adjust as an employee’s tenure changes
Employees remain on the same leave policy—no linking or delinking required
Policies are easier to manage, audit, and scale as your workforce grows
How it works
In Leave Policy > Accrual Logic, admins can now define accrual rules by tenure slabs (for example: 0–1 years, 1–3 years, 3+ years).
The system’s daily accrual scheduler automatically applies the correct accrual rate based on each employee’s current tenure.
Module: Fitness
This enhancement allows businesses to control class visibility in CMA at the center level, so customers see only the classes offered at their selected location. Centers that do not offer classes no longer display empty class pages, and memberships that exclude classes are represented accurately, reducing confusion and perceived value gaps when customers compare centers.
The new center-level setting works alongside the existing org-level control, giving businesses greater flexibility while ensuring consistent and predictable behavior in CMA.
Business Scenario: Many multi-center businesses offer classes only at select locations. Previously, enabling classes at the org level exposed the classes section across all centers, which resulted in empty schedules at some locations and created perceived value gaps when customers compared centers.
With center-level control:
Centers without classes no longer show the Classes section in CMA.
Customers see only relevant offerings for their selected center.
Navigation remains clean and consistent across customer-facing surfaces.
How to Use:
At the center level navigate to Configurations > Online Booking > Online Booking Settings.
Expand Online Booking Setup and toggle Enable Classes ON or OFF for the selected center.
Save changes.
Note
Enable classes for online booking at the organization level to view this setting.
Add-On Product
Module: HyperConnect
You can now enable Emergency Calling in HyperConnect to contact your local emergency number directly, such as 911, from Zenoti’s phone system. When you turn on this feature, Zenoti automatically shares your business address with emergency responders. This helps first responders quickly locate your salon, spa, medspa, or fitness center during a fire, medical emergency, or other urgent situation. We strongly recommend enabling Emergency Calling for every location to ensure your team and guests stay safe.
Why this matters :
Automatically sends your business address to emergency services
Helps first responders reach you faster during emergencies
Ensures accurate location identification across all centers
How to use:
Launch HyperConnect.
Click the Settings icon.
From the Voice tab, turn on the Enable Emergency Calling toggle.
Provide information for the required fields.
Click Save.
Learn more: For more information, refer to the Enable Emergency Calling in HyperConnect article.
We have introduced spam call detection and management in HyperConnect Voice to give businesses smarter protection against robocalls and unwanted spam while maintaining full control over how calls are handled.
This enhancement leverages Twilio’s intelligent spam detection infrastructure to identify and flag suspected spam calls in real time.
How to use:
Launch HyperConnect.
Click Settings and navigate to the Voice tab.
Scroll to the Spam Call section and toggle the Enable the spam call feature setting.
Choose how spam calls should be handled:
Automatically block spam calls
Show a warning and allow the agent to decide
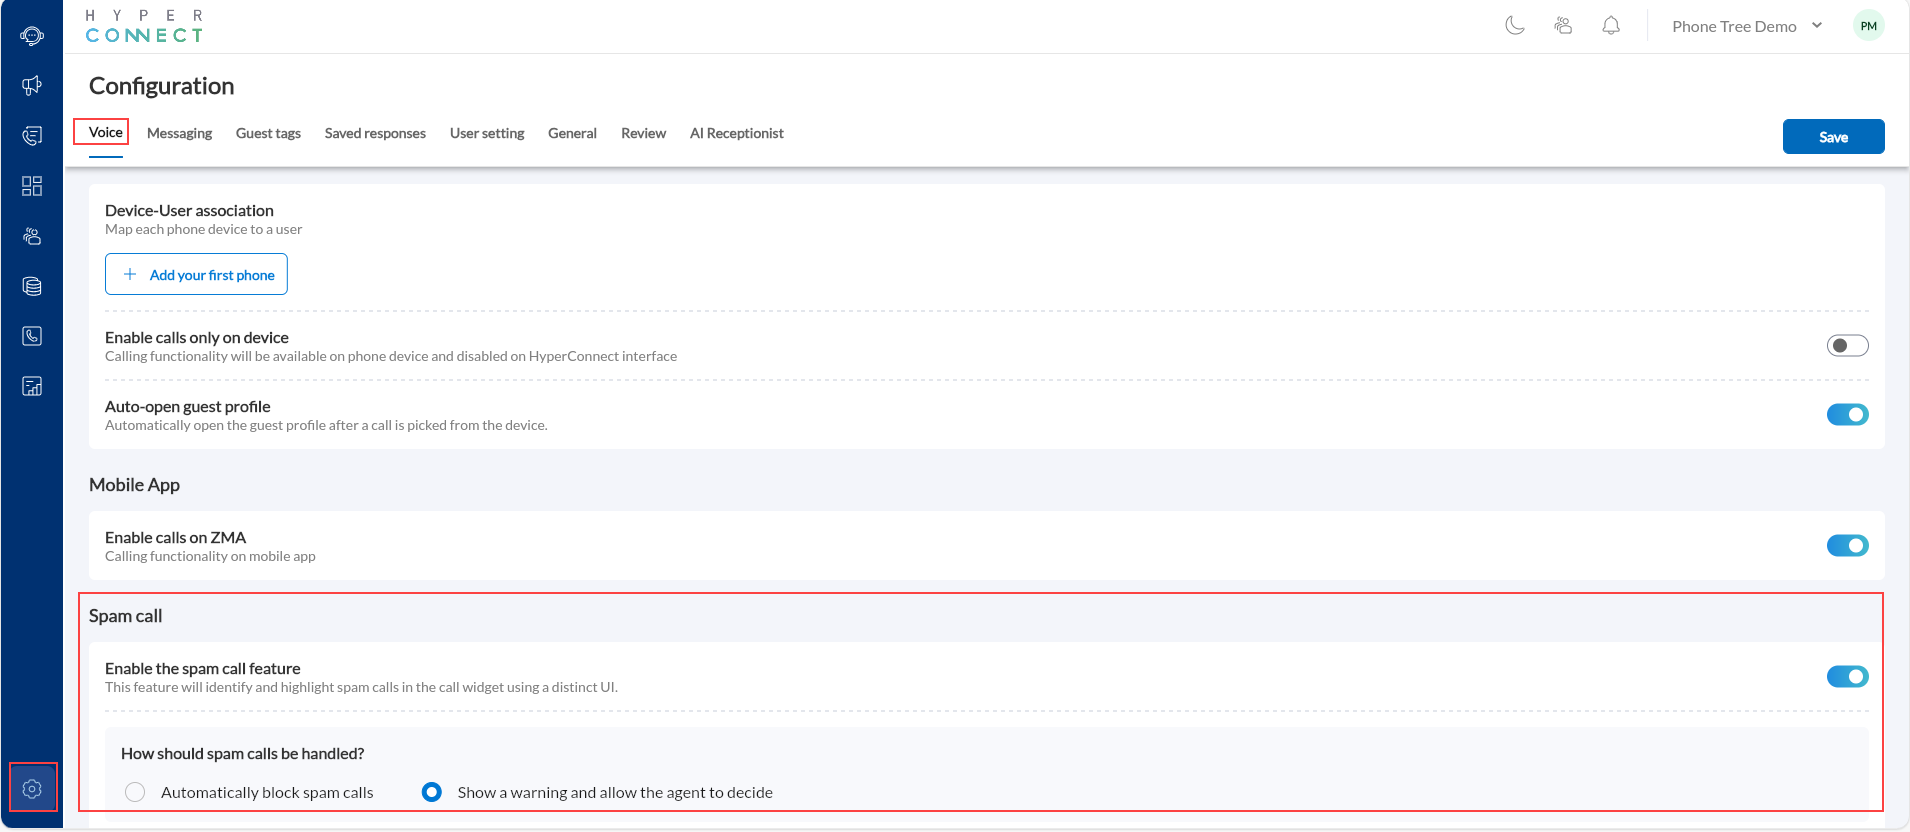
Click Save.
Learn more: For more information, refer to the Spam Call Detection and Management in HyperConnect article.
You can now enable Media Redaction in HyperConnect to automatically remove sensitive customer information from both call recordings and transcripts.
When this feature is turned on, personally identifiable information (PII), such as credit card numbers, social security numbers, and other sensitive data is permanently redacted from stored audio and text records. This allows your business to continue using call recordings for AI analysis, quality assurance, and training while maintaining compliance with data privacy regulations.
Why this matters:
Automatically redacts credit card numbers and other sensitive customer information
Protects your business from storing regulated PII in recordings
Supports compliance with regional data privacy and PCI regulations
Minimizes risk exposure by automatically removing regulated PII from stored media files
How to use:
Launch HyperConnect.
Click the Settings icon.
From the Voice tab, locate Privacy protection settings.
Turn on the Enable media redaction toggle.
Click Save.
Learn more: For more information, refer to the Enable Call Recording Privacy Protection in Zenoti Hyperconnect article.
We have introduced the Missed Call Reasons Report in HyperConnect, giving businesses deeper insight into not just how many calls were missed, but exactly why they were missed. This enhancement provides detailed breakdowns of missed calls, including agent actions, caller behavior, and call routing progression, enabling data-driven operational improvements.
Key Capabilities
Clear categorization of missed call reasons
Visibility into agent-declined calls
Identification of caller drop-offs while ringing
Insight into how many agents/devices were reached
Agent-level accountability
Filter and export functionality for deeper analysis
How to use:
Launch HyperConnect.
Navigate to Reports icon on the left navigation panel.
Select Missed Calls.
Use filters to narrow results by reason or date range
Export data if needed for further analysis
For more information, refer to the Reports in Hyperconnect article.
We have enhanced the Call Queue experience to give businesses greater flexibility over how queue announcements are delivered to callers.
Businesses can now choose:
Whether to play queue announcements that include wait time and queue position
The language in which the queue message is played (English or French)
Whether to enable a Self-Serve option for callers who prefer not to wait in the queue
If the self-service option is enabled, callers waiting in the queue will hear a prompt offering an alternative option.
For example: When a caller enters the queue and agents are unavailable, the system plays the configured hold music along with a message such as, “Thank you for calling. All our agents are currently busy. Please stay on the line. To explore self-service options, press 1.”
If the caller chooses to remain on the line, they continue waiting in the queue until an agent becomes available. However, if the caller presses 1, the call exits the queue and moves to the configured Self-Serve flow the business may have set up such as a menu that says, “Press 1 for Sales, Press 2 for Technical Support.” Based on the caller’s selection, the call is routed accordingly.
This allows callers to avoid waiting for the full queue duration and instead choose an alternative path such as department routing, voicemail, callback, or automated assistance.
If selected, the caller exits the queue and is routed to a customized flow configured under the Self-Serve transition
This enhancement improves the caller experience by:
Supporting multilingual environments (including Canadian businesses)
Allowing greater control over how wait times are communicated
Aligning queue messaging with your brand and operational preferences
Learn more: For more information, refer to the Add in Queue Widget article.
Dynamic Phone Association has been enhanced and is now split into two distinct options: Dynamic (Soft Phone) and Dynamic (Phone Device). This update gives businesses more flexibility in how phones are associated and better supports enterprise security needs.
Dynamic (Soft Phone)
The phone is linked to a specific browser session on a terminal.
Any employee who logs into HyperConnect using that browser is automatically associated with the phone.
Dynamic (Phone Device)
The physical phone is directly associated with an individual employee.
Employees complete the association directly on the device using their Employee Extension and Association PIN.
The PIN is used only for device association and is separate from the employee’s extension.
Learn more: For more information, refer to the Link Devices to Users in HyperConnect article.
International calling is now available as a standard feature in Hyperconnect, Zenoti's integrated phone system. Businesses can make calls to international numbers without requiring special setup or manual enablement by Zenoti support.
This gives multi-location businesses, franchises with international operations, and businesses serving global clientele the flexibility to communicate across borders seamlessly, all from within the Zenoti platform.
Many salon, spa, medspa, and fitness businesses operate across multiple countries or serve customers who travel internationally. Whether you are coordinating with suppliers overseas, managing appointments for clients abroad, or supporting franchise locations in different countries, international calling is essential. This capability is built right into Hyperconnect as a standard option, giving you the flexibility to communicate globally whenever your business needs it.
Note:
International calls appear in your call history and records like any other call.
Usage-based billing appears automatically on your monthly invoice when international calls are made.
HyperConnect Review Management now supports Automated Review Responses, enabling businesses to automatically respond to customer reviews. Smart Replies help salons, spas, medspas, and fitness studios respond to customer reviews automatically across multiple platforms like Google, Facebook, and Zenoti. This feature uses either AI-generated responses or predefined templates to reply to customer feedback quickly and professionally, saving staff time while maintaining engagement with customers. You can customize the tone, timing, and approval process for these automated responses.
How to configure:
Launch HyperConnect.
Navigate to Reviews.
To get started, enable Smart Replies and choose how responses should be handled.
Select one of two timing options:
During business hours only: Smart replies will only be sent during your center's operating hours
Anytime: Replies will be sent immediately whenever a review is received, regardless of time
Decide whether you want to review AI-generated replies before they are sent:
Select the review channel and response types under Select channels and response types for smart replies. You will see checkboxes for each connected platform:
Zenoti
Facebook
Google
Check the boxes next to the platforms where you want Smart Replies enabled.
If you selected AI-generated for any channel, scroll to the Configure AI-generated responses section.
You will see the option to customize the brand tone and the length of the message.
The system will use these settings to generate responses that match your brand voice.
If you selected Template-based for any channel, scroll to the Fill template-based responses section. You will see the option for Recommendation Type.
Click Save.
Learn more: For more information, refer to the Set Up Smart Replies for Customer Reviews in Zenoti Hyperconnect article.


