Admin tasks for booking appointments
Configure prerequisite services
Medical Spas or Medi-Spas are a hybrid between the traditional day spa and a medical clinic. Most of the services in medi-spas require medical procedures to be carried out which are usually performed by professional doctors. These services also require guests to take mandatory consultation services that determine if the guests are allergic to certain procedures or whether the guests have any pre-existing conditions. Such consultations are termed as prerequisite services.
For example, a service such as “Facial Fillers and Botox Injections” will require a basic consultation (prerequisite) to determine the skin type, composition of facial muscles, and existing facial irregularities. This gives clarity to the service providers about the number of botox injections that are needed, and which parts of the face require such injections.
Zenoti allows you to create such prerequisite services and attach them to the main services. This will ensure prerequisites are met before the main service.
Before you begin
If you want to enable prerequisite services for your business, reach out to Zenoti Support.
You must have an existing prerequisite service to add it to the main service. You can create a prerequisite service in the same way as you create any other service in Zenoti.
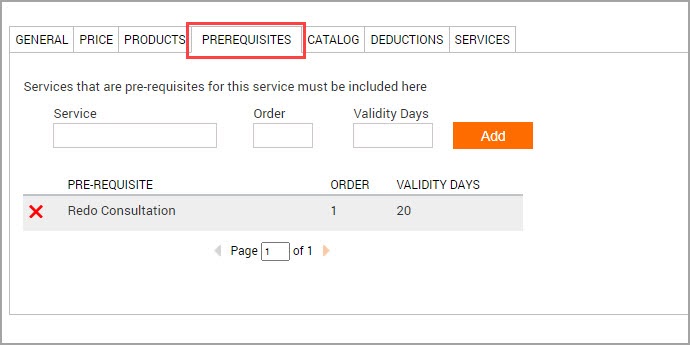
At the organization level, click the Master Data icon. Navigate to Services > <Service Name> (This is the main service for which you want to add a prerequisite service) > Prerequisites tab.
The Prerequisites tab opens.
From The guest must have finished _ in the time range defined in thevalidity days field prior to booking main service drop-down, select all the below services.
Note
To add a patch test as a prerequisite to a hair color appointment, select one of the below steps
Configure the following fields:
Service: Enter the name of the prerequisite service to find and add to the main service.
Order: Enter the order of the prerequisite. This is helpful if there are multiple prerequisite services that have to be taken in a sequence. Enter the number 1 for the first prerequisite and so on.
Validity Days: Enter the number of days for which the prerequisite service is valid.
Click Add.
The prerequisite service is linked to the main service,
Click Save.
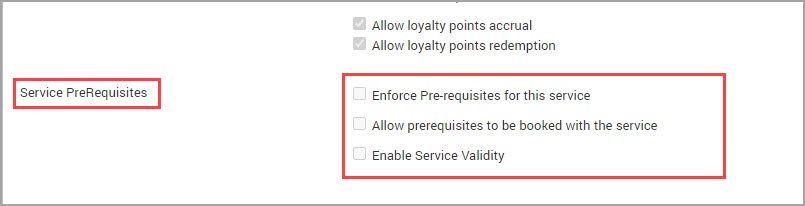
Click the General tab.
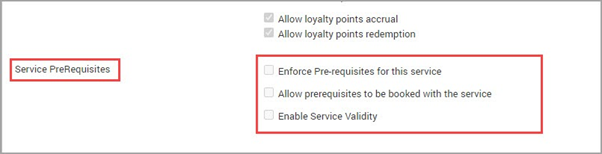
Locate the Service Prerequisites section.
Configure the following:
Enforce Prerequisites for this Service: Select this checkbox to enforce a prerequisite service while booking the main service. This means that the guests cannot book a main service without booking the prerequisite.
Allow Prerequisites to be Booked with the Service: Select this checkbox to allow the guests to book the prerequisite and the main service together. If you do not select this checkbox, your guests should first book a prerequisite service and then book the main service separately.
Enable Service Validity: Select this checkbox to set an expiry date for the main service. After this date, the guests have to book the prerequisite service and main service again. For example, Judy (guest) is booking a Botox procedure. The Botox procedure can remove wrinkles on her forehead. But this is a temporary solution that will last for just six to seven months. After this, Judy should book another consultation, and based on the results of the consultation, she can book the Botox procedure again.
Click Save.
You have successfully configured the prerequisites for a service.
Next Step:
Add finishing services to a service
What are finishing services
Services such as hair color, require a compulsory blow dry and hair styling service. A blow dry and hair styling service allows the hair color to last longer and prevents unwanted scalp issues. Such services are called finishing services as they complement the main service and complete the entire styling.
The finishing services are usually chargeable and require a specific provider. Zenoti allows you to add finishing services to your regular service so that your guests also book the finishing services along with the regular service.
Things to remember
Finishing services cannot be added to the following:
Services that are part of a deal
Finishing services cannot be booked using a gift card.
The base service or the main service cannot be added as a finishing service.
Services that are defined as a prerequisite service for the same base service,
cannot be added as a finishing service.
To add a finishing service
At the organization level, click the Master Data icon.
Navigate to Services.
Select a service for which you want to add the finishing services.
Click the Finishing Service tab.
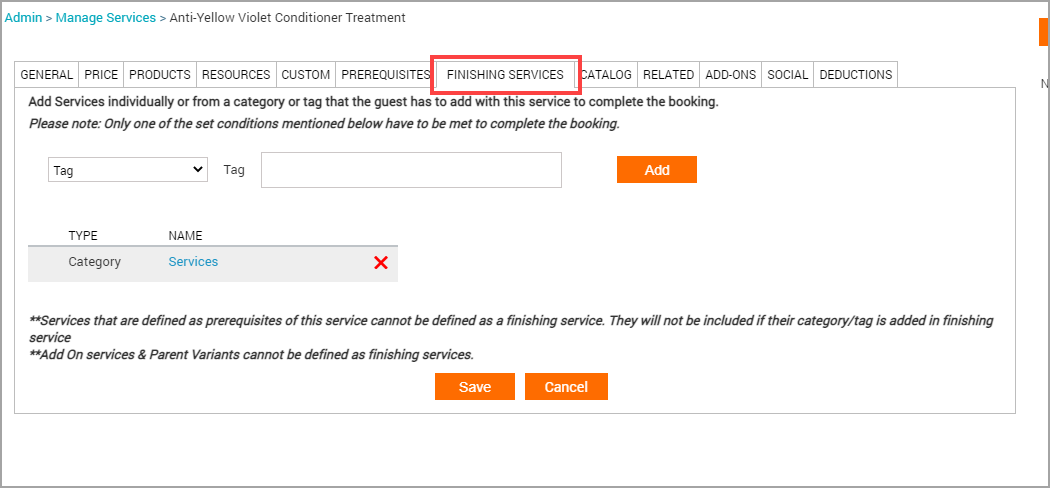
Configure any of the following:
Category: Select this option if you want to add all the services listed in a particular category and sub-category.
Service: Select this option if you want to search for a single service and add it as a finishing service.
Tag: Select this option if you want to add all the services listed in a particular tag.


Click Add.
The services are added.
Note
You can click the red “X” icon to delete the configured finishing services.
Click Save.
You have successfully configured the finishing services.
When your guests book a service (with added finishing services), Webstore prompts them to also book the finishing services.
Configure patch test prior to booking hair color online
Salons and Spas can add a prerequisite service to check whether the guest has allergies. If the guest has undergone an allergy test prior to this appointment or an appointment with the same service in a specified time period, say in the last six months, they need not undergo the allergy test.
For example, if your salon requires that the guest undergo a color patch test, to check for allergies before the guest undergoes a hair color service, you can set up the color patch test as a prerequisite service. You can also set up a specified time period, during which if the guest has undergone a patch test or a hair color appointment, they will not have to undergo the patch test again.
To configure patch test as a prerequisite for a service
At the organization level, click the Master Data icon and navigate to Services > <Service Name> (This is the main service for which you want to add a prerequisite service) > Prerequisites.
The Prerequisites tab opens.
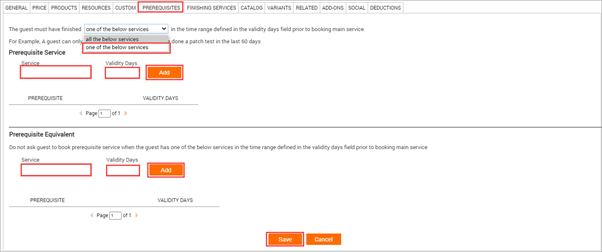
From the The guest must have finished _ in the time range defined in the validity days field prior to booking main service list, select one of the below services.
Note
To add two or more services, all of which are prerequisite for a service, select all the below services.
In the Prerequisite Service section, configure the following fields:
Service: Enter the name of the prerequisite service to find and add to the main service.
Validity Days: Enter the number of days for which the prerequisite service is valid.
Click Add.
The prerequisite service is attached to the main service.
In the Prerequisite Equivalent section, configure the following fields:
Service: Enter the name of the prerequisite equivalent to find and add to the main service. For example: if you do not want a guest to undergo the patch test if they have already undergone a hair color appointment in the past six months, add the hair color appointment as a prerequisite equivalent.
Validity Days: Enter the number of days for which the prerequisite equivalent is valid.
To attach the prerequisite equivalent to the main service, click Add.
Click the General tab.
Locate the Service Prerequisites section.
Configure the following:
Enforce Prerequisites for this Service: Select this checkbox to enforce guests to book a prerequisite service while booking the main service.
Allow Prerequisites to be Booked with the Service: Select this checkbox to allow guests to book the prerequisite and the main service together. If you service and then book the main service separately.
Enable Service Validity: Select this checkbox to set an expiry date for the main service. After this date, the guests must book the prerequisite service and main service again. For example, Judy (guest) is booking a Botox procedure. The Botox procedure can remove wrinkles on her forehead. But this is a temporary solution that will last for just six to seven months. After this, Judy must book another consultation, and based on the results of the consultation, she can book the Botox procedure again.
Click Save.
You have successfully added the patch test as a prerequisite for the service.
Prioritize bookings of guests with specific providers
Guests who regularly book services at your center, often have a preference when it comes to their choice of providers. This could be due to reasons such as being comfortable with a specific provider, the experience of the provider, or because the provider customizes the services according to the guest’s preferences. Whatever the reason, we find that 33% of guests who book online have a preference for a specific provider.
To support this, Webstore allows you to prioritize the bookings of your guests with “Specific” providers over the bookings of guests with “Any” providers.
For example, at a single-location nail salon, Ashlee has a 10:30 AM manicure appointment with Shirley, who did not specify a provider. If another guest books Ashlee specifically at the same time, Shirley's appointment is moved to Adam, another available provider. The system handles this switch seamlessly, helping the salon fulfill more than 2,000 specific provider requests in one year. By giving priority to guests with provider preferences, businesses can improve client satisfaction and optimize provider utilization.
Note
For appointments booked using Webstore or CMA, if there is no provider preference, the system does not show the provider name and instead says, “Any provider”. Since the guest is not informed of the provider's name, even if their appointment is moved to another provider, there will not be any confusion.
The appointment is moved only if there is no provider preference and if there is availability at the same time with another provider.
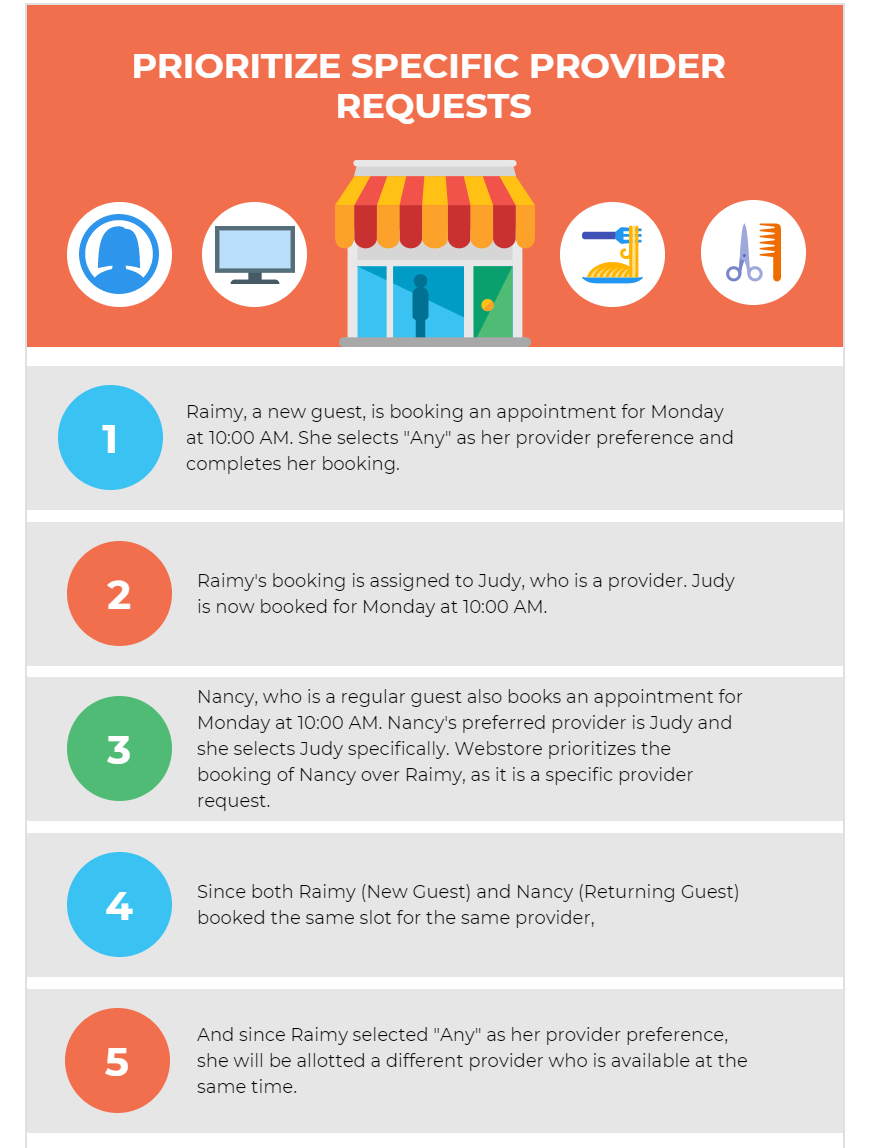
How does prioritization work?
To better understand how this prioritization works, look at the following illustration:
Exceptions to prioritizing specific therapist bookings
Webstore will not prioritize “Specific” provider bookings, in the following scenarios:
Bookings with segmented services
Group bookings
Couple bookings
Appointments with payments or redemptions
Appointments with marketing campaigns and deals campaigns
Appointments with coupons
Appointments with marketing discounts
Optimization settings enabled by the center
Bookings made outside Webstore and CMA
Bookings managed by the Queue
Locked appointments
Locked addons
Appointments with predefined rooms and equipment
Prioritize specific therapist bookings
You can prioritize the bookings of your guests with "Specific” providers over the bookings of guests with “Any” providers.
Define service visit frequency
Learn how you can define service visit frequency and restrict multiple bookings of the same service within a period.
Businesses such as med-spas require guests to come in at regular intervals for their services and adhere to the prescribed schedule of the service. For example, a Botox treatment requires guests to take the Botox shots once every 2 months.
The time gap between every Botox shot ensures recovery and healing. If guests book another Botox appointment earlier than the prescribed schedule, it may be counterproductive. In addition, the current treatment may not give the desired results, leading to poor guest satisfaction.
To avoid such instances, Zenoti allows you to define visit frequency for services that ensure your guests stick to the prescribed service schedule.
At the organization level, click the Master Data icon.
Navigate to Services.
Select the desired service for which you want to define the service frequency.
Click the Catalog tab.
Select the Enable Service Visit Frequency checkbox.
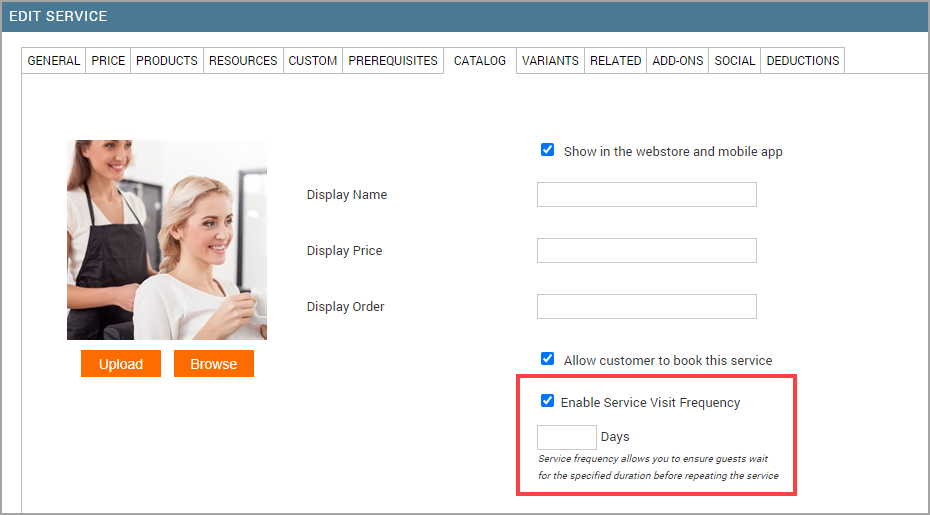
The Days text box appears.
Enter the number of days after which a repeat service can be booked.
For example, if you enter 21 days, it means that guests cannot book the same service within 21 days of their treatment. This gap of 21 days is necessary for recovery and the best results.
Click Save.
You have successfully defined a visit frequency for this service.
Note
The service frequency is applicable only for bookings on Webstore and CMA.
Considerations
Booking Restrictions
Guests cannot book or redeem the same service again until the specified number of days has passed since their last visit for that service. This restriction applies both at the POS and for online bookings.
Automated Eligibility Checks
Zenoti automatically calculates the next eligible date for the guest to book the service. If a guest tries to book before the allowed interval, the system will block the booking and may show a message explaining the restriction.
Example
The Enable Service Visit Frequency is enabled and set to 30 days for a facial. A guest books a facial on January 1. The system will not allow them to book the same facial again until January 31.
The maximum allowed value for frequency is typically 999 days. This setting is ignored for add-on services. If you enable the setting but do not specify a value, Zenoti will prompt you to enter the number of days.
Display introductory pricing of services to new guests
If you are a center that has opened recently or want to give promotional discounts to attract new guests, Zenoti allows you to display introductory pricing for services on your Webstore V2.
When new guests visit your Webstore V2, they will see the price of the services at a discounted rate and this way you can boost your new guest bookings.
Before you begin
You must create an Intro Campaign and assign it to the center where you will display the introductory pricing to the guests.
Learn more about creating an intro campaign.
To display introductory pricing for guests, make sure the Enable introductory pricing for guests setting is turned on.
Restrict minors from booking appointments
For a new guest to book an appointment on your Webstore, it is mandatory to create a profile and provide personal details such as name, age, email address, and phone number. If the guest is a minor, Zenoti does not allow the guest to create a profile and book an appointment.
This restriction on the online guest profile creation is to be compliant with the Children’s Online Privacy Protection Act (COPPA) of the USA. As per this act, any organization or person operating online services (including social media), is not allowed to collect personal information of anyone under the age of 13 without parental consent.
So, if you are a parent and you want to book an appointment for your kids, you have to create a profile for yourself and book appointments from there.
To define a minor and restrict minors from booking appointments
At the organization level, click the Configuration icon.
Navigate to Guests > Profile > Guest profile rules.
Locate the setting Consider guest less than ___ years of age as minor.
Select the minor age from the drop-down list.
This setting allows you to define the age of minors in your organization. If your organization considers the age of more than 13 as a minor (say 15), you can select the appropriate age from the drop-down list.
Note
You cannot select an age that is less than 13.
Scroll down and disable the setting Allow minors to create their own guest profiles on Webstore and Consumer Mobile App.
The Date of Birth field in the guest sign up page is made mandatory when you disable this setting.
Click Save.
Any individual below the age of 13 cannot create a profile and book appointments from your Webstore.
If minors who are less than 13 years of age open your Webstore and try to create a profile, they will see the following error message:
Enforce guest preference for important add-ons
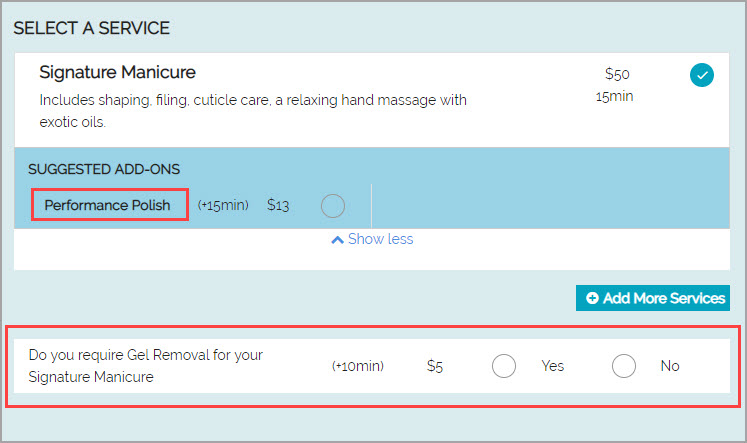
Add-ons are offered along with other main services; guests cannot book these add-ons separately. For example, you may have a Manicure service that has add-ons such as Performance Polish and Gel Removal. Guests can choose whether they want the add-ons while booking the main service.
The Performance Polish add-on appears in the regular Suggested Add-Ons section. See the following screenshot for reference.
Your business may consider Gel Removal as an important add-on that you want to recommend to guests so that the main service (Manicure) gives better results. To this end, you can configure a setting to prompt guests to indicate their preference for such add-ons. The purpose of this prompt is to ensure that the guest does not overlook such important add-ons. See the following screenshot for reference.
To enforce guest preference for important add-ons
At the organization level, click the Configuration icon.
Navigate to Online Booking > Online booking settings > Webstore V2.
Scroll down to view General settings
Enable the setting, Display a Mandatory Selection Prompt.
Click Publish.
When guests book a service with an important add-on which has the necessary configurations, the Webstore prompts guests to indicate their preference.
Enable request-based bookings for appointments
Your organization can opt for request-based bookings or continue with direct bookings. If your business wants the front-desk staff to review appointments before confirming bookings, you must enable request-based booking.
Note
Only organizations for which the Webstore v2 only setting is enabled can enable request-based booking.
Once you switch on the request-based bookings setting for the organization, it will impact all the services in all the centers of the organization. You cannot switch off the setting for specific services or centers.
If you enable request-based bookings, guests can choose:
Specific service (or multiple services)
Suitable time slots
A specific provider or the first available provider
Your front desk staff can confirm, modify, or decline requests. Guests receive notifications when front-desk staff confirms or declines their requests.
At the organization level, click the Configuration icon.
Search for and select the Appointment Booking Flow setting from the Online booking settings section.
Click Webstore V2 > Appointment Booking Flow.
Turn on the Enable request mode setting.
Important
This action switches off the following settings:
Appointment booking flow settings
Allow guests to enter discount code in invoice
Enable Deals
Show Upcoming Appointments
Enable Group Booking
Enable Couple Booking
Enable package pricing and redemption
Membership sales
Enable Membership Pricing
Click Publish.
Configure the label of the request mode button
Your organization may want to call the button that guests use to request appointments by another name. For instance, you may want to call the button Request Booking, instead of Request Appointment.
At the organization level, click the Configuration icon.
Search for and select the Appointment Booking Flow setting from the Online booking settings section.
Click Webstore V2 > Labels & Text Configuration.
Scroll down to Request Mode.
To customize the text displayed on the button that users click to request a new appointment update the Request Appointment Button Label
For example: Request booking
Example: Request Again
To customize the text of the button that users click to request another appointment after completing one, update the Request Again Button Label.
For example: Book again
Click Publish.