Manage Student Profiles in the Roster
The student or member profile helps in managing various student details, all in one place. It lets you keep track of their personal details, class history, payments, and even their preferences. Whether you’re registering a new student, checking their attendance, or managing payments, the Student or Member Profile makes it easy.
After you create a new student profile or click on an existing student's profile, add the required information for the student.
Create a new student profile
New student profiles are automatically created when you register a student for a class. You can manually create a new student profile if a student does not have an existing file.
From the Roster view, select More (...).
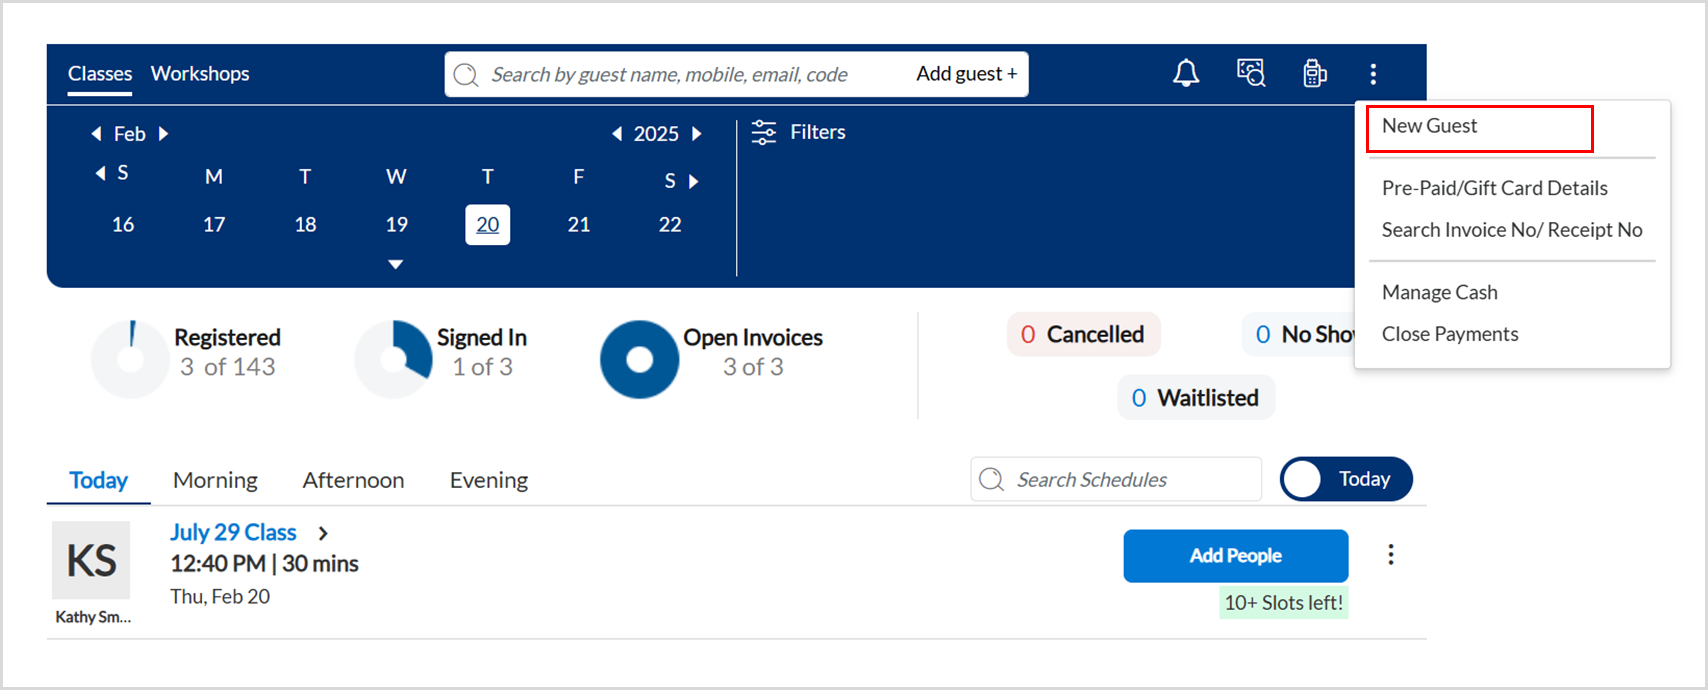
Click New Student.
Enter the student’s details. Make sure to fill in all mandatory fields.
Click Save.
Note
You cannot submit the student form if the signed form settings are on.
Create a new student profile from roster view
When you register a new student for a class, Zenoti captures the student's details and creates a profile automatically.
At the center level, click the Fitness icon and navigate to Roster.
Click the three dots in the top-right corner of the page to open the roster menu.
Click New Student.
On the Create Student window, enter the student details.
Under the Preferences section, select the email or text notifications that the student wants to receive.
If TCPA is enabled for your organization, you must get consent from the guest before selecting these checkboxes in the guest profile.
Click Save.
Note
Alternatively, you can also create a new student on the class roster view, by clicking Add Guest+ next to the search icon. Fill in all required details and click Save.
Access existing student profile
In certain scenarios, you may access the student profile to check certain details about the student, such as the date of birth, contact address, anniversary details, etc.

On the Roster page, enter student details such as name, mobile number, or email address in the search bar.
To access the profile of a student, click the student's name.
You can also access the profile of a registered or waitlisted student on the class roster page by clicking the student's name.
View classes-related info on the student profile
On the student profile, click the Classes tab or the Guest Pass tab to view details of classes and guest passes respectively.
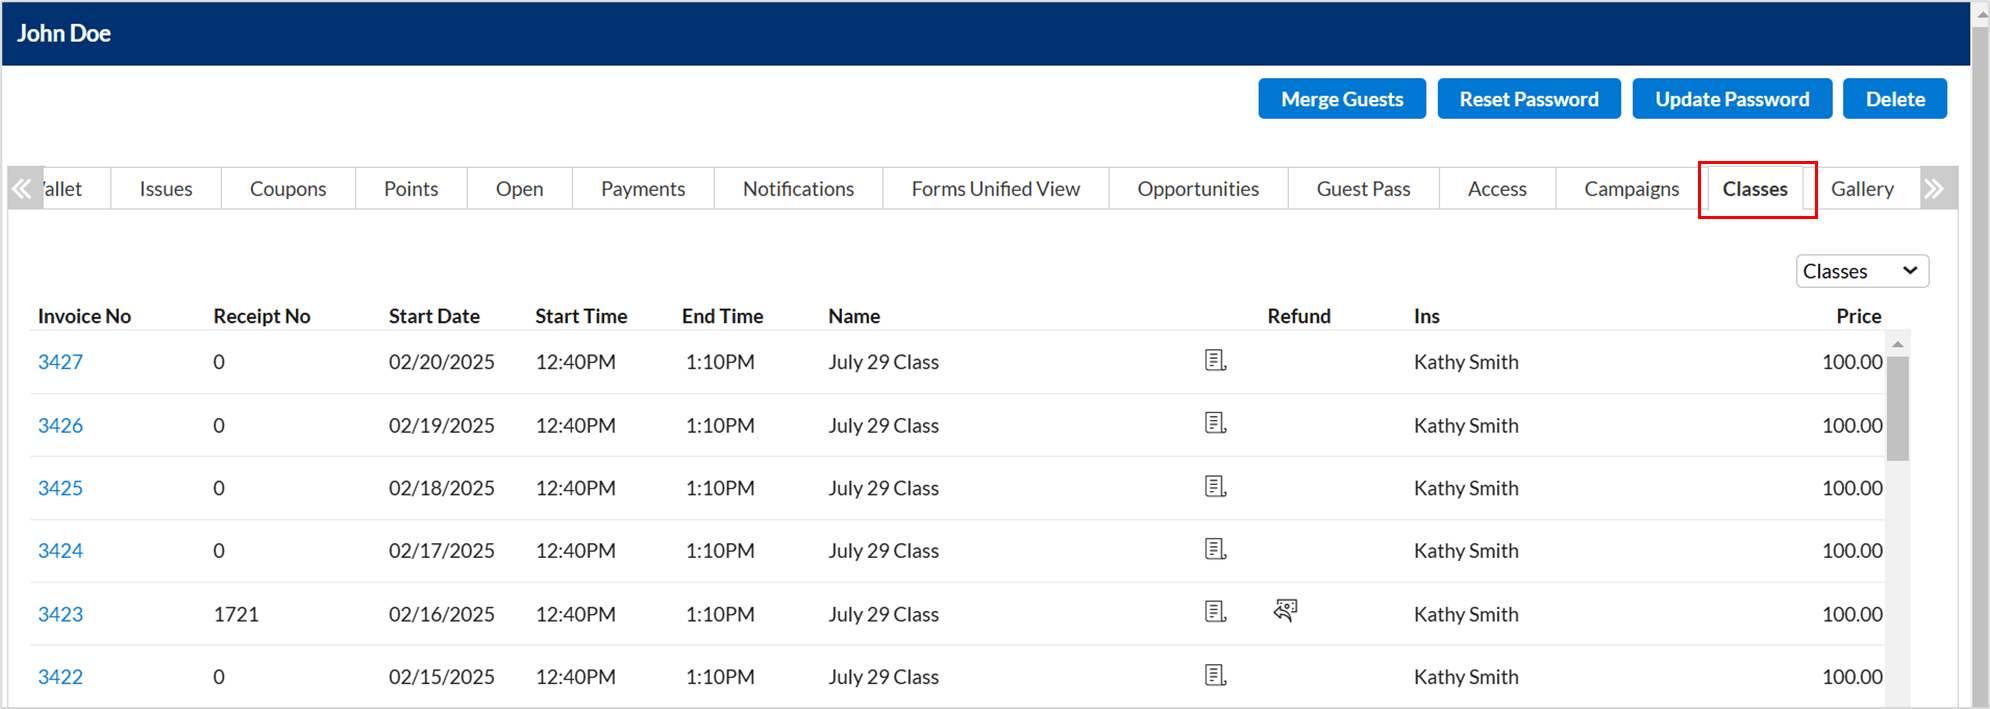
Action | Description |
|---|---|
View info about classes | View details such as the name of the class and the instructor, invoice, and receipt number, start date, start and end time of the class, price, and refunds. |
View info about guest passes | View the number of guest passes that are available, used, received, or sent, under the respective sections. You can view further details about guest passes such as start date, redemption date, expiration date, redemption center, and status. |
Verify a student’s proof of COVID vaccination
Most fitness businesses require proof of COVID-19 vaccination to participate in class. Zenoti allows businesses to mark students whose proof of vaccination is verified by the front-desk staff. They can also view if the student is marked as verified from the roster view and the guest profile. Organizations can make this setting available for studios and centers, for more information, go to Display COVID vaccination proof verification for guests.
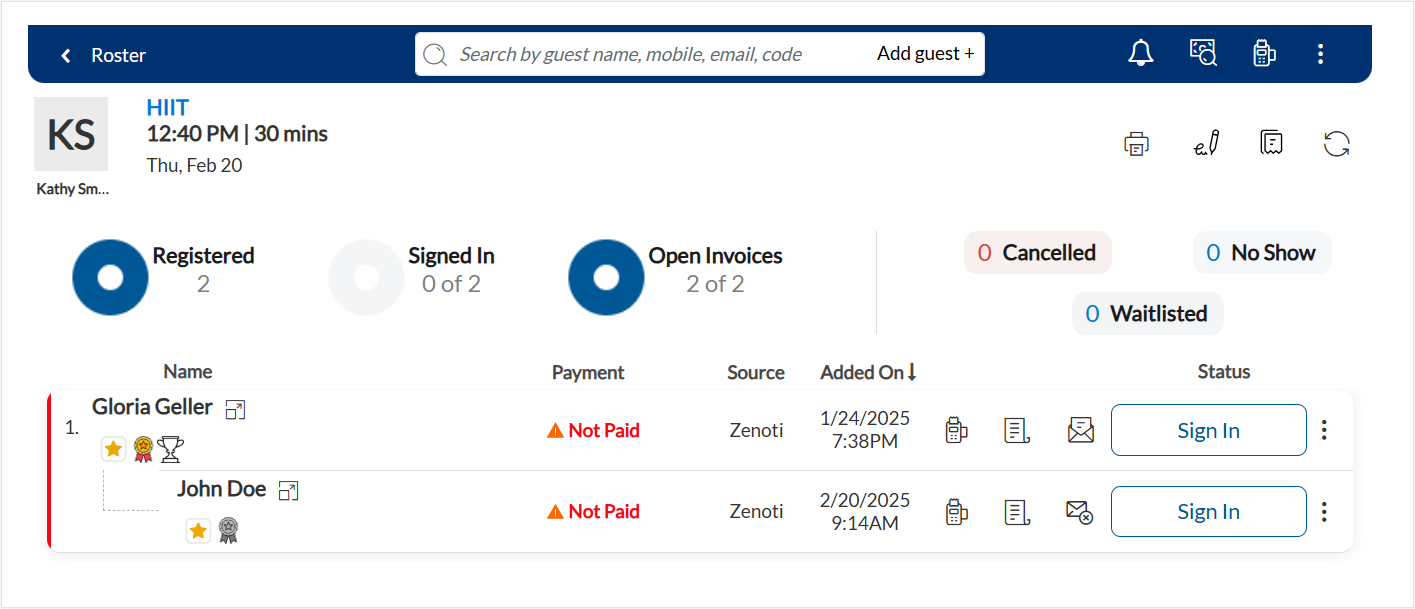
In the Roster view, find the class in which the student is enrolled.
Select View Roster.
On the Class Roster page, search for the student's name, mobile number, or email address.
To access the profile of a registered or waitlisted student, click the student's name.
To access the profile of an enrolled student, click the book icon.
Below the Gender field in the General tab, select Proof of COVID vaccination verified.
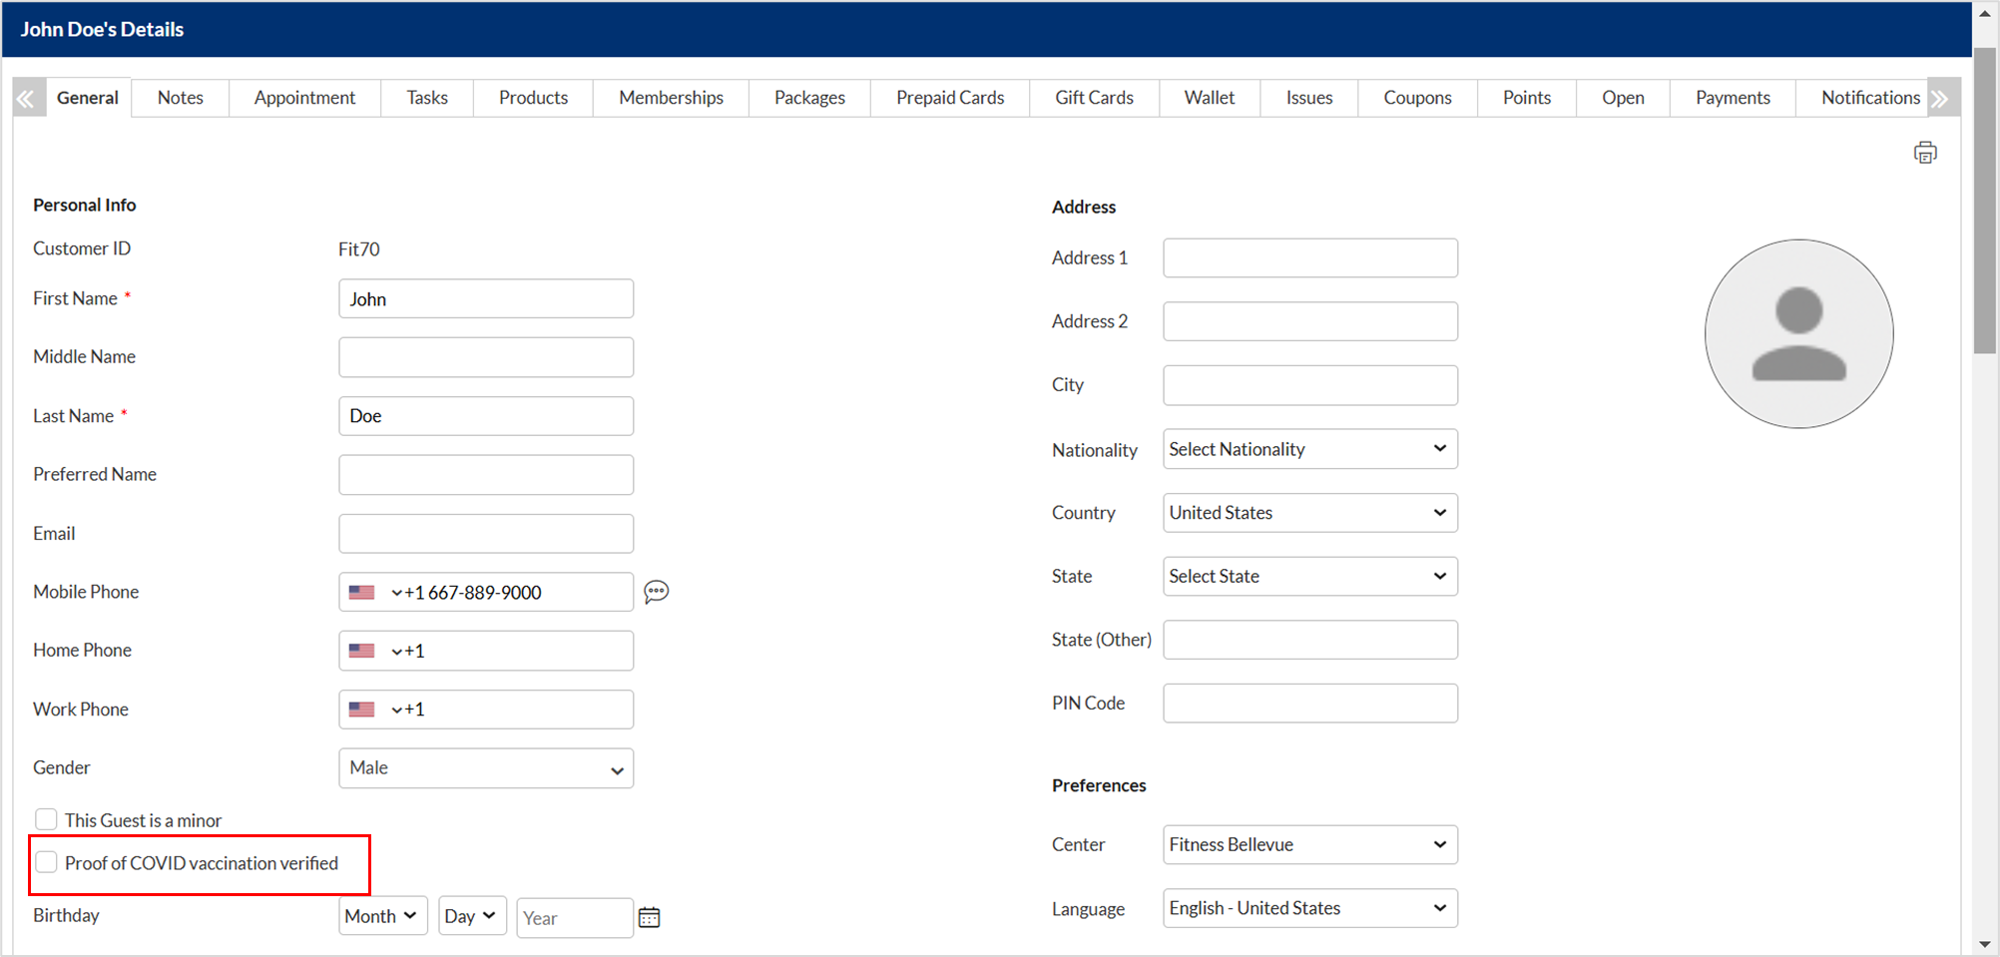
The front desk can verify the student’s proof of COVID-19 vaccination such as physical certificate or an digital copy of the vaccination. After the proof verification, click Save.
Add guest pass for walk-in guests
From the Roster, identify the class or session that the visiting guest wants to attend.
Click Add People to view a list of all members or students attending the class or workshop.
Identify the host student or member and click on the more options.
Select the Add Guest option and enter details for a new guest or search for an existing guest.

Fill in the guest details and select the applicable marketing preferences.
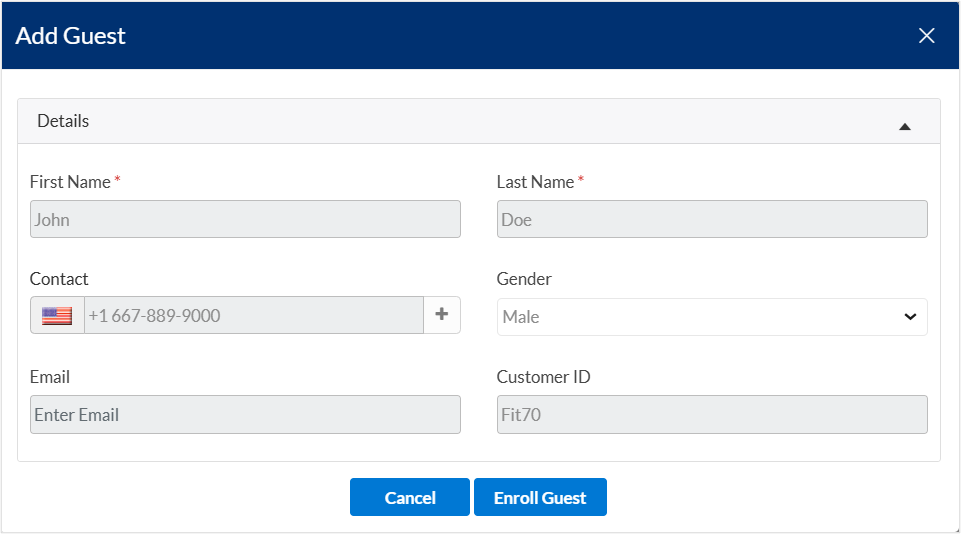
Click Enroll.
The Payment Type appears as Guest Pass for the walk-in guest; such guests get an email (based on the Guest pass for new guest template or Guest pass for existing guest template) with details such as the class, host guest, and center name.
Add student to waitlist
If a class is already full, studios can place students on a waitlist to try and fit them into the schedule later.
In the Roster View, select the required class or workshop.
If the student already has a key tag, scan it to enroll the student in the class or workshop. For enrolling students from the Webstore, ensure you are on the Waitlisted page while scanning the key tag.
Click Add to Waitlist from the class or workshop roster page.
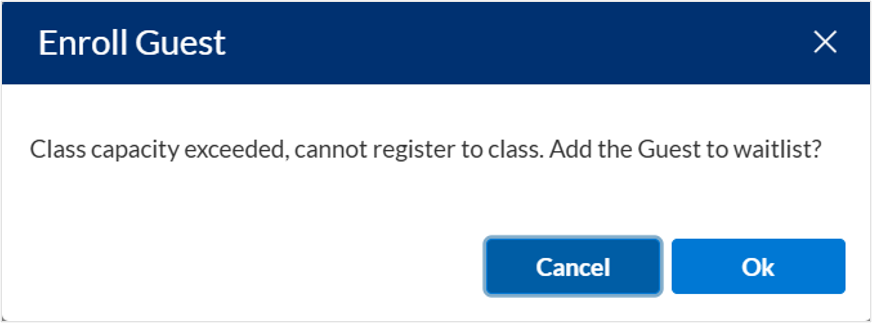
The Add to Waitlist option appears only if the capacity of the class or workshop is full.
Search for the student and follow one of the ways to enroll the student in the class:
If it is a new student, select +New Student to enroll the student in the class.
If it is an existing student, select the student profile and click Enroll.
Once an available spot opens up, the student will be automatically moved from the waitlist to the class using the first-in-first-out method.
Note
If you are on the Registered page and the class is in full, a pop-up will alert you about the full strength of the class. The alert will provide an option to add the student to the waitlist. When the spot becomes available, the system will move the student from the waitlist to the registered list using the first-in-first-out method.
Note
Front desk staff can add students to the waitlist for classes on ZMA V2 from both tablets and mobile devices.
Move student from the waitlist
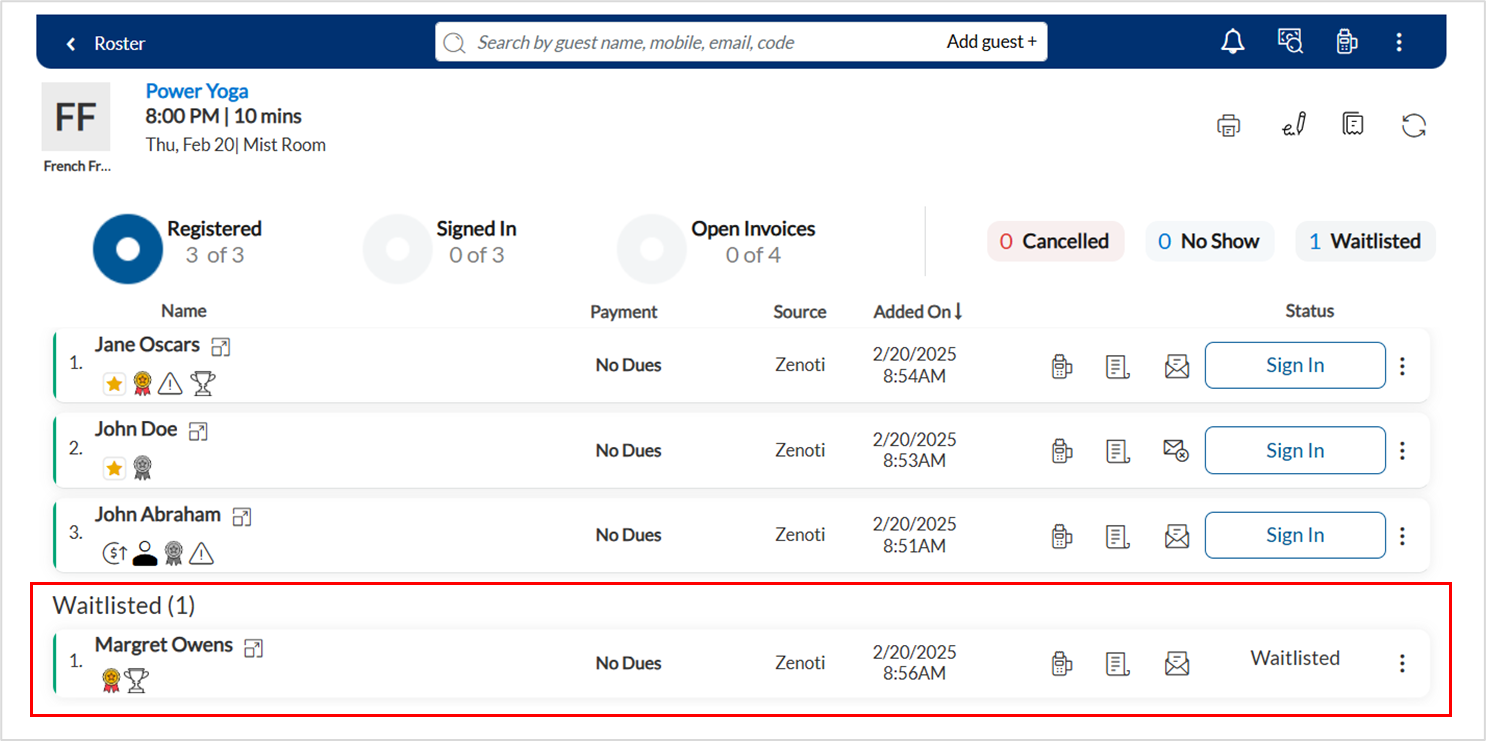
In the Roster View, select the required class or workshop where the student is waitlisted.
Scroll down to the Waitlisted section of the class or workshop.
Locate the student you want to register for the class.
From the more options drop-down menu, select Confirm.
On the pop-up window, click Confirm.
The student is moved from the waitlist to the registered students' list.
Note
Once a student is moved from the waitlist to the registered list, the action cannot be undone or reversed.
Tip
Student sign in
Front desk staff and center managers can sign in students before a class begins.
Tip
Students are signed in to a class after their key tag is scanned. However, if there is no key tag, the front desk staff can sign in the students manually.
In the Roster View, select the class or workshop you want the student to enroll in.
Search for the student profile and click Enroll
Click Sign In.
The system updates the student from Registered to Signed in. The status of the student turns green.
To mark a student as canceled or no-show, Mark a student as a no-show or canceled.
To undo a sign-in, select Signed In!.
A pop window appears.
Click Confirm.
Mark a student as a no-show or late cancel
In Zenoti, you can perform the following actions on registration:
Cancel: Cancel the registration without a fee, but keep the entry on the roster
No-Show or Late Cancel: Cancel registration with a fee, but keep the entry on the roster
Delete: Remove registration entirely from the roster
When a student does not turn up for the class, you can mark the student as a no-show. Sometimes, you may also mark a late cancellation as a no-show.
When you mark a student as a no-show, the following happens:
the registration is canceled and the slot becomes available.
a fee is charged if configured by your business.
the entry on the roster is not removed for future reference.
Depending on the payment option available for the student, there are 3 ways you can mark the student as a no-show :
Mark a student as a no-show for a class pack
Click the Fitness icon and go to Roster.
Open the roster on which you want to mark an entry as a no-show.
If the class was to be redeemed from the class pack, you do not have to change the status of the student. However, you need to close the invoice as a redemption.
Click the payment status to open the invoice.
The package benefit is automatically redeemed and the balance is zero.
At the end of the page, in the Comments box, enter any notes that you want to add.
To add a note to the student profile, click the clock icon.
Click the Notes tab. Add the note and close the student profile window.
On the invoice window, close the invoice.
The student's status is updated to Closed.
Mark a student as a no-show for a membership
Click the Fitness icon and go to Roster.
Open the roster on which you want to mark an entry as a no-show.
If the class was to be redeemed from membership, you have to change the status of the student to No Show.
Access the more options drop-down for the student and select No Show.
On the alerts window, click Confirm.
If the student has a card on file, the auto-payment and invoice closure are completed 15 minutes after the class ends.
Mark a student as a no-show for no class pack, membership, or class pass
Click the Fitness icon and go to Roster.
Open the class or roster on which you want to mark an entry as a no-show.
If the student does not have a class pack or a membership, then the Payment column shows as Not Paid. In this case, you have to change the status of the student to No Show.
Access the more options drop-down for the student and select No Show.
On the alerts window, click Confirm.
If the student has a card on file, the auto-payment and invoice closure are completed 15 minutes after the class ends.
No card on file
If a student is already marked as a no-show, but the student does not have a card on file, go to the student profile and enter a note and alert type.
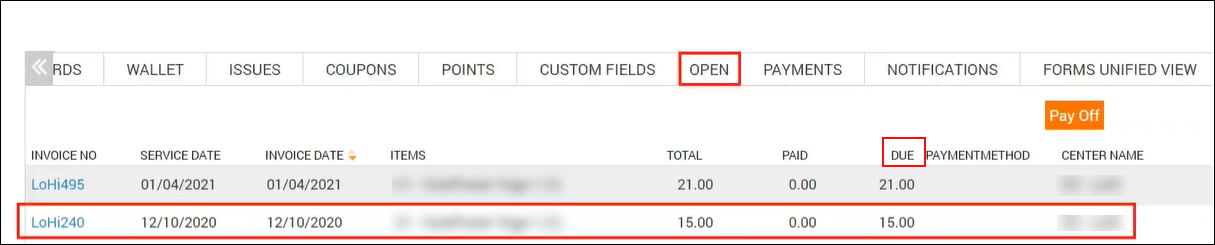
The no-show fee appears on the student's profile under the Open tab as a due amount.
Mark invited guest bookings as 'No Show' or 'Cancel'
On the Rosters view, select the required class.
From the list of member guests or students, locate the invited guest enrolled in the class.
Click the menu icon on the right of the virtual guest.
Select the Cancel or No Show options from the menu.
To cancel the visit or mark the visit as a no show, click Proceed.
Impacts and considerations
If the virtual or invited guest is not confirmed on the roster, the Payment column displays the status as Not Paid.
When the front desk staff marks the invited guest booking as a No Show or Cancel, the invited guest pass for the invited guest is canceled.
When a guest pass is canceled, the service credit section for visits is updated for the member guest.
The Payment column is updated with Guest Pass status in place of Not Paid, once the cancel or no show payment is done.
Student profile alerts in Roster
Front desk staff can now provide a personalized experience using guest alerts in the roster view, during check-in, enrollment, and payment, as a means of internal communication.
Required permissions: Training > Classes > Add, Edit, View
By default, the manager role has permission to enter guest notes. Permission can be added to other roles if required.
To enter and enable guest notes to pop up as alerts
Navigate to the Student Profile.
In the Notes tab, enter notes related to the student.
Select all or any of the below options:
Show on opening Guest History: Select if you want critical alerts to show on opening the Guest Profile screen. Example: Guest is allergic to lavender oil
Show during check-in: Select if you want the alert to show on the roster view when the front desk staff checks in a student. Example: Student prefers a hot beverage on arrival
The roster view also displays a birthday icon for the student profile. The front-desk staff determines a student’s birthday at a glance, during check-in, and reminds them of birthday freebies.
Show when booking an appointment: Select if you want the alert to show on the roster view when enrolling a student for a class or workshop. Example: High Profile Guest
Show when taking payment: Select if you want the alert to show when you take payment for the guest from the roster view. Example: Guest is a member
Private: Select if you wish to restrict this alert to only managers and front-desk staff - this alert will not be visible to the instructor. You can see this option only if you have the required role permissions.
Click Add.
Impacts and considerations
After saving the details, the note is now added to the Notes section. With the required permission (by default, the manager role has permission), you can delete the note.
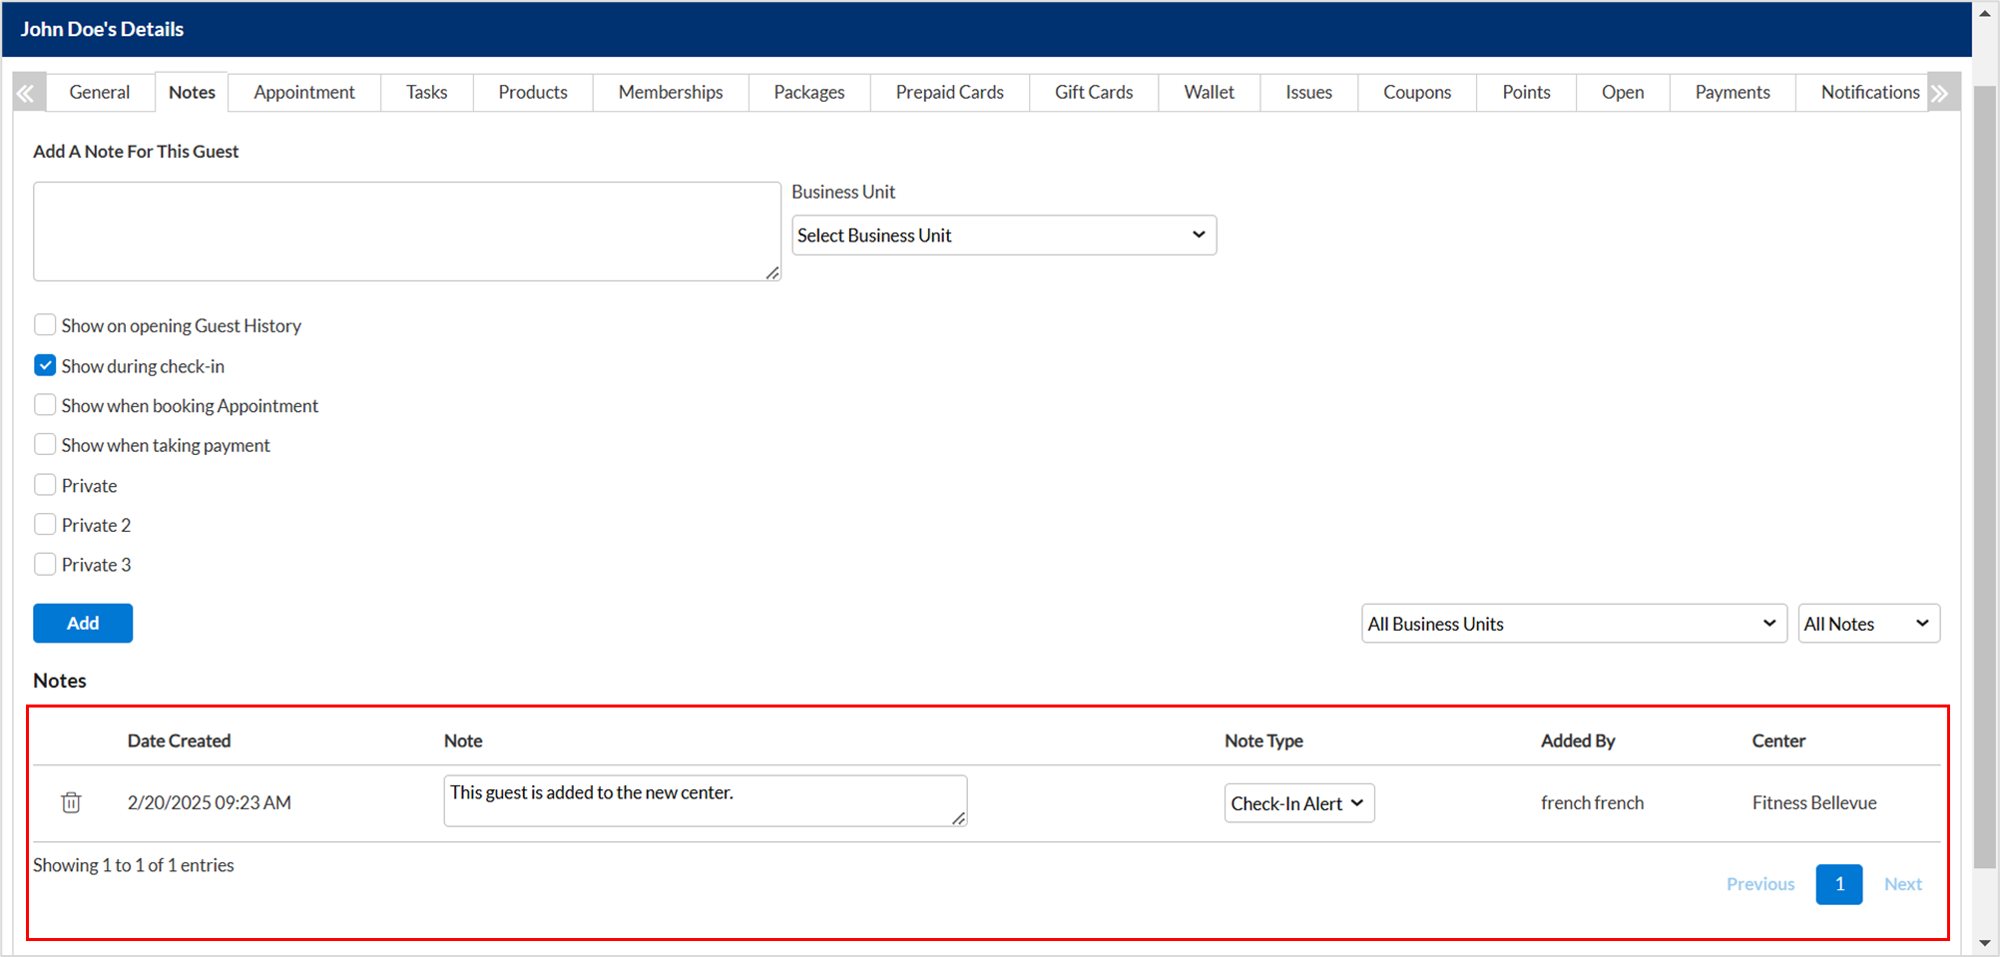
Use the filter to locate a student note by the Note Type easily - for example, you can quickly look up the Booking Alerts for a guest. This is especially helpful if you use Guest Notes heavily for internal communications. Depending on the configuration, you can now view the alert that you added each time you access the guest profile.
Membership/package expiration alerts in roster view
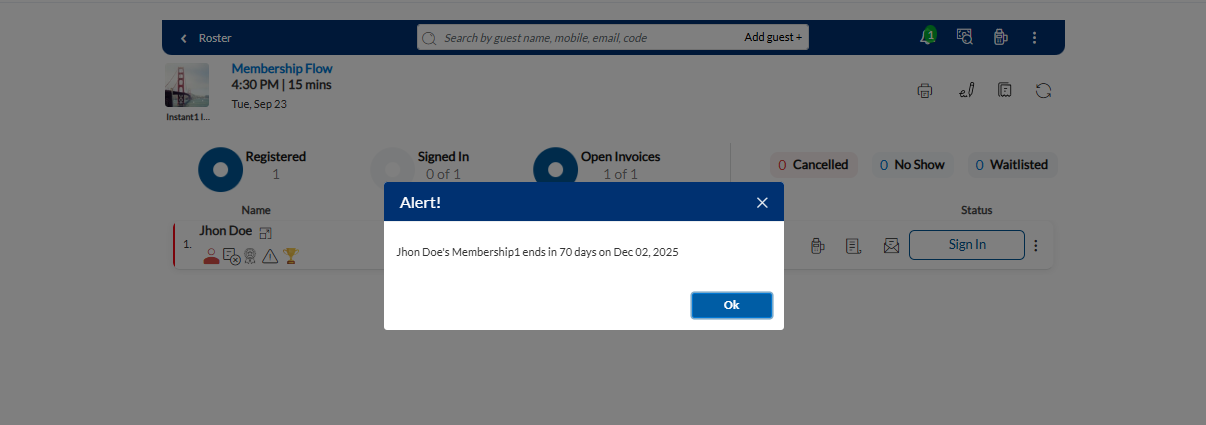
After setting up, the system shows alerts when employees sign in for a student using the roster view. It checks if any student’s membership or package is nearing expiration based on the configured alert window. If a match is found, it displays a pop-up with the student’s details.
Each alert includes the following details:
Student name
Membership or package name
Days until expiration
Expiration date
View student's terms and conditions form
The front desk staff and center managers can navigate through the roster view to verify the student's terms and conditions form.
Search for and locate the student on the Roster page.
To open the student profile, click the student's name.
To view the T&C form, navigate to the Custom Fields tab.
To email the form to the student, click Send Student T&C Form Link.
Click Send Custom Data Link on the student profile to send the user data form to the student's email address.
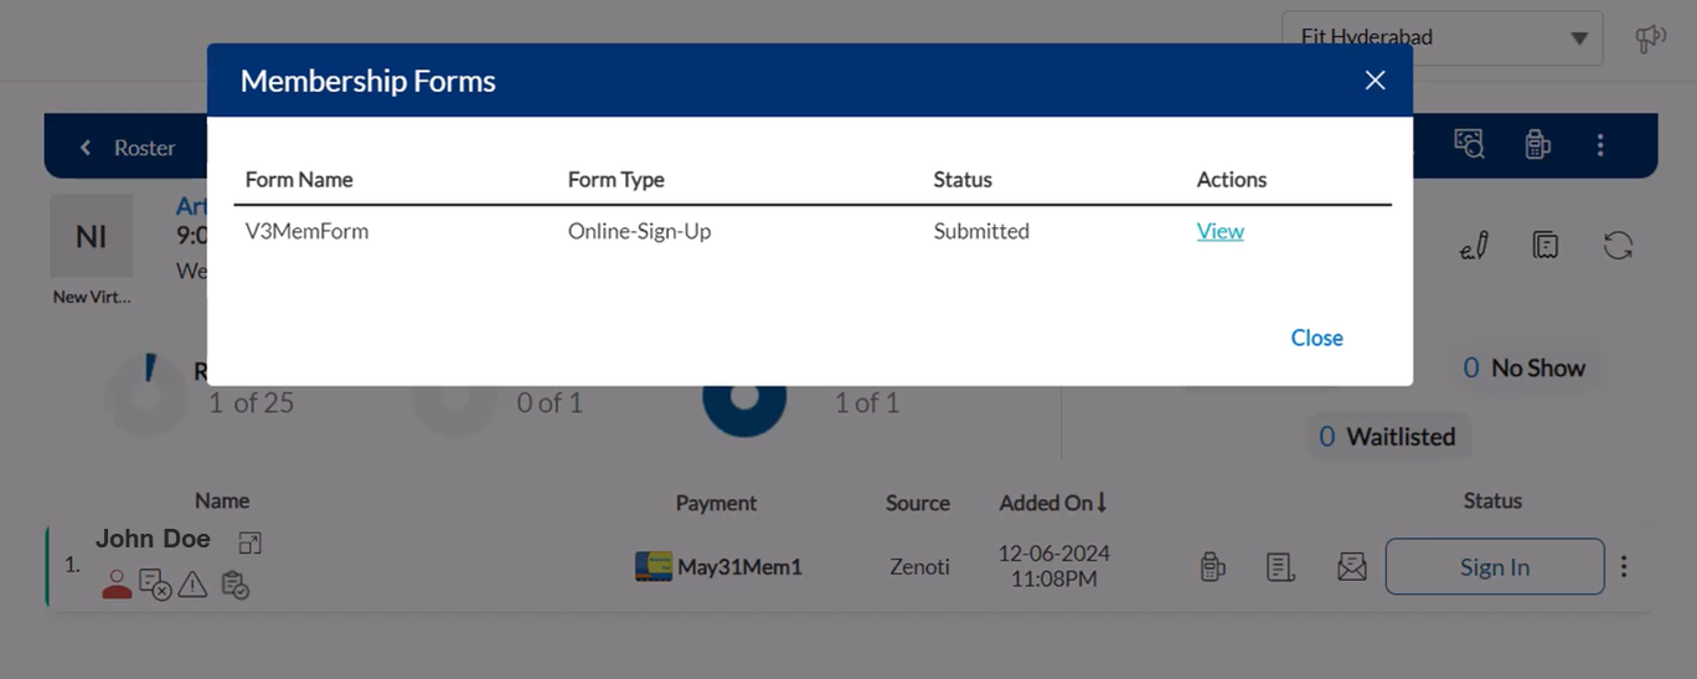
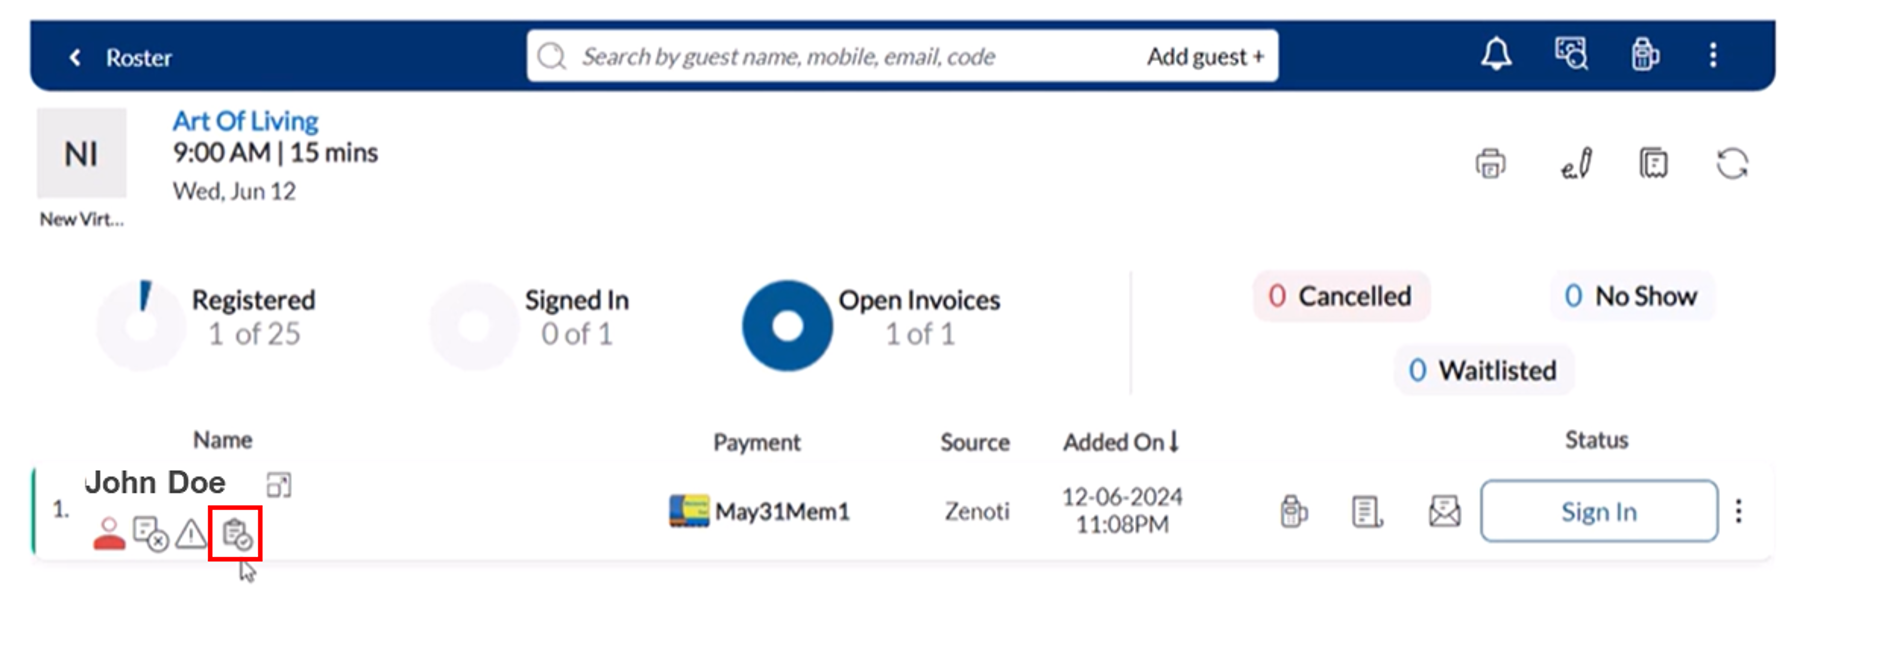
View membership form
Front desk staff can resend the membership form link via the Roster, while members must complete the form via the Webstore to enroll for classes and workshops. This form appears for the first time during membership purchase on the Webstore. Members can fill in the form during purchase and if the form is not complete, the front desk staff can see a notification on the roster.
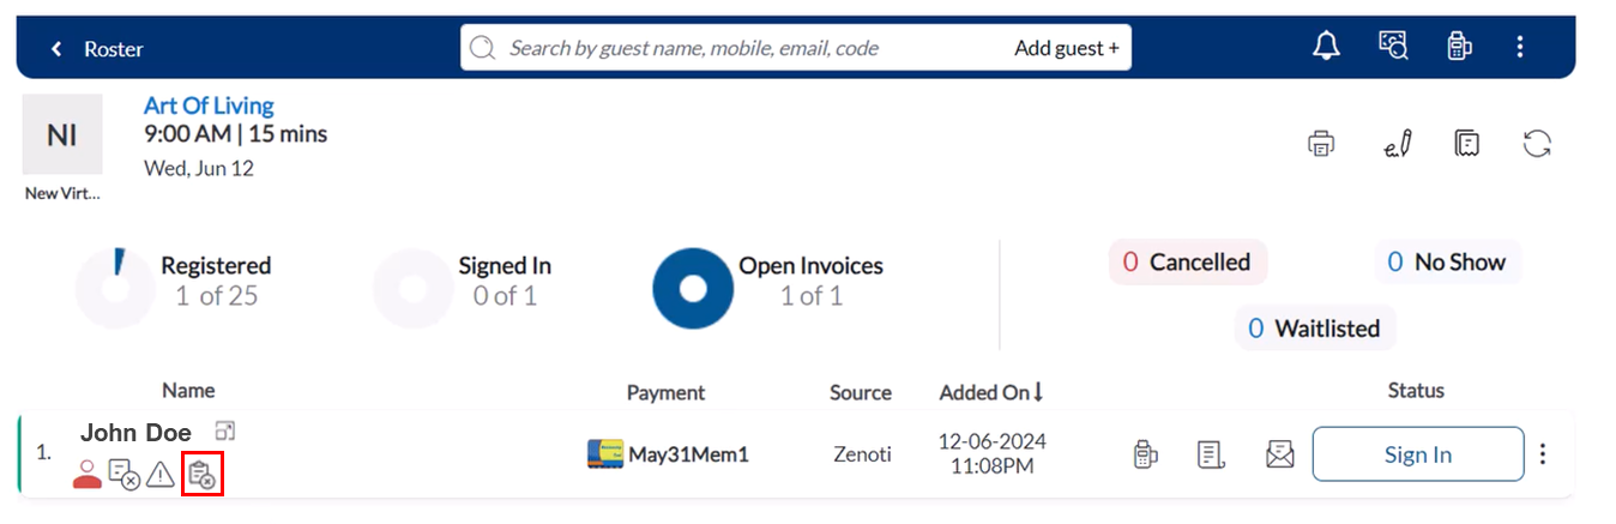
The Roster displays an icon indicating form status. A form icon with a cross symbol (X) indicates that the membership sign-up form has not been filled out yet. A checkmark (✓) indicates that the form has been completed.
In the Roster View, search for the student profile.
Click the Membership Forms icon just under the students’ name.
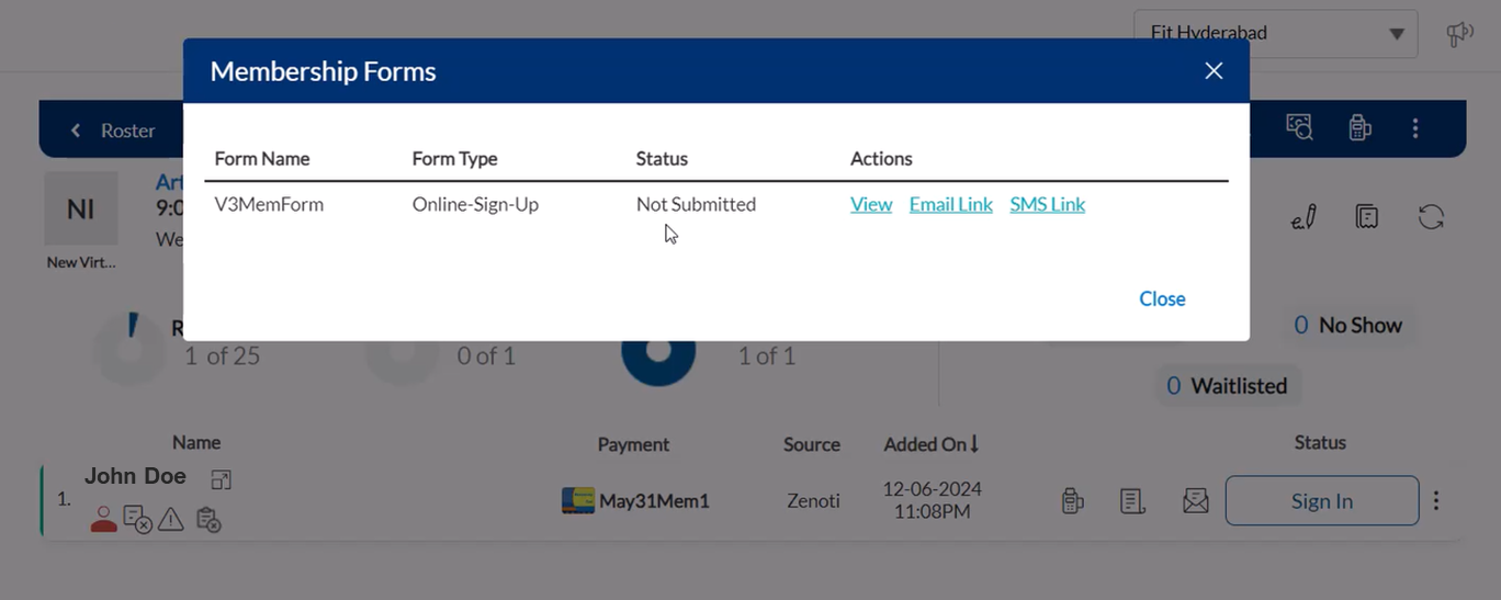
A Membership Forms pop-up window appears, displaying the form details. The Status column indicates whether the form is Submitted or Not Submitted.
You can perform the following actions for the incomplete form.
View: Open the membership form for review.
Email Link: Send the form link to the student via email.
SMS Link: Send the form link to the student via SMS.
Once the form is submitted, the Membership Forms icon on the Roster updates to a checkmark (✓).
Impacts and considerations
Students receive an email or SMS with the membership form link when the front desk staff resends it from the Roster.
The student is redirected to the Webstore membership form page by clicking the link.
The member must fill in the required fields and submit the form. Once submitted, the form is validated and linked to the student’s profile.
The Roster is updated automatically to reflect the completed status. When the front desk staff clicks on the icon, the details are updated if the student has already submitted the membership form.