FAQ and troubleshooting
FAQ on guest feedback (v2)
How do I set up negative issue management in Zenoti for my guest feedback?
How can I check the feedback forms setup in email and SMS for my guests?
How do I set up conversations with guests with negative feedback in Zenoti?
How do I check the Feedback v2 reports filled for a specific time period in Zenoti?
How do I add a new guest?
Zenoti automatically creates a new guest profile when you create an appointment for a new guest from the booking panel or from the Booking Wizard.
If you wish to create a new guest profile without creating an appointment for the guest, use the Loyalty module to create a new guest record.
Note that when guests book services online, they create their own guest records.
Note
The guest record or the guest profile contains the details of the guest.
How to access a guest's profile?
You access guest profile in Appointment Book from the search box, appointment block and Appointment Info Panel.
Note
If you are only able to view the Notes tab on the guest profile, then you do not have the Receptionist role permission. To enable the role permission, reach out to your manager.
From the Search box
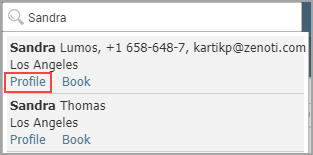
If you are an existing customer*, you will see the guest search box as follows.
Click Profile to view guest details. See screenshot.
Note
Existing customers can opt-in to see the new guest search.
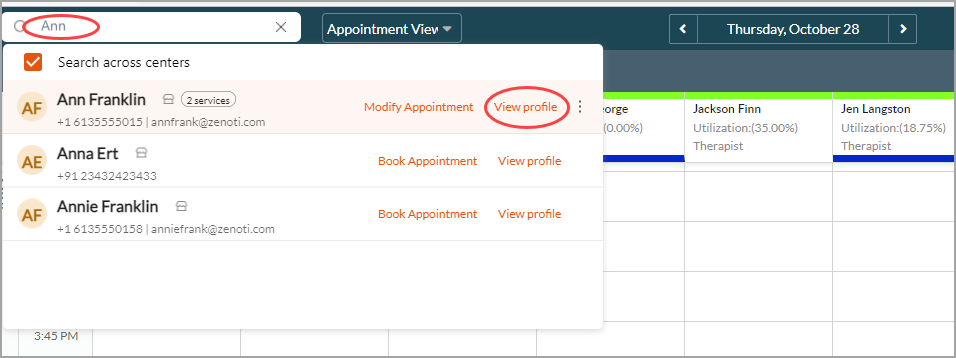
New customers** will see the following guest search by default.
Click View profile to view the guest's profile.
From an existing appointment block
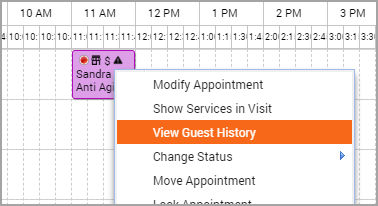
Existing customers* will see the context menu as follows.
Click View Guest History to view guest profile.
Note
Existing customers can opt-in to see the new context card.
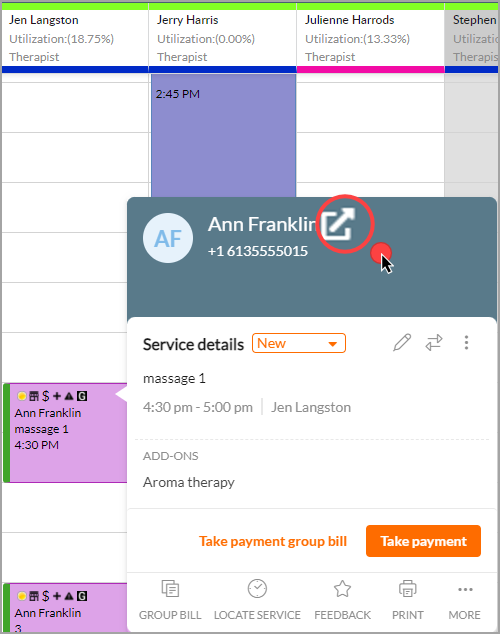
New customers** will see the following context card by default. To view the guest profile, click the highlighted option (see screenshot).
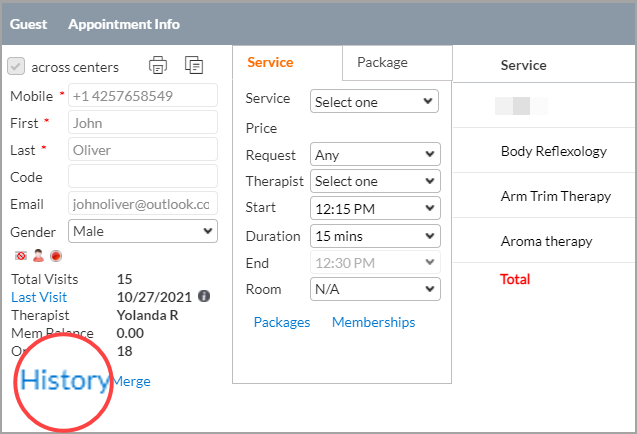
From the Booking Panel or the Appointment Info panel
Click History to view the guest profile.
How to reset a guest's password?
Guests can use their login credentials to access the online Webstore and Customer Mobile Application (CMA).
Guests may often reach out to you to reset their passwords. To do this, simply go to their guest profile and click Reset Password. Zenoti will send a link to the guest's registered email address. The guest must then click the link to reset their password.
You may also update the guest's password directly using Update Password.
Tip
If you do not see the Update Password button, reach out to your administrator. Your administrator must select the organization level setting, Enable key-in password update at the guest profile.
How many categories a guest can be part of?
A guest can be part of all the Guest Categories whose criteria the guest fulfills.
Example: Consider the following Guest Category settings of a center:
Regular Guest: Visits the Center once or more on an average in a month
Non-Recent Guest: Does not visit the Center for 2 months
If a guest visits a center 4 times in January, and does not visit the center in February and March; if the guest visits the center in April, the front desk will see the Guest Category as Recent (guest has an average of 1 visit per month) and Non-Recent guest (guest did not visit for the past 2 months).
If the guest does not visit in April but visits in the month of May, the front desk executive will see the Guest Category as only Non-Recent Guest.
How do I turn off loyalty points for referring a new guest?
Zenoti allows customers to set up various types of loyalty points, one of these being points for referring new customers. There are instances when a business with a referral program would prefer not to release loyalty points to an existing guest referring a new guest. This scenario arises when a business has both the referral program and accrued loyalty points for referring a new guest enabled at the organization level.
In such cases, businesses can opt to disable the accrued loyalty points setting for referring a new guest at the organization level.
To disable the loyalty points setting for referring a new guest
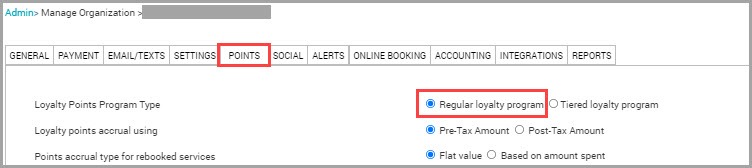
At the organization level, click the Configurations icon.
Click the Points tab.
Ensure that a type of loyalty program is selected.
Go to the Accrual Settings section.
Locate and unselect the Referring a new guest setting.
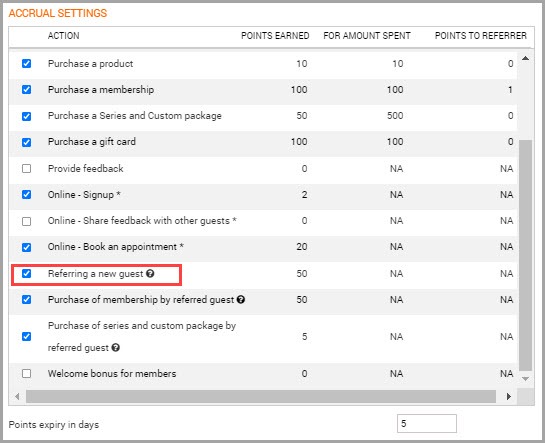
Click Save.
You have successfully disabled accrued loyalty points for referring a new guest.
Guest is not receiving loyalty points statement
If a guest complains that she is not receiving loyalty points statement, do the following:
At the organization level:
Click on the Configurations icon.
Click on the Points tab and ensure that you switched on the Loyalty Points Statement setting.
If the option is selected, follow the normal trouble shootings steps prescribed in the articles below:
When are points accrued in a tiered loyalty program?
In a tiered loyalty program, loyalty points are accrued at the end of business hours.
The email/text notification will be sent on the next day of the purchase.
Do not award loyalty points on discounted items
Loyalty points are awarded by default on payments made by cash, card, check, and custom payments (if configured).
If you do not wish to award loyalty points for discounted items that are paid using any of the above payment types, you can do the following:
Regular loyalty program
Create a loyalty points promotion and do not select the option to Auto Apply.
Points will not be automatically awarded on the invoices.
To award points, you must create a campaign and link the Loyalty Points Promotion.
This campaign is made available in POS and front desk must manually select the campaign to award loyalty points.
You must train the front desk to apply the campaign only on invoices that do not contain discounted items.
Tiered loyalty program
You can restrict awarding of loyalty points on discounted items only if you restrict awarding of points to closed invoices.
If you setup your loyalty program to consider closed invoices only, you can use the option Award points on discounted items to tier members to restrict awarding of points on discounted items.
Loyalty points notification emails are not delivered
There are several possible reasons why an email/text message was not delivered or is not seen by a guest.
The following are some of the common scenarios and troubleshooting steps:
Email could have been delivered to the guest's Spam folder instead of the Inbox.
Guide the guest to check the Spam folder.
Navigate to the guest profile and click the Notifications tab.
Review the status of the notification. The notification can have Failed, Sent or Pending status.
If the status is Sent, the message has been delivered successfully.
If the status is Pending, then Zenoti is awaiting confirmation that the email was delivered. Check the status again after few minutes.
If the status is Failed, it could mean that one of the prerequisites have not been met and you must check other settings.
Navigate to Configurations icon > Notifications > Email/Text and ensure Activate email option is selected.
Navigate to Configurations icon > Notifications > Email/Text and ensure the notification template (for which issue is reported) has Email set to On.
The guest's action should match the configured accrual settings of the Regular loyalty program and the individual tier settings of the Tiered loyalty program.
If the loyalty points program is limited to members only, then the guest must hold a membership to be eligible for loyalty points
Note
This is applicable only for Regular loyalty program.
If it is a Tiered loyalty points program, points accrued will be credited at the end of business hours.
The email/text message will be sent on the next day of the purchase.
Loyalty points notification text messages are not delivered
There are several possible reasons why an email notification was not delivered or is not seen by a guest.
The following are some of the common scenarios and troubleshooting steps:
There are not enough text (SMS) credits: Verify that there are enough SMS credits for the center to send notifications.
Verify if the guest has a valid phone number: Open the guest's profile and check if the guest has a valid phone number.
Verify if the guest has opted to receive notifications: In the guest's profile, ensure the Receive loyalty point statement as a text message (SMS) and an email checkbox is selected.
Click the Configurations icon and ensure that the Activate text message (SMS) checkbox is selected.
Click the Configurations icon and click on the Email/Texts tab and ensure that the required notification template is set to On under the Text column.
The guest's action should match the configured accrual settings of the Regular loyalty program and the individual tier settings of the Tiered loyalty program.
If the loyalty points program is limited to members only, then the guest must hold a membership to be eligible for loyalty points.
Note
This is applicable only for Regular loyalty program.
If it is a Tiered loyalty points program, points accrual, tier enrollment, or tier upgrade takes place at the end of business hours.
The email/text notification will be sent on the next day of the purchase.
Check if the product/service/series or custom package purchased is selected as a redemption option in the Redemption Settings of the Regular and Tiered loyalty program.
FAQ: Unable to send or resend terms and conditions for a regular loyalty program
If you are unable to send Terms and Conditions for a regular loyalty program, follow these steps.
At the organization level, click the Configurations icon.
From Loyalty Points Program Type, select the Regular loyalty program option.
Switch on the Enforce redemption of points in increments of setting.
Select the Display points balance in increments check box.
Switch on the Require guest to sign terms and conditions before redemption setting.