Manage an appointment in ZMA v1
Edit an appointment
Tap the appointment.
Tap Edit in the top right-hand corner.
Modify the appointment as required.
Tap Confirm Appointment.
Action | Perform these steps |
Move the appointment time | At step 3, select the time to which you want to move the appointment. |
Move the appointment to another day |
|
Change the provider | At step 3, select the provider to whom you want to move the appointment. |
Change the duration of the appointment | At step 3, in the Duration column, select the duration. |
Modify a service within an appointment |
|
Modify the guest details |
|
Add a service to an appointment |
|
Remove a service from an appointment | Tap the Delete appointment icon next to the service. |
View or add appointment notes |
|
Modify an appointment with service segments |
|
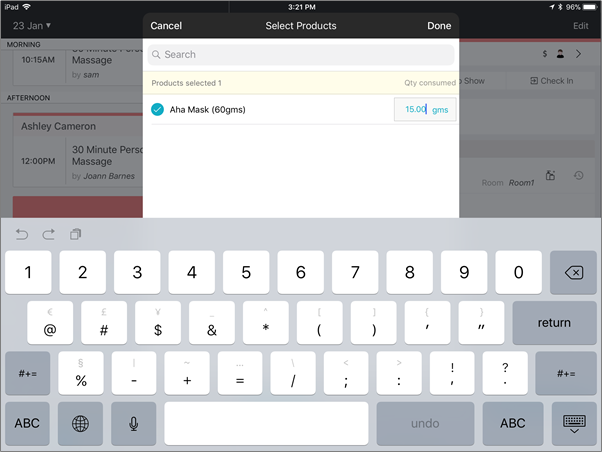
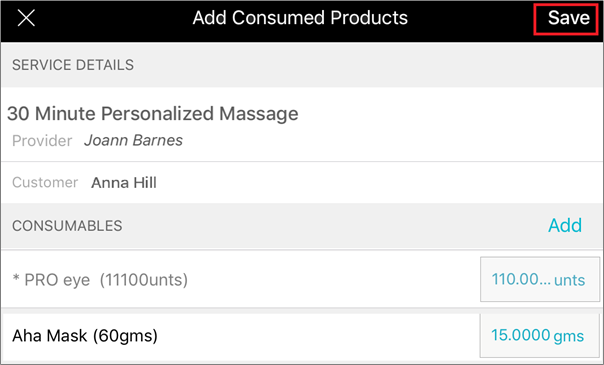
Add products consumption for a service (Consumables) |
|
Modify appointment
Change appointment statuses
In the Appointments tab, tap the appointment.

Select one of the following statuses as per the requirement:
Confirm: If your guest confirms the appointment, tap Confirm.
Check In: After your guest arrives to take the service, tap Check In.
Cancel: If your guest cancels the appointment, tap Cancel, select a reason for cancellation, add comments, and finally tap Submit.
No Show: If your guest has not shown up for a booked appointment, select No Show, add comments, and then tap Submit.
Mark a service start or end time
Tap the appointment you are going to work on and wish to track the service time.
When you are ready to begin your service, tap Start.
The timer starts.
Note
After the timer starts, you cannot reset the timer to zero.
The timer continues even if the Zenoti Mobile application is not running.
After you are done with the service, tap Complete.
Note
You cannot select Start or Complete for a future appointment.
If your guest has another appointment on the same day, you can see the details in the same appointment block. You would only be able to edit the appointment if it is assigned to you.
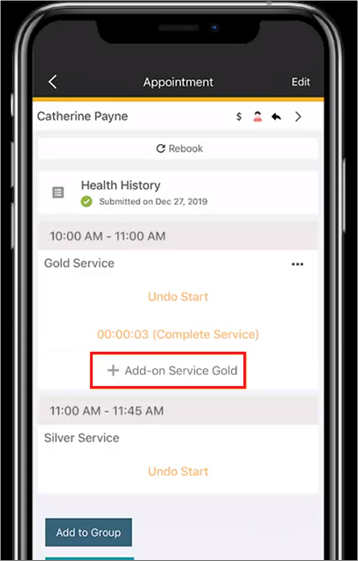
Add service add-ons and retail items during an appointment
To add service add-ons, tap +Add-on.
To sell retail items, in the Appointment Details screen, tap +Add more and then select the items. If there is a commission assigned for selling products, it will be assigned to you.
Note
To make a retail sale of items such as products, services, gift cards, prepaid cards, membership, or packages, you must have appropriate permissions for your role.
Adjust an appointment duration
During a service, you may want to reduce or increase the time duration to better accommodate other appointments.
For example, if you realize that you need less time to complete a haircut service, you may want to modify the duration to free up your calendar for other appointments.
Tap Modify Appointment, and then adjust the time.

Fill intake forms
On the Appointment details page, tap the guest form with a Not filled status,
To turn on the guest mode, tap the ‘Lock’ icon on the top right corner of the screen.
Note
Enable this lock before handing over the device to the guest so that they can fill the form. This lock ensures that guests cannot access anything apart from the intake form in the app.
Expand each form.
Ensure the guest fills in the details in the form as per requirement.
Tap Submit.
Note
If you minimize or toggle the screen, an alert message appears, prompting you to submit or save the changes to avoid loss of data.
To see the list of guest intake and service intake forms for a guest, on the Guest Details screen, tap the Forms Unified View tab.
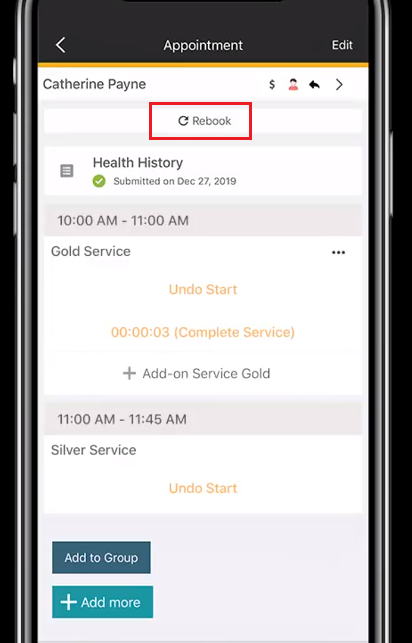
Rebook a service
To rebook, from the Appointment Details screen, tap Rebook, select the appointment date and time slot, and tap Confirm.