Manage Other fee
Some organizations charge a fee to cover operating costs related to services. For example, an organization may charge an environmental fee or green fee to cover expenses incurred toward the safe disposal of service waste. You may collect such fees also to cover the cost of recycling goods or products at your center. In this way, you involve your customers such that they accept responsibility for the entire life cycle of the product (or service) they are purchasing, including final disposal.
Administrators can set up such fees from the center level. The fee may be charged either on the full invoice value or based on specific item types such as Services, Products, Memberships, Day Packages, Series Packages, Gift Cards/Prepaid cards. Employees with the appropriate permissions can add, edit, delete, and waive such fees.
Before you begin
To enable this feature, reach out to Zenoti Support.
To be able to add, edit, delete, and waive Other Fee, the center administrator must have the Fee Objects (Add, Edit, Delete, Waive) permissions (organization level > Configuration > Security > Security Roles > Role Name such as Administrator > Permissions tab > Administrator section > Fee Objects). By default, these permissions are turned OFF.
To be able to refund Other fee, the center administrator must have the Refund (Environment Fee) permission selected (organization level > Configuration > Security > Security Roles > Role Name such as Administrator > Permissions tab > Administrator section > Refund (Environment Fee).
Administrators with the Add permission can view the Other Fee set up page and add a fee. Administrators with the Edit and Delete permission can edit or delete the fee configured.
Users (front-desk staff or managers) who have the Waive permission can waive the Other fee while processing payments from the guest in the Take Payment/ POS screen.
At any point, a center can have only one type of ‘Other Fee’ configured.
You can view details of other fees, green fees or environmental fees, only in the Collections report. For more information, refer to collections reports.
Set up Other Fee
At the center level, click the Configuration icon.
Search for and select Other fee from the POS section.
Click Add.
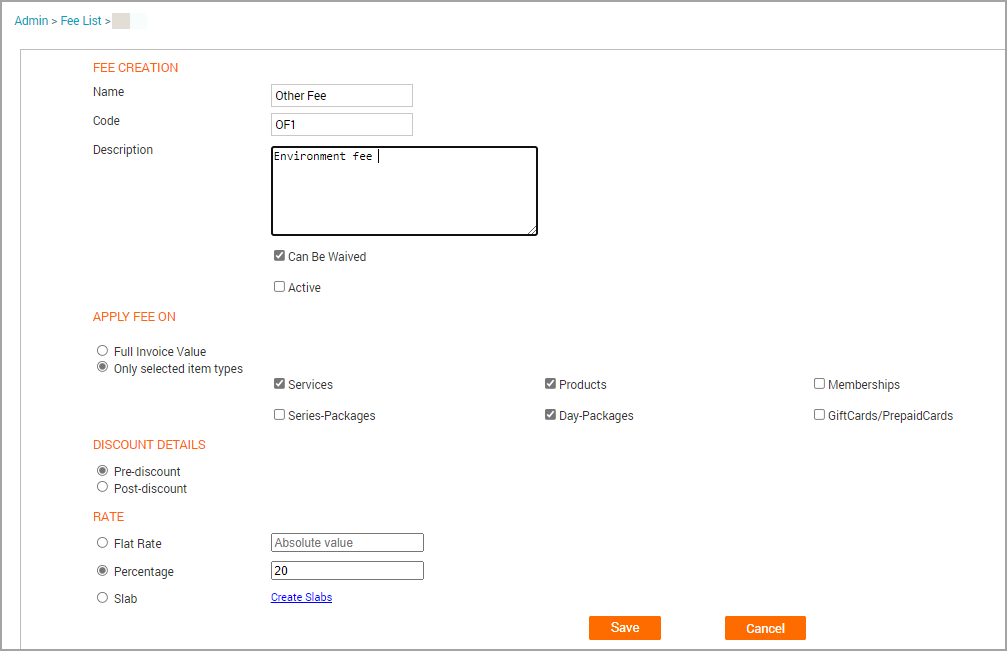
Enter the Name for the fee you want to charge.
Example: Other Fee or Environmental Fee
Enter a Code for the fee.
Enter a Description for the fee.
Example: We charge an environmental fee to cover the cost of the safe disposal of service waste.
Select the check box, Can be Waived, if this fee can be waived.
Note
If this check box is selected but the front desk does not have the waive permission, then such a user cannot waive the fee while processing the payment. Similarly, if the front desk has the Waive permission but this check box (Can be Waived) is not selected for the Other Fee, then such a fee cannot be waived (even though the user has the waive permission).
Select the check box, Active, if you want this fee to show up during billing and payments (in the Take Payment screen).
Note
If a fee is inactive (that is, the Active check box is not selected), then the fee will not show up when the front desk processes payments.
Choose whether you want to apply the fee to the Full invoice value or Only selected item types such as Services, Products, Memberships, Day Packages, Series Packages, and Gift Cards or Prepaid Cards.
Example: If you select Only selected item types and then specify, Services and Products it means that the fee will be applied to the sale of only Services and Products. If there is a sale of say, a Day Package, then the fee will not be applied to such an invoice. This is because, in this example, this fee only applies to Services and Products (and not to the other items).
Use the options Pre Discount or Post Discount to specify whether you want to apply the fee before or after discounts are applied on the invoice.
Note
The Pre Discount and Post Discount values apply only if you choose to define fee rates based on the Percentage value option or while configuring the fee based on Revenue Slabs based on percentages. See the next step (Step 12) for details.
Specify whether you would like to charge a Flat rate, Percentage value, or charge based on Slabs.
Example:
a) Flat rate: Irrespective of the list price of the items for which the fee is applicable, you may charge $2 as a fee.
b) Percentage value: Say you charge 2% of the list price of the items. If the list price of the items is $400, the fee will be $4.
c) Slabs: Define revenue slabs (as an absolute value or in percentage) and specify the fee you’d like to levy. For example, for a list price between $10 - $200, charge a fee of $2, for a list price between $201 - $500, charge a fee of $4.
The guest is charged the fee based on the cumulative slabs. To continue with the same example, if the list price is $150, the fee charged will be $2 (as per the slab 10 to 200). But if the list price is $250, the fee charged will be $6 (2 +4) (as per the amount defined in the cumulative slabs - that is, the list price qualifies for both the slabs, 10-200 and 201 to 500).
Click Save.
Impacts and considerations
Depending on the sum of the list price of items, the fee will appear automatically in the Take Payment/ POS screen. Users with the appropriate permissions can waive such fees while processing payments.
After you have set up a fee in such a manner for the first time, you will no longer see the Add button when you navigate back to this page. This is because, at any point in time, you can set up only one such ‘Other Fee’ for a center.