Other activities related to employee check-in and checkout
Configure alerts for missed employee check outs
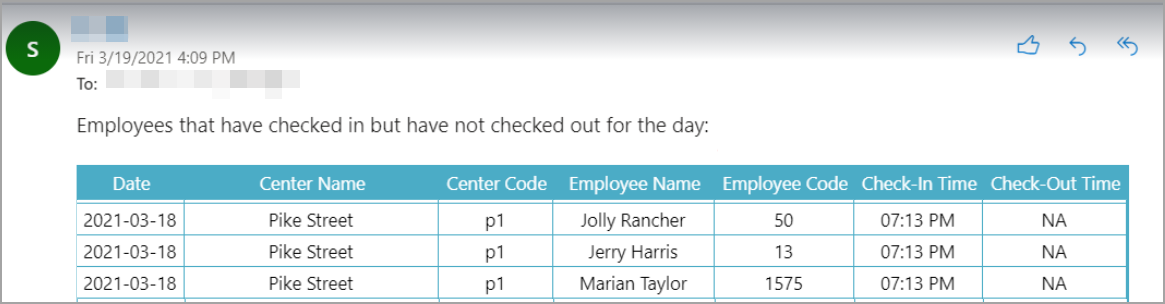
At times, employees check-in for the day but forget to check out. In such cases, Zenoti discards details about the employee check-in too. This leads to inaccuracies in the number of hours that get reported in employee attendance-related reports.
Organization level and center level administrators can configure email alerts to be sent out to business owners or managers at the organization and the center level. These email alerts are sent at the end of the day with a list of employees who have checked in but forgot to checkout. The business owners must then cross-check when employees checked out for the day and add the details back into Zenoti for accurate reporting.
Sample email alert received by business owners or center managers
To configure alerts for missed employee checkouts at the organization level
At the organization level, click the Configuration icon.
Search for and select Alerts from the Notifications section.
From the Employee section, switch ON Missed check-outs (organization) or Missed check-outs (center) as required.
Note that the Delivery Mode is Email by default.
Select Recipient Type as Role or Username.
Click Add.
Click Save.
Zenoti will send email alerts to the role or to the usernames you specify.
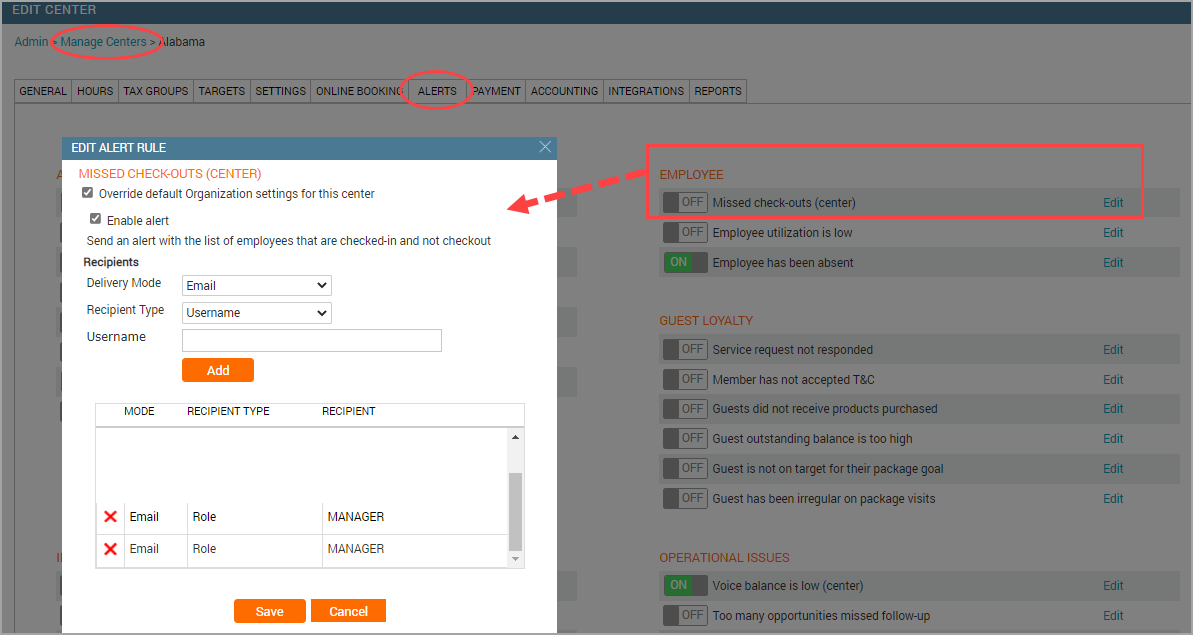
To configure alerts for missed employee checkouts at the center level
At the center level, click the Configurations icon.
Search for and select the Missed check-outs (center) setting from the Alerts section.
Note
If the organization level setting is OFF, you can override this at the center level.
Enable the setting.
Select Override default Organization settings for this center.
Select Enable Alert. Note: The Delivery Mode is Email by default.
Select Recipient Type as Role or Username.
Click Add.
Click Save.
Zenoti will send email alerts to the role or to the usernames you specify.
Edit an employee's check-in and checkout time
This article explains how to update or edit an employee's check-in and checkout time in Zenoti. In day-to-day business operations, employees may forget to check in or out, check in late, or be on planned leave but still work due to business needs. In such cases, authorized users can adjust or record an employee's check-in or checkout time.
Employees may not always follow standard check-in and checkout practices due to various scenarios like forgetfulness, late arrival, or scheduled leave. This feature allows managers to manually update or correct attendance records, ensuring accurate payroll and attendance data.
Expected Check-In / Checkout: Used for calculating payroll when certain settings are enabled but do not affect the employee’s schedule.
Check-In Time / Checkout Time: The actual time the employee starts or ends work.
Work Tasks: Optional assignments used to track time against specific activities performed by employees.
If updating schedules, the user must have permissions to edit employee schedules.
Only users who have the Update Check-in permission selected under Security Roles > Employee Manager Functions > Other Settings can edit an employee’s check-in and checkout time.
Watch this video to learn how to edit an employee's check-in and checkout time.
Important
If your organization uses Work Tasks to record and track employee check-in and checkout against multiple tasks that employees perform, then managers (or users with permissions) can select the Work Task only while editing a check-in and not during actual check-in. For more information, see the section on checking in and checking out employees against work tasks later in this article.
To update or edit an employee's check-in and checkout time
At the center level, click the Employee icon and navigate to Employees > Check In.
Select the date from the calendar.
Hover over the time or comments fields to access the edit option.
Click the Edit icon to enter or edit Expected check-in, Expected checkout, Actual check-in, Actual checkout, and add Comments if any.
To add attendance for an employee, click Add Attendance.
In the Add employee attendance panel, fill in the following details:
Attendance date (auto-filled or editable)
Schedule status: Select the appropriate status from the dropdown
Employee: Select the employee from the dropdown list.
Expected check-in: Enter the scheduled start time.
Expected check-out: Enter the scheduled end time.
Actual check-in: Enter the check-in time.
Actual check-out: Enter the check-out time.
Comments: Optionally, enter any notes related to the attendance entry.
Zenoti updates the check-in and checkout time for the employee with the comments you add.
You can delete attendance details using the Delete icon by hovering over a line item.
You can extend an employee’s schedule for the day even after they’ve checked in. For example, if the schedule was 9 AM to 4 PM, it can be updated to 9 AM to 6 PM.
Editing the schedule requires the appropriate permissions.
You cannot change the employee’s status once they have checked in. For example, a status of Working cannot be changed to Leave or Weekly Off.
If your organization requires cash tip declaration, a column named Declared Cash Tips will appear in the listing. For days without declared tips, you’ll see a visual cue and message No Response to follow up with employees.
Expected Check in and Expected Check Out time have no impact on the employee schedule. However, the Expected Check In and Expected Check Out times are useful for calculating employee payroll hours if the center level setting Calculate Employee Payroll Hours/Employee Utilization based on Scheduled and Actual Hours Combination is on. As a result, employee Expected Check In and Expected Check Out Times form the basis for calculations in the the Employee Hourly Pay/Service Commission Report.
Work tasks
Note
An administrator should have added these Work Tasks to individual employee profiles as part of set up for Work Tasks.
Important
You can record check-in and checkout time for employees only while editing a check-in and not during actual check-in.
To check-in and checkout hours against work tasks as part of employee attendance;
Select the checkbox Check-in with Work Task.
You can now see a new drop-down list for Work Tasks and an option for Comments.
Select a Work Task.
For example: Trainer: New Hires
Enter Comments, if any.
Enter the Check-in Time and Check Out Time.
Click Add.
The break-up of the employee’s check-in and checkout time against the work task appears in the bottom section.
Logging hours for each of the work tasks the employee is capable of performing is important to ensure that the employee is paid for each of the tasks she performs appropriately (since each work task may have a different hourly rate of pay). This leads to accurate calculation of payroll.
Note
Zenoti Mobile does not support calculating payroll based on work tasks.
The Employee Attendance Details report shows details of each check-in and checkout as a separate row.
Add a new leave type
By default, you can assign an employee a leave status of Leave, Special Leave or Weekly Off. If you require additional leave types, such as Sick Leave or Maternity Leave, you need to add these into Zenoti.
To add a new leave type:
At the organization level, click the Configurationsicon
Search for and select Leave types from the Employee section.
Click Add.
Add a name and the description for the leave type.
Click Save.
Use the Zenoti Biometrics application for check-in and checkout - overview
WHAT IS BIOMETRIC CHECK-IN AND CHECK-OUT?
You can use a biometric device that authenticates an employee during check-in and check-out. Biometric check-in ensures that employees cannot manipulate their start and end timings as the employee's fingerprint is required for check-in and check-out. To use this capability, you will need to connect a biometric device to your computer.
If you are a multicenter organization, your employees need to register their fingerprint only once, and can then check-in or check-out at any location. Zenoti uses the check-in and check-out data to track attendance and punctuality.
If you are an existing customer using the browser-based check in, switch to the new Zenoti Biometrics application that works without depending on the browsers. Also, you do not need to re-enroll employees when you switch from the browser-based check in and check out to the Zenoti Biometrics application. You must also first uninstall the old software.
Supported operating systems for the biometrics application are:
Windows 7
Windows 8
Windows 8.1
Windows 10
Windows 11
Supported devices
The supported models for the biometric device are:
Digital Persona U.are.U 4500
DigitalPersona U.are.U 5160.
Important
Mac OS does not support these devices. Note also that the Zenoti biometrics app does not support Linux Operating System.
The DigitalPersona U.are.U 5160 is a more desirable device to use because it is rugged, and works well with dry, moist, or rough fingers.
Zenoti Biometrics continues to support the old device model U4500.
You can purchase these from websites like Amazon.
Install the Zenoti Biometrics application
The new Zenoti Biometrics application is independent of any browser and works with the Windows Operating System. Before you begin, you must download the new Zenoti Biometrics application.
Download the Zenoti Biometrics application
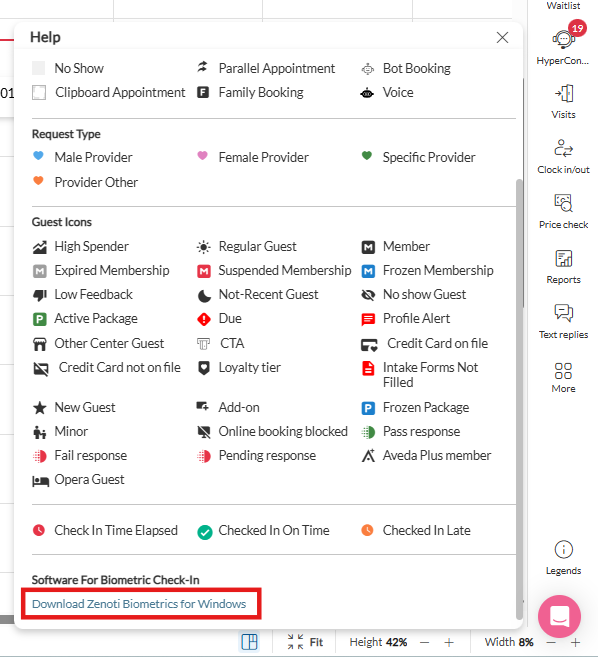
In the Appointment Book click Legends.
Click Download Zenoti Biometrics for Windows.
Steps to install
Double-click the Setup file.
Click More info. This step is applicable only for Windows 8, and Windows 8.1.
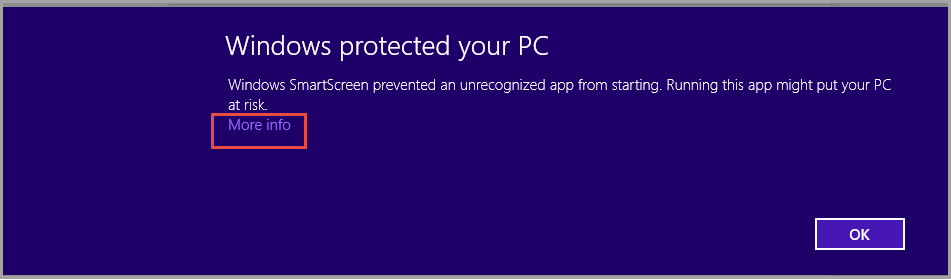
If the system displays the following screen, click Run Anyway. This step is applicable only for Windows 8, and Windows 8.1.
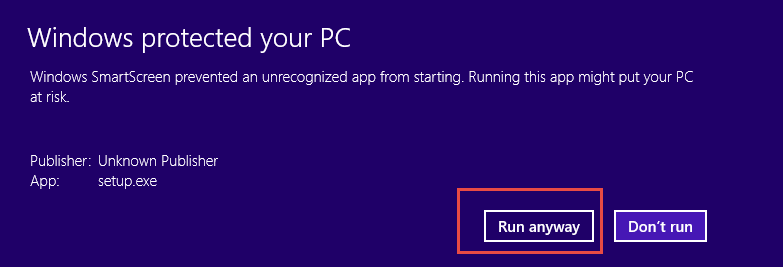
Click Yes.
Click Next.
Click Next.
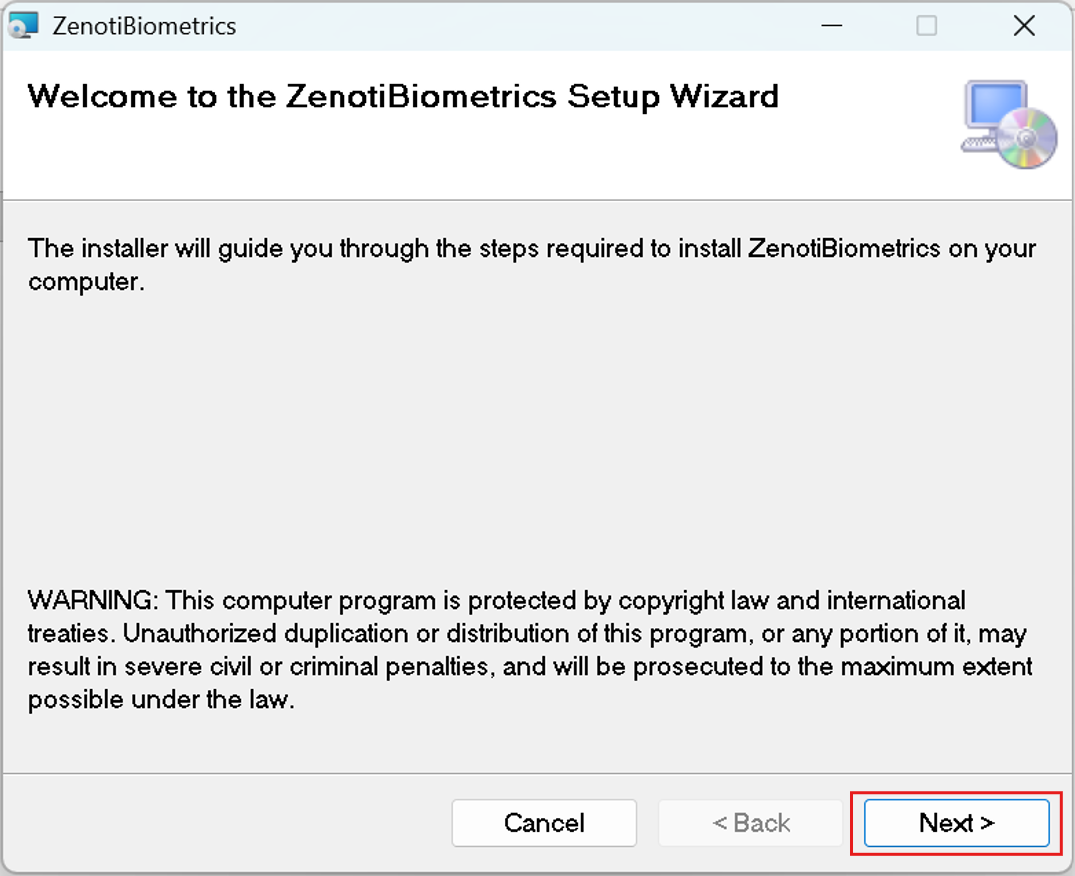
Click Next.
Select the folder for installation and select Everyone.
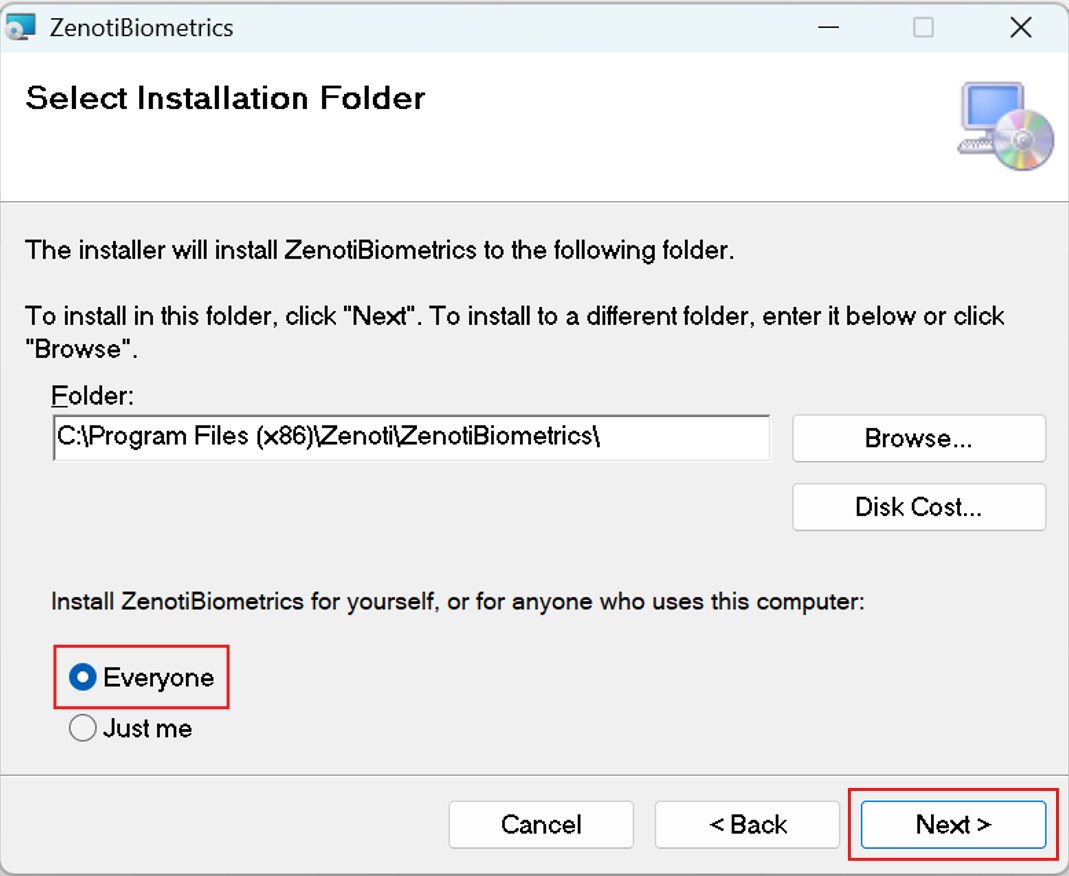
Click Next for the subsequent setup related tasks.
Click Install.
Select the "I accept the terms in the license agreement" option.
This starts the installation of the device drivers.
Click Next.
Click Install.
Click Finish.
You must restart the computer after the installation is complete.
Next step
Configure the Zenoti Biometrics application
Important
The person who is configuring the Zenoti Biometrics application must have the 'Authenticate' security role permission.
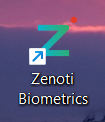
Double-click the Zenoti Biometrics icon on your desktop.
Click Configure.
Type your Account name. Account name is how you access your account.
For example, if you log in to Zenoti using demo.zenoti.com, then demo is your account name.
Enter the username and password of the employee who is authorized for configuring the application.
Click the Change Center link and from the drop-down list, select the center you will be checking-in or checking-out the employee using the Zenoti Biometrics app.
Click Save.
Note
If you want multiple centers to use the Zenoti Biometrics app, you must download, install, and configure the application at all the centers.
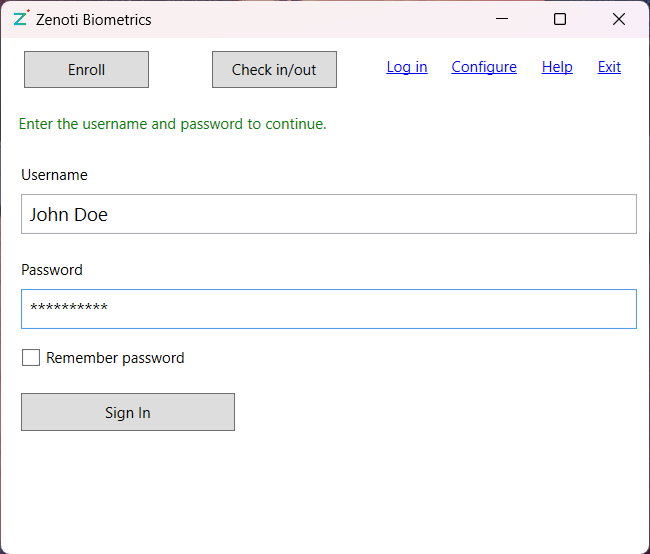
Log in with your username and password.
Select the 'Remember Password' checkbox if you want to avoid typing your password each time.
You get a message, 'Login is successful.'
How do I enroll employees into the Zenoti Biometrics application?
Before you begin:
The employee performing the task of enrolling fingerprints into the application, must have the Enrollment security role permission enabled. Only the owner can enable this permission.
Ensure that the biometric device is connected to the computer and a blue light appears. The blue light is an indicator that the device is connected properly to the computer.
Ensure that the employee's finger is clean and dry.
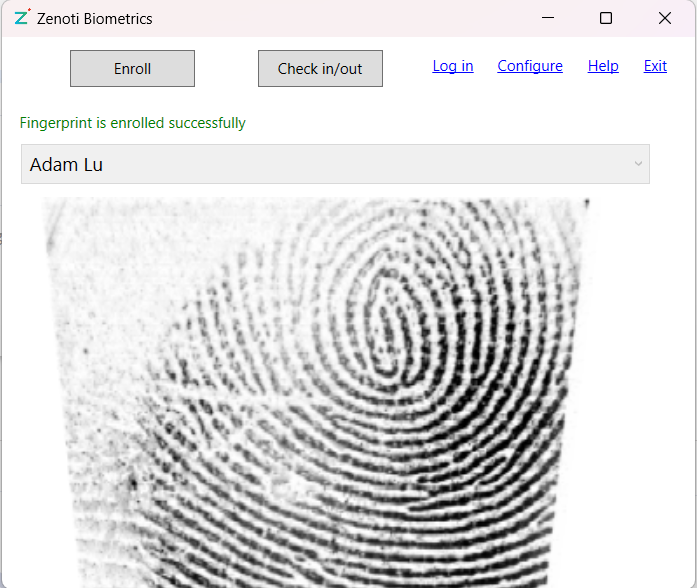
To enroll employee fingerprints into the biometrics application
Open the Zenoti Biometrics application and click Enroll.
Select an employee from the drop-down list.
Place the employee’s finger on the fingerprint reader device. The system displays a confirmation message that the finger print is enrolled successfully.
Ensure that the employee enrolls only that finger, which the employee is going to use for biometric check in and check out. If an employee enrolls the fingerprint for a different finger, the previously enrolled fingerprint is overwritten
You can scan a finger only six times on the device.
Register fingerprint for the first time in the Zenoti Biometrics app
Important
The person enrolling the fingerprints in the application must have the 'Enrollment' security role permission to be able to do so. Typically, it is the front-office personnel who perform these tasks but this may vary from organization to organization.
Click Enroll on the Zenoti Biometrics app. Ensure that the biometric device is connected to the computer and the blue light in it is on. If you see a blue light, it indicates that the device is connected properly to the computer.
Select an employee from the drop-down list. Ensure that the finger of the employee is clean and dry.
Place the employee’s finger on the fingerprint scanner till the application displays a confirmation message that the fingerprint is enrolled successfully.
Note
Ensure that the employee enrolls only the finger that the employee is going to use for the biometric clock in and clock out. If an employee enrolls the fingerprint for a different finger, the previously enrolled fingerprint is overwritten. You can scan a finger only six times on the device.
Next step: Check-In and Checkout an Employee using the Zenoti Biometrics App
Check in and check out an employee using the Zenoti Biometrics app
Important
The person checking in and checking out the employees in the application must have the 'Checkinout' security role permission to be able to do so. Typically, it is the front-office personnel who perform these tasks but this may vary from organization to organization.
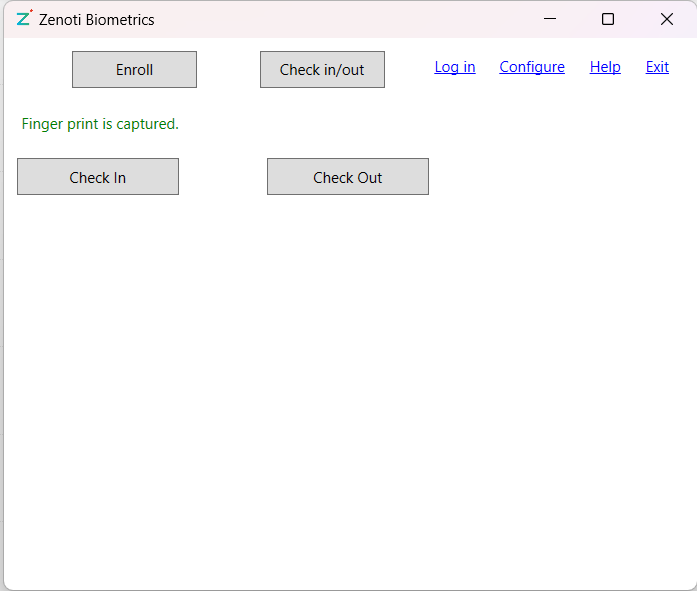
Click Check-in/out on the Zenoti Biometrics app.
Place the finger of the employee for print on the device until the computer displays the message that the fingerprint is authenticated.
Click Check In or Check Out.
Note
You must enroll employees into Zenoti Biometrics to be able to check-in and check out employees.
If an employee is exempted from the biometric check-in and checkout, you must check-in or checkout the employee from the Appointment book by clicking the clock icon for check-in or checkout.
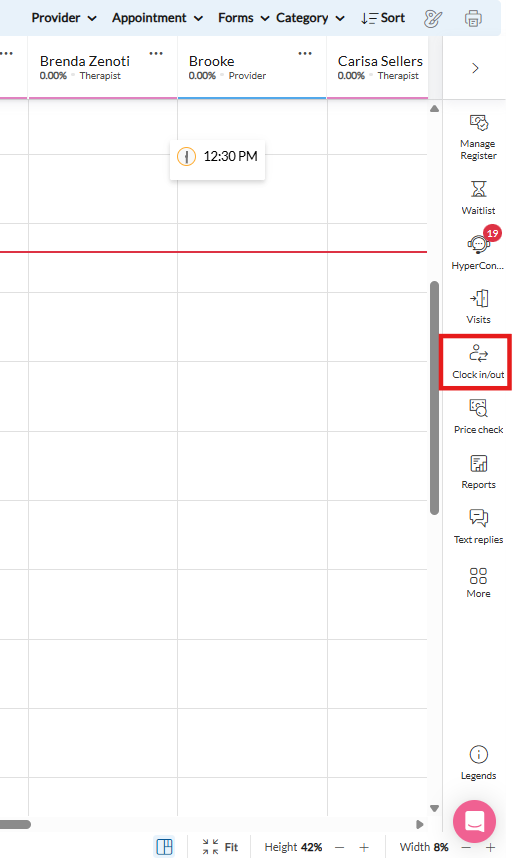
Alternatively, you can also click Clock-in/out to check-in and checkout.
Uninstall the browser based biometric software to install the latest Biometrics application
If you are using the browser-based check-in/checkout using DigitalPersona One Touch for Windows RTE, you must first uninstall it.
Go to the Control Panel.
Click Programs.
Click Programs and Features.
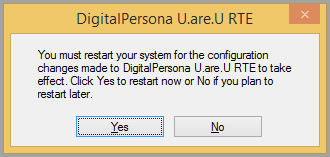
Click DigitalPersona One Touch for Windows RTE or DigitalPersona U.are.U RTE.
Click Uninstall.
The system prompts you to restart the system. Ideally, you must restart the system.
Next step: Install the Zenoti Biometrics Application