Release Notes - September 02, 2025
Revision History
Date | Feature/ Module Name | Section | Change Description |
|---|---|---|---|
16-09-2025 | HyperConnect | Added Release Notes snippet | |
16-09-2025 | HyperConnect | Added Release Notes snippet | |
16-09-2025 | HyperConnect | Streamline monitoring with reports dashboard in HyperConnect | Added Release Notes snippet |
16-09-2025 | HyperConnect | Added Release Notes snippet | |
19-09-2025 | Employee | Added Release Notes snippet |
We’ve enhanced the structure of our release notes to better serve your needs. Updates are now categorized under clear headings based on Add-ons, Core Product, Product Edition, Personas, and Modules.
This new format ensures you can quickly find updates most relevant to your role, understand the value each change delivers, and seamlessly adopt new features or enhanced workflows.
This Release Notes contains the following sections:
Announcements: Key updates and important information related to the release.
New Features: Newly introduced functionalities designed to enhance the product experience.
Enhancements: Improvements made to existing features for better usability and performance. Categorized features as Core Product, Product Editions, and Add-ons.
Additional Resources: Links to supporting materials such as guides, training, and documentation. This also includes references to the release notes for the patches included in this update.
Icon | Description |
|---|---|
 | Automatic update for all users. |
 | Employee: Enhancements or features for employee and payroll. |
 | Admin: Features specifically enhanced for admin users who manage the system configuration, including user roles, permissions, and system integrations. |
 | Business Owner/Center Manager: Updates implemented for the business owners or managers who are responsible for overall business strategy, growth, and decision-making. |
 | Front Desk Operator/Service Provider: Features that enhance the usability for front-desk staff who handle appointments, customer queries, payments, and guest interactions. |
 | Guests: Improvements made for the end-users or customers of the business who interact with Zenoti through online booking systems, self-service kiosks, and branded mobile apps. |
The following table provides a consolidated list of new features, announcements, and updates included in this release. Use this section to quickly scan all major changes before exploring detailed descriptions in the following sections.
Type | New Feature/Enhancement |
|---|---|
Announcements | |
Enhancements |
|
Announcements
Module: Reports
Business Owner/Center Manager
Zenoti has standardized column names across key reports to improve consistency and clarity. The updated naming conventions apply to reports such as Business KPI, Master Center Metrics, Sales - Accrual, and Master Employee Metrics. This change enhances report readability and minimizes ambiguity across modules.
For more information, refer to the Business KPI, Master center metrics, Sales - accrual, and Master employee metrics.
Module: Admin
Front Desk Operator, Admin
Front desk staff and admins can now configure additional fee beyond the base service fee and choose whether Prepaid Cards (PPCs) can be used to pay for them. This enhancement gives businesses greater control over how payments are applied. It also supports more accurate, transparent invoicing and reduces the need for manual tracking of extra charges.
Business scenario:
Earlier, only standard service fees could be added to invoices. Any additional charges such as convenience or penalties, had to be tracked manually.
Now, you can easily include miscellaneous fees such as:
Convenience charges
Processing fees
Surcharges
Late payment penalties
You also have the option to define whether PPCs can be used to pay for each fee type. This improvement simplifies billing, improves accuracy, and helps staff provide a smoother checkout experience.
Note
Some reports may reflect changes depending on how PPCs are applied to these fees. Review key reports after setup to ensure data aligns with your business requirements.
Module: Payments
Business Owner/Center Manager
Zenoti will discontinue support for the Ezypay payment processor effecting September 30, 2025. To ensure uninterrupted payment processing, please switch to a supported payment processor before this date.
Enhancements
Core Product
Module: Appointments
Front Desk Operator, Admin
Front desk staff can now email a guest their upcoming appointments directly from the Guest Profile. This reduces manual effort and improves the guest experience by sharing clear, consolidated information.
Business Scenario:
Sharing appointment details with guests often required manual effort, which was time-consuming and error-prone. With this enhancement, staff can now use the new option in Guest Profile > Appointments > Upcoming Appointments section, to send an email listing up to 20 upcoming appointments, grouped by visit and excluding cancelled or deleted ones. This ensures accurate communication, streamlines workflows, and improves guest satisfaction.
How to use:
Go to guest profile.
Open the Appointments tab and find the Upcoming Appointments section.
Click the Email 20 upcoming appointments icon.
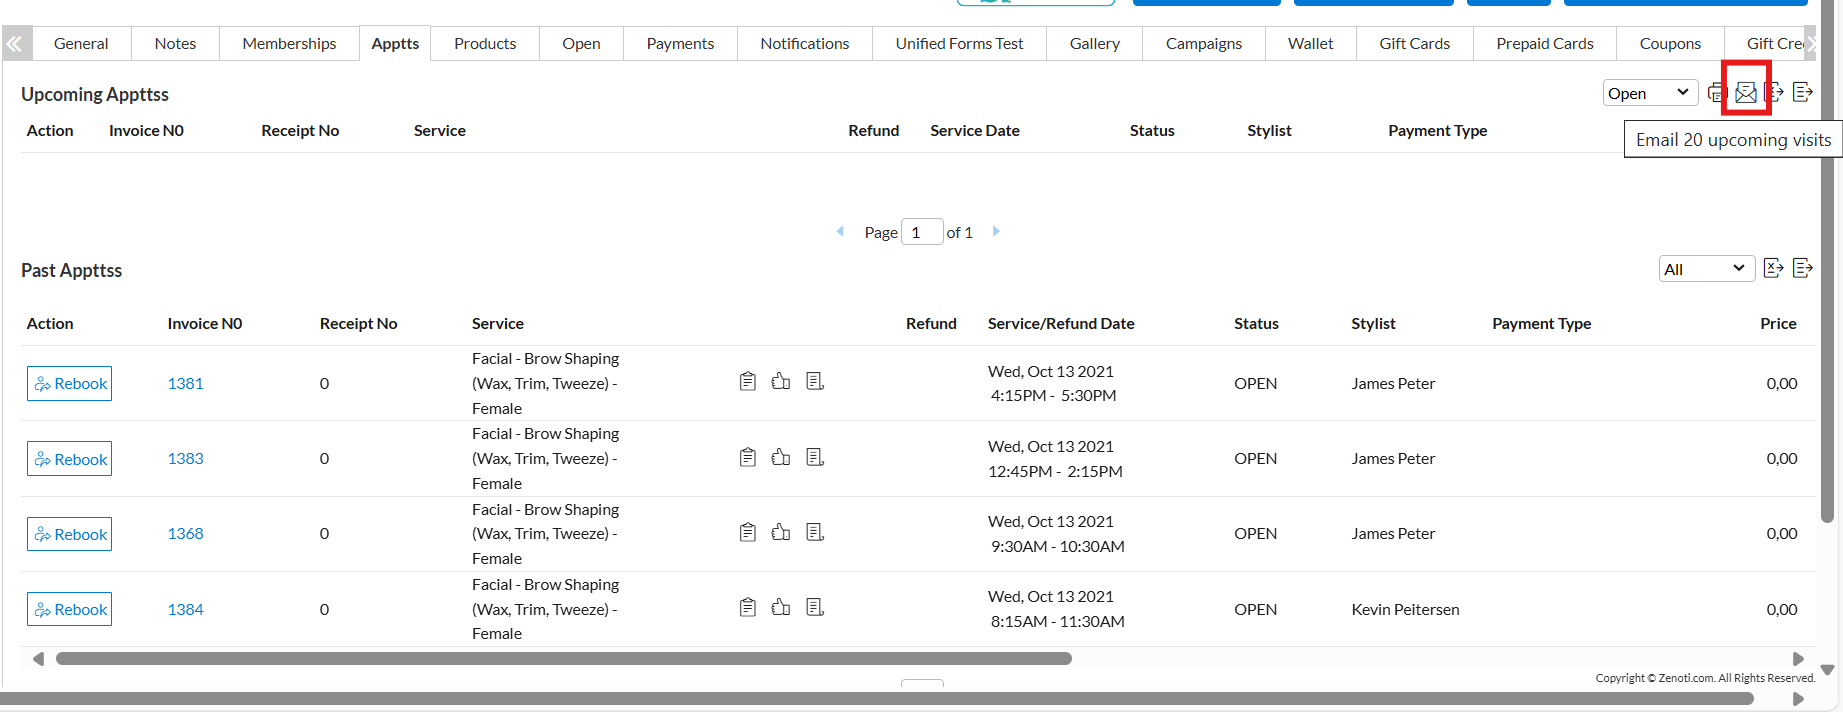
A toast message confirms: An email containing upcoming appointments has been sent to the guest. If no appointments are found, the system displays: No upcoming appointments found for this guest.
Learn More: For more information, refer to the Print upcoming appointments article.
Front Desk Operator, Admin
When you enable the redesigned Appointment Book, you also unlock the new register and enhanced guest profile, giving a unified experience across scheduling, transactions, and guest management.
Additionally, managing the Appointment Book is simpler with more nuanced controls. Staff can now adjust zoom levels, choose fit options, and create block-outs for multiple employees in one go. These updates save time, reduce repetitive tasks, and improve overall scheduling accuracy.
Business scenario:
Managing appointments and staff schedules often requires quick adjustments and clear visibility. With these updates, you can now:
Use new Fit Height and Fit Width options directly from the bottom-right zoom controls for easier navigation.
Now, adjust zoom levels in 5% increments for more precision.
Apply a block-out to multiple employees from the Block-Out Time modal using a searchable multi-select list. This makes it simple to apply breaks, meetings, or time-offs across the team without creating each entry manually.
These enhancements streamline appointment and schedule management, improve visibility, and reduce repetitive tasks for staff.
Learn More: For more information, refer to the Redesigned Appointment Book article.
Admin
With this update, organizations have more flexibility in controlling both provider prioritization for bookings and the display order of providers in the Appointment Book. By streamlining how custom orders are configured, Zenoti reduces setup complexity and ensures consistency across booking channels.
Business scenario:
For many businesses, the order in which providers should be booked, keeps changing regularly. Previously, centers had to go through multiple steps to update this order, if they chose a customized order. Now, this change is simpler and is a single step process.
Key updates:
Admins can now configure/manage provider order directly in Booking Order settings.
The custom order setting continues to define provider prioritization for bookings through the Booking Wizard and Webstore.
If both Specify the display order for therapists and Define the order in which providers must be prioritized for bookings are set to “Custom,” the same provider order is applied across both display order in Appointment Book as well as booking order of providers, ensuring consistency.
Business owner/ Center Manager
Zenoti has enhanced the automated waitlist flow to support grouped service scheduling and single provider assignment. This update aligns the waitlist with booking flows and improves operational efficiency.
Key updates:
When multiple services are added to the waitlist and the Service Duration (in minutes) setting is enabled, Zenoti schedules them as one continuous time block.
A single dropdown is available to assign one provider to the entire group of services. The provider list shows only those qualified for all selected services.
These behaviors apply whether the waitlist appointment is confirmed manually or automatically.
Note
Appointments confirmed with a selected provider from the waitlist are treated as Specific Provider requests. This is reflected in the Appointment Book, reports, and other applicable views.
A guest walks in for a brow wax and lip wax, two short-duration services typically scheduled back-to-back. Earlier, staff had to select a provider for each service, and the services appeared as separate slots. This added extra steps for the front desk, created confusion, and increased the risk of errors during automated confirmation.
With this enhancement, the services are grouped into one slot, the dropdown shows only qualified providers, and the front desk assigns one provider for the full visit. Zenoti confirms the waitlist seamlessly, ensuring faster handling, better yield, and fewer scheduling errors.
Module: Employee
Administrators, Business owners
Zenoti now allows you to configure custom KPI metrics to track employee productivity, performance, and retail effectiveness. These enhancements help standardize performance tracking across teams and locations.
Business scenario: Let’s say you're a salon owner tracking not just how many services a stylist performs, but also how well they upsell, retain guests, and drive retail revenue. With custom KPIs like Productivity %, Retail Per Client Ticket (RPCT), and Guest Retention, you get a more complete view of employee impact.
How to Use:
At the organization level, navigate to Configuration > Employee > Reports.
In Custom KPI Service Types, define labels and assign services.
In Custom KPI Columns Configuration, enter labels for two custom percentage-based KPIs.
Use the service item dropdowns to associate service types with categories and/or specific services.
Click Save to apply settings. These mappings reflect in Employee KPI reports.
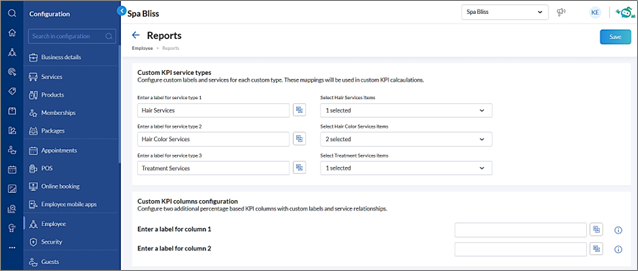
Learn More: For more information, refer to the Employee KPI report article.
Release date: August 19
Business owners, Administrators
The Employee Survey feature enables administrators to collect structured employee feedback by creating and scheduling surveys using custom forms. Surveys are delivered through the MyZen app, simplifying internal communication, improving decision-making, and centralizing survey management at the organization level.
Note
Ensure Add, View, Edit, and Delete permissions are granted for Employee Survey under Employee Manager. Grant View and Edit permissions for Service Custom Data under Appointment Book to allow service providers to view and submit the form on MyZen.
How to Use:
At the organization level, navigate to Configuration > Zenoti Labs > Employee Survey.
Turn on the Enable Employee Survey toggle.
Navigate to Employee > Employee survey.
Click Create Survey Form.
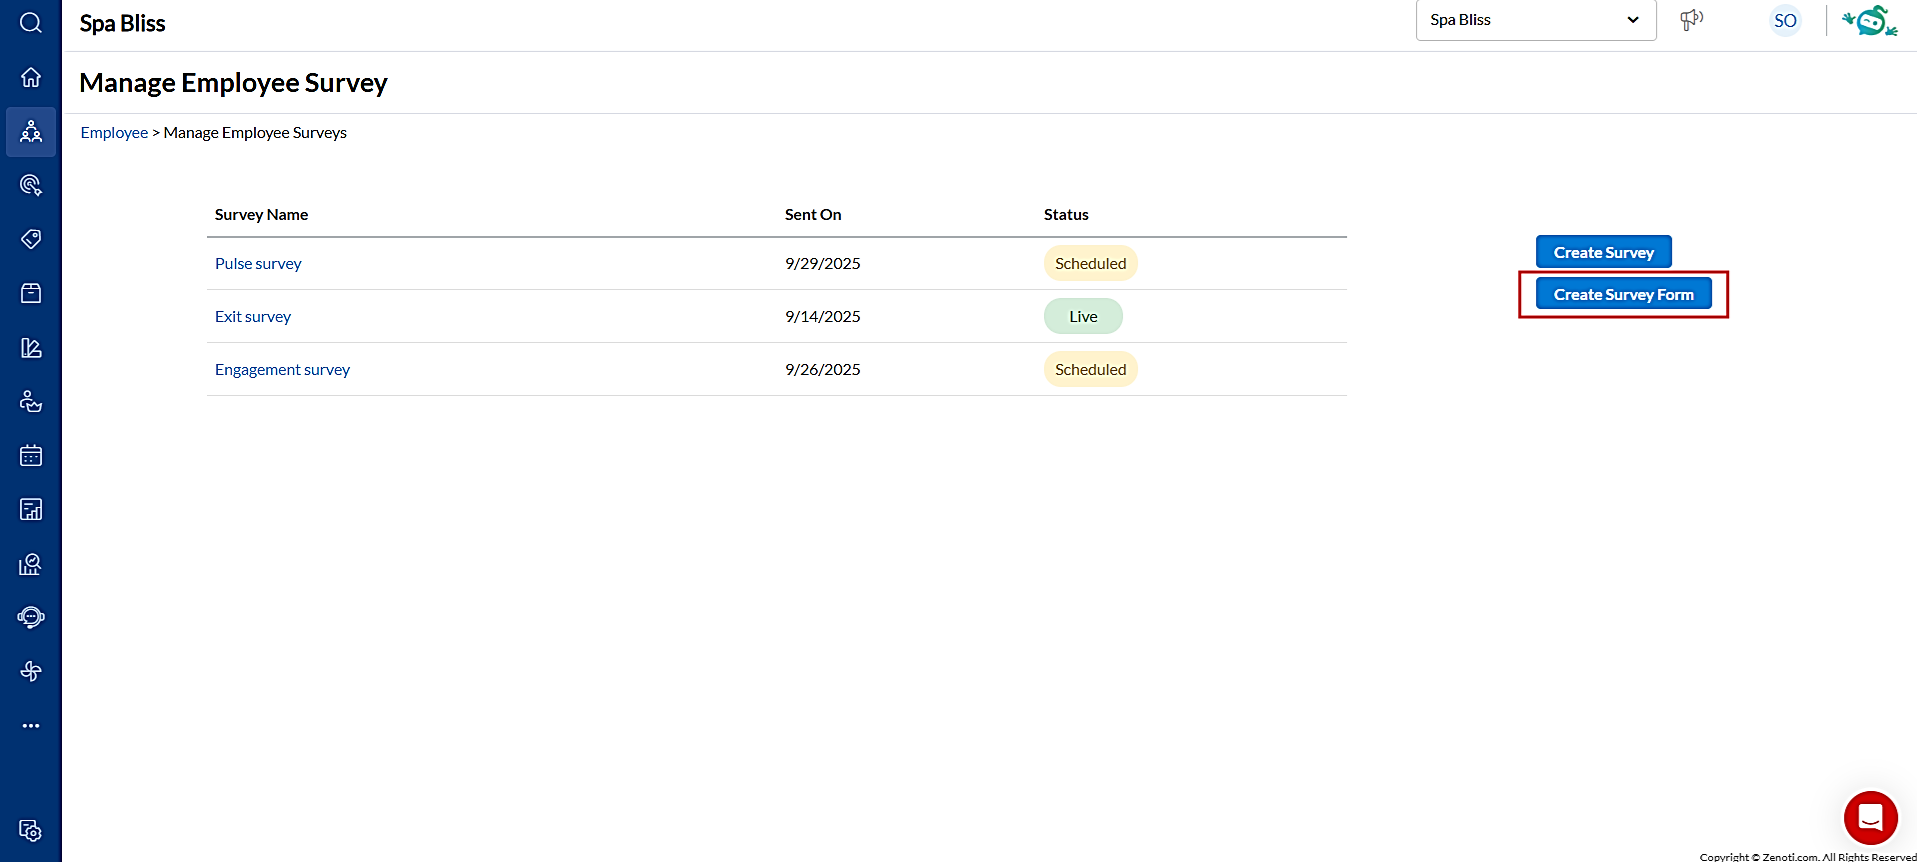
Enter the required details to create a new form and click Save and Proceed.
Click Create Survey, select the form, set the schedule, choose recipients, and select MyZen Push Notification.
Click Save.
Learn More: For more information, refer to the Send and Manage Employee Surveys article.
Module: Inventory
Administrators, Inventory Managers
Zenoti now helps maintain accurate vendor pricing when procurement prices change. While receiving a Purchase Order (PO), vendors may increase or reduce prices, and users enter the updated unit cost in the PO delivery screen. At this point, the system prompts users with appropriate permissions to update the Product Master vendor mapping directly from the delivery screen. This ensures that vendor-center price mappings remain current and consistent without additional manual steps.
Business Scenario: A center raises a PO for a Shampoo at $10 per unit but receives at $13. Zenoti detects the price difference and displays a prompt, allowing the user to update the Product Master price immediately. This helps save time, reduce errors, and keep vendor pricing up to date.
How to Use:
At the center level, navigate to Configuration > Inventory.
Turn on the Enable price difference prompt on PO receiving toggle.
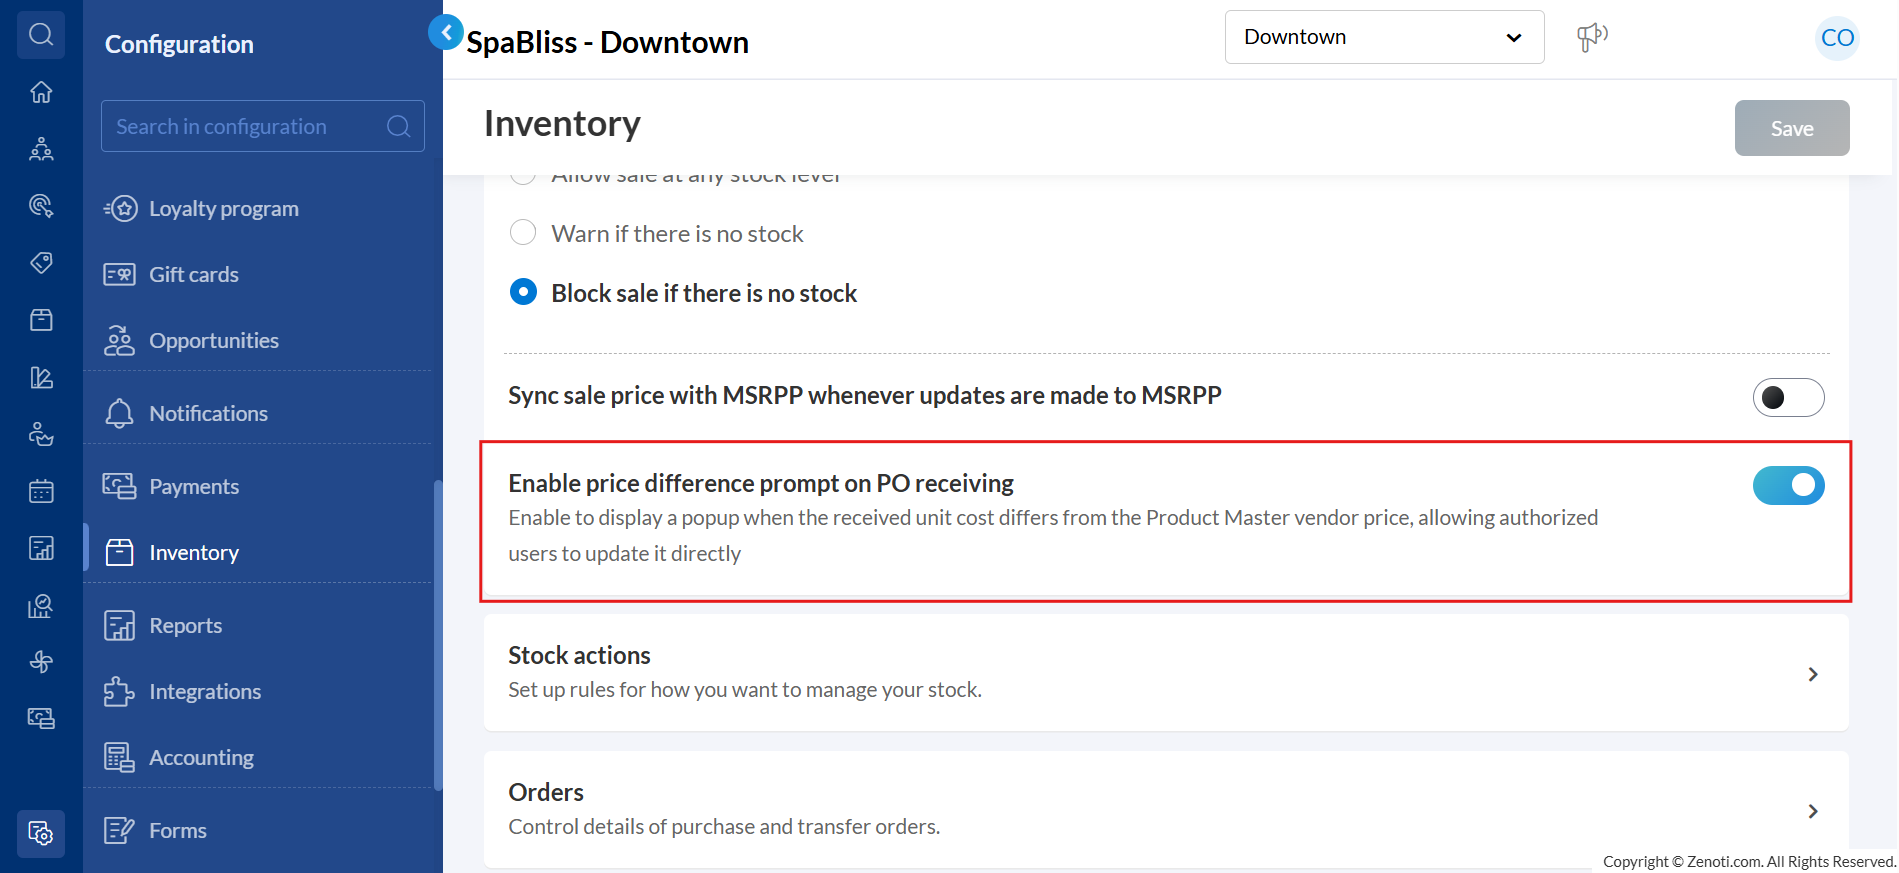
At the center level, navigate to Inventory > Orders and open the relevant PO.
Mark products as Full Delivery or Partial Delivery and enter the received unit cost.
If the received cost differs from the Product Master, a Price Difference Detected popup appears.
Review the list of affected products and select the ones to update.
Click Update Master Prices to apply changes.
Learn More: For more information, refer to the Set up essential inventory details article.
Administrators, Inventory Managers
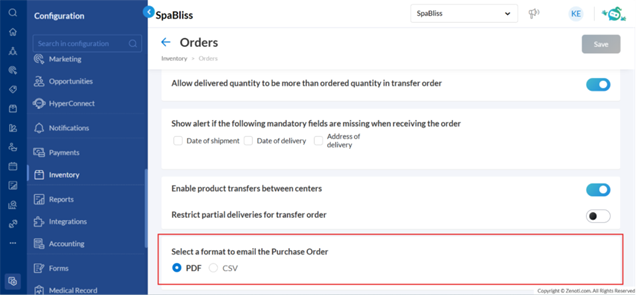
Customers who rely on accounting or inventory platforms often need Purchase Order (PO) data in CSV format for direct imports. This enhancement introduces a configuration that allows administrators to set the default PO email attachment format as either PDF (default) or CSV. This simplifies data exchange and removes the need for manual file conversions.
How to Use:
At the organization level, go to Configuration > Inventory.
Locate the Select a format to email the Purchase Order setting.
Select your preferred default attachment format: PDF or CSV.
Click Save.
The selected format automatically applies when emailing POs to vendors.
Learn More: For more information, refer to the Set up purchase order article.
Module: Zenoti Mobile
Service Providers
Employees can now view service revenue, the actual amount used to calculate commissions, directly within Performance tab in MyZen. This helps them track how their day, week, or quarter is going and understand how much more they need to earn to reach their targets.
Business Scenario: A stylist finishes a shift and checks the MyZen app. Within the Performance tab, they now see their service revenue, the actual earnings eligible for commission. They can filter results by day, week to date, or custom range. In the past, stylists only saw Service Sales, which included non-commissionable amounts such as shop costs and free services. This often led to confusion and made it difficult to track actual commissionable earnings. With this enhancement, stylists have a clear and reliable view of their performance, helping them stay motivated and focused on their goals.
How to Use:
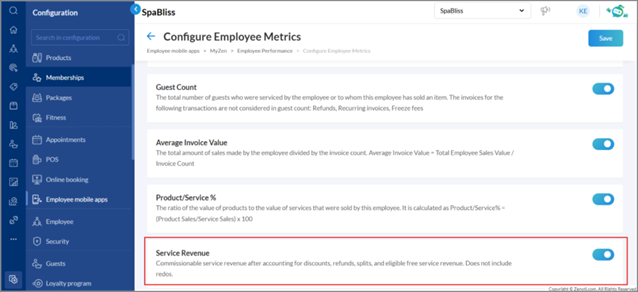
At the organization level, navigate to Configuration > Employee Mobile Apps > MyZen.
Click Configure Employee Metrics.
Turn on the metrics you want to display. Options include Service Sales, Product Sales, Membership Sales, Package Sales, Gift Card Sales, Rebooking Source %, Average Feedback, Requested Count, New Guest Count, Guest Count, Average Invoice Value, Product/Service %, and the new Service Revenue.
Click Save.
Navigate to MyZen > Performance to view Service Revenue alongside other KPIs.
Use filters (day, week-to-date, month, or custom range) to monitor commissionable revenue and track progress against commission slabs.
Track your performance and earnings in real-time throughout the pay period.
Module: Web POS
Front Desk Operator, Service Provider
Zenoti introduces a new setting, Auto-assign sale by to logged-in user for recommendations. It automatically gives sales credit to the team member logged in when an item is added through the recommendation flow. This improves tracking of recommendation-based sales while keeping standard POS workflows unchanged.
When this setting is enabled, the Sold By field is pre-filled with the name of the logged-in user whenever an item is added through recommendations at POS. This update:
Improves accuracy in tracking recommendation-driven sales.
Ensures fair incentive distribution among staff.
Maintains flexibility, since the Sold By field can still be edited manually when needed.
How-to use:
At the organization level, click Configuration.
Click Business Details > Business set up > Features.
Ensure the Show recommendations on POS toggle is enabled.
Note: The following setting appears only when this option is turned on.
Switch on the Auto-assign sale by to logged-in user for recommendations toggle.
Click Save.
Note
This setting is currently configurable only at the organization level.
If recommendations on POS are not enabled at the org level, this behavior remains off by default.
For more information, refer to the Streamline sales attribution for recommendations article.
Business Owner/Center Manager
Zenoti now supports guest search by room number for properties integrated with Opera Cloud PMS. This enhancement streamlines front desk operations by enabling faster check-ins, preventing duplicate profile creation, and improving accuracy in guest lookup.
Key updates:
Creates a guest profile in Zenoti automatically during check-in from Opera Cloud.
Enables room number search in the Appointment Book (bottom panel).
Returns only the most recent checked-in guest, even if the room has past check-ins.
Excludes checked-out guests from room-based search results.
Prevents duplicate guest profile creation.
Note
This feature is automatically enabled for businesses with Property Management System (PMS) integration.
If PMS integration is not enabled, guest search works as per standard functionality.
For more information, refer to the Integrate Zenoti with Opera cloud article.
Business Owner/Center Manager
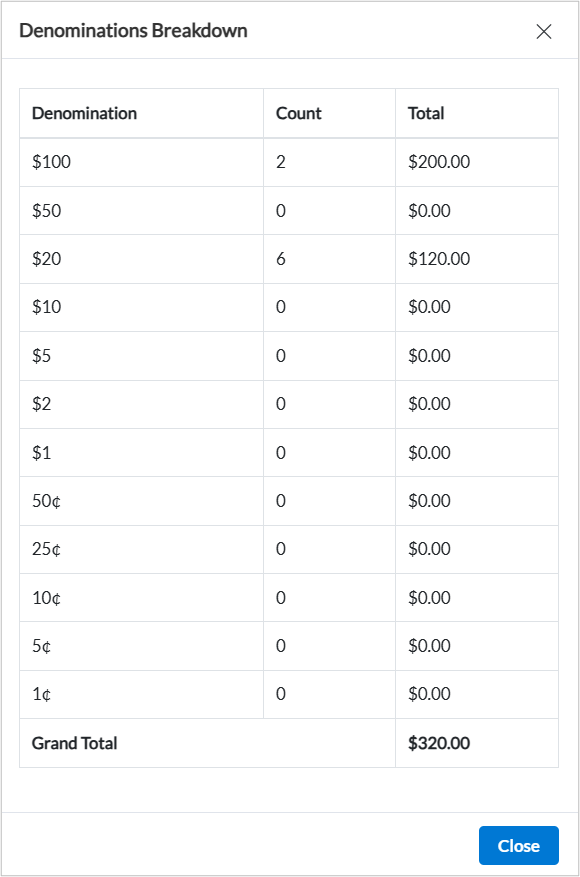
Zenoti has enhanced the Register cash counts report to provide managers with detailed visibility of all cash submissions including opening, mid-day, and closure along with denomination-level details recorded by the front desk.
From the report, managers can now:
View denomination-level breakdowns for each submission.
Drill-down by clicking values in the Actual amount fields.
Analyze submissions grouped by Center Name, Register Name, and Counted By.
How-to use:
At the organization level, click Reports.
Click Finance > Accounting.
Click Register Cash Count report.
In the Actual amount column, find the amount for the cash submission you want to review.
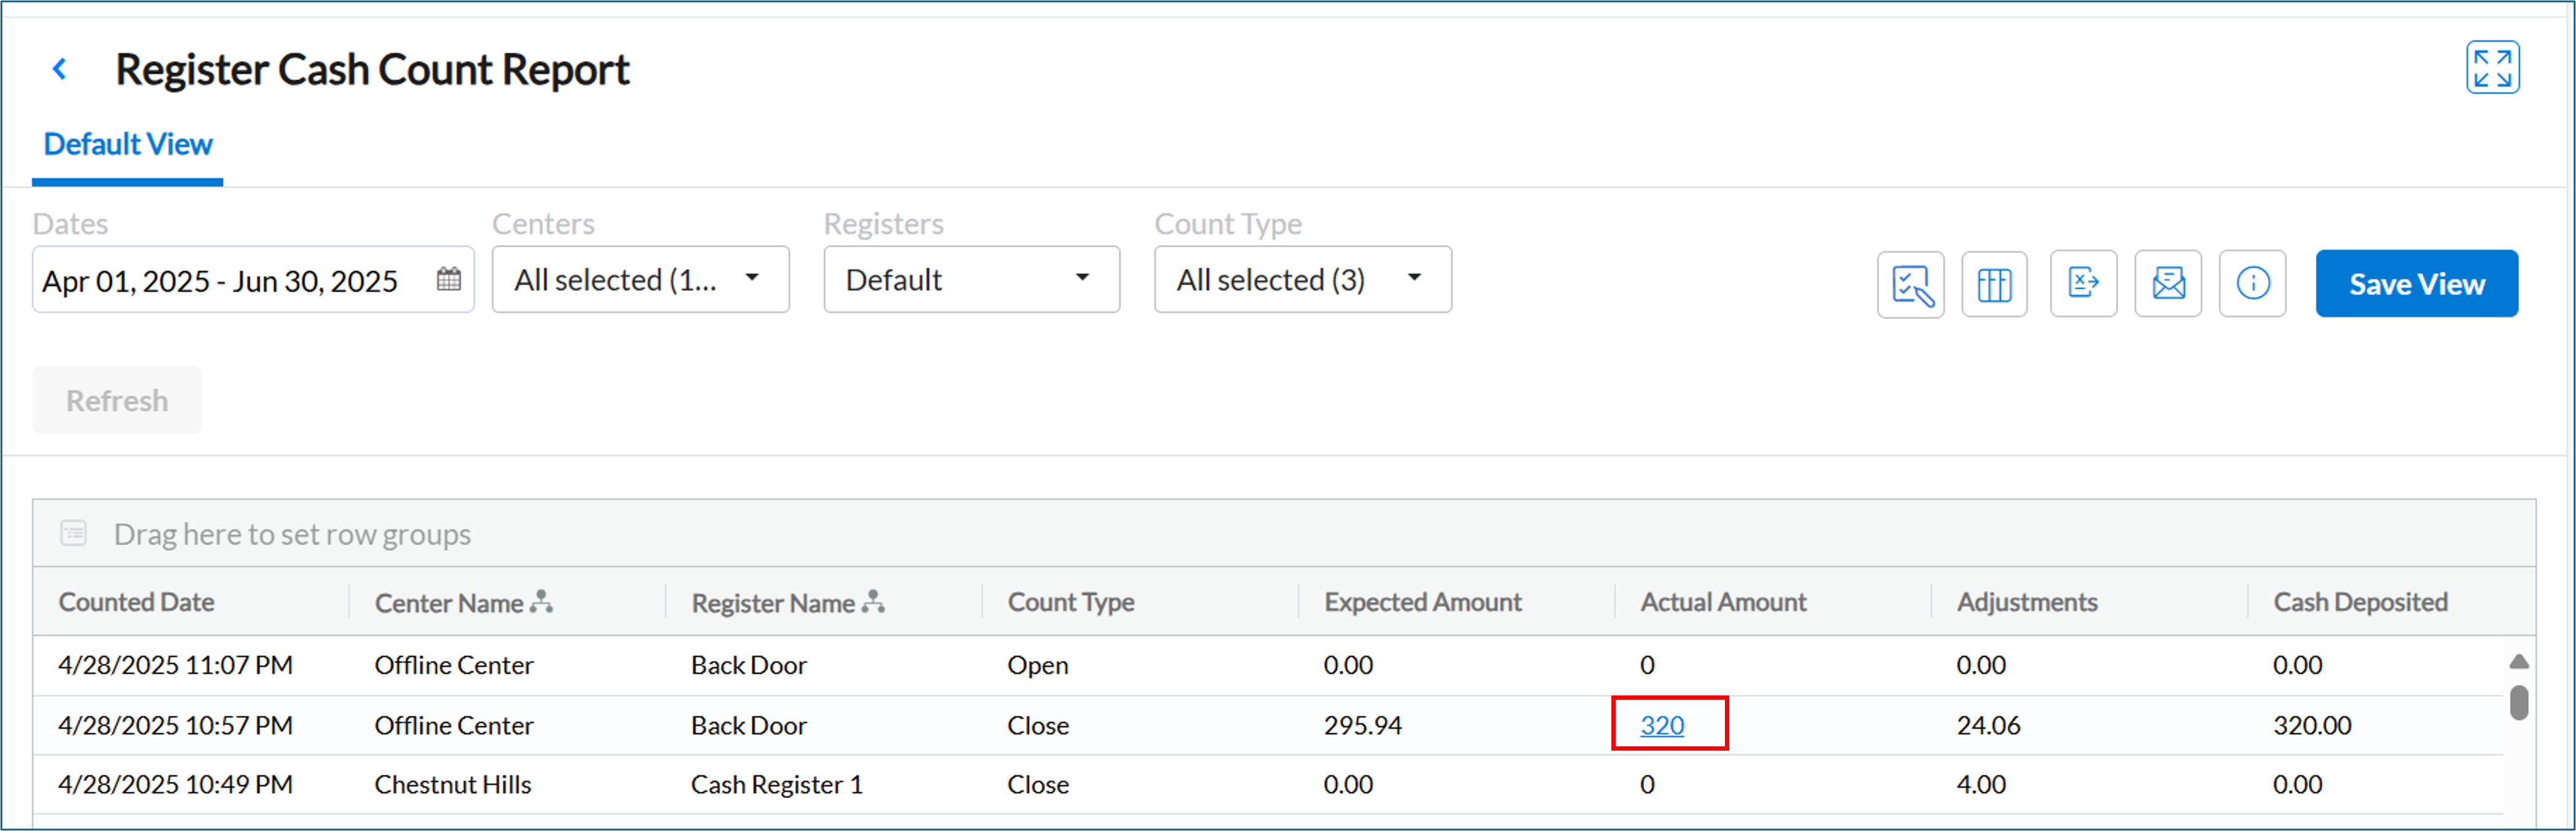
Click the value.
A pop-up appears showing the denomination-level breakdown for that submission.
Note
The clickable link will not appear if no denominations are saved.
For more information, refer to the Register cash count report article.
Module: Admin
Front Desk Operator, Admin
This new two-factor authentication (2FA) feature enables users to mark a device as trusted for up to 90 days., This reduces the need to enter 2FA codes each time they log in from the same device, making access faster while still maintaining security.
Business scenario:
Repeated 2FA prompts can disrupt workflows, especially on frequently used devices. With the new trusted device option, users can mark a device as trusted after a successful 2FA login. A trusted device stays active for up to 90 days, after which it expires automatically. Users can also manage or revoke trusted devices at any time. This balances convenience and security while improving efficiency for daily users.
Key details:
Trusted devices expire automatically after 90 days.
Any unrecognized device still requires full 2FA.
Manual revocation is supported.
Product Edition
Module: Marketing
Create target segments for guests with memberships that have not started Business Owners, Marketing Teams
You can now create target segments, based on memberships with the ‘Not started’ status. These target segments help you identify and engage guests who purchased a membership but have not yet used it.
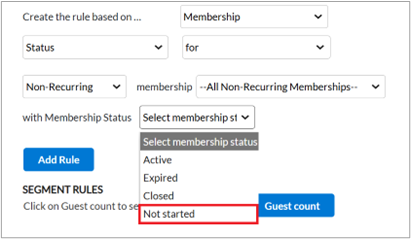
Key benefits:
Focus on unused memberships: Identify guests who purchased a membership but have not started using it.
Encourage early usage: Take proactive steps to help guests start using their benefits sooner.
Prevent churn: Reduce the risk of non-renewal by engaging guests before they drop off.
Boost revenue: Re-engage guests with offers or reminders that unlock upsell and cross-sell opportunities.
Increase Lifetime Value (LTV): Improve the chances of continued usage and renewal when guests begin early.
Note
This feature is enabled by default.
Learn More: For more information, refer to the Create a target segment article.
Target and engage guests with expiring or expired gift cards Business Owners, Marketing Teams
Zenoti now supports creating target segments based on the expiration status of guests’ gift cards. Segments can include guests with gift cards that are about to expire or those that have already expired. This feature enables businesses to engage guests at the right time, such as sending reminders to redeem gift cards before they become invalid.
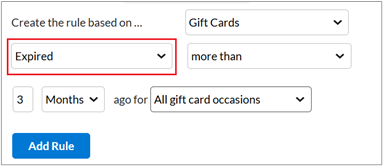

For example, a center can create a segment of guests whose Valentine’s Day gift cards will expire in the next 10 days. A campaign can then be sent to encourage those guests to book an appointment before the expiration date.
Key Benefits:
Boost revenue through upsells: Guests who redeem gift cards are often open to purchasing additional services or retail items, creating opportunities for upselling and cross-selling.
Strengthen guest relationships: Sending reminders shows guests you care, helping to build loyalty and encourage repeat visits.
Accelerate revenue recognition: Gift card revenue can only be recognized when redeemed, encouraging usage ensures timely revenue realization and healthier financial reporting.
Note
This feature is enabled by default.
Learn More: For more information, refer to the Create a target segment article.
Automatically retry failed WhatsApp campaign deliveries Business Owners, Marketing Teams
WhatsApp campaign messages that fail due to Meta’s engagement policies are now retried automatically. Zenoti retries delivery up to two more times, each 24 hours apart.
If delivery still fails after three attempts, the WhatsApp credit is refunded automatically. This helps protect marketing spend and improve guest engagement.
Meta enforces a healthy ecosystem policy that limits message delivery based on user engagement. If guests consistently ignore or block messages, Meta may temporarily restrict further delivery attempts. Read Meta’s documentation to learn more.
To work within this policy while still maximizing outreach, Zenoti's auto-retry mechanism ensures:
Increased delivery success: Additional attempts give messages a better chance of reaching guests once restrictions lift.
Optimized guest engagement: Retry timing aligns with Meta’s policies to re-engage users without spamming.
Reduced marketing waste: If all retries fail, Zenoti automatically refunds the WhatsApp credit, protecting your marketing budget.
Note
This feature is enabled by default.
Learn more: For more information, refer to the Create a campaign article.
Module: Payments
Administrator
The Payroll Register report now includes a new export format that provides a detailed breakdown of payroll components. This enhancement supports accounting workflows, simplifies reconciliation, and ensures accurate compliance reporting.
Business scenario: The enhanced Payroll Register Export delivers a clear breakdown of payroll data to simplify compliance and reconciliation. It includes:
Earnings – View all earning types, including separate tracking of tips for federal reporting.
Taxes – See employee withholdings and employer contributions side by side for accurate compliance and audits.
Benefits – Separate employee and employer contributions, and finalize vendor premiums.
This provides payroll teams with greater visibility, compliance readiness, and cost accuracy in one export.
How to use:
Navigate to Employee > Zenoti Integrated Payroll > Reports.
Select Payroll Register report.
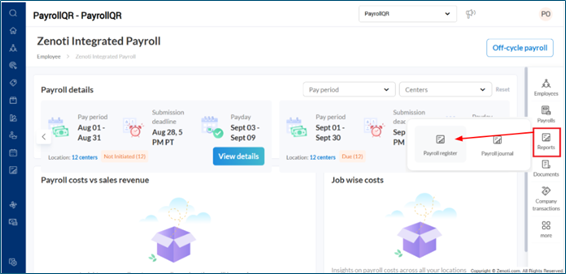
Select the relevant pay period.
Click Export and choose either CSV or XLSX format.
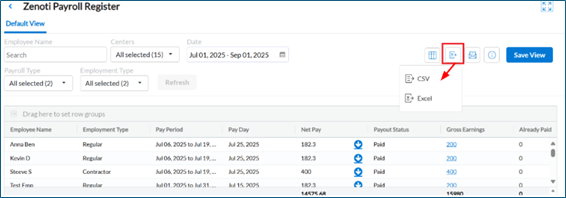
In the downloaded file, review distinct columns for earnings, taxes, benefits and other deductions.
Note: Totals are provided per employee and for the entire report for easy reconciliation.
Learn More: For more information, refer to the Access the Payroll Register Report in Zenoti Integrated Payroll article.
Add-On Product
Module: Photo Manager
Easily access appointment photos from Appointment Gallery Administrators, Business Owners, Service Providers
You can now access appointment-specific photos directly from the Appointment Gallery. Photos are available when viewing forms within the appointment block or when reviewing past appointment forms in the guest profile.
This enhancement streamlines access to appointment images by reducing navigation steps, improving efficiency, and supporting better guest communication.
Note
This feature is enabled by default.
This feature is available only on ZMA for tablets.
Learn More: For more information, refer to the View and Manage Appointment Photos Using the Appointment Gallery article.
Administrators, Business Owners, Service Providers
The Global gallery, previously available only in the Zenoti Mobile App (ZMA), is now accessible from the Web. This enhancement allows users to view, organize, and curate all photos in the Global Gallery directly from the Web, improving convenience and management capabilities.
How to use:
At the organization or center level, navigate to Medical hub > Global gallery.
Note
This feature is not enabled by default. Reach out to your CSM or Zenoti representative to enable this feature for your business.
Learn More: For more information, refer to the Curate and Showcase Treatment Photos with Global Gallery article.
Module: HyperConnect
Release Date: 16-09-2025
You can now control which events appear on the Center Timeline and Guest Timeline in HyperConnect. This helps reduce clutter and ensures staff and guests see only the most relevant information.
A center manager notices that front desk staff are distracted by too many timeline events, like reviews and voice interactions, when checking guest details. By customizing the timeline to show only appointments and purchases, the staff can focus on what matters most during check-in, making guest interactions faster and smoother.
How to Use:
Launch HyperConnect.
Click the Settings icon
Go to the General tab.
Scroll to the Customizable Timeline Events section.
You will find two areas: Center Timeline and Guest Timeline.
Use the checkboxes to choose which events to display.
For example, enable Appointments and Purchases while hiding Voice interactions or Reviews.
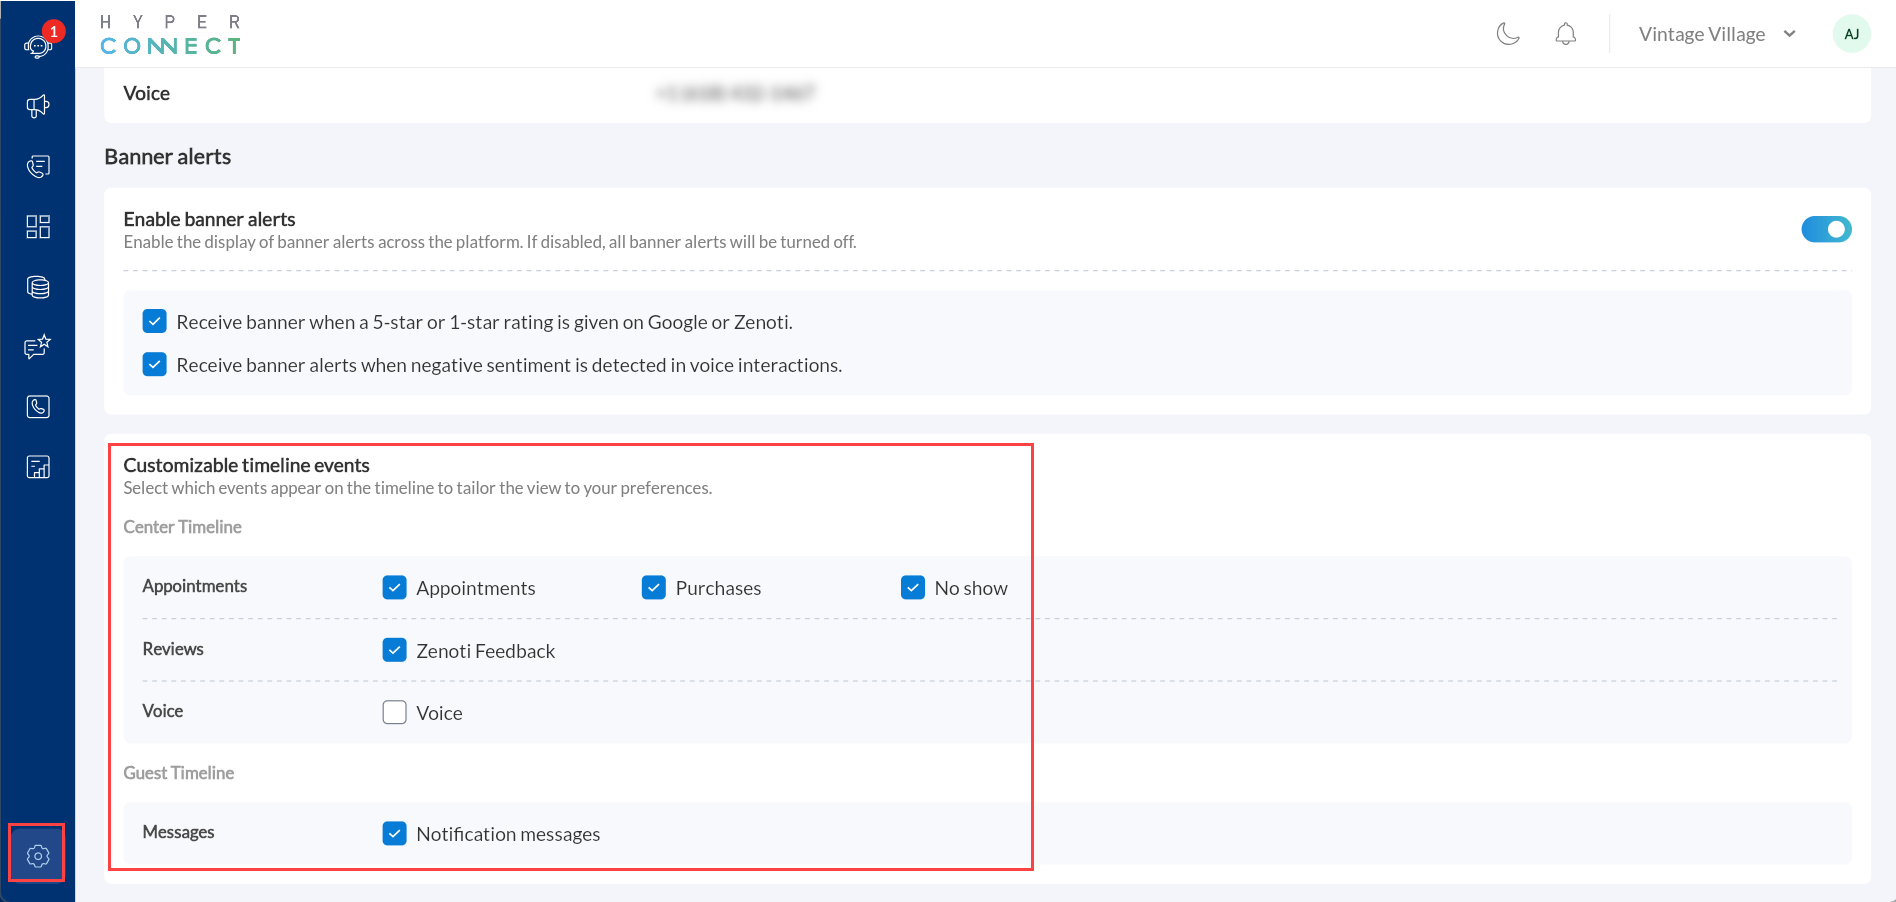
After making your selections, click Save to apply the settings.
Learn more: For more information, refer to the Customize Timelines in HyperConnect article.
Release Date: 16-09-2025
You can now link every appointment cancellation to a reason from your center’s predefined list. This makes cancellations easier to track, ensures accurate reporting, and helps you understand why guests are canceling.
If a reason is deactivated, the system will prompt you to choose a valid replacement before saving the cancellation.
A guest cancels their appointment last minute. Instead of leaving the record blank, the front desk selects “Guest is unwell” from the center’s list. Over time, managers notice many cancellations are tagged under “Scheduling conflict” and decide to offer more flexible rescheduling options to reduce drop-offs.
How to Use:
Launch HyperConnect.
Click the Settings icon.
From the Messaging tab, switch on the Honor Cancellation Policy toggle.
Under Cancellation Reason, click the dropdown next to Choose Reason.
Select an active cancellation reason to apply to cancellations.
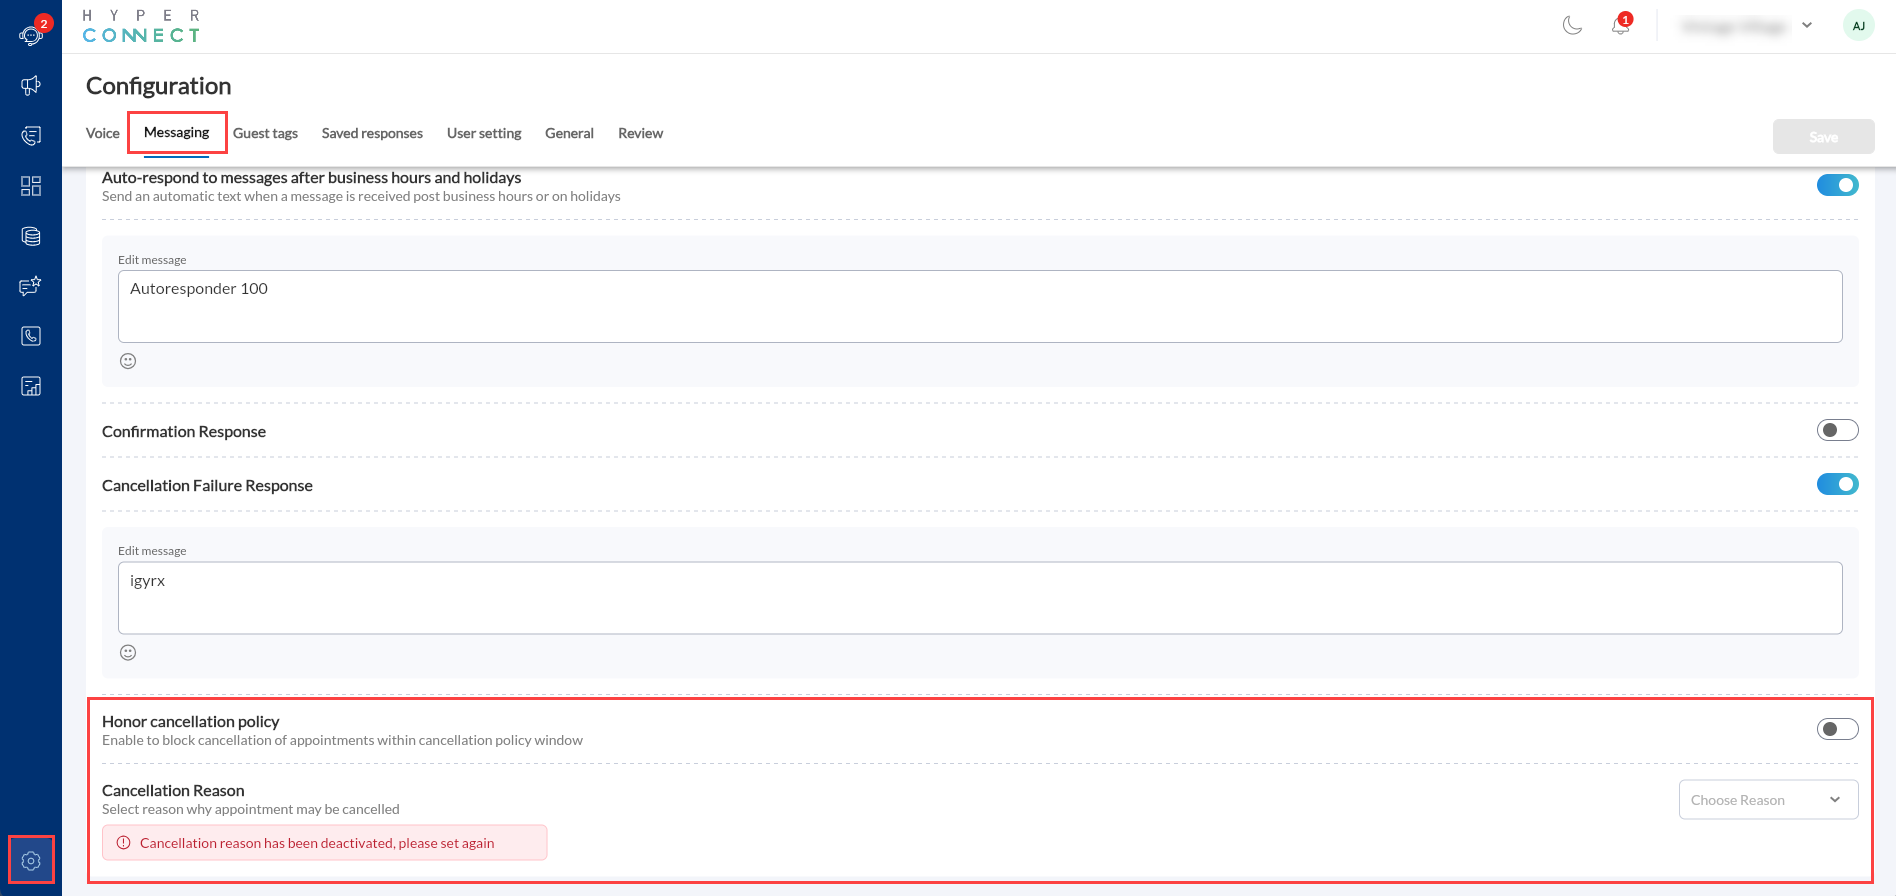
Click Save.
Learn more: For more information, refer to the Honor Cancellation Policy article.
Additional Resources
This section includes recently published patch release notes and a comprehensive up to date glossary for your reference.
Release date | Document type |
|---|---|
August 12, 2025 | |
July 22, 2025 | |
N/A |