Manage domains
A domain name is a unique web address that helps users find your website, it is like a website’s equivalent of a physical address. For example: www.serenityspa.com
When a user enters a domain name in a browser, a global network of Domain Name System (DNS) servers looks up the associated IP address and web server. The web server then retrieves the requested data and presents it as a web page to the user.
A domain name can be a combination of letters, numbers, and hyphens and can be up to 63 characters long.
Note
Domain names cannot start or end with a hyphen, and they cannot have consecutive hyphens.
Add and verify a domain
At the organization level, click the Configuration icon.
To configure outbound email, search for and select the Customize outgoing email addresses setting from the Business details section.
Click the Customize outgoing email addresses link.
In the Domain you send From box, enter the name of the domain and the domain extension such as .com, .net, .org, or .info.
To configure advanced settings, expand Advanced Settings.
Your IT admin or webmaster will help you set up these settings:
Use automated security: Select this checkbox to allow Zenoti to handle DKIM (Domain Keys Identified Mail) signing and SPF (Sender Policy Framework) authentication of outgoing emails with CNAME records.
Use Custom return path: Select this checkbox to allow Zenoti to use a custom return path for bounced emails.
Use custom DKIM selector: Select this checkbox to use a custom DKIM selector to authenticate a domain multiple times by adding the custom selector as a custom subdomain to the main domain.
Click Next.
Click Verify.
You can add multiple domains.
Install and verify DNS records
After adding the domain, the Domain Verification screen appears.
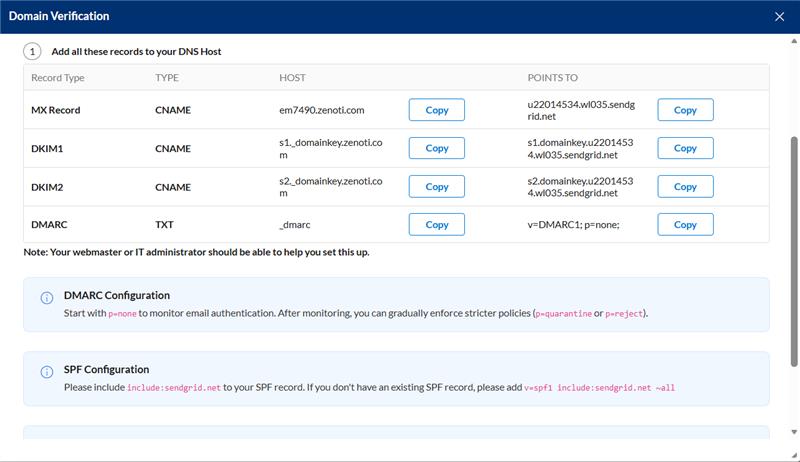
Under Add all these records to your DNS Host, you will see the required DNS records:
MX Record (CNAME)
DKIM1 (CNAME)
DKIM2 (CNAME)
DMARC (TXT)
For each record:
Copy the Host value.
Copy the Points To value.
Log in to your domain hosting provider (GoDaddy, Google DNS, Cloudflare, etc.).
Create a new DNS record with:
The specified Type (CNAME or TXT)
The copied Host
The copied Points To value
Save the record.
Note
Your IT administrator or webmaster can help complete this step.
Avoid duplication in Google DNS: If you use Google DNS, the Host portion of the records duplicates the domain. For example, if Zenoti asks to have em3456.serenityspa.comas part of a CNAME record, and this is pasted directly into the Google DNS field, the actual string that gets written to the server is em3456.serenityspa.com.serenityspa.com, and therefore will not get verified.
Copy CNAME host values correctly: If the CNAME host is em4123.zenoti.com, you should only enter em4123.
Once all DNS records are added:
Return to Zenoti.
Click Verify to check if your DNS records have been configured properly.
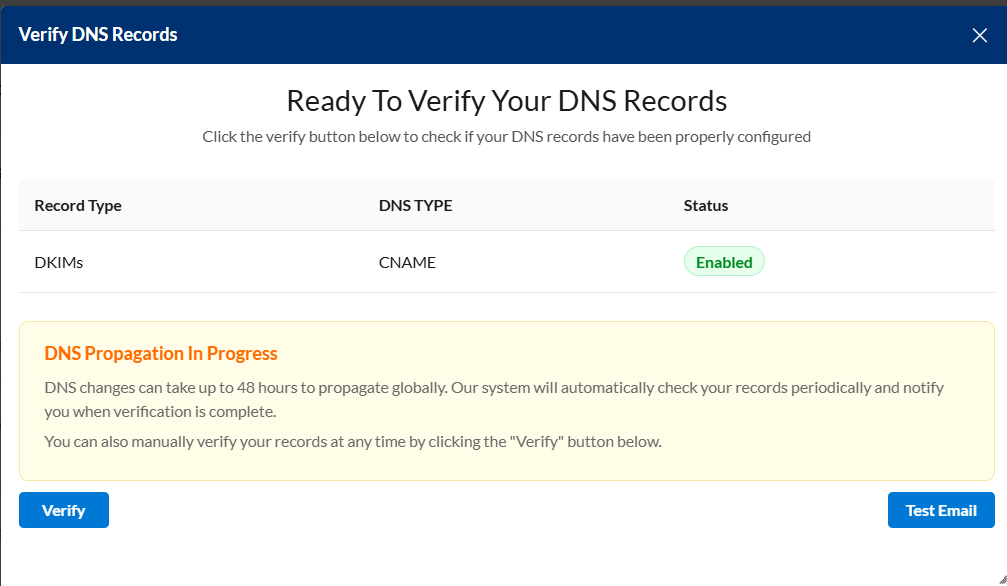
Note
There are two possible DNS verification statuses.
Missing: DNS records have not been detected yet.
Enabled: DNS records are correctly configured.
In case DNS status is missing, here is what can be done.
Click Verify again to manually recheck.
Wait for automatic verification.
Once enabled, click Test Email to confirm email delivery.
Configure outgoing emails
After the DNS records are verified, you must configure the sender name and email for marketing, transactional, and OTP emails.
To allow centers to reconfigure the sender names and sender emails, select the Allow center to override the sender email settings checkbox.
Note
If you disable Allow center to modify sender email settings it will result in deleting center-specific sender names and emails configured for marketing, transactional, and OTP emails. This also means that sender names and sender emails set at the organization level will be restored.
Click Save.
Delete a domain
At the organization level, click the Configuration icon.
Search for and select the Customize outgoing email addresses from the Business details section.
Click the Customize outgoing email addresses link.
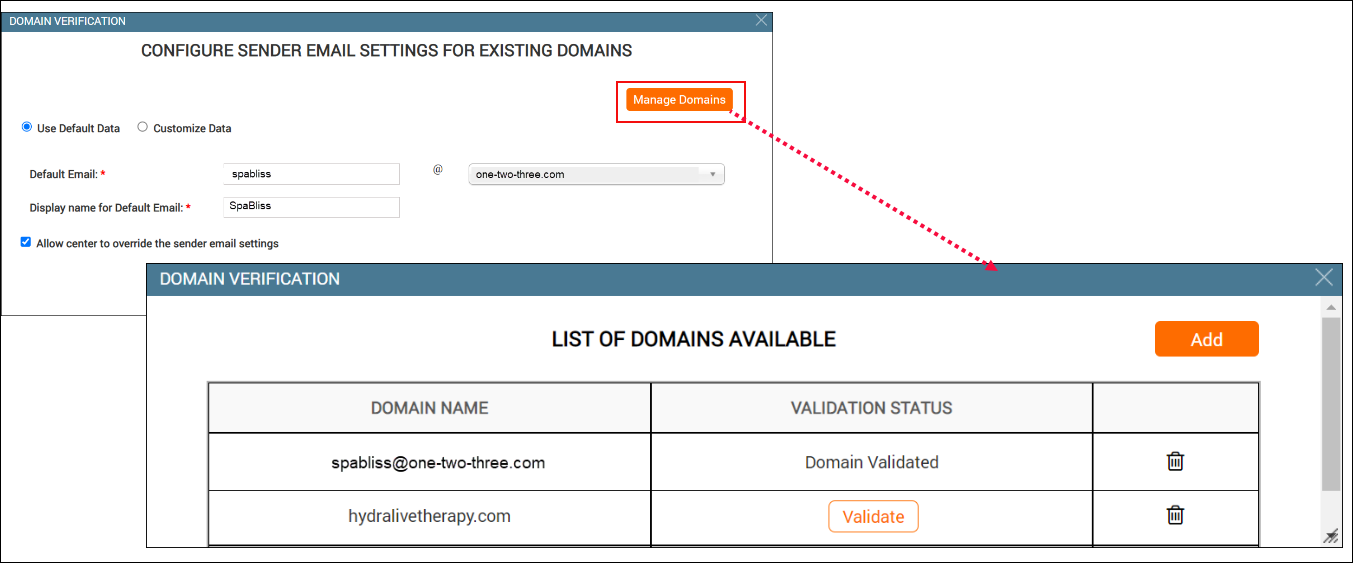
Click Manage Domains.
Click the delete icon.
Configure sender name and sender email at center level
Businesses can have multiple domains to send outbound emails to guests. A simple, straightforward domain name helps guests identify the email sender.
Important
Important: For marketing, transactional, and OTP emails, Zenoti follows the following configuration hierarchy:
Center level: Zenoti first checks for email settings at the center level. If there are settings at this level, these are used for sending emails.
Organizational level: If no center-level configuration exists, Zenoti looks for settings configured at the organizational level. These settings apply to all centers within the organization.
Default sender: If neither center-level nor organizational-level settings are configured, Zenoti sends these emails from the default sender name and email address: noreply@zenoti.com.
Prerequisites
Ensure that your organization has created the required domains and registered the DNS records.
Ensure that your organization allows centers to configure sender names and sender emails. If not, reach out to your head office.
Retain organizational-level settings:
At the center level, click the Configuration icon.
Search for and select the Customize outgoing email addresses setting from the Business details section.
To retain organization-level settings, select Use Organization Data.
View the sender names and sender emails from where you want to send the marketing, transactional, and OTP emails.
The organizational level configurations will be considered and center-level configurations, if any, will be deleted.
Click Save.
Override settings for your center:
At the center level, click the Configuration icon.
Search for and select the Customize outgoing email addresses setting from the Business details section.
Select Customize Data and specify if you want to configure only one sender name and email for all emails or a different sender name and email for marketing, transactional, and OTP mails.
Select one of the following:
To send emails from a single email address select Use Default Data, and enter the Default Email and Display name for Default Email.
Note: Any customized data is deleted if you choose to retain default data.
To send emails from a separate email address, enter details for Email for marketing emails, Display name for marketing emails, Email for transactional emails, Display name for transactional emails, Email for OTP emails, and Display name for OTP emails.
Click Save.