Create a campaign
You can create personalized campaigns across different channels such as email, SMS, and push notifications. You can create two types of campaigns from this page:
Always-on Campaign: Always-on campaigns are automated and hands-free that assess the target segments on a daily basis and trigger campaigns when the criteria are met. In addition to the standard campaign creation flow, goal-based always-on campaigns are designed to drive revenue, bookings, and overall business growth Learn more.
Scheduled Campaign: Scheduled campaigns are pre-planned marketing campaigns that are sent out at specific times as a one-time blast.
Create Email/Text campaigns
Create and publish email campaigns
Prerequisites:
Ensure that you have the Send/Schedule Email Campaigns permission.
Note
If you do not have this permission, you can still create an SMS campaign, but you cannot publish it (send or schedule).
Ensure that you have consent from guests to receive email campaigns as per TCPA.
Ensure that you have a physical address added for your center. This is very important since, as per CAN-SPAM compliance, any marketing emails that you send to your guests must include the business's physical address. Violating this law can result in a huge penalty of up to $42,530.
Click here to learn more about the best practices for email marketing.
At the organization level, navigate to Marketing > Campaigns > Email/Text Message.
Select one of the following:
Add Scheduled Campaign: Add a scheduled campaign that lets you send an email on a scheduled date and time.
Add Always on Campaign: Add an always-on campaign that lets you set up a series of emails and then let Zenoti send them out at the right time to the right customers.
Enter the campaign information.
Click Done.
Select Email Message as the communication channel.
Click Done
Select the campaign type as Announcement .
Note
When you launch a scheduled or always-on cashback campaign, Zenoti prints an auto-generated coupon number and a default coupon text: 'Cashback of $ [amount]' on the receipt of the eligible guest. You can customize the text as per your need. If you want to include the cashback in your customized offer text, insert the macro: [CashbackValue] in it. For example, if your offer text is: ‘You have earned a brow wax worth [CashbackValue]!’, it reflects on the receipt as ‘You have won a brow wax worth $25!’.
To know more about the macros you can include for your text or email campaign, read: Macros to Customize your Email/Text Campaign
The Revenue attribution configuration toggle is switched on by default, and allows you to track revenue generated from this campaign once it goes live. Refer to this section for steps to configure revenue attribution.
Click Done.
Select recipients.
Click Done.
Click Done.
Enter campaign info
In this section, enter the following information:
Field | Description |
|---|---|
Campaign Name | Enter a name for the campaign. |
Offer Code | Enter an offer code, such as SUMFRESH, that guests can use to avail the offer for online purchases. |
Description | Enter an appropriate description. |
Revenue attribution configuration
To define how long the attribution rules will apply after the campaign delivery, enter the number of days in the Attribution Time Frame field. This value should be between 1 and 30 days.
Note: The Attribution Time Frame is set to 14 days by default.
To specify which items are eligible for revenue attribution, click the plus icon to add mandatory or optional rules. You can add up to 5 mandatory rules and 5 optional rules.
By default, a mandatory rule is added with the item type set to "Service" and the item group type set to "All."
On the Add rule window, choose the Item type and subsequent values according to your selection.
To specify whether a rule should be mandatory or optional for revenue attribution, select the Mandatory rule for revenue attribution checkbox as appropriate.
Click Save.
You can track revenue attributed from the marketing dashboard and the campaigns effectiveness report.
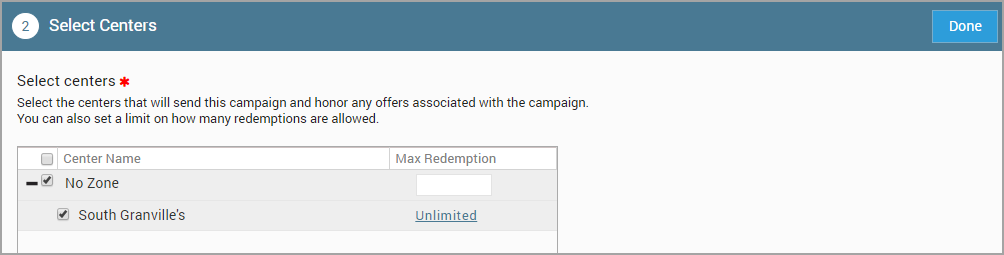
Select recipients
In this section do the following:
Field | Description |
|---|---|
Center Name | Select the center for which the campaign is applicable. |
Max Redemption | Enter the maximum number of times the offer can be redeemed at the selected center. |
Target Segment | Select a target segment from the drop-down list. You can get the exact number of guests in the selected target segment by clicking Count. To create a new target segment, click Create target segment. You can create a custom target segment on this page directly. |
Send campaign to the guest only once in | Select the check box and then enter a number to set a duration of how many times you want the guest to receive the campaign. For example, if you select the checkbox and enter the number 60, the guest receives the campaign once every 60 days. |
Scenario 1
Assume you create a 10% discount campaign (valid for 30 days) for a target segment of guests whose birthday is in a week from today (say July 16). In the Campaign, if you set the same target segment for the Target Segment Billing field then, a guest who visits your place after a week from the birthday (say July 23) will not be able to use the discount.
Scenario 2
Assume you create a 15% discount campaign for guests who spend up to $5000 in a single visit and sent out the email to a wider audience. If you selected the Target Segment Billing as 'Guests who spent $5000+' then, all the guests who received the email and have billed $5000 may not get the discount.
To handle such scenarios, we recommend you to set Target Segment Billing as 'All Guests' so that the guests who received the campaign email can use the benefit.
Scenario 3
Create an email campaign to remind guests of the cancellation and no-show policy of a business.
At the organization level, navigate to Marketing > Campaigns .
Select Email/Text Message and click Add Scheduled Campaign.
Provide the details of the campaign and select the appropriate communication channel. For more information, refer to create a campaign.
Select Campaign type as Announcement.
Select the target segment to whom you want to share the cancellation and no-show policy of your business. For more information, refer to create a target segment.
Customize the content of your campaign using the rich-text editor.
After adding all the necessary details, set the campaign live.
Create the content
You can use one of the following options to create an email campaign:
Use the available template within Zenoti
Use an external HTML code (outside Zenoti)
Note
You can create your own email template at the organization or center level. However, at the center level, you cannot delete an email template that was created at the organization level.
Select a preferred layout of your email template.
The available options are Basic Layout, Themed Template, and Custom Template.
To know more, refer Email Campaign: Select a Template.
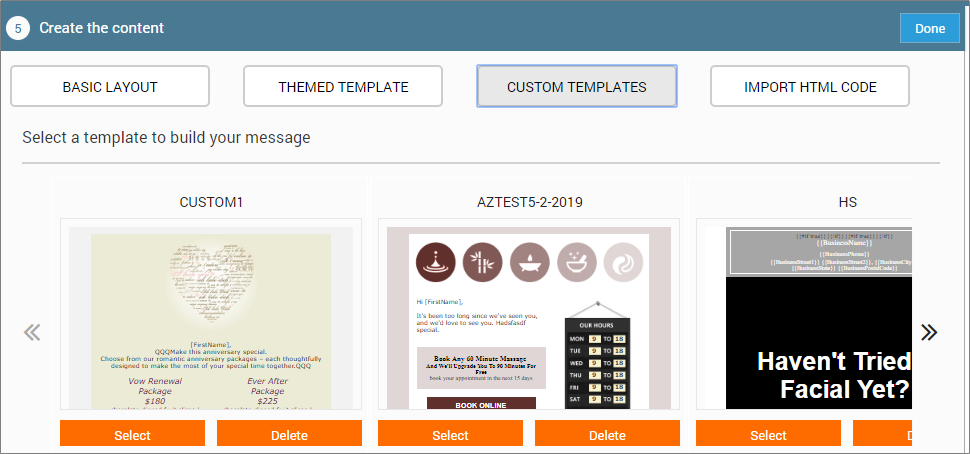
To use a template, click Select.

To select the device for which you want to design the content, use the following icons.
Edit the content by using the available tools.
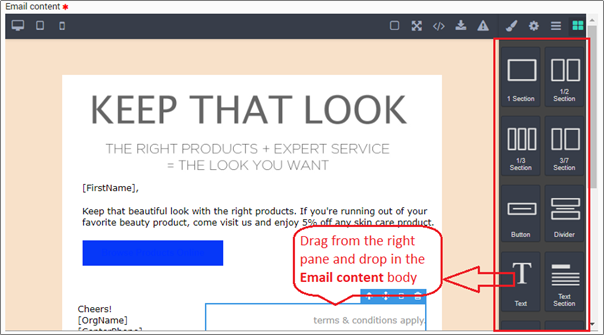
Insert the [CenterAddress] macro or enter the physical address of your center. As per CAN-SPAM compliance, this is mandatory for any business operating in the US. To make changes within the template, click the cell and select the icons that appear on the top of the Email content field, as required.
Important
Violating this law can result in a huge penalty of up to $42,530.
Use any of the available macros to customize your email/text campaign. You can also include custom macros in your content. To make inline changes to the cell, such as select the parent cell, move, duplicate, or delete the cell, click the cell, and select the respective icons that appear in the top right corner.
After you are done with the edits, proceed to the final step in creating the Email campaign: Save and Finish.
If you want to save this email template for future use, click Save as Custom Template. Give a name to the template and Click Save.
If you have created an HTML page as per your style standards, then do the following:
Click the Import template icon.
Copy the HTML code from the source and paste it in the Email Content field.
Click Preview to see how the email appears to the recipient.
Click Send Test Mail and enter an email address to send a test email before you send out a campaign to your guests.
Click Done.
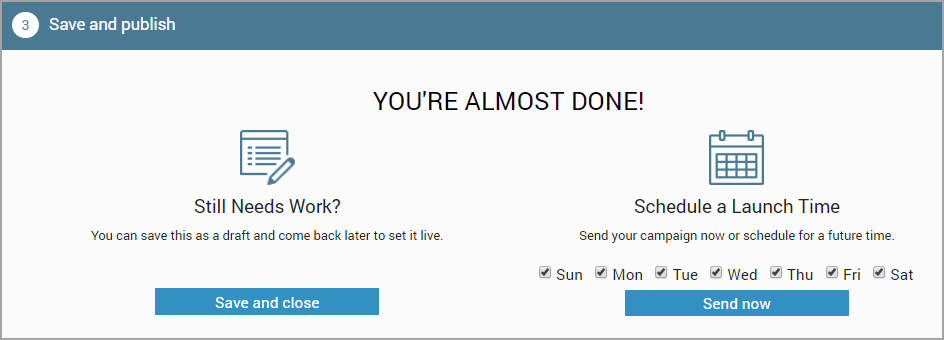
Save and publish
Click Save and Close to save the campaign as a draft.
Click Send Now to send out the campaign.
Click Schedule to schedule the campaign for a future date and time.
When you click either Send Now or Schedule, if the following Alerts dialog box pop up, it means that you have not added the [CenterAddress] macro in the email content.

If you have entered the address manually in the email content, click Acknowledge and Proceed. Otherwise, click Cancel and Go Back to enter the address manually or add the [CenterAddress] macro.
As per CAN-SPAM compliance, this is mandatory for any business operating in the US.
Important
Violating this law can result in a huge penalty of up to $42,530.
Option for guests to unsubscribe from the emails
Zenoti automatically includes an option to unsubscribe, at the end of every marketing email sent to the guest. When a guest chooses to unsubscribe, Zenoti records their response and ensures that the guest will not be included in the mailing list.
Guest will not receive any notifications, even if they are eligible for special offers or discounts.
You can create text and option to unsubscribe along with a link as shown in the following example:

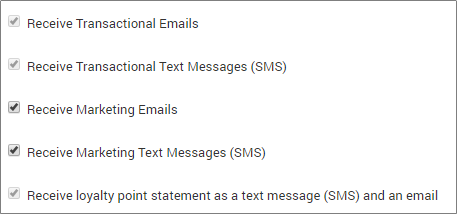
Resubscribe guests to notifications
If a guest wants to receive the emails again, turn on the checkboxes (shown in the image) in the Guest profile:
Create an email discount campaign
Tip
An email discount campaign involves sending out the discount that you have created to a targeted set of customers in an email. As an example, let’s see how we can go about creating an email campaign to reach out to guests who have not visited you in a while.
Based on your role, at the organization or center level, click the Marketing icon and navigate to Campaigns > Email/Text Message.
The Email/Text Message Campaigns page appears.
Click Add Scheduled Campaign.
The Create New Email/Text Message Scheduled Campaign page appears.
Start by entering the campaign name. For example, Welcome Back. The name that you enter in this field appears in POS for the front desk to apply the discount.
Enter the campaign code in case your business has online booking enabled, and if you want to give your guests a promo code that they can apply during check-out on CMA or Webstore. For example, WBS10P15.
Enter an optional description (a campaign targeting lost guests that provides 10% off on services and 15% off on products).
Expand the Communication channel section and as we are creating an email campaign, and leave the Email Message option unchanged.
Expand the Campaign type section and select the campaign type as Discount.
In the additional options that appear, select the discount. For this example, select the 10% discount on services and 15% discount on products.
To restrict the number of times the campaign can be used by a guest, enter a number in the Maximum number of times this campaign can be applied on a guest.
If you enter 1, a guest can use the discount from the campaign only once. If you leave this option blank, the guest can use the campaign any number of times.
To specify any pre-requisites such as date of the appointment, validity of the campaign, and the minimum or maximum spend on the invoice., enter the details under Prerequisite for applying the campaign in POS.
In the Offer is valid for X days field, enter the number of days that you want the discount campaign to be valid. You can now use the [OfferValidityDate] macro in the campaign body to inform your guests of the expiry date of the campaign.
Expand the Select the recipients section to select the eligible guests who will receive the email.
Based on your role, the centers you can select vary. The campaign will be sent only to the eligible recipients of the centers you have selected.
Select the desired target segment. As we are creating a campaign to reach out to guests who have not visited for a while, select the last guest target segment.
Select the desired options to specify if the front desk can apply the campaign to all guests, only the guests who received the campaign, or any guest who is in the target segment.
Note
To view the number of guests who will receive this campaign, click Count.
To limit the campaign to online bookings, select the Limit to online and mobile bookings option.
Expand the Create the content section to create content using the editor, or use and edit one of the pre-defined templates, or import an HTML code.
When you select a template, the template loads in the email editor.
Make changes to the template in the editor, such as replace or add images and links, or personalize content by editing the text. Learn more about the email editor.
When you are done, you can preview the content or send a test email.
Expand the Save and publish section and click Send now to set the campaign live right away.
The discount campaign is sent successfully.
Send open slots availability through email campaigns
Guests who regularly visit your center, might be eager to know about the booking availability at your center. The idea of sending out an email to them about the available slots for the next 30 days (for example), will help them plan an appointment with you.
You can create the available-slots emails at center or organization level, depending on your business need. Navigate to Marketing > Campaign > Email/Text Message. Decide whether to create a scheduled campaign or Always on Campaign.
Enter Campaign Info: Give a name to the campaign, enter the offer code especially if you are offering any discount, loyalty points, or cashback. Enter a description about the campaign such as ‘Email to communicate available Slots for non-member regular guests’.
Choose Communication Channel as ‘Email’.
Choose Campaign Type: Your slots availability email can be just a simple announcement or a campaign offering discount, loyalty points, or cashback.
Configure Open Slot Availability
Enable open slots availability checkbox: Whatever be the campaign type, if you want to send out the available slots email to the targeted guests, select the checkbox.
Minimum no. of slots: Enter the minimum number of open slots that should be available to run the campaign. For example, if you enter 5 then, email will not be sent unless there are at least 5 open slots.
Show availability for next n days: Enter the maximum days until which you want to show the availability. For example, if you enter 30, the email is sent to the guests only if there are 5 open slots available for the next 30 days.
Slot interval that has to be displayed in the content: Select the slot period you want to display to the guest. For example, if you select 1 hour then, open slots of one hour duration are shown in the email content. Note that the email is sent to the guests only if there are at least 5 slots of one-hour duration each, are available in the next 30 days.
Select a service, a category, or a tag:
If you want to keep the open slots generic then, select ‘Any Service’.
If you want to announce for specific services only then, select ‘Belongs to category/subcategory/specific service’. A text field appears; In the text field, enter name of a category, subcategory or a specific service.
If you want to announce slots by tags, select ‘With Tag’. A text field appears; on clicking the text field, you can see the list of tags in Zenoti.
Select one or more tags as per need.
Select Recipients: Select the center(s) and the target segment to whom you want to send out the email.
Note
To get the exact number of guests in the selected target segment, click Count.
Select Send campaign to the guest only one time in n days checkbox, to ensure that the open slots email is not sent too frequently to the guests.
Create Content: To the email content, add two macros:
[BookingUrl]: Url that takes the guest to the booking page (your website or Zenoti Webstore services listing page).
[OpenSlots]: This macro shows date and time of available slots. For example, it shows Sept: 12: 11am, 2pm, 7pm, 8pm Sept 13: 10am, 12pm, 2pm, 3pm. To learn more about the macros used for email campaigns, read: Macros to Customize Email/Text for your Campaigns
Schedule or Always on the Campaign: You can schedule to send the campaign on a particular day (Scheduled) or run the campaign on only selected days in a week (Always on).
Email campaign will be sent to the guests in the target segment.
Note
Guests who have unsubscribed from the marketing emails will not receive the email campaigns.
Create and publish SMS campaigns
Tip
You can create SMS (text messages) campaigns and send announcements or promotional offers as text messages to your guests.
Ensure that you have the Send/Schedule SMS Campaigns permission.
Note
If you do not have this permission, you can still go ahead and create an SMS campaign, but you will not be allowed to publish it (send or schedule).
Ensure to take consent from guests to send SMS campaigns as per TCPA law.
Caution
Zenoti strictly prohibits cannabis-related terms, images, or promotions in messaging content in accordance with the federal regulatory guidelines in USA. Violating this policy may result in your account being blocked.
Zenoti is not responsible for any penalties, account restrictions, or other consequences of non-compliance.
For detailed guidelines, refer to the SMS and MMS policy on cannabis and CBD-related messaging.
Navigate to Marketing icon > Campaigns > Email/Text Message.
Based on your requirement, Add one of the following campaigns:
Add Scheduled Campaign: Scheduled campaigns let you send a text message on a scheduled date and time.
Add Always on Campaign: Always on campaigns let you set up a series of text messages and then lets Zenoti send them out at the right time to the right customers.
Depending on your selection, either Create Scheduled Campaign or Create Always On Campaign page opens.
Click Done.
Select the communication channel as Text Message (SMS).
Click Done.
Choose a campaign type: Announcement, Discount, or Cashback.
Click Done.
Click Done.
Click Done.
Note
When you launch a scheduled or always-on cashback campaign, Zenoti prints an auto-generated coupon number and a default coupon text: 'Cashback of $ [amount]' on the receipt of the eligible guest. You can customize the text as per your need. If you want to include the cashback in your customized offer text, insert the macro: [CashbackValue] in it. For example, if your offer text is: ‘You have earned a brow wax worth [CashbackValue]!’, it reflects on the receipt as ‘You have won a brow wax worth $25!’.
Enter campaign info
In this section, do the following:
Campaign Name | Enter a name for the campaign. |
Offer Code | Enter an offer code, such as SUMFRESH, that guests can use to avail the offer for online purchases. |
Description | Enter an appropriate description. |
Note
When you launch a scheduled or always-on cashback campaign, Zenoti prints an auto-generated coupon number and a default coupon text: 'Cashback of $ [amount]' on the receipt of the eligible guest. You can customize the text as per your need. If you want to include the cashback in your customized offer text, insert the macro: [CashbackValue] in it. For example, if your offer text is: ‘You have earned a brow wax worth [CashbackValue]!’, it reflects on the receipt as ‘You have won a brow wax worth $25!’.
Select recipients
In this section do the following:
Select the centers for which the campaign is applicable.
Select the target segment.
Note
To get the exact number of guests in the selected target segment, click Count.
(Optional) Select the check box Send campaign to the guest only one time if you want a guest to receive the campaign text message only one time.
Click Done.
Create content
In this section do the following:
In the Plain text message field enter the text for the campaign.
To generate ideas for your message, enter the required keywords and click Generate Ideas. Select a tone and choose from the recommendations displayed. To add the selected content snippet, click Insert .
To add images to your message, click the plus icon from the Upload Media section.
Note
MMS marketing feature is only available for customers in the USA and Canada. If the configured number at the center or organization level does not have the MMS capability, then you will not be able to create an MMS campaign.
You can only upload files in either JPEG or PNG format. You can also upload up to five images with the total file size not exceeding 5 MB.
MMS message will consume double the credits compared to sending an SMS. For example, if sending a 100-character SMS costs 1 credit, sending a 100-character MMS will cost two credits. The number of credits consumed will be the same whether you upload one image or five images.
For a preview of how the MMS appears to the recipient, it is recommended to send a test MMS.
Alternatively, you can select the desired macros from the Macros list.
(Optional) Click Send Test SMS and enter a mobile number to send a test message before you send out a campaign to your guests.
Click Done.
Save and publish
Click Save and Close to save the campaign as a draft.
Click Send Now to send out the campaign.
Click Schedule to schedule the campaign to a future date and time.
Important
Zenoti starts delivering the campaign messages to SMS providers at the scheduled time. However, your guests may not receive your campaign messages immediately. This delay occurs due to several external factors that are beyond Zenoti’s control.
If you have included any blocked keywords in your campaign, a warning message appears here, prompting you to remove them. To proceed, you must remove the blocked keywords from the campaign.
Subscribe/Unsubscribe to SMS notifications
Businesses must allow guests to choose if they wish to receive marketing SMS.
Based on the guest's preference, the front-desk staff can turn on or off the Receive Marketing Text Messages (SMS) checkbox on the guest profile.
Create COVID-19-related email campaigns
As we come to terms with the effects of the COVID-19 pandemic, an unfortunate outcome has been that you may have to temporarily close your center or have restricted working hours. To help you communicate this message in a tactful and reassuring manner, we have added predefined email templates that you can use to notify guests.
For a detailed, step-by-step article on how to use Email Campaigns, refer to Create and Publish Email Campaigns.
In this article, we will discuss the new templates and how to use them to communicate COVID-19-related updates with guests.
At the organization level, click the Marketing icon.
Navigate to Campaigns > Email/Text Message.
Depending on the requirement, select Add Scheduled Campaign or Add Always on Campaign.
On the Create Campaign page, do the following:
Enter campaign info.
In the Communication Channel section, select Email Message.
In the Select campaign type section, select Announcement.
In the Select Recipients section, select the segment that should receive the message.
To learn more about the various target segments that you may want to create to communicate the temporary closure or restricted timings of your center, see Create Segments for COVID-19-Related Campaigns.
In the Create the content section, click Themed Templates, and then select the appropriate COVID-19-related template.
There are three templates you can choose from:
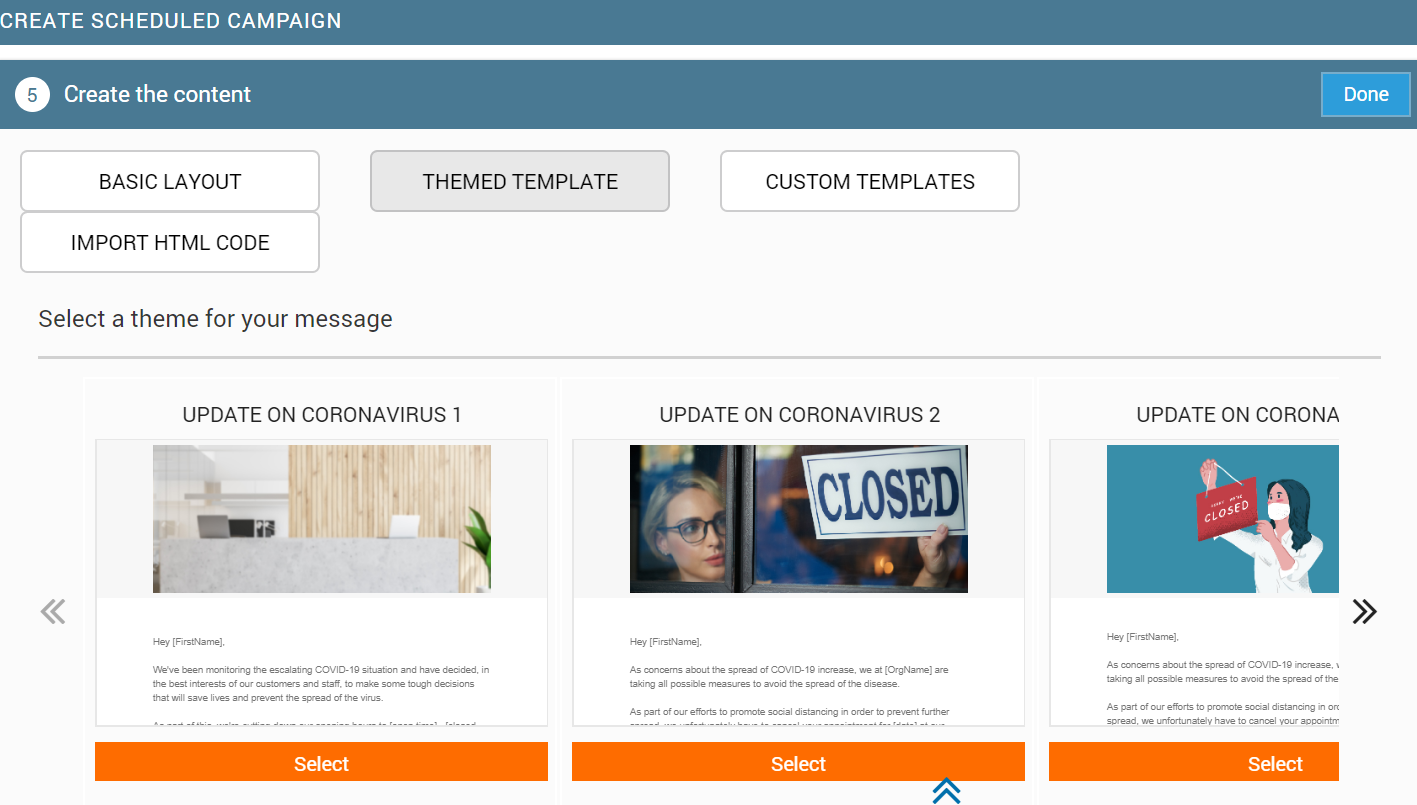
Update on Corona Virus 1: Use this template to inform your guests about reduced working hours while reassuring them that you and the staff will take all the necessary precautions for their safety.
Update on Corona Virus 2: Use this template to inform your guests that, in view of the Corona virus outbreak, their appointment stands canceled. The email explains that this has been done for their safety and for the safety of the staff. It also reassures them that you will inform them when the center is ready to reopen.
Update on Corona Virus 3: Use this template to inform your guests that the center is closed until further notice and reassure them that you will inform them about when the center is likely to reopen.
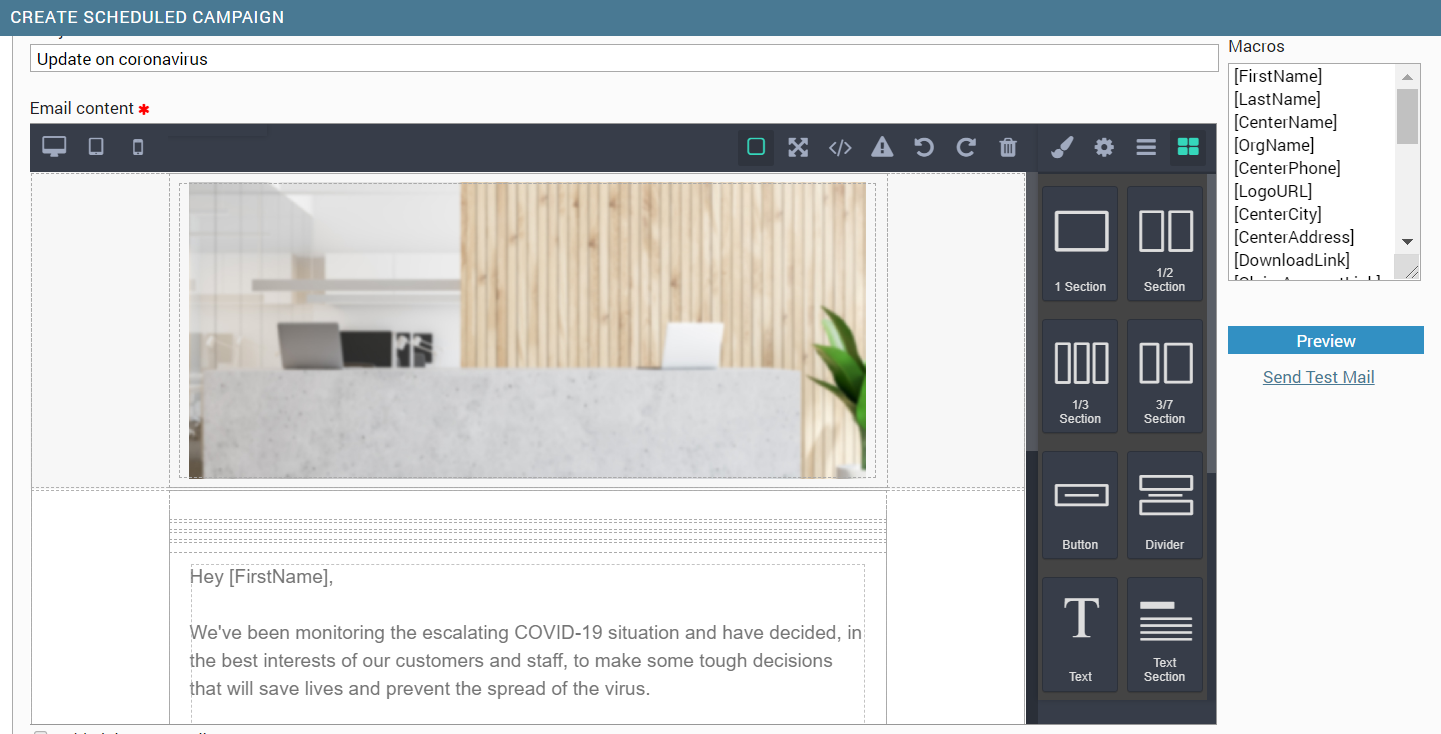
You can edit the contents of the templates to customize them further. You can change the subject, image, and text in the template. Furthermore, you can use the macros from the box on the right-hand side to add more information to the email.
If you are ready to send out the campaign, click Send now or to send it out at a later point of time, click schedule a time. If you haven’t finished working on the campaign, click Save and close.
Best practices for email marketing
Disclaimer
This editor is now available to all businesses.
Keep these best practices handy as you use our new and simplified email editor.
Avoid spammy content
Email services include spam filters that check for a few things before moving an email to the spam folder.
To ensure that your emails do not end up in Spam folders, keep the following pointers in mind:
Keep the email subject line crisp: Use the subject line to tell your guests what's in your email.
Reach out to Zenoti Support to enable a different type of "send-as", which allows clients to reply to campaign emails.
Always include a Reply-To address: Make sure that you have an accurate address to which the guests can send their replies.
Email Content - what to avoid: Avoid using all capital letters, gimmicky words or phrases, and too many exclamation marks. Also, avoid unnecessary formatting such as bolding and underlining of text.
Include unsubscribe links
As an email marketer, you might be excited about every campaign you send to your guests. However, your guests may not always share your enthusiasm. Make sure that you add an unsubscribe link in your email to let guests choose to NOT receive any future emails.
Zenoti automatically adds an unsubscribe link to every email. You can view the link when you test the email. The unsubscribe button is also automatically added to the email header as mandated by email providers.
Use only HTML code & CSS code
If you are coding your own template, ensure that you separate HTML and CSS codes and then import the codes in the editor.
Do not use Javascript. Our email editor and most other email services do not support Javascript.
Preview and Test email content
After you create the email content, be sure to preview the content on different devices, and send the email to a test email account. This helps you to identify the issues in your email and fix them before the email is sent to your guests.
While you are testing content, do not forget to test links, if any. Ensure that there are no broken links.
Build a clean subscribers list
Do not send emails to all guests blindly. Ensure that the guests in your target segment have opted in to receive marketing emails.
Track the performance of your campaign
After you’ve sent your email and you want to know how it is performing, use our Campaigns Performance Dashboard. When you track a campaign, it gives you an idea of the kinds of content your subscribers respond to, based on which you can make decisions about future campaigns.
Plan a media campaign or promotion
We are in the first step of media promotion - Planning. This article helps you to:
Plan your offer with the promo
Set up things in Zenoti as per plan
Plan What You Would Offer with a Promo
As part of your media promotion, plan the following:
At which level would you like to do the promotion? - Across all your centers in your organization, across all centers at a zonal level, or just in one center that is new or needs more publicity to improve sales. You are the best judge of what you want.
Next thing you might want to plan is, which enticement would you like to apply to draw the attention of your target crowd - a discount, loyalty points, or an attractive cashback offer?
Also, decide whether you want to roll out the discount, loyalty points, or cashback benefit to all your guests or only to a target audience.
In Parallel to the setup in Zenoti, as an offline activity, build and implement your strategy on media marketing. Design your ads, decide the channels, and then broadcast, publicize, print or publish them in the channels.
Set up Things in Zenoti as per plan
Based on your plan, you might have to set Create a Media Campaign: Enter Campaign Infop one or more of the following.
Set up the Org level of the media promotion.
If your promotion offers a discount then, Create a Discount. If your promotion offers loyalty points then, Create Loyalty Point Promotion. No setup is required for cashback offers. While creating a media promotion, you can directly set the amount or percentage of cashback you would like to offer to the responding guests while generating the invoice.
If you want only few guests to get the benefit of your media promotion then, Create a Target Segment of guests who will receive the discount, loyalty points, or cashback as part of your media campaign.
Note
Ensure that you have necessary permissions to add, edit, delete, view, and/or publish the campaign in Zenoti. Contact your Admin for the necessary permissions.
Next Steps:
Create a Media Campaign in Zenoti
Create a media campaign
Enter campaign info

After planning, let’s create a media campaign in Zenoti. This article helps you to:
Navigate to the media campaign in Zenoti
Learn steps involved in creating a media campaign
Do the first step in campaign creation: Enter Campaign Info
Click the Marketing icon and navigate to Campaigns > Media.
The Media Campaigns page appears.
Note
Permissions to add, edit, delete, view, and/or publish the campaign depend on your user role in Zenoti. Contact your Admin for the necessary permissions.
Click Add to add a virtual record of a media campaign.
The Create New Media Campaign page appears.
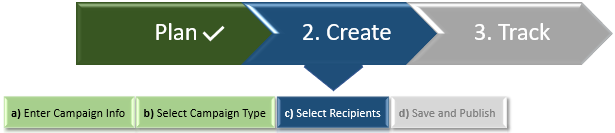
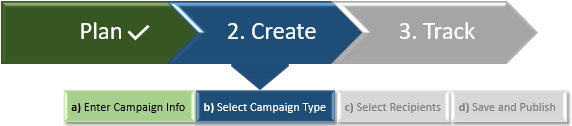
You will find four simple steps to 'create a campaign' (shown in 4 blue boxes below Create).
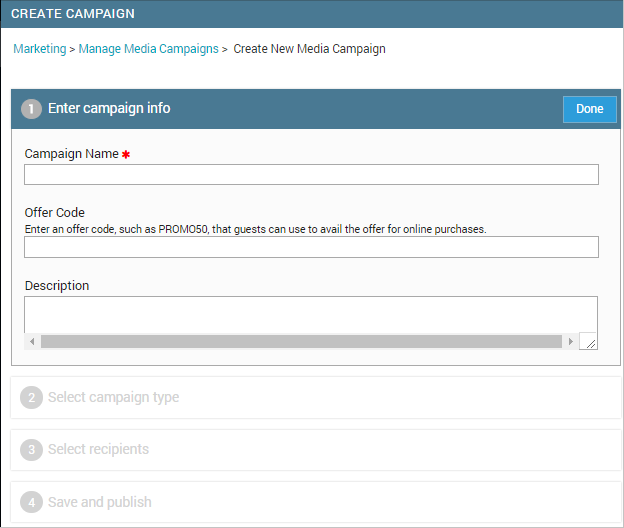
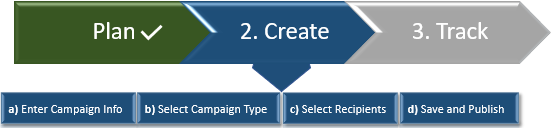 Enter Campaign Info
Let’s start with the first step - Enter Campaign Info.

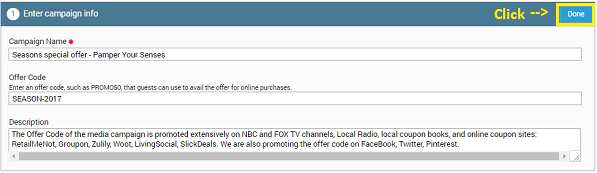
In the Campaign Info section, enter the following details:
Campaign Name: Give a name to your media campaign. The best practice is to give an easy-to-understand name to your campaign.
For example, if you are doing a campaign for Christmas and New Year then, you could name the campaign as 'Seasons special offer - Pamper Your Senses'. Your campaign name can include alphabets, numbers, and a few special characters. Yet, you cannot use the following special characters in the campaign name - Tilde (~), Dollar ($), Star/multiplication symbol (*), Exclamation mark (!), double quotes (").
Offer Code: Ensure that the Offer Code is simple, short, and readable so that your users feel easy to type in or copy-paste when they are applying the offer code when buying from the Web Store. Your code can convey campaign type or campaign goal. Best Practice for Offer Code: Ensure that the code does not include the letter ‘i’, space, or hyphen. Example: 'PROMO2018', 'CASHBACK25'.
Description: Enter details such as promotion channels, date of launch of promotion, and other related info to keep a track of the campaign. The description you enter here is posted in the Webstore.
Note
Clicking Done will only close the 'Enter Campaign Info' section and will not save your information.
Next: Select a Campaign Type
Select recipients
After selecting the campaign type, proceed with the next step: Select the recipients of your offer.
During the planning phase, you would have decided the level at which you would be promoting the campaign - organization level or center level. Based on that, select the recipient centers and recipient guests of the offer.
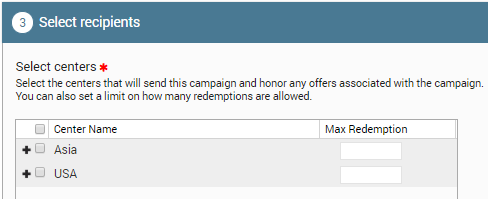
Select Centers The field shows centers depending on the level at which you wish to roll out your promotion.
For an organization-level campaign, the field shows zones and the centers within the zones. You can select the checkbox beside the zone to apply the campaign to all the centers within the zone or expand the zone by clicking + (plus), to select only a few centers within the zone.
If the campaign is at the center level then, Select Center field shows only the center that is selected to run the campaign. Select the center.
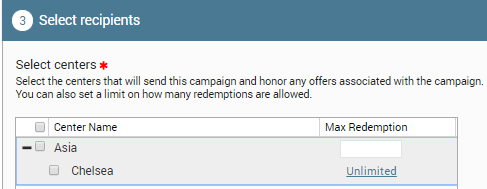
Max Redemption - Select the Maximum number of times the offer can be redeemed at each center. For example, if you enter 50 for Chelsea, it means that the center can pass on the benefit to 50 invoices.
Target Segment Billing Usually, the goal of a media campaign is to get new visitors and have existing guests come back.
As part of planning, you would have created a target segment in Zenoti. Map the target segment to the media campaign by selecting from the Target Segment Billing drop-down list. Click Count to get the number of guests who fall in the target segment you selected. If it is 'All guests' every guest will receive the benefit.
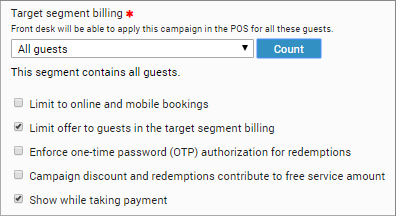
Limit to online and mobile bookings: Select the checkbox to give the offer only when services or products are booked from Web store and Zenoti mobile app.
Limit offer to guests in the target segment billing: this checkbox is selected by default. By un-selecting, you extend the offer to everyone.
Enforce one-time password (OTP) authorization for redemption: Select the checkbox if you want the guests to provide OTP confirmation to use the benefit from the campaign.
Campaign discount and redemption contribute to free service amount: Select this checkbox if you want the amount from campaign discount and redemption to be counted as part of free service revenue. The provider earns a commission on the base price or on the discounted price as defined at the service level.
Show while taking payment: On selecting the checkbox, the campaign shows up in the Invoice page.
Next step: Save and Publish
Select campaign type
After entering Campaign Info, select the type of offer you would like to give with your promotion - a Discount, Loyalty Points, or a Cashback.

As part of planning, you would have created a discount in Zenoti. It’s time to attach the discount to the media campaign.
Hint: You can also view how your cashback campaign is performing using the Dashboard in the Marketing tab.
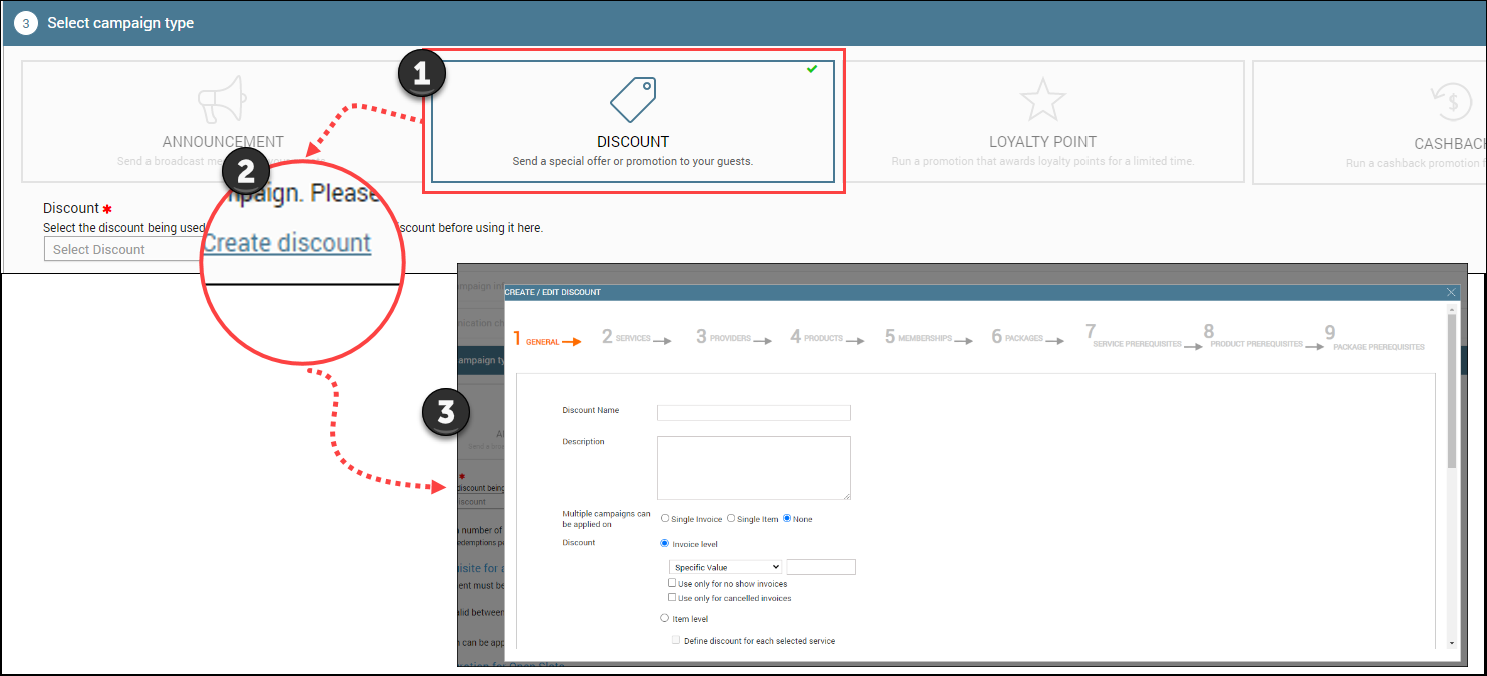
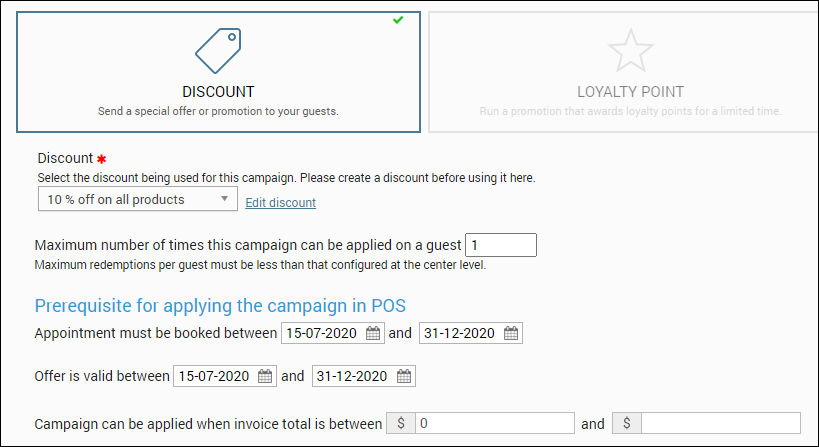
Discount: Select the discount you created for this campaign from the Discount drop-down list. (You can attach any existing discount that suits the campaign; there is no need to create a new discount every time you start a new campaign).
If you want to create a new discount, you can do that from within this campaign page.
Maximum number of times this campaign can be applied on a guest: Enter how many times a guest can use your offer code or campaign to use the discount. For example, enter 1 to mean that a guest can use your offer only once.
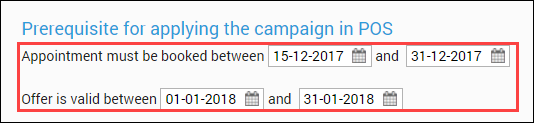
Prerequisites for applying the campaign in POS: While rolling out an offer, you have two important dates: Appointment period and Offer Validity period.
Appointments must be booked between: Decide the dates between which an appointment should be booked. On this appointment date, the guest can visit you to take the services booked (during the Offer is valid between dates) and apply the discount.
Offer is valid between: Select the From and To dates between when your guests should book the appointment to get the cashback offer. The offer is valid only if the appointment date is between the selected time period.Example: Say you want to give a ‘Joyful January’ offer with 15% discount on your services. You want the appointments to be in January 2018 (1 to 31) and expect your guests to book the appointments between December 15, 2017 and December 31, 2017 for January. In this case, your Offer is Valid between dates should have Start Date as January 1, 2018, and the End Date as January 31, 2018 and the Appointments must be booked between should have the Start Date as December 15, 2018, and the End Date as December 31, 2018.
Important
Remember that the guests get this offer only if they are in the target segment and have the appointment date scheduled during the validity period. Your target segment can be 'All Guests' if you would like to roll out this offer to everyone.
Campaign can be applied when invoice is between: Decide the minimum or maximum bill, the guest should generate, in order to get the offer.
Example: Say you want to give a ‘Joyful January’ offer with 15% discount on your services. You want the appointments to be in January 2018 (1 to 31) and expect your guests to book the appointments between December 15, 2017 and December 31, 2017 for January. In this case, your Offer is Valid between dates should have Start Date as January 1, 2018, and the End Date as January 31, 2018 and the Appointments must be booked between should have the Start Date as December 15, 2018, and the End Date as December 31, 2018.
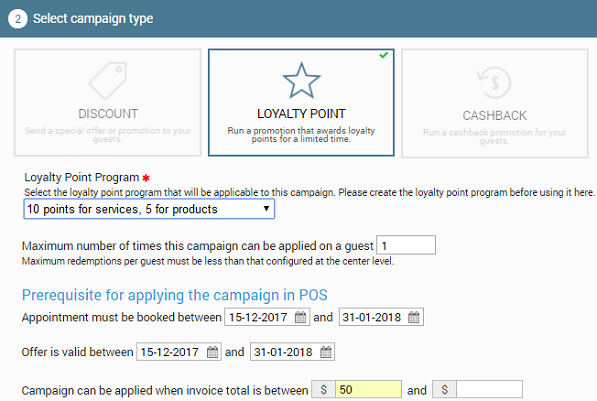
If you would like to offer loyalty points to your guests as part of a media promotion, then, select 'Loyalty Points' tile. As part of planning, you would have created new loyalty points in Zenoti. It’s time to attach the loyalty points to the media campaign.
Loyalty Point Program: Select the loyalty points you created for this campaign from the Loyalty Points drop-down list. (If your campaign is at the center level then, loyalty points should be enabled for your center from the org level. Center level users cannot create loyalty points in Zenoti).
Important
Only Regular Loyalty Points can be applied; Tier level loyalty point programs cannot be applied to a media campaign.
Maximum number of times this campaign can be applied for a guest: Enter how many times a guest can use your offer code or campaign to get loyalty points.
Prerequisites for applying the campaign in POS:
Appointments must be booked between: Decide the dates between which guests can visit you to take the service(s) booked (during the Offer is valid between dates) and get loyalty points.
Offer is valid between: Select the From and To dates when your guests need to book the appointment to get the discount.
Let’s see an example. Say you want to give 50 points for appointments booked for Christmas and New Year of 2017. You want your appointment calendar filled from December 18, 2017 to January 6, 2018 and expect your guests to book the appointments from December 5, 2017 to December 31, 2017 to get the loyalty points. In this case, your Offer is Valid between dates should have Start Date as December 5, 2017 and End Date as December 31, 2017 and the Appointments must be booked between should have Start Date as December 18, 2017 and End Date as January 6, 2018.
Campaign can be applied when invoice is between: Decide the minimum and/or maximum bill, the guest should generate, in order to get the points.
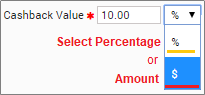
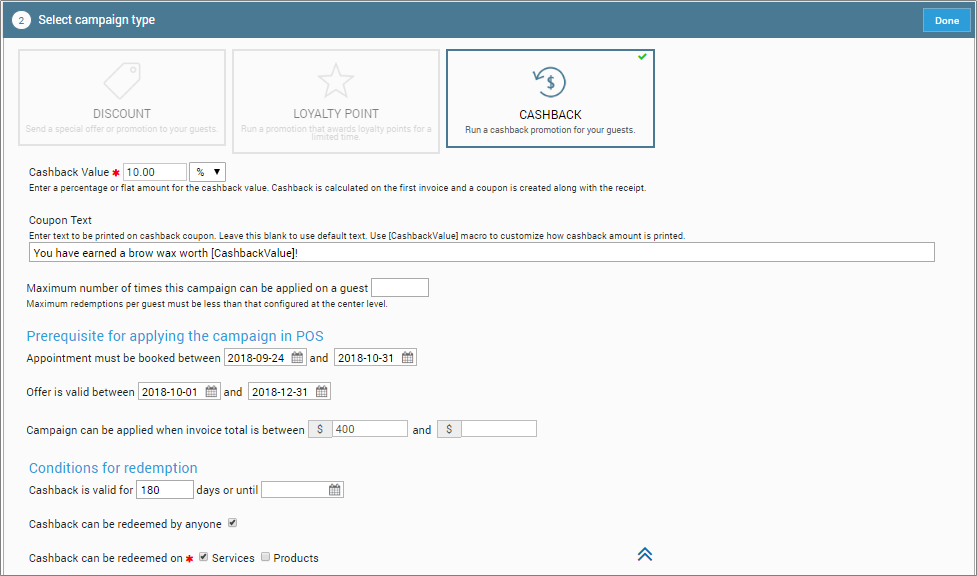
If you would like to offer a cashback media promotion then, select the 'Cashback' tile. Cashback campaign does not need any setup in Zenoti. You can mention the cashback value in amount or in percentage while creating the media campaign.
When you launch a scheduled or always-on cashback campaign, Zenoti automatically generates and prints a coupon number and a default offer text: 'Cashback of $ [amount]' on the receipt for the eligible guest.
Let's see how to create a cashback promo and add a coupon text:
Cashback Value: For Cashback Value, enter a percentage value, or change the drop-down to '$' and mention the cash amount in the text box.
Coupon Text: The text you enter in this field reflects on the receipt of the eligible guest. If you leave this field blank, Zenoti prints the default text: 'Cashback of [amount]'. In the default text, the amount or percentage being given as cashback is automatically inserted. If you want to include the cashback in your customized offer text, insert the macro: [CashbackValue] in it. For example, if your offer text is: ‘You have earned a brow wax worth [CashbackValue]!’, it reflects on the receipt as ‘You have won a brow wax worth $25’.
Maximum number of times this campaign can be applied for a guest: Enter how many times a guest can use your offer code or campaign to get the cashback.
Prerequisites for applying the campaign in POS:
Appointments must be booked between: Decide the dates between which, guests can visit you to take the service(s) booked (during the Offer is valid between dates) and get the cashback.
Offer is valid between: Select the From and To dates when your guests need to book the appointment. Let’s see an example. Say you want to give a ‘Valentine Special’ cashback of 10% on your services. You want the appointments to be in February 2018 (from 1 to 28) and expect your guests to book for appointments between January 20, 2018 to February 10, 2018. In this case, your Offer is Valid between dates should have Start Date as January 20, 2018 and End Date as February 10, 2018 and the Appointments must be booked between should have Start Date as February 1, 2018 and End Date as February 28, 2018.
Campaign can be applied when invoice is between: Decide the minimum and/or maximum bill, the guest should generate, in order to get the cashback benefit.
Conditions for Redemption: Configure the following conditions for the guests to receive cashback.
Cashback is valid for: Enter the number of days or a specific date until which the cashback will be valid.
Cashback is redeemed by anyone: Select the checkbox to indicate that the cashback can be redeemed by any visiting guest (first-time visitor/existing guest as per Zenoti’s records).
Cashback can be redeemed on: Select Services checkbox if you want to offer cashback on services only. Select Products checkbox if you want to offer cashback on products only. To apply cashback to both services and products, select both the checkboxes.
Next step: Select Recipients
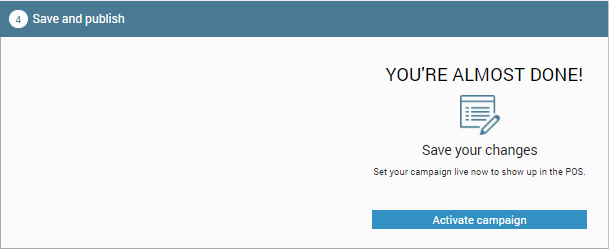
Save and publish

After you complete all the three steps - 'Enter Campaign Info', 'Select Campaign Type', and 'Select Recipients', go ahead and activate your campaign.
Under the Save and Publish section, click Activate Campaign to activate your campaign in Zenoti.
Note
Permissions to add, edit, delete, view, and/or publish the campaign depending on your user role in Zenoti. Contact your Admin for the necessary permissions.
The campaign becomes active from the Offer Valid date mentioned in the 'Select Campaign Type' section.
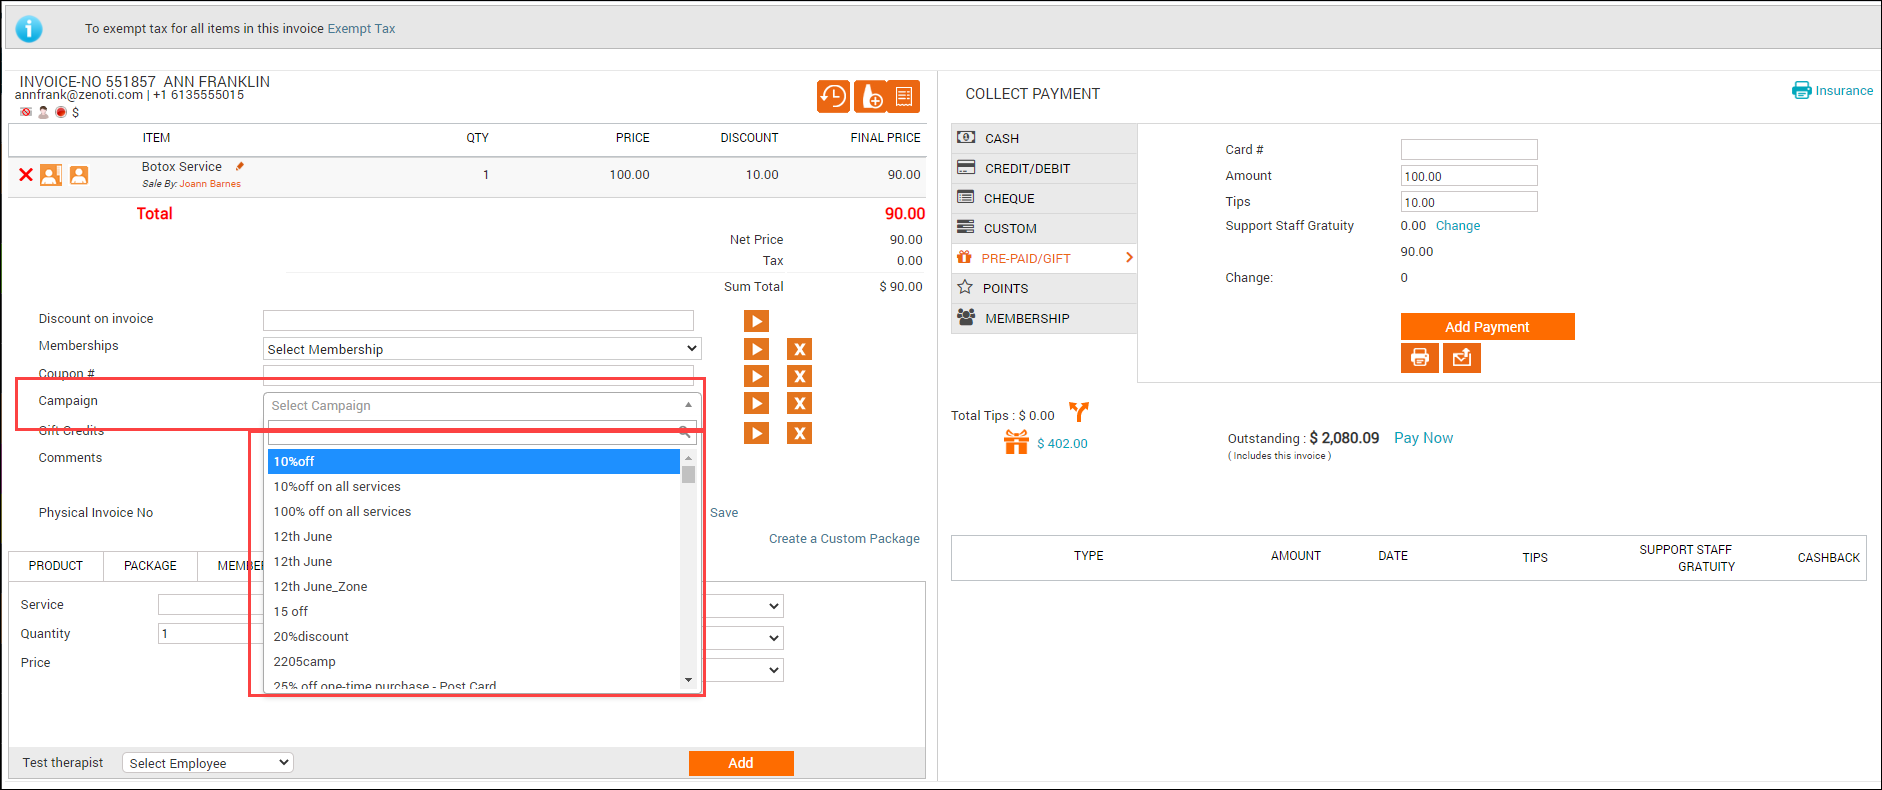
Eligible guests can use the offer code of the media campaign while buying the products or services from the Web Store.
The front desk or the reception can apply the media campaign for guests (on their invoices), if they are part of the target audience.
With this, we have completed creating the media campaign record in Zenoti.
You can now, apply the campaign while taking payment from the guest.
Create and publish opportunity campaigns
Using an Opportunity Campaign you can create a new Sales Opportunity for your sales team whenever a membership is about to expire.
For example, if you use an Always On Campaign to send out a Membership renewal email 30 days before the membership expires, you can then also set up an Opportunity Campaign to automatically create opportunities for guests whose Memberships are about to expire so that you can track follow-ups. This ensures that someone follows up on the Membership renewal, in addition to sending out an email message telling the guest that their Membership is about to expire.
Prerequisite: This article assumes that you have:
The Send/Schedule Opportunity Campaign permission is enabled for your role.
Note
If this permission is not enabled, you can still go ahead and create an opportunity campaign.
Created a target segment.
At the organization level, click the Marketing icon.
Navigate to Campaigns > Opportunity.
Based on your requirement, Add one of the following campaigns:
Add Scheduled Campaign: Scheduled campaigns let you send opportunities on a scheduled date and time.
Add Always on Campaign: Always on campaigns let you set up a series of opportunities and then lets Zenoti send them out at the right time.
Depending on your selection, either Create Scheduled Campaign or Create Always On Campaign page opens.
Click Done.
Click Done.
Save and publish.
Based on your requirement, select either Save and Close, Send now, or Schedule a time.
Enter campaign info
In this section, do the following:
Campaign Name | Enter a name for the campaign. |
Rule Code | Enter a rule code for the campaign. |
Description | Enter a description for the campaign. |
Opportunity Description | Enter a description for the opportunity. |
Select Opportunity Type | Select the opportunity type. |
Select centers
In this section, do the following:
Select Centers | Select the centers within your organization for which you want to enable this campaign. |
Select Target Segment | Select the Target Segment. NoteYou should have already created your target segments so that they appear in this drop-down list. To get the exact number of guests in the selected target segment, click Count. |
Follow up within __ days | Specify the number of days within with you want the follow-up to be done. |
Close the Opportunity within __ days | Specify the number of days in which you expect the opportunity to be closed. |
Create and publish notes campaign
A Notes campaign is essentially a campaign to add Guest Notes automatically to Guest Profiles that meet a particular target segment.
For example, you can add a Guest Note such as "Ask the guest for a valid phone number and email address" to a target segment of guests created on the current day and whose phone number or email address are not verified. You can further configure when such Note should appear - such as during check-in. This way, the Note acts like a handy reminder to the front desk to ask for valid contact details from the guest when they come in for an appointment.
You can set up such a campaign as an Always On Campaign so that every day Zenoti checks for guests will invalid phone numbers and email addresses and adds this Note to Guest Profiles who meet the target segment requirements.
Before You Begin
You must have the following permissions enabled for your role:
Create Notes Campaign permission to be able to create a notes campaign name of the role such as Owner > Permissions tab > Marketing Manager > Campaigns section).
Send/Schedule Notes Campaign to be able to publish notes campaign.
Note
If this permission is enabled for a role, but the Create Notes Campaign permission is disabled, the employee cannot view the Notes option in the left-hand side menu (Marketing > Campaigns) on the Marketing dashboard.
Click the Marketing icon and navigate to Campaigns > Notes.
Based on your requirement, Add one of the following campaigns:
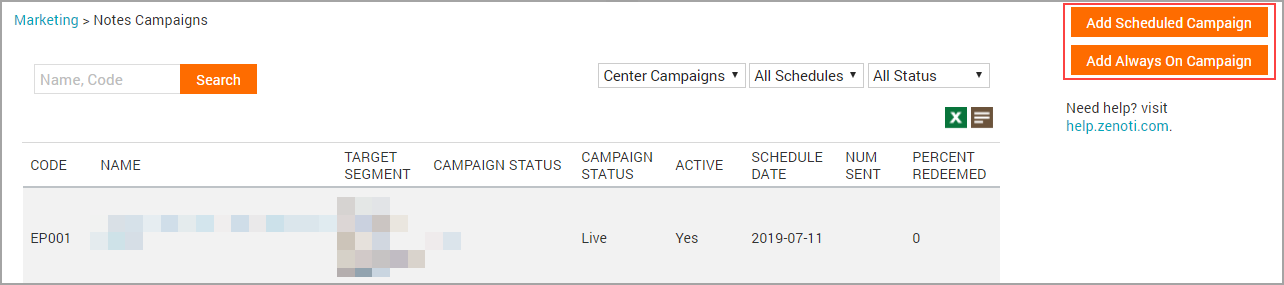
Add Scheduled Campaign: Scheduled campaigns let you send an email on a scheduled date and time.
Add Always on Campaign: Always on campaigns let you set up a series of emails and then let Zenoti send them out at the right time to the right customers.
Depending on your selection, either Create Scheduled Campaign or Create Always On Campaign page opens.
Enter campaign information.

Click Done.
Select the centers at which you want the Notes campaign to go live.
Click Done.
Save and publish.
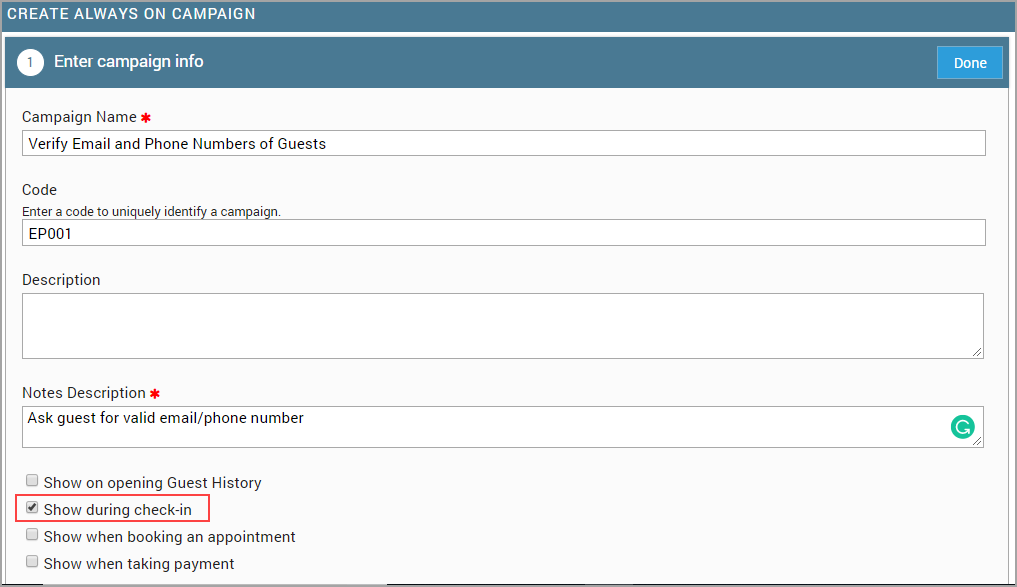
Enter campaign info
In this section, do the following:
Campaign Name | Enter a name for the campaign. For example: Verify the email and phone numbers of guests. |
Code | Enter a code to identify the campaign. |
Description | Enter an appropriate description. |
Notes Description | Enter the text that should appear in the Guest Note. For example: Ask guest for a valid email/phone number. |
Specify when the Note should appear | The options are:
For example, if you choose Show during check-in, then the note will appear the next time the guest checks in. |
Select the target segment | Select a target segment that you created earlier. NoteTo get the exact number of guests in the selected target segment, click Count. For example, you may have created a target segment with the rules (Demographic - Creation Date is equal to 0 Days, Guest Email is not Verified, and Guest Phone Number is not Verified). |
Save and Publish
Click Save and Close to save the campaign as draft.
Click Send Now to send out the campaign.
Note
If you selected Always On campaign earlier, all the days of the week are selected by default.
Create and publish WhatsApp campaigns
You can create WhatsApp campaigns and send announcements or promotional offers as text messages to your guests.
Note
Zenoti now integrates with Twilio to offer a seamless and enhanced WhatsApp marketing experience.
Meta may temporarily block some marketing messages to maintain engagement quality. If this happens, Zenoti will automatically retry sending the message after 24 hours. No action is needed from your side.
Set up Twilio for WhatsApp (Self-Onboarding)
The Twilio self-onboarding process in Zenoti allows your organization to easily enable WhatsApp messaging. This setup connects your Twilio account, verifies your Facebook Business, and configures your WhatsApp phone number. Once complete, all WhatsApp messages from your organization will be sent through Twilio.
Prerequisites
Before you begin:
Reach out to your Zenoti representative to enable WhatsApp integration for your organization.
Have a verified Facebook account with access to your Meta Business Manager.
Keep your business website URL ready (not your Zenoti URL).
Ensure you have a valid and active phone number to receive verification codes from Meta.
Configure integration settings
Navigate to Integration Settings at the organization or center level.
Expand the WhatsApp section.
Under Provider, select Twilio.
Click Continue.
In the Pre-Configuration tab:
Accept the Terms and Conditions.
Click Continue.
Phone number configuration
By default, the same number is used for both Transactional and Marketing messages.
To use different numbers, turn the Use same number toggle off.
Switch on the Use a Non-Twilio number toggle.
Enter the phone number in E.164 format (Example: +442035478758).
Enter the display name that will be visible to customers when they receive messages.
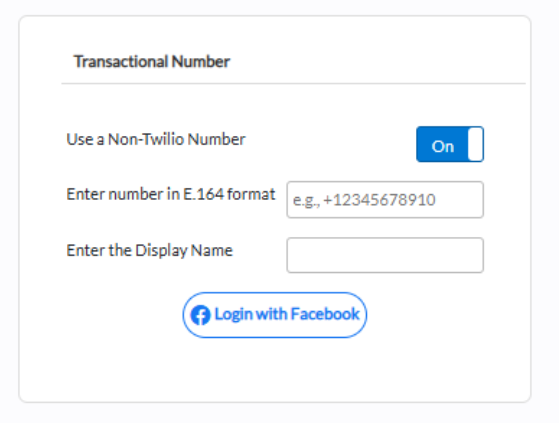
Link your Facebook business account
Click Login with Facebook.
Log in and authenticate your business.
On the authorization screen, click Get Started to grant access.
Fill in your business portfolio details and click Next.
When configuring WhatsApp for the first time, select Create a WhatsApp Business Account.
Note
For later configurations, you can select an existing WhatsApp Business Account or create a new one.
Complete the Facebook verification steps.
Click Finish to return to Zenoti.
Note
Do not close the Facebook popup until verification is complete, it will close automatically. You will then be redirected to the Zenoti Integrations page, where a success alert confirms you have been onboarded to Twilio for WhatsApp.
Add WhatsApp numbers for additional centers (multi-center organizations)
If your organization manages multiple centers, you only need to complete the embedded Twilio onboarding flow once, for the first center. Zenoti stores the Twilio provider linkage at the organization level.
For subsequent centers in the same organization, Zenoti automatically detects the existing Twilio linkage and skips the embedded onboarding flow. You can then add a WhatsApp number for the center using one of the following options:
Purchase a new number (Twilio): Zenoti automatically creates the required Twilio subaccount and purchases the number, avoiding manual verification steps.
Use an existing number (Bring Your Own Number): Enter your business number in E.164 format. Zenoti initiates Twilio’s verification process (SMS or voice) to confirm ownership. The number appears as Pending verification until Twilio confirms linking. You can refresh the status from the configuration summary.
Once verification is complete, the number becomes available for WhatsApp messaging.
Note
Numbers already linked to another WhatsApp Business Account (WABA) cannot be added.
The number must be WhatsApp-capable.
BYON numbers from a different provider than the organization’s configured provider are not supported.
Using the same or different numbers
Zenoti allows flexibility in how numbers are used:
Use one number for both transactional and marketing messages (default).
Use separate numbers by toggling off the combined option during setup.
Next steps
After completing the onboarding:
Test WhatsApp messaging from Marketing and Campaigns.
Monitor delivery and engagement in your message logs.
If you face any issues:
Verify your Twilio and Facebook configurations.
Ensure your account URL is whitelisted.
Contact Zenoti Support for assistance.
WhatsApp Template Approval Guidelines
Before you create a WhatsApp template, it is important to understand Meta’s approval process and content rules. All WhatsApp templates must be reviewed and approved by Meta before they can be used for business-initiated messages.
Templates are divided into three main categories:
Category | Description |
|---|---|
Marketing | For promotional offers, announcements, and engagement-driving messages. |
Utility | For confirmations, updates, and essential account or transaction alerts. |
Authentication | For one-time passwords or secure access codes. |
Templates that do not meet WhatsApp’s criteria may be rejected or recategorized.
Templates may be rejected if they include:
Vague or unclear content (Example: “Hi [First Name] [Last Name], Thank you.”)
Consecutive placeholders (Example: two variables without text in between)
Template body starting or ending with a placeholder
Duplicated content across templates
Text headers containing emojis or line breaks
Missing media samples for media templates
Threatening or abusive language
Direct links to WhatsApp (“Share on WhatsApp”)
More than two consecutive newlines or four consecutive spaces
Allowed:
Notifications (Example: Delivery alerts, reminders)
Customer care messages
Two-factor authentication (2FA)
Marketing or promotional offers
Forbidden:
Newsletters or subscription-based content
Forbidden business types:
Adult content, alcohol, drugs, gambling, tobacco, financial trading, weapons, dating, or defense.
Restricted countries:
Crimea, Cuba, Iran, North Korea, and Syria.
Keep templates concise, grammatically correct, and contextually relevant.
Avoid placeholders at the start or end of messages.
Include clear call-to-action buttons only when needed.
Always submit templates in the correct language and message type.
Replace placeholders with real data when testing.
Ensure customers understand why they’re receiving the message.
Tip: Review templates internally before submission to increase approval success.
To create the campaign template
Note
To have WhatsApp marketing enabled for your organization, reach out to Zenoti support.
If the Manage WhatsApp Template button is not visible, it means that you do not have the required role permissions to carry out this action. Please contact your manager to request the permission to Send/Schedule WhatsApp Campaigns.
Navigate to Marketing > Campaigns > Create Campaigns and click Manage WhatsApp Templates. Manage WhatsApp Templates window displays a list of created templates.
Select an existing template or to create a new campaign template, click Add New Template.
Enter the Template Name.
Select the Template Header if required. You can select either an image or text. If you select image, you can upload it from your local browser.
In the Template Body, enter the content as required. Add macro if needed
Enable the Template Footer option and enter the required text. For example, you can add opt out keywords in the Template Footer.
To prompt the user to take an action, you can enable the Button option and add a URL.
Click Save. You can use this template after it is approved by Meta which takes 48 hours to approve. Once approved, the templates appear in the Create Content section of campaign creation flow.
To create a campaign
Navigate to Marketing > Campaigns > Create Campaign.
Select one of the following:
Add Scheduled Campaign: Lets you send a WhatsApp message on a scheduled date and time.
Add Always on Campaign: Lets you set up a series of WhatsApp messages and then lets Zenoti send them out at the right time to the right customers.
Enter the campaign information.
Click Done.
Select WhatsApp Message as the communication channel.
Click Done.
Select the campaign type.
Click Done.
Select recipients.
Click Done.
Select the WhatsApp template from Create Content. You cannot or edit or create a template from here.
Click Done.
Note
Guests are automatically opted in for WhatsApp marketing communications if the Set new guest profile to receive marketing WhatsApp messages setting is enabled.
Create and publish Rich Communication Services (RCS) campaigns (Closed Beta)
Note
This feature is currently in closed beta and available to a limited number of users.
RCS (Rich Communication Services) campaigns enable businesses to send rich, interactive messages to customers via supported messaging apps. With this feature, you can create reusable RCS templates and run personalized, scheduled, or always-on campaigns that include images, action buttons, and carousels.
Create an RCS campaign template
To create a template for RCS campaigns:
At the organization or center level, navigate to Marketing > Campaigns > Email/text/whatsapp/rcs.
Click RCS.
Click Add template.
Enter a name for the template.
Select the Content type (Text, File, Card, or Carousel).
Check the Preview section to review how the message will appear to recipients.
Click Save.
Text
Use this type to send simple messages using plain text, optionally enhanced with macros and suggested actions.
Enter the Message text you want the guest to see.
Add any suggested actions, such as:
A clickable link (For example, View Appointment).
A phone number to enable one-tap calling.
File
Use this type to send an image file along with optional suggested actions.
Attach an image file by entering a URL or directly uploading it by clicking Upload.
Note
The following file types are supported: .jpeg, .jpg, .png, .gif, .h263, .m4v, .mp4, .m4p, .mpeg, and .webm
Add any suggested actions, if needed.
Card
Use this type to create a rich card that includes text, an image, and one or more call-to-action buttons. Ideal for highlighting offers or showcasing a service.
Select the orientation of the card. (Vertical or Horizontal)
Enter the title and description to display on the card.
Attach an image file by entering a URL or directly uploading it by clicking Upload.
Customize the size of the image file displayed on the card by selecting it from the Media height dropdown.
Add one or more call-to-action buttons.
Add any other suggested actions, if needed
Carousel
Use this type to create a carousel of cards that customers can swipe through. Each card includes an image, text, and interactive buttons. Ideal for multi-offer promotions.
Select the Card width to control layout spacing.
Enter the title and description to display on the card.
Attach an image file by entering a URL or directly uploading it by clicking Upload.
Customize the size of the image file displayed on the card by selecting it from the Media height dropdown.
Add one or more call-to-action buttons.
Add another card to the carousel by clicking Add card.
Add any other suggested actions, if needed
Create an RCS campaign
Navigate to Marketing > Campaigns > Email/text/whatsapp/rcs.
Select one of the following:
Add Scheduled Campaign: Lets you send an RCS message on a scheduled date and time.
Add Always on Campaign: Lets you set up a series of RCS messages and then lets Zenoti send them out at the right time to the right customers.
Enter the campaign information.
Click Done.
Select RCS message as the communication channel.
Click Done.
Select the campaign type.
Click Done.
Select recipients.
Click Done.
Select the RCS template from Create Content. You cannot edit or create a template from here.
Click Done.
You can also create campaigns using pre-set campaigns that can be customized as per your preference to drive bookings and grow revenue.
Note: To send ad-hoc transactional notifications as scheduled campaigns to specific guest segments, select Transactional as the campaign type when you create a scheduled campaign.