Transfer orders
A multi-center business often needs to transfer products from one center to another during shortages and demands.
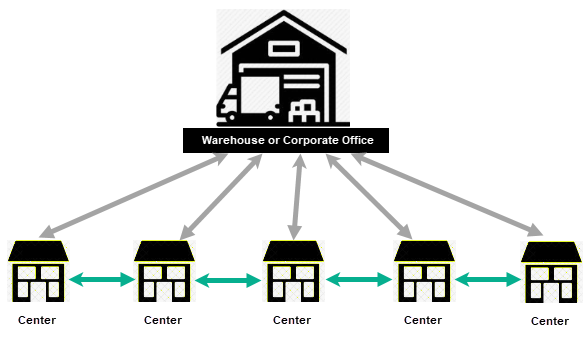
Or, one of the centers in the company, called the warehouse or corporate office (CO), procures products from a vendor and all other centers request products from the CO. Moreover, the company can have damaged/expired products from all centers to be stocked in one center. Zenoti caters to such inventory needs via transfer orders.
A transfer order (TO) is a form that a center uses to manage product inflows and outflows with other centers in the company. It can be used to transfer products between centers, to request products from the warehouse, or move all damaged/expired products to a center.
Important
You cannot receive products without a purchase order or a transfer order.
Important
A company can also operate in a franchise model, wherein a franchisee is an individual operating unit. The transfer of products in this setup needs each franchise to raise a purchase order to another center or to the warehouse - the way it would purchase products from an external vendor.
Transfer models
The process of transferring products involves two centers:
Source Center
A center from where the products are moved to another center.
Destination Center
A center that is receiving the products from another center.
In Zenoti, you can transfer products in two ways:
Push: In this model, the source center initiates the transfer process by creating and raising the order to itself on behalf of the destination center. This is usually the case of the warehouse transferring stock to all the centers in the company.
Pull: In this model, the destination center initiates the transfer process by creating and raising the order to the source center.
Lifecycle of a transfer order
Right from creating a form to receiving goods fully, a transfer order goes through various stages in its lifecycle.

In Zenoti, each phase or stage is indicated by a status of the PO:
Status | Description |
|---|---|
Created | The order is created and saved as a draft. In this status, you can continue to edit order details, add products that you want to request, or even remove products. |
Raised | The order is raised, but not sent to the vendor. |
InTransit | The order is dispatched to the destination center. In this state, the destination center cannot edit the dispatched quantity. |
Updated | The order is received partially (received quantities are updated) and saved but not marked as a partial delivery. The current stock is not affected unless you mark the order as partial or full. |
Partially Delivered | The order is received partially and marked as partial.
|
Delivered | The order is fully received and closed.
|
Before you begin
Before centers can transfer products, the admin must do the following:
Make products available in both, source and destination centers. If a product is not available in either the source center or the destination center, the product cannot be transferred. Navigate to Master Data > Products and click the product name to edit it. In the Price tab, select the source and destination centers.
Define transfer price and transfer tax for all the centers in the Price tab. This price and tax become the unit price and tax in the transfer order.
Important
A transfer order always considers the transfer price and transfer tax of the source center.
Configure settings at both org level and center level.
Select the role permissions for the inventory managers or store supervisors to, for example, add, edit, delete, and raise orders.
Organization-level settings
Navigate to Configuration > Inventory.
Enable product transfers between centers Allow product transfers in your company
If this option is not selected, the centers will not see the Add Transfer and Add Transfer (Auto) options in the I want to… list on the Manage Purchase Orders & Transfers page.
Allow product checkout, transfer and conversion when stock is not available Allow the creation of transfer orders even when the stock is running low
Enable auto checkouts from store to floor for product transfers
Consider raised purchase orders/transfer orders for calculating Auto PO/TO quantity Deduct the raised transfer order quantity from the alert quantity while creating auto-transfer orders
Restrict editing of transfer orders in the recipient center Do not allow editing of any field in the transfer order
Restrict editing of price, discount & tax fields in the recipient center after the transfer order is raised Do not allow the order details to be updated after it is raised
Restrict delivery of transfer orders in the source center Do not allow the source center to deliver products in its own center in case of push
Allow delivered quantity to be more than ordered quantity in Transfer Order
Center-level settings
Ensure you are at the org level and navigate to Configuration > Inventory.
Cannot raise transfer Restrict a center from raising transfer orders. However, a center that is restricted to raise a transfer order can still create it. This is usually required in case of the warehouse or a single center in the company that is responsible to procure stock from the vendor. : If this option is selected, the centers will not see the Save & Raise button on the order page.
Enable auto checkouts of transfers Allow stock checkouts automatically for transfers
Center acting as a vendor Mark the center as a warehouse
Use default warehouse centers for Transfer Orders Allow centers to receive products only from the default warehouses - defined separately for retail and professional supply.When the centers are creating a transfer order to receive products from the warehouse, only these two centers will be displayed in the Select Center list on the Manage Purchase Orders & Transfers page.
Center acting as a franchise
Mark the center to be an authorized independent entity to work individually.
Transfer Order Label Label to be used while printing or emailing the transfer order
Role permissions
Ensure you are at the org level and navigate to Configuration > Security > Security roles ><role>> Permissions > Inventory.
Add
Edit
Delete
In addition to these permissions, you can enable settings like exporting data from Zenoti to Excel or CSV format.

Create a transfer order
To transfer products to a center or receive them from another center, you have to create a transfer order in Zenoti. If you are transferring products to another center, your center becomes the source center. However, if you are receiving products from a warehouse or another center, your center becomes the destination center.
In Zenoti, you can create a transfer order as a source center or destination center from the same page.
Before you begin, the Admin must ensure the following:
Source and destination centers have the products associated. Navigate to Master Data > Products > <Product name> Price tab of a product to view the centers to which the products are associated. If a product is not associated with your center, reach out to your Admin.
Your center is allowed to create transfer orders.
At Org Level
Select the Configuration > Inventory > Orders > Enable product transfer between centers setting.
At Center Level
Do not select the Configuration > Inventory > Prevent center from raising transfer orders setting. If this setting is enabled, you will not see the Add Transfer and Add Transfer (Auto) options in the I want to...drop-down list on the Manage Procurement & Transfers page.
Click the Inventory icon and navigate to Procurement > Orders.
From the I want to… drop-down list, select the Add Transfer option.
The Create a Transfer Order page appears.
Select a center, source or destination, depending on whether you are creating the transfer order to transfer the products or receive the products. The selected center address is displayed.
When you select Transfer From, it means that you are creating a transfer order to receive products at your center from the selected center. So, your center becomes the destination center.
When you select Transfer To, it means that you are creating a transfer order to transfer products from your center to the selected center. So, your center becomes the source center.
Important
If your company has a warehouse, you will see the center’s name on the list.
In the Product Name field, enter the product name. As you type, you would get suggestions for the product name only if the product is made available for the center and it is associated with the selected vendor.
Note
If you are unable to find a product, check if it is available for both the centers (source and destination) by navigating to Master Data > Products > Click the product name > Price tab.
Enter the quantity of the product you are transferring or receiving. Based on the type of the product, you will see the Retail Qty textbox or the Consumable Qty textbox, or both the textboxes if the product is for both retail and professional supply. You can enter 0 if you are not transferring or receiving the specific product type (retail or consumable). The total order quantity is (Retail Qty + Consumable Qty).
For example, you can enter 20 for Retail Qty and 0 for Consumable Qty. The total order quantity is (20 + 0) = 20.
Note
Before adding the products, you can change the center that you have selected in step 3.
Click Add.
The product is added.
Note
After you add a product, you cannot change the center selected in step 2.
Repeat steps 4 - 6 to add more products.
Important
If a product stock count is 0 and your organization restricts centers to transfer products to another center you to transfer products from your center, you cannot add the product to the order. This is set by disabling the Configuration > Inventory > Allow product checkout, transfer and conversion when stock is not available setting.
However, if this setting is enabled, you will get a warning to which you can agree and proceed with the transfer.
The following details are displayed for each product:
Product Name: Name of the product
Example: Lotus Face Gel
Stock: Current total stock level of the product (both retail and consumable) in your center.
Note
If this quantity is negative, it indicates that the product is running out of stock by the quantity. It could be because of checkout, conversions, and transfers done even on low stock. You need to do a stock count to set the quantities right. Or, raise an order and receive the product.
Last Month Usage: Number of units of the product that was used (retail and professional supply) in the previous month
Last Month Purchase: Number of units of the product (both retail and professional supply) that was purchased in the previous month
Retail Qty: Required quantity of the product for retail
Note
This field is 0 if the product is only a professional supply or you have entered 0 for Retail Qty in step 4.
Consumable Qty: Required quantity of the product for consumption
Note
This field is 0 if the product is only a retail product or you have entered 0 for Consumable Qty in step 4.
MRP ($): Maximum retail price or the Manufacturer Suggested Retail Price of the product
Unit Price ($): Transfer price defined for the source center
If you are transferring the product to another center, this price is the transfer price defined for your center. However, if you are receiving the product from another center, it is the transfer price defined for that center.
Discount ($ or %): Discount defined by the source center
OnDelivery Price ($): Product Price charged by the source center. It is usually the same as the unit price unless the center decides to give you better pricing. The destination center can change it while receiving the delivery.
Total Price ($): (Retail Qty + Consumable Qty) x Unit Price
For example, if the Retail Qty is 20 and Consumable Qty is 30 and the unit price is $5, the Total Price is (20 + 30) x 5 = $250
Tax: Transfer tax defined for the source center. If you have to use a different tax, select it from the drop-down list
Total Tax ($): Total tax on the total price
Notes: Use this field to record any specific details about transferring the product.
Click Save As Draft.
The transfer order is created.
Next Step: Raise the Transfer Order
Dispatch a raised transfer order
After a center raises a transfer order to request products from your center, you must dispatch the order. You can either dispatch the full order or partial order with multiple shipments.
While you are dispatching an order, if the quantity on the floor is low, and your org has enabled the Enable auto checkouts from store to floor for product transfers setting, the stock is checked out from store to floor automatically.
Important
In case you’ve signed up with Zenoti after the April 2020 release, you will not see this setting - it is enabled by default.
In this article, you will know how to dispatch the transfer order in full or partial.
At the center level, click the Inventory icon.
Navigate to Procurement > Orders.
The Manage Purchase Orders & Transfers page appears.
Locate the transfer order as follows:
From the Select a Report drop-down list, select List of Orders.
From the Order Type drop-down list, select Transfer From to get the orders raised to your center.
From the status drop-down list, select Raised.
Note
If you have already dispatched the order partially, select the status as Intransit.
Click the Ref# link of the transfer order.
The transfer order is opened.
Product Code: The code defined by the Admin while adding the product in the Products page.
Product Name: Name of the product
Retail Raised: Retail quantity raised by the center
Consumable Raised: Professional supply quantity raised by the center
Retail Qty: Retail quantity remaining to be dispatched. After you click Save & Dispatch, it is auto-calculated as (Retail Raised - Retail to Dispatch), which is 0 in case of a full dispatch.
Consumable Qty: Consumable quantity remaining to be dispatched. After you click Save & Dispatch, it is auto-calculated as (Consumable Raised - Consumable to Dispatch), which is 0 in case of a full dispatch.
MRP ($): Maximum retail price or the Manufacturer Suggested Retail Price of the product
Unit Price ($): Transfer price defined by your center
Retail to Dispatch: Retail quantity that your center is dispatching. It is auto-populated and it is the same as the raised quantity. Edit this field if you need to do a partial dispatch.
Note
The destination center cannot edit this quantity.
Consumable to Dispatch: Consumable quantity that your center is dispatching. It can be a full dispatch or a partial dispatch. Edit this field if you need to do a partial dispatch.
Note
The destination center cannot edit this quantity.
Discount ($ or %): Discount defined by your center.
OnDelivery Price ($): Product Price charged by your center. It is usually the same as the unit price unless if you want to give better pricing to the destination center. The destination center can also change it while receiving the delivery.
Total Price ($): (Retail Qty + Consumable Qty) x Unit Price
For example, if the Retail Qty is 20 and Consumable Qty is 30 and the unit price is $5, the Total Price is (20 + 30) x 5 = $250
Tax: Transfer tax defined by your center. If you want to use a different tax, select it from the drop-down list
Total Tax ($): Total tax on the total price
Notes: Use this field to record any specific details about transferring the product.
Shipping & Handling: Cost that you incur to dispatch the order and charge to the destination center.
Grand Total: Total cost to transfer the order. It is auto-calculated as(Total Price + Total tax + Shipping & Handling)
(Optional) Before dispatching, if you want you can edit the order details and click Save.
Click Save & Dispatch, if you are doing a partial dispatch or a full dispatch.
The order is dispatched and the status changes to InTransit.
Note
The status does not change for orders that have already delivered stock partially.
If you made a partial dispatch, repeat steps 1 to 5 until you dispatch the full order. However, if you made a full dispatch, wait for the destination center to mark the delivery as Full Delivery (order status changes to Fully Delivered) or Partial Delivery (order status changes to Partially Delivered).
Restrict editing of transfer orders in destination center after dispatch
Disclaimer
Reach out to the source center for any edits after the order is dispatched but before it is marked partial, full, or close.
After the source center dispatches an order, the destination center is not allowed to edit the transfer order. This ensures that there are no stock discrepancies at the source center.
For example, the LA center raises a transfer order for 10 Hair Shampoo bottles to the corporate office or the warehouse. If the warehouse dispatches full stock (10 Hair Shampoo bottles) to the LA center, but the LA center enters Retail Received as 8 bottles rather than 10, the 2 Hair Shampoo bottles are unaccounted for and lead to discrepancy at the warehouse.
For this, Zenoti restricts the destination center from edit the following fields after the order is dispatched - the source center can still edit these details before the order is marked partially delivered, fully delivered, or closed:
At the product level
MRP
Unit Price
Retail Received
Note
The received quantity cannot be less than or more than the dispatched quantity – the source center can still dispatch less than or more than the raised quantity.
Consumable Received
Note
The received quantity cannot be less than or more than the dispatched quantity – the source center can still dispatch less than or more than the raised quantity.
Discount
Taxes
At the order Level
Discount % or $
Shipping and Handling
Other
After an order is dispatched, the Retail Received and Consumable Received are auto-populated based on the Retail To Dispatch and Consumable To Dispatch, respectively. The destination center cannot edit these quantities after the transfer order moves into Intransit, Partial Delivered, or Delivered state.
Raise a created transfer order
After you have created a transfer order, you must raise it to submit to the other center.
Important
You cannot raise a transfer order if your center is not allowed to do so. The Admin can restrict centers from raising transfer orders by enabling the center-level setting.
Click the Inventory icon and navigate to Procurement > Orders.
The Manage Purchase Orders & Transfers page appears.
Locate the transfer order as follows
From the Select a Report drop-down list, select List of Orders.
From the Order Type drop-down list, select either:
Transfer From: If the transfer is from your center.
Transfer To: If the transfer is to your center.
From the status drop-down list, select Created.
All transfer orders that are created in your center are displayed.
Click the desired Ref#.
The transfer order opens in a new tab.
Note
By default, employees with any role permission can view various prices (unit price, mrp, on-delivery price) on the transfer order. However, if the Admin has selected the Configuration > Security > Security Roles > Role Name >Permissions tab > Role > Inventory > Hide Price option, the prices are hidden.

(Optional) Add or edit product details like the required quantities, unit price, discount, and tax. You can also add additional products that you want to transfer or receive.
Click Save & Raise.
The transfer order is raised in Zenoti and it moves to the Raised status. You can edit the order if the organization has allowed you to edit the order after it is raised by enabling Configuration > Inventory > Restrict recipient center from editing price, discount, and tax fields after a transfer order is raised. Restrict recipient center from editing price, discount, and tax fields after a transfer order is raised
Note
If you are the source center, the Save & Dispatch button is displayed for you.
If you are the destination center, the Partially Delivered and Full Delivery buttons are displayed for you.
The following two fields are used as counters for the undelivered quantities:
Retail Qty: (Retail Raised - Retail Received)
Consumable Qty: (Consumable Raised - Consumable Received)
Important
If your Admin has enabled the Consider raised purchase orders/transfer orders for calculating Auto PO/TO quantity setting at the Org level, as soon as you raise a transfer order, the Inventory > Reports > Inventory Alert Reports page is updated with the following:
Retail Undelivered Qty for retail is updated with the Retail Qty and Consumable Undelivered Qty for consumable is updated with the Consumable Qty
Recommended Level for retail is reduced by Retail Qty and Recommended Level for consumable is reduced by Consumable Qty
Notify the source center
After you have raised a transfer order, you can see the Email To Center button on the order page.
Using this button, you can notify the source center about your stock request.
Important
You will not see this button due to the following reasons:
Your center is the source center
Restrict delivery of transfer orders in the source center org-level setting is not enabled
Click Email To Center.
An email is scheduled to be sent to the source center email id (configured while creating the center).
Next steps
Complete one of the following actions depending on the type of center you are, source or destination:
Receive stock from a source center
After you have created and raised a transfer order and the source center has dispatched it, you can receive the order in your center.
While receiving a transfer order, you may or may not be allowed to do certain things in the transfer order if your organization has enabled the following settings:
Restrict editing of transfer orders in the recipient center
To restrict the destination center from editing any details in the transfer order after it is raised
Restrict editing of price, discount & tax fields in the recipient center after the transfer order is raised
To restrict the destination center from editing pricing and tax details after the order is raised
Restrict delivery of transfer orders in the source center
To restrict source centers from receiving the order
Allow delivered quantity to be more than ordered quantity in Transfer Order
To allow destination center to enter received quantity more than the raised quantity
At the center level, click the Inventory icon.
Navigate to Procurement > Orders.
The Manage Procurement page appears.
To open a specific transfer order, enter its number in the Order No box, and click Search. Otherwise, proceed to Step 4.
From the Select a Report list, select List of Orders.
From the Order Type list, select Transfer to Center.
From the Order Status list, select Raised.
From the order date list, select the duration, and then click Refresh.
Click Ref# (reference number) of the order that you want to open.
The order opens in editing mode.
Enter the physical quantity received in the Qty Received box. It is the dispatched quantity.
Note
You cannot edit this quantity - only the source center can edit this quantity.
If a discount was given, enter the discount. The On delivery price and Total price get adjusted as per the quantity received and the discount. Enter Notes, if required.
Enter any other charges as applicable, such as shipping and handling charges.
Mark the order as one of the following:
Partial Delivery
If you have received the order partially, click the Partial Delivery button.
The current stock is updated both in the source center and in your center.
You can mark the order as partial delivery unless you receive the complete order. Click the Delivery History link to view the delivered made to your center for this order.
Full Delivery
If you have received the order fully, click the Full Delivery button.
The current stock is updated both in the source center and in your center.
Return transfer order to warehouse
Before you begin, the Admin must ensure the following:
Source and destination centers have the products associated.
At the organization level, click the Master Data icon.
Navigate to Products.
Select the desired product.
Select the Price tab.
View the centers to which the products are associated.
Transfer orders are enabled for your business and for your center.
At the organization level, click the Configuration icon.
Navigate to Inventory.
Turn on the Enable product transfer between centers.
Ensure the Cannot Raise transfer setting is not selected.
Navigate to Inventory > Procurement > Orders.
The Manage Purchase Orders & Transfers page is displayed.
From the I want to… drop-down list, select the Add Transfer Return option.
The Transfer Order Return page appears.
Select if your center is the source center or destination center:
Transfer To: Select this option if your center is the source center for the return transfer order, which means you are returning the stock.
Select the warehouse.
In the Product Name field, enter the product name. As you type, you would get suggestions for the product name only if the product is made available for both centers.
Note
If you are unable to find a product, check if it is available for both the centers (source and destination) by navigating to the Master Data > Products > Click the product name > Price tab.
Enter the return quantity of the product that you want to return.
Based on the type of the product, you will see the Retail Qty box or the Consumable Qty box, or both the boxes if the product is for both retail and consumable.
You can enter 0 if you are not transferring or receiving the specific product type (retail or consumable). The total return quantity is (RetaiL Qty + Consumable Qty).
For example, you can enter 20 for Retail Qty and 0 for Consumable Qty. The total order quantity is (20 + 0) = 20
Click Add.
The product is added.
Note
After you add a product, you cannot change the center that you’ve selected in step-4.
Repeat steps 5 - 7 to add more products.
The following details are displayed for each product:
Product Code: The code defined by the Admin while adding the product on the Products page.
Product Name: Name of the product
Example: Lotus Face Gel
Stock: Current total stock level of the product (both retail and consumable) in your center.
Note
If this quantity is negative, it indicates that the product is running out of stock by the quantity. It could be because of checkout, conversions, and transfers done even on low stock. You need to do a stock count to set the quantities right. Or, raise an order and receive the product.
Last Month Usage: Number of units of the product that was used (retail and professional supply) in the previous month
Last Month Purchase: Number of units of the product (both retail and professional supply) that was purchased in the previous month
Retail Qty: Required quantity of the product for retail
Note
This field is 0 if the product is only a professional supply or you have entered 0 for Retail Qty in step 4.
Consumable Qty: Required quantity of the product for consumption
Note
This field is 0 if the product is only a retail product or you have entered 0 for Consumable Qty in step 4.
MRP ($): Maximum retail price or the Manufacturer Suggested Retail Price of the product
Unit Price ($): Transfer price defined for the source center
If you are transferring the product to another center, this price is the transfer price defined for your center.
Discount ($ or %): Discount defined by the source center
OnDelivery Price ($): Product Price charged by the source center. It is usually the same as the unit price unless the center decides to give you better pricing. The destination center can change it while receiving the delivery.
Total Price ($): (Retail Qty + Consumable Qty) x Unit Price
For example, if the Retail Qty is 20 and Consumable Qty is 30 and the unit price is $5, the Total Price is (20 + 30) x 5 = $250
Tax: Transfer tax defined for the source center. If you have to use a different tax, select it from the drop-down list
Total Tax ($): Total tax on the total price
Notes: Use this field to record any specific details about transferring the product.
Click Save As Draft.
The transfer order is created.
Next steps
After you've created a return transfer order, the next step is to raise it and then dispatch the stock, which is similar to the way you will raise and dispatch a transfer order.