FAQ and troubleshooting
You may not be able to view the Product Consumption report for the following reasons:
You’ve not audited stock for more than three months.
For this, complete the audit and reconciliation and generate the report exactly one day after the reconciliation.
For example, if the audit is reconciled on Jan 1, 2020, you will be able to generate this report from Jan 2, 2020.
You’ve submitted an audit and are waiting for reconciliation. In case your business has enabled Approvals, you have to wait for the reconciliation to be approved.
Your business may use products manufactured in-house or bought from vendors.
If you want to promote the purchase of these products, the best way is to offer a sample to your guests. The sample may also be a product related to the client’s treatment.
For example, if a guest has a manicure, you could pop in a sample nail cuticle oil or a nail file.
The guests can try these samples before buying the products of higher value.
Your business does not generate any revenue when a sample is handed over to guests. However, your business does invest money in manufacturing or purchasing the samples.
So, it is imperative for the business to track and keep a record of the samples given to your guests. This allows you to avoid pilferages and also understand if there are samples frequently asked or rejected by guests.
In Zenoti, you can track free samples using one of the two ways:
Maintain separate stock for testers: Procure or manufacture products specifically to use as sample or tester products.
Use on-hand stock as testers: Use retail or consumables that you’ve purchased from vendors or from other centers as sample or tester products.
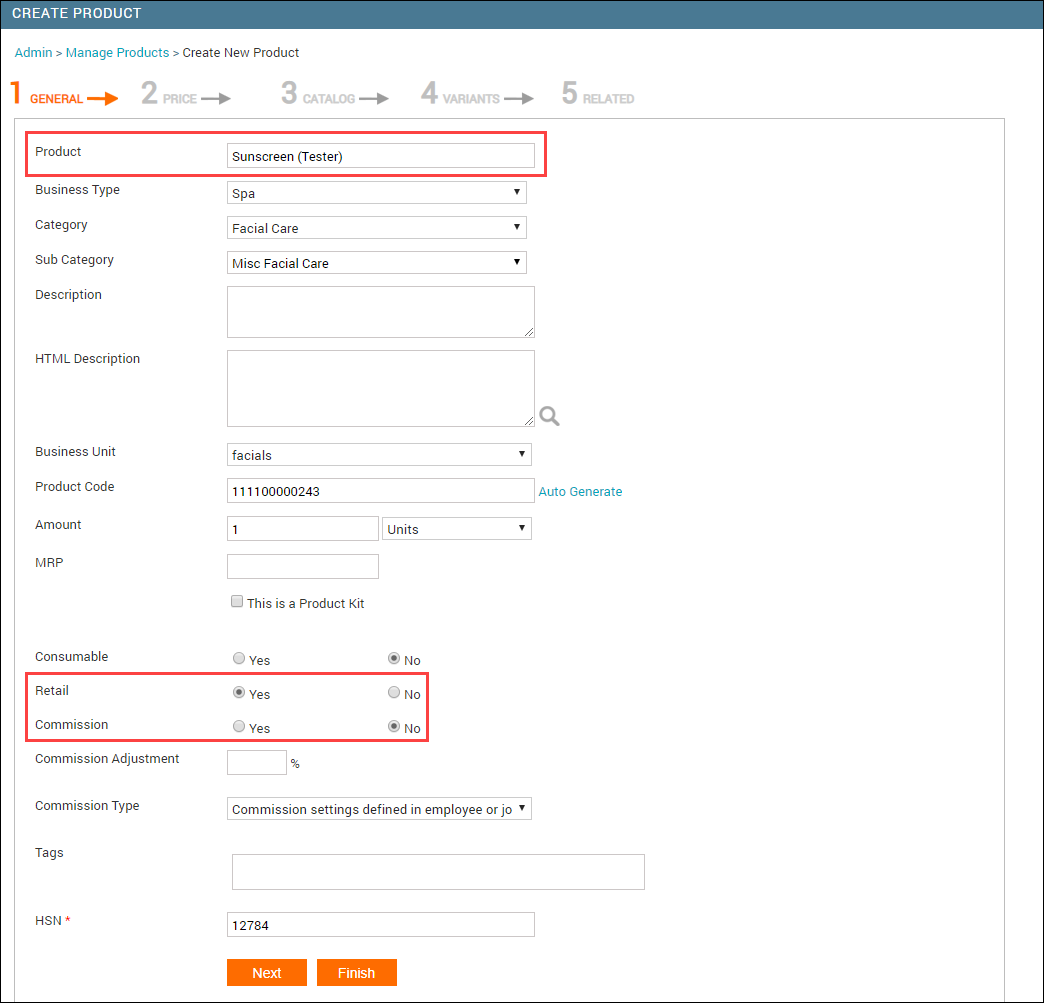
Create a product and name it appropriately to indicate that it is a free sample.
Let’s say that your business manufactures a sunscreen lotion in-house. Let’s say that your business manufactures a sunscreen lotion in-house. When you add this product in Zenoti, you can name the product as Sunscreen (Tester) or Sunscreen (Free Sample).
Create a new guest profile to which you want to give the free sample. This will help you track the number of testers that you have taken from your inventory.
Note
Each center can create a guest profile to manage testers at the center level.
Sell the tester in a separate invoice to this sample guest profile that you have created and apply a discount of 100%.
Create an always-on media campaign of 100% discount at the org level and make it available at all centers. Each center can then individually apply this campaign to all the invoices in which the testers are sold.
This ensures that there’s no revenue generated from such sales and the respective center is not liable to any tax.
To remove professional (consumable) products from inventory, perform the following steps:
At the center level, click the Inventory icon.
Navigate to Stock Levels > Consumables > Check Out.
The Checkout Consumable Products page appears.
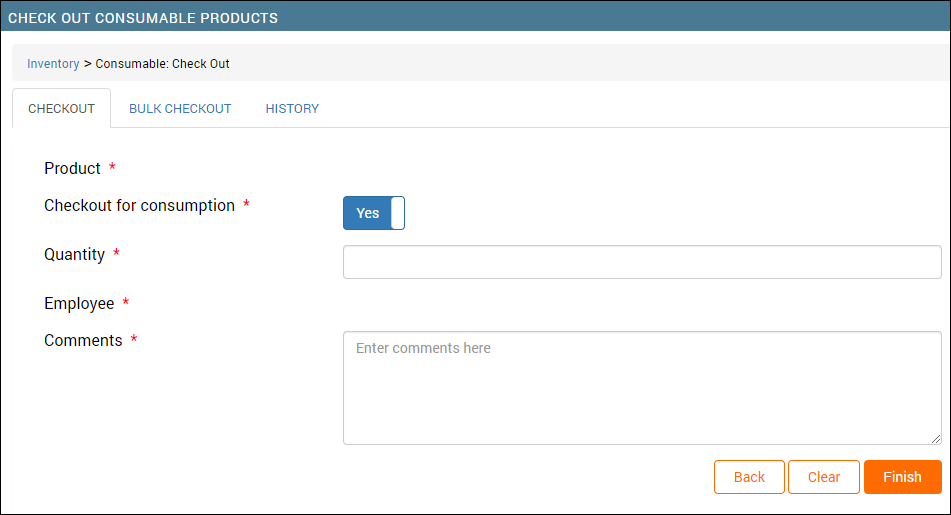
In the Product box, enter the name of the product to be checked out or scan its barcode using a scanner.
The unit and current store quantity of the product appears automatically.
Select the Checkout for consumption checkbox.
Note
If the organization-level Manual checkout for consumption when checking out from store to floor setting is selected, this checkbox is selected by default.
In the Quantity box, enter the checkout quantity, which must be less than or equal to the current store quantity.
Select the employee who is responsible for the checkout.
In the Comments box, enter notes, if any.
Click Finish.
The product is checked out from the store directly and checked-out product appears in the Check Out History section.
If you've products that you are no longer using at your center, do not forget to remove the center-product association. Otherwise, the products will be added to the Auto Purchase Order page, and you might end up ordering products that you are not using anymore.
At the organization level, click the Master Data icon.
Click Products.
Search for the product and open it for editing.
Click the Price tab.
Clear the checkbox for the center where you want to discontinue the product.
Click Save.
The product is disassociated for the selected centers and will not appear on the Auto-Purchase Order page.
What are the possible statuses for an order?
Based on the actions you perform such as creating an order, submitting an order, or updating an order, an order type can have one of the following statuses:
Created: A purchase order is in Created status when you save the Purchase Order without submitting it to the vendor.
Note
In the Created status, you can continue to add products that you want to procure.
Example: Let’s say you are short of 50 bottles of Citrus Face Pack and 25 bottles of Peach Face Scrub. You create a purchase order and add 50 bottles of Citrus Face Pack and save the order. The order is created and the status of the order changes to Created. Later, you can open the same purchase order and add 25 bottles of Peach Face Scrub.
Raised: A purchase order is in Raised status when you save and submit the Purchase Order to vendors. In the Raised status, you can mark the purchase order as partially delivered or fully delivered based on the quantity you receive from the vendor.
Note
For every partial or full delivery you mark, Zenoti automatically updates the current stock.
Example: Let’s say that you are short of 50 bottles of Citrus Face Pack. You create and submit the purchase order to the vendor. The order is submitted and the status of the order changes to Raised.
Updated: A purchase order is in Updated status when you accept partial delivery of an order, but you click Save instead of marking it as Partially Delivered.
Example: Let’s say that you have raised a purchase order requesting 50 Papaya chapsticks for retail use. However, for some reason, your vendor was able to deliver only 30 chapsticks. Therefore, you update retail portion of purchase order with the received quantity and just save it. The order is updated and the status of the order changes to Updated.
Partially Delivered: A purchase order is in Partially Delivered status when you accept partial delivery of an order in two or more shipments.
Example: Let’s say that you have raised a purchase order requesting 50 Papaya chapsticks for retail use. However, for some reason, your vendor was able to deliver only 30 chapsticks. Therefore, you update retail portion of purchase order with the received quantity and mark it as Partially Delivered. The order is updated and the status of the order changes to Partially Delivered.
Delivered: A purchase order is in Delivered status when you accept full delivery of the requested products.
Example: Let’s say that you have raised a purchase order requesting 30 Mint chapsticks for retail use. Your vendor delivered total stock as requested. Therefore, you update the retail portion of purchase order with the received quantity and mark it as Fully Delivered. The order is updated and the status of the order changes to Delivered.
Resetting inventory is a two-step process:
Reset retail
Reset consumables
Note
Before you begin, we recommend that you export all current stock details and keep it as a backup.
At the center level, click the Inventory icon.
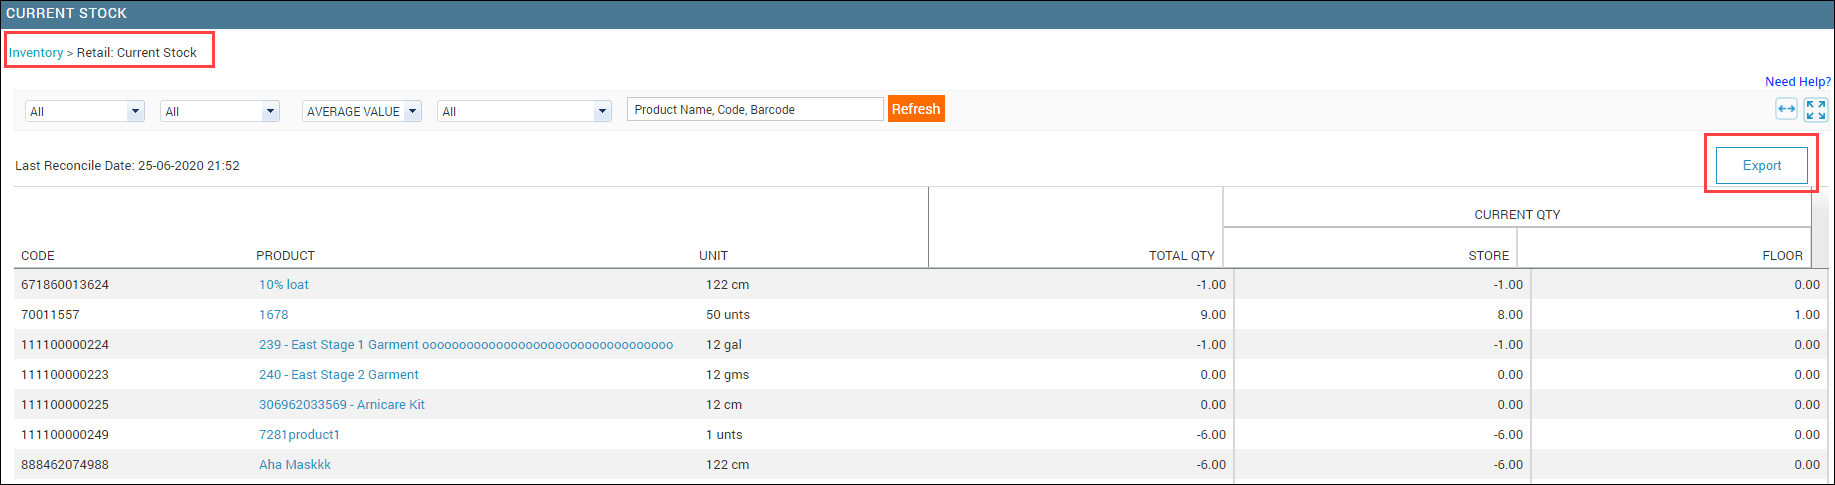
Navigate to Stock Levels > Retail > Current Stock.
The Current Stock page appears for retail products.
Click Export and select the format to which you want to export the details.
Navigate to Inventory > Stock Levels > Consumables > Current Stock.
The Current Stock page appears for consumables products.
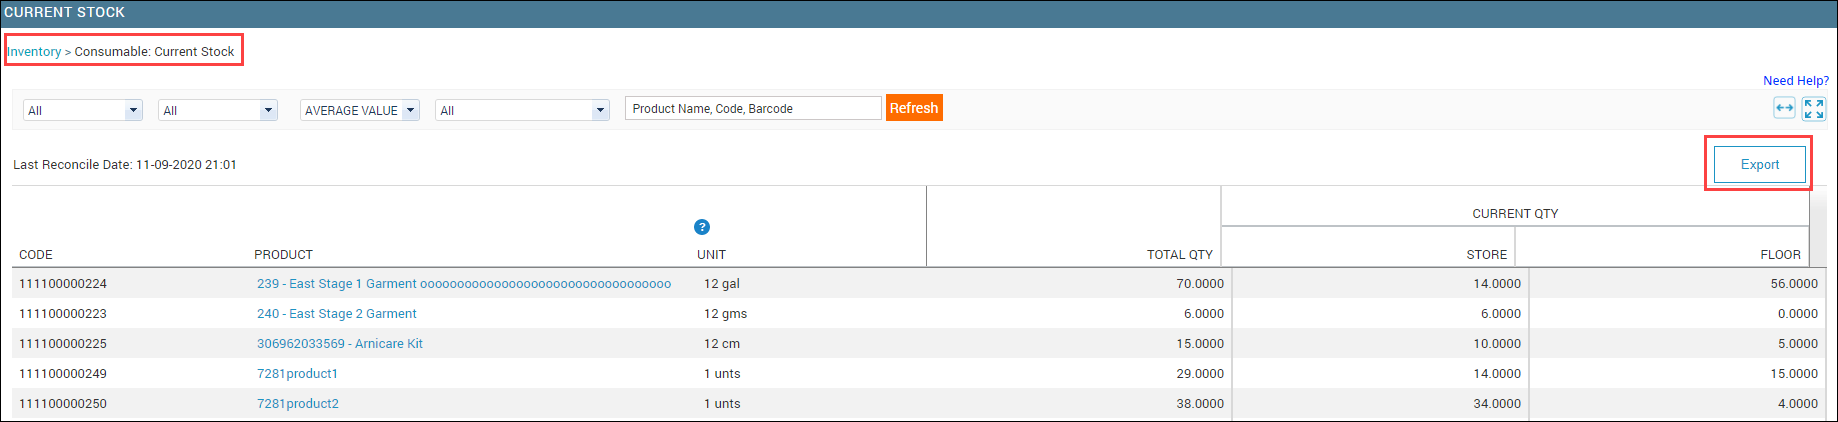
Click Export and select the format to which you want to export the details.
Navigate to Inventory > Stock Levels > Retail > Audit.
The Audit Inventory page for retail products appears.
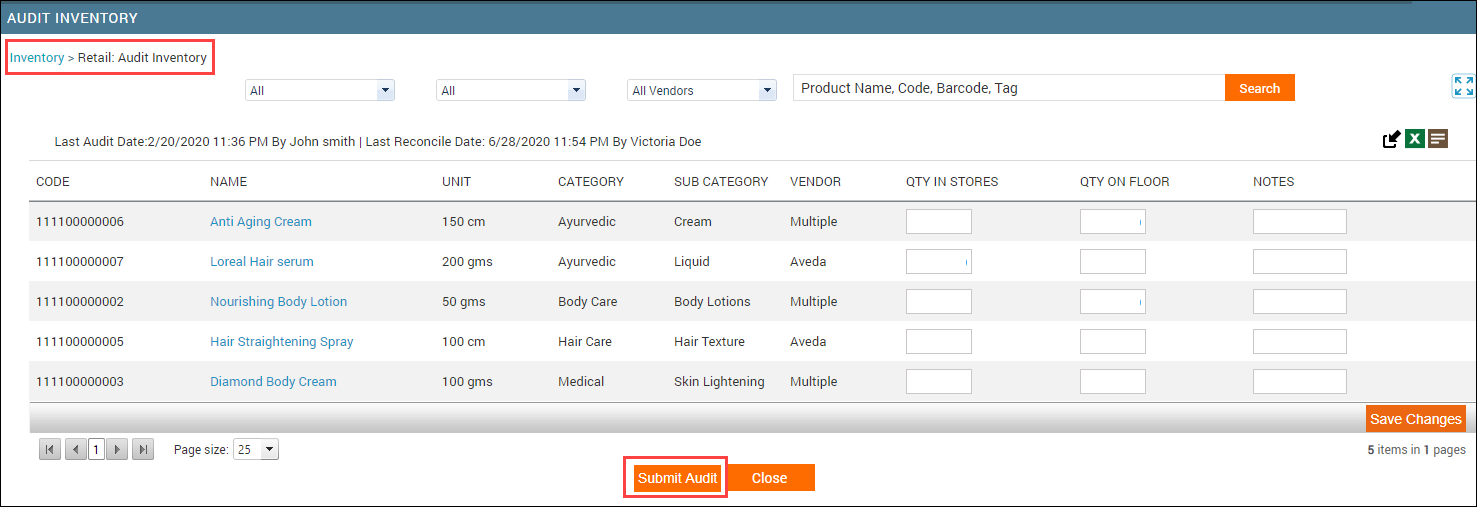
Click Submit Audit. A series of confirmation dialog boxes appear.
Click Ok on each dialog box.
The Audit Details dialog box appears.
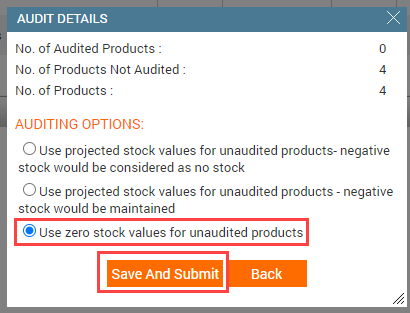
Do not enter any stock quantities and select the third option Use zero stock values for unaudited products to set all stock quantities to zero irrespective of the current stock quantities.
Click Save and Submit.
The zero audit is submitted for reconciliation.
Navigate to Stock Levels > Retail > Reconcile.
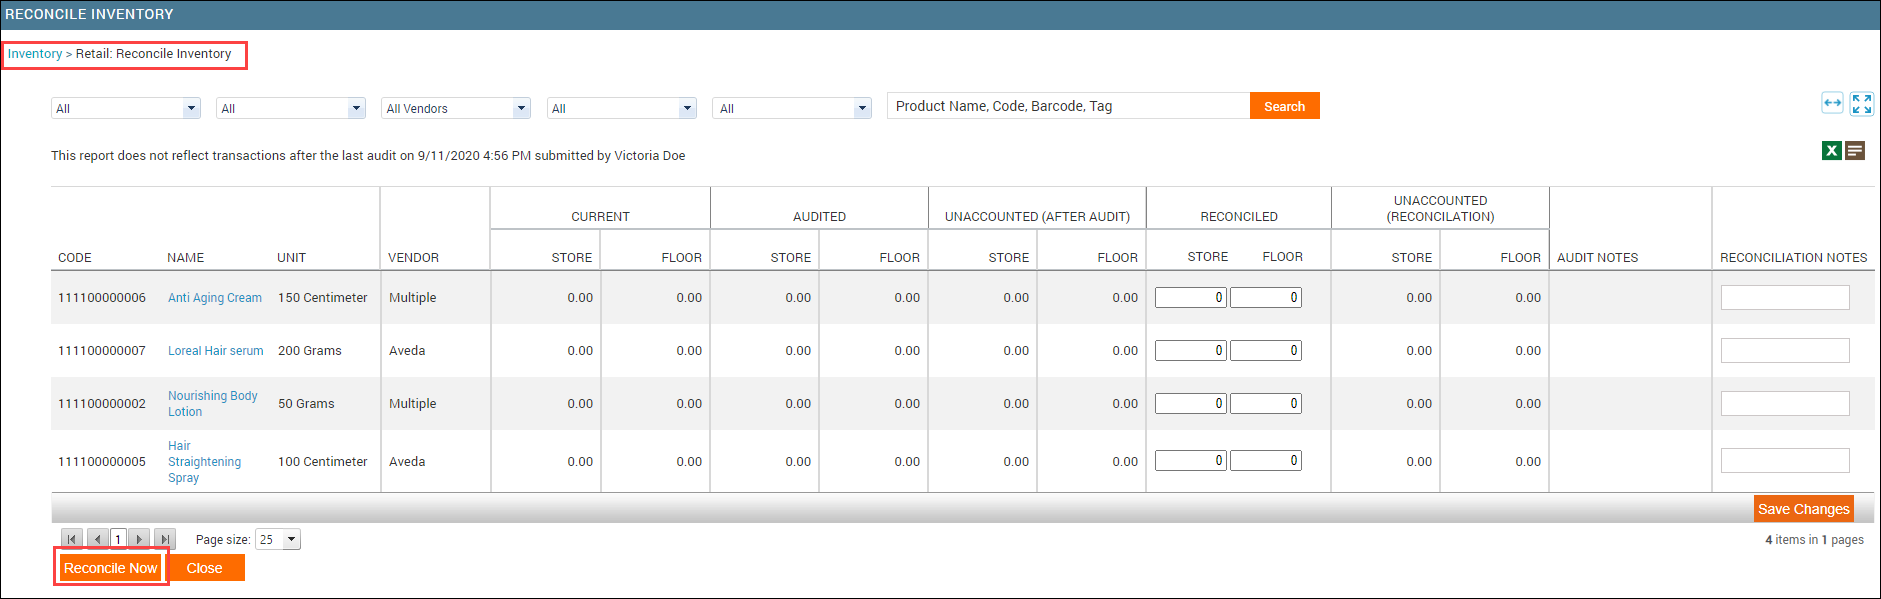
Click Reconcile Now.
A series of confirmation dialog boxes appear.
Click Ok on each dialog box.
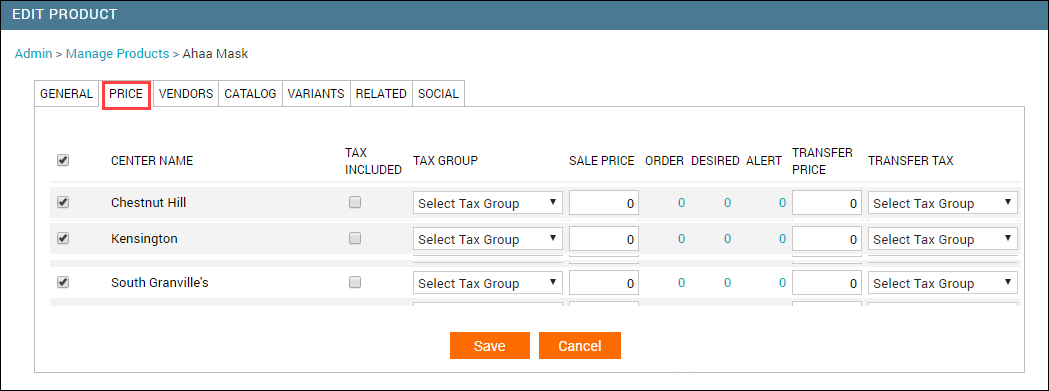
At the organization level, click the Master Data icon.
Navigate to Products.
Click the product code to edit it.
Click the Price tab.
You can view the pricing, tax, and stocking details for the product.

At the organization level, click the Configuration icon.
Navigate to Products.
Click the product code to edit it.
Click the Price tab.
You can view the pricing, tax, and stocking details for the product.

The Product Levels window pops up.

Enter the order, desired, and alert quantities for retail and for consumable.
Click Save.
The total quantities are updated for the product.
If you don't see the cost (amount at which you procure the product from vendors) of the product, that means the Hide Price permission is disabled for your role.
Note
If you are the manager, you can enable it yourself. However, if you do not have access to Security Roles, reach out to the corporate office or head office.
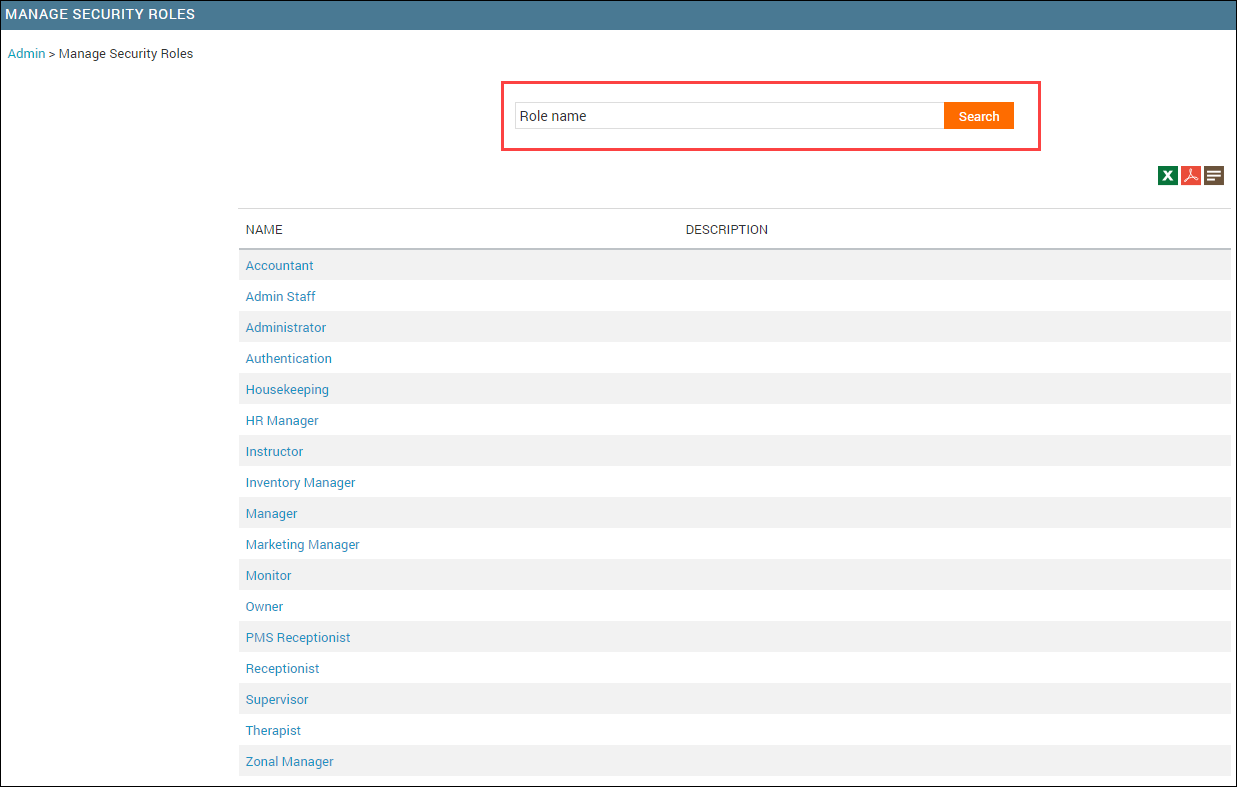
At the organization level, click the Configuration icon. Navigate to Security > Security roles.
Search for the desired role and click it for editing.
Click Permissions.
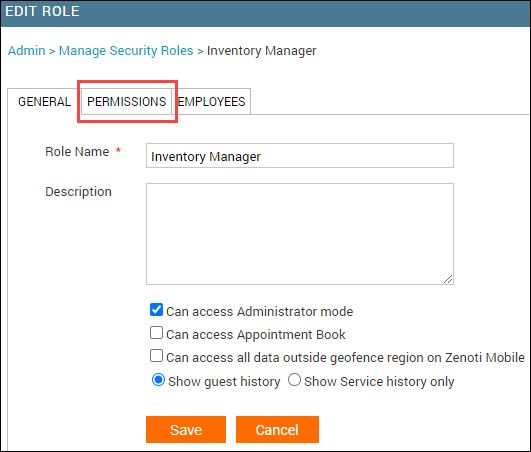
Expand Inventory Manager.
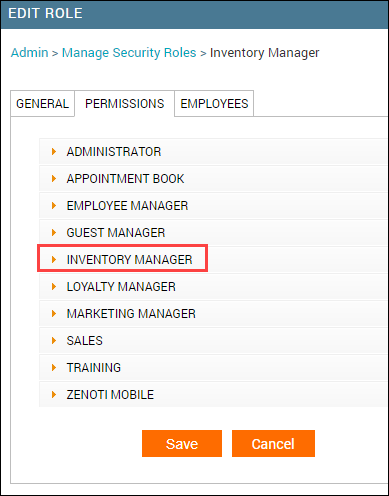
Select the Hide Price check box.
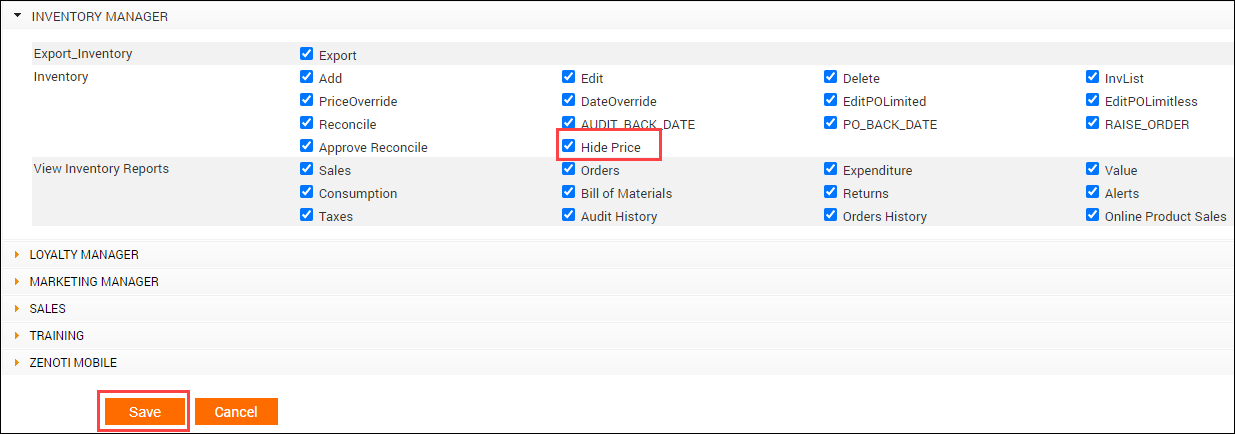
Click Save.
After you have set the alert levels, and notifications (SMS or Email) are enabled for your organization, you can choose to notify the Inventory Manager or a specific employee when a product's quantity reaches the Alert Level to avoid overnight shipment charges.
Note
You can set the notifications either at the organization level or at the center level.
Click the Configuration icon.
At the organization level, click the Configuration icon and navigate to Alerts.
At the center level, click the Configuration icon and navigate to Alerts.
The Organization or Center page appears based on the navigation.
Click the Alerts tab.
Note
The Alerts tab appears only if the Enable Alerts checkbox is selected.
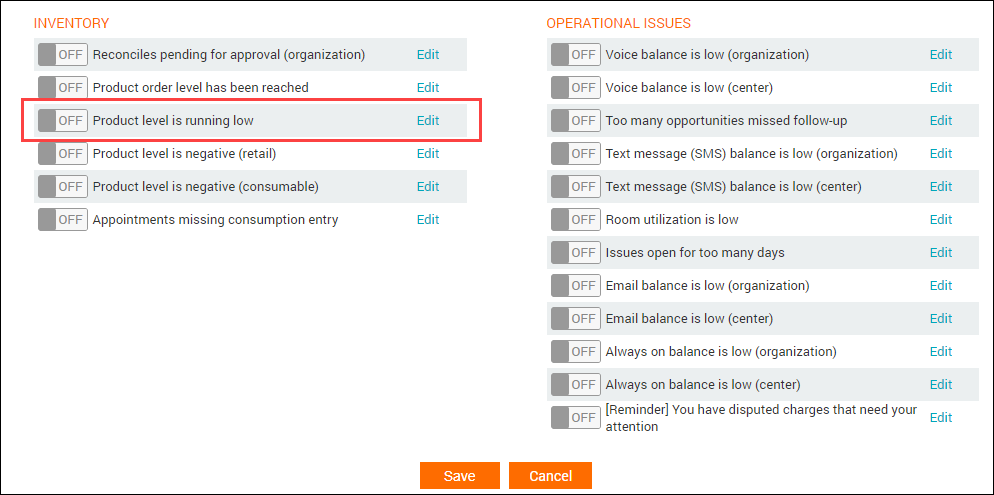
Toggle the switch to from OFF to ON for Product level is running low.
The Edit Alert Rule window pops up.
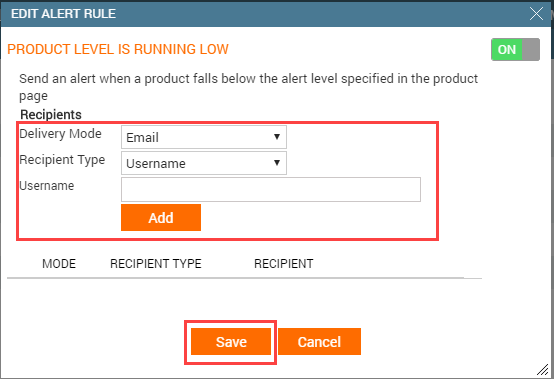
Select the Delivery Mode and Recipient Type as desired.
You can add multiple roles and employees.
Click Save.
The notification is enabled and the details are saved.
After you have raised a transfer order, you can see the Email To Center button on the order page.
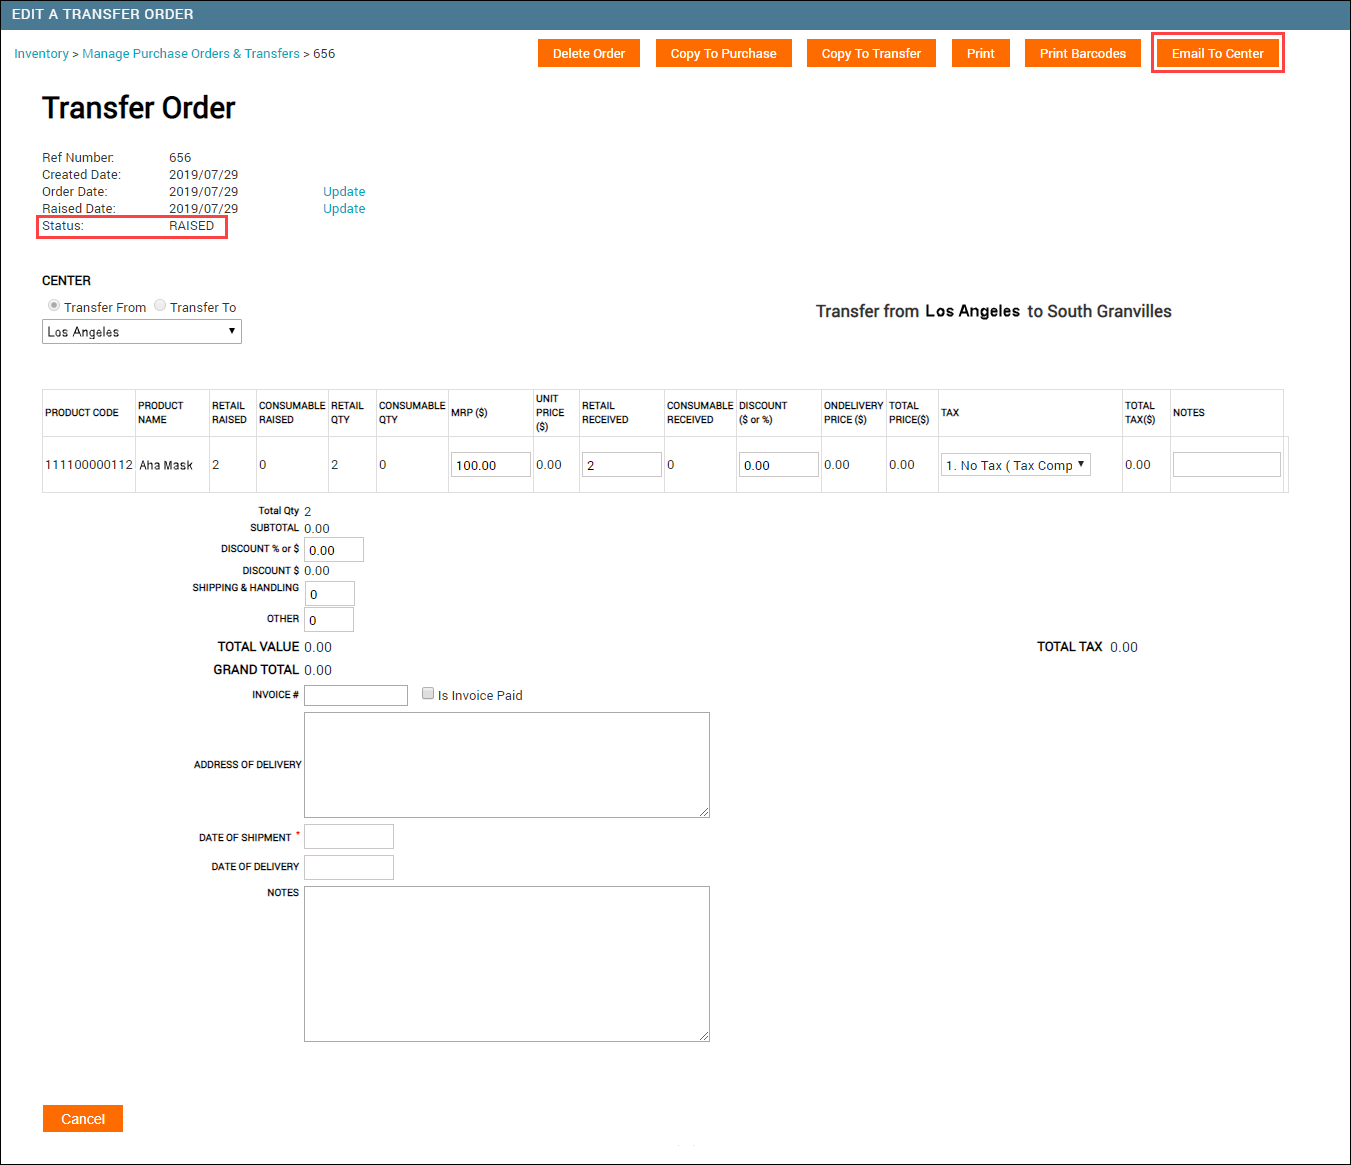
Click Email To Center to notify the source center about your stock request.
An email is scheduled to be sent to the source center email id (configured while creating the center).
Important
You may not see the Email To Center button if your center is the source center and the Restrict delivery of transfer orders in the source center org-level setting is not enabled.
If you have the required permission, you can backdate a purchase order or transfer order in any of the statuses: Created, Raised, and Delivered, unless you have not as follows:
At the center level, click the Inventory icon.
Navigate to Procurement > Orders.
The Manage Purchase Orders & Transfers page appears.
Search for the order and click the Ref# to open the order.
The order is opened for editing.
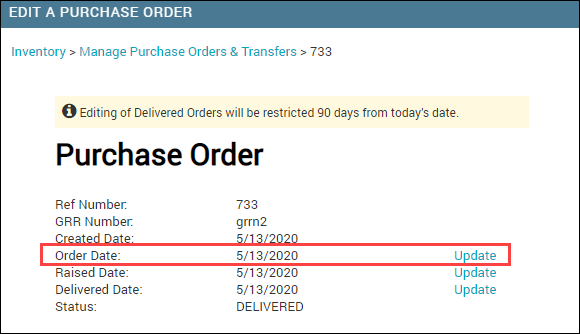
Click Update for Order Date.
Important
You may not see the Update option due to the editing restrictions (financial lock or edit lock).
Select the desired date in the past.
Important
If the financial lock or the edit lock is enabled for your business, you are allowed to backdate only till a certain date.
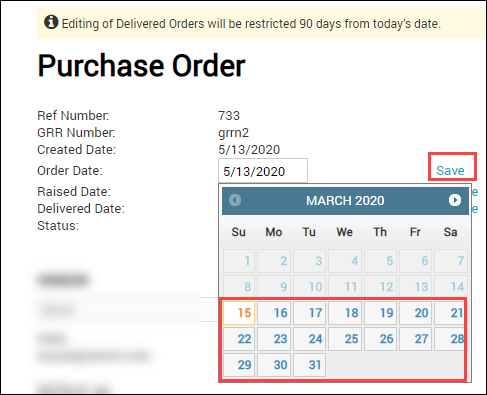
Click Save.
The Comments box appears.
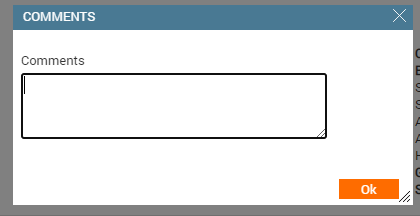
Enter the comments and click OK.
The order is backdated.

You get the There are either no products defined or there is a pending audit that has not been reconciled message for two reasons:
Either the products are not added or made active for your center.
You can reach out to the corp office or head office to add the products. If the products are added, but not available at your center, you can go ahead and do that.
Or, you've already submitted an audit for reconciliation.
Wait for your manager to reconcile the audit.
To view the pending audit, navigate to Inventory > Reports > Audit History report.
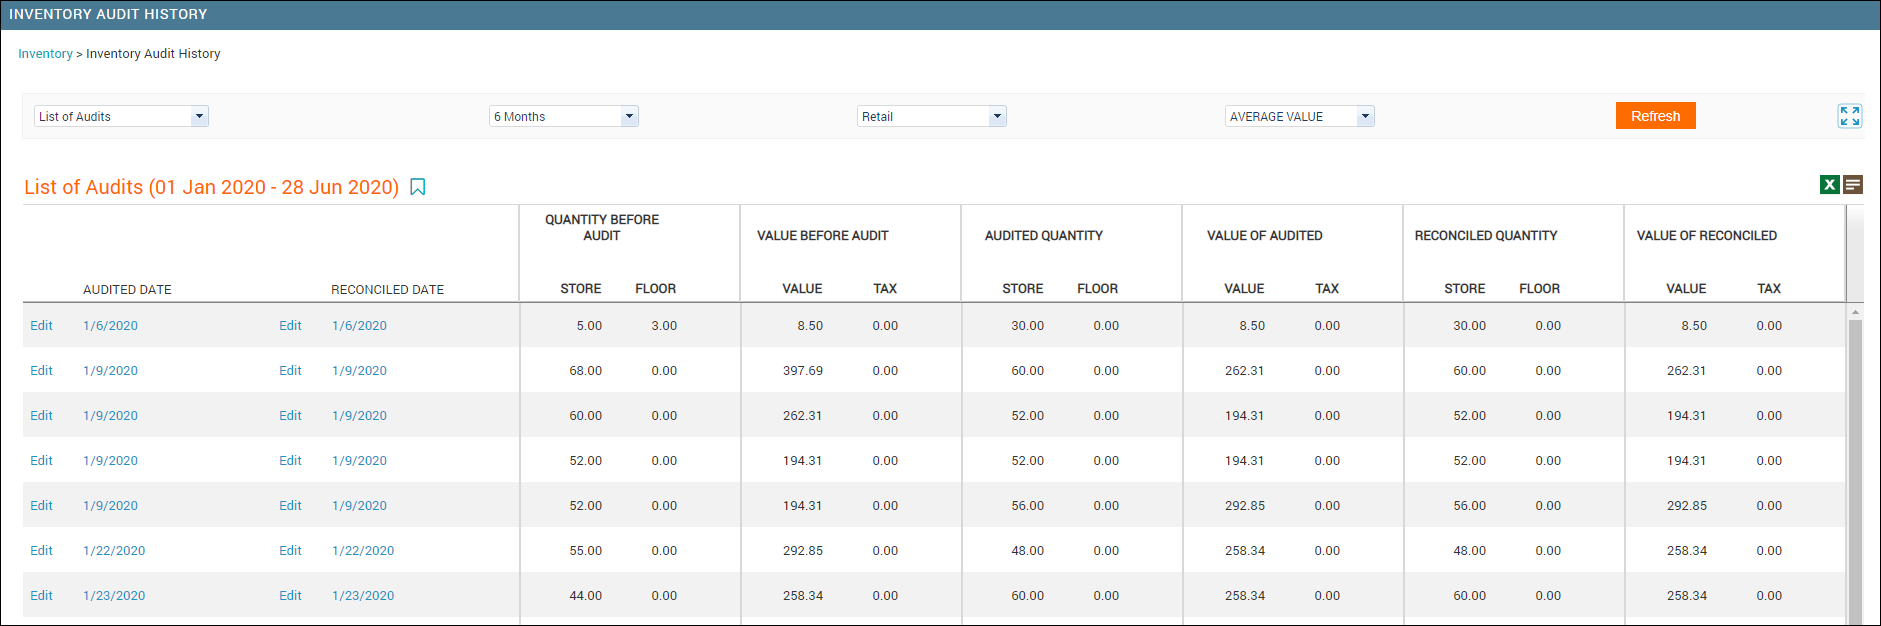
Important
If you are the manager, you must reconcile all audits (both retail and consumable) on the Zenoti Web, irrespective of whether you've done the audit on Zenoti Web or Zenoti Mobile app.
Watch a quick video on Reconciliation on Zenoti Web
Or, read our complete help article on reconciliation.
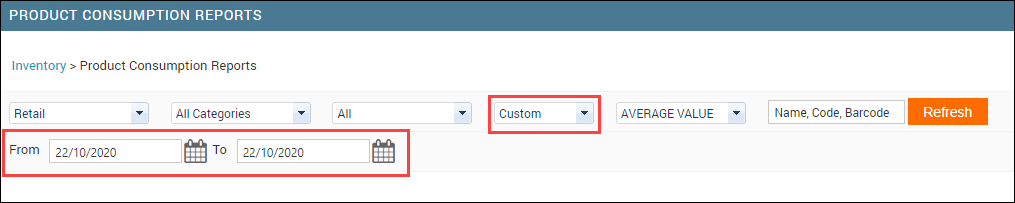
Use the stock level filter on the Current Stock page.

While you are submitting an audit, you can see three auditing options for the unaudited products. This is to let Zenoti know how the unaudited products must be considered for auditing.
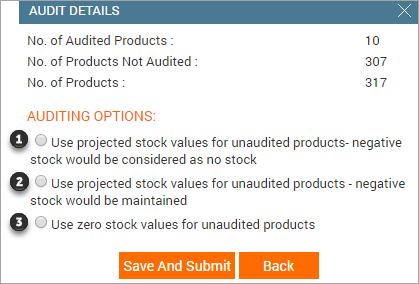
Use projected stock values for unaudited products - negative stock would be considered as no stock
Zenoti projects current stock quantities based on the orders received, conversions, sales, and in-service consumption.
When this option is selected, you allow Zenoti to fill up the quantities for the unaudited products with these projections. For the negative quantities, Zenoti sets them to zero.
Use projected stock values for unaudited products - negative stock would be maintained
Important
Select this option to audit a few products
When this option is selected, stock quantities for unaudited products are set to the quantities from current stock. Stocks that have negative quantities will continue to show as negative.
Use zero stock values for unaudited products
When this option is selected, stock quantities for unaudited products are reset to zero irrespective of the quantities they have in the current stock. Stocks that have negative quantities are also reset to zero.
Transfer price for a product is used when transferring a product to another center.
If you are the owner or admin for the organization, you can define the transfer price/tax for a product.
At the organization level, click the Configuration icon.
Navigate to Master Data > Products.
Click the product name for which you want to define the transfer price.
The Edit Product page appears.
Click the Price tab.
Enter the transfer price in the Transfer Price box and select the desired transfer tax from the Transfer Tax drop-down.
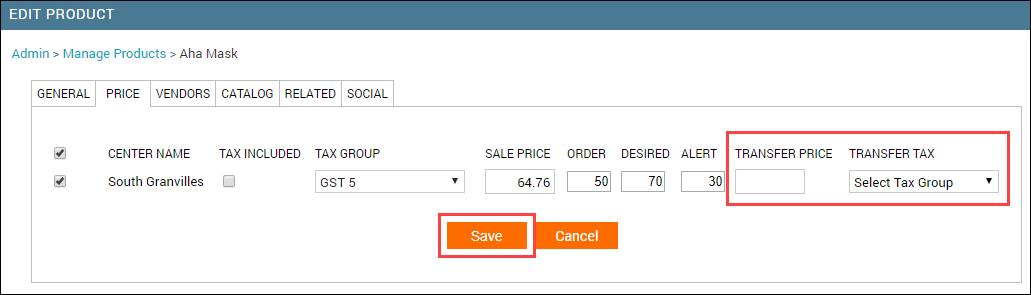
Click Save.
You've added the transfer price and tax for the product.
For a new product, you can add the cost or the selling price at the organization level.
Before you begin, you must either have admin or owner permission to add a product its price.
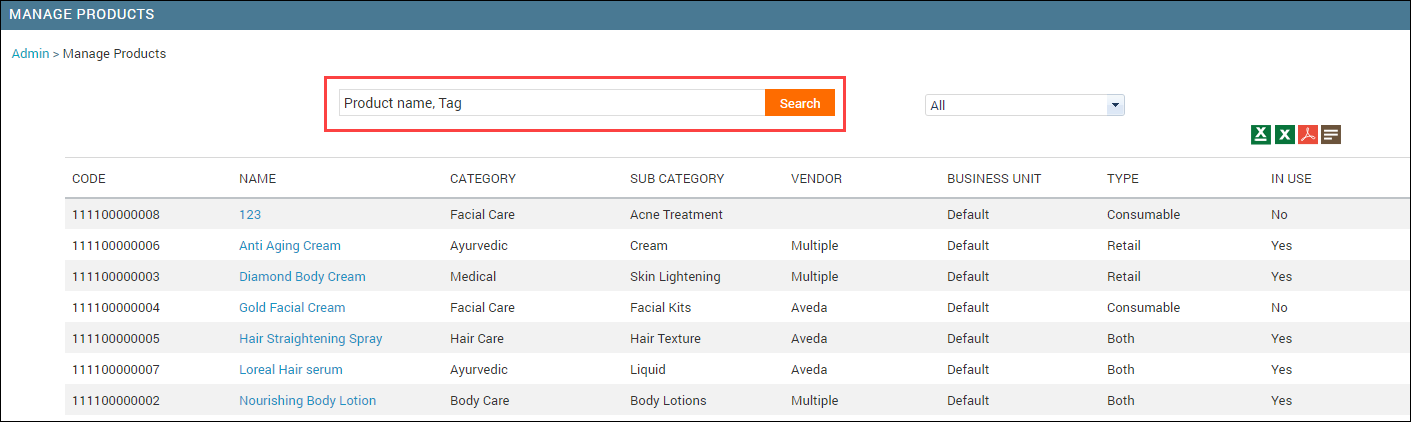
At the organization level, click the Configuration icon and navigate to Master Data > Products.
The Manage Products page appears.
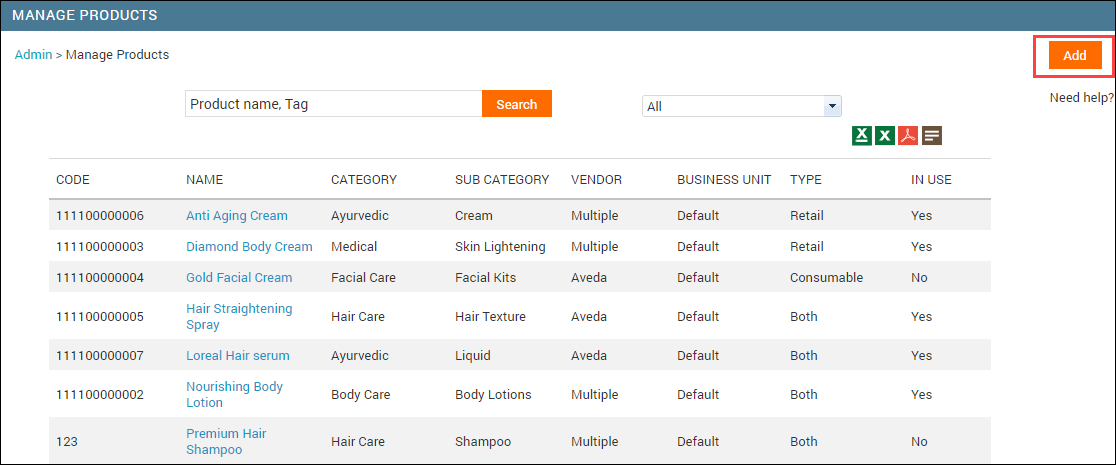
Click Add at the top-right corner of the page.
The product details appear.
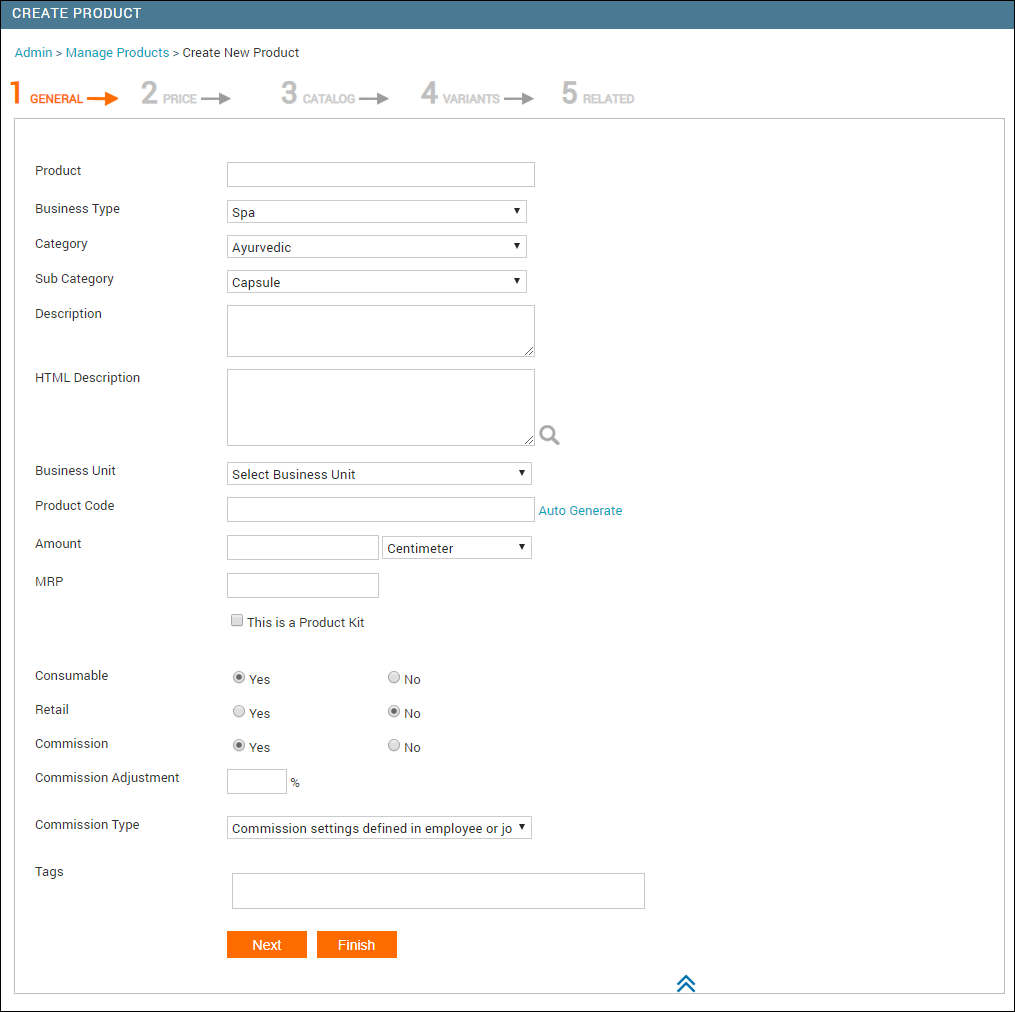
Enter the general details of the product.
Click Next to go to the Price tab.
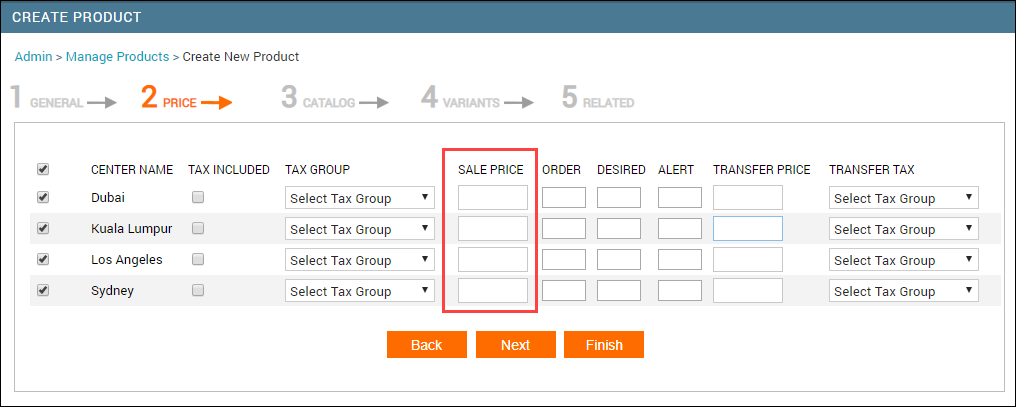
In the Sale Price box, enter the price at which you want to sell the product to your guests. You must do this for each center where this product is available.
After you are done entering the sale price for all centers, click Finish.
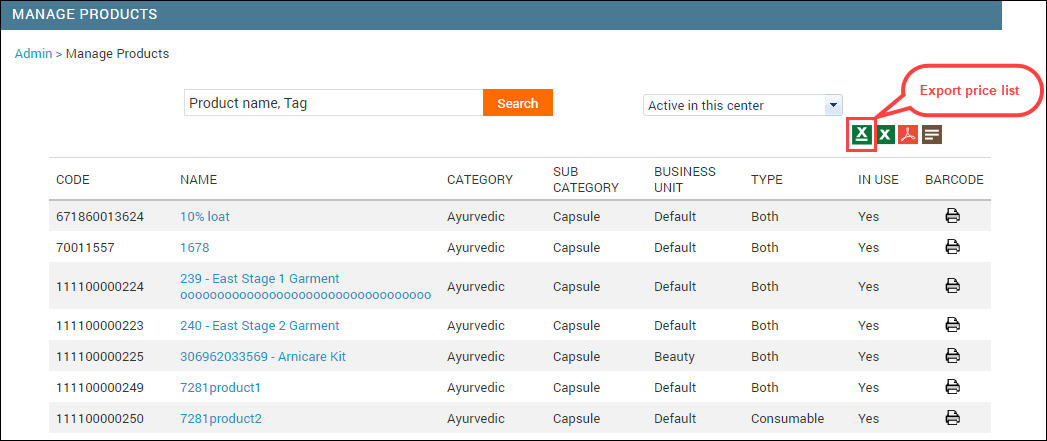
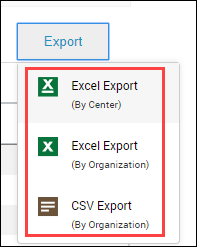
You can export the price list of all the products by clicking the Excel icon for the price list.
To print the current stock of one center or all centers, first export it by using the Export option on the Current Stock page and then print the exported file.
At center level
At Org or Corp level
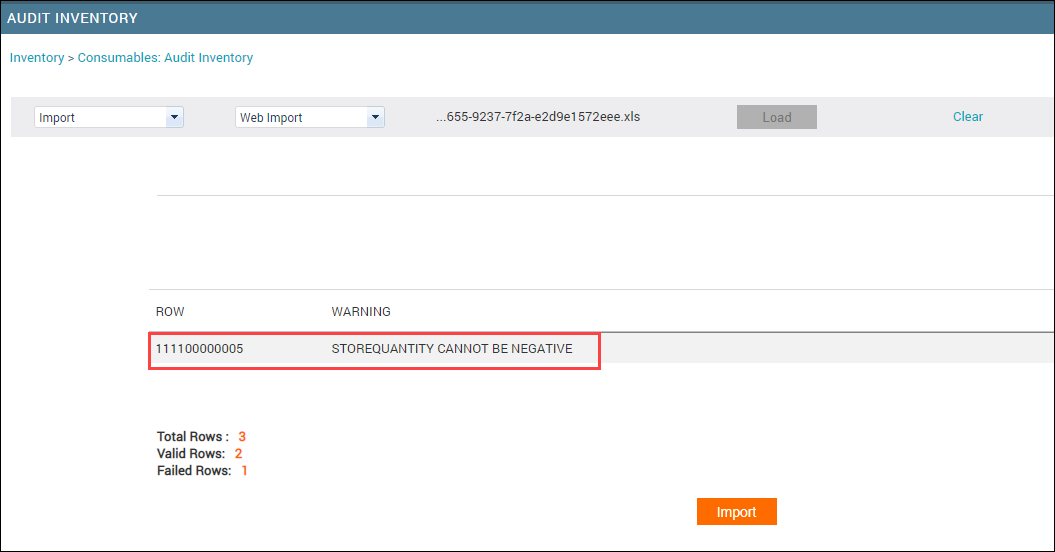
While you are uploading an audit file to Zenoti, you may across some errors, or you may not be able to upload the file itself.
Here are a few guidelines that you can follow to avoid such problems:
Export the stock data from Zenoti to either an Excel file or CSV file.
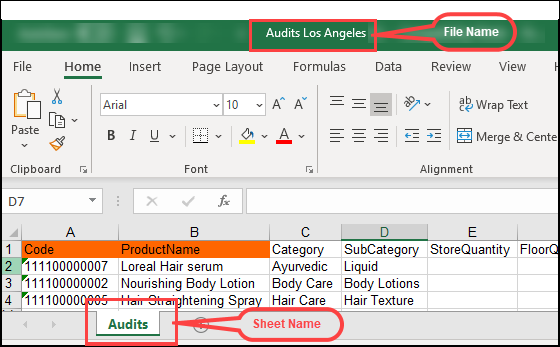
Do not rename the file or the sheet name in the file.
Enter only positive stock quantities. Do not enter quantities in minus, for example, -10.
Do not change other details: Code, Product Name, Category, and Subcategory.
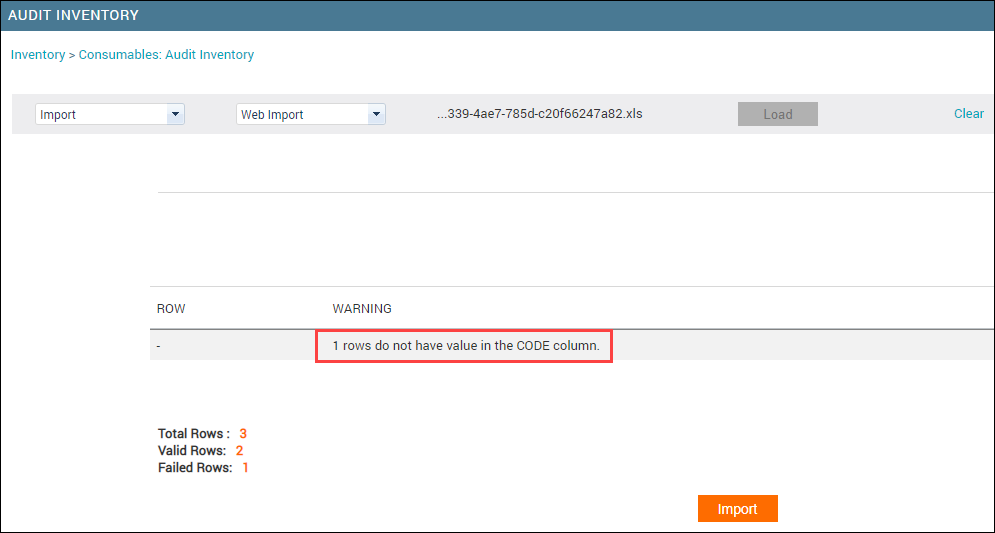
If you see that a product does not have a code, you must first add it in Zenoti, add it here in the sheet, and then finally import the sheet to Zenoti.
Ensure that the file size is not more than 3MB.
You can print barcode labels only for products that have a barcode assigned.
At the organization level, click the Configuration icon.
Navigate to Products.
Search and click the product you wish to confirm the barcode association.
The Edit Product page opens.
In the General tab, locate the Product Barcodes field, and verify if the product has a barcode.
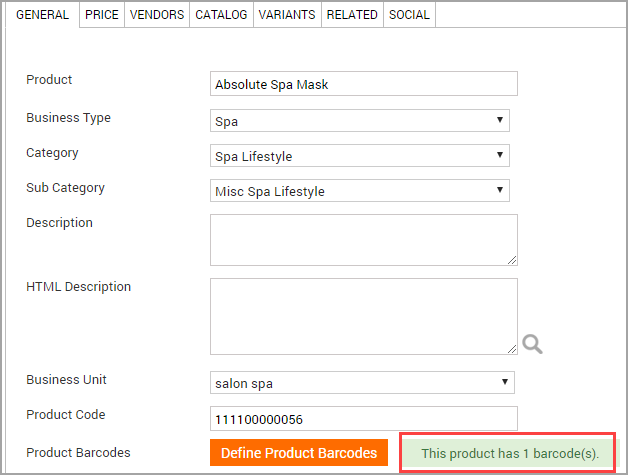
If the product has at least one barcode assigned to it, you can see The product has 1 barcode(s). When you print barcode labels, this code is printed on the labels.
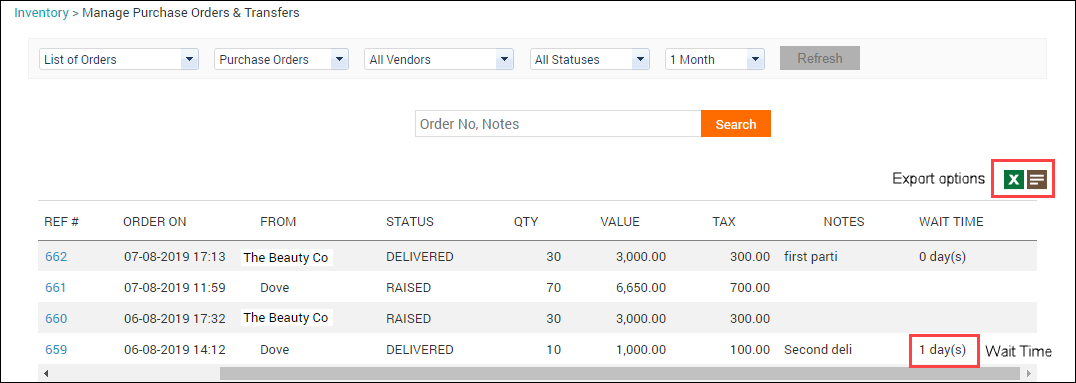
Purchase order wait time is the total number of days from the date when it is raised until it is fully received in Zenoti.
To know the wait time for a purchase order
Click the Inventory icon and navigate to Procurement > Orders.
The Manage Purchase Orders & Transfers page appears.
Look for the Wait Time column by scrolling to the right.
Note
You can also export the purchase orders and know the wait time of each purchase order.
The reason you are not seeing the product on the purchase order page is because of following reasons:
Vendor-Product Association is MissingThe product is not associated with the vendor you've selected on the purchase order page.
Here's how you can associate a product to a vendor.
Product is Inactive in Your Center
To mark the product as active, follow these steps:
Navigate to the product page as follows: Organization > Master Data > Products > click Add to add a new product or click the name of the product you want to edit.
The General tab opens.
Enter the general details of the product and click Next, or simply click the Price tab if you want to edit the price details.
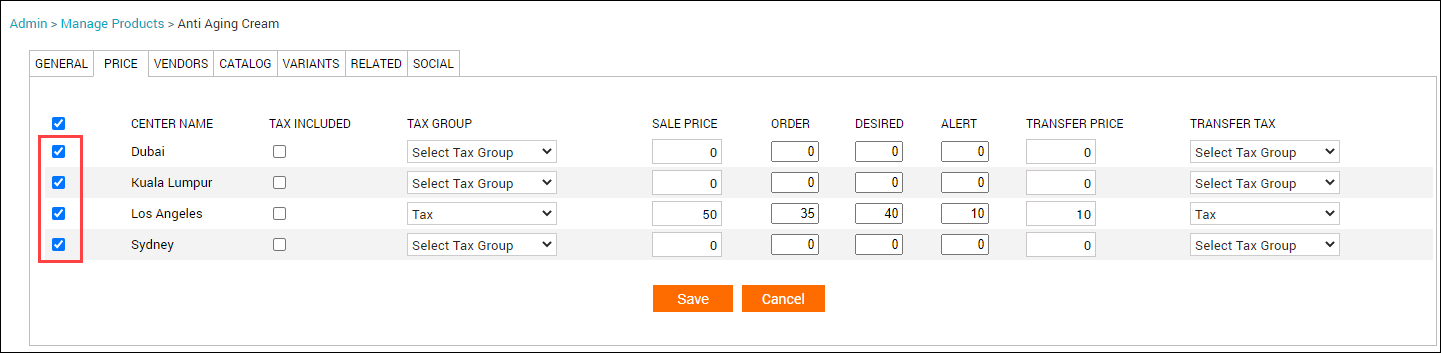
On the Price tab, complete the following actions:
Center Name: Select your center name.
Tax Included: Select this checkbox to include the tax in the list price itself.
Example: If your list price of a product is $100 and percentage tax in the assigned tax group is 5%:
If you select the Tax Included checkbox - the list price becomes inclusive of tax and the list price of the product appears as $105.
If you do not select the Tax Included checkbox, the 5% tax is added additionally to the sale price. On invoice, the price of the product appears as $100 and $5 as tax.
Tax Group: Select the appropriate tax group for the product from the drop-down list.: To have a tax group listed in the drop-down, you must associate it to your center.
Sale Price: Enter the price at which you want to sell this product, which is inclusive of tax if the Tax Included option is selected.
Click Save.
The product is made available or active in your center.
Recommendation: You can also set the reorder levels for the product if you want to be notified when the product is running low stock and you want to purchase the product.
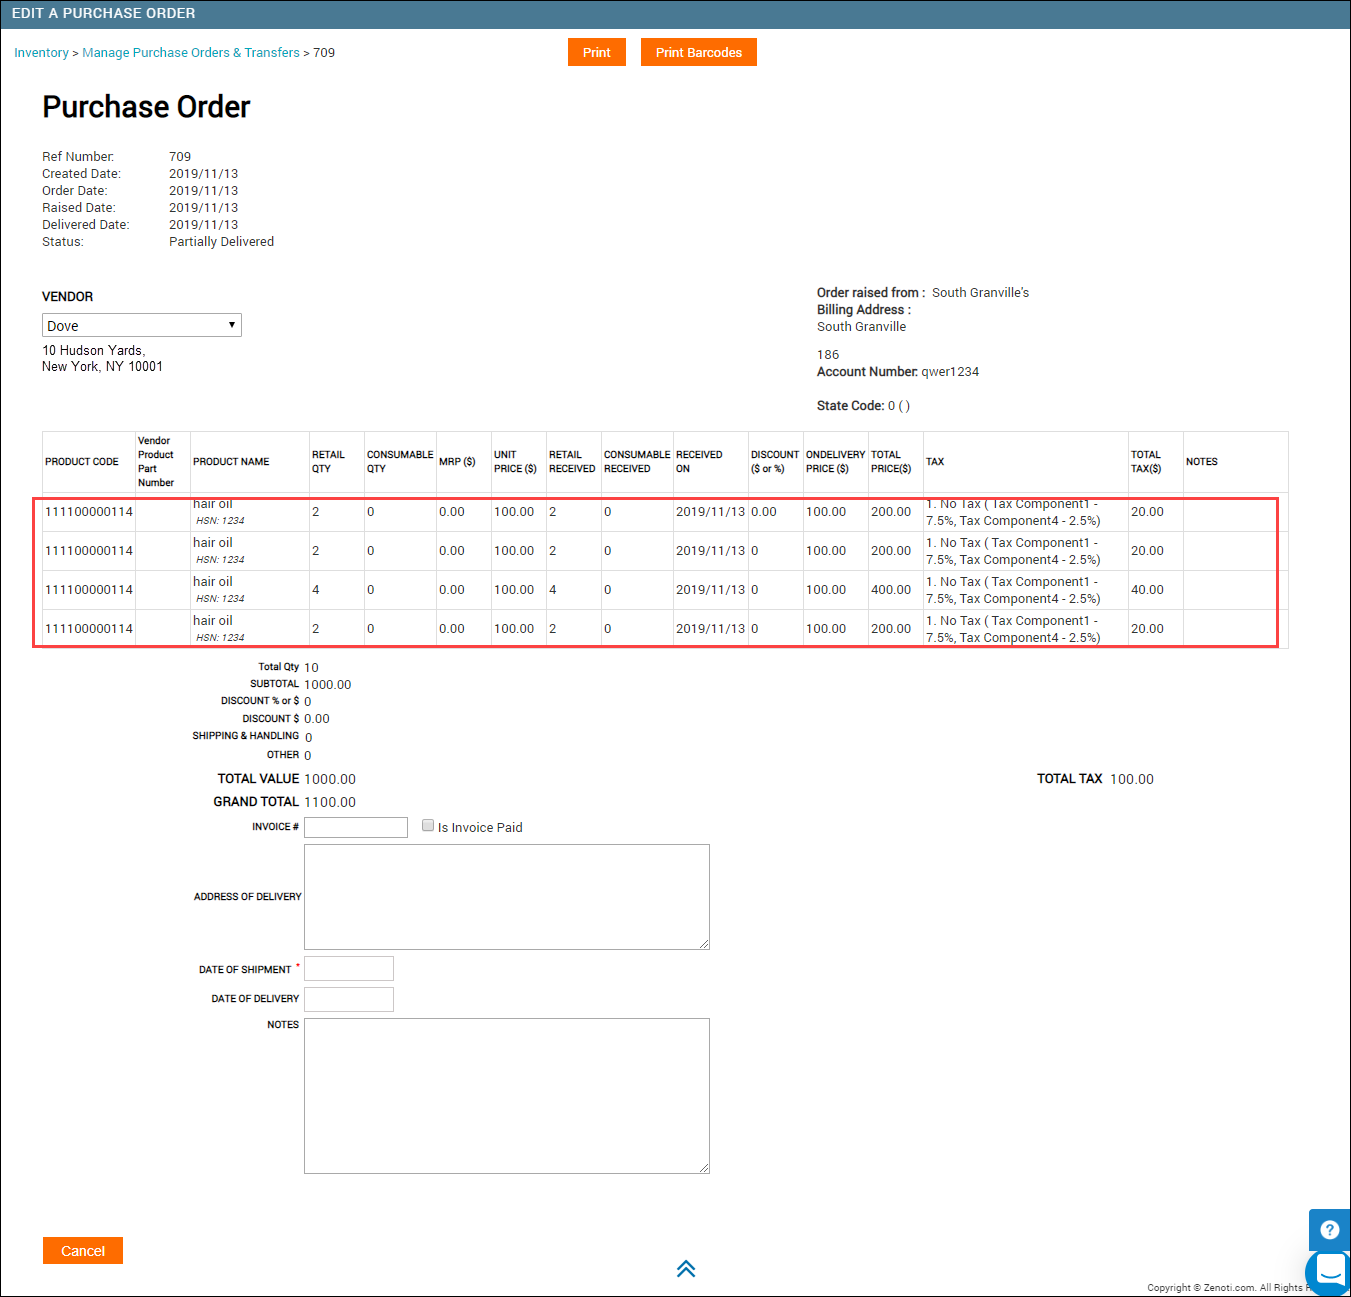
When you receive the order in partial shipments, you need a shipment log to know the details of each shipment.
Delivery History in Zenoti is a dispatch (transfer order) or shipment (purchase order) log for your order. You can view details like the delivery date, quantity received, and the name of the employee who has received the delivery. You can also export the log to Excel, CSV, and PDF formats.
Important
You can view delivery history only for orders that are in the Partially Delivered state. After you mark the delivery as a full delivery, the log is no longer available for the order.
Click on the Inventory icon.
Navigate to Procurement > Orders.
The Manage Purchase Orders & Transfers page appears.
Locate the order with status as Partially Delivered.
A list of orders appears.
Click the order Ref# to open the order.
The order is opened for editing.
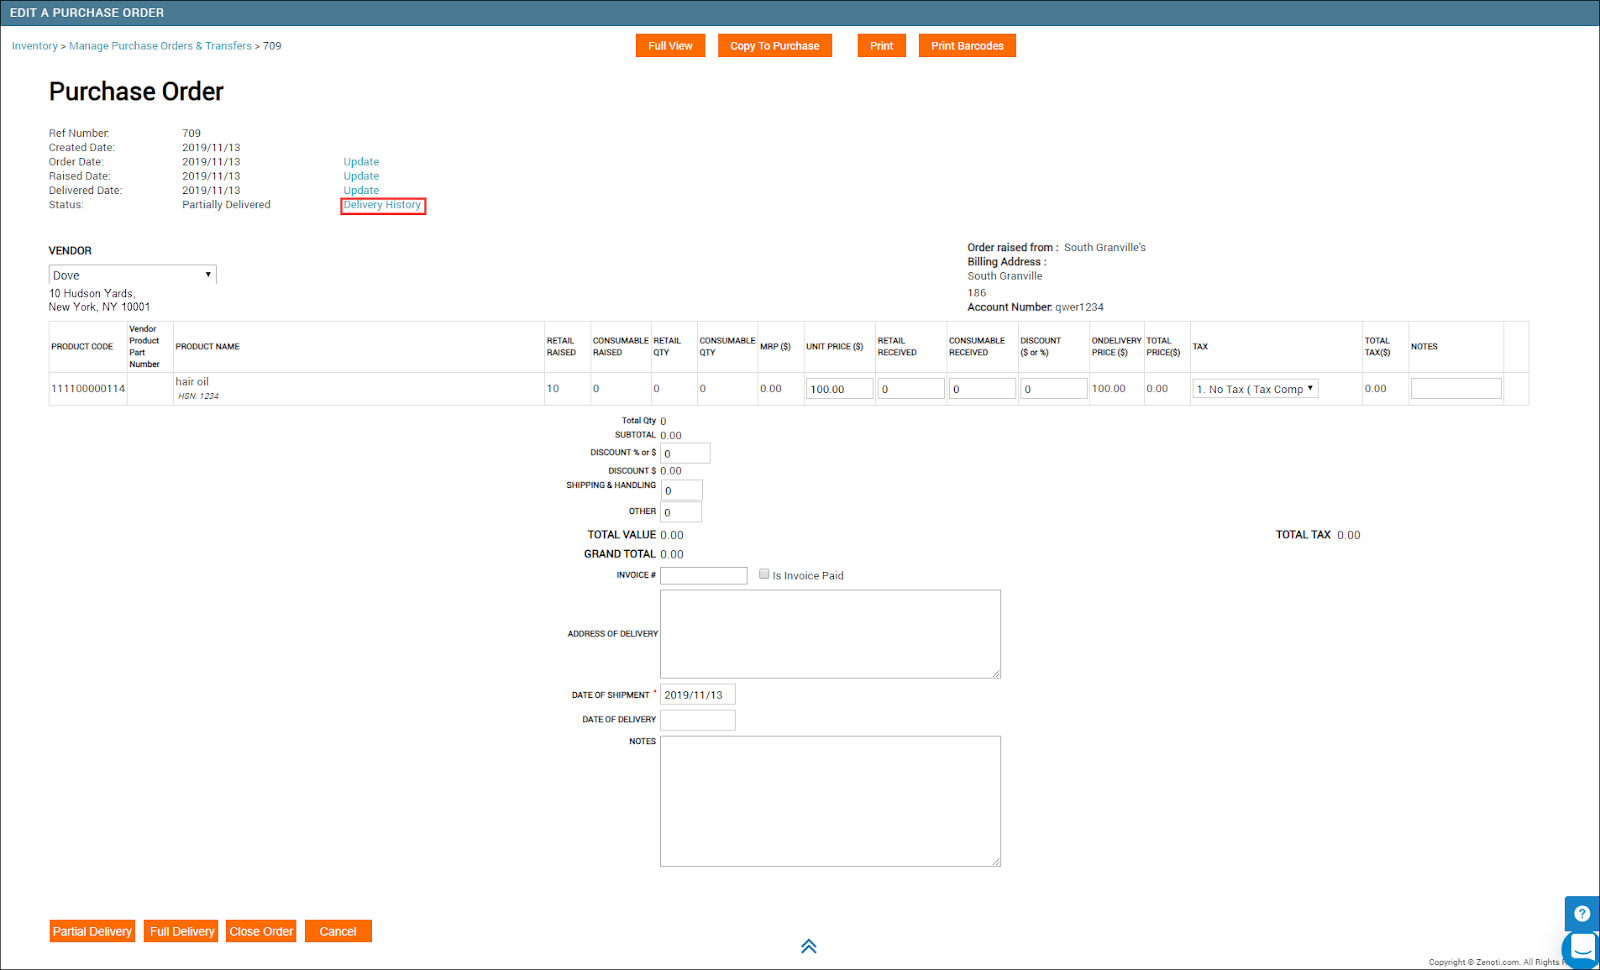
Click the Delivery History link.
The delivery history window opens.
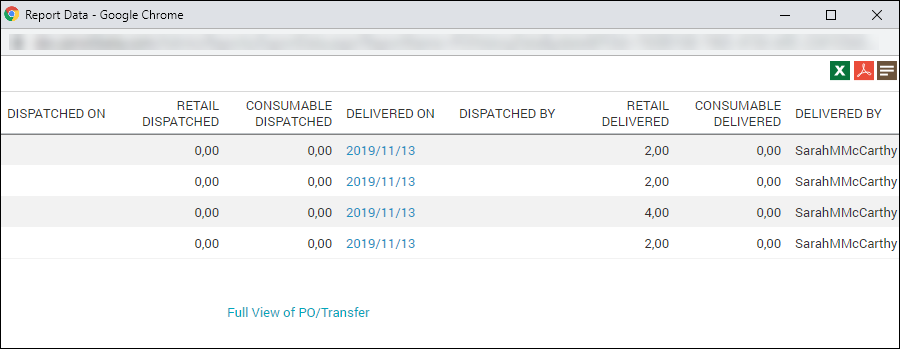 For Transfer Orders
Dispatched On: The date on which the transferred products were received.
Click this link to view the transfer details on that date.
Retail Dispatched: The retail quantity received from the source center.
Consumable Dispatched: The consumable quantity received from the transfer order.
Dispatched By: The employee who received the products.
*These columns are blank for purchase orders.
For Purchase OrdersDelivered On: The date on which the shipment was received from the vendor.
Click this link to view the shipment details on that date.
Retail Delivered: The retail quantity received from the vendor.
Consumable Delivered: The consumable quantity received from the vendor.
Delivered By: The employee who received the products.
*These columns are blank for transfer orders.
Full View of PO/Transfer
Click this link to view all the shipments for the order.
How can I manage and differentiate consumable and retail products in Zenoti?
Zenoti provides robust tools for categorizing and managing inventory, allowing businesses to track and differentiate between products used internally (consumables) and those sold to customers (retail products). This guide offers an overview, system behaviors, configuration instructions, and operational considerations for handling these product types.
Understanding consumable and retail product types
Consumable products: Items intended for internal use during services, such as shampoo used before a haircut or massage oils. These are not sold directly to customers.
Retail products: Items sold directly to customers, intended for their personal use outside the business environment.
System behavior and dual-category products
In Zenoti, products can be categorized as both consumable and retail. This dual classification has implications for how products are tracked and audited:
Products marked as both retail and consumable appear in both the retail audit and consumable audit sections of the system, with their values displayed accordingly. For instance, consumable values show up in the consumable audit screen, while retail values appear in the retail audit section.
Items may appear in the retail audit section because of this dual-classification status, even if they are consumables.
Configuring products in Zenoti
You can classify a product as consumable, retail, or both by following these steps in Zenoti:
At the organization level, navigate to Master Data > Product > General Tab.
Scroll down to find the checkboxes labeled Retail and Consumable.
Select the appropriate options for the product.
Choose Retail to make the product available for sale.
Choose Consumable for products to be tracked as used internally.
Select both options if the product serves both purposes.
Consumable products must have a non-zero quantity associated with the service to ensure proper usage tracking. Retail products can typically be linked to the POS (Point of Sale) without requiring usage tracking. If needed as part of a service, ensure the following configurations:
Disable the Allow product consumption entry in appointment book option. Associate the product under the Products tab within the service settings.
How can I manage inventory discrepancies and write off retail products in Zenoti?
Proper inventory management in Zenoti ensures product accuracy, prevents stock discrepancies, and supports smooth daily operations. Auditing helps verify actual stock against recorded quantities and maintain data accuracy.
At the center level, navigate to Inventory > Audit .
Enter the correct on-hand quantities for a product.
Select Submit only above products.
Click Submit Audit.
Reconciliation updates Zenoti to match physical stock levels.
At the center level, navigate to Inventory > Retail/Consumable > Reconcile.
Enter the reconciled on-hand quantity.
Click Submit Reconcile.
Negative stock occurs when received stock doesn’t fully offset existing negative quantities.
Conduct a physical stock check to confirm actual quantities.
Update Zenoti using Audit and Reconcile.
Ensure any saved audits are submitted to prevent incomplete updates.
Discarding or writing off removes unusable products.
Update the quantity using Audit and Reconciliation.
Enter clear Notes explaining the reason for discarding (for example, Discarded 3 units of Herbal Silky Shampoo due to damaged bottles).
When audits are reviewed later, these notes appear in the Audit History Report, helping auditors understand why changes were made.
How can I manage purchase orders in Zenoti effectively?
Effectively managing purchase orders in Zenoti involves understanding the various steps, configurations, and limitations related to creating, updating, and troubleshooting purchase orders.
At the center level, navigate to Inventory > Orders > Raise a Purchase Order. Add vendor details and item quantities. Review the order and save it as a draft or raise it. Centers can be restricted from raising orders if your admin enables Prevent center from raising purchase orders.
Warehouse or corporate teams can raise orders created by centers. Enable the Raise_Order permission at the org level and restrict centers if needed. Review pending orders under Procurement > Orders and raise them after verification.
Open the raised order, enter received quantities, add shipment details, and save. Click Partial Delivery to update stock and generate delivery history. Price-difference prompts appear if enabled by admins.
Open the order, adjust received quantities, add delivery details, and click Full Delivery. Stock updates instantly, and the order status changes to Delivered. Excess quantities are allowed only when enabled by admins.
Define at least one tax type to create a purchase order.
Purchase orders can only be created at the center level, not the organization level. To distribute stock across locations, set one center as a vendor and use it to supply items to other centers.
What are the dependent Inventory settings across Orders, Stock Actions, Essentials, and Audits in Zenoti?
Orders settings and their dependencies
Display products in the order added in inventory orders: This affects product ordering in Purchase Orders, Transfer Orders, and invoices in the Orders flow.
Restrict recipient center from editing transfer orders: Enable this if you want the destination center to only receive, not modify, the Transfer Order.
Restrict recipient center from editing price, discount, and tax fields after a transfer order is raised: This should be enabled together with the previous restriction for complete lock-down at destination.
Restrict delivery of transfer orders in the source center: When enabled, delivery is blocked and the dispatch workflow becomes mandatory for Transfer Orders.
Restrict partial deliveries for transfer order: This is most useful with dispatch flow, because it forces one complete delivery per Transfer Order.
Restrict partial deliveries for purchase order: Enable this when you want full deliveries only, especially for strict vendor reconciliation.
Allow delivered quantity to be more than ordered quantity in Purchase Order: Only enable if your process allows over-delivery, or your audits handle extra stock cleanly.
Allow delivered quantity to be more than ordered quantity in Transfer Order: Pair this with clear approval rules, because destination stock can exceed planned movement.
Consider raised purchase orders/transfer orders for calculating Auto PO/TO quantity: This depends on using Auto PO/TO alerts; it prevents double-ordering by counting raised quantities.
Enable multiple scans of barcodes for transfer and purchase orders: Works best when you maintain primary and secondary barcodes for the same product.
Show alert if required fields are missing when taking the order delivery: When enabled, these fields become mandatory before delivery can be completed.
Date of Shipment becomes mandatory for delivery completion.
Date of Delivery becomes mandatory for delivery completion.
Address of Delivery becomes mandatory for delivery completion.
Stock actions settings and their dependencies
Allow product checkout, transfer and conversion when stock is not available: This controls negative stock behavior and impacts every checkout, transfer, and conversion action.
Enable auto checkouts from store to floor for product transfers: This only matters if you move items through Store and Floor locations during transfers.
Enable auto checkouts from store to floor for retail product sales: Use this if retail sales should always reduce Floor first without manual checkout.
Enable auto checkouts for consumable product consumption: This depends on consumables being tracked on Floor, so consumption can auto-checkout correctly.
Manual checkout for consumption when checking out from store to floor: Enable this if staff must choose a “consumption” reason during checkout, not just a default move.
Essentials settings and their dependencies
Enable product transfers between centers: If disabled, Transfer Order options disappear from Orders, even if other TO settings are enabled.
Enable product conversions: This unlocks the Conversion tab, and it also relies on negative stock setting if stock can dip.
Allow to restock returned products: This affects POS returns and invoice refunds, and should match your accounting policy.
Enforce approval for reconciliation for difference between expected and audited stock value: This unlocks the Approvals page and makes reconciliations require approval when deviation crosses a set limit.
Audit settings and their dependencies
Hide the option to use zero stock values for unaudited products under Product Audits: Enable this if zero stock audits must be prevented, especially in strict compliance environments.
Enable partial audit of products: This is irreversible after enabling, and it hides older V1 inventory reports permanently.
How do I manage imports in Zenoti?
Zenoti allows you to import files to create purchase orders or upload stock count data in bulk, which helps save time for retail-heavy businesses.
Import purchase orders
At the center or organization levels, navigate to Inventory > Orders.
From the “I want to…” drop down, select Import Order.
Upload an Excel (.xls) or CSV file containing the Vendor Code, Product Code, and product quantities.
Click Load to validate the file.
If there are no errors, click Import.
Review the generated order and click Save and Raise to create the purchase order.
Note
The file must contain only one vendor code, but it can include multiple products.
Import stock count (audit) data
At the center level, navigate to Inventory > Audit.
Use the Import/Export option to export the audit template.
Enter the physical stock quantities in the file.
Upload the file using Import > Web Import > Upload > Load.
If the data is valid, click Import to update the audit data.
Imports help inventory managers quickly upload large volumes of data, reducing manual entry during purchase order creation or stock audits.
For more information, refer to the Import and export stock count data and Import purchase orders articles.