Configure CMA V3 template: Online Booking
This article explains how administrators configure core Online Booking settings at the organization level in CMA V3, including defaults, booking windows, time slots, deposits, waitlists, family booking, login options, and other guest-facing behaviors.
At the organization level, click the Configuration icon.
Search for and select the Online Booking setting from the Online booking settings section.
Click CX V3 > Online Booking.
To better manage your business's daily calendar, you can open appointment slots for booking for a specific duration by selecting Days from the Show appointment booking slots for drop-down list.
This can be a certain number of days or set to no limit.
To assign all online membership purchases to a single center, select the Different center for membership sales checkbox and select a center from the drop-down list.
All memberships bought online by your guests are by default assigned to the center of purchase. However, for ease of tracking and reports, you might want to assign all online membership purchases to a single center. For example, assigning all memberships to the main company and not franchises. You can then select the Different center for membership sales checkbox and assign a center.
To assign a center as the default for package sales, select the Different center for package sales checkbox and select a center from the drop-down list.
To assign a center as the default for gift card sales, enable the Different center for gift card sales setting.
To allow centers to override the organization level setting, enable the Allow Center level override setting and select a center from the drop-down list.
To hide the monetary value associated with the loyalty points, enable the Hide monetary value of loyalty points setting. The guest profile in Webstore and CMA will only display the points that the guest has earned.
To specify the time interval between each appointment time slot, select the value from the Appointment Time Slots drop-down list. For example: If you select the duration as fifteen minutes, the Webstore will display the appointment slots as 10:00, 10:15, 10:30, and so on.
To define the online appointment hold time, in the Online Appointment Hold section, enter the value in minutes. For example: If you configure the hold time as five minutes, the Webstore will hold the appointment for five minutes after the guest selects the service, provider, date, and time. The guest must confirm the appointment within five minutes. After the stipulated time, the booking is void and the guest must start the booking process again.
To prioritize the bookings of your guests with "Specific” providers over the bookings of guests with “Any” providers, enable the Prioritize Specific Provider Slots for Guests setting.
To allow administrators to add login instructions for their guests, enter the text in the Instruction Banner In Login Page text box.
The maximum length for the text is 250 characters.
Click Save.
Set your default center for guest login
When you operate multiple locations, you want to create a seamless booking experience by presenting guests with the most relevant center when they first log into CMA. The Default Center setting allows you to pre-select which location appears as the default choice, eliminating an extra step for guests and directing traffic strategically across your business locations.
At the organization level, click Configuration.
Navigate to Online Booking > Online booking settings > CX V3 > Online Booking.
From the Default Center drop-down list, select the center you want to display by default.
Click Save.
Note
This setting only affects the initial center selection when logging in.
Guests can still manually select any other center after login.
Control how far in advance guests can book an appointment
You can control how far into the future guests can schedule appointments by setting a booking window. This helps balance guest convenience with operational needs such as staff scheduling, seasonal capacity changes, and resource planning. Whether you want to limit bookings to 30 days out or allow unlimited future booking, this control gives you the flexibility to match your business model.
At the organization level, click Configuration.
Navigate to Online Booking > Online booking settings > CX V3 > Online Booking.
From the Show appointment booking slots for drop-down, select one of the following:
Days: Enter a specific number of days (Example:, 30, 60, or 90 days)
No limit: Allow bookings for any future date with available slots
Click Save.
Hide or show loyalty points monetary value
Your loyalty program can display point balances to guests in two ways: showing just the points (Example: "500 points") or revealing their cash value (Example: "500 points = $50"). This setting gives you control over that presentation, allowing you to shape how guests perceive and engage with your rewards program. The choice impacts guest psychology, program participation, and how guests make spending decisions.
At the organization level, click Configuration.
Navigate to Online Booking > Online booking setting > CX V3 > Online Booking.
Enable the Hide monetary value of loyalty points setting to show only points and not the monetary value associated with the loyalty points.
The guest profile in Webstore and CMA will only display the points that the guest has earned.
Click Save.
Enable social login
At the organization level, click the Configuration icon.
Search for and select the General setting from the Online booking settings section.
Click CX V3 > Online Booking.
To let your guests use their Facebook or Google credentials to log in to the Webstore, select the Enable Social Login check box, and then enter the following information:
Facebook App Id: Enter the Facebook app id.
Facebook App Secret: Enter the Facebook app secret id.
Google App Id: Enter the app id or Google Client Id in this field.
Google App Secret: Enter the Google Client secret code in this field.
Click Save.
Guests can both sign-up and login using their social credentials.
Impacts and considerations:
Social Login can only be enabled for organizations with guest uniqueness set to "email"
Restrict process time segment outside schedule hours
At the organization level, click the Configuration icon.
Search for and select the Online Booking setting from the Online booking settings section.
Click CX V3 > Online Booking.
To ensure that the processing time of the segmented service does not fall outside the employee schedule hours, enable the Restrict Process Time Segment Outside Employee Schedule Hours setting.
Click Save.
Note: This setting is applied only when the processing segment is the last segment of the service. If a finishing segment, even zero minutes duration, follows it, the setting will not apply and processing time may extend beyond staff hours. To ensure the restriction is applied correctly, make sure that Processing is the final segment in the service definition.
Book multiple service with same therapist
At the organization level, click the Configuration icon.
Search for and select the Online Booking setting from the Online booking settings section.
Click CX V3 > Online Booking.
To allow the therapist to perform multiple services in a single booking, enable the Book Multiple Services with Single Therapist setting.
Click Save.
Impacts and considerations
For parallel booking, disable the Book Multiple Services with a Single Therapist setting.
Display allocated therapist name
At the organization level, click the Configuration icon.
Search for and select the Online Booking setting from the Online booking settings section.
Click CX V3 > Online Booking.
To allow guests to see the name of the assigned therapist on the upcoming appointments page if the guests select 'Any Therapist' while booking, enable the Display allocated therapist name to guests for 'Any therapist' selection setting.
Click Save.
Enable deposit for online booking
Enable waitlist
At the organization level, click the Configuration icon.
Search for and select the Enable Waitlist setting from the Online booking settings section.
Click CX V3 > Online Booking.
To allow your guests to join waitlists for a service instead of booking appointments using the regular flow, turn on the Enable Waitlist setting.
If you do not see this setting, reach out to your Zenoti representative to enable it for you.
Enter the waitlist and the confirmation button label.
Click Save.
Impacts and considerations
If you enable this feature, guests can book appointments using both the waitlist, and the regular appointment booking flow on Webstore, Kiosk, and FDO.
Enable family booking
At times, guests may want to take services with their families, such as spa sessions, salon appointments, or wellness treatments. The Family Booking feature supports this by allowing a guest (host) to book services for multiple family members in one reservation.
At the organization level, click Configuration.
Navigate to Online Booking > Online booking settings > CX V3.
To facilitate guests to book services for their family members, enable the Family Booking checkbox.
In the Family Label field, enter a custom name to display to guests on the booking interface. (For example: "Family”)
Enable Host Required for Family Booking to ensure the host (primary guest) also selects a service along with the family members.
In Family Booking Guest Limit, specify the maximum number of additional guests the host can book for.
Example: Enter “4” to allow bookings for up to 4 family members.
Customize the Email, Gender, and Date of Birth as Mandatory or Optional by selecting the appropriate options from the drop-down menus.
If you want family members to be booked in consecutive (non-overlapping) time slots during a visit, select the Allow guests to book back-to-back sessions in a visit, for family members checkbox.
In Family Booking back-to-back services per reservation limit, enter the maximum number of services allowed in a back-to-back booking. The maximum limit is up to 5.
Example: Enter “4” to permit up to 4 back-to-back services.
Note
This limit helps ensure faster booking. Loading six or more services can slow things down, while four services load quickly. While the system allows up to 5, we recommend a limit of 4 for the best performance.
Define the maximum permissible interval between the back-to-back time slots in the Maximum permissible interval between back to back slots for slots to be shown.
For example, if you set a 10-minute interval and one service starts at 10:00 AM, the next must begin by 10:10 AM.
Click Save to apply your changes.
Copy host's contact details automatically in family bookings
When a guest, or the “host” books services for family members, you can automatically copy the host’s contact details such as email, phone number, and address into the profiles of new family members. Family bookings often involve the same contact information for each member.
At the organization level, click Configuration.
Navigate to Online booking > Online booking settings > CX V3.
In the Family Booking section, switch on the Copy host contact details to new family member toggle.
Select one or more relationships (for example, son, daughter) where the contact details should be auto-filled.
Click Save.
Note: You must select at least one relationship. When a new family member with a selected relationship is added during booking, their profile will automatically include the host’s contact details.
Configure announcement banner
The Announcement Banner appears on every page of the Webstore. On the CMA this banner appears on the service and center selection screens.
At the organization level, click the Configuration icon.
Search for and select the Centers setting from the General section.
Click CX V3 > Combined settings for Webstore V2 and CX V3.
To enable the Announcement Banner on your Webstore and CMA, select the Enable Announcement Banner check box.
To allow the centers to configure their individual announcement banners, select the Allow Center Override for Announcement Banner check box.
Enter the announcement title in the Title field. This is a mandatory field.
Specify the foreground and background color.
Enter the message or the text of the announcement banner.
Enter the message or the text of the banner in the Body field. You can add bullet points to the text and also format the text as per your needs.
Click Save.
To allow center-level customization of the announcement banner text, after enabling the Allow Center Override for Announcement Banner setting, go to the center-level Enable Announcement Banner setting.
Enable collection of additional fields during sign-up
You can capture crucial guest information during sign-up, ensuring a seamless and customized experience.
At the organization level, click the Configuration icon.
Navigate to Online booking > Online booking settings > CX V3.
Click Online booking > search for Enable Collection of Additional Fields During Sign-up setting.
To facilitate the inclusion of additional fields in guest profiles, turn on the Enable Collection of Additional Fields During Sign-Up setting.
To collect address details such as Zipcode, City, State, and Country, turn on the Enable address setting.
To facilitate the collection of referral information during the sign-up process, turn on the Enable referral setting.
To include three customizable fields during the sign-up process, providing the flexibility to capture unique guest information beyond standard details, select the Enable additional field checkbox.
You can set these fields as mandatory or optional to create more comprehensive guest profiles.
Reach out to your CSM or Zenoti representative to enable the custom additional fields for your business.
Click Save.
Enable transactional communication
Transactional notifications allow businesses to send informative messages (email/SMS) to guests.
At the organization level, click the Configuration icon.
Navigate to Online booking > Online booking settings.
Click CX V3 > Transactional communication.
To ensure guests always receive transactional messages, enable the setting.
Click Publish.
Impacts and considerations
If enabled, the guest will not be shown the option to opt in and opt out. Transactional communication about their booking/purchase will be sent only through the default channel.
Allow guests to log in with verification code
Businesses can let guest log in to their accounts on webstore and CMA without a password. Guests enter their email or mobile number and receive a verification code to complete the login.
To enable this feature, follow these steps:
At the organization level, click the Configuration icon.
Search for and select the CX V3 setting from the Online booking settings section.
Click Online Booking.
To enable passwordless login, turn on the Enable login with verification code setting.
The guest receives an OTP for verification. After OTP verification, guests must provide their First Name, Last Name, Email, and Mobile Number, as these fields are mandatory. The Gender and Date of Birth (DOB) fields are configurable based on settings.
After enabling login with a verification code, configure how the OTP is delivered to guests.
Under Mode of code/OTP delivery to be supported, select one of the following options:
Both: OTP can be sent via Email and SMS.
Email only: OTP is sent only to the guest’s email address.
SMS only: OTP is sent only to the guest’s mobile number.
Note
Ensure that the selected OTP delivery mode (email or mobile) is collected mandatorily from all guests. This helps avoid duplicate guest profile creation.
Select the mandatory fields you want to collect from new guests.
Note
First Name and Email or Mobile number are mandatory by default. You cannot change these fields.
You can also collect additional information. Choose other fields such as Gender, Marketing Consent, and Referral Code.
Click Save.
Impacts and considerations
The Enable login with verification code setting is disabled by default.
The available log in methods, either email, mobile, or both, are based on the Enable login via mobile or email organization-level setting.
Guests must click Login with Password to access the Guest Checkout flow and view social login options (Google/Facebook), similar to the guest checkout process.
Restrict providers from providing some services
Administrators can control therapists' online availability for specific services, deciding which therapists can be booked online. For example, senior or specialized providers may offer certain services exclusively to select customers, keeping them off online booking platforms.
Allow bookings for only repeat guests
Businesses can exclusively allow guests to book appointments with employees who have previously served them. For instance, Sarah, a frequent salon visitor, can book appointments with her trusted stylist, Emily, ensuring that her preferences are understood and her needs are consistently met with each visit.
Impacts and considerations
Clicking Save makes the Restrict bookings to prior serviced guests only setting visible in Employee > Employee name > General tab. Enabling this setting allows service providers to be booked exclusively by their repeat customers through online channels.
Display Products Tab in Guest Profile
The Products tab in the user profile enhances the customer experience by enabling seamless tracking of purchased or reserved products. Customers can easily view and manage their product history directly from their profile, making the process more convenient and transparent.
For administrators, enabling the Products tab simplifies guest management by:
Reducing service inquiries about purchase history.
Improving transparency and trust.
Offering guests control over their product-related information.
For guests, this feature provides:
A centralized space to track purchases.
Quick access to invoice details for returns or exchanges.
When guests click the Products tab, the following details are displayed for each product:
Invoice Number: The reference number associated with the purchase.
Product Name: The name of the purchased product.
Purchase Date: The date the product was purchased.
Quantity: The number of items purchased.
Price: The price per item.
Total Amount: The total cost for that product.
Status: The current status of the purchased product. For example, delivered, pending.
Administrators can enable the Products tab to be visible in the guest profile by following these steps:
At the organization level, click Configuration.
Navigate to Online Booking > Online booking settings > CX V3 > General > User Profile.
Switch on the Display Products in profile toggle.
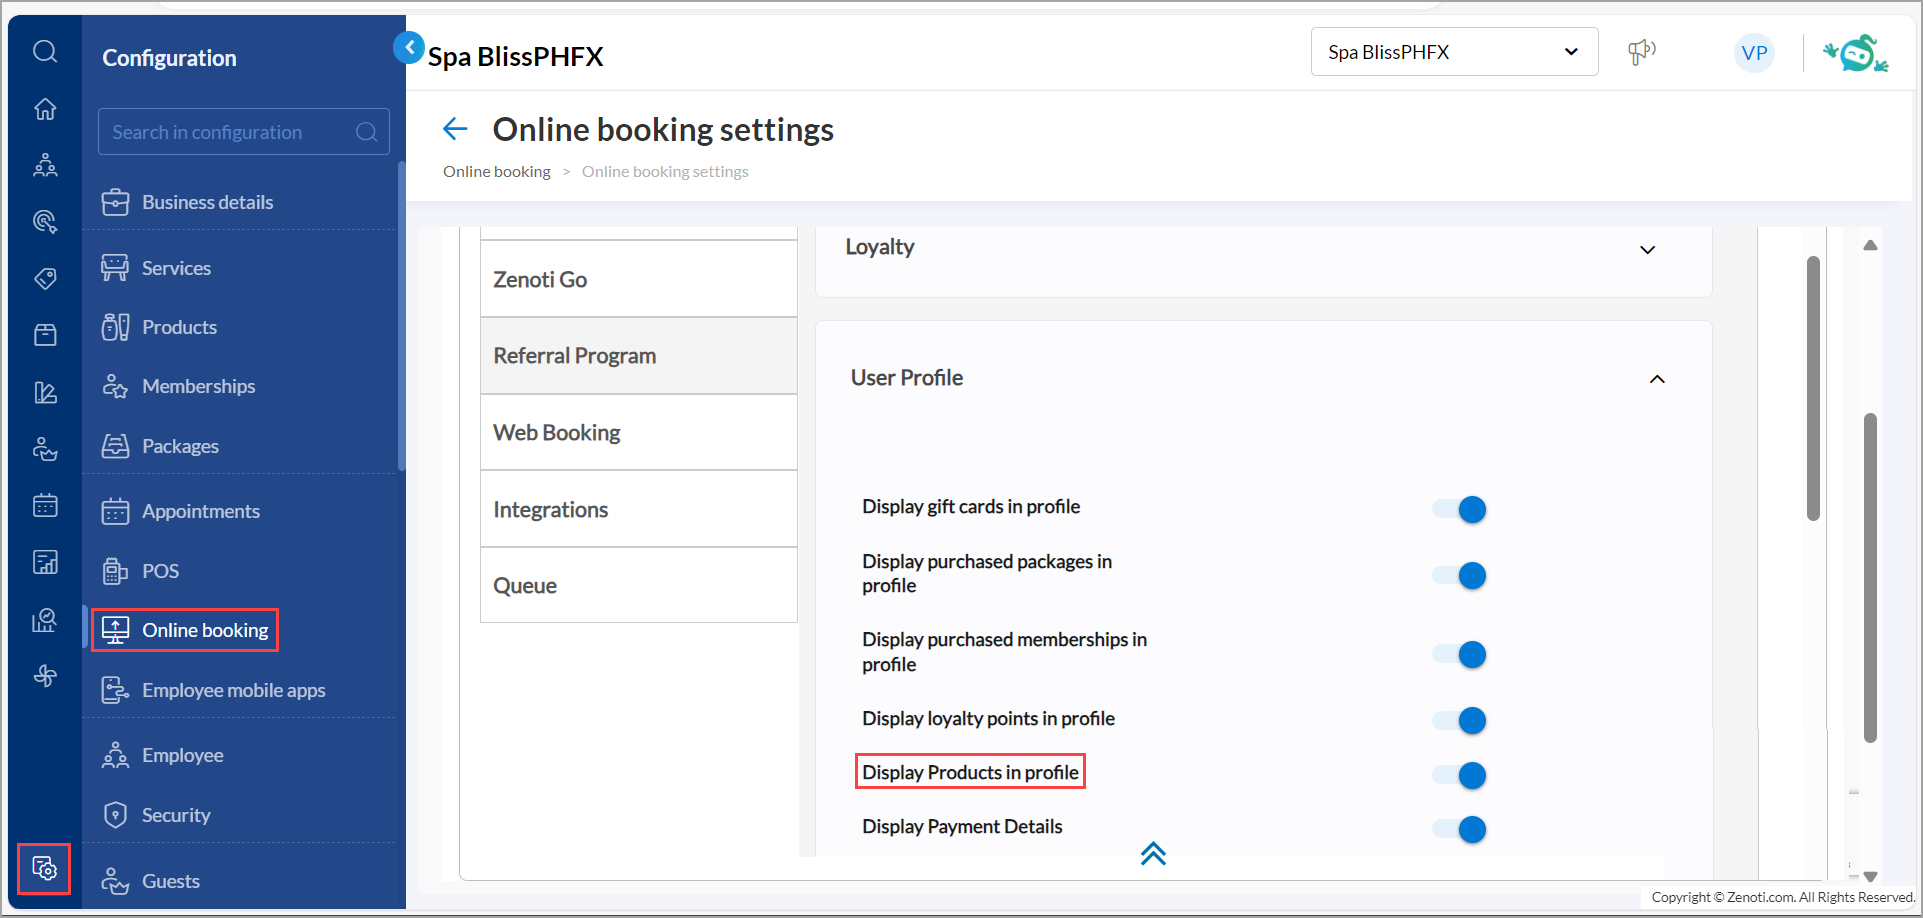
Once enabled, guests can access their product details directly in their profile, making it easier to manage and track their purchases.
Click Save.
Enable automatic collection of cancellation fee
By enabling automatic collection of cancellation fee, businesses can automate fee collection for canceled bookings, reducing manual intervention and ensuring timely payments.
This is available on both Webstore and CMA.
At the organization level, click Configuration.
Navigate to Online booking > Online booking settings > CX V3 > Online Booking.
Select the Enable auto-collection of cancellation fee checkbox.
To allow guests to pay cancellation fees using their membership service credits, select the Allow cancellation fee redemption from guest’s membership benefits checkbox.
This option will only be available after enabling the Auto-collection of cancellation fee setting.
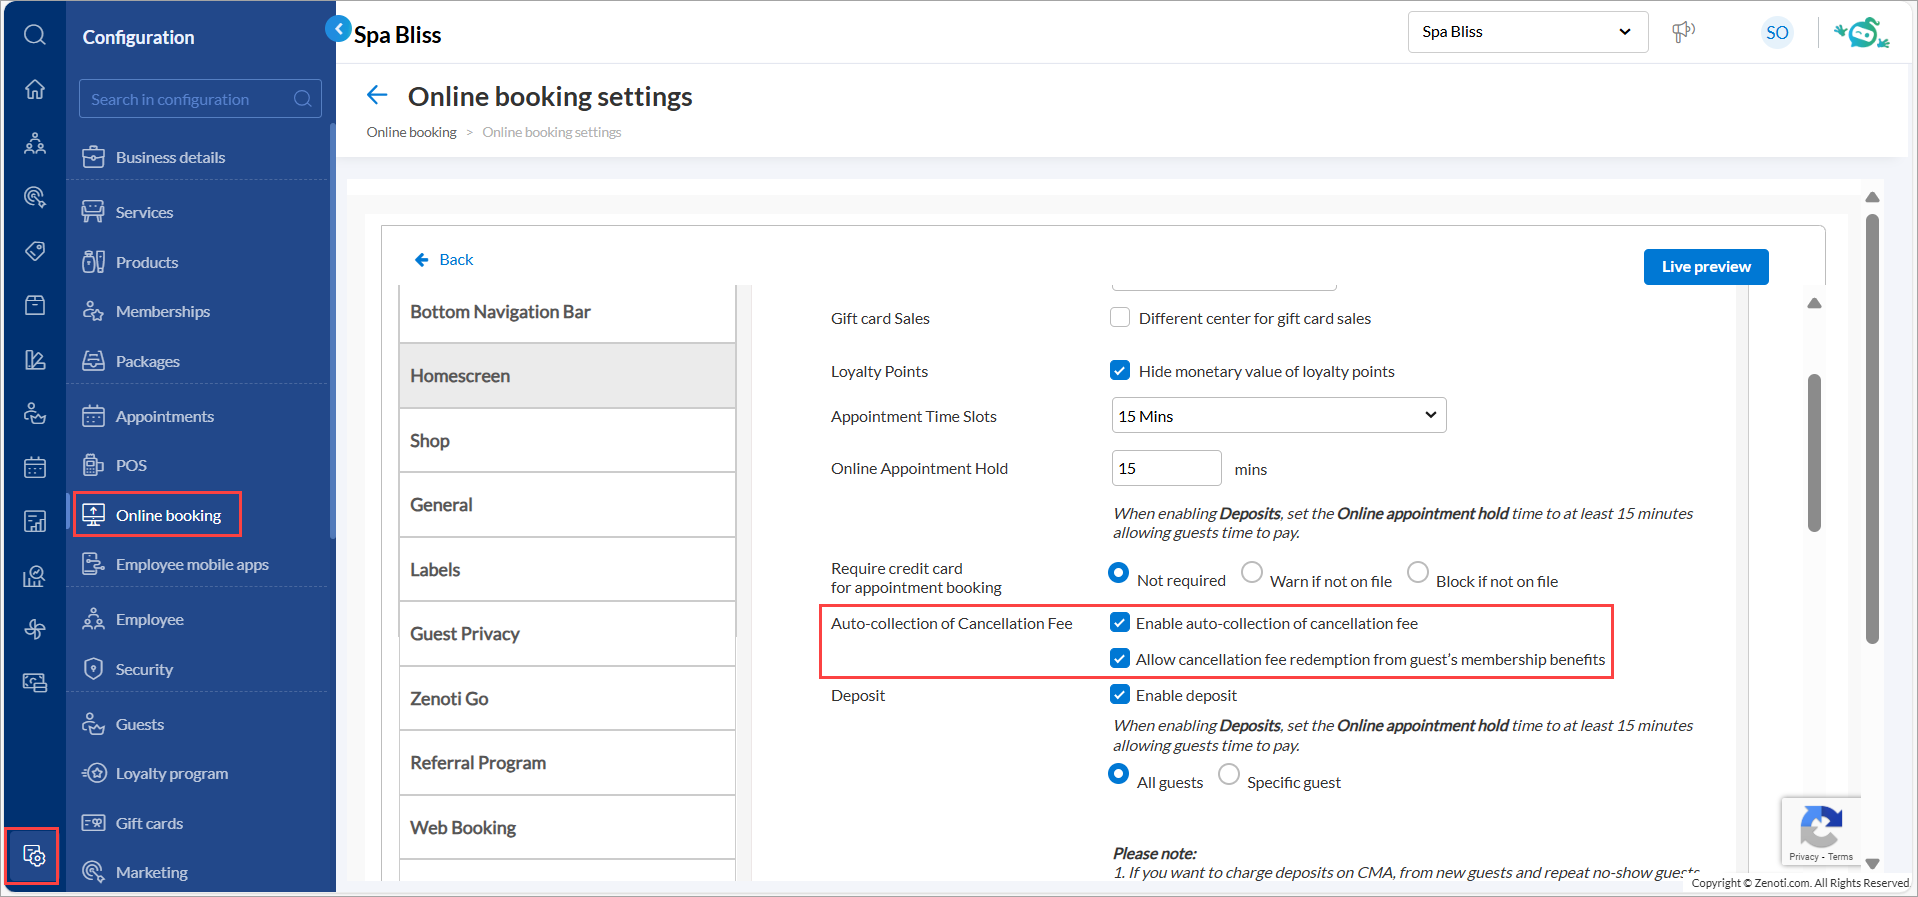
Click Publish.
Note
The Allow cancellation fee redemption from guest’s membership benefits setting is not available by default. Reach out to your administrator to enable this option.
For more information, refer to the Cancel an appointment article.
Enable Efficient Booking
Efficient Booking, also known as Gap-Free Scheduling, helps prevent unbookable gaps in a service provider’s schedule when appointments of different durations are booked. When this feature is enabled, Zenoti dynamically rearranges available appointment times so that partially available slots are visible and bookable during online booking.
By surfacing shorter gaps that would otherwise remain unused, this feature ensures better utilization of provider time, enables more bookings, and helps maximize overall revenue.
For example, if an appointment slot is partially booked, Zenoti automatically makes the remaining time available for booking, as long as the selected service fits within that duration.
How Enable Efficient Booking Works
With Enable Efficient Booking, available slots are automatically adjusted to reduce gaps in service provider schedules. Shorter gaps that would otherwise remain unused are surfaced and made available for booking, allowing more appointments to be scheduled throughout the day. Guests benefit from seeing more convenient booking times that would not normally appear during online booking.
This feature is especially effective for businesses offering hourly or longer appointment slots, where mixed service durations can create significant scheduling gaps. While the impact is less pronounced for shorter slots (such as 15-minute intervals), the feature still helps maintain a clean and streamlined booking experience.
Tip
Increasing the booking hold time particularly helps when deposits are enabled, as it reduces booking failures and prevents transient blocked slots
How to Enable Efficient Booking
To enable Efficient Booking, follow these steps:
At the organization level, click Configuration.
Navigate to Online Booking > Online Booking Settings > CX V3 > Online Booking.
Select the Enable Efficient Booking checkbox.
Click Save.
Once enabled, gap-free scheduling is automatically applied to online booking screens.
Impacts and considerations
Gap-free scheduling is not compatible with family booking.
Enable Sticky Booking
The Enable Sticky Bookings feature ensures guests can only book appointments directly before or after existing appointments and blocked times. When enabled, guests see only time slots that create continuous booking blocks without leaving unfillable gaps in the calendar. It eliminates calendar gaps by showing guests only slots where the service duration fits exactly before or after existing appointments or block-out times. This maximizes service provider utilization but reduces guest booking flexibility by displaying fewer available time slots.
This feature is applicable only in online booking (Webstore (V2) and CMA v3).
Before you begin
Enable Sticky Bookings cannot be used with Enable Efficient Booking
Disable incompatible settings before enabling this feature:
Prioritize Specific Provider Slots for Guests
Allow guests to book back-to-back sessions for family members
Allow setup of service durations in minute intervals
Enable Request Mode (Webstore V2 Settings)
Honor Therapist Booking Interval (Webstore V2 Settings)
How to enable sticky booking
At the organization level, click Configuration.
Navigate to Online booking > Online booking settings > CX V3 > Online Booking.
Select the Enable Sticky Bookings (Avoid calendar gaps) checkbox.
Note: When enabled, guests booking online will only see time slots immediately before and after a provider's existing appointments, to minimize schedule gaps. If a provider already has appointments on a given day, guests may see as few as two available slots, which could make it harder to find a suitable time slot to fewer bookings.
If you have Enable Efficient Booking currently selected, the system displays an alert: "Sticky Booking cannot be enabled while Efficient Booking is active. Please disable Efficient Booking first."
Click OK on the alert.
Clear the Enable Efficient Booking checkbox first, then select Enable Sticky Bookings (Avoid calendar gaps)
How sticky bookings works for guests
When guests book online with this setting enabled:
Guest logs in to the webstore.
Guest selects a service and provider on the webstore.
In the SELECT DATE AND TIME section, the system displays only slots that fit exactly before or after existing appointments.
For a 30-minute service with an existing 10:00-11:15 AM appointment, guests see limited options like:
9:20 AM (30 minutes before the existing appointment)
11:15 AM (immediately after the existing appointment)
Slots that would create gaps (like 9:45 AM, leaving a 15-minute unusable gap) are hidden.
Guest selects from available continuous slots and completes booking.
Impact on Appointment Book
When viewing the Appointment Book:
Service provider schedules fill sequentially without gaps
New bookings appear directly adjacent to existing appointments
Block-out times are respected as boundaries for sticky bookings
No unfillable time slots remain between appointments
If a guest cancels or reschedules an appointment when sticky bookings is enabled, cancellations create gaps in the schedule. The online booking system will not automatically move other appointments to fill these gaps, as that would not honor the time confirmed with other guests. Front desk saff can manually contact guests to reschedule and fill gaps if needed.
An alert is sent to the Front desk staff on appointment book, online booking notifications for cancellations and reschedules,
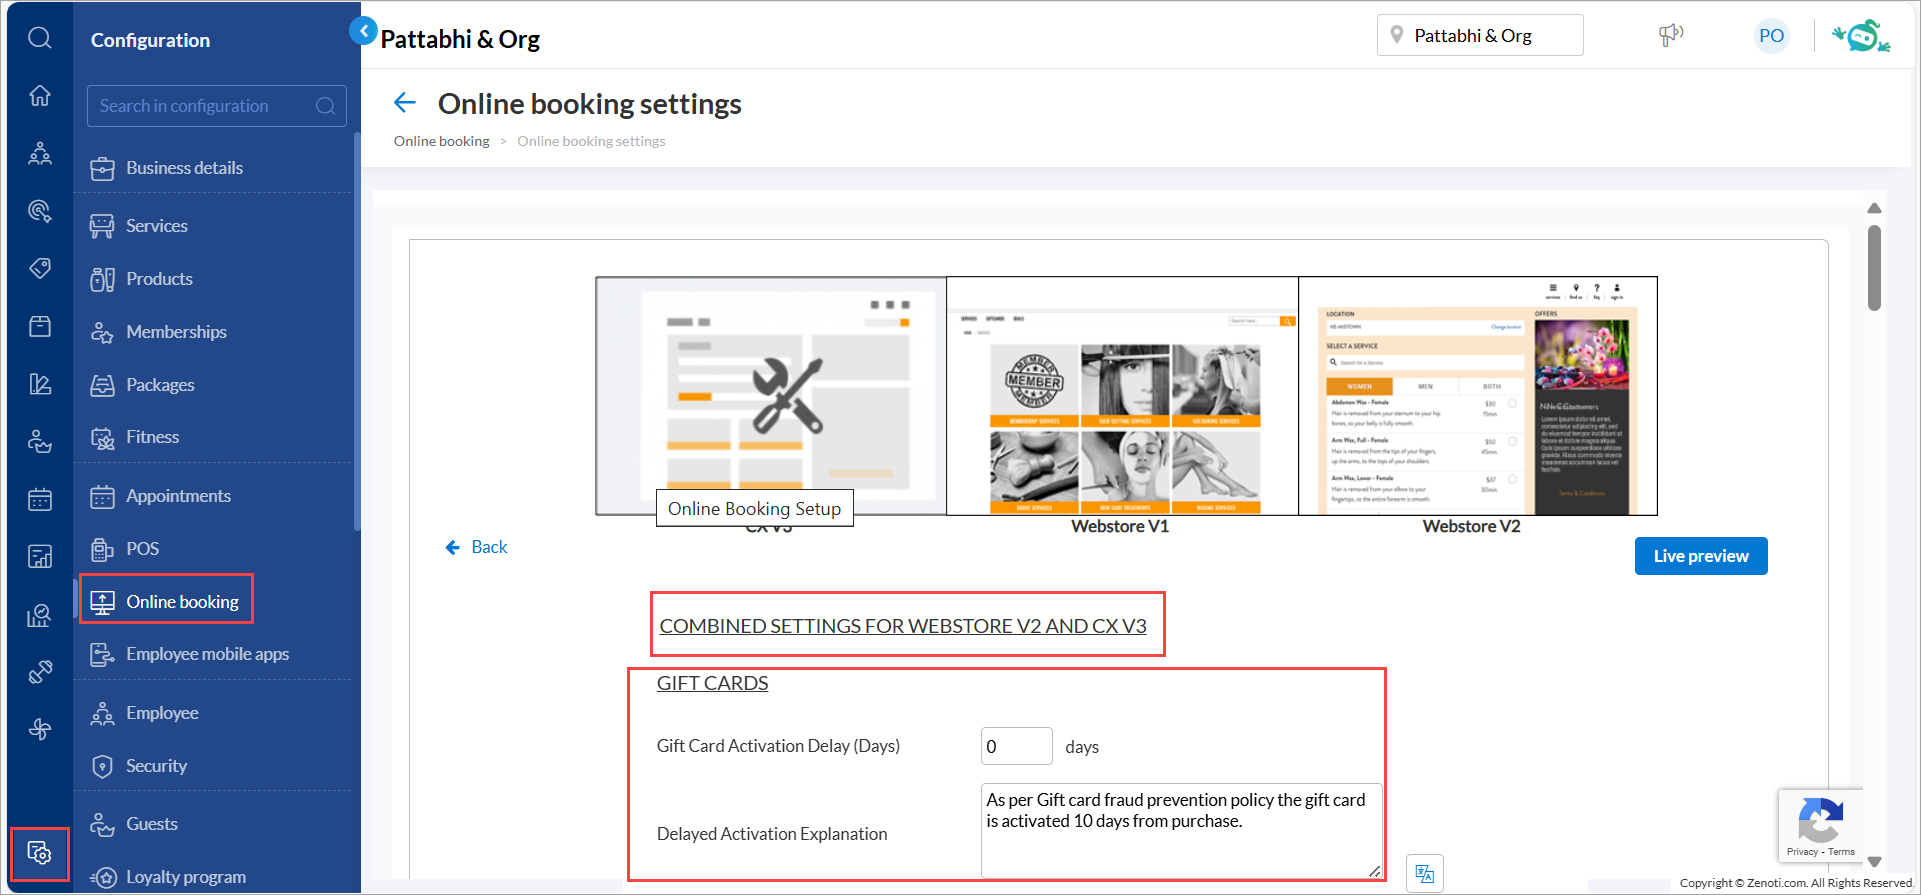
Set Activation Delays to Reduce Fraudulent Redemptions
Online gift cards are a popular and convenient choice for both businesses and customers. To keep them secure, it is important to be aware of potential misuse like attempts to purchase cards using stolen payment information. By setting up proper safeguards, businesses can confidently offer gift cards while minimizing the risk of chargebacks and revenue loss.
One such safeguard is to set a delay between the time of purchase and when the gift card becomes active. For example, if you set up the gift card activation delay to 10 days, it gives legitimate cardholders time to recognize and report unauthorized activity. It helps businesses block fraudulent gift card redemptions before they happen.
At the organization level, click Configuration.
Navigate to Online Booking > Online booking settings > CX V3.
In the Common settings for Webstore and CMA section, navigate to Gift cards.
In the Gift Card Activation Delay (Days) field, enter the number of days you wish to set as the activation delay.
For example: If you set a 2-day delay, a gift card purchased on March 1 will activate on March 3.
You can set a delay of a maximum of 10 days.
In the Delayed Activation Explanation field, add the message that will appear on the email confirmation and Webstore/CMA.
Note
Ensure the activation delay does not exceed or match the gift card's overall validity period at either the organization or center level.
Click Publish.
Set Advance Booking Availability for Appointments in CMA
The Show appointment booking slots for setting allows businesses to define the booking window available to guests. By limiting or extending how many days into the future appointments are visible, you can better manage demand, staff scheduling, and calendar utilization.
For example, some businesses prefer to open bookings only 30–90 days in advance to avoid frequent rescheduling, while others may allow unlimited future bookings for guest convenience.
At the organization level, click Configuration.
Navigate to Online Booking > Online booking settings > CX V3 > Online Booking.
Locate the Show appointment booking slots for setting.
Select one of the following options from the drop-down:
Days: Select this option if you want to limit online bookings to a specific number of days into the future.
This is useful if your staff schedules change frequently or if you want better control over availability and resource planning.
For example, entering 90 Days allows guests to book appointments up to 90 days from the current date.
No limit: Select this option if you want guests to book appointments for any future date as long as availability exists.
Click Save.
Enable referral program
The Referral Program enables your guests to recommend your business to friends and family directly through the online booking experience. When referrals are enabled, guests can share or apply referral benefits during booking, creating a seamless way to grow your customer base through word-of-mouth marketing. Activating referrals for CMA, drives higher engagement, increases repeat visits, and helps convert new guests more efficiently.
At the organization level, click the Configuration icon.
Navigate to Online Booking > Online booking settings > CX V3 > Online Booking.
To make the referral program available for your guests who book online, turn on the Enable Referrals for cma .
Click Save.
Once enabled, the referral option becomes available to guests booking appointments online through CMA.