Manage campaigns
Permissions required to configure campaigns
You can use Zenoti’s permissions for campaigns to control what employees can or cannot do while setting up campaigns. For instance, you can allow one set of employees to only create and edit campaigns while you can allow another set of employees to edit, schedule, and send campaigns.
At the organization level, click the Configurations icon.
Search for and select Security roles in the Security section.
Select a security role and click the Permissions tab.
Expand Marketing Manager.
Note the following permissions for campaigns:
Add: Select this checkbox to permit a person to be able to add or create campaigns. Using this permission, center managers can also add their center to a campaign that has been created at the organization level.
Edit: Select this checkbox to permit a person to be able to edit campaigns. Note that the edit permission does not include the ability to send the campaign. Using this permission, center managers can also add or remove their center from a campaign that has been created at the organization level.
Delete: Select this checkbox to permit a person to be able to delete campaigns.
View: Select this checkbox to permit a person to be able to only view campaigns. Such a person cannot create, edit, send, or delete a campaign.
Create Notes Campaign: Select this checkbox to permit a role to be able to send out a Notes Campaign. A Notes campaign is essentially a campaign to add Guest Notes automatically to Guest Profiles that meet a particular target segment.
Important
Be extra careful before you turn on this permission for anyone as it may result in adding Notes to hundreds of Guest Profiles once the campaign is 'live'.
Send/Schedule SMS Campaign: Select this checkbox to permit a person to be able to schedule and send campaigns.
Controlling permissions to this level is especially useful in cases where centers want to create their own campaigns and where the organization (or the corporate) can approve the campaign and send it.
Note
By default, Zenoti enables this permission for the Owner role.
Important
If a person has the Add and Edit permission but does not have the Send/Schedule SMS Campaign permission, then after creating a campaign, such a person can only save and close the campaign - such a person cannot send or schedule the campaign.
Send/Schedule Email Campaign: Select this checkbox to allow the role to schedule and send only email campaigns.
Note
By default, Zenoti enables this permission for the Owner role.
Important
If a person has the Add and Edit permission but does not have the Send/Schedule Email Campaign permission, then after creating a campaign, the role can only save and close the campaign, but cannot send or schedule the campaign.
Send/Schedule Push Campaign: Select this checkbox to allow the role to schedule and send only push campaigns.
Note
By default, Zenoti enables this permission for the Owner role.Important: If a person has the Add and Edit permission but does not have the Send/Schedule Push Campaign permission, then after creating a campaign, the role can only save and close the campaign, but cannot send or schedule the campaign.
Send/Schedule Opportunity Campaign: Select this checkbox to allow the role to schedule and send only opportunity campaigns.
Note
By default, Zenoti enables this permission for the Owner role.Important: If a person has the Add and Edit permission but does not have the Send/Schedule Opportunity Campaign permission, then after creating a campaign, the role can only save and close the campaign, but cannot send or schedule the campaign.
Send/Schedule Notes Campaign: Select this checkbox allow a role to send or schedule notes campaigns. Be extra careful before you turn on this permission for anyone as it may result in adding notes to hundreds of guest profiles once the campaign is live.
Important
Before you enable this permission for the role, ensure that you have enabled Create Notes Campaign. Otherwise, the role will not be allowed to even create a notes campaign.
Click Save.
Include only base center for campaigns
Businesses needs a way to send campaigns to guests based on their last visit or their base center - where the guest profile is created.
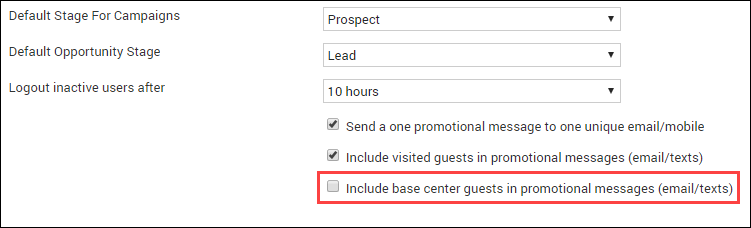
When you select the existing org-level setting, Include visited guests in promotional messages (email/texts), the campaign considers guests who have visited the center irrespective of in which center the guest profile is created.
At the organization level, click the Configurations icon.
Go to the Settings tab.
Expand the General section.
The settings in the General section appear.
Select the Include base center guests in promotional messages (email/texts) checkbox.
Click Save.
Important
For campaigns to be sent to the guests, you must select either Include visited guests in promotional messages (email/texts) or Include base center guests in promotional messages (email/texts).