Shopify integrations
Prerequisites, required configurations, and unsupported features for Shopify integration
In this article, you will learn about the prerequisites and required configurations to integrate Zenoti-Shopify. You will also learn about the features that are not supported in this integration.
Prerequisites
Product SKU: SKU or Store Keeping Unit is a code given to your products online. You must ensure that the product SKU code in Shopify and the product code in Zenoti match.
For example, If the product code in Zenoti for Hair Gel is HG7432, you must ensure that the SKU code for the product in Shopify is also HG7432. When inventory sync is performed, Zenoti matches the product code with the SKU code in Shopify.
Dedicated Center: A center in Zenoti where are the sale orders and inventory levels are synced from Shopify. You don't need a new center for this, rather you can use an existing center as the dedicated center.
Shopify Plan: You must have an active Shopify plan. This could be the Shopify Basic or Shopify Plus.
Store URL: When you register with Shopify and subscribe to one of its plans, you must enter the URL of your store. The Store URL is based on the name of your business. Every Store URL begins with https:// and ends with .shopify.com
Example: If the name of your business is SpaBliss, your store URL will be https://spabliss.shopify.com
API Key: Contact Zenoti to provide you the API Key for Shopify integration.
API Secret Key: Contact Zenoti to provide you the API Secret Key.
Multipass Secret Key: If you have subscribed to the Shopify Plus plan, Shopify provides you a multipass secret key.
Payment Gateway: Set up a payment gateway with Shopify. You can use Shopify’s own payment gateway called Shopify Payments or use a third-party payment service provider.
Learn about: Shopify Payments and Shopify Supported Third-Party Payment Gateways.
Required configurations
To integrate Shopify with Zenoti, you must ensure that your guests log in to the Shopify store with a unique email address. In case the guest has multiple profiles with the same email address in Zenoti, the invoice is updated randomly to one of the profiles.
Note
Zenoti recommends that you have a single profile for each email id.
Unsupported features
The following features are not supported when you integrate Shopify with Zenoti.
Product Refunds*
*Zenoti does not support refunds for online purchases, however, the refunds made in Shopify are reflected in Zenoti.
Product Exchanges
Adding Product Variants
Product Shipping or Tracking Information on Zenoti
Product Pick-up at Store
Next Step: Integrate Zenoti with Shopify
Overview of Shopify integration
Shopify is an eCommerce solution that allows you to set up an online store to sell your products.
Visit the Shopify website at help.shopify.com to learn more.
When you integrate Zenoti with Shopify:
The inventory levels in Zenoti are updated with every purchase on Shopify.
Invoices generated from products purchased on the Shopify store are updated in Zenoti.
Guests can use their Webstore credentials to log in to Shopify - they need not log in separately for the Shopify store.
Daily sales and Product sales reports in Zenoti get updated to reflect sales on Shopify.
In this article, you will learn about some popular features of Shopify that are supported or not supported by Zenoti, based on the Shopify plan you subscribe to. You will also learn how to get started with Shopify-Zenoti integration.
Some popular Shopify features
Shopify has multiple plans with varying features. You can visit the Shopify website to know more about the plans and the complete list of features in each of these plans.
Disclaimer: The link to Shopify is provided for informational purposes only. Zenoti bears no responsibility for the accuracy, legality, or the content of the external site or for that of subsequent links.
The following table lists some of the popular features of Shopify and if these features are supported by Zenoti:
Feature | Shopify Plus | Other Shopify Plans |
|---|---|---|
Single Sign-On | Yes (Webstore is required) | No |
Sign-On via webstore | Yes | No |
New Guest Creation with Email | Yes (Webstore) | Yes (when the invoice is synced to Zenoti) |
Email is mandatory | Yes | Yes |
Inventory debit in Zenoti after purchase (After a guest purchases a product from Shopify, Zenoti deducts the corresponding stock level from Inventory.) | Yes | Yes |
Inventory sync from Zenoti to Shopify | Yes | Yes |
Product Sales Report Updates | Yes | Yes |
Today's Sales Report Updates | Yes | Yes |
Invoices | Yes | Yes |
Sync all the information except Gift Cards | Yes | Yes |
Discounts/Promotions | Yes | Yes |
Product Refunds* *Refunds happen in Shopify | Yes | Yes |
Product Exchanges | No | No |
Product Variants | No | No |
Using Zenoti Gift Cards on Shopify | No | No |
Pick up at the Store | No | No |
Shipping/Tracking Information on Zenoti | No | No |
How the integration works
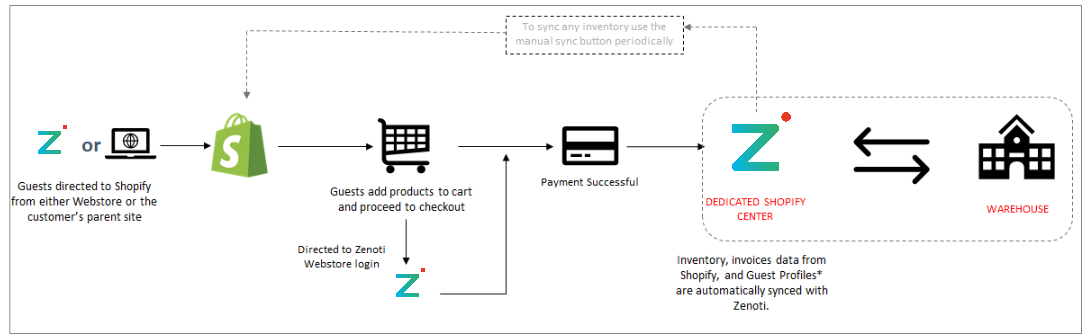
Guests are directed to your Shopify store either from your Webstore or from your organization’s website.
Guests add products to cart and proceed to checkout.
Shopify prompts your guests to log in.
Note
If you have subscribed to the Shopify Plus plan (which supports single sign-on), the guests are directed to Webstore login. After the guests log in to Webstore, they are then redirected to Shopify to complete the transaction. If you have subscribed to other Shopify plans (which do not support single sign-on), you must use the guest checkout feature of Shopify.
Guest makes the payment for the product.
The product inventory gets updated in Zenoti.
Invoices are created in Zenoti.
What happens after the integration?
After you integrate Zenoti with Shopify, when a guest purchases a product from your Shopify store, the following happens in Zenoti:
The corresponding product count is reduced from inventory.
For example, the stock levels of a Hair gel in Zenoti is 100 units and a guest, Jennie, has purchased 2 units of Hair gel from the Shopify store. After the invoice is created, the stock level of Hair gel in Zenoti is reduced to 98 units.
The guest profile is updated with the latest transactions and invoices.
Considering the same example, Jennie’s profile in Zenoti is updated with the invoice generated from the purchase.
The reports are updated with the purchases made on Shopify - all product reports and Today’s Sales, Sales Invoice, Product Sales, and Invoice Number report.
Note
If you have changed the stock level of a product in the Inventory module of Zenoti, to update Shopify with the latest stock levels, you must log in to Shopify and manually sync the inventory level.
Add products to your Shopify store
After you have set up the Shopify integration with Zenoti, you can log in to your Shopify store with admin credentials and start setting up your store and also add products.
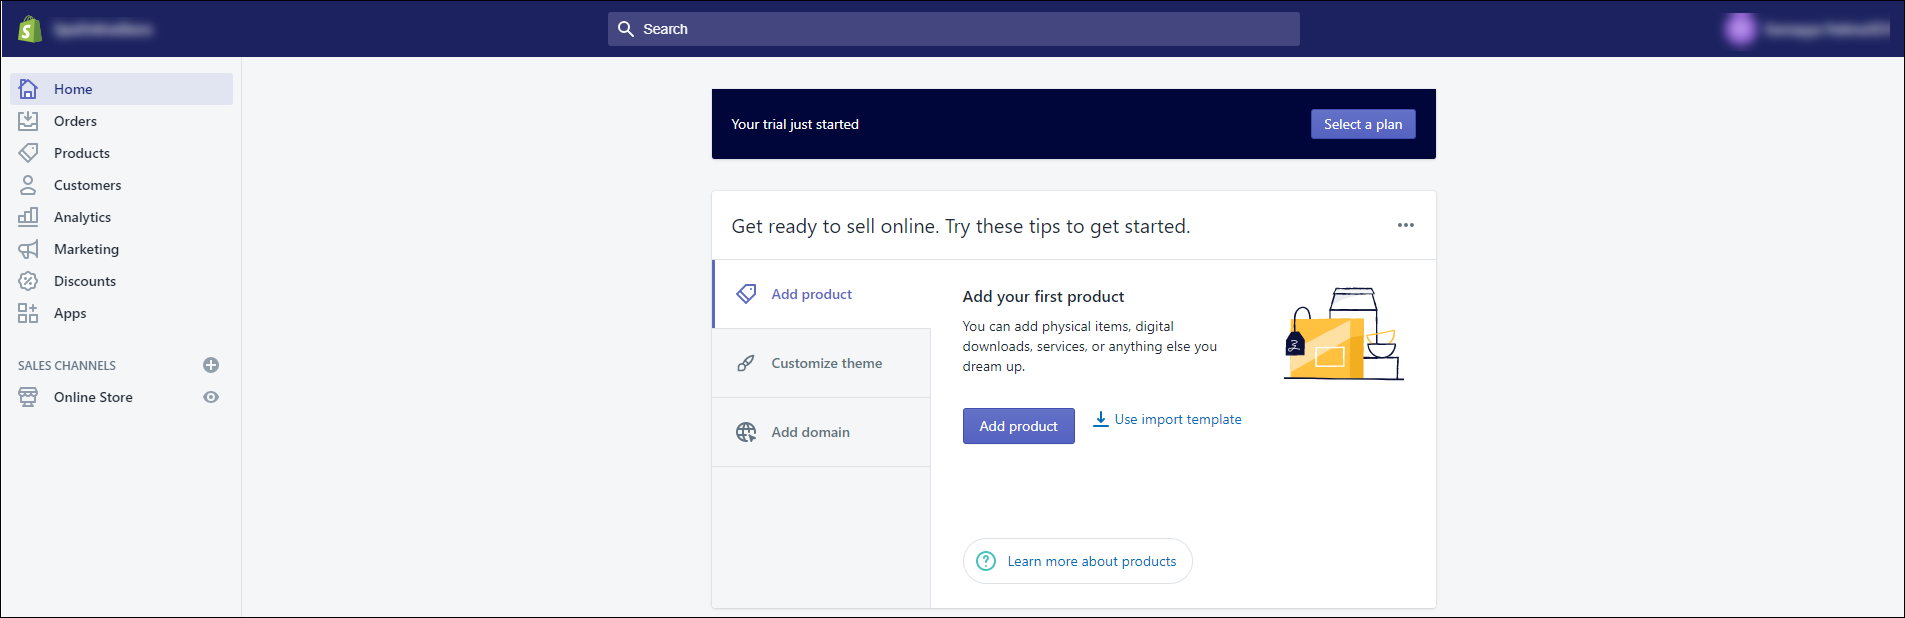
Log in to your Shopify store with Admin credentials.
The Shopify admin page opens.
Select Products from the left navigation menu.
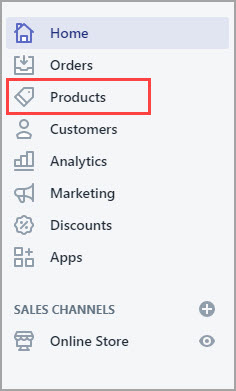
The All Products page appears.
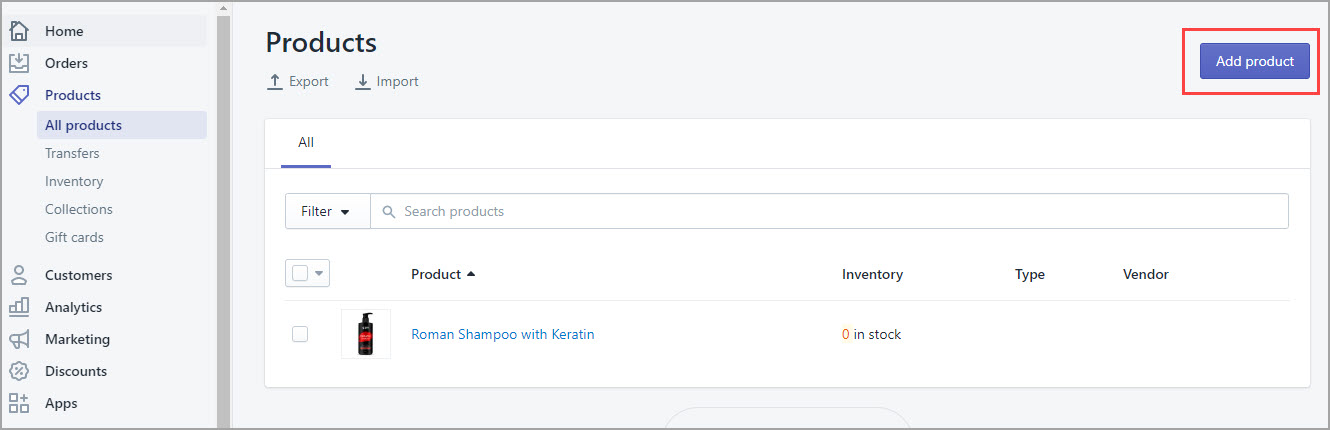
Click Add Product.
The Add Product page appears.
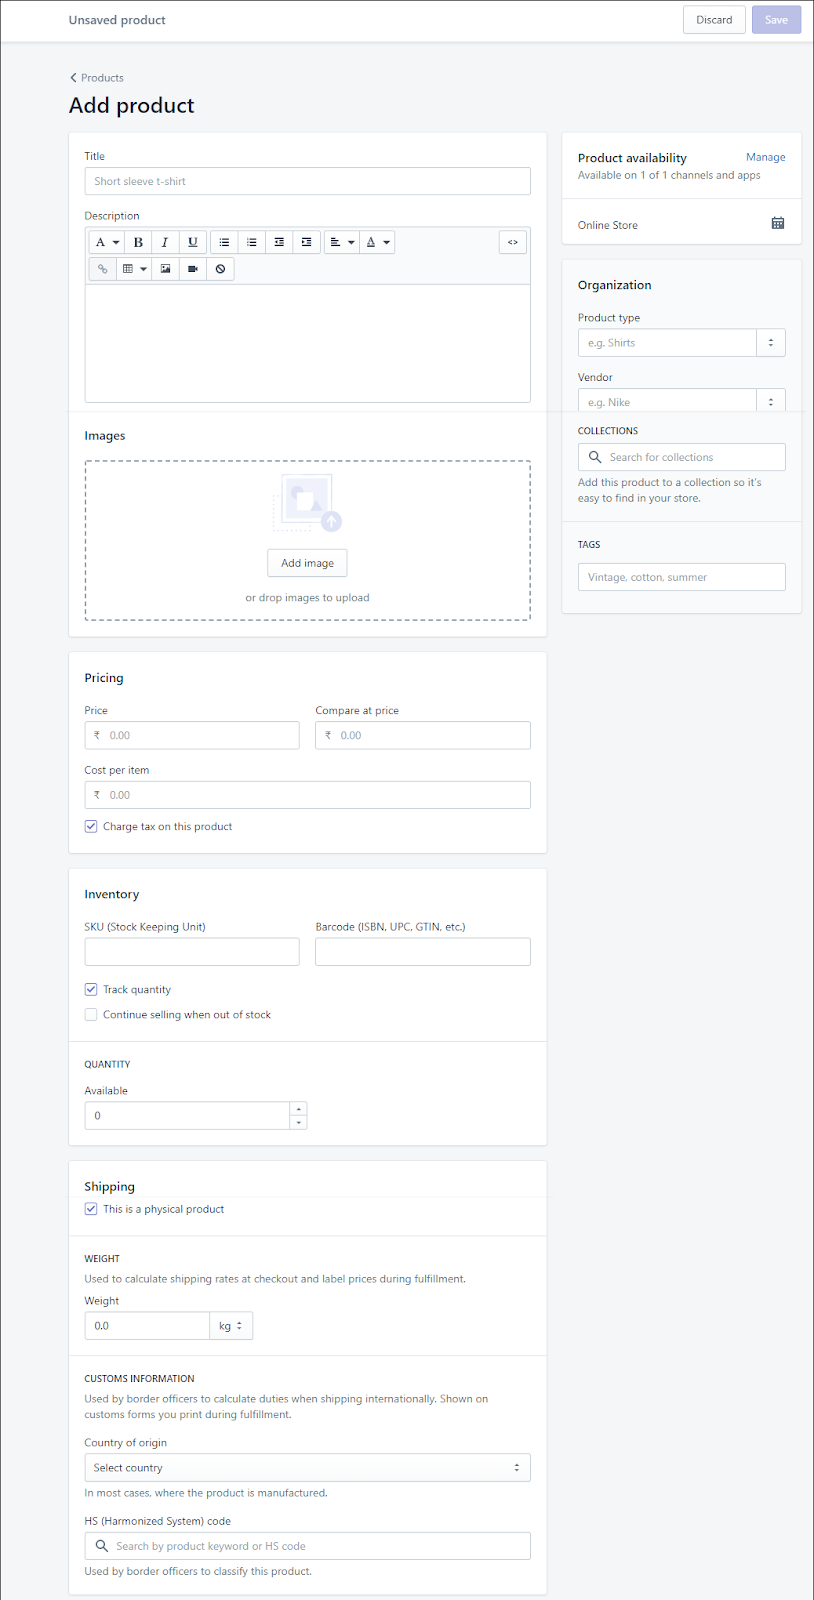
Enter the following details for the integration to work.
Note
You can ignore the remaining fields as these are optional to the integration. to know about what each of these fields are, refer to the Shopify documentation.
Title: Enter the name of your product along with a special feature of the product.
Example: Shampoo with Keratin.
Description: Enter a short description of the product and how the product will be useful to your guests.
Images: Upload the images of the product. Zenoti recommends you to have at least three images of the product.
SKU: Store Keeping Unit or SKU is the product code that you give to your products. Enter the SKU in this field.
Note
The product code in Zenoti and the SKU in Shopify should be the same.
Example: If the product code in Zenoti for a Hair Gel is HG7432, then you must ensure that the SKU code for the product in Shopify is also HG7432.
Barcode: If the products come with a bar code, then enter the bar code number here.
Capturing Vendor Details for Products Added from Shopify via the Integration
When a product is added or updated from Shopify, Zenoti automatically syncs vendor details to ensure seamless inventory management. Here's how the process works:
Existing vendor matching: If the vendor name from Shopify (after special characters are removed) matches an existing vendor name in Zenoti's inventory database, the product is mapped to that vendor entry.
New vendor creation: If the vendor name does not match any existing vendors at the organization level, Zenoti automatically creates a new vendor in the database with the following details:
Vendor name: Automatically fetched from Shopify for the product and cleaned to remove special characters.
Vendor price: Defaulted to 0 (this can be updated manually if needed while raising purchase orders or can be bulk updated too).
Vendor code: Automatically generated for new vendors with word "Shopify" in the prefix to help identify vendors created from your Shopify integration.
Vendor center: Linked to the default center configured for retail sales of products associated with Shopify in the organization’s settings.
These automated configurations eliminate manual effort, ensuring consistency and accuracy in vendor-product mapping.
Integrate Zenoti with Shopify
After you have reviewed the prerequisites and completed the required configurations, you can proceed to integrate Zenoti with Shopify.
Important
Reach out to Zenoti to get Shopify enabled for your business.
At the organization level, click on the Configurations icon.
Search for and select Ecommerce from the Integrations section.
Set up the following configurations:
Note
If you do not see the Ecommerce tab on this page, you must reach out to Zenoti to get Shopify enabled for your business.
Apart from the Shop tab, you must set up all of the tabs for the integration.
Configuration: Requires you to enter store details such as Store URL and API Keys.
Authorize: Enable/disable Zenoti-Shopify integration.
Manual Sync: Use this option to update Shopify with your retail offerings and other details such as SKU, available quantity and price.
Locations: Enter the physical address of the dedicated center for the Shopify store. This can be an existing center as well.
Payments Mapping: Specify your payment gateway and payment method.
Sync Schedule: Set up a sync schedule to regularly update Zenoti and Shopify with inventory changes.
Contact Zenoti to set up the sync schedule.
Shop: View a summary of your Shopify store details such as store name, address, and contact information.
Click Save.
You have successfully integrated Zenoti with Shopify.
Set up the Shopify Configuration tab
The Shopify configuration tab consists of key settings to integrate Shopify with Zenoti such as Store URL and API Secret Key.
Important
Before you begin, you must generate the multipass secret key in Shopify. You will need this key while setting up the configurations.
At the organization level, click the Configurations icon.
Search for and select Ecommerce from the Integrations section.
Expand the Configuration tab.
You will find the following settings under the Configuration tab:
E-Commerce Platform: Select the name of the Shopify plan that you are using. You may select Shopify Basic or Shopify Plus plan.
Store URL: When you register with Shopify and subscribe to one of its plans, you must enter the URL of your store. The Store URL is based on the name of your business. Every Store URL begins with https:// and ends with .shopify.com
Example: If the name of your business is SpaBliss, your store URL will be https://spabliss.shopify.com
API Key: Contact Zenoti for the API key.
API Secret Key: Contact Zenoti for the API Secret key.
Multipass Secret: Enter the multipass secret key that you have generated in Shopify. This is used for Single Sign-On for your guests from Webstore to Shopify.
Important
You can leave this field blank if you have subscribed to Shopify Basic.
Sync Start Date: Enter the date from when you want the inventory and the product information sync to begin.
Important
You cannot change this date (backdate it or change it to a future date) after you select it and complete the integration.
Default Center: Select your designated Shopify center from the drop-down list. This center need not be a new center, you can select an existing center as well.
Default Custom Payment: Select the default custom payment. This is the custom payment that you create in Zenoti for your center.
Default Employee: Select the default employee who will have the admin access.
Select the Active checkbox to enable the integration.
Click Save.
Next step
Set up the Shopify Authorize tab
After configuring the Configuration tab, you must set up the Authorize tab to enable the integration. This tab allows you to enter details to authorize Zenoti to access the Shopify store and sync information.
At the organization level, click Configuration.
Search for and select Ecommerce from the Integrations section.
Expand the Authorize tab.
You will find the following settings:
Store URL: Enter the URL of your store. For example, https://myshop.myshopify.com.
Authorize Now: This button authorizes Zenoti to access your Shopify store and sync inventory information.
Note
When you click this button, a tax group is also created automatically with the following details:
Tax group code: OnlineSales
Tax group name: Ecommerce Sales Tax
Active: Yes
Tax Component: no tax component
Center - Shopify default center
Click Authorize Now.
The Shopify Login page appears.
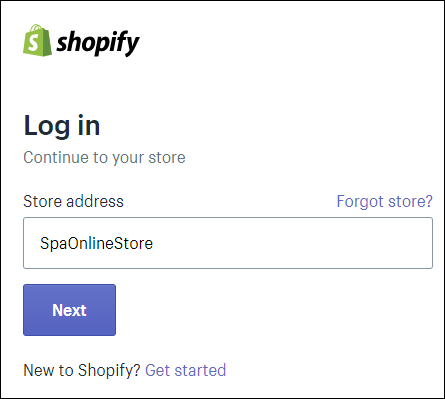
Enter your Shopify credentials.
Click Log in.
You are logged into Shopify.
Click Install Unlisted App.
The app is installed and the authorization is complete and you are redirected to the Zenoti integration page.
Register Scripts (Only for Shopify Plus subscription): Click Register Scripts to enable Single Sign-On (SSO) for your Shopify store. This means that your guests do not have to log in separately to the Shopify store. They can log in to your Webstore with their credentials and seamlessly transition to your Shopify store. In the backend, Shopify will use the multipass secret key and authorize guests from your website to your Shopify store.
Uninstall: Click Uninstall if you want to disable the Zenoti-Shopify integration.The guest will not be able to view the Products link in the Webstore.
If you are experiencing issues with the Uninstall button not working, follow the steps below to manually uninstall the app and reset the authorization:
Go to Shop > Login as Admin. You will be redirected to your Shopify test store.
Use your Shopify credentials to log in to your store.
In the Shopify admin dashboard, search for the app. Once located, proceed to uninstall it directly from there.
After uninstalling, return to the app's Authorization page. Since the app has been uninstalled, the previous access token is now invalid.
Click the Reset button to clear the deprecated access token.
Go to the Configuration section.
Turn on the Active toggle.
Click Save to apply the changes.
Click Authorize Now to generate a new access token and re-establish the connection with Shopify.
Next step
Generate multipass secret key in Shopify
Multipass Secret Key is used in the case of the Shopify Plus plan to redirect users from your webstore to the Shopify store and seamlessly logs them in with the same email address they used to sign up for the webstore.
Learn more about Multipass secret key in Shopify.
Login to Shopify with your admin credentials.
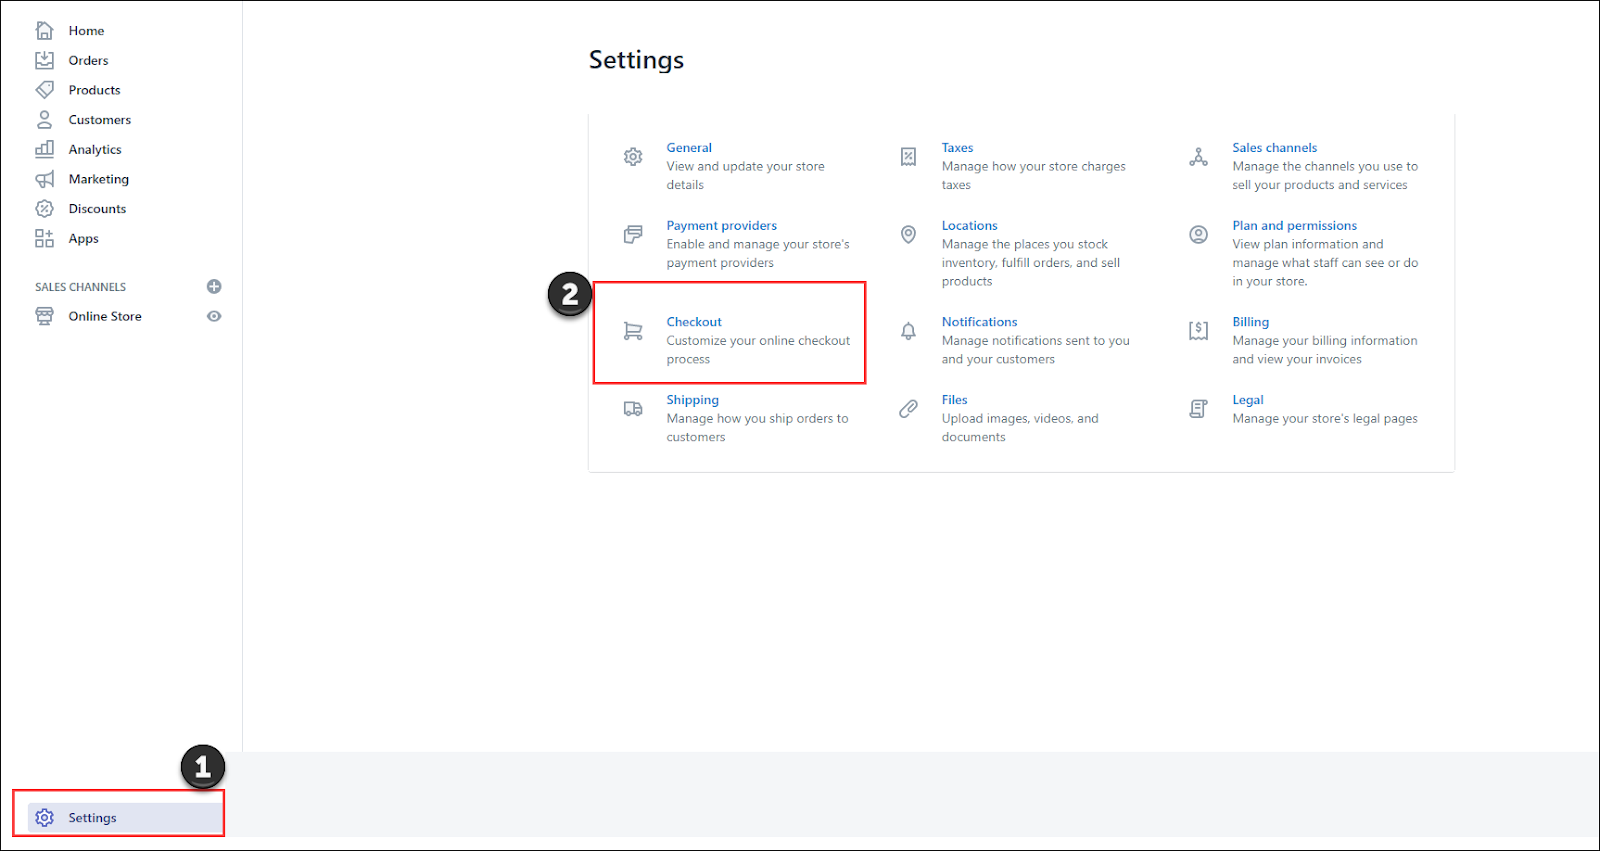
Click Settings on the admin homepage.
Click Checkout.
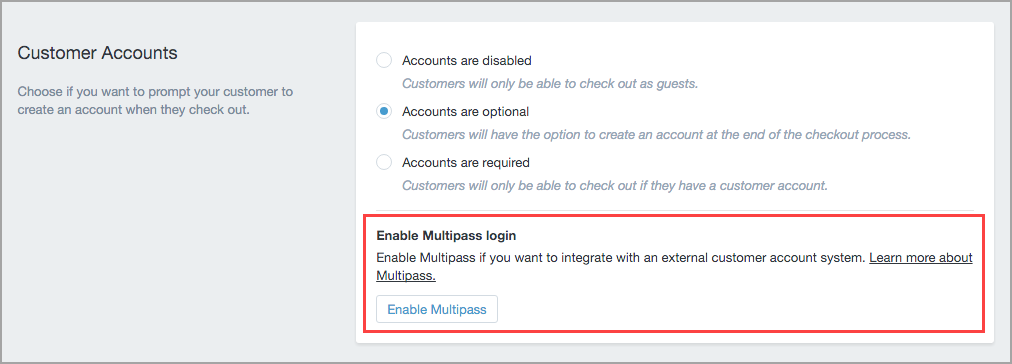
Ensure you enable either Accounts are optional or Accounts are required.
The Enable Multipass login setting appears.
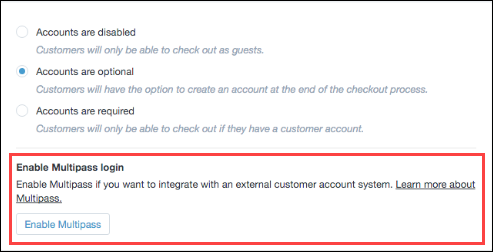
Click Enable Multipass.
The Multipass secret key appears.
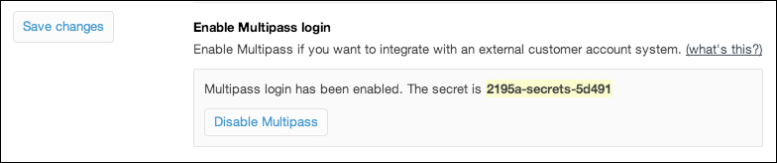
Note the multipass secret key and keep it handy to configure the Zenoti-Shopify integration.
Set up the Shopify sync schedule tab
After you are done with payment mappings, you can schedule automatic syncs for inventory levels and sale orders from your Shopify store to Zenoti.
Next step
Verify your store configurations details and save the details.
Set up the Shopify Manual Sync tab
After you set up the Authorize tab, you must configure the Manual Sync tab. This allows you to manually sync the product information and the inventory information from Zenoti to Shopify and vice versa.
Important
It is mandatory to sync the products and inventory manually for the first time at the time of registration - this activity must be done during the initial setup. You can, however, use the manual sync option anytime to sync the information.
If you want to set up a sync schedule to sync the information periodically, you can set up a scheduler to sync automatically in the Sync Schedule tab.
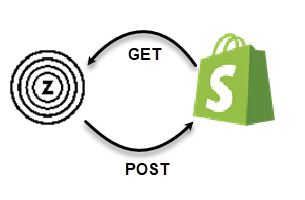
Manual sync in Zenoti uses two buttons to get information from Shopify or update information to Shopify:
Get: To get information from Shopify to Zenoti
Post: To update information from Zenoti to Shopify
At the organization level, click the Configurations icon.
Search for and select Ecommerce from the Integrations section.
Click Manual Sync.
Under the Manual Sync tab, you can sync the following information:
Locations
- GET: Click this button to fetch the location information of your Shopify store and map it to the dedicated center on Zenoti.
Products
Before you begin syncing up products, you must add them to Shopify.
- GET: Click this button to fetch the following product information from Shopify and map it to the product in Zenoti:
-- SKU
-- Description
-- Price
-- Weight
Important
If the product does not exist in Zenoti, the product is added with the Shopify details and associated with the default center.
Sale Orders: Select the date and click the Get button to fetch all the sale orders from Shopify to Zenoti for that date
Inventory Levels:
- GET: Click this button to fetch the inventory levels from Shopify and update it on the dedicated center in Zenoti.
- POST: Click this button to update the inventory levels from the dedicated center in Zenoti to Shopify.
Next step
Set up the Shopify Payments Mapping tab
After you set up the Locations tab, you must configure the Payments Mapping tab. This tab allows you to add the payment gateway name and the custom payment method that you are using in Zenoti.
Important
You must set up a payment gateway with Shopify. You can use Shopify’s payment gateway called the Shopify Payments or use a compatible third-party payment service provider. Both Shopify Payments and Third-Party providers support over 100 credit card payment providers and accept all major payment methods.
Learn about: Shopify Payments and Shopify Supported Third Party Payment Gateways.
Disclaimer: The payment gateway setup should be configured by your admin and Zenoti will not set it up. The payment processing and the payment management is done by Shopify and it is independent of Zenoti.
At the organization level, click the Configurations icon.
Search for and select Ecommerce from the Integrations section.
Expand the Payments Mapping tab.
Under the Payments Mapping tab, you can configure the following:
Payment Gateway: Select the payment gateway that you are using. Options available are
Bank Deposit
Cash on Delivery
Money Order
Buy now, pay later with Klarna
Click Add.
Note
Zenoti supports all custom payments in Shopify.
Zenoti Payment Method: This drop-down list shows all the custom payment options that you are using in Zenoti. Select the appropriate custom payment method corresponding to the payment gateway.
Note
Zenoti recommends that you create a custom payment method called Shopify in your dedicated Shopify center and select the same in this drop-down list.
Example: If your payment gateway is Klarna, and if you have created the custom payment for your center as Shopify, you must do the following:
Select Buy now, pay later with Klarna from the Payment Gateway drop-down list and click Add.
From the Select a Payment drop-down list, select Shopify as your custom payment.
Turn on the payment method by using the Active slider next to the payment method field.
Click Save.The Payments Mapping tab is now set up.
Next step
Move Shopify from new center to an existing center
Businesses that are already managing inventory on existing centers find it difficult to create a new center for Shopify as managing the inventory for the Shopify center becomes operationally challenging.
To help such businesses, Zenoti now allows businesses to set up Shopify even on an existing center.
Businesses that have already set up Shopify in a new center, can move the Shopify center to an existing center.
Important
If businesses make any changes to products on Shopify, during migration from the new center to the existing center, these changes will be carried over to the products in Zenoti.
Disclaimer: The invoices during the migration are not updated. Zenoti does not hold any liability towards data sync for the older invoices.
Step 1: Uninstall the eCommerce integration.
a. Navigate to Integrations > Ecommerce > Authorize.
b. Click Uninstall.
c. To confirm the uninstallation, click Ok.
The integration is uninstalled.
Step 2: Reinstall the Ecommerce integration.
While you are reinstalling, ensure the following.
a. Select the existing center that you want to make the dedicated or default center for Shopify.
b. Map the custom payments to the existing center.
Important
The tax group is configured for the new default center automatically.
c. Map locations.
d. Manual sync is not updated for the older orders.
Limitations
The following is the list of limitations that businesses will notice after moving Shopify to an existing center:
The stock has no indication of the type of stock: online or in-store.
While data is being synced from Zenoti to the existing Shopify center, there is a delay due to which there will be a difference between the stock on Zenoti and the stock on Shopify.
The sales in the Daily Financial Summary report will show up as a total of online sales and in-store sales.
View your Shopify store details in the Shop tab
After you have set up Configuration, Authorize, Manual Sync, Locations, Payments Mapping, and Sync Schedule, the last step to complete the integration is to verify your Shopify store details and save all configurations and details.
The Shop tab gives you a summary of your shop details such as the address, owner name, phone number, email address, URL, and the Shopify plan.
At the organization level, click on the Configurations icon.
Search for and select Ecommerce from the Integrations section.
Select Shop.
You will find the following information in the Shop tab:
Shop Name: Displays the name of the store.
Owner: Displays the name of the owner of the store.
Phone: Displays the phone number of the owner of the store.
Email: Displays the email id of the owner.
Customer Communication Email: Displays the email id given specifically for customer communication.
Important
: You must configure order notifications in Shopify.
Learn about: New Order Notifications in Shopify
Domain: Displays the URL of the store.
Shopify Plan: Displays the current plan taken in Shopify.
Created at: Displays the date when the store was created.
Address: Displays the address of the center.
TimeZone: Displays the timezone of the center.
Price Includes Tax: Displays if the price is inclusive of tax or not using True or False
Is Shipping Taxed: Displays if the tax charged on Shipping is True or False.
Multi Locations Enabled: Display if the multiple locations are enabled in True or False.
(Optional) Click Login as Admin to log in as the administrator to change or update the information.
(Optional) Click Visit Store to visit your store and view your store details.
If you are doing the setup, verify all the tabs and click Save.
Shopify: Items Sync report
You can use the Items report to view all the products that are synced from Shopify to Zenoti. : If a product does not exist in Zenoti, it is created with the Shopify details automatically, associated with the default or dedicated Shopify center, and finally synced to Zenoti.
If you are not on the Ecommerce Sync Report page, at the organization level, go to Reports > Financial > Ecommerce. The Ecommerce Sync Report page appears.
From the sync type drop-down list, select Items to view the sync details of all products. Additional filters for the Items report appear.

Select the filter criteria and click Refresh. The report is generated.
To export the report as an Excel file, click the Excel icon.

To export the report as a CSV file, click the CSV icon.

Filter criteria
Criteria | Options | Description |
Sync Status | - All - Pending - Synced - Failed | Select the sync status. - Pending: Select this to view all the products that are being synced by the system. - Synced: Select this to view all the products that are synced from Shopify to Zenoti due to error. - Failed: Select this to view all products that are not synced from Shopify to Zenoti. : You can view the reason for the sync to fail in the Response Message column. Fix the issue, and sync the products manually.- All: Select this if you want to view the report for all sync statuses. |
Date Range | Select the date range for which you want to view the report. |
Column descriptions
Column | Description |
SKU | The stock-keeping unit that uniquely identifies the product in Shopify. |
Name | The name of the item in Shopify. |
Created On | The date on which the item is added in Shopify. |
Updated On | The date on which the item is updated in Shopify. |
Sync Status | The status indicating if the items were synced from Shopify to Zenoti or not. This column can be one of the following: - Pending: Select this to view all the items that are being synced by the system. - Synced: Select this to view all the items that are synced from Shopify to Zenoti. - Failed: Select this to view all items that are not synced from Shopify to Zenoti. : You can view the reason for the sync to fail in the Response Message column. Fix the issue, and sync the products manually.- All: Select this if you want to view the report for all sync statuses. |
Product Code | The code that uniquely identifies the product in Zenoti. |
Status | The status of the product in Shopify. This column can be one of the following: - Active: The product is active in Shopify - Inactive: The product is not synced due to the SKU is missing, the same SKU is added for multiple products, or the SKU or Title(product name) has invalid characters. - Deleted: The product is deleted from Shopify |
Response Message | NoteIf the sync fails, the reason for the failure appears in this column. You can view this message and fix the issue. : This column is blank for the Pending and Synced statuses.Examples: - Product exists in Zenoti but it is inactive - Zenoti : Name AG HAIR Oil Curl Activator 178ML has invalid chars |
View Details | Click this button to view the details of the product in Shopify. |
Shopify Customers Sync report
You can use the Customers report to view the details of all the customers that got synced from Shopify to Zenoti. The sync is irrespective of any sale order generated for a customer in Shopify. : If a customer does not exist in Zenoti, it is created with the details in Shopify, associated with the Shopify default center, and finally synced. The referral source for such customers is Shopify.
If you are not on the Ecommerce Sync Report page, at the organization level, go to Reports > Financial > Ecommerce. The Ecommerce Sync Report page appears.
From the sync type drop-down list, select Customers to view the sync details of all products. Additional filter for the Customers report appears.

Select the Status and click Refresh. The report is generated.
To export the report as an Excel file, click the Excel icon.
To export the report as a CSV file, click the CSV icon.
Filters
Criteria | Options | Description |
Sync Status | - All - Pending - Synced - Failed | Select the sync status. This column can have one of the following: - Pending: Select this to view all the customers that are being synced by the system. - Synced: Select this to view all the customers that are synced from Shopify to Zenoti. - Failed: Select this to view all customers that are not synced from Shopify to Zenoti due to an error. NoteYou can view the reason for the sync to fail in the Response Message column. Based on the reason, fix the issue and sync the customers manually.- All: Select this if you want to view the report for all sync statuses. |
Column descriptions
Column | Description |
First Name | The first name of the customer in Shopify. |
Last Name | The last name of the customer in Shopify. |
Phone | The phone number of the customer in Shopify. |
The email of the customer in Shopify. | |
Created On | The date on which the customer account is created in Shopify. |
Updated On | The date on which the customer account is updated in Shopify. |
Sync Status | The sync status of the customer account. Success: The customer details are synced successfully. Failed: The customer details are not synced due to an error. Example: In Zenoti if there are multiple customers sharing the same email, the sync fails. |
Guest | The guest full name in Zenoti. Click the link to view the guest profile in Zenoti. |
Status | The status of the guest in shopify. This column can have one of the following values: - Active: Account is active in Shopify - Deleted: Account is deleted from Shopify |
Response Message | If the sync fails, the reason for the failure appears in this column. You can view this message and fix the issue. NoteThis column is blank for the Pending and Synced statuses. Examples: - Multiple customers with the same email exist in Zenoti - Email is not added for the customer in Shopify NoteThis column is blank for the Pending and Synced statuses. |
View Details | Click this button to view the details of the customer in Shopify. |
Shopify Sale Orders Sync report
You can use the Sale Orders report to view the sale orders that have synced from Shopify to Zenoti.
If you are not on the Ecommerce Sync Report page, at the organization level, go to Reports > Financial > Ecommerce. The Ecommerce Sync Report page appears.
From the sync type drop-down list, select Sale Orders to view the sync details of all customers in Shopify.Additional filters for the Sale Orders report appear.

Select the Status and click Refresh. The report is generated.
To export the report as an Excel file, click the Excel icon.
To export the report as a CSV file, click the CSV icon.
Filter criteria
Criteria | Options | Description |
Financial Status | - Pending - Paid | Select the payment status. |
Fulfillment Status | - None - Partially Fulfilled - Fulfilled | Select the order delivery status. Select None if the delivery is not done yet (partial or full). |
Order Status | - Created - Closed - Voided - Deleted | The status of the order in Shopify. This column can be one of the following: - Created: The order is created in Shopify. - Closed: The order amount is paid in full in Shopify - Voided: The order is canceled in Shopify - Deleted: The order is permanently deleted from Shopify |
Date range | Select the date range for which you want to view the report. |
Column descriptions
Column | Description |
Order No. | The sale order number in Shopify. |
Center | The default center in Zenoti where the invoice is created for the order. |
Created On | The date and timestamp at which order is created in Shopify. |
Updated On | The date and timestamp at which order is updated in Shopify. |
Financial Status | The payment status for the order. This column can have one of the following values: - None: Order is not paid - Partially Fulfilled: Order is partially paid - Fulfilled: Order is fully paid |
Order Status | The payment status for the order. This column can have one of the following values: - Created: The order is created in Shopify. - Closed: The order amount is paid in full in Shopify - Voided: The order is canceled in Shopify - Deleted: The order is permanently deleted from Shopify |
Total Price | The total amount paid by the customer to purchase the product. |
Total Discounts | The total amount of discounts given on the order. It includes both item-level and invoice-level discounts. |
Total Tax | The total tax the customer paid to purchase the product. |
Invoice No. | The number generated while creating an invoice for the sale order in Zenoti. TipClick the link to view the Zenoti invoice for the sale order. |
Guest | The full name of the guest in Zenoti. TipClick the link to view the guest profile. |
Update | Click this button to resync the sale orders. |
Track Order | Click this button to track the order on Shopify. You are redirected to the Shopify page. |
View Details | Click this button to view the sale order summary. |
Shopify Refunds Sync report
You can use the Refunds report to view all the product refunds that are done in Shopify and synced to Zenoti. : In case of restocks, if the refunded product is selected as restocked, the product quantity is updated in Zenoti based on the refund order.
If you are not on the Ecommerce Sync Report page, at the organization level, go to Reports > Financial > Ecommerce. The Ecommerce Sync Report page appears.
From the sync type drop-down list, select Refunds to view the sync details of all product refunds. Additional filters for the Refunds report appear.

Select the filter criteria and click Refresh. The report is generated.
To export the report as an Excel file, click the Excel icon.
To export the report as a CSV file, click the CSV icon.
Filter criteria
Criteria | Options | Description |
Sync Status | - All - Pending - Synced - Failed | Select the sync status. This column can have one of the following: - Pending: Select this to view all the product refunds that are being synced by the system. - Synced: Select this to view all the product refunds that are synced from Shopify to Zenoti. - Failed: Select this to view all product refunds that are not synced from Shopify to Zenoti due to an error. NoteYou can view the reason for the sync to fail in the Response Message column. Based on the reason, fix the issue and sync the product refunds manually.- All: Select this if you want to view the report for all sync statuses. |
Column descriptions
Column | Description |
Order No. | The refund order number. |
Center | The name of the default or dedicated Shopify center where you can view the sale order and refund order. |
Created On | The date timestamp at which the refund is initiated in Shopify. |
Updated On | The date and timestamp at which the order details are last synced from Shopify. |
Total Price | The total amount paid by the customer to buy the product from Shopify. |
Total Tax | The total tax levied on the customer to buy the product from Shopify. |
Invoice No. | The number generated by Zenoti for the order. Note: Click the number to view the Zenoti invoice for the order. |
Guest | The name of the guest who purchased the product. Note: Click the guest’s name to view the guest profile in Zenoti. |
View Details | Click this button to view the details of the product in Shopify. |
Shopify Product Inventory Levels Sync report
You can use the Product Inventory Levels report to view the inventory level of all products in Shopify. : This report or any inventory level sync (manual or automatic) gets only the available quantities of the products, not update them in Zenoti. You can go ahead and update them based on the sale orders.
If you are not on the Ecommerce Sync Report page, at the organization level, go to Reports > Financial > Ecommerce. The Ecommerce Sync Report page appears.
From the sync type drop-down list, select Product Inventory Levels to view the sync details of all products. Additional filters for the Product Inventory Levels report appear.

Select the filter criteria and click Refresh. The report is generated.
To export the report as an Excel file, click the Excel icon.
To export the report as a CSV file, click the CSV icon.
Filter criteria
Criteria | Options | Description |
Sync Status | - All - Pending - Synced - Failed | Select the sync status. - Pending: Select this to view all the product inventory levels that are being synced by the system. - Synced: Select this to view all the product inventory levels that are synced from Shopify to Zenoti due to an error. - Failed: Select this to view all product inventory levels that are not synced from Shopify to Zenoti. NoteYou can view the reason for the sync to fail in the Response Message column. Fix the issue, and sync the product inventory levels manually.- All: Select this if you want to view the report for all sync statuses. |
Date Range | Select the date range for which you want to view the report. |
Column descriptions
Column | Description |
Name | The name of the product in Shopify. |
Center | The name of the default Shopify center. |
Location | The physical address of the default Shopify center. |
Available | The quantity of the product based on the last sync. |
Updated On | The date and timestamp when the sync (manual or automatic) happened. |
View Details | Click this button to view the details of the product in Shopify. |
Shopify FAQ
Does Zenoti support auto-renewal of my Shopify account?
No. You must reach out to Shopify for subscription and renewal of your Shopify account.
Does Zenoti support auto-renewal of my Shopify account?
No. Zenoti-Shopify integration does support this. You have to raise the request separately with a vendor to fulfill the order.
Why I don't see the Shopify refund details on Zenoti?
The following could be the reasons for not seeing refund details in Zenoti:
You've not entered the refund quantity. Moreover, if you've entered the refund quantity after the refund, the update is not captured by the sync process.
You've refunded only shipping charges on the invoice. This is not captured by the sync process.
You've made a cash refund without selecting a product.
How are Shopify Refunds reflected on Zenoti?
-------------------------------------------------------------------------------------------------------------------------
Disclaimer: If your customer has bought a product on your Shopify store, and you need to refund the invoice, you MUST do that on Shopify - Zenoti does not support refunds for online purchases.
--------------------------------------------------------------------------------------------------------------------------
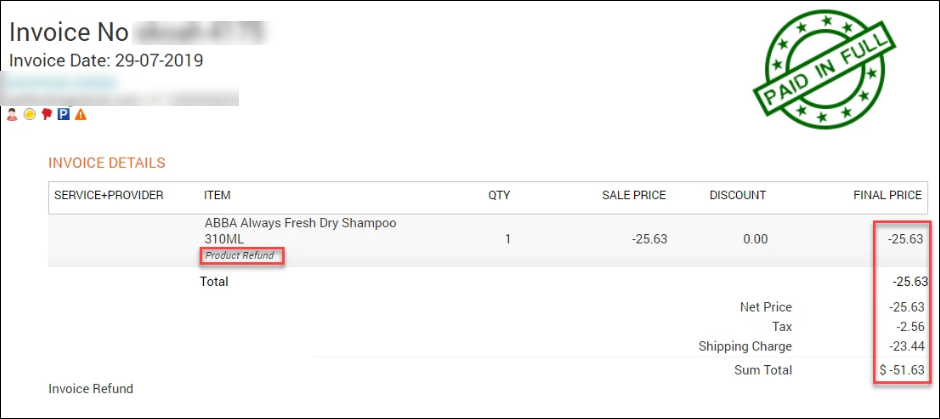
When you refund an invoice on Shopify and the data is synced to Zenoti, you can find the refund details Zenoti:
Refund Invoice
On the refunded invoice, you can see the refund details.
Product Transaction History
In product transaction history, you can see the refund details.
Note
In product transaction history, you can see the refund details.
. Refunds Sync Report
In the Shopify Refunds Sync report, you can see the refund entries.