Automatic purchase orders and transfer orders
Reorder levels, notifications, and auto PO/TO
Be a retail-heavy business or a business that’s known for a signature service using a specific product, you never want to be in a situation where this product is running low or it is completely out of stock. Your company’s revenue also depends on how calculative you are with the inventory.
While products are ordered on a regular basis, it is easy for a manager to miss low stock levels between ordering cycles. With Zenoti, you can define various levels for each product at a center, so that you neither run out of stock nor have in excess. You can also choose to notify managers when the stock reaches a specific level and have orders (purchase/transfer) auto-created for them.
Alert, Desired, Order, and Recommended Levels
Alert Level: The minimum stock quantity that you must have on hand to run your business until your inventory is replenished. If a product's quantity is below the alert level, you can allow Zenoti to alert a specific employee or a role to order the product. You can learn about notification in the later part of this article.
Example: Let's say that you need at least 30 bottles of Hair Shampoo to run your business. You can enable notifications to be sent automatically to the desired roles or employees as soon as the stock level reaches 30.
Desired Level: The quantity of a product that you want to maintain in stock at any time to run your business smoothly.
Example: Let’s say that the desired level of a product is 100 bottles, but you have only 30 bottles left in stock. In this case, you can order 70 bottles to maintain the desired level.
Recommended Level: The quantity of the product suggested by Zenoti. It is calculated as follows,

The Current Inventory, Recommended Level and the UndeliveredQty are columns in the Inventory > Reports > Alerts report, where
Current Inventory = Total stock (in store and floor)
UndeliveredQty = Order quantity that is already raised. This column is available only if your company has enabled the Configuration> Inventory > Orders > Consider raised purchase orders/transfer orders for calculating Auto PO/TO quantity setting.
The Recommended Level is calculated for a product ONLY when
Desired Level > Recommended Level.
So, not all products will have the Recommended Level. For products that do not meet this condition, the Recommended Level is blank.
Example: Let's say that, for the Hair Shampoo product, you have set the Desired Level as 70. You have 30 bottles in stock and there are 20 bottles that you have raised and waiting for delivery.
Current Inventory - 30
Desired Level - 70
UndeliveredQty - 20
Recommended Level = (70 - (30+20)) = (70-50) = 20, which is less than the Desired Level (70)
Since, the condition is not met, in this case, the Recommended Level is blank for the Hair Shampoo product.
Order Level: The stock quantity that should be ordered to maintain the desired level.
At the organization level, click the Master Data icon and navigate to Products.
Click the product code to edit it.
Click the Price tab.
You can view the pricing, tax, and stocking details for the product.
Ensure you are at the organization level.
Navigate to the Master Data > Products.
Click the product code to edit it.
Click the Price tab.
You can view the pricing, tax, and stocking details for the product.
To edit the quantities for retail and consumable products, enter the value in the Order, Desired, and Alert columns.
Click Save.
The total quantities are updated for the product.
After you have set the alert levels, and notifications (SMS or Email) are enabled for your organization, you can choose to notify the Inventory Manager or a specific employee when a product's quantity reaches the Alert Level to avoid overnight shipment charges. You can set the notifications either at the organization level or at the center level.
Note
The notification is sent only after the product level goes below the alert level. For example, if you have this set to alert level to 0, the stock has to be -1, only then you will be able to see the product in the auto order.
Navigate to the Alerts tab.
For Org level - Configuration > Notifications > Alerts.
For Center level - Configuration > Notifications > Alerts.
The Organization or Center page appears based on the navigation.
Click the Alerts tab.
Note
The Alerts tab appears only if the Enable Alerts checkbox is selected.
Toggle the switch from OFF to ON for Product level is running low.
Select the Delivery Mode and Recipient Type as desired.
You can add multiple roles and employees.
Click Save.
The notification is enabled and the details are saved.
Auto PO/TO
When a product's current stock (including any undelivered orders) is less than the Alert Level defined for it, following takes place:
A notification is sent to the recipients (as defined in the Alerts tab).
An order is auto-created when you navigate to Inventory > Procurement > Orders and select Add Order (Auto) for purchase order.
Automatic Transfer Orders
When a product's current stock (including any undelivered orders) is less than the Alert Level defined for it, following takes place:
A notification is sent to the recipients (as defined in the Alerts tab).
An order is auto-created when you navigate to Inventory > Procurement > Orders and select Add Transfer (Auto).
Create automatic purchase orders
Click the Inventory icon and navigate to Procurement > Orders.
From the I want to list, select Add Order (Auto).
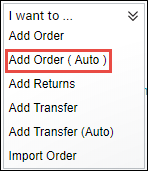
The Inventory Order Alert page appears with details such as Current Inventory, Desired Level, Order Qty, Alert Level, and Recommended Level.
Using the filters, search for the required products.
Note
Discontinued products are not available for selection and are not displayed.
From the search results, select the desired products and click Next.
One of the following can take place:
If any of the products are not associated with a vendor, a message, There are some products which are not associated to any vendor appears. In this case, you must first associate the products with the vendors.
The Create Purchase Orders page appears with the list of products (selected on the Inventory Order Alert page) and associated product details such as Quantity, MRP, Discount, and Taxes.
If required, from the Vendor list, select a different vendor (a product can be associated with multiple vendors). Based on the vendor, Zenoti updates the product details such as Quantity, MRP, Discount, andTaxes.
If required, in the Retail Qty, Consumable Qty, MRP, Unit Price, Discount, or Tax fields, modify the details.
After you enter these details, TOTAL PRICE and TOTAL TAX are automatically updated. The sum of these values is displayed against the Total field below the respective columns.
Grand Total is the sum of both the Total values. This is the amount you have to consider in your budget for this purchase order.
In the Notes field, enter comments, if required .
Click Create Purchase Orders.
A single purchase order or multiple purchase orders are created based on the number of products you select on the Inventory Order Alert page with the status Created, and the Manage Procurement page appears.
Now that you have created an automatic purchase order, you must raise the purchase order.