Webstore V2 admin tasks
Upload images to the image gallery
Zenoti allows you to customize the look and feel of your Webstore V2 or Campaigns according to your business requirements.
For example, for Webstore, you can add a backdrop image, show a default banner and also show a default preview image.
After you upload an image to the image library, you can copy the URL and use it while setting up the Webstore or creating the campaigns.
At the organization or center level, click the Configuration icon.
Search for and select Image gallery from the Marketing section.
Click Add.
Click Select.
Navigate to the location of your image on your computer.
Select the image which you want to add/upload.
The maximum size of the image can be up to 10 MB.
(Optional) Enter the image name in Save File As text box.
Note
If you do not name the image, Zenoti generates a random name for your image. It is recommended that you name the image to locate it easily.
Click Save.
A URL is generated and the image is added to the Zenoti Image Gallery.
Locate your image in the Zenoti Image Gallery.
Click Copy Link.
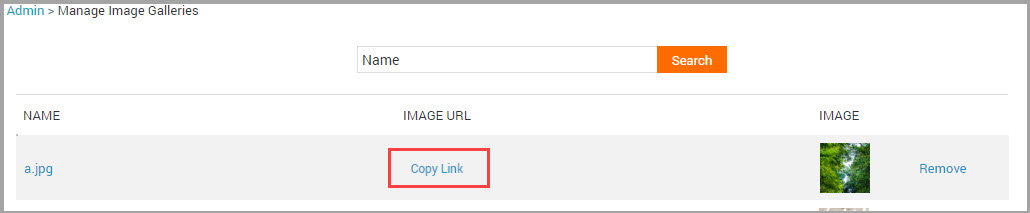
A message stating that the link is copied to clipboard appears.
Use this URL while setting up your Webstore or when Creating Email Campaigns.
When using uploaded images in the Webstore, such as banners, background images, or promotional content, ensure that a descriptive alt text is configured wherever the image is referenced. Alt text enables screen readers to convey the purpose of the image to visually impaired guests. For promotional banners, alt text should describe the offer shown in the image.
For example: "Refer a Friend promotion: Give $50, Get $50 on your next service."
Use the color picker
Color Picker allows you to select a color from the color spectrum (called a color slider) or define your color numerically.
To select a color visually, do the following:
Drag the color slider to get in the range of the color you want.
In the Color Field section, select the shade of the color by clicking and dragging on the circle.The dialog box displays your new chosen color.
Note
In the Color Values section, the numeric values also change accordingly to represent the exact shade you’ve chosen. (Optionally) If you know the numeric values of the color you want to use, you can enter the values in the Color Values textboxes. For example, RGB values are based on brightness levels, from 0 to 255, with 0 being black and 255 being the pure color or white.
Display an announcement banner
While continuity in business is imperative, there's always a chance that due to unforeseeable events you may have to temporarily close your business. At times, you may have to operate at reduced hours due to prevailing local conditions.
In all such cases, it is a good idea to keep your guests informed. You can use the Announcement Banner on your Webstore or CMA to announce such business measures. This way, you ensure that guests do not book new appointments at such times.
To display the announcement banner, follow the steps mentioned here: Configure announcement banner.
Note
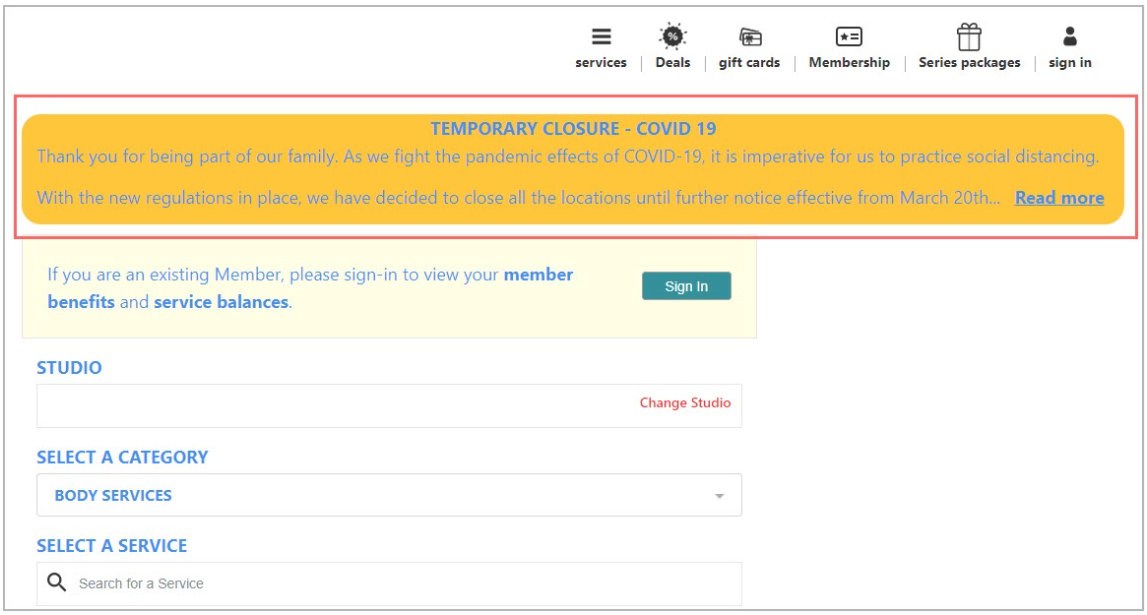
The Announcement Banner appears on every page of the Webstore. On the CMA this banner appears on the service and center selection screens.
When your guests open your Webstore, they will see the Announcement Banner on the top of every page. On the CMA, the Announcement Banner will be visible on the service selection and center selection screens. see the examples below:
CMA:

Webstore:
Hide monetary value of loyalty points
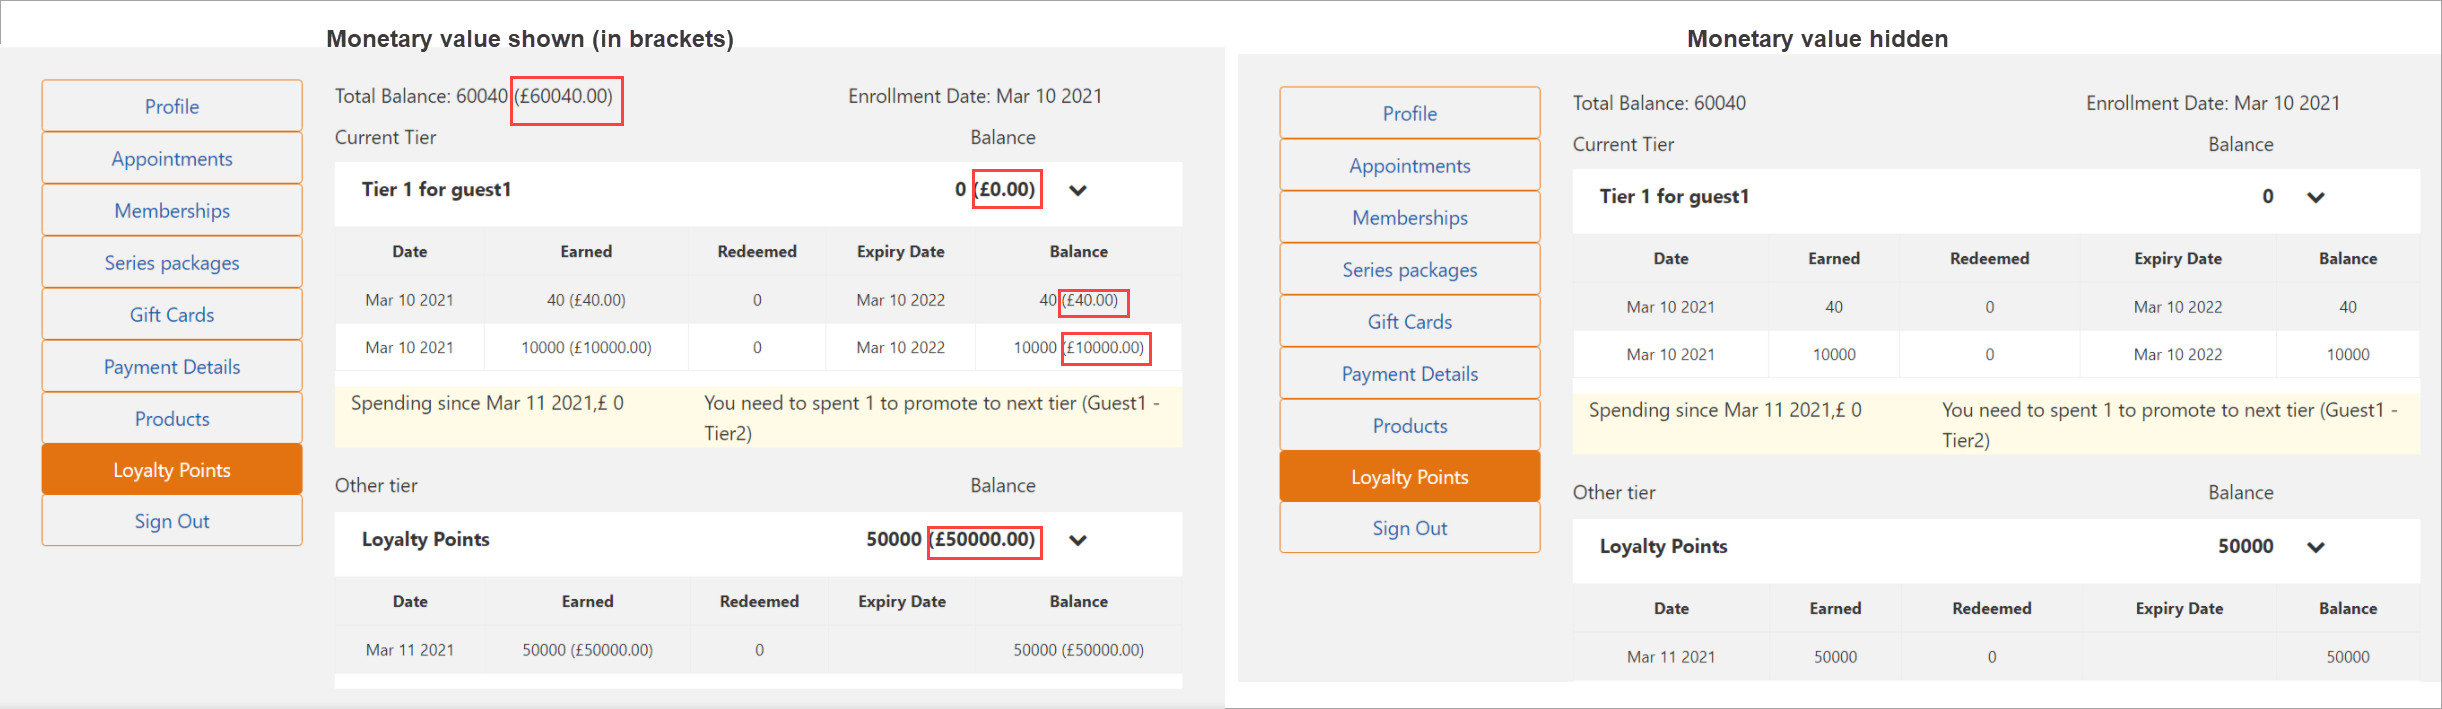
When a guest avails a service, purchases a product, or performs certain actions, such as referring a friend, "reward points" or "loyalty points" are added to the associated guest’s profile. Using these points guests can pay for services or buy products for the equivalent monetary value. By default, guests can see the monetary value of the loyalty points they are entitled to from the guest profile.
However, when guests can see the monetary value of loyalty rewards in this manner, it limits the flexibility of businesses. For example, businesses cannot create loyalty schemes in which, at times, the rewards may not be the same monetary value.
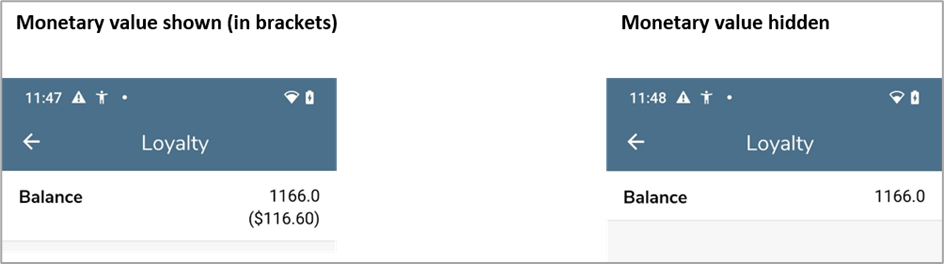
To provide businesses flexibility while creating loyalty schemes, Zenoti allows you to hide the monetary value of loyalty points in the Consumer Mobile Application (CMA) and Webstore V2. This way, guests only see the points they have earned and not the monetary value of the points.
At the organization level, click the Configuration icon.
Navigate to Online Booking > Online booking settings > CX V3.
Scroll down and select the Hide monetary value of loyalty points check box.

Click Save.
Enforce guest details to be mandatory for group bookings
Learn about the settings that allow you to enforce the guest details to be mandatory for a group booking
When your guests book an appointment for a group on the Webstore V2, it is not necessary for the host to enter the details of all the guests in the group such as name, and email id.
The Webstore identifies the guests in the group as Guest 1, Guest 2, and so on.
You can enable the Mandatory Guest Details setting at the organization level and make it necessary for the host to enter the details of all the guests in the group. This allows the front-desk staff to serve the guests in a better way.
At the organization level, click the Configuration icon.
Navigate to Online booking > Online booking settings > Webstore V2.
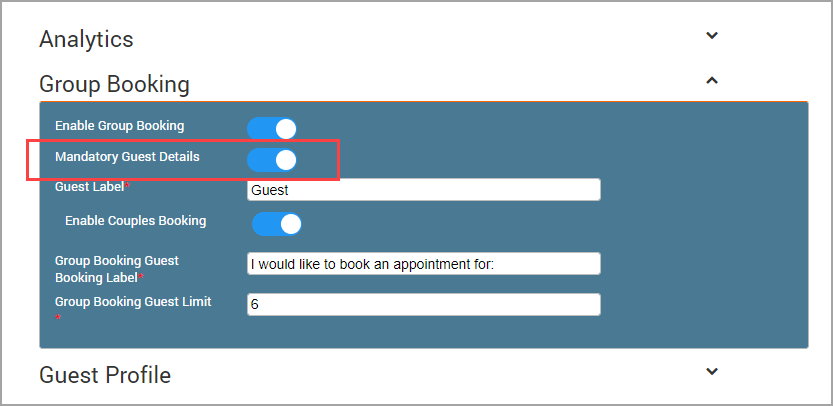
Locate and expand Group booking.
Turn on the setting Mandatory guest details.
On the Webstore V2, when your guests are booking a group appointment, the details for the Guest 1 is auto-populated with the information of the host. The information for the others guests should be entered by the host.
Example: Natasha wants to take a Balinese Massage is also joined by her friends Trish and Daisy. Natasha, being the host for the group, logs in to your Webstore and books the service. She takes the following actions on your Webstore:
She selects 2-6 Guests from the guest drop-down list and specifies the number of guests as 3.

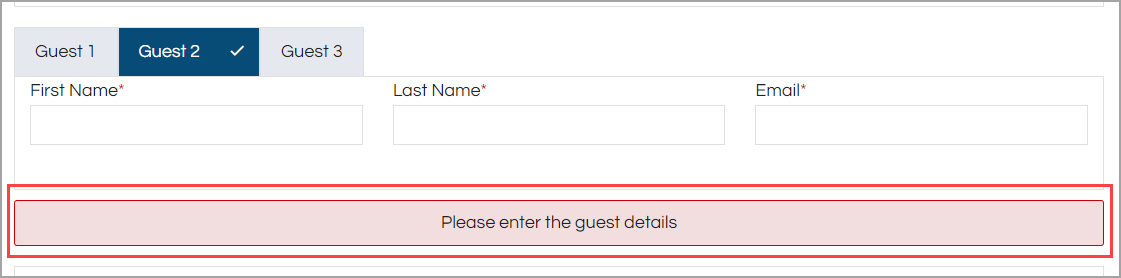
She will see three tabs appear. One for each of the guests.
The guest tabs consist of First Name, Last Name, and the Email Id.

The first guest tab is auto-populated with the name of the host, or whoever logs in to the Webstore.
The second and the third tab require Natasha (host) to enter the details of Trish and Daisy respectively.
If Natasha does not enter the details of the other guests in the group, Webstore will display an error message and not allow her to proceed with the booking.
Note
A guest profile is not created in Zenoti when the host enters the details of the guests
Capture the reasons for guest cancellations
There could be various reasons why your guests cancel their online bookings. But knowing the exact reason for the cancelation of an online booking helps you understand your guests better and also allows you to improve your guest relations.
In this article, you will learn how you configure and display a set of reasons to your guests when they cancel an online booking.
This is a two-step process:
Configure reasons
Allow guests to cancel appointments.
Step 1 - Configure Reasons
At the organization level, click the Configuration icon.
Search for and select Cancellation reasons from the Appointment and Queue management section.
Click Add.
Enter the following information:
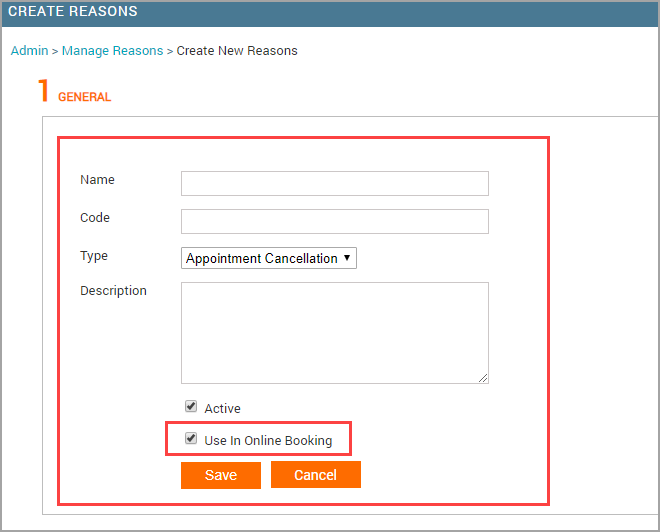
Name: Enter the name of the reason. For example, if you are creating a reason for the guest not being well, enter the name as Not Well.
Code: If you have a code for the reason, enter the code here.
Type: Select the type of reason as Appointment Cancellation.
Description: Enter a short description of the reason.
Active: Select the checkbox to set the reason as active.
Use in Online Booking: Select this checkbox to make it available on the Webstore.
Click Save.
The appointment cancelation reason is now created and will appear on the Webstore.
Step 2 - Allow Guests to Cancel the Appointment
At the organization level, click the Configuration icon.
Navigate to Online Booking > Webstore V2.
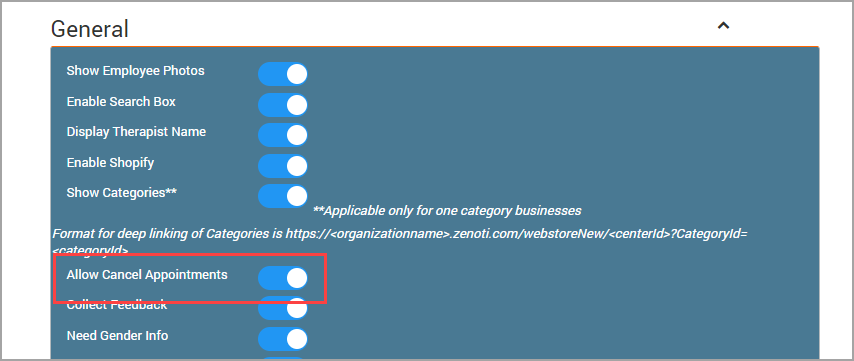
Expand the General settings.
Turn on the Enable appointment cancellation setting.
After you configure the above settings, click Publish to publish all the configured settings.
Scenario: Capturing the reason for guest cancellations
Martha books an appointment for January 10th at 6:30 PM. Later she realizes that she has a private party to attend on the evening of January 10th. She decides to cancel the appointment.
Martha takes the following actions:
Martha logs in to the Webstore.
She opens her guest profile and selects the Upcoming Appointments tab.
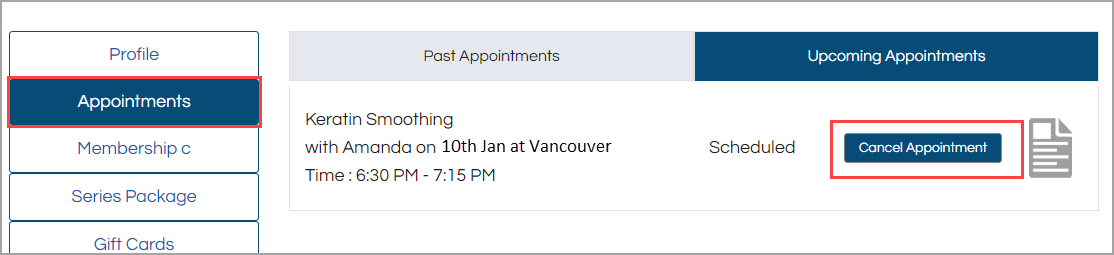
Webstore displays her upcoming appointment for January 10th at 6:30 PM.
Martha clicks Cancel Appointment.
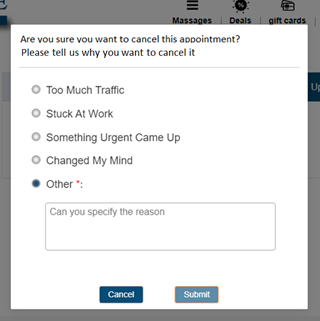
The Webstore displays a window asking her to select an appropriate reason for the appointment cancellation.
Martha can either select any of the given reasons, or select Other to specify the reason in the text box.
Martha clicks Submit to cancel the appointment.
Note
If the guest selects the reason as Other, it is necessary to enter the information or reason in the text box. Otherwise, the guest cannot click Submit and cancel the appointment.
Create an intro campaign
Marketing campaigns in Zenoti comprise of a discount, cashback, or loyalty points associated with a particular target segment.
Zenoti also allows you to create Intro campaigns that are designed specifically to attract new guests and give them one-time discounts on services.
In this article, you will learn how to create an Intro campaign and assign it to a center so that when your guests visit that center’s Webstore, they are shown the introductory prices.
To create an intro campaign
At the organization level, click the Marketing icon and navigate to Campaigns > Media.
Note
An Intro campaign is actually a type of media campaign. So, you must first create a media campaign
To add a new media campaign, click Add.
The Create Campaign page opens.
Enter the following details on this page:
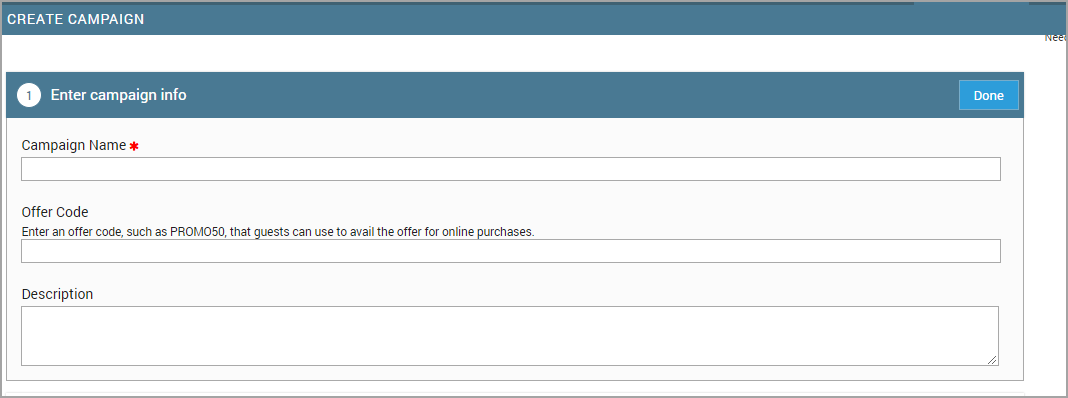
Campaign Name: Enter the name of your campaign.
Offer Code: Enter a shortcode for the campaign for quick identification. Note: Ensure that you copy this code and paste it when you are enabling the Intro Price setting in the Webstore V2 template.
Description: Enter all the details about the campaign, so that it is clear to the front desk staff when they apply this campaign. Click Done after you enter the description.
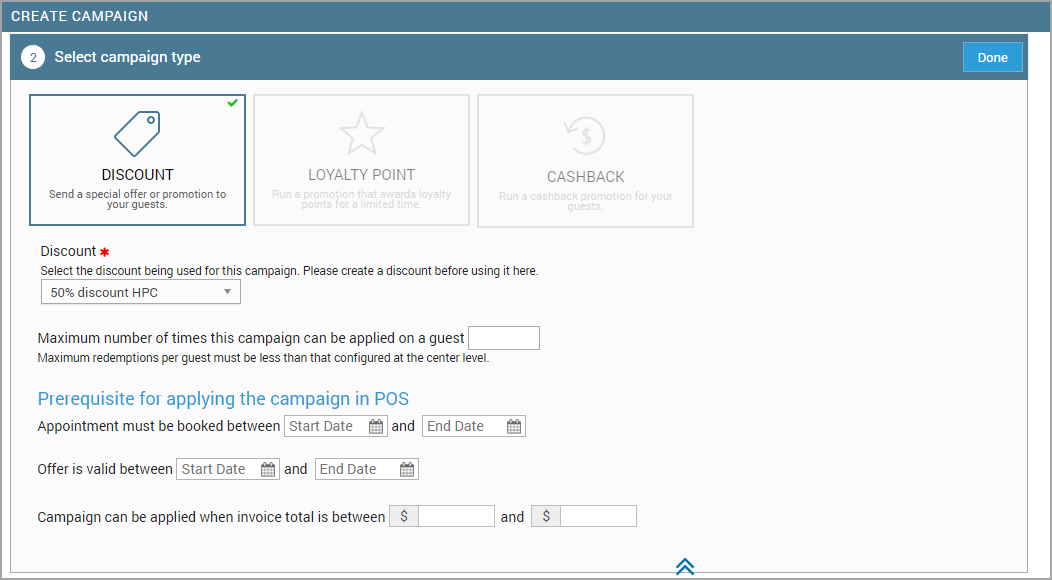
Campaign Type: Select the campaign type as Discount.
Discount: Select the percentage of discount you are willing to provide on the services.
Maximum Number of Times this Campaign is Applied: Enter 1.
Note
Since this is an introductory campaign, the guests will receive this discount only once.
Appointment Must be Booked Between (Start Date) and (End Date): If you want to limit this promotion for appointments that are booked in a certain period, then select a start date and end date for the appointments.
Offer is Valid Between (Start Date) and (End Date): If you want this campaign to run for a certain period of time, you will select a start date and end date for the campaign.
Campaign can be Applied when Invoice is Between ($ and $): Enter the minimum and maximum amount the guest must spend to be eligible for the campaign.
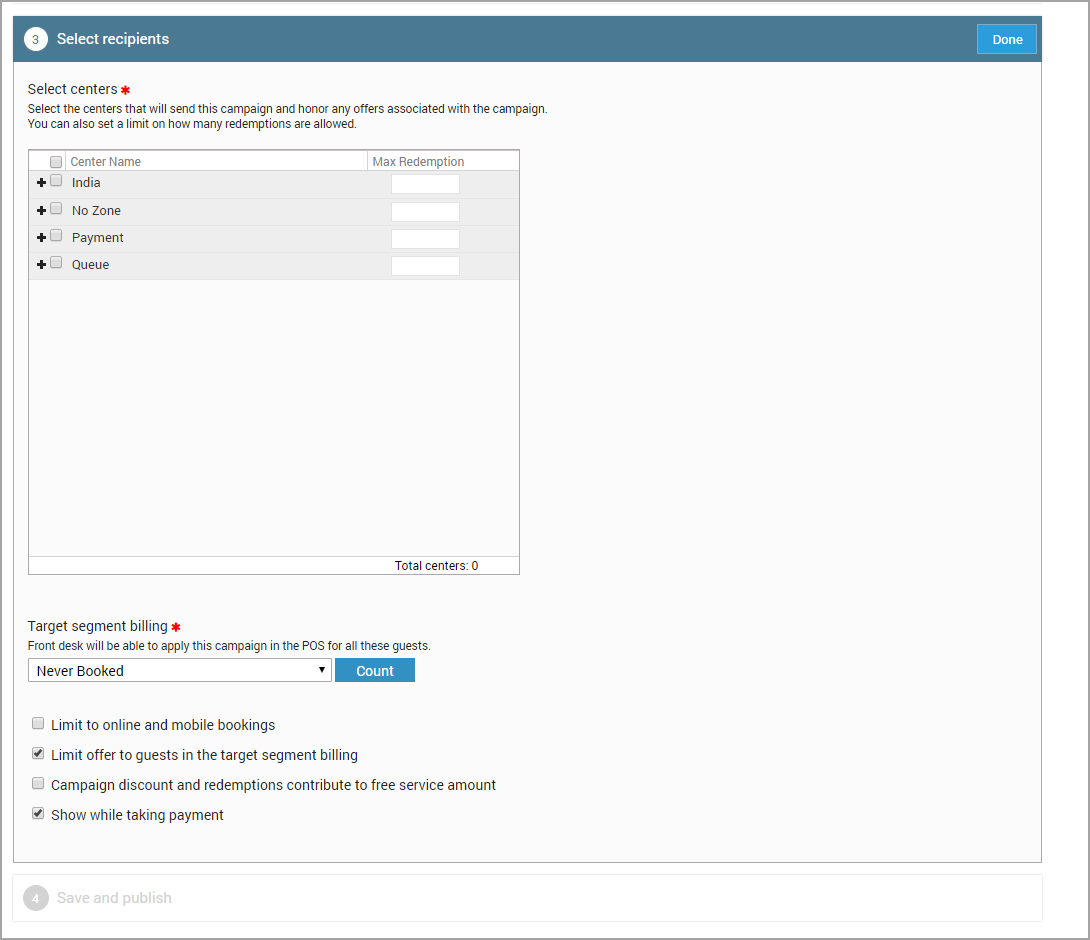
Select Centers: Select all the centers that will run this campaign.
Target segment Billing: Select the target segment as Never Booked.
Limit to online and mobile bookings: Select this checkbox if you want this campaign to be applicable only for online and mobile bookings.
Limit offer to guests in the target segment billing: Select this checkbox to limit the campaign discounts to only those guests that you have selected in the Target Segment field. Else, this campaign will apply to all guests.
After you configure all the settings click Save and Publish.
You have successfully created the intro campaign.
Learn more: Display Introductory Pricing of Services to New Guests
Collect feedback on services
Collecting feedback from your guests will help you understand the areas of your business in which you excel and the areas in which you need improvement.
In online booking, your guests can rate the services that you provide to them. They can also share the feedback on social media. The guests can rate you for your services and leave a comment about what they felt was good or bad about the service.
Before you begin
You must configure Feedback for your organization.
You must add feedback link to the Thank you emails and text messages.
There are two ways for you to prompt your guests to give feedback through Webstore (online store).
Email/text message
Manual
There are two ways for you to prompt your guests to give feedback through Webstore (online store).
Email/text message
Example: Sandra, after finishing her Pedicure at your center, receives an e-mail thanking her for visiting the center. This mail has a link that asks her to rate the services.
She takes the following steps:
Sandra clicks the link in the email.
The feedback screen appears, which consists of the appointment details and the name and photograph of the stylist (if uploaded).
Sandra rates the service 5 stars as she really liked your service.
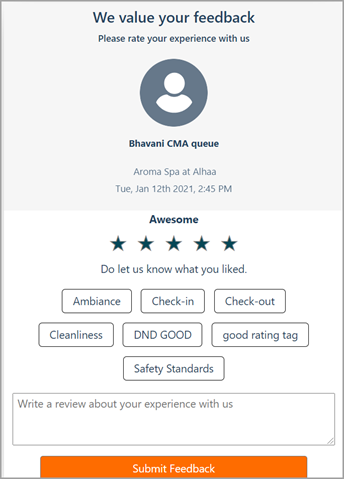
Additional options appear asking Sandra to indicate what she liked the most.
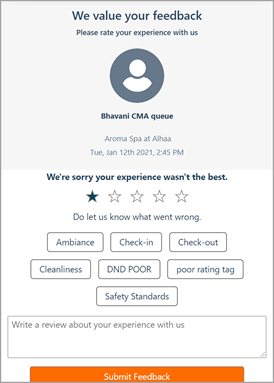
Alternatively, if Sandra has issues with the service provided and gives only say, two stars, she can specify the reason why she did not like the service and also leave a comment on how to improve the services.
Note
After submitting the feedback, Sandra cannot change the feedback.
After Sandra gives her feedback, the feedback sharing screen appears where she can share the feedback on social media.
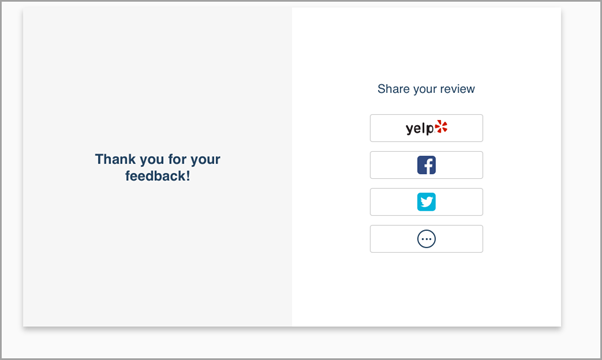
Note
If Sandra clicks any one of the social media icons, she is redirected to the respective website.
Manual
Example: Sandra, completes her Pedicure at your center. She would like to provide some feedback about the service.
She takes the following steps:
Sandra logs in to Webstore (online store).
She clicks the user profile icon on the top right. The User Profile Summary appears.
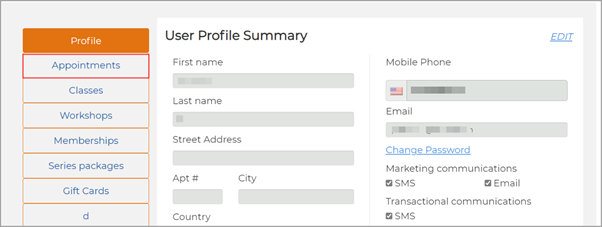
She clicks Appointments.
The Upcoming and Past appointment tabs appear.
She clicks Past Appointments.
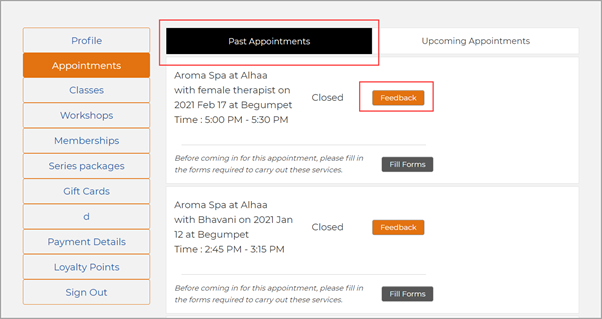
She clicks Feedback.
The feedback screen opens, and Sandra can give her feedback in the form of a rating ranging from one to five stars, with five stars being the highest rating. She can also leave a comment about what she felt was good or what could have been better about the service.
Note
After submitting the feedback, Sandra cannot change the feedback.
Configure email/text notification for appointment confirmation for online booking
At the organization level, click the Configuration icon.
Navigate to Notifications > Templates for email and text.
Expand the Mobile/Webstore section.
Click Edit next to Appointment Confirmation-Online.
On the Edit page, configure the following templates:
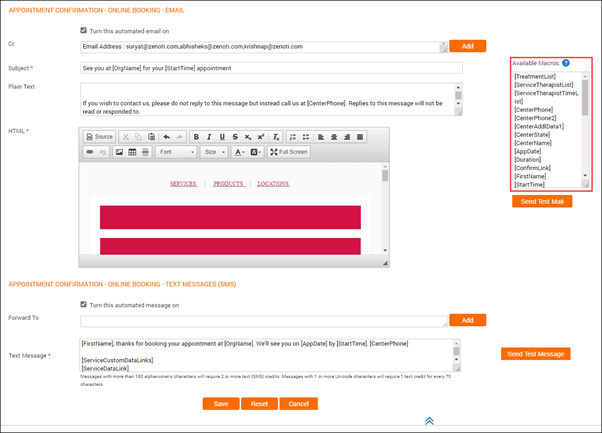
Appointment Confirmation – Online Booking - Email
Select Turn this automated email on checkbox to activate the email template. - To send an email copy (Cc), click Add to include recipients by username, employee role, or email.
Note
For recipients added by role, all employees mapped to the role in the guest's base center receive the email notification.
Edit the Subject box and use the available macros, if required.
Use the available macros to customize the content for plain text and HTML emails.
Tip
Click Full Screen in the editor to edit the text in full-screen mode.
Depending on the recipient's browser, the email is delivered as plain text (no formatting and images) or HTML text (images, links, and formatting).
Click Send Test Email to send a test email and to view how the test email appears to your guest.
Note
In the test email, macros appear as is and will not be expanded. For example, if you use [FirstName] macro in the email text such as 'Hi [FirstName]' then, test mail continues to show 'Hi [FirstName]' and does not show actual first name of the receiver. When the email is delivered to guests, the first name of the corresponding guest appears in the email.
Appointment Confirmation – Online Booking – Text Messages (SMS)
Select Turn this automated message on checkbox to activate the text message template.
Click Add to include recipients by their username, employee role, or phone number
Note
For recipients added by role, all employees mapped to the role in the guest's base center receive the message.
Use the available macros to customize text messages.
Important
Messages with more than 160 alphanumeric characters require two or more text (SMS) credits. Messages with one or more Unicode characters (international/multilingual text characters) require one text credit for every 70 characters.
Click Send Test Message to send a test notification and view how the test message appears to your guest.
Note
In the test message, macros appear as is and will not be expanded. For example, if you use [FirstName] macro in the text message such as 'Hi [FirstName]' then, test message continues to show 'Hi [FirstName]' and does not show actual first name of the receiver. When the text message is delivered to guests, the first name of the corresponding guest appears in the text message.
Click Save.
Available macros to customize email/text notification for appointment confirmation for online booking
A macro is a placeholder text that gets replaced with specific data when inserted into an automated email/text message. Use the below macros to customize emails/text messages to include information such as organization name, guest name, and service name. For example, the [CenterName] macro gets replaced with the actual center’s name.
[TreatmentList] List of services scheduled for the appointment.
[ServiceTherapistList] List of therapists scheduled to perform the services in the appointment; also shows the service name.
[ServiceTherapistTimeList] Scheduled time for the service and the service name; includes the therapist’s name.
[CenterPhone] Primary phone number of the guest's base center (corresponds to the Phone 1 field in the center’s settings).
[CenterPhone2] Secondary phone number provided for the guest's base center (corresponds to the Phone 2 field in the center’s settings).
[CenterAddlData1] Additional information about the center, provided in the Additional Text field in the guest's base center (Settings>Invoice& Receipts).
[CenterState] State where the guest’s base center is located.
[CenterName] Name of the guest’s base center.
[AppDate] Date on which the appointment is scheduled.
[Duration] Duration of the appointment.
[ConfirmLink] Link to receive the guest’s confirmation of the appointment.
[FirstName] First name of the guest.
[StartTime] Time when the appointment is scheduled to start.
Note
When you add this macro, the time zone is also appended to the time as per center time zone.
[CenterAddress] Complete address of the guest's base center (corresponds to the Address 1 and Address 2 fields in the center’s settings).
[OrgName] Name of the organization.
[AppCost] Cost of all the services in the appointment.
[Visits] Number of times the guest has visited the base center.
[DownloadLink] Link to download the Customer Mobile Application (if enabled by the organization).
[CenterZip] Zip code/postal of the center’s location.
[CenterCity] City where the guest’s base center is located.
[LastName] Last name of guest.
[CenterCountry] Country where the guest's base center is located.
[DayofAppointment] Day on which the appointment is scheduled.
[EndTime] Time when the appointment is scheduled to end.
Note
When you add this macro, the time zone is also appended to the time as per center time zone.
[Name] First name followed by the last name of the guest.
[InvoiceComments] Any notes or information about the invoice that you want to share with your guests.
[CenterE-mail] Email address of the guest's base center.
[MailUnsubscribeLink] Link to unsubscribe and stop receiving marketing and campaign emails.
[ServiceDataLink] Link to the service data form that your guests can use to specify any additional data related to a service. For example, to effectively administer a hair spa service, you may need to know the guest’s hair type, or for a customized facial you would want to know and store the guest’s skin type.
[WhatsAppNumber] WhatsApp number of the guest's base center
[CustomMacro1] and [CustomMacro2]: Optional fields that appear as CustomMacro1 and CustomMacro2, can be used to add messages in the notification to communicate information to guests
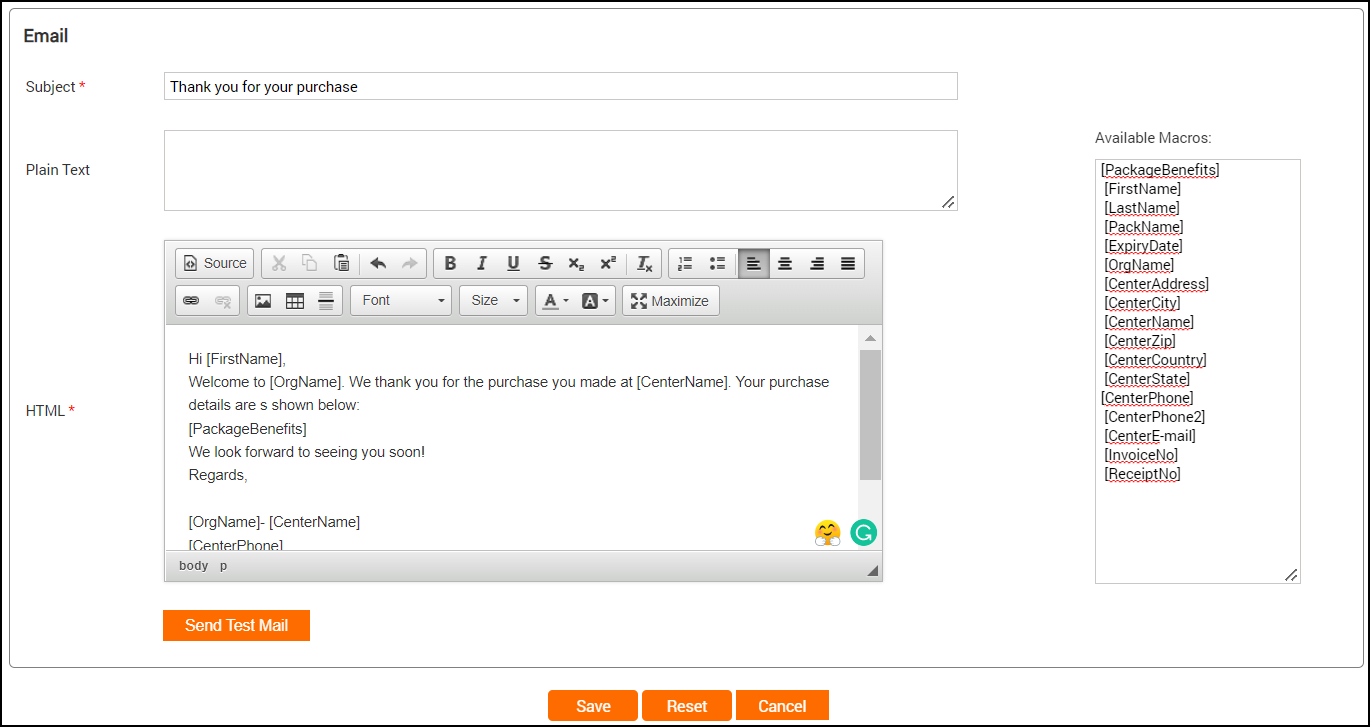
Customize the email template for package online sales
When a guest purchases a series package from Webstore, an acknowledgment email is automatically sent to inform them of their purchase. You can customize the content of this email, add links and media objects, and use macros to personalize the content.
At the organization level:
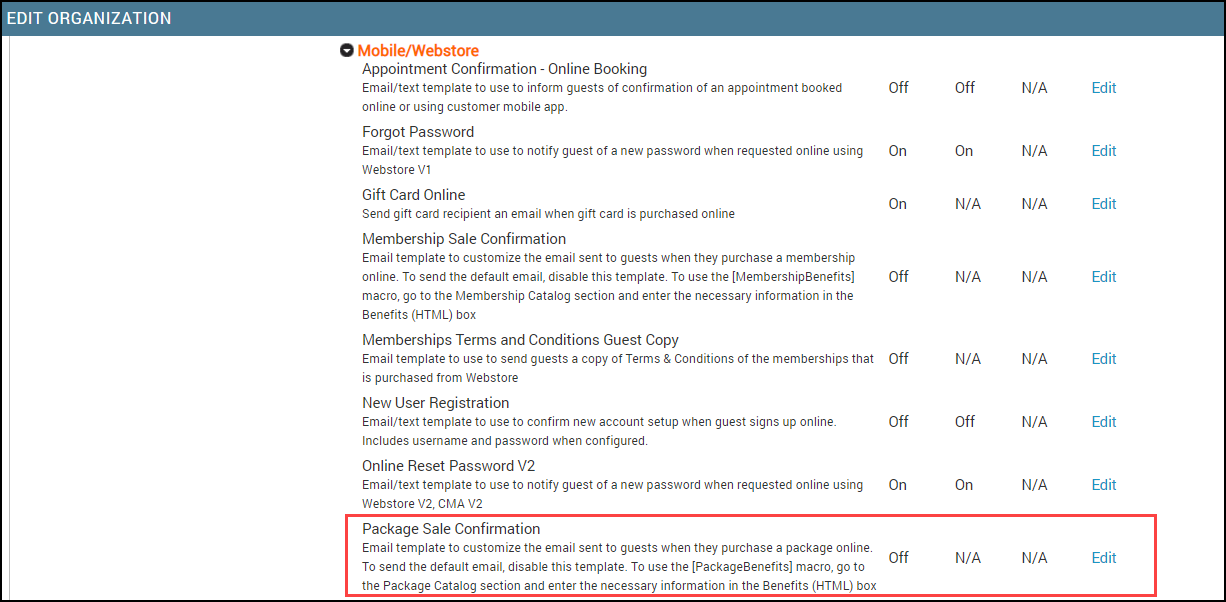
Click on the Configuration icon and navigate to Templates for email and text.
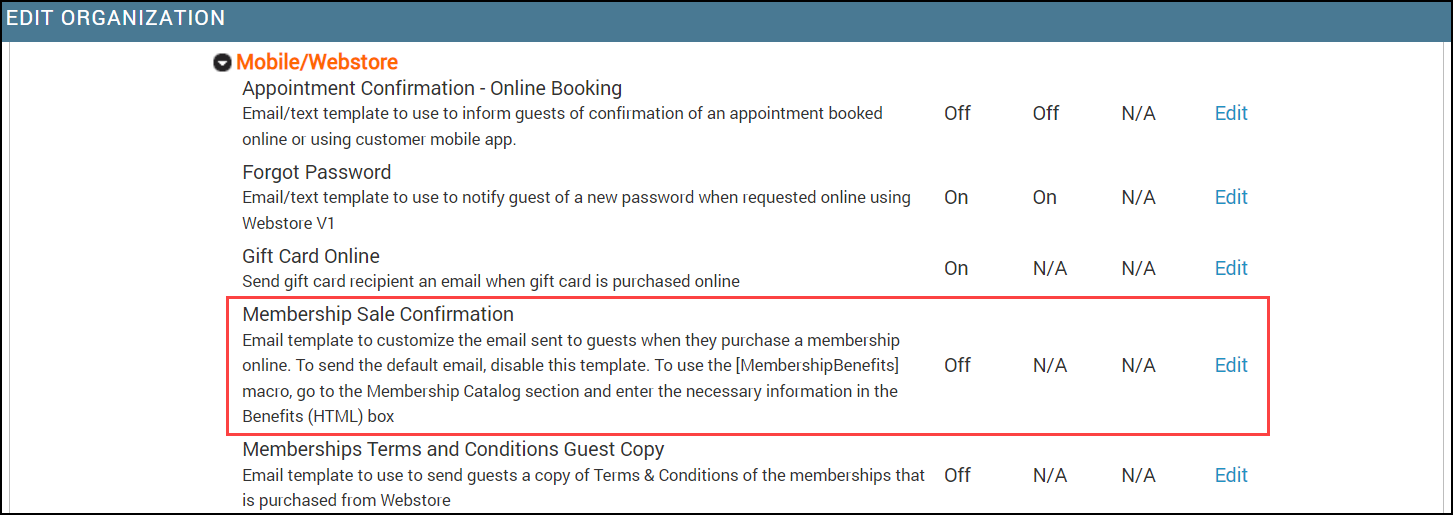
In the Mobile/Webstore section, locate Package Sale Confirmation.
You can edit the following fields:
Subject
Plain Text: Enter the message that is sent if the receiver's browser does not support HTML.
HTML: Enter the message that is sent if the receiver's browser supports HTML. An HTML text may contain macros, images, videos, and other formatting options.
Click Save.
Macros in the package sale online email notification
A macro is a placeholder text that gets replaced with specific data when inserted into an automated email/text message. Use the macros to customize emails/text messages to include information such as organization name, guest name, and day of purchase.
Macros | Description |
|---|---|
[PackageBenefits] | Details of benefits offered with the package |
[FirstName] | First name of the guest |
[LastName] | Last name of the guest |
[PackName] | Name of the package sold |
[ExpiryDate] | The expiry date of the package |
[OrgName] | Name of the center’s organization |
[CenterAddress] | Complete address of the center from where the package was sold |
[CenterCity] | The city in which the center where the package was sold is located |
[CenterName] | Name of the center from where the package was sold |
[CenterZip] | Zipcode of the center from where the package was sold |
[CenterCountry] | Country of the center from where the package was sold |
[CenterState] | State of the center from where the package was sold |
[CenterPhone] | Primary phone number of the center from where the package was sold (corresponds to the Phone 1 field in the center settings) |
[CenterPhone2] | Secondary phone number of the center from where the package was sold (corresponds to the Phone 2 field in the center settings) |
[CenterE-mail] | E-mail ID of the center |
[InvoiceNo] | The invoice number generated for the current purchase |
[ReceiptNo] | Receipt number for the purchase |
[CustomMacro1] to [CustomMacro10] | Available as Optional Field 1 to Optional Field 10 on the organization-level general settings |
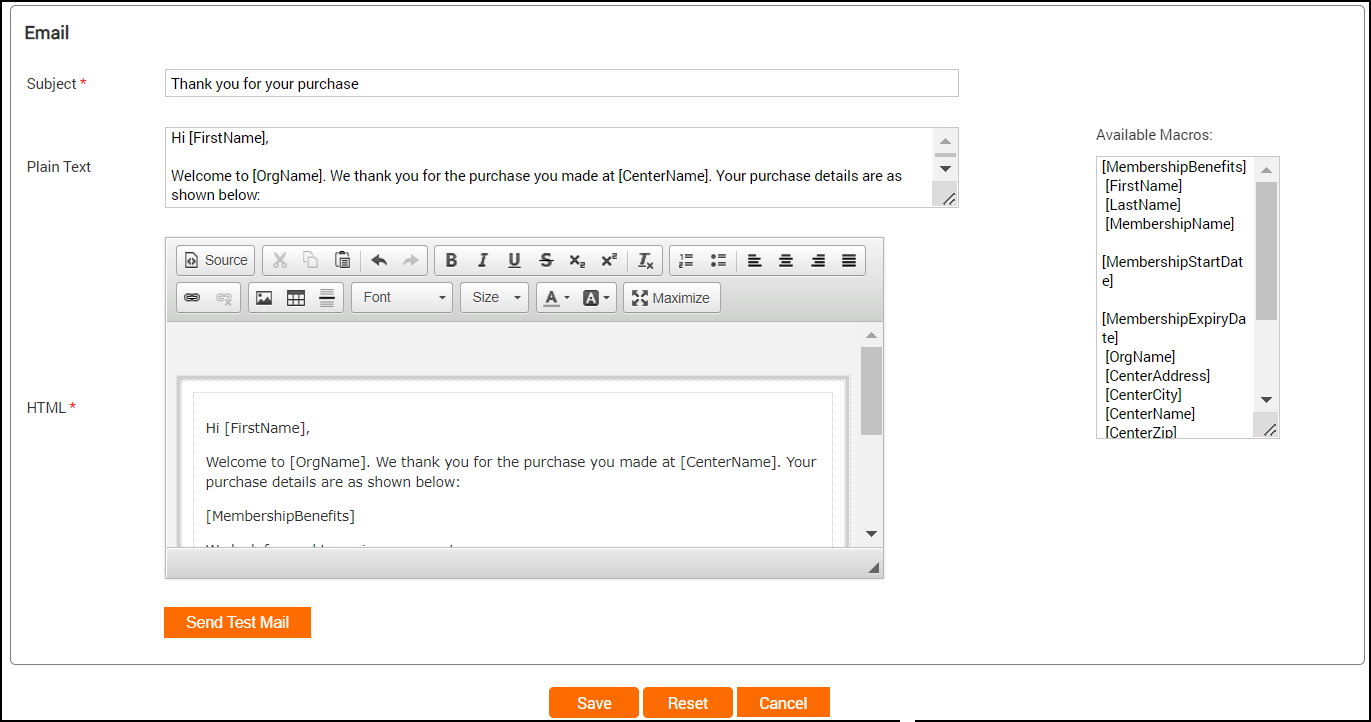
Customize the email template for membership online sales
When a guest purchases a series package from Webstore, an acknowledgment email is automatically sent to inform them of their purchase. You can customize the content of this email, add links and media objects, and use macros to personalize the content.
At the organization level, click on the Configuration icon.
Navigate to Notifications.
Go to Email/Text tab.
In the Mobile/Webstore section, locate Membership Sale Confirmation.
You can edit the following fields:
Subject
Plain Text: Enter the message that is sent if the receiver's browser does not support HTML.
HTML: Enter the message that is sent if the receiver's browser supports HTML. An HTML text may contain macros, images, videos, and other formatting options.
Click Save
Macros in the membership sale (purchase) email notification
A macro is a placeholder text that gets replaced with specific data when inserted into an automated email/text message. Use the macros to customize emails/text messages to include information such as organization name, guest name, and day of purchase.
Important
Use the Send membership sale confirmation configuration setting to control whether this notification is sent for online purchases only or for both online and offline purchases.
Macros | Description |
|---|---|
[MembershipBenefits] | Details of benefits offered with the membership |
[FirstName] | First name of the guest |
[LastName] | Last name of the guest |
[MembershipName] | Name of the membership sold |
[MembershipStartDate] | The date on which the said membership is scheduled to begin |
[MembershipExpiryDate] | The date on which the said membership expires |
[OrgName] | Name of the center’s organization |
[CenterAddress] | Complete address of the center from where the membership was sold |
[CenterCity] | The city in which the center where the membership was sold is located |
[CenterName] | Name of the center from where the membership was sold |
[CenterZip] | Zipcode of the center from where the membership was sold |
[CenterCountry] | Country of the center from where the membership was sold |
[CenterState] | State of the center from where the membership was sold |
[CenterPhone] | Primary phone number of the center from where the membership was sold (corresponds to the Phone 1 field in the center settings) |
[CenterPhone2] | Secondary phone number of the center from where the membership was sold (corresponds to the Phone 2 field in the center settings) |
[CenterE-mail] | E-mail ID of the center |
[InvoiceNo] | The invoice number generated for the current purchase |
[ReceiptNo] | Receipt number for the purchase |
[MemberCode] | Unique code associated with the sold membership |
[CustomMacro1] to [CustomMacro10] | Available as Optional Field 1 to Optional Field 10 on the organization-level general settings |
Configure templates for online password reset
Learn how you can configure the guest email/text notification templates for a password reset
When using the Webstore, there may be cases when your guests forget the passwords for their accounts. For such cases, you can configure an email notification template that is triggered every time your guests click Forgot Password. This email will be sent with a verification code for an easy password reset.
Note
The verification code in the email is valid only for 24 hours.
To configure the notification templates
At the organization level, click the Configuration icon.
Navigate to Notifications > Templates for email and text .
Scroll down to the Mobile/Webstore section.
For Online Reset Password V2, click Edit.
The notification templates for Online Reset Password V2 open.
You must configure the following templates:
Online Reset Password V2 - Email
Online Reset Password V2 - Text Messages (SMS)
Online Reset Password V2 - Email
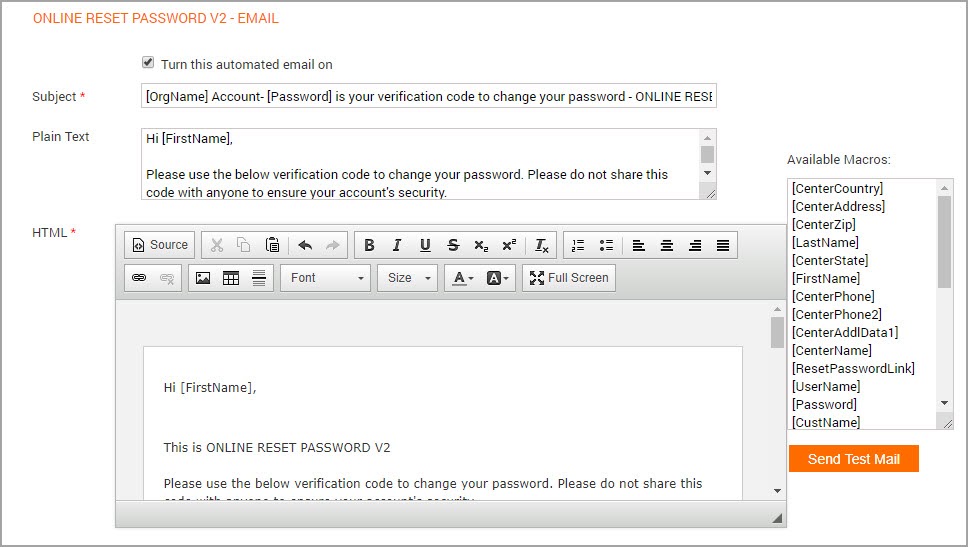
To send the automated emails, select the checkbox Turn this AutomatedEmail ON.
Enter the subject for the email.
Use the Available Macros to customize the content for Plain Text and HTML emails. Depending on the recipient’s browser, the email will be delivered as plain text (no formatting and images) or HTML text (includes images, links, and formatting).
Note
Click the Full-Screen icon in the editor to edit the text in full-screen mode.
Click Save.
The Online Reset Password Email template is now created.
Online Reset Password V2 - Text Messages (SMS)
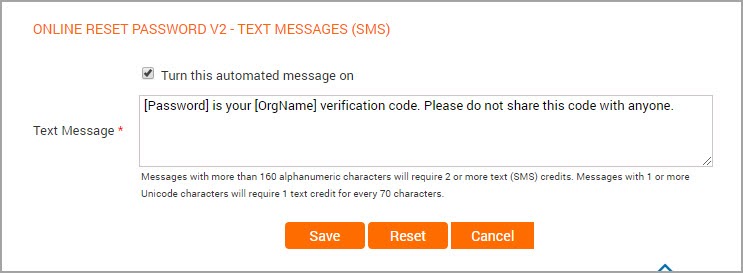
To send the automated emails, select the checkbox Turn this Automated Email ON.
Use the Available Macros to customize the content for the Text Message template.
Click Save.
The Online Reset Password Text Message template is now created.
Available macros for Webstore V2 online password reset
Check all the available macros for creating the Online Reset Password V2 email and text message templates
You can use the following macros for creating Online Reset Password V2 email and text message (SMS) templates.
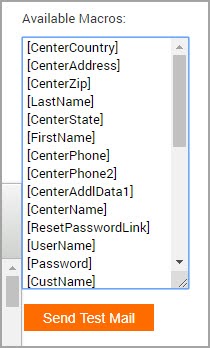
[CenterCountry]: Country where the guest’s base center is located.
[CenterAddress]: Complete address of the guest’s base center.
[CenterZip]: Zip Code/Postal Code of the guest’s base center.
[LastName]: Last name of the guest.
[CenterState]: State of the guest’s base center.
[FirstName]: First name of the guest.
[CenterPhone]: Phone number of the guest’s base center.
[CenterPhone2]: Phone number of the guest’s base center.
[CenterAddlData1]: Additional center information provided in the Additional Text field in the guest's base center Settings->Invoice & Receipts.
[CenterName]: Name of the guest’s base center.
[ResetPasswordLink]: The link to reset the password of the guest’s account.
[UserName]: Guest’s username (corresponds to the Username field in Guest profile ->General tab).
[Password]: This is the verification code used to reset the password.
Note
The verification code is valid only for 24 hours.
[CustName]: The name of the guest.
[CenterCity]: The city of the guest’s base center.
[OrgName]: The name of the organization.
[DownloadLink]: Redirects to the Customer Mobile Application (CMA) thereby allowing the guest to download the CMA application. For example - Depending on the guest's device, the link redirects to the App Store (iOS) or Playstore (Android) to download the Customer Mobile Application.
[CenterE-Mail]: The email address of the center.
[MailUnsubscribeLink]: Link to unsubscribe from transactional emails. Once unsubscribed, no transaction-related email will be sent (including appointment-related emails).
How does the Webstore V2 Referral Program work?
Disclaimer
From October 8th 2020, this feature is generally available (GA) for all businesses.
With the referral marketing feature of Zenoti, you can allow your guests to refer their friends or family. This is the fastest way to acquire new customers and you can capitalize on the positive feedback from your existing guests.
New guests who use these referrals receive discounts on products and services.
Prerequisite
You must enable Referral Marketing for your business and configure the discounts and the rewards.
You must also configure the Referral Page on the Guest Profile, and the Landing Page for new guests on the Webstore.
Scenario
Tabitha (existing guest) wants to refer her friend Kylie to your Skin Rejuvenation services, as she thinks Kylie can benefit from it.
Let us look at how Tabitha can refer Kylie and the steps involved.
Tabitha can do the referral in the following ways:
As soon as she opens the Webstore homepage
After she books an appointment
After she submits positive feedback on one of your services
Directly from her guest profile
Note
Guest login is mandatory to view the Referral Program page.
Give a referral from the Webstore Home page
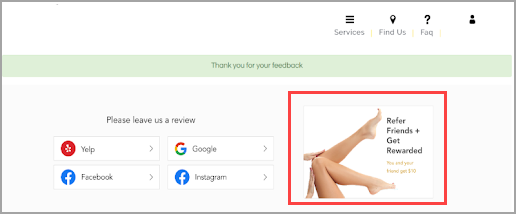
The moment Tabitha opens the Webstore, on the home page, she can see a card asking her to refer her friends.
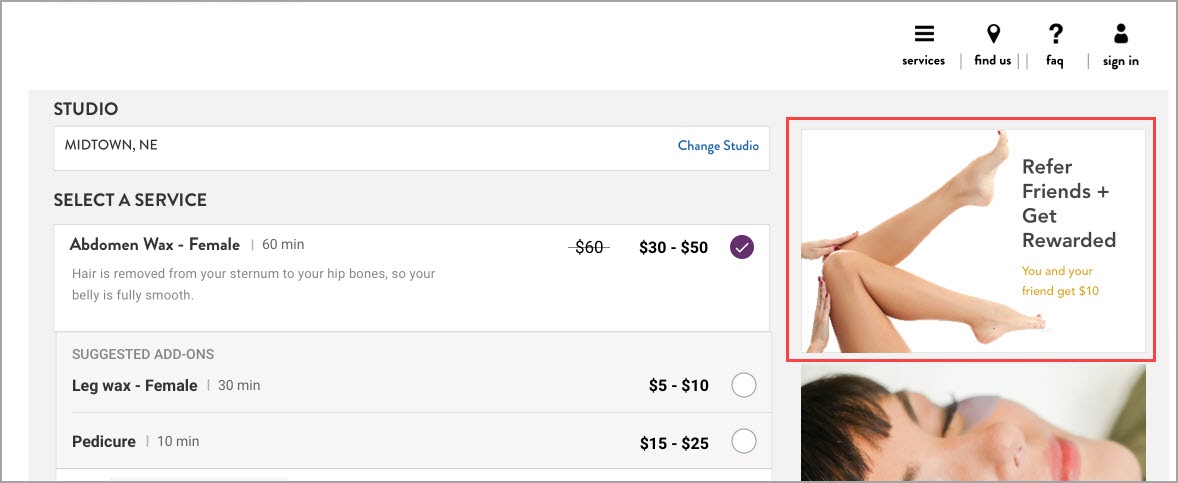
Tabitha is prompted to log in when she clicks the card. This will take her to the Referral Program page on her guest profile.
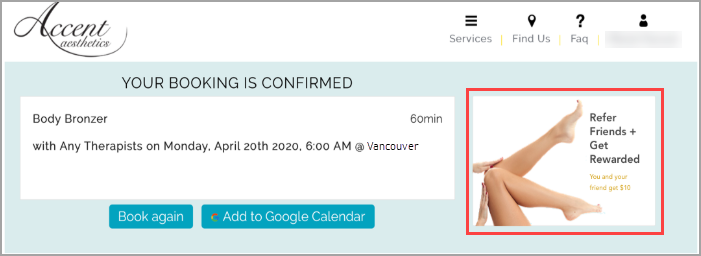
Give a referral after you book an appointment
After every successful booking of an appointment on the Webstore, Tabitha and other guests like her can see the Referral card on the Appointment Confirmation page. She can click the card to move to the Referral Program page of her guest profile and proceed with the referral.
Give a Referral after You Submit a Feedback
The Referral Program card also appears after Tabitha submits a feedback on the Webstore. Clicking on the card takes her to the Referral Program page of her guest profile.
Give a Referral from Your Guest Profile
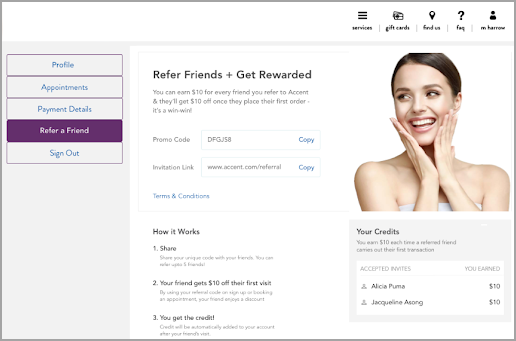
Tabitha can also navigate to her guest profile on the Webstore and do a referral from the Refer a Friend section.

Once Tabitha enters the Referral Program page on the Webstore, she will see the following:
Note
This page must be configured by your business and is available in the Referral Program section of the Webstore V2 template at the organization-level. You can customize the following elements:

Based on the business’s Referral Program configuration, Tabitha may see an auto-generated promo code and invitation link. She must share the promo code and invitation link with Kylie to refer her to your business’s services and products.
Steps to redeem the promo code
The following steps are involved in the redemption process:
Kylie clicks the invitation link.
The Referral Program landing page appears.
Note
You must configure this landing page in the Referral Program section of the Webstore V2 template. Below is a sample landing page for representational purposes.
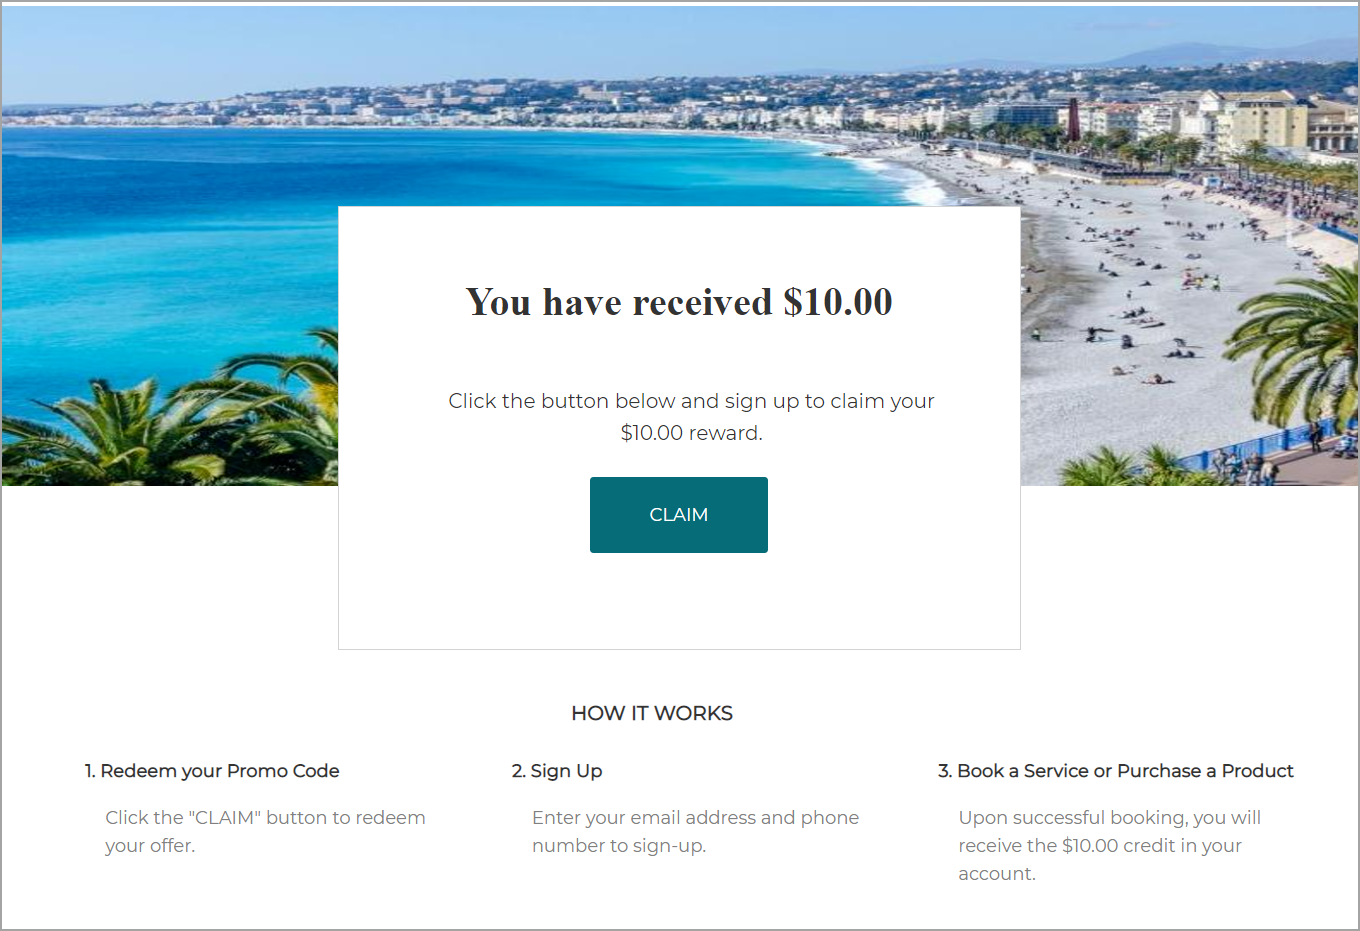
Kylie clicks Claim.
Note
Your business can configure the text label of the button.
The Webstore displays a sign-up form and the referral code is automatically copied to the form.
Kylie fills the sign-up form and books an appointment on the Webstore.
Tabitha is rewarded for her referral and a mail is sent out to her informing her about Kylie’s successful sign-up using her invite.
Integrate Reserve with Google on Webstore
One of the most effective ways to turn your online visitors into customers is to provide them with options to reach your Webstore. One such way is to display a booking button on the Google search results page.
Reserve with Google is a feature that makes the process of displaying the Book online button simple for you.
Important
Things to remember
When you set up the Book online button at the organization level, all centers are set up automatically.
Similarly, when you disable this setting at the organization level, all centers will be disabled.
Individual centers can opt out of this setting if they want to.
Reserve with Google is available globally, and open to businesses in all countries.
Users see this button when they search for the business using a browser.
The Book online button will appear on the Google search results page after 24 to 48 hours of enabling Reserve with Google.
You can track the number of guests who visited your Webstore through the Book online button with the Social booking metrics report.
Employee role permissions required
At the organization level, click the Configuration icon.
Navigate to Security > Security roles.
Select an employee role and click the Permissions tab.
Expand the Administrator section and from API, select the Manage apps check box.
Click Save.
Integrate Reserve with Google on Webstore v2
At the organization level, click the Configuration icon.
Navigate to Online booking > Online booking settings > Webstore V2.
Expand Integrations and select Google.
To display a book online button on the Google search results page, click Configure book online button.
On the pop-up that appears, click Add Book online button.
How does Reserve with Google work?
What you do | What your guest does |
|---|---|
Ensure that you have the following information updated in your organization and center settings, and set up the Book online button.
|
|
If the Book now button is not showing up, ensure to validate the following:
Update the center address in the Google Dashboard. If the center mapping is not present on Google's end, reach out to your CSM or Zenoti representative.
After updating, check the status after 24-48 hours.