Configure campaigns
Customize the unsubscribe line in email campaigns
Generally, businesses have their own communication guidelines and they want to maintain the same tone in all their communications. One part of communication is the unsubscribe line.
For example, businesses want to add some catchy lines such as:
"Don't want to receive emails from us?"
"Click here to unsubscribe"
"If you don't want these updates anymore, please unsubscribe from this list"
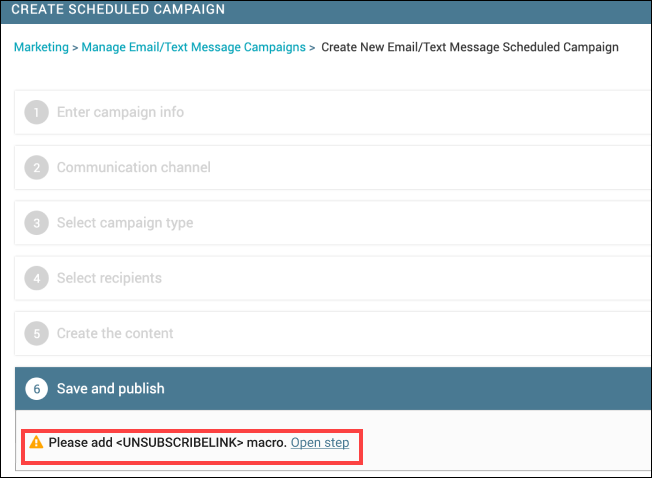
As per the CAN-SPAM Act, it is mandatory that all service providers ensure that each marketing communication has the unsubscribe line. To this end, if you hide or do not add the [MailUnsubscribeLink] macro in campaigns, Zenoti mandates that you add it in your campaigns with an alert message.
Important
We've already added a default unsubscribe line and the [MailUnsubscribeLink] macro to all existing campaigns that are delivered, not delivered, scheduled, and paused. The Themed and Basic Layout templates are also updated with this macro.
Moreover, if you are importing HTML code for a campaign, do not forget to add the macro.
Simplified Editor
If you've enabled the Simplified Editor for your business, you can add the [MailUnsubscribeLink] macro in a campaign as follows,
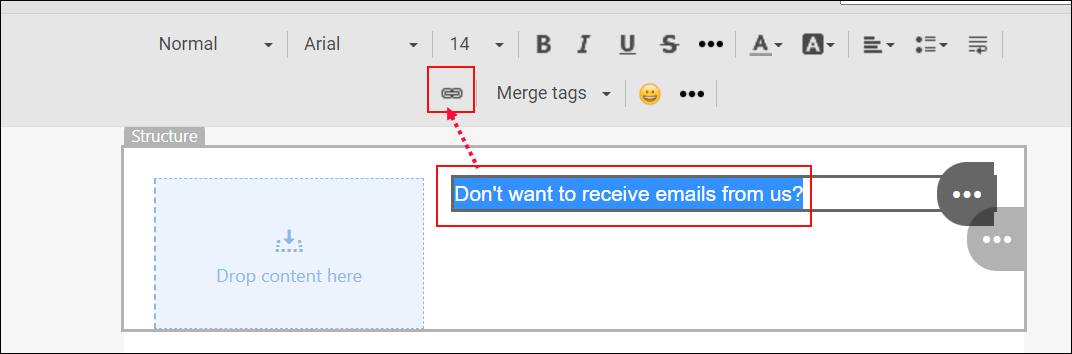
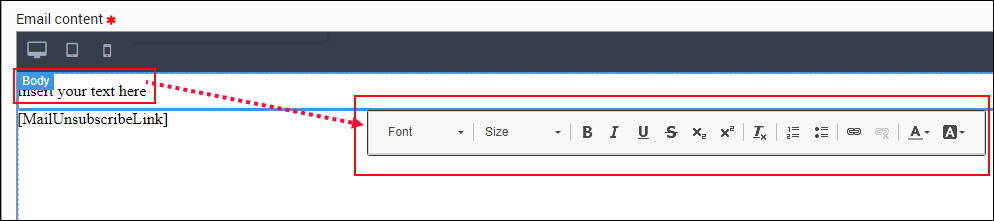
In the editor add a text box and click in it.
You can see the Merge tags menu.
Enter the unsubscribe line in the text box.
Click the link icon (you can find this icon to the right of the Merge tags option).
From the Link (Site) list, select the Other Protocol type.
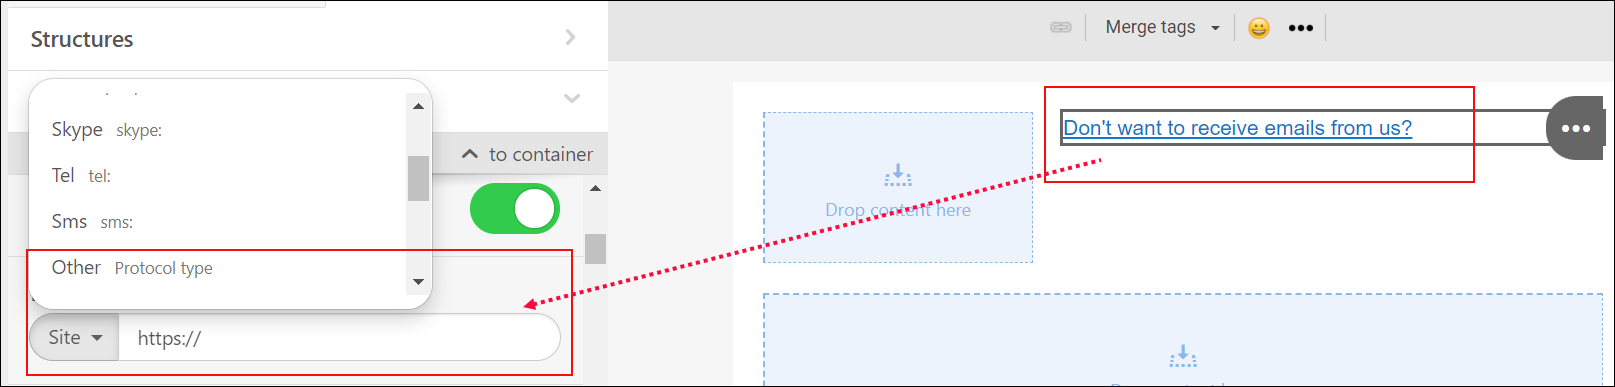
In the box, enter '[MailUnsubscribeLink]' (without the quotes).
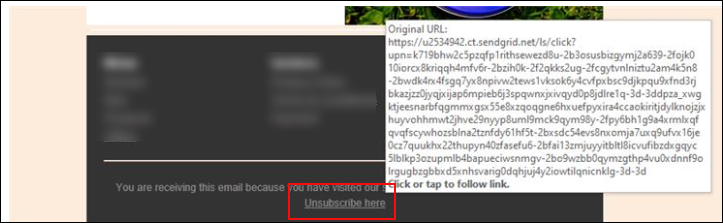
Test the macro by sending an email to a test email address. In the test campaign, you will still see the macro, but not the link.
Note
The link to the unsubscribe line appears only after you publish the campaign.
Rich-Text Editor or Professional Editor
If you've enabled the rich-text editor or the professional editor, you can add the [MailUnsubscribeLink] macro in a campaign as follows,
In the editor, drag the Text block and drop it in the editor area.
Drag the [MailUnsubscribeLink] from the list and drop it in the textbox.

Customize the unsubscribe line.
You see the editing options.
From the editing toolbar, select the link icon.
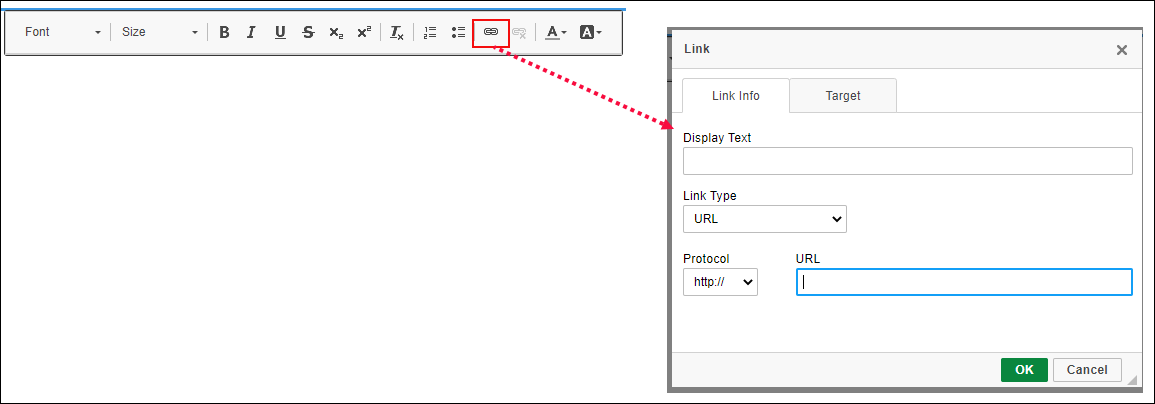
You can see the link options.
Provide information in the Display Text, Protocol, and URL fields.
Click OK.
Test the macro by sending an email to a test email address.
After you send a test email, you can preview the unsubscribe line and link in the test email.
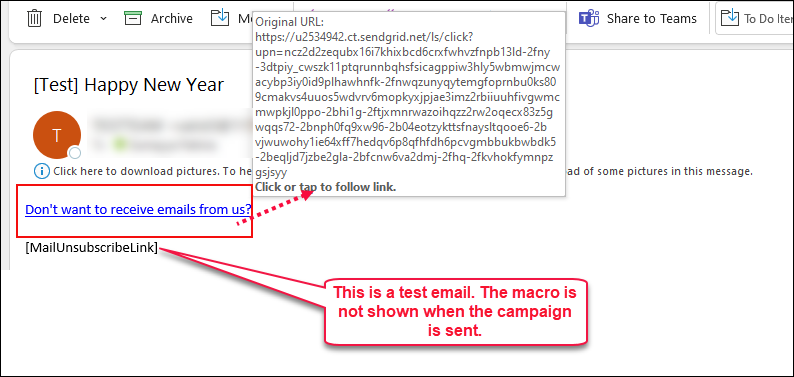
When the campaign is sent, the macro is not shown in the email.
Include only base center for campaigns
Businesses needs a way to send campaigns to guests based on their last visit or their base center - where the guest profile is created.
When you select the existing org-level setting, Include visited guests in promotional messages (email/texts), the campaign considers guests who have visited the center irrespective of in which center the guest profile is created.
At the organization level, click the Configurations icon.
Go to the Settings tab.
Expand the General section.
The settings in the General section appear.
Select the Include base center guests in promotional messages (email/texts) checkbox.
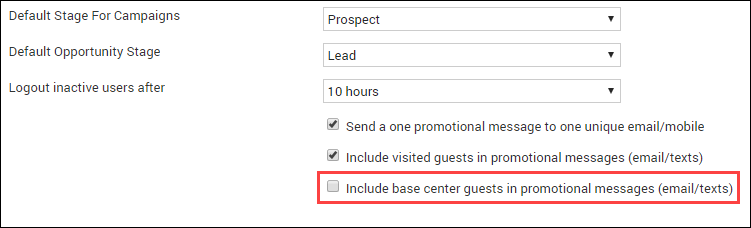
Click Save.
Important
For campaigns to be sent to the guests, you must select either Include visited guests in promotional messages (email/texts) or Include base center guests in promotional messages (email/texts).
Capture guests’ attention with campaigns in preferred languages
Businesses operating in different countries need a way to communicate with guests in their preferred language. In Zenoti, businesses can send email and text campaigns in languages that are enabled at the organization level. This will help businesses to capture guest attention and increase brand value.
 |
Important
Zenoti does not translate the content, businesses must get content and images translated from a third-party tool and copy-paste the translated content and images in the Zenoti template.
Before sending a campaign, Zenoti checks for the language preference and the language in which a template is enabled. However, if there's no content defined, the campaign will not be sent.
Set up BIMI for your business
Disclaimer
The link to external resources is provided for informational purposes only. Zenoti bears no responsibility for the accuracy, legality, or the content of the external site or for that of subsequent links.
Zenoti encourages you to review whether the BIMI framework is right for your business. The following information is part of our holistic approach to your business growth, but we cannot help you through this process or connect with vendors. These steps are for your business to take for BIMI.
Set up Sender Policy Framework (SPF) and Domain Keys Identified Mail (DKIM) to authenticate your domain for all the applications that can send email from your business.
Reach out to your Email Service Provider (ESP) for the exact process.
Set up Domain-based Message Authentication, Reporting & Conformance (DMARC).
Generate a BIMI record
Generate the BIMI record for your logo.
Note
When you’re generating a BIMI record, you must convert your logo into a .SVG file.
Apply for a trademark
Follow the instructions in this guide for the trademark process. If you’ve already trademarked your logo, ensure you have all the paperwork to prove it.
Apply for a VMC (Verified Mark Certificate)
Apply for a VMC to DigiCert. If you have multiple logos that you want to display next to specific emails, you’ll need to apply for multiple VMCs. You must renew your VMC every year.
Important
DigiCert will go through and verify all your information — SPF/DKIM, proof of DMARC enforcement, your BIMI record, and proof of trademark. DigiCert will also have a video chat with you, to prove that you’re a human; and require that you get paperwork notarized in person, by a notary that they choose.
Set up DMARC for your domain
Disclaimer
The link to external resources is provided for informational purposes only. Zenoti bears no responsibility for the accuracy, legality, or the content of the external site or for that of subsequent links.
To avoid any fraudulent senders from sending emails to guests, an email with BIMI must pass the Domain-based Message Authentication, Reporting & Conformance (DMARC) protection that the business has enabled on their domain.
Generate your Domain-based Message Authentication, Reporting & Conformance (DMARC) record and set the enforcement level to Monitor Only.
Set up an app like DMARC Monitor, and monitor DMARC status for a week or two.
Ensure that you’ve authenticated all the applications that can send emails from your business domain. Do not change the enforcement level before you authenticate all the senders for your business; the emails will be blocked.
Update the enforcement level to Quarantine to automatically move spammy emails in the spam folder.
Update your DNS with the new record.
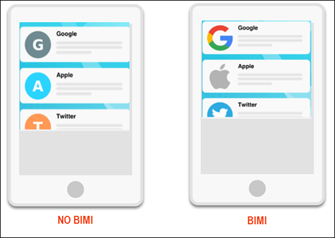
Show brand logo in emails – BIMI
Disclaimer
The link to external resources is provided for informational purposes only. Zenoti bears no responsibility for the accuracy, legality, or the content of the external site or for that of subsequent links.
Brand Indicators for Message Identification (BIMI) lets a business display brand-controlled logos in guests’ inboxes to emphasize authenticity. To avoid any fraudulent senders from sending emails to guests, an email with BIMI must pass the Domain-based Message Authentication, Reporting & Conformance (DMARC) protection that the business has enabled on their domain.
Why must a business use BIMI?
Recent research proves that brands using BIMI had up to a 10% increase in customer engagement. BIMI is very similar to the profile picture that you put on your social media account – it helps to identify that the message is from your business, and not a spam or from a fraudulent account.
What will BIMI work with?
Currently, BIMI works with Gmail and Verizon Media-powered email addresses (AOL and Yahoo Mail).
Is my newsletter or marketing email a candidate for BIMI?
Yes, but only if your business has a trademarked logo that is approved by one of the following offices:
United States Patent and Trademark Office
Canadian Intellectual Property Office
European Union Intellectual Property Office
UK Intellectual Property Office
Deutsches Patent- und Markenamt
Japan Trademark Office
Spanish Patent and Trademark Office O.A.
IP Australia
What do I do if I don’t have a trademarked logo?
Currently, BIMI only works with trademarked logos, and for the context of emails from Zenoti, it's the only approach available to use the BIMI framework.
If you have not yet trademarked your logo, or have no plans to do so, you can still display a logo in your emails by setting up a Gmail account and adding a logo to that account. Moreover, you can create a YouTube account with this Gmail account – so the logo appears on the Gmail account automatically.
Recommendation: To future-proof your brand, we encourage you to apply for a trademark to authenticate your identity.