Get Started
This article explains how to connect and use a dedicated Amazon Redshift cluster for advanced analytics with Zenoti. This setup provides more flexibility than the standard shared (multi-tenant) Redshift cluster.
Overview
Typically, businesses are hosted on a multi-tenant cluster in Redshift. Due to multiple clients sharing the same environment, there are some restrictions that we impose such as query timeout and the inability to write custom SQLs. If your business would like to bypass these restrictions and achieve a more sophisticated Analytics solution, you can use the Dedicated Redshift offering.
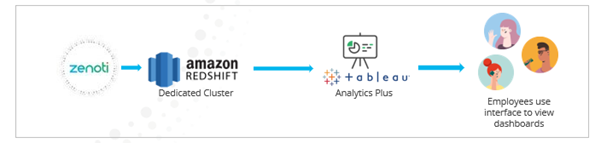
With this offering, Zenoti syncs data into your own dedicated Redshift cluster. You can connect to this cluster and build your own dashboards using Tableau or your own BI tool. You get access to the consolidated data sources as well as the underlying fact and dimension tables. Query timeout limit is extended to 15 mins with this offering and you can write custom SQLs to enable joins between tables. You can also use this offering to pull Zenoti data out of this dedicated cluster into your own data warehouse. This data sync into your own warehouse can be done only once a day during overnight hours.

Note
Data warehousing and BI tool expertise is required to be successful with this offering.
This document helps you get started with connecting to and using your dedicated Redshift cluster.
Prerequisites
You must have Zenoti’s Dedicated Redshift Analytics offering enabled for your business.
Credentials (username, password, JDBC endpoint) will be shared with you by the Zenoti team.
Step 1: Connect to your dedicated Redshift cluster
Install SQL Workbench.
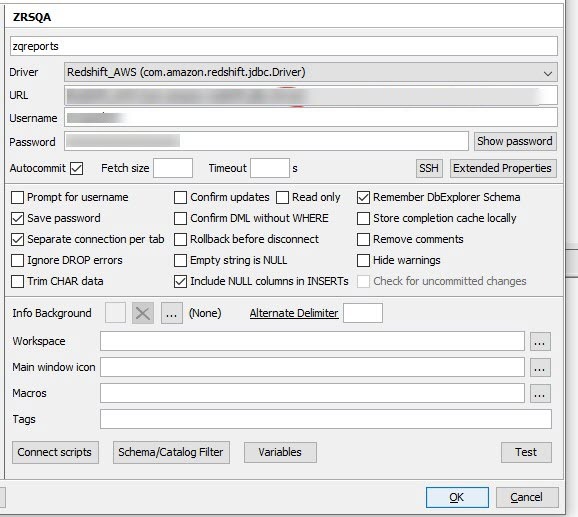
Start SQL Workbench, on the Select Connection Profile dialog box, click Manage Drivers.
In the Manage Drivers dialog box,
From the Driver dropdown list, select the redshift.jdbc driver and give it a name.
In the URL box, enter the JDBC endpoint shared over email.
In the Username box, enter the username shared over email.
In the Password box, enter the password shared over email.
To save the settings, click OK.

Step 2: Move data from a dedicated Redshift cluster into another data warehouse
Incremental sync from the dedicated Redshift cluster into another warehouse can be accomplished by making use of the fact and dimension tables. It cannot be done directly from the consolidated data sources. If consolidated data sources are required in the warehouse, the business can perform incremental sync using the fact and dimension tables and then use the SQLs to generate the consolidated data sources from the facts & dimensions. This incremental sync can be done once a day during overnight hours. It cannot be done multiple times a day.
The following are the steps to perform incremental sync of the fact and dimension tables:
Do a one-time full load sync of the data.
From then onwards, note down the time stamp that the last sync was initiated and use that for the next incremental cycle.
Before pulling incremental load, the records that have been reprocessed since the last sync have to be deleted. To do this:
Identify all the PKs that got updated in the Bi_DimFactChanges table since the time the last sync was done. Use the etlcreated timestamp to identify the updates.
Identify all the PKs that got updated in the fact and dimension tables in the dedicated Redshift since the time the last sync was done. Use the etlcreated timestamp in each table to identify the updates.
Compile all the distinct PKs from steps a and b and delete these records from the tables in your warehouse.
Next, pull in the incremental load by identifying all the PKs that got updated in the fact and dimension tables in the dedicated Redshift since the time the last sync was done. Use the etlcreated timestamp in each table to identify the updates. Append these records to the tables in your warehouse.
Note
Records are never deleted from dimension tables, they are only updated.
Maintain a log of the timestamps (in UTC) when each sync is initiated to help identify the delta load for the next sync.
Use this table to join each fact to the Bi_DimFactChanges table.
Fact Table | Column from Fact to be joined with Bi_DimFactChanges (factpk) |
Bi_FactEmployeeCommission | FactEmployeeCommissionId |
Bi_FactEmployeeSalary | FactEmployeeSalaryId |
Bi_FactEmployeeSchedule | FactEmployeeScheduleId |
Bi_FactEmployeePay | FactEmployeePayId |
Bi_FactIssues | IssuePK |
Bi_FactInvoiceItem | factinvoiceitemid |
Bi_FactCollections | factcollectionid |
Bi_FactAppointment | factAppointmentid |
Bi_FactTurnAways | factsegmentid |
Bi_FactOpportunityCustomFieldValues | opportunityfieldvalueid |
Bi_FactScheduledCollections | factsegmentid |
Bi_FactPackageUserRedemptions | factsegmentid |
Bi_FactDeletedAppointment | factsegmentid |
Bi_FactEmployeeTipsAndSSGDetails | factsegmentid |
Bi_FactMultipleEmployeeCommission | empcommissionpk |
Bi_FactCampaignSummary | FactCampaignId |
Bi_FactMembershipUserRedemptions | factsegmentid |
Bi_FactPettyCashDetails | FactSegmentID |
Bi_FactCashRegister | factcashregisterid |
Bi_FactItemCommissionDeductions | deductionpk |
Bi_FactEmployeeItemLevelCommissions | employeeitemid |
Bi_FactEmployeeMembershipCommissions | empmembershippk |
Bi_FactFeedBackV2 | FeedBackId |
Bi_FactLoyaltyPoints | LoyaltyPointsId |
Bi_FactGuestTierChanges | GuestTierChangesId |
Bi_FactGuestMergeLog | GuestMergeHistoryPK |
Bi_FactGiftCards | factgiftcardid |
Bi_FactCampaignDiscount | factcampaigndiscountid |
Bi_FactEmpSalary | FactEmployeeSalaryId |
Bi_FactEmployeeInvoiceItemRevenue | FactEmployeeInvoiceItemRevenueID |
Bi_DimUserMembership | DimUserMembershipId |
Bi_factmembershiptransfers | FactMembershipTransferId |
Bi_factguestcheckin | Factguestcheckinid |
Bi_factmembershipdunning | FactMembershipDunningId |
Bi_factuserguestpass | Factuserguestpassid |
Bi_factinventory | Factinventorypk |