Lead Management
Caution
Lead Management is currently in closed beta and available to a limited number of users.
Lead Management enables businesses to capture customer enquiries, organize them into a structured pipeline, automate follow-ups, and track conversions effectively. It brings together lead configuration, daily lead operations, automation, and performance insights in a single module.
This article explains the complete Lead Management flow—from configuring lead settings to working leads and analyzing results—so you can set up and use the module efficiently.
Overview
The purpose of Lead Management is to help teams respond to enquiries faster, maintain consistent lead data, and improve conversion rates. By defining lead settings, automating lead progression, and using dashboards and reports, businesses gain full visibility into their sales pipeline and team performance.
Configure and set up Lead Management
Configure Lead Management before your team starts working leads.
Security role permissions
To enable security permissions for Lead Management,
Navigate to Configurations > Security > Security roles at the organization level.
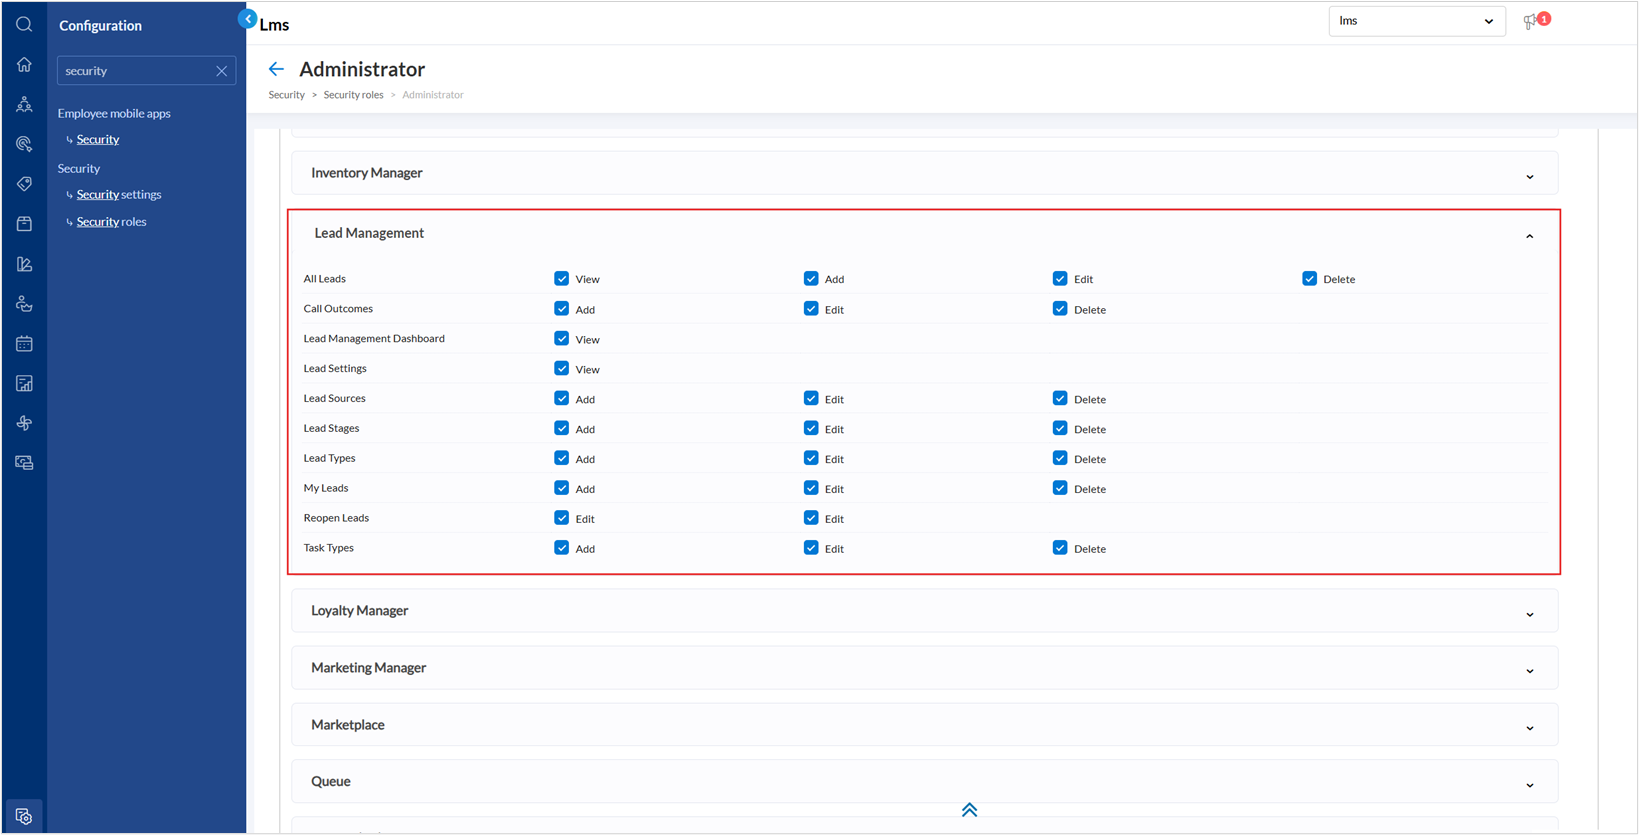
Go to Owner > Permissions > Lead Management.
Enable the following checkboxes as required:
All leads control access to all leads across the organization.
View - View all leads, regardless of assignment
Add - Create new leads
Edit - Update lead details
Delete - Permanently delete leads
My leads controls access to leads assigned to the logged-in user.
Add – Create leads assigned to self
Edit – Update assigned leads
Delete - Delete assigned leads
Reopen leads controls the ability to reopen closed or lost leads.
Edit - Reopen previously closed leads
Call outcomes controls configuration of call outcomes used during lead follow-ups.
Add – Create new call outcomes
Edit – Modify existing call outcomes
Delete – Remove call outcomes
Lead Management dashboard controls access to lead analytics and dashboards.
View – View lead performance dashboards and insights
Lead settings control access to lead-related system settings
View – View lead configuration settings
Lead sources control configurations of lead sources.
Add - Create new lead sources
Edit - Update existing lead sources
Delete - Remove lead sources
Lead stages control configuration of lead lifecycle stages.
Add - Create lead stages
Edit - Modify lead stages
Delete - Remove lead stages
Lead Types control configuration of lead categories
Add – Create lead types
Edit – Modify lead types
Delete - Remove lead types
Task Types control configuration of task types used for lead follow-ups.
Add – Create new task types
Edit – Modify task types
Delete – Remove task types
Configure your Lead Settings
Lead Settings define how leads are classified, tracked, and automated. These settings form the foundation of Lead Management and should be configured before working with leads.
Configure Lead Types
A lead type is a category you use to organize and manage potential customer inquiries or business opportunities. They are used in automation rules, lead creation, and reports. By categorizing leads into meaningful types, you can efficiently route, prioritize, and follow up on different kinds of requests or interests shown by potential clients.
For example, you may create lead types such as Consultation request, Membership inquiry, Package inquiry, Group booking inquiry, Service complaint, or Gift card purchase.
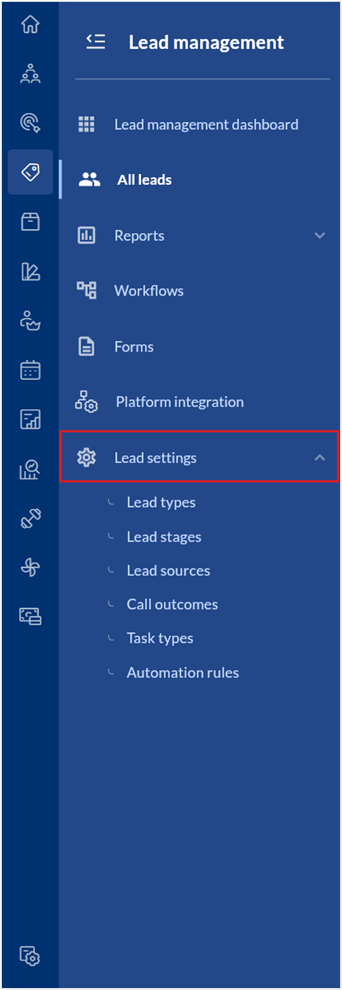
At the organizational level, navigate to Lead Management.
Click the navigation panel icon to expand Lead Management menu.
Select Lead settings.
Select Lead types.
A list of all lead types are displayed.
To create a new Lead type,
Click Add lead type.
Enter the Name, Code, and Description.
Click Save.
To edit a Lead type,
Hover over the specific Lead type listing and click the edit icon.
Edit the Name, Code, or Description.
Set the lead type as active or inactive by using the toggle.
Click Save.
Configure Lead stages
Lead stages represent the various steps in your sales journey – starting from the very first contact with a potential customer or lead to either converting them into a paying customer or losing the lead or opportunity. By tracking lead stages, your business can monitor progress, ensure timely follow-ups, and measure conversion performance at each stage of the funnel. For example, you may create lead stages such as New lead, Contacted, Qualified, Closed - Won, Closed - Lost.
Lead stages provide visibility into the health of your sales pipeline, hold teams accountable for follow-ups and deadlines, highlight where leads drop off to improve conversion, and support accurate revenue forecasting by tracking progression through each stage.
At the organizational level, navigate to Lead Management > Lead Settings > Lead Stages.
The page displays all your lead stages.
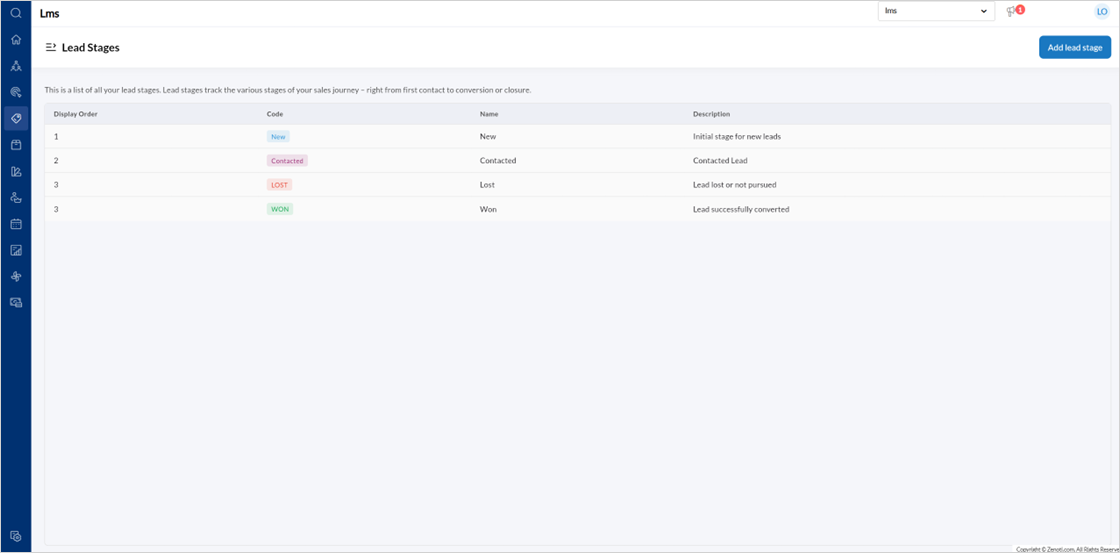
To create a new lead stage, click Add lead stage.
Enter the stage Name, Order, Code, Color, and Description.
Click Save.
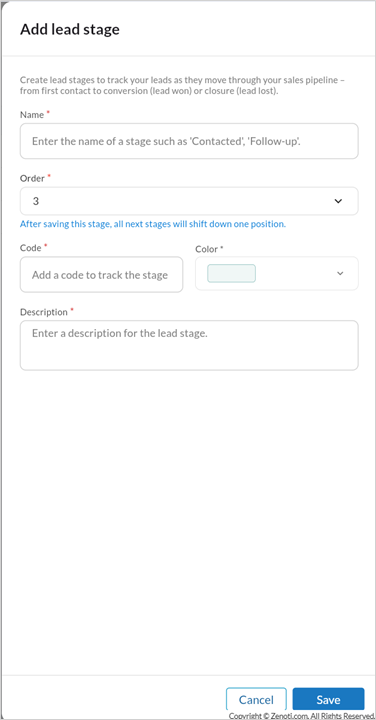
Note
Changing the order automatically adjusts other stages.
To edit a Lead stage,
Hover over the specific Lead stage listing and click the edit icon.
Edit the Name, Order, Code, Color, and Description.
Click Save.
Configure Lead sources
Lead source is the channel or method through which a potential customer discovers and engages with your business. It helps you track where your leads come from so you can measure marketing effectiveness, optimize campaigns, and allocate resources wisely.
By assigning a lead source to each new inquiry or customer, your business can identify which channels drive the most conversions and revenue.
For example, your lead sources may include Client referrals, Instagram, Facebook, TikTok, Google Ads, Email and SMS campaigns, and Marketing phone calls.
Lead sources matter because they provide clear visibility into where customers are coming from, enabling businesses to track ROI (Return on Investment), allocate marketing spend more effectively, and gain deeper insights into customer behavior. By knowing which channels perform best, businesses can focus on the most impactful campaigns while also streamlining the sales process to nurture leads more efficiently based on their origin.
At the organizational level, navigate to Lead Management > Lead Settings > Lead Sources.
The page displays all your lead sources.

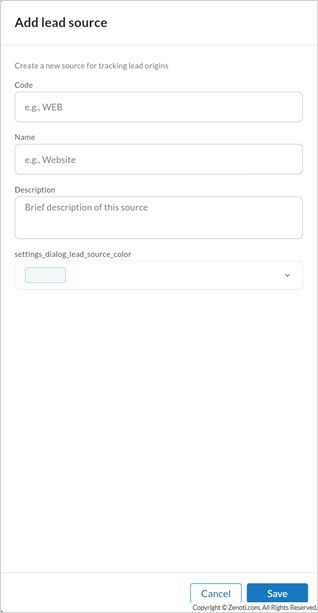
To add a new Lead source, click Add lead source.
Enter the Code, Name of the lead source, a Description of the sources, and Color.
Click Save.
To edit a Lead source,
Hover over the specific Lead source listing and click the edit icon.
Edit the Code, Name, Description, or Color.
Set the lead source as active or inactive by using the toggle.
Click Save.
Configure call outcomes
A call outcome is a status used to capture the result of a call made to a lead or customer. It helps your team consistently record what happened during the call, whether it was successful, required follow-up, or did not connect at all.
By tracking call outcomes, businesses can measure call effectiveness, standardize lead engagement, schedule automated follow-ups, and gain insights into sales and service performance.
For example, your call outcomes may include Booked appointment, Interested - Follow-up needed, Interested - Wants discount, No answer, and Not interested.
At the organizational level, navigate to Lead Management > Lead Settings > Call Outcomes.
The page displays all your call outcomes.
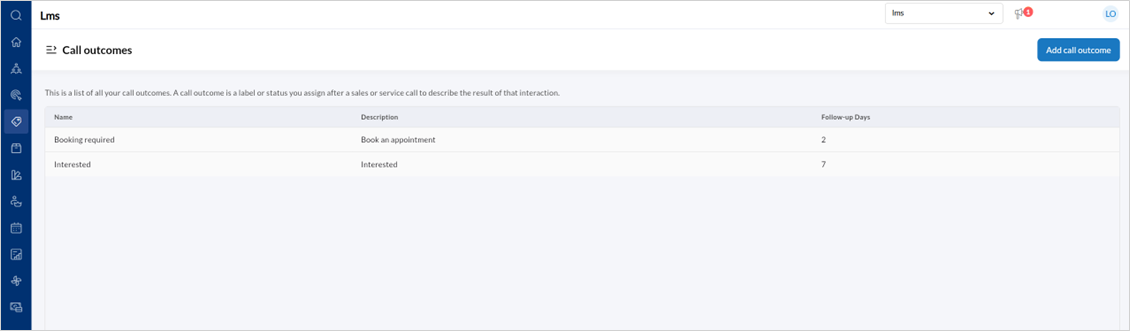
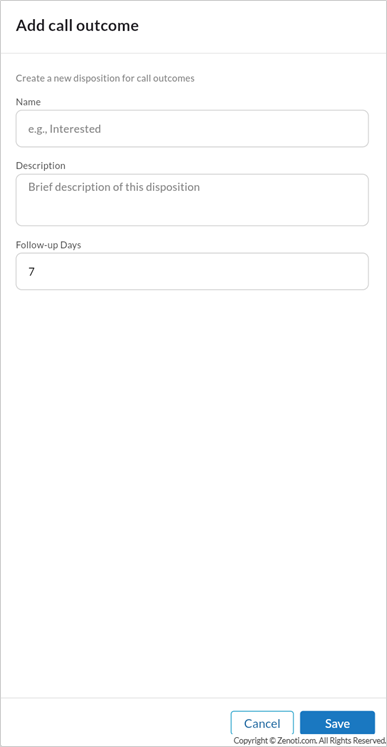
To create a call outcome, click Add call outcome.
Enter the Name, Description, and Follow-up days.
Click Save.
To edit a Call outcome,
Hover over the specific Call outcome listing and click the edit icon.
Edit the Name, Description, or Follow-up days.
Click Save.
Configure task types
A task type in lead management refers to a predefined category of actions your team can assign, track, and complete as part of the lead nurturing process. Task types standardize how you manage follow-ups, reminders, communication, and bookings, helping your team stay organized and responsive.
At the organizational level, navigate to Lead Management > Lead Settings > Task types.
The page displays all created task types.
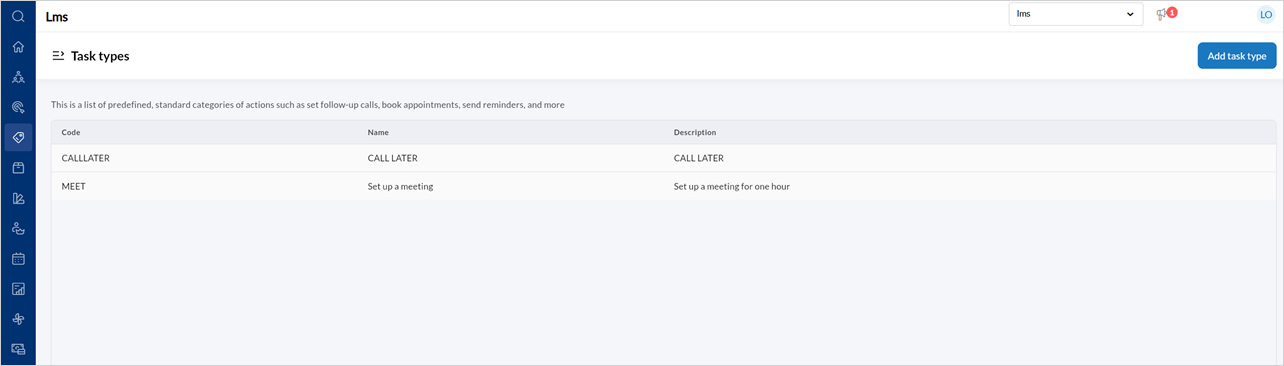
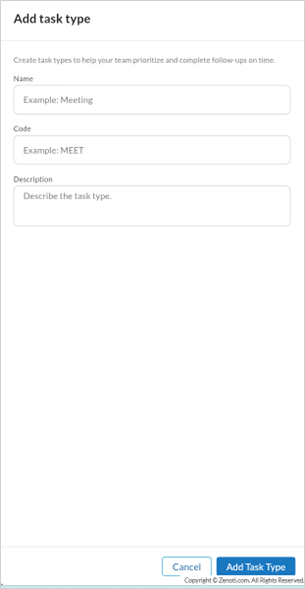
To create a Task type, click Add task type.
Enter the Name, Code, and Description.
Click Add task type.
To edit a task type,
Hover over the specific Task type listing and click the edit icon.
Edit the Name, Code, or Description.
Click Save.
Configure lead automation rules
Lead stage automation rules allow you to automatically move leads between stages based on key events such as appointment bookings, cancellations, no-shows, and membership invoice actions. This reduces manual updates, ensures consistency, and keeps lead stages accurate throughout the sales journey.
To create an automation rule,
At the organizational level, navigate to Lead management > Lead settings > Automation rules.
The page displays all created automation rules.
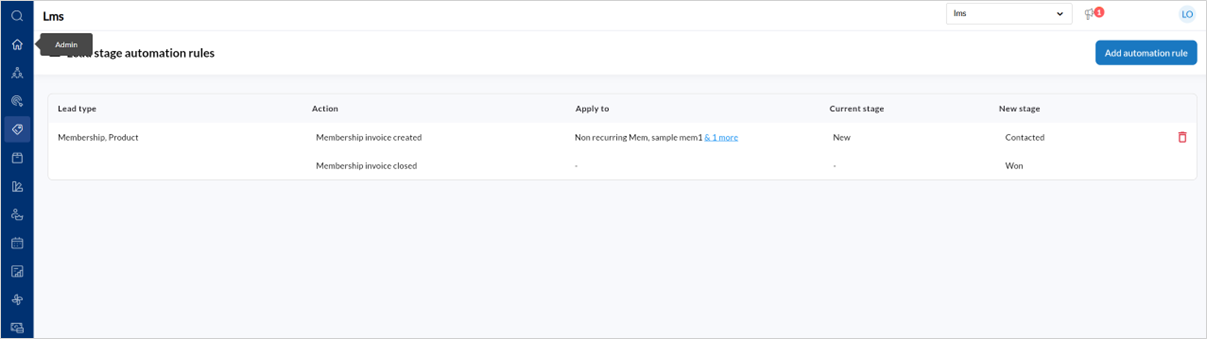
To create a new rule, click Add automation rules.
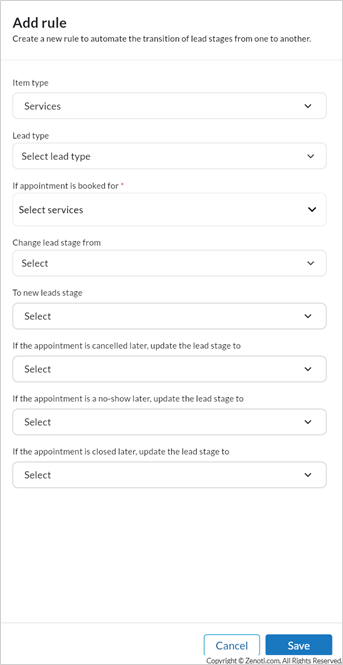
To configure a rule for services,
Select Services from the Item type field.
This tells the system that the rule should trigger based on appointment-related events.
From Lead type, select the lead types this rule should apply to. You can select one or more specific lead types, or choose Any if the rule should apply to all service-related leads.
In the If appointment is booked for field, select the services or service categories that should trigger this rule. You may expand categories to choose individual services, or select Any if the rule should apply regardless of which service is booked. After making your selection, click Save to confirm the services.
In the Change lead stage from field, choose one or more stages that the lead must already be in for the rule to trigger. For example, you might select New or Contacted.
In the To new lead stage field, select the stage the lead should move to as soon as the appointment is booked. For example, you may want the lead to move to Contacted or Interested.
If you want the lead stage to update when an appointment is cancelled, select the appropriate stage from the If the appointment is cancelled later, update the lead stage to field. For example, you may choose Lost or Interested, depending on your business process.
If you want the lead stage to update when the customer does not show up, use the If the appointment is a no-show later, update the lead stage to field and select the relevant stage.
If you want the lead stage to update when the appointment is successfully completed, select the final stage from the If the appointment is closed later, update the lead stage to field. This is commonly set to Won.
Click Save.
To configure a membership-based rule,
Select Memberships from the Item type field.
In the Lead type field, choose the lead types this membership rule should apply to. You can select multiple lead types if required.
In the If membership invoice is created for field, select the memberships that should trigger the rule. You can choose specific memberships or select Any to apply the rule to all memberships. Save your selection once complete.
Choose the applicable starting stages in the Change lead stage from field. These are the stages the lead must currently be in for the rule to apply.
In the To new lead stage field, select the stage the lead should move to immediately after the membership invoice is created.
In the Membership invoice is subsequently field, select the lead stage the lead should move to when the invoice is closed. This ensures that the lead stage reflects the final outcome of the membership sale.
Click Save.
Lead capture
This section covers all the ways enquiries enter Zenoti as new leads, without manual entry. It includes lead management forms, platform integrations, and manual lead creation.
It ensures every lead is created with consistent fields, mapped correctly, and assigned automatically. This makes follow-ups faster, reduces missed enquiries, and keeps reporting accurate across sources.
Lead Management forms
Key Benefits
Flexible form creation with a drag-and-drop builder
Support for multiple field types
Centralized lead data through field mapping
Public sharing via links or embedded code
Templates for faster form creation
Key Terms
Master form: The master form that defines all fields used to store lead data
Lead generation forms: A public-facing form used to collect lead information
Field mapping: Linking fields in a Lead generation form to fields in the Lead Details form
Form status: Indicates whether a form is Draft, Active, or Inactive
Template: A pre-configured form structure used as a starting point
Prerequisites
Before creating Lead generation forms, ensure that a Master form is created before creating and activating any lead generation form.
To access the forms,
At the organization level, navigate to Lead Management > Navigation panel > Forms.
The Forms and templates page displays Master Form and Lead Generation forms.
Master form
The Master form defines the master structure for storing all lead information. Only one Master form can exist per organization. The Master form section of the page displays the Form name, Number of fields, Created date, and Last edited date.
Hover over the Master form listing to reveal a 3-dot menu.
Click Preview form to review the fields.
Click Edit form to add or edit new fields.
Note: The Master form is for internal use only and cannot be shared publicly.
Lead generation form
Lead generation forms are used to collect lead information from external sources. This section displays the Status toggle (Active / Inactive), Status badge, Form name, Number of fields, Created date, and Last edited date.
Hover over the Lead generation form listing to reveal a 3-dot menu.
Click Preview form to review the fields of the form.
Click Share form to generate a link or embed code.
Click Edit form to open the form builder and add or delete form fields.
Note: You can create unlimited forms.
Form Statuses
Each form can be in one of the following statuses:
A form is in Draft status when it is being built or edited.
A form is in Active status when it is published.
A form is Inactive when it is disabled.
Note
Lead generation forms with unmapped fields remain in Draft status.
Only Active forms can collect lead data or be shared.
Creating a new Lead generation form
Building your own form
At the organization level, navigate to Lead Management > Navigation panel > Forms.
Click Create form.
Select Lead generation form.
Click Build your own.
This opens an empty form builder canvas. The form starts in Draft status by default.
The form builder is divided into three main areas:
Left panel of form fields that is grouped into basic fields and layout fields. Basic fields include Text, Email field, Phone, Radio buttons, and more. The Layout field includes a 2-column or 3-column layout.
The center panel is where you design your form. Title and Form description are required fields. Either email field or phone field are mandatory so that the lead can be contacted. Fields from the left panel can be dragged into the canvas.
Alternatively, click the + icon to add them. Each field shows a mapping status. Not connected indicates that the field is not mapped to the Master form. Connected means it is mapped to the Master form.
Note: Fields marked Not connected will prevent the form from being activated.
To map a field to the Master form,
Select a field in the canvas to open the Field properties panel.
Configure the field label, placeholder text, and enter a placeholder text if needed.
Turn on the Required and Help text toggles.
Enter the help text to give a description to the field label.
From Map to lead master form, select the corresponding field.
Map email addresses to email addresses and phone numbers to phone numbers.
If the required master field does not exist, add it to the Lead Master Form first.
Click Save draft to open the Form properties panel.
Select the Lead stage, Lead type, Source, Priority type, Center, and Assignee.
These values are automatically applied to every lead generated through the form.
Click Save form to complete setup.
To share the form,
Select Share link or Embedded JSON code.
Copy the link or code to add it to.
Click Done.
Embed a form on your website
This option lets you display the form directly inside your business website. Visitors can fill the form without leaving your page.
To embed the JSON code,
Click Share form from Forms.
Select Embedded JSON code from Choose how to use the form.
Copy the iframe code shown in the panel.
Paste the code into your website page editor, inside the HTML section.
Save and publish the website page, then test the form
Templates
Templates allow quick creation of commonly used forms.
From the Forms and templates page, click Manage templatesto open the builder.
The template builder uses the same interface as the form builder.
Enter the Template header, and Description.
From Template type, select Lead generation for public-facing lead forms or Master for master form templates.
The template builder uses the same drag-and-drop interface as the form builder, allowing you to add fields, configure layouts, and define field properties.
Add the necessary fields and set the field properties.
Click Save form.
To edit a template,
Navigate to Forms templates.
Click Edit template.
Update the fields, layout, or field properties.
Click Save.
Important: Changes apply only to future forms created using the template. Existing forms are not affected.
When creating a new form, you can choose Use template to start with a predefined structure. The template fields are copied into the new form, after which you can modify fields, map them to the Lead Master Form, define default lead properties, and publish the form.
Considerations
Only one Master Form can exist per organization.
Once a Master Form is saved, existing fields cannot be deleted and can only be edited.
Master Forms cannot be shared publicly or embedded.
All Lead Generation Form fields must be mapped to the Master Form before publishing.
Incompatible field types cannot be mapped between forms.
Draft forms cannot collect or submit lead data.
Plan the Master Form structure carefully before saving.
Use consistent and unique field labels to avoid duplicate label errors.
Ensure all fields are mapped before activating a form.
Test forms using preview mode before sharing or embedding.
Use templates to standardize common form layouts.
Set default form properties to ensure correct lead routing.
Forms may remain in Draft if one or more fields are not mapped.
A new Master Form cannot be created if one already exists.
Share links will not work if the form is in Draft or Inactive state.
Duplicate field label errors occur when multiple fields use the same label and must be resolved by renaming fields before saving
Platform integration
The Platform Integration feature in LMS allows businesses to connect their advertising platforms such as Meta Ads and Google Ads to capture leads directly into the system. Once integrated, leads generated from ad campaigns are automatically synced, reducing manual effort and ensuring faster follow-ups. This feature also provides visibility into integration status, re-sync timelines, and account authorization health.
Before setting up the integration, ensure the following:
You must be an Admin of the respective Meta Ads or Google Ads account.
You must have access to the Facebook Pages / Business Manager (for Meta Ads).
You must have access to the Google Ads account associated with lead forms.
Pop-ups must be enabled in your browser for authentication.
Valid ad campaigns and lead forms must exist on the ad platform.
Access Platform integration
At the organization level, navigate to Lead Management > Navigation pane > Platform Integration.
The Platform Integration dashboard displays available integrations and their current status.
Integration Status Indicators
Authorization is needed – The account is not authenticated or authorization has expired.
Integration is active – The account is successfully connected.
Re-sync needed in X days – The integration will require re-authorization before expiry.
Connect a new account
Note
To connect to Meta ads, Zenoti requires you to have access to Facebook Pages list, Page metadata and settings, Page engagement metrics and insights, Lead data from Facebook and Instagram ads, and Business assets and permissions.
To connect to Google Ads, Zenoti requires you to have the permissions to fetch customer accounts, forms, and retrieve leads. It also requires you to get user email address and user profile information.
Click Connect account on the Platform Integration page.
Select the platform:
Meta ads
Google Ads
Review the Access required permissions listed.
Click Proceed to authenticate.
You will be redirected to the respective platform’s login page.
Sign in and grant the required permissions.
Manage an Existing Integration
Hover over the Integration card menus and click the 3-dot menu.
Click Manage lead sources to map each Meta form question (for example, First name, Email, Phone number) to a Zenoti lead field.
Click Unmapped to open a Manage form fields panel.
Ensure every field is mapped to a corresponding Master form field.
Continue to do so until all fields are mapped.
Click Define field properties to set
Lead stage
Source
Priority type
Lead type
Center
Assignee
Click Save form.
From the 3-dot menu, click Re-sync to refresh the integration.
Use this before the sync expiry date shown in the status banner.
You can toggle the integration between Active and Inactive states.
Select Disconnect account to stop the integration.
Enter a reason for disconnection, then click Proceed.
Click Delete to remove the integration.
Enter a reason for deletion, then click Proceed.
To reauthorize a failed integration,
Click Authorize from the 3-dot menu to reauthorize a failed integration.
Sign in and grant the required permissions.
Work with Leads and Tasks
Manage leads daily, including creating leads, filtering, bulk updates, and follow-up tasks.
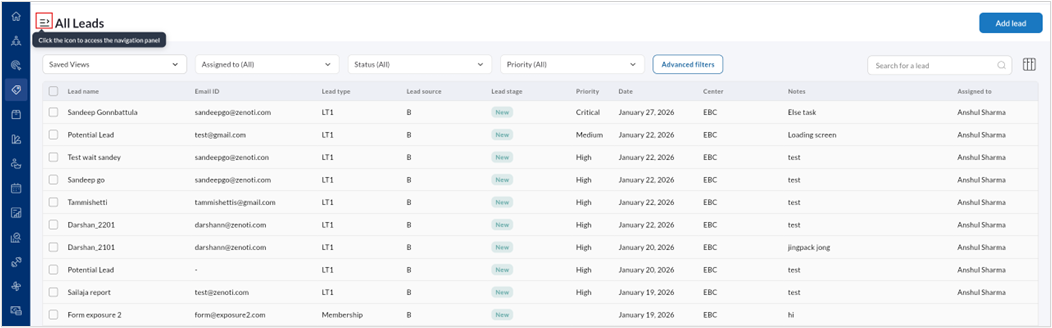
All leads
The All Leads page provides a centralized view of all leads captured across your organization. From this page, users can:
Search and filter leads
Add new leads
Customize the table view
Track lead stages and priorities
Monitor assignment and engagement
This page helps sales teams and managers track inquiries and convert prospects efficiently.
At the organizational level, go to Lead Management > All leads.
The All Leads page is displayed. The default columns in the listing include:
Lead name
Email ID
Lead type
Lead source
Lead stage
Priority
Date
Center
Notes
Assigned to
Click Advanced filters to narrow down the results by:
Assigned to
Status
Priority
Lead type
Source
Call outcomes
Gender
Follow-up range
Expected close date
Select the checkbox next to any listing.
Click Bulk update to update the Assigned employee, Lead status, Priority, and Lead source.
Click Detailed view to open detailed information for the selected lead(s).
Click Add Lead to open the lead creation panel.
Select the Assigned stage, Lead type, Priority, and Source.
In Other information, enter:
Lead name
Gender
Description
Center
Created date
Owner
List price
Offered price
Follow-up date
Expected close date
Click Save to create the lead.
All tasks
The All Tasks page provides a centralized view of all follow-up and engagement tasks associated with leads. These tasks help teams manage callbacks, appointment bookings, and other follow-up actions required to convert leads.
Users can monitor overdue tasks, completed tasks, task ownership, and task priority.
At the organizational level, navigate to Lead Management > All Tasks.
Each row represents a task associated with a lead. The default columns displayed are:
Due date and time – When the task is scheduled
Task type – Type of activity (for example, Call Back, Book Appointment)
Task description – Additional task details
Assigned to – Employee responsible for the task
Priority – Medium, Critical, etc.
Status – Completed or Overdue
Assigned lead – The lead associated with the task
Click the 3-dot menu next to each listing to:
Mark as Complete
Edit Task
Delete Task
Tasks display colored badges:
Overdue (Red) – Task was not completed by the due date
Completed (Green) – Task has been completed
Lead Management Workflows
The Workflows feature in Lead Management allows you to automate communication and follow-up actions based on lead conditions. You can trigger automated emails, SMS messages, tasks, notes, and delays to ensure consistent engagement and faster conversions.
Workflows reduce manual effort, standardize follow-ups, and help teams nurture leads systematically.
Create a new workflow
At the center level, navigate to Lead Management > Navigation pane > Workflows.
Click Create Workflow.
The workflow builder opens with a default Trigger node.
Select the Trigger node.
Turn on Filter audience if you want to restrict eligible leads.
From Filter Type, select one of the following:
Lead stage
Lead source
Lead type
Lead priority
Gender
Select an Operator (for example, equals to or not equals).
Select the Value (for example, New).
Click Add Condition to include more rules.
Combine conditions using:
AND
OR
Click Save.
Add workflow steps using widgets
Click the + icon below the trigger or any step.
Select a widget from the list:
Send Email
Send SMS
Create Lead Note
Create Lead Task
Create Lead Task
Time Delay
Condition
End
Add a delay between actions
Click the + icon and select Time Delay.
Enter the Duration.
Select the Unit (for example, days).
Click Save.
Example: Wait 1 day before sending the next follow-up.
Send automated email or SMS messages
Send Email
Click the + icon and select Send Email.
Choose a template from:
Basic
Themes
Custom
Configure the email content.
Click Save.
Send SMS
Click the + icon and select Send SMS.
Configure the SMS content.
Click Save.
Create follow-up tasks automatically
Click the + icon and select Create Lead Task.
Configure the task details:
Task type
Task description
Due date
Due time
Assigned to
Priority
Click Save.
This ensures leads always get assigned follow-up work automatically.
Add internal notes automatically
Click the + icon and select Create Lead Note.
Enter the note content.
Click Save.
Use this to log workflow-driven actions inside the lead record.
Split the workflow using conditions
Click the + icon and select Condition.
Under Condition 1, select:
Field (for example, Lead Source)
Operator (for example, equals to)
Value (for example, AI Receptionist)
Click Add to apply the condition.
Add more rules inside the same condition using:
AND
OR
To create additional conditional paths, click Add if branch.
The workflow splits into:
Define condition 1
Else
You can add different actions under each branch.
End the workflow
Click the + icon and select End.
Add End to stop actions after a branch completes.
Once End is reached, no further actions are executed.
Delete a step and reconnect the flow
To Delete a node from the workflow, click the remove icon.
In the Delete node dialog, choose one option:
Connect to next step (keeps the workflow sequence intact)
Remove all (removes downstream steps)
Click Done.
Save and publish the workflow
Click Save.
Click Publish.
Only published workflows execute automatically.
Considerations
Only published workflows run automatically for eligible leads.
Use Filter audience carefully to avoid triggering workflows for all leads.
Conditions support AND/OR logic, so review combinations before publishing.
Use Time Delay between actions to avoid overwhelming leads with rapid messages.
Email actions depend on available templates, so confirm templates exist before setup.
Create Lead Task should include clear due dates to prevent overdue task buildup.
If you split flows using Condition, each branch should end with an End node.
When deleting a step, choose Connect to next step to preserve the workflow sequence.
Selecting Remove all deletes downstream steps and may remove important actions.
Integrate Lead Management with Zapier
Zenoti Lead Management integrates with Zapier to help you capture leads from external sources and create them directly in Zenoti. This integration is designed for fast setup and simple automation. It supports a single action: Create Lead. Once the lead is created, Zenoti Workflows can handle follow-ups like tasks, notes, and communication.
A typical Zap follows this structure:
Trigger (lead source app) → Formatter (Utilities) → Zenoti: Create Lead
After the lead is created in Zenoti, your team can continue the process inside Lead Management. You can use Zapier to ingest leads from many common sources, including:
Meta Lead Forms
Google Ads Lead Forms
Typeform and Jotform
Webflow and Wix forms
Yelp leads
Calendly
Webhooks by Zapier
To create a lead in Zenoti, Zapier must send the following:
Email address or Phone number (at least one is required)
Center ID (recommended for correct routing)
If the lead is created using a phone number, a country value is also recommended. If Zenoti rejects a lead, the Zap run is marked as failed. Common failure reasons include:
Both email and phone are missing
The phone number format is invalid
Required center details are missing
A temporary API error occurred
Failures can be reviewed in Zapier under Task History, and re-run after fixing the mappings.
Dashboards and performance tracking
Track lead performance, conversion progress, lead source distribution, and agent productivity using dashboards.
Lead management dashboard
The Lead Management Dashboard provides a real-time snapshot of your entire lead pipeline, helping managers and agents quickly understand lead volume, progress, and conversion performance. It is designed for daily monitoring, performance tracking, and decision-making.
At the top of the dashboard, use the Duration selector to define the time period for which data is displayed. When you select a duration such as Month to Date, Last 7 days, or a custom range, all dashboard metrics, charts, and tables update automatically to reflect activity within that period. Use shorter durations for operational monitoring and longer durations for trend analysis.
Quick Overview
The Quick overview section provides high-level performance metrics for the selected duration.
The Total leads metric shows the number of leads created during the selected period. This helps you understand overall lead inflow.
The New leads metric shows how many of those leads are currently in the New stage, indicating leads that may still require first contact.
The Conversion rate reflects the percentage of leads that have moved to a Won stage. This metric is calculated automatically based on lead stage changes.
The Revenue generated metric shows the total revenue attributed to leads that converted during the selected period.
The Leads at risk metric highlights leads that require attention, such as leads with overdue follow-ups or no recent activity. This section is designed to help teams act before leads are lost.
Each metric also displays a comparison against the previous period, allowing you to quickly identify increases or declines.
Lead to Win Progress
The Lead to win progress section visualizes how leads move through different stages of the pipeline.
The funnel represents each configured lead stage, starting from New and progressing toward Won or Lost. The width of each stage indicates the number of leads currently at that stage. This visualization helps you quickly identify where leads are accumulating or dropping off.
Above the funnel, the estimated funnel value shows the potential revenue associated with the current pipeline. The Highest drop-off indicator highlights the stage where the most leads are exiting the funnel, helping managers identify problem areas in the sales process.
Use the Lead source filter within this section to view funnel performance for a specific source, such as Google Ads or Facebook, and compare how different channels convert.
Lead Source Distribution
The Lead source distribution section shows how leads and revenue are distributed across different lead sources.
This section highlights which sources generate the highest number of leads, which sources convert best, and how much revenue each source contributes. When no data is available for the selected duration, a placeholder message is displayed.
Use the Lead type filter in this section to analyze source performance for specific lead categories, such as Services or Memberships. This helps marketing and leadership teams evaluate campaign effectiveness and allocate budgets more effectively.
Lead Capture Trends
The Lead capture trends section shows how leads are captured over time.
The trend graph displays new leads and returning leads across the selected duration. This helps you identify peak lead capture days, daily fluctuations, and overall momentum.
At the top of this section, the dashboard highlights the Peak day capture, showing the highest number of leads captured on a single day. It also shows the Average new leads and Average returning leads, allowing you to understand lead consistency and repeat engagement.
Use this section to plan staffing, outreach schedules, and campaign timing.
Agent Leaderboard
The Agent leaderboard provides visibility into individual agent performance.
This section shows the total number of agents working on leads during the selected period and the average time taken to close a lead. Below this, agents are ranked based on their performance.
For each agent, the dashboard displays the number of leads closed, conversion rate, and average time to close. This helps managers identify top performers, balance workloads, and provide targeted coaching where needed.
Use the Lead type filter in this section to evaluate agent performance for specific lead categories.
Lead report
Track pipeline activity, lead movement, follow-up status, and operational performance.
Lead Pipeline Activity Report
The Lead Pipeline Activity Report gives you a single, filterable view of leads moving through your pipeline, along with their latest engagement and follow-up status. This report is designed for day-to-day operational tracking of lead progress. You can use it to monitor pipeline health across centers, owners, sources, stages, and priorities, and to quickly identify leads that need attention based on last activity and next follow-up dates.
To access the report, navigate to Lead management > Reports > Lead pipeline activity report.
Use the Saved views filter to load a preconfigured set of filters.
Filter leads by their Status, Priority, and Source.
Click Advanced filters.
Select the center you want the report to run for, then narrow results further by choosing the relevant employee.
Refine the data by selecting the lead stage, priority, and source you want to analyze.
Choose the date type that should drive the report, then set the start and end dates for the reporting period.
Enable the option to include leads without a follow-up date if you want those leads to appear in the results.
Click Apply filter to refresh the report with your selections.
Click Save filter if you want to reuse this filter later or use Clear all to reset and start over.
Column name
Description
Details and Examples
Guest Code
Unique identifier linked to the guest (if available)
Displays the guest code if the lead is linked to an existing guest record.
Guest Name
Guest name associated with the lead
Shows the guest’s full name when the lead is connected to a guest profile.
Lead Name
The lead record name/title
Displays the name entered at lead creation.
Center Name
Center the lead belongs to
Indicates the center where the lead was created or is currently managed
Owner
Lead owner/agent responsible
Shows the employee responsible for managing and following up on the lead
Source
Where the lead came from
Displays where the lead originated from
Current Stage
Current pipeline stage
Shows the lead’s present stage, for example, New, Contacted, Interested, Won/Lost.
Priority
Urgency level
Indicates whether the lead is High, Medium, or Low priority, guiding follow-up focus and escalation.
Stage Entry Date/Time
When the lead entered the current stage
Shows when the lead last moved into its current stage
Avg Stage Age
Average time spent (typically in stage, depending on configuration)
Displays how long the lead has remained in the current stage
Offered Price
Value associated with the lead (if captured)
Shows the expected or quoted value associated with the lead
Last Activity
The most recent activity type (for example, Email/Call)
Indicates the latest activity recorded for the lead, such as Email or Call
Last Activity Time
Timestamp of the most recent touch
Shows the exact date and time of the most recent activity
Next Follow-up Date
When the next follow-up is due
Displays the next follow-up date planned for the lead
Created Date
When the lead was created
Shows when the lead was first created in the system