Check out products
A storeroom or stock room, or simply store, is a place in your center where you receive products from vendors, your company warehouse, or another center in your company. The floor is an area that is outside the store. In order to provide a service, sell a product to the guest, or transfer the product to another center, you need to move the product from the store to the floor.
Checkout is the physical movement of a product from store to the floor by an employee. For each checkout, the Inventory manager must record it to track the movement to have accuracy in the stock levels.
Important
For businesses that have signed up with Zenoti after April 2020 release, checkout is only available for consumables and the store and floor quantities are combined into a single quantity.
Types of checkout
There are two ways you can record a product checkout:
Manual
Use the Inventory > Checkout menu option to record each checkout. This can be done for one product at a time or for multiple products at the same time.
Single
In this, the Inventory Manager repeats the checkout entry process for each product. This is time-consuming, but helpful when the product is an expensive product. For example, your center provides the Skin Rejuvenation service using Botox. The dosage in this treatment is important and need more tracking than other services.
Bulk
In this, the Inventory Manager can checkout multiple products using the bulk checkout option.
Automatic
Allow Zenoti to do the checkouts at a center level.
This is required for checkouts that are done on a regular basis like for sale, for consumption to provide a service, and for transfers.
Note
For businesses that have signed up with Zenoti after April 2020 release, this is enabled by default and no related setting is available in the UI (user interface).
Settings
You must enable the following settings depending on how your business runs and needs checkouts to be recorded:
Allow product checkout, transfer and conversion when no stock is available To allow checkouts (with a warning) even when the product is out of stock.
Enable auto checkouts for consumable product consumption To allow Zenoti to record the checkouts of professional supplies
Manual checkout for consumption when checking out from store to floor (select “Checkout for consumption by default") To enforce checkouts to be recorded for non-service related products like paper napkins that do not need granular-level of tracking
Enable auto checkouts from store to floor for retail product sales
Enable Auto Checkouts for Transfers To allow auto-checkout of products for transfer
Enable Auto Checkouts for Product Sales To allow auto-checkout of products for retail
Enable Auto Checkouts for Consumable Product Consumption To allow auto-checkout based on the service-product association and consumption tracking (auto or manual)
If you've signed up with Zenoti after April 2020 release, you will see only the Allow product checkout, transfer and conversion when no stock is available setting at the organization level. The other settings are enabled by default, but you will not see them in the user interface (UI).
Check out a product
You can check out a product from the store to the floor to sell the product, use it as a professional supply (consumable), or transfer it to another center.
Important
If your business signed up with Zenoti after the April 2020 release, the Checkout process has the following changes:
No retail checkouts - as checkouts are required only for consumption in services. Thus, the Checkout for consumption option is also not available.
The Manual checkout for consumption when checking out from store to floor setting is enabled by default, but not available in the UI (user interface).
Ensure that you are at the center level.
Based on whether you are checking out retail or consumable products, select one of the following:
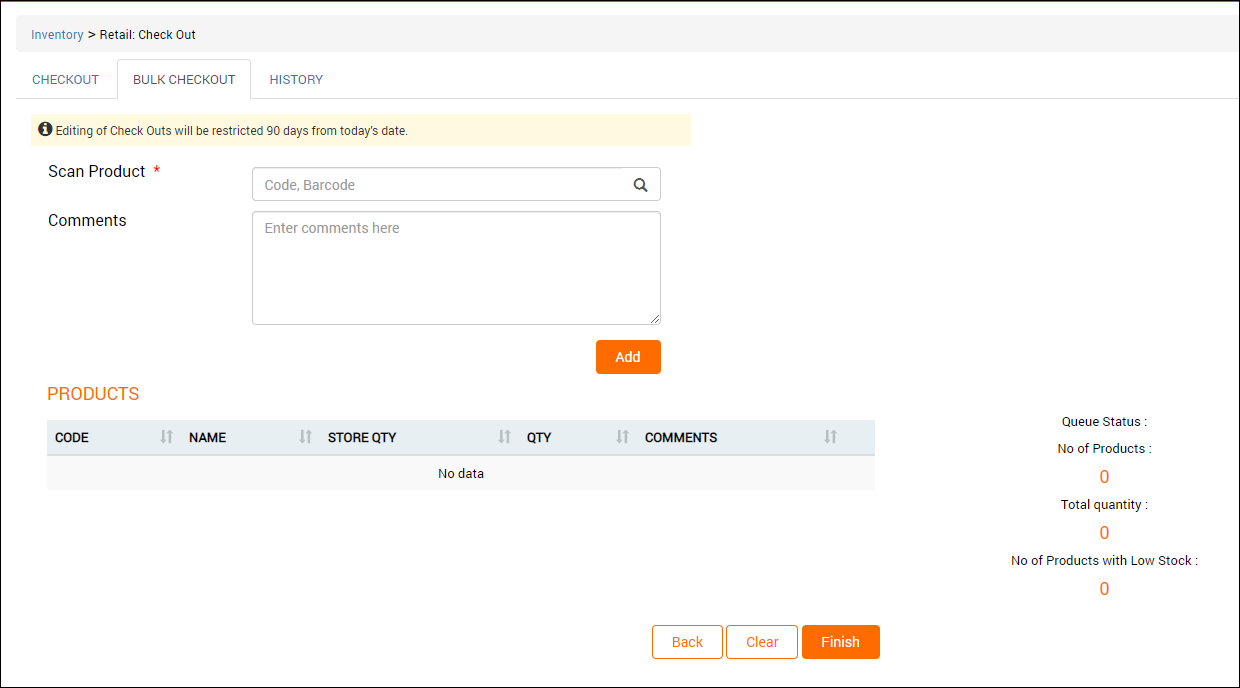
Inventory > Stock Levels > Retail > Check Out
Important
In case you’ve signed up with Zenoti after the April 2020 release, you can only check out consumables - you will not see the Check Out option for retail.
Inventory > Stock Levels > Consumables > Check Out
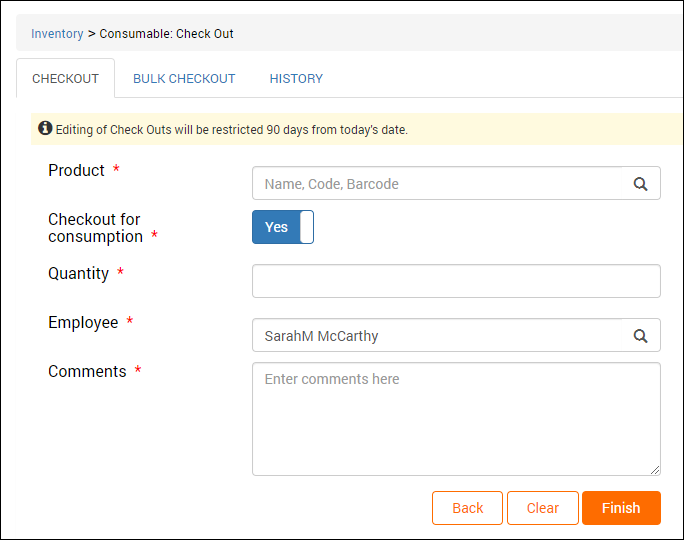
Let's say that you want to check out a consumable. When you navigate for consumable checkouts, the following page appears:
Important
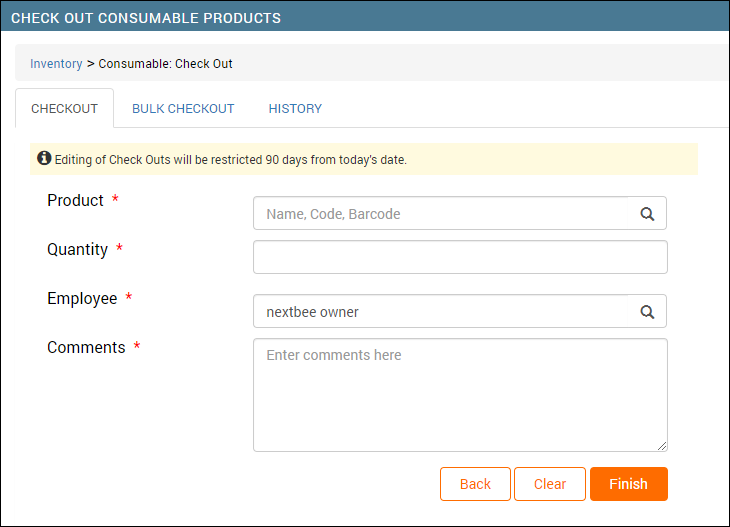
If your business signed up with Zenoti after the April 2020 release, the following page appears when you navigate for consumable checkout:
Enter the name of the product to be checked out.
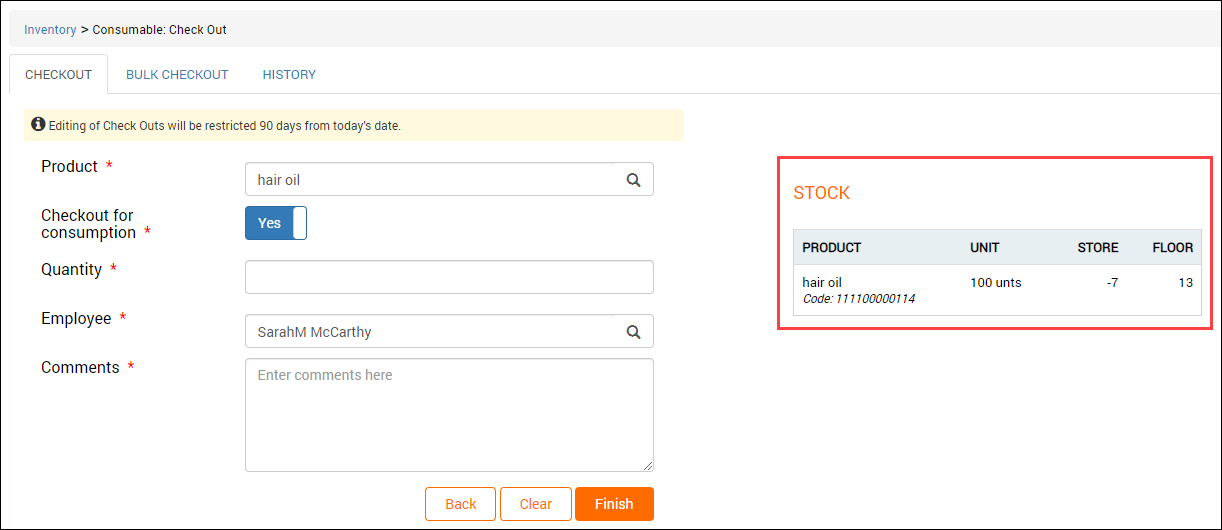
The total quantity of the product appears.
Important
If your business signed up with Zenoti after the April 2020 release, the product quantity appears as follows:

Select the Checkout for consumption checkbox if you want to check out the product first from store to floor and then finally for consumption.
This option is only for products that are not associated with any service but are still consumed at your center. In that case, you can manually mark them consumed during the checkout process. To do so, while checking out a consumable product, select the Checkout for consumption option. This will mark the product as consumed and it will reflect in all the inventory reports.
Note
If your business has enabled the organization-level setting Manual checkout for consumption when checking out from store to floor at Configurations > Inventory, then this setting is enabled by default.
For businesses that have signed up with Zenoti after April 2020 release,
Checkout for consumption option is also not available
The Manual checkout for consumption when checking out from store to floor setting is enabled by default, but not available in the UI (user interface).
In the Quantity box, enter the quantity of product to be checked out.
Select the employee who is responsible for the checkout.
Note
By default, the logged in employee's name appear in the Employee box.
In the Comments box, enter notes for the checkout.
Click Finish.
The product is checked out with the entered quantity.
In case if the product is out of stock and your business has allowed check out even on low stock, you will be alerted and the check out is complete. Otherwise, you must enter a lesser quantity of the product or add stock and then proceed with the checkout.
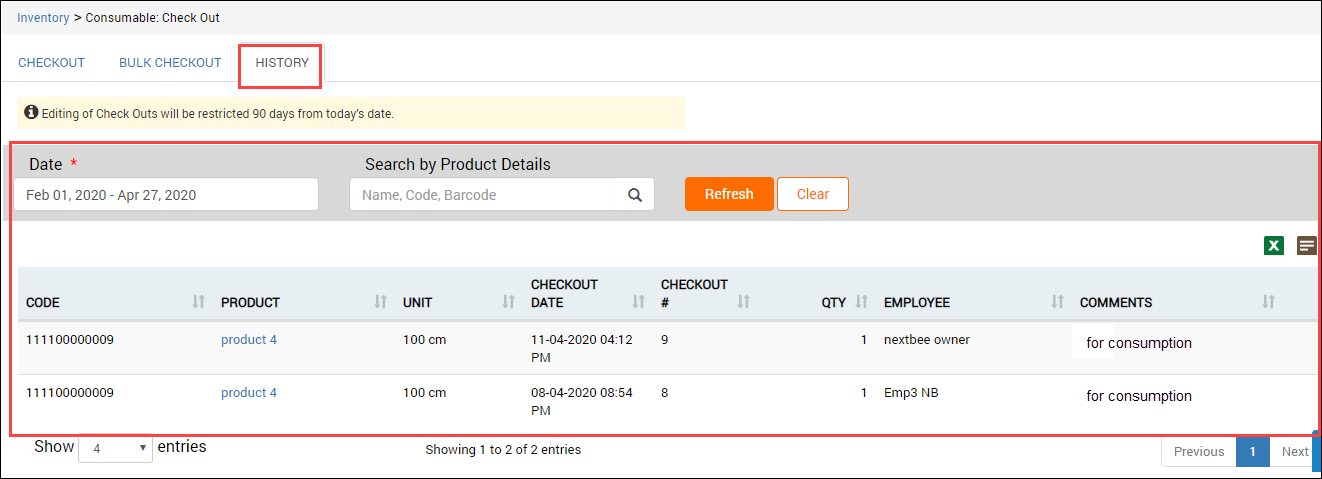
You can refer the History section to view the details of a checkout on a specific date or during a date range.
Bulk check out products with a scanner
The bulk check out option helps you track inventory by scanning multiple product barcodes in one go. Instead of checking out every product individually, scanning and checking out all products at once expedites the checkout process and saves time. This is especially useful for centers that sell or utilize products in large volumes on any given day.
Important
If your business signed up with Zenoti after the April 2020 release, the Checkout process has the following changes:
No retail checkouts - as checkouts are required only for consumption in services. Thus, the Checkout for consumption option is also not available.
The Manual checkout for consumption when checking out from store to floor setting is enabled by default, but not available in the UI (user interface).
Ensure that you are at the center level.
Based on whether you are checking out retail or consumable products, select one of the following:
Inventory > Stock Levels > Retail > Check Out Important: In case you’ve signed up with Zenoti after the April 2020 release, you can only check out consumables - you will not see the Check Out option for Retail.
Inventory > Stock Levels > Consumables > Check Out
Select the Bulk Check Out tab.
Important
In case you’ve signed up with Zenoti after the April 2020 release, you can see the following page when you click the Bulk Checkout tab:
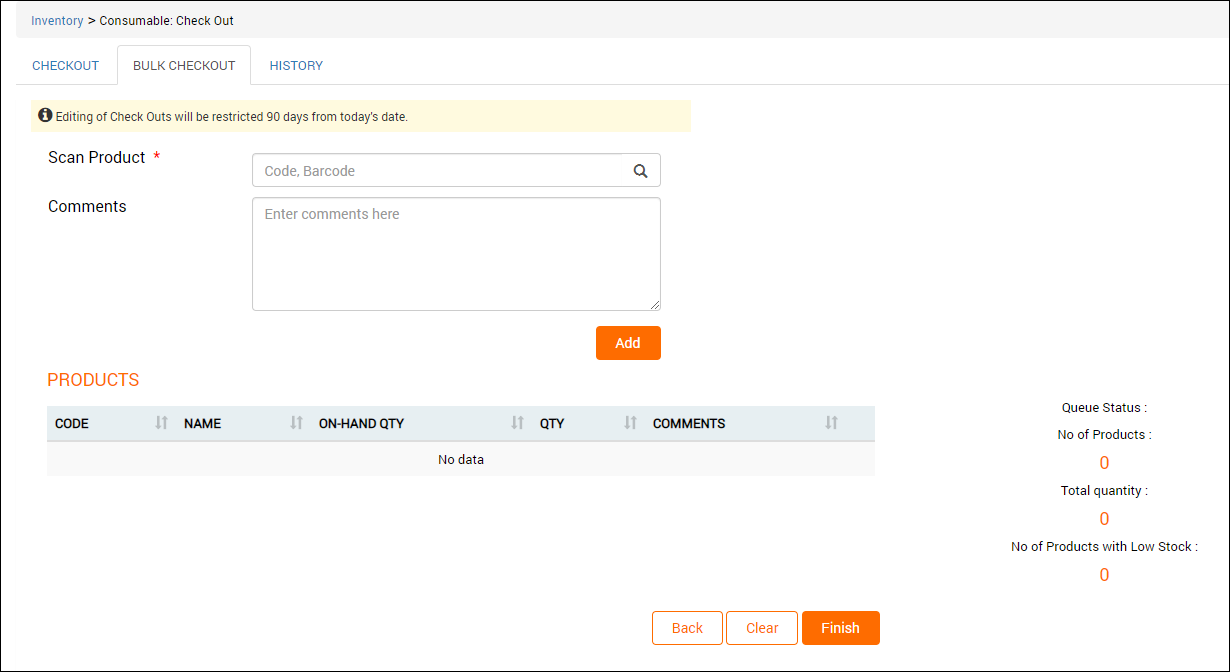
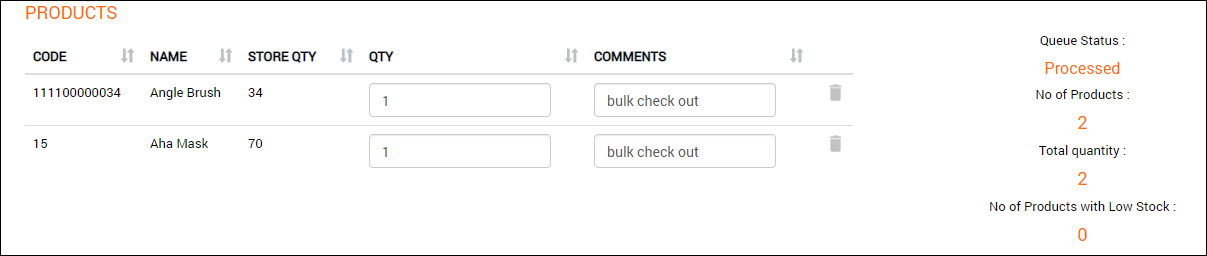
Here, Qty is the total checkout quantity of a product.
Enter the product code or scan the product barcode.
Each time you scan the product, the checkout quantity for that product increases by one.
Enter any additional notes you may want to record for the checkouts.
Click Add.
An entry is added for the product in the Products section.
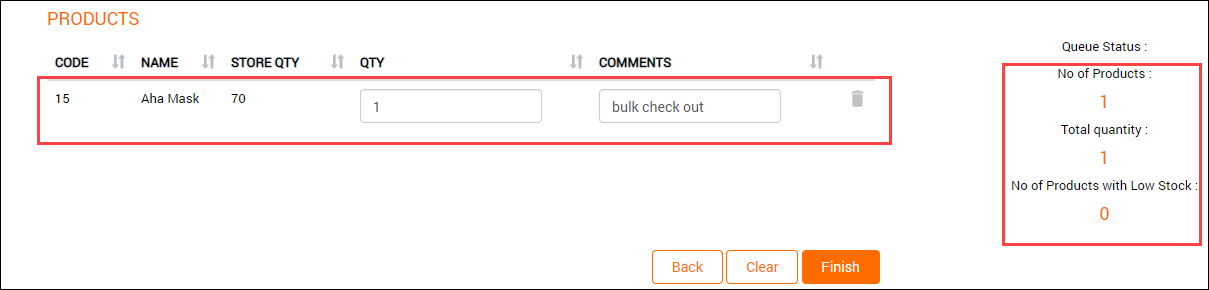
You can also see the quantity of the product in stock, the total quantity of the checkout, and the number of products that are out of stock, if any.
In case your business allows checkout even if a product is out of stock, you can continue with the check out. However, it such checkouts are restricted, you must first add the stock for the product or remove the product from checkout.
If you want to check out more products, repeat steps 4 to 6 for each product.
If you want to remove a product from checkout, click the corresponding delete button.
After you are done adding the products for checkout, click Finish.
The bulk check out is done successfully.