Set up inventory
Zenoti Inventory is suitable for a business that is already using an inventory management system and wants to migrate to Zenoti, for a business that has managed inventory manually, and even for a new business that is planning to have one.
Do not worry! Just set up the inventory once and get started with it.
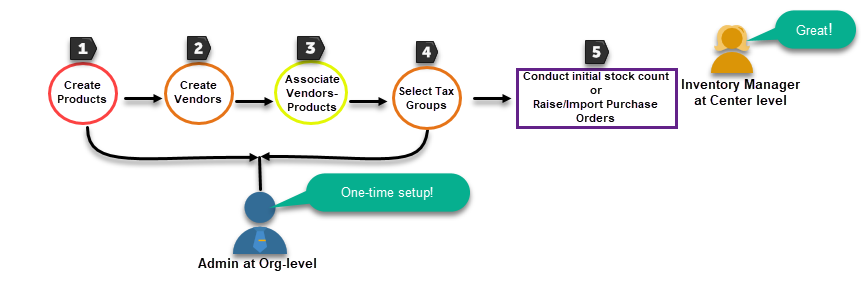
Regardless of how your inventory is currently managed, setting up inventory in Zenoti involves the following steps:
Creating products, vendors, and associating each product to at least one vendor.
This is done by the Administrator at the organization level.
Recording initial stock count and getting stock value.
This is done by the Inventory Manager at the Center level.
Note
While you are taking the initial count, if you do not see a product for your center, you can reach out to your admin at the organization level who can, in turn, make it available for your center.
Important
A business usually has more than one center. So, the admin for the organization performs the first three actions (1,2, 3, and 4 in the diagram) for each center while the Inventory Manager of the respective center takes the initial stock count or raises orders (5 in the diagram).
Please ensure that access to the Inventory module is given only to the Inventory Manager and the Owner.
For products with zero quantity, do not enter the value 0 in the Quantity column. Leave it blank.
Create Products
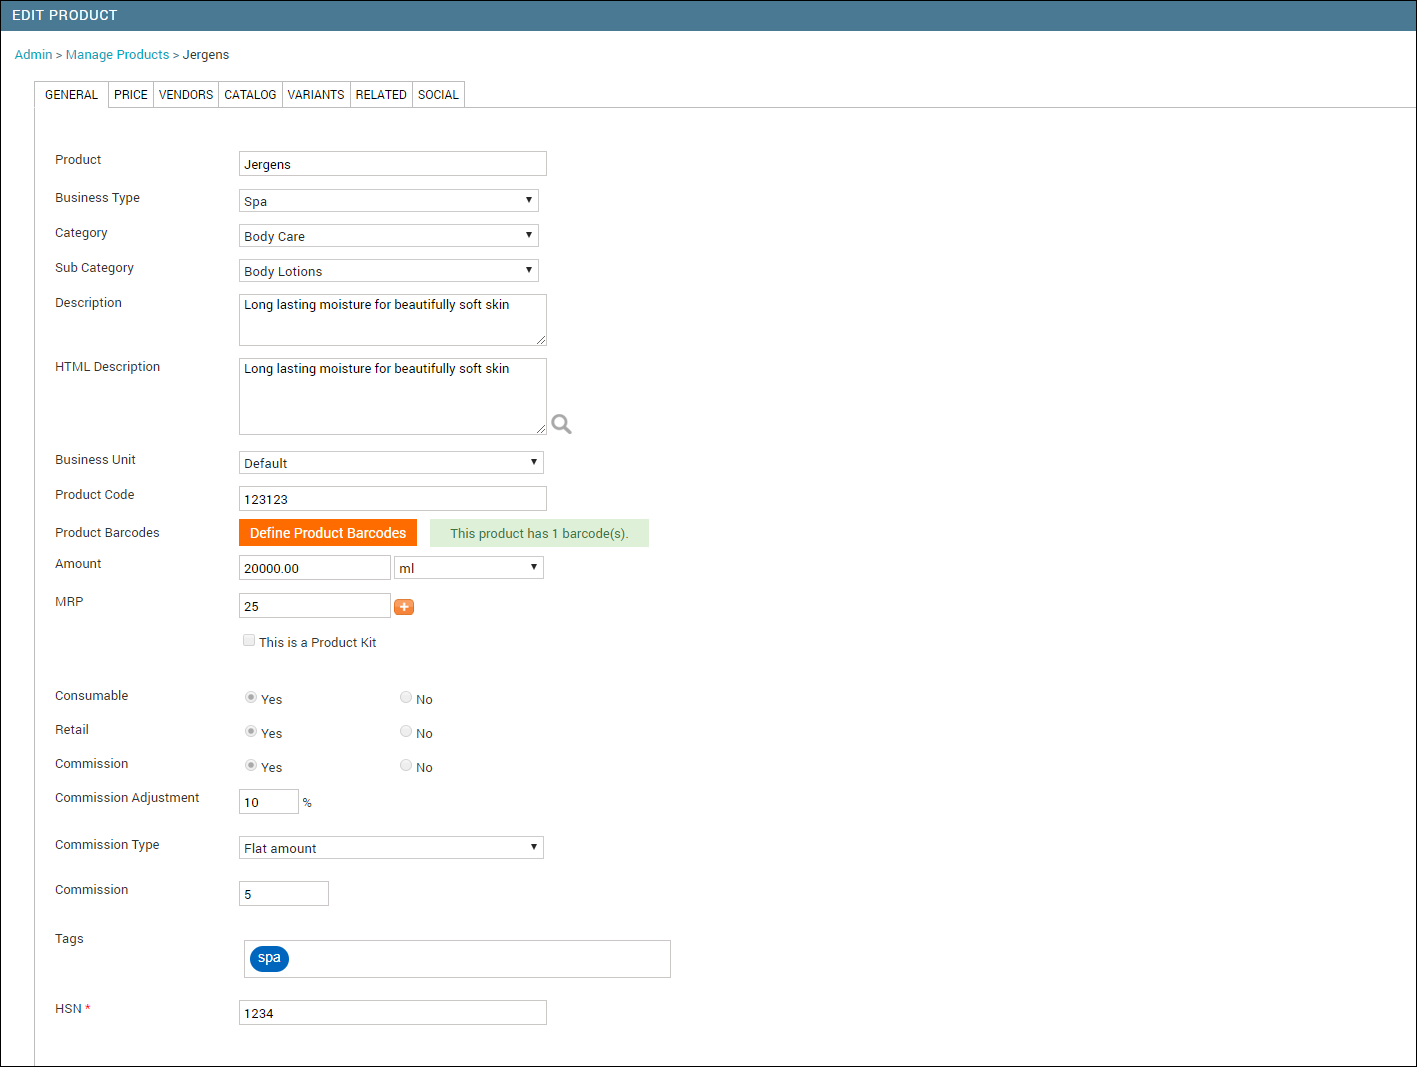
Create a product in Zenoti for each retail or professional supply in your company. Provide all the necessary details like code, category, units, type, commission, price & tax, alert quantity, transfer price & tax, variants (if there are any), catalog details (for online sales), and related products & services.
If your center works with product kits, your Admin must mark the product as a kit and set up the products that must be part of it.
Important
Ensure that you select the centers where the product must be available - the centers will not be able to perform the initial stock count or raise purchase orders, transfer orders, and return orders without the products.
Create categories and subcategories for the products
Note
A product category and subcategory is similar to service categories/subcategories. Zenoti recommends that you categorize the products effectively for an effective inventory system.
A vendor is a supplier of products. It is usually external to the company, however, it can also be a center within the company. In the latter case, the center that’s acting as a vendor becomes a warehouse or corporate office, which procures products from the vendor for the entire company.
Important
Ensure that you add an email address for each vendor. The centers will use this email address to send a copy of the raised orders.
Associate Vendors and Products
Associate each product to at least one vendor. The centers can procure products only if they are associated with vendors in Zenoti.
Select tax groups for each center
Select at least one tax group for each center for Inventory. This allows the centers to access Zenoti Inventory. Otherwise, the employees cannot access the Zenoti Inventory system and they will get the following error mesage:

Note
The selected tax groups will appear in the Tax drop-down while creating a purchase order.
Get stock level and value
To set only the quantities, you can conduct stock count for the desired products in your center.
To set quantities and get value for the stock, you need to raise a purchase order and receive it in Zenoti. You can also use the Import Order option to save time.
Raise a purchase order for the products with the required quantity
Receive the orders in Zenoti
Amazing! You are now ready to use the Zenoti Inventory management system.
Set up opening stock
Disclaimer
This page is available only if your business has signed up with Zenoti from July 2020 release.
If you are a new center or a new franchisee, to get started with Zenoti Inventory, you need to set up the opening stock, also known as the starting inventory. This helps businesses to set the stock level and stock value for each center.
Important
If the current center is acting as a vendor, the opening stock process is not supported for such a center.
Prerequisites
Before you begin, ensure that you have completed the following:
Add products at the organization level and make them available for your center : If the products are already added, you can mark them available for your center.
Add vendors at the organization level and associate them to your center.
Add tax groups that you want to use for inventory
Important
If your business follows the tax-inclusive model, create a zero tax group for inventory.
At the center level, click on the Inventory icon.
Important
If the current center is acting as a vendor, the opening stock process is not supported for such a center.
Click the Dashboard icon
The Set Up Opening Stock page appears.
Select Add Opening Stock.
Important
Select Start stocks afresh if you do not have stock and you want to set up the starting inventory and value manually by raising purchase orders.
The Opening Stock page appears.

You can see all the stock that is added to your center.
Note
If you do not see any product and you have the permission to add products at the organization level, you can go ahead and add the products. However, if you do not have permission, reach out to your corporate office or head office.
If a product is not active in your center, you can mark it as active.
Enter the following information for the desired products:
Vendor: Select the vendor from where you purchase the product.
Quantity: Enter the quantity of the product.
Unit Cost: Enter the cost at which you procure the product from the vendor.
Tax: Select the tax group that’s applicable.
Important
If your business follows the tax-inclusive model, select the zero tax that your admin must have created for inventory.
For each product for which you want to set up the stock, you must enter the Vendor, Quantity, Unit Cost, and Tax.

Total Taxes: The tax paid for the total quantity of the product. It is calculated as,Total Taxes = Quantity x Tax
Sub Total: The total cost of the product including the tax, if applicable.
Notes: Enter any additional comments or information that you want to add for the product. The notes will appear on the Purchase Order and on Audits and Reconciliations in the Audit History report.
(Optional) At the top of the page, you can view the current date when the opening stock is being set up. However, if you want to change this date, click the Edit icon, select the desired date and time, and click Apply.
(Optional) Click Save Progress if you are not done entering the details for all the products.
Note
You can view the last time that the opening stock was saved at the bottom of the page.
Before you click Save & Finish to save the details that you have entered and complete the opening stock process, ensure that you’ve entered the details for all products.
The following dialog box appears.
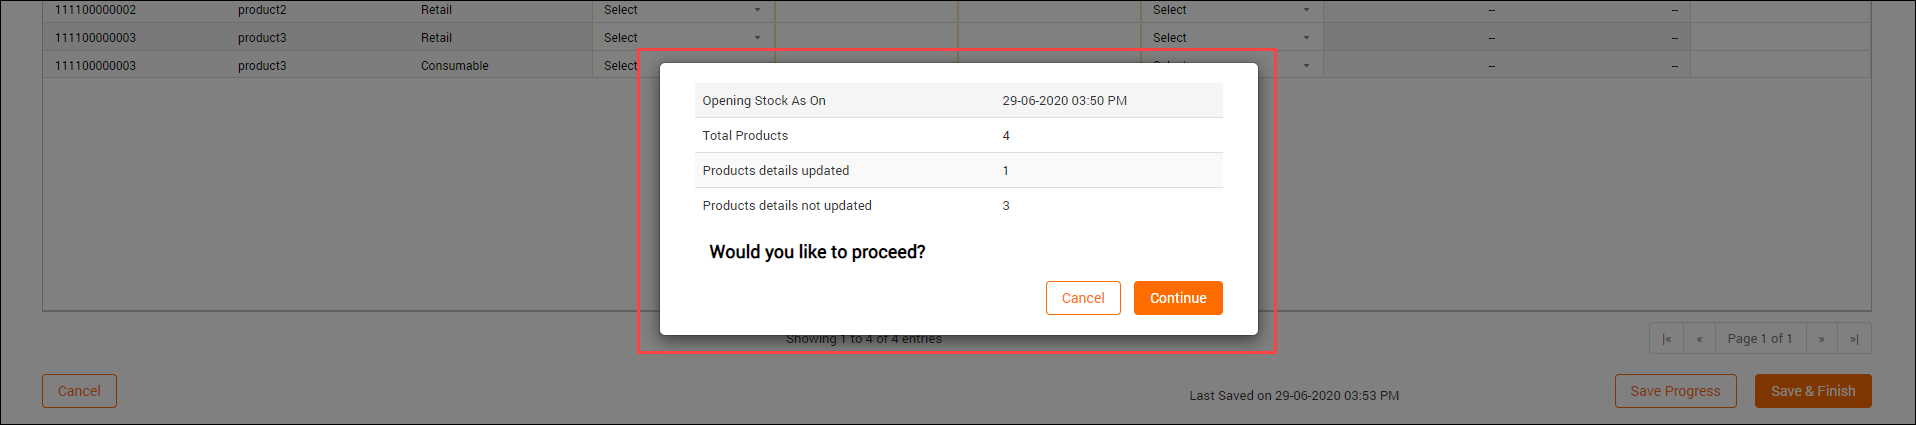
Click Continue.
After you set up the opening stock, Zenoti automatically creates the following audits and purchase order in the exact sequence:
Zero Audits - To clear the stock levels to zero
Zenoti creates two audits - one for retail and the other one for consumables, both with zero quantities and reconciles the two audits automatically.
You can view these audits and reconciliations when you navigate to Inventory > Reports > Audit History report.

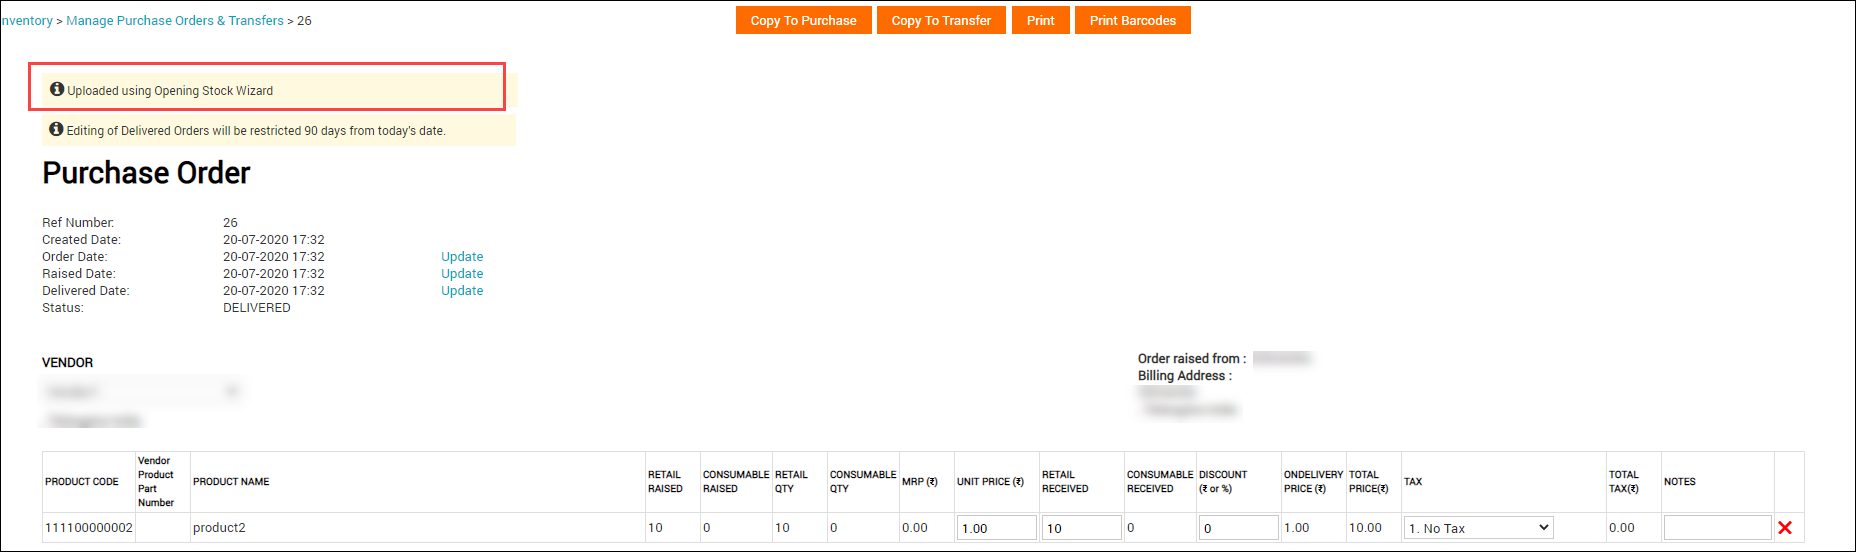
Delivered Purchase Orders with details from the opening stock - To set the stock value based on the opening stock process
Important
Zenoti does not create transfer orders automatically. Zenoti creates delivered purchase orders (with the quantity, cost, and tax that you’ve entered during the opening stock setup)for each product by vendor and by product type combination. For example, if you procure a product, let's say, Hair Shampoo, from one vendor Vendor 1 and the product type is both retail and consumable, the purchase orders are created as follows,
PO 1 - Hair Shampoo from Vendor 1 for retail
PO 2 - Hair Shampoo from Vendor 1 for consumable
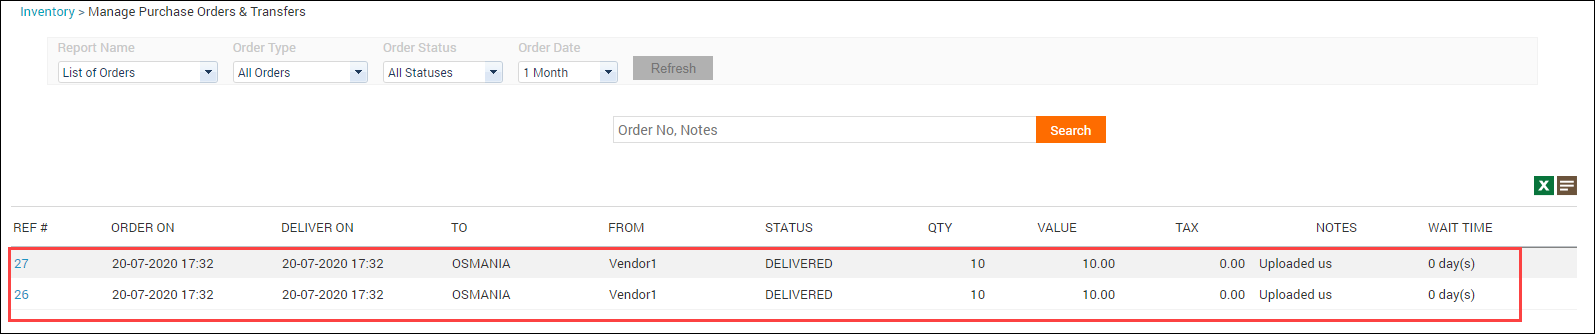
You can see a banner text for these purchase orders when you view them from Inventory > Procurement > List of Orders page.
Actual Audits & Reconciliations with the opening stock
Zenoti creates two more audits - one for retail and the other one for consumables, with actual product quantities that you’ve entered during the opening stock setup and reconciles the two audits automatically.
To view the audits and reconciliations, navigate to Inventory > Reports > Audit History report.

You can see a banner text for these audits and reconciliations when you view them from the audit history report.
Product Code, Barcode, and Vendor Product Part Number
Right from the product is manufactured until it reaches the retail stores, different codes are assigned to identify it.
Product Code: Code assigned in Zenoti. This can be auto-generated.
You must add this code while creating the product.
Barcode: Code assigned by the manufacturer. If the manufacturer change the code frequently, you can add multiple barcodes and have one code as the primary code.
You can add this code while creating the product.
Vendor Product Part Number: Code assigned by the vendor.
You can add this code while associating the product to the vendor.
Set up the product unit of measurement
Unit of Measurement (UoM) or just Unit, is the way to define how your company wants to measure a product's quantity. It allows you to quantify and track the products in stock.
In Zenoti, for each product (or product kit), you can define what one unit of the product mean. Generally, for retail products, the UoM is Units, while for the professional supplies it can be ml, gallon, oz, grams, etc.
For example, one of your vendors may supply products in bulk as 50 bottles in one case. So, for the vendor, 1 carton is 1 unit. However, when you receive the delivery, you unbundle each carton and consider 1 bottle as 1 unit.
If your company is into medi-spa and your company offers skin rejuvenation services, each provider must use a specific dosage of the product to provide a service. For example, in the case of Botox treatment, depending on the age of the guest, the provider is supposed to use only the prescribed amount of botox. Here, you must set up the unit of measurement as ml.
In services, you can define the amount of the product that can be used for the service. In case, you are not sure of the amount of the product that can be used, for example, the Hair Shampooing service may need a different amount of the shampoo based on the hair length of the customer. In this case, the staff can add the consumption details. You can restrict the entry of consumption details by only specific roles.
The way you define UoM for a product affects your entire inventory. Especially, when you are raising orders, you need to enter the quantity of the product you are requesting from the warehouse or purchasing it from the vendor.
At the organization level, navigate to Master Data.
Click Products.
Select the product name for which you want to set the units.
The product details are displayed.
Select the UoM for the product.
Example: Let's say that the product is for retail, you will select Units as UoM.
Enter the amount of the product.
Example: If 1 bottle of the Hair Shampoo is 1 product, you will enter 1 in the Amount field.In case of product kits, though the kit is a group of products, in the Amount field, you will still enter 1, not the number of products in the kit.
Click Save.
The product unit along with the amount of the product is defined.
Search for a product
After you have added products in Zenoti, you might want to edit their details. You can search a product using its name, the tag assigned to it, or its status: active or inactive.
Click the Master Data icon and navigate to Products.
Enter the product name or a tag.
Click Search.
If you have searched for a specific product, the product is listed if it is already added. If it is not, you can add it.
If you have searched by a tag, a list of products with the tag is displayed.
Caution
We recommend that you do not use the following keywords in your search string: $, F, G, H, I, J, L, M, N, O, P, Q, R, S, T, U, V, W, X, Y, Z, about, after, also, an, another, any, are, as, at, because, been, before, being, between, but, came, can, come, could, did, do, does, else, from, got, had, has, have, he, her, here, him, himself, his, how, if, into, is, its, just, like, make, many, might, more, most, much, must, my, never, no, now, on, only, or, other, our, over, said, same, see, should, since, so, some, still, such, than, that, their, them, then, there, these, they, this, those, through, to, too, under, use, very, want, was, way, we, well, were, what, when, where, which, while, who, will, with, would, you, your.
Navigate to Inventory > Products.
Select one of the following options from the drop-down list:
Active in any center in org - Product is associated with at least one center
Inactive in all centers - Product is not associated with any center
Discontinued in all centers - Products discontinued for ordering
All - Product may be or may not be associated with a center
If you are searching for a product at the center level, you get an additional option in the drop-down list:
Select the Active in this center option to view products active in the current center.
Perpetual average cost
Stock cost is the total cost of your available unsold stock. When you purchase a product at different prices and sell it at a marked-up price, you want to know the cost of your product in stock based on the purchase price.
In Zenoti, businesses can view the cost of on-hand stock based on the perpetual average costing method.
In this costing method, the cost of the product is prorated with every purchase order or transfer order. For any unaccounted increase in stock due to transactions such as audits, there is no change in the perpetual average cost, and the stock is added as per the perpetual average cost.
Formula: Perpetual Average Cost = Cumulative Stock Cost / Cumulative Stock Quantity
Important
Retail sales do not have an impact on the average cost.
Receive Purchase Order
Receive Transfer Order
Return Stock to Vendor
Convert Retail to Consumable (Store to Store)
Bundle
When products are bundled as a kit, the cost of the kit is the sum of the cost of each individual product in it.
Unbundle
The cost of the individual product is prorated based on the cost price of each item.
Example
Let’s consider the following stock-ins and stock-outs of Hair Shampoo 100ml at your center and calculate the perpetual average cost after each transaction:
Transaction | Details | Perpetual Average Cost | Cumulative Qty | Cumulative Cost |
Purchase Order | Purchased 10 bottles of Hair Shampoo 100ml at $10 each on Jan 1st | 10x10 / 10 = $10 | 10 | $100.00 |
Purchase Order | Purchased 20 bottles of Hair Shampoo 100ml at $15 each on Feb 1st | (10x10 + 20x15) / (10 + 20) = $13.33 | 30 | $400.00 |
Transfer Order (Received) | Received 10 bottles of Hair Shampoo 100ml at $20 each on Mar 1st | (13.33x30 + 10x20)/(30+10) = $15.00 | 40 | $600.00 |
Purchase Order | Purchased 10 bottles of Hair Shampoo 100ml at $18 each on Apr 1st | (15x40 + 10x18)/(40+10)= $15.6 | 50 | $780.00 |
At this point, the Perpetual Average Cost of Hair Shampoo is $15.6. If the front-desk staff sells 10 bottles on Apr 20th. Transaction cost = $15.6 x 10 = $156.00 Cumulative Qty = 50 - 10 = 40 Cumulative Cost = $15.6 x 40 = $624.00 | ||||
Transaction | Details | Perpetual Average Cost | Cumulative Qty | Cumulative Cost |
Purchase Order | Purchased 15 bottles of Hair Shampoo 100ml at $20 each on Apr 30th | (15.6x40 + 15x20)/(40+15)=$16.8 | 55 | $924.00 |
At this point, the Perpetual Average Cost of Hair Shampoo is $16.8. If your center transfers 10 bottles to another center on May 1st. Transaction cost = $16.8 x 10 = $168.00 Cumulative Qty = 55 - 10 = 45 Cumulative Cost = $16.8 x 45 = $756.00 |
Transaction | Details | Perpetual Average Cost |
Purchase Order | Purchased a Hair Shampoo carton of 5 bottles of Hair Shampoo 100ml at $40 each on May 10th | $16.8 |
At this point, there is no change in the Cumulative Qty and Cumulative Cost as the kit is not unbundled. Transaction cost = 5 kits x 40 = $200 |
Transaction | Details | Perpetual Average Cost | Cumulative Qty | Cumulative Cost |
Unbundle | Unbundled the 5 kits, with each bottle of $16 on May 12th | (16.8x45 + 25x16)/45+25 = $16.51 | 70 | $1156.00 |
At this point, the Perpetual Average Cost of Hair Shampoo is $16.51. If your center returns 10 bottles, let’s say at $14 each to a vendor on May 15th. Perpetual Average Cost = (16.51 x 70 – 10x14) / (70-10) = $16.93 Transaction cost = $14 x 10 = $140.00 Cumulative Qty = 70 - 10 = 60 Cumulative Cost = $16.93 x 60 = $1015.08 |
Transaction | Details | Perpetual Average Cost | Cumulative Qty | Cumulative Cost |
Audit/Reconcile | Reconciled +2 unaccounted Hair Shampoo 100ml bottles at $16.93 each on Jun 1st | (16.93 x 60 + 16.93 x 2)/ (60 +2) = $16.93 | 62 | $1049.66 |
Transaction cost = $16.93 x 2 = $33.86 |
Transaction | Details | Perpetual Average Cost | Cumulative Qty | Cumulative Cost |
Audit/Reconcile | Reconciled -60 unaccounted of Hair Shampoo 100ml bottles at $16.93 each on Jun 10th | (16.93 x 62 – 16.93 x 60)/(62-60) = $16.93 | 02 | $33.86 |
Transaction cost = $16.93 x 60 = $ 1016.00 |
If the on-hand quantity of a stock becomes zero, the incoming value of new stock will serve as the new perpetual average.
If the on-hand quantity of a stock becomes negative, the perpetual average is assigned the unit price of the stock lot purchased after the quantity went negative, specifically referring to the stock that restored the inventory from a negative to a positive quantity. The stock cost is calculated based on this perpetual average.
Transaction Type | Details | On-hand quantity | Total stock cost | Perpetual average |
|---|---|---|---|---|
Purchase | Purchased 10 bottles of Hair Shampoo 100ml at $10 each | 10 | $100 | $10 |
Purchase | Purchased 5 bottles of Hair Shampoo 100ml at $15 each | 15 | $175 ($100 + $75) | (10x10) + (5x15)/15= $11.67 |
Sale | Sold 17 bottles of Hair Shampoo | -2 | ||
Purchase | Purchased 10 bottles of Hair Shampoo at &15 each | 8 | $120 (15x8) | $15 |
In the above scenario, as the on-hand quantity went negative (-2), the cost of the items purchased after reaching negative quantity was $15 each, so the new perpetual average will be assigned the unit price of the stock lot purchased after the quantity went negative. The stock cost will then be calculated based on this new perpetual average.
If the stock quantity falls into negative values and new stock is subsequently added, the system allocates the cost of goods sold (COG) for quantities below zero to the unit price of the most recently added product.
Example:
Transaction Details | Initial stock | Sale | Current stock | Cost of goods sold |
|---|---|---|---|---|
Purchased 10 bottles of Hair Shampoo 100ml at $10 each | 10 | 10 | ||
Sold 12 bottles of Hair Shampoo | 10 | 12 | -2 | $100 |
Purchased 10 bottles of Hair Shampoo at $15 each | -2 | 8 | The extra 2 quantities will be assigned a cost of 15 per unit. Cost of good sold for 12 products = 10*10 + 2*15 = $130 | |
Sold 10 bottles of Hair Shampoo | 8 | 11 | -3 | $120 (8*15) |
Purchase 1 bottle of Hair Shampoo at $18 each | -3 | -2 | Assign $18 as unit price for the additional 1 quantity. | |
Purchased 2 bottles of Hair Shampoo at $20 each | -2 | 0 | Assign $20 as unit price for the additional 2 quantities Cost of goods sold for 10 products = 8*15+ 1*18 + 2*20 = $178 |
When the stock reached a negative value (-2), items were purchased at $15 each. Consequently, the additional quantities are assigned the unit price of the latest product. The new cost of goods is calculated as follows: 10*10 + 2*15 = $130
As the stock went negative (-3), a hair shampoo was added at a unit price of $18. While the stock remained negative (-2), 2 more hair shampoos were added at $20 each. The new cost of goods is calculated as follows: 8*15+ 1*18 + 2*20 = $178
In both scenarios, the cost for additional quantities is determined by the unit price of the latest product procured after reaching a negative stock.
Add Vendors
Modify vendors
Important
The role that you are assigned to must have permission to create and modify vendor accounts.
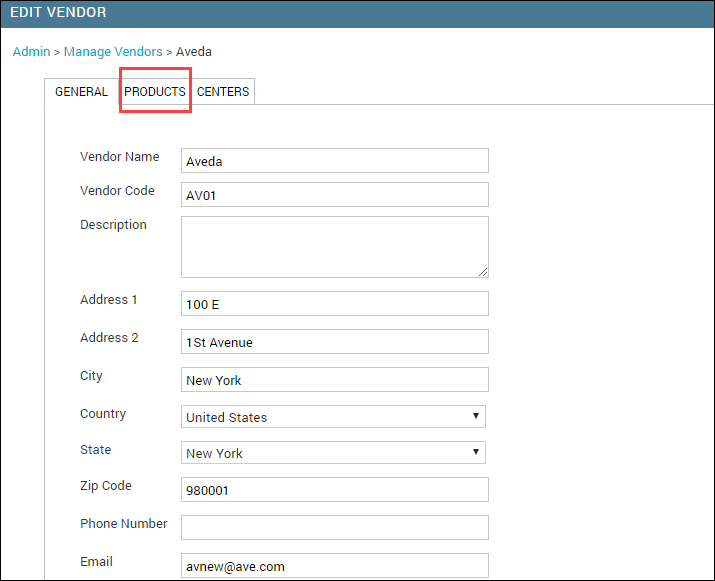
Zenoti allows you to maintain a comprehensive list of vendors that supply products to your organization. When you create a vendor account, you enter information about the vendor that is used to automatically populate purchase orders created for the vendor and to track product deliveries and returns.
At the organization level, click on the Configuration icon.
Navigate to Products > Vendors.
Click the name of the vendor whose details you want to edit.
On the General page, edit the following information as appropriate:
Vendor name: Name of the vendor
Vendor code: Code used to identify the vendor
Description: An optional statement to describe the vendor
Address 1, Address 2, City, Country, State, and Postal Code: Vendor's complete address
Phone number: Vendor's contact number
Email address: Vendor's email address
CST #: (If applicable) The vendor's Central Sales Tax (CST) number
Note
CST is a form of indirect tax imposed only on goods sold from one state to another state, which particularly takes into account that the buyer and the seller are in two different states.
TIN #: (If applicable) The vendor's Taxpayer’s Identification Number (TIN)
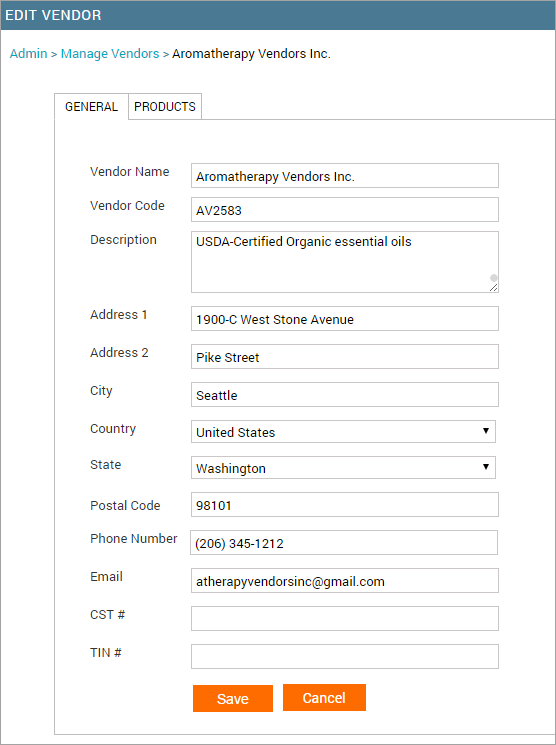
Click Save.
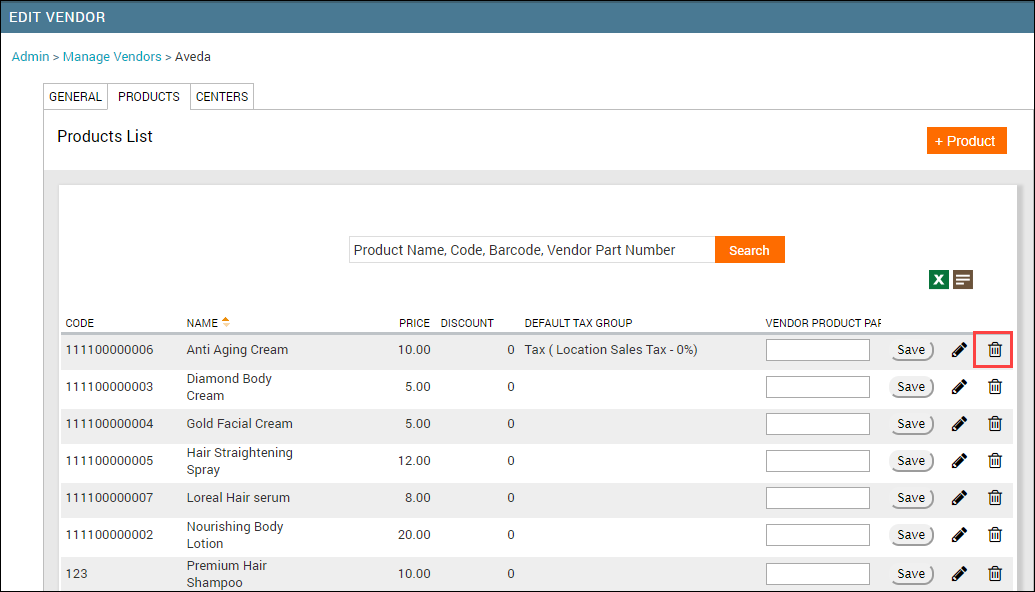
On the Products page, specify the products supplied by the vendor.
Important
Ensure that your organization has configured a list of products used or sold at your organization or center.
Add vendor product part number
A product can have multiple codes assigned to it. A vendor product part number is a code used by the vendor to uniquely identify the product.
At the organization level, click on the Configuration icon.
Navigate to Products > Vendors.
Click the vendor name.
The vendor details appear.
Click the Products tab.
The products associated with the vendor appear.
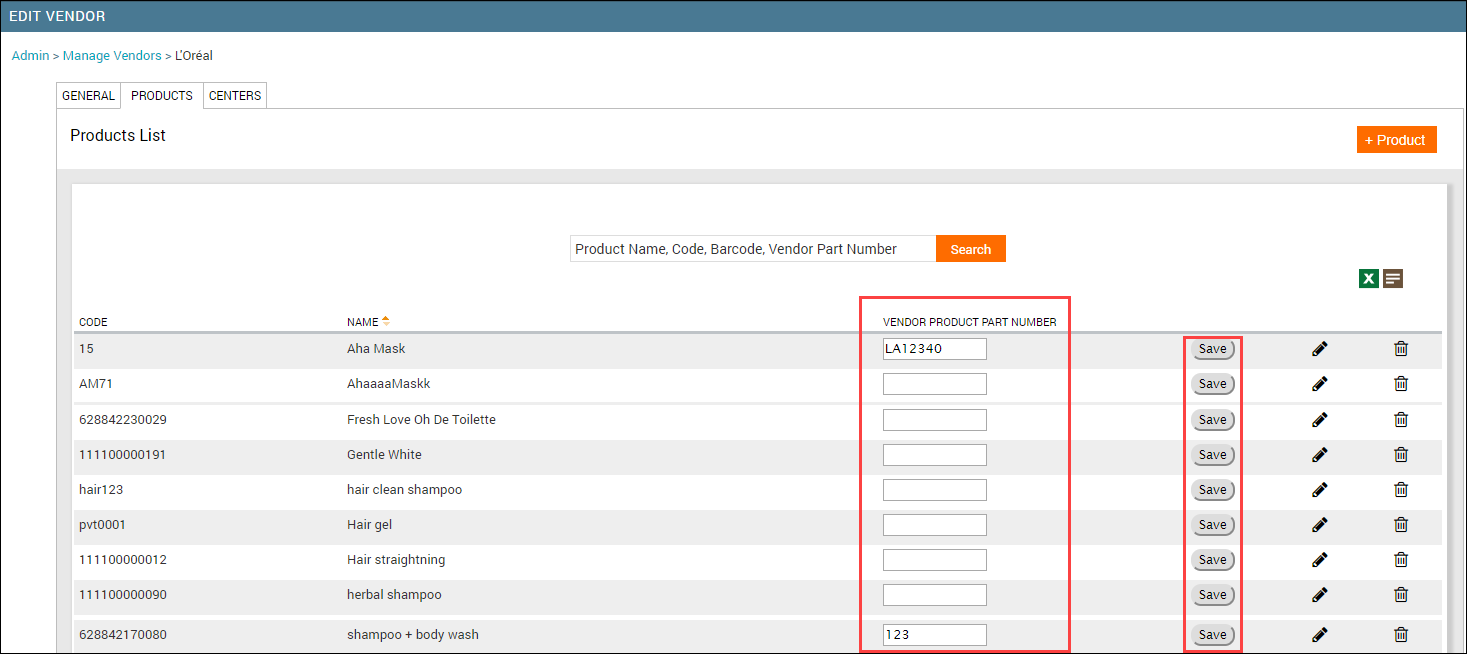
For the desired product, enter the vendor product part number. It can have letters and numbers.
Click Save.
The vendor product part number is saved for the product.
(Optional) Repeat steps 4 and 5 for the desired number of products.
You can see the vendor product part number in the following pages:
Purchase orders
List of Orders by Products report
Mark a product as available
Before you start performing any action on a product, you must first make it available or make it active for your center. Usually, your warehouse admin does this for all the centers. However, if you are a franchised business, you can go ahead and do so.
At the center level, click the Master data icon.
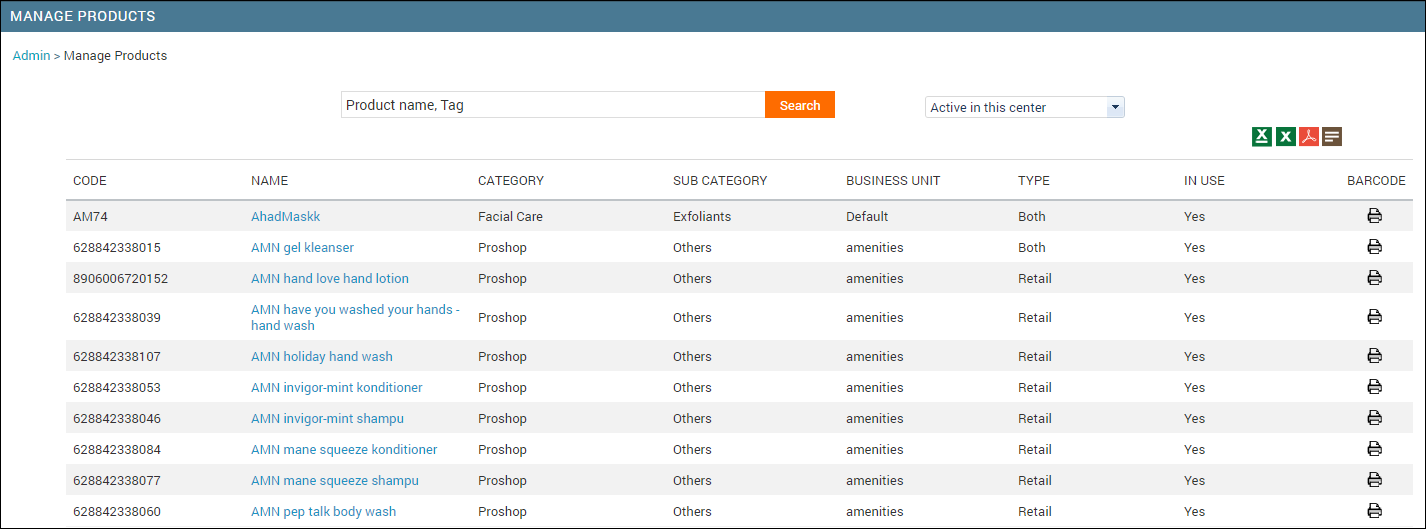
Navigate to Products.
From the active/inactive filter, select Inactive in all centers.
A list of products that are inactive in your center is displayed.
Search for the product by its name.

Click the product name.
The product details are displayed.
Navigate to the Price tab.
The fields in the Price tab are displayed.
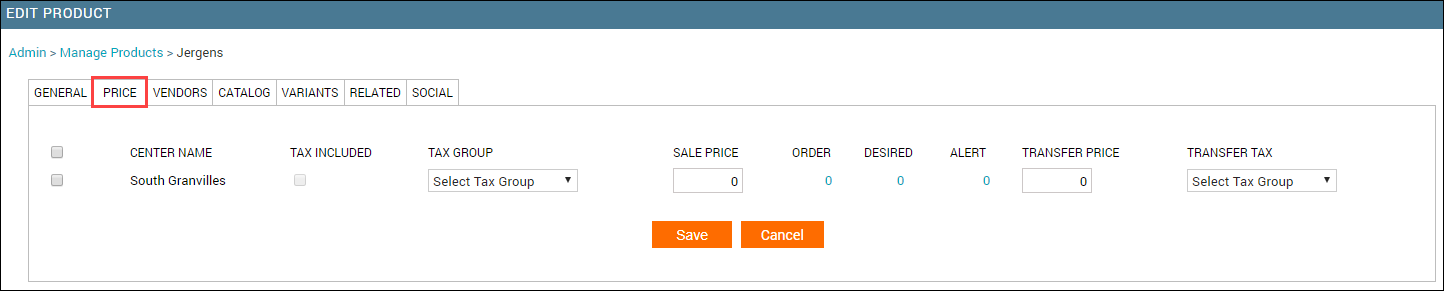
Select the checkbox that is just before your center name.
Select the Tax Included checkbox if you want to include the tax amount in the sale price. Also, select the desired tax group.
Enter the price at which you will sell this to your guests.
Note
This is not the price at which you purchased the product from the vendor.
Set the alert and order levels for the product that will help Zenoti create an auto-purchase order for you.
Enter the price at which you wish to transfer the products to other centers.
Also, select the transfer tax group, if applicable (the center is in another region).
Click Save.
The product is marked available in your center.

Deactivate a product
If you have a product that is temporarily not in use, you can go ahead and mark it inactive for your center and remove the vendor-product association. This means, that the product will not be available for your center for any inventory-related transaction.
Important
If you want to delete a product permanently, you can do that at the org level.
At the organization level, click the Master Data icon.
Navigate to Products.
Search for and select the product you wish to deactivate.
Disable the Active toggle button.
Caution
If you have raised a purchase order for the product or you are running an audit, you cannot make the product inactive. You must wait until these transactions are complete.
Click Save.
Remove vendor-product association
After you have made the product inactive for your center, you must also remove the vendor-product association.
At the center level, click the Configuration icon.
Navigate to Products > Vendors.
Click the vendor that is associated with the product.
Click the Products tab.
The list of products associated with the vendor appear.
Search for the product you want to disassociate.
Click the delete button for the product.
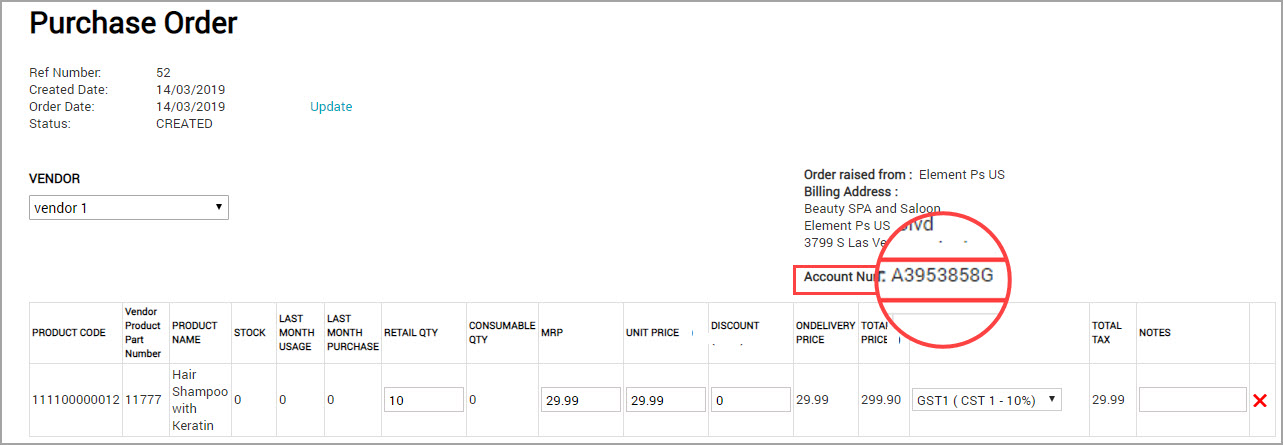
Vendor account number for a center
The vendor account number is a unique identifier for each center to which the vendor is supplying the products. In the case of a franchise model of business, all the franchisees share the same business name. The vendor needs to know which franchises are raising a purchase order and delivering the products to the correct franchise.
Also, in the case of a non-corporate office model of business where each center raises and receives orders individually, the vendor account number is required to differentiate each such center.
In Zenoti, you can enter the vendor-assigned reference number for each center, which gets populated on purchase orders done from each such center.
At the organization level, click on the Configuration icon.
Navigate to Products > Vendors.
The Manage Vendors page appears.
Select the desired vendor.
The Vendor page appears.
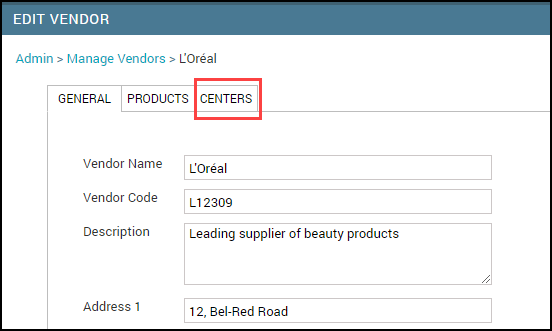
Click the Centers tab.
You can see all the centers associated with the vendor.
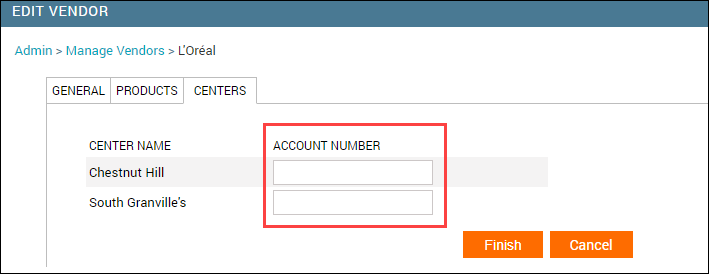
Enter the account number for each center in the respective Account Number field.
Note
You can enter both alphabets and numbers in the Account Number field.
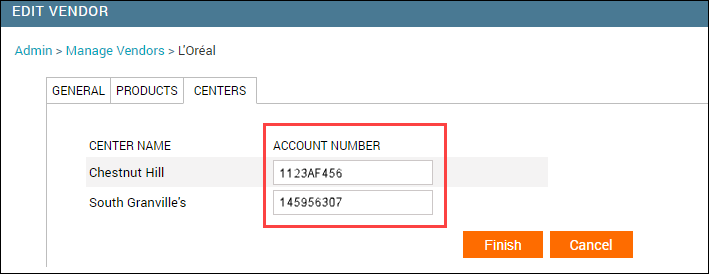
Click Finish.
For each center, the vendor-assigned reference number is updated on all the purchase orders created or even raised from the center.
Receive partial shipments
After you have raised an order with the vendor, you can receive orders from vendors in multiple shipments. This can happen when the products are out of stock or the vendor use multiple shipping providers.
Example: Let’s say that you have raised a purchase order for 50 bottles of Green Tea shampoo. However, your vendor delivers partial shipments as follows:
30 bottles in the first shipment
10 bottles in the second shipment
10 bottles in the third shipment
For the first two shipments, you mark the purchase order as partial delivery and for the third shipment, you mark the purchase order as a full delivery.
Zenoti allows you to receive multiple shipments for a single purchase order. You can record the quantities received on each individual delivery along with a separate invoice number for each delivery. As you start receiving more and more partial shipments, you can view the shipment history for the purchase order. And at any point, if you want to mark the order as delivered, you can close the order.
When you raise a purchase order, you can view the following fields added on the Purchase Order page:
Retail Raised: Quantity raised for retail
Note
This field will have a zero value either when it is just a consumable product or when no quantity is raised for it.
Consumable Raised: Quantity raised for consumption
Note
This field will have a zero value either when it is just a retail product or when no quantity is raised for it.
Retail Received: Quantity received from the vendor for retail. This is auto-filled with the raised quantity. You can change it to capture the actual quantity that is received in the shipment.
Consumable Received: Quantity received from the vendor for consumption. This is auto-filled with the raised quantity. You can change it to capture the actual quantity that is received in the shipment.
Invoice#: Receipt number of the payment made to the vendor.
Note
The invoice number for each shipment must be different.
Is Invoice Paid: Invoice amount is already paid
Address of Delivery: Address where the delivery is made. This can be the same center from where the order is raised, or it can be a different location.
Date of Shipment: Date when the order is received partially. It can be an earlier date or current date. It cannot be a future date.
Date of Delivery: Date when the order is received fully. It can be an earlier date or current date. It cannot be a future date.
Navigate to Inventory > Orders.
The Manage Purchase Orders & Transfers page appears.
Locate the order with status as Raised.
A list of purchase orders is displayed.
Click the desired Ref#.
The purchase order is opened in a new tab.
Enter the partially received quantity in Retail Received or Consumable Received columns, along with any applicable On Delivery price, Discounts, and Notes.
Complete the required fields such as Shipping and Handling charges, Invoice#, Address of Delivery, Date of Delivery, Date of Shipment, and Notes.
Note
The Date of Shipment, Date of Delivery, and Address of Delivery fields can be mandatory if your Admin selects the respective options under the Show alert if the following mandatory fields are missing when receiving the order setting.
(Optional) Click Save to save the delivery details.
The order status changes to Updated.
Note
The shipment is not marked Partially Delivered unless you click the Partial Delivery button.
Click Partial Delivery when you are ready to mark the order as partial delivery.
If the received cost differs from the Product Master value, a Price Difference Detected pop-up appears.
Review the list of affected products and select the ones to update.
Click Cancel or Update Master Prices.
Note
This popup appears only if your administrator has enabled the Enable price difference prompt on PO receiving setting in the center configuration.
The following takes place:
The order is marked as Partially Delivered. Click the Delivery History hyperlinkto know all the partial deliveries for the order.
The product quantity is updated in your current stock. In case of product kits, if auto-bundling on delivery is enabled, the stock level of the individual products increases while that of the kit decreases.
The Retail Qty is changed to (Retail Raised - Retail Received) in the purchase order.
A GRR number is auto-generated for the order if your Admin has enabled the Auto generate Goods Received Receipt number setting at the center level.
Next step
Complete the following steps:
Receive full delivery from vendor
After you have raised a purchase order, you are ready to receive deliveries. You may receive the order in partial or in full. In case you have already received partial shipments and now you have received a final shipment, you need to mark the delivery as fully delivered.
Click the desired Ref# to open the order.
The order is opened in for editing.
You can view the following fields added on the Purchase Order page:
Retail Raised: Quantity raised for retail
Note
This field will have a zero value either when it is just a consumable product or no quantity is raised for it.
Consumable Raised: Quantity raised for consumption
Note: This field will have a zero value either when it is just a retail product or no quantity is raised for it.
Retail Received: Quantity received from the vendor for retail. This is auto-filled with the raised quantity. You can change it to capture the actual quantity that is received from the vendor.
Consumable Received: Quantity received from the vendor for consumption. This is auto-filled with the raised quantity. You can change it to capture the actual quantity that is received from the vendor.
Invoice#: Receipt number of the payment made to the vendor
Is Invoice Paid: Invoice amount is already paid
Address of Delivery: Address where the delivery is made. This can be the same center from where the order is raised, or it can be a different location.
Date of Shipment: Date when the order is received partially. It can be an earlier date or current date. It cannot be a future date.
Date of Delivery: Date when the order is received fully. It can be an earlier date or current date. It cannot be a future date.
Notes: Notes for the delivery (partial or full)
(Optional) Enter the shipment details: Shipping & Handling charge, Invoice#, Address of Delivery, Date of Delivery, and Notes.
Note
The Address of Delivery, Date of Shipment, and Date of Delivery fields can be mandatory if your Admin selects the following options:

(Optional) If your vendor has sent some excess quantity in advance. You can still go ahead and receive the order in Zenoti by editing the Received Qty (which in this case will be more than the Order Qty), only if your Admin has enabled the Allow delivered quantity to be more than ordered quantity in Purchase Order setting at the organization level.
Click Full Delivery.
If the received cost differs from the Product Master value, a Price Difference Detected pop-up appears.
Review the list of affected products and select the ones to update.
Click Cancel or Update Master Prices.
Note
This popup appears only if your administrator has enabled the Enable price difference prompt on PO receiving setting in the center configuration.
Upon full delivery, the following take place:
The product quantity is updated in the current stock report.
In the Manage Purchase Orders & Transfers page, the status of the order changes to Delivered.
A GRR number is auto-generated for the order if your Admin has enabled the Auto generate receipt number for goods received setting.