Front desk actions
Enter data in v1 digital forms
The V1 Digital Form in Zenoti, allows you to capture additional guest related information beyond the regular details provided at the time of creating a new guest profile. Based on your business requirements, you can create your own guest custom fields for collecting guest information, make certain fields mandatory, and select how the fields should appear on the form. Typically, guest custom fields are created to record a guest’s medical condition or to create a regular guest sign-up form. However, it could vary based on the organization's needs.
Using Zenoti, you can capture guest data in the following two ways:
Manually enter information: Enter information into each guest custom field manually. For more information, see Manually Entering Details in Guest Form.
Sending an email: Send an email to the guest with the link to the guest custom data form. Email the form from the Appointment Book or from the guest profile. Once the guest completes the form, the information gets automatically captured in Zenoti. For more information, see Emailing the Guest Form.
Enter details in a v2 guest form
Using Zenoti, you can create Guest forms for your guests to fill during their service.
Note
You can create guest forms at the organization level (Configuration > Forms > Form creation > Custom forms > Add).
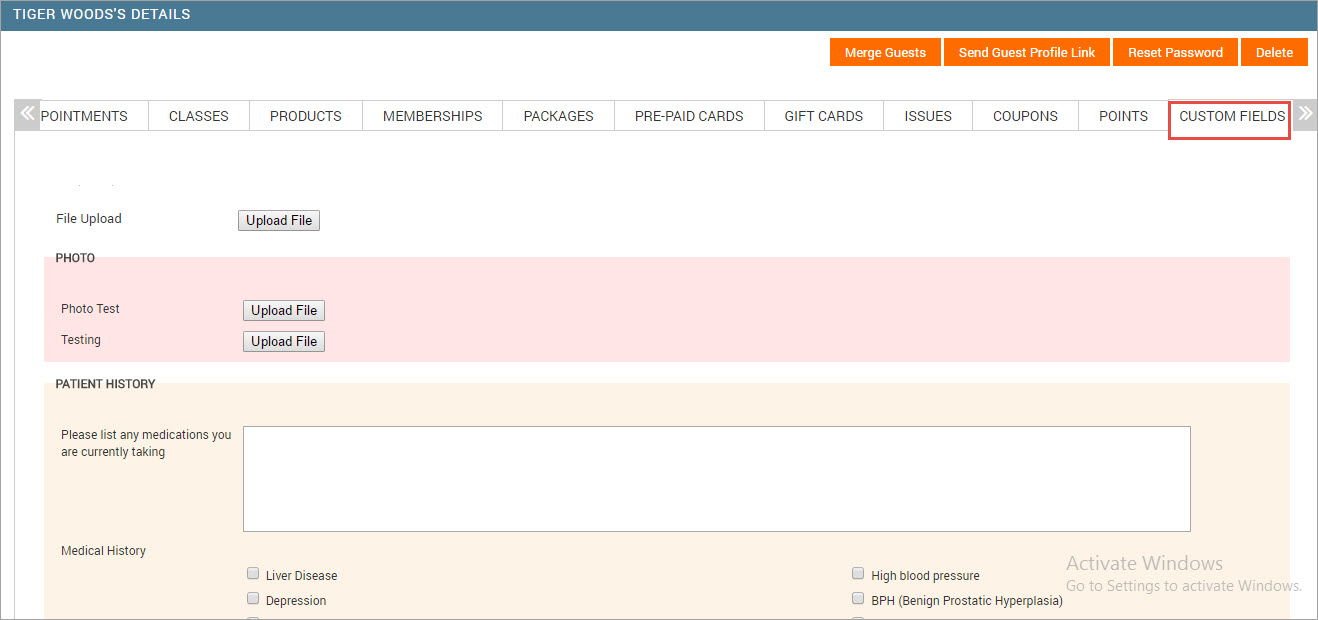
Open the guest profile.
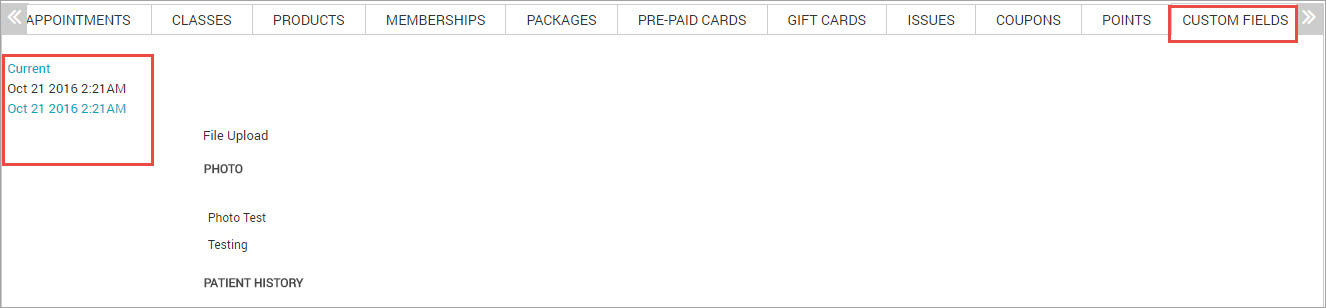
Click the Custom Fields tab.
Enter the relevant details in the available custom fields.
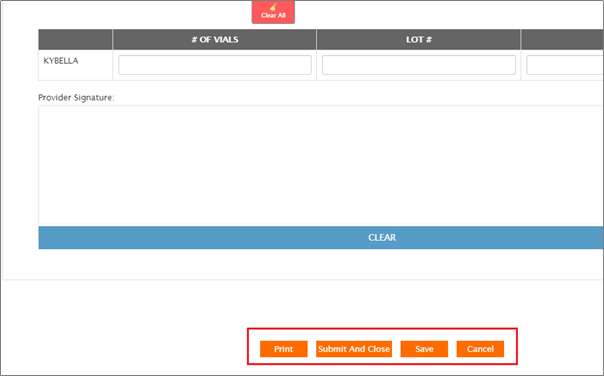
Click any of the following options after completing the form:
Print: Click to take a printout of the form.
Submit and Close: Click to submit the details which the guest has filled and then close the form.
Save: Saves the guest details as it is and any later changes made to the data will override the current information.
Note
Changes made are saved and your guests can revisit the form and make changes at a later point of time. To view prior changes, you can use the Save a Version option.
Cancel: Click to close the window. Any unsaved changes will be lost
Save a Version: Allows you to save a data version. At any time, you can browse through data versions and view an older version. You cannot edit previous data versions.
View the versions on the left of the Custom Fields page with the latest version listed first with the date and time of update. Click on any version to view its details.
Enter details in a v2 guest form
Using Zenoti, you can create Guest form for your guests to fill during their service.
You can use Guest Form, ( also known as the guest intake form, new guest form, or guest consultation form), to gather information of a guest such as name, address, contact details, health history, allergies, and lifestyle details, when a guest visits you for the first time.Note:
A business can only have one guest form.
You can create guest forms at the organization level (Configuration > Forms > Form creation > Custom forms > Add).
Open the guest profile.
Click the Custom Fields tab.
3. Enter the relevant details in the available custom fields.
4. Click any of the following options after completing the form:
Print: Click to take a printout of the form.
Submit and Close: Click to submit the details which the guest has filled and then close the form.
Save: Saves the guest details as it is and any later changes made to the data will override the current information.Note: Changes made are saved and your guests can revisit the form and make changes at a later point of time. To view prior changes, you can use the Save a Version option.
Cancel: Click to close the window. Any unsaved changes will be lost
Save a Version: Allows you to save a data version. At any time, you can browse through data versions and view an older version. You cannot edit previous data versions.View the versions on the left of the Custom Fields page with the latest version listed first with the date and time of update. Click on any version to view its details.
Alert guests and front-desk staff about new versions of forms
Your business may need your guests to sign digital forms when they buy a service, package, or membership. Zenoti uses digital forms to capture a guest’s personal information, signature, consultation details, consent, and treatment information.
Inevitably, businesses may add, update, or delete questions regarding medical history in such forms. Guests are then required to fill in the updated forms and submit them again before they can go ahead with their services or treatments.
Tip
When is a new version of a form created?
Each time the business owner or manager updates a HTML version of the form (I.e. Makes any update to the form verbiage), Zenoti considers it as a new version of the form.
What happens when a new version of a form is created?
Only open appointments and new appointments are affected. If the old version has not been saved or submitted, Zenoti shows the latest form as a blank form.
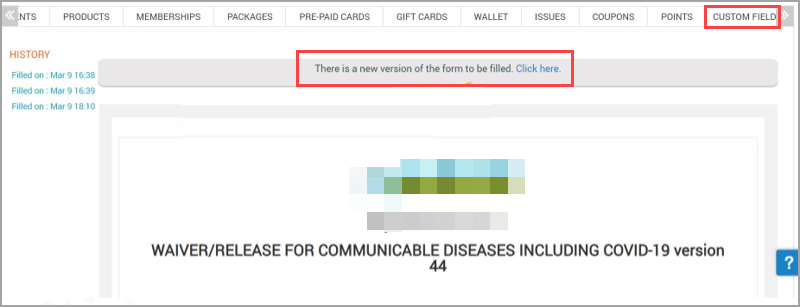
If the old version has been saved or submitted, a banner to switch to the latest version appears on Zenoti Web (guest profile), Webstore v2, CMA, and ZMA v2 (Zenoti Mobile App).
Closed appointments are not touched. They will reflect the original form version that was signed.
How does the front-desk staff know that there’s a new version of the form and that a guest must update and resubmit?
When front-desk staff accesses the Guest Profile or when guests access the form that they filled earlier (from Webstore v2, CMA, or Zenoti Mobile App v2), a banner notifies them that they must fill the updated version of the form. When they click the link provided in the banner, the updated form opens; guests must fill in the updated form and resubmit.
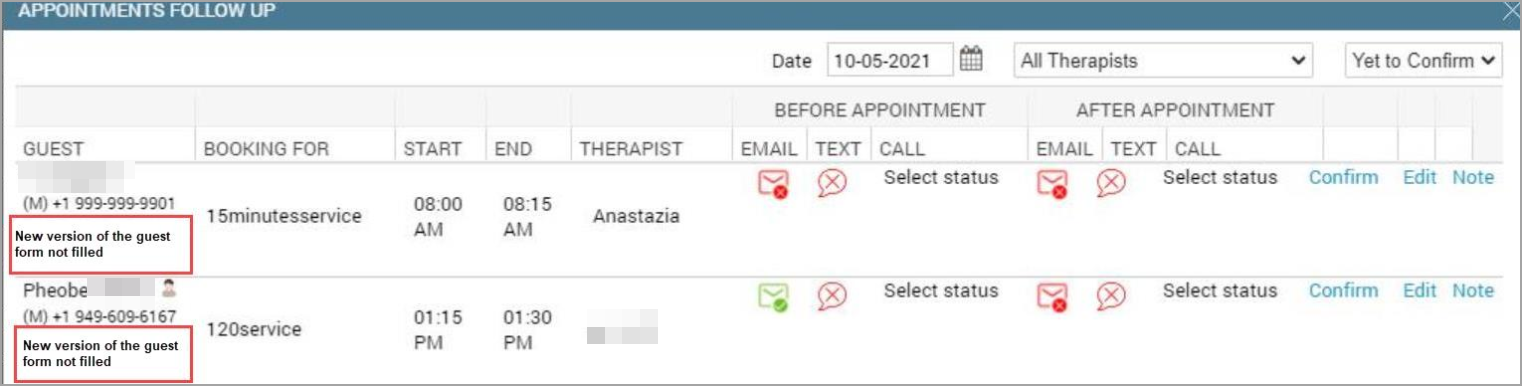
Front-desk staff can also check if a guest has filled the updated form from the Appointment Follow Up section.
Email guest form
If you need Guest Custom Data to be filled in for an appointment booked online or by phone, then you can email the guest a link to the form. The information submitted by the guest is automatically captured into the system, and will show in the guest’s profile Custom Fields tab.
Note
Based on your organization settings, the guest may need to log in using the username and password to view or enter information in the form. Read Preventing Unauthorized Access to Guest Custom Data Form.
Important
To email the custom guest data form to the guest’s email address, ensure the following:
There are enough email and text (SMS) credits in the center to send email notifications. You can view your available credits in the right panel in the organization and center level. To purchase email/text credits, go to buy and manage SMS and email credits.
The Guest Data Form template is turned On in the EMAIL/TEXT tab (Configuration > Notifications > Templates for email and text ).
The guest has a valid email address registered in the guest profile.
Use one of the following methods to send a link to the guest custom data form:
Appointment book
Guest Profile
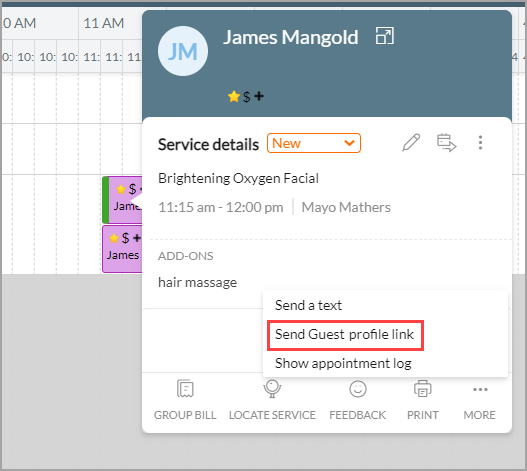
Email from the Appointment Book
To email the link to the guest from the appointment book:
On the appointment book, click the guest's appointment block.
Click Send Guest Profile Link from the context menu.
To email the link to the guest from the guest profile:
Navigate to the guest profile.
Click the Send Guest Profile Link button at the top of the guest's profile page.

View membership form log
Note
You can’t currently print Offline v3 Membership forms. To print one, set it up in online mode.
After selling a membership, the membership form must be filled and submitted by the guest at the front desk. Depending on the format (online or offline) of the membership form you created, you can capture the guest’s details and signature.
Offline form: You need to print the offline form and have the guest fill and sign the form.
Online form: You can capture the guest’s details and signature, and submit the membership form using the web and Zenoti Mobile.
After capturing the details in the online form, you can view a log of the form history.
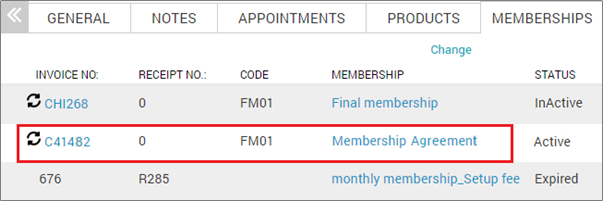
Open the guest's profile page.
Go to the Memberships tab.
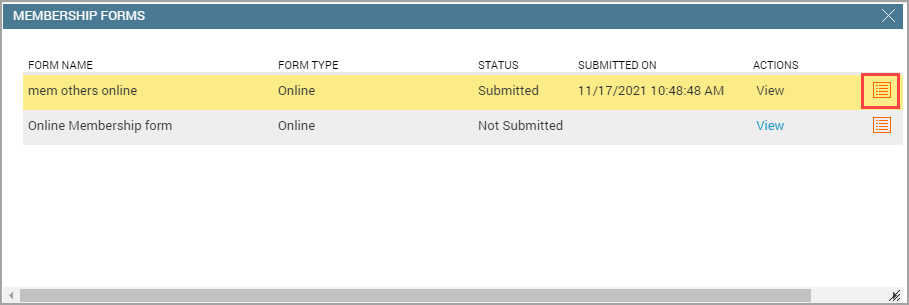
Click View under Form, against a membership.

You can see the form associated with the membership, its type, status of form submission, date of form submission, and action to be performed for the form.
Click View.

The form appears.
5. Click View Log.
Submit offline membership form
After selling a membership, the membership form must be filled and submitted by the guest at the front desk. Depending on the format (online or offline) of the membership form you created, you can capture the guest’s details and signature.
Offline form: You need to print the offline form and have the guest fill and sign the form.
Online form: You can capture the guest’s details and signature, and submit the membership form using Zenoti web and Zenoti mobile
Open the guest profile page.
Go to the Memberships tab.
Click the invoice under the Invoice Number against the membership sold.
The Sales Invoice appears.
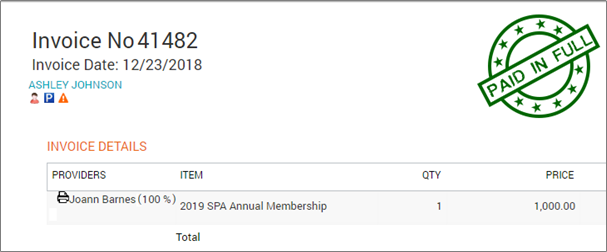
Click the printer icon next to the membership you sold.
Note
The printer icon also appears in the pop-up window of the closed invoice after the sale of a membership.
Zenoti prints the form. You can use the form to capture the guest’s signature.
Submit membership form online
After selling a membership, the membership form must be filled and submitted by the guest at the front desk. Depending on the format (online or offline) of the membership form you created, you can capture the guest’s details and signature.
Offline form: You need to print the offline form and have the guest fill and sign the form.
Online form: You can capture the guest’s details and signature, and submit the membership form using the web and Zenoti Mobile.
To submit an online membership form
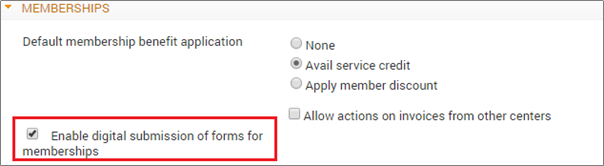
You must enable the setting at the center level to be able to access and submit the online form using the web and Zenoti Mobile.
Settings to enable online digital form submission
At the center level, click the Configuration icon.
Search for Enable digital submission of forms for memberships, and under Memberships, select Enable digital submission of forms for memberships.
Enable the Enable digital submission of forms for memberships setting.
 |
Open the guest's profile page.
The Guest Details page appears.
Go to the Memberships tab.
The tab displays a list of all the memberships purchased by the guest.
Click View under Form, against a membership.
The Membership Forms window appears. You can see the form associated with the membership, its type, status of form submission, date of form submission, and action to be performed for the form.
Click View.
The form appears.
Enter the required details in the fields.
Capture the guest’s signature in the text box under Signature.
Click Submit. The form is submitted.
Note
Once the form is submitted, you cannot make any edits.
Submit online membership form in Zenoti Mobile
After selling a membership, the membership form must be filled and submitted by the guest at the front desk. Depending on the format (online or offline) of the membership form you created, you can capture the guest’s details and signature.
Offline form: You need to print the offline form and have the guest fill and sign the form.
Online form: You can capture the guest’s details and signature, and submit the membership form using the web and Zenoti Mobile.
Log in using your Zenoti Mobile account.
The Appointment screen appears.
Tap Customer to search and select a guest.
The Guest Details screen appears.
Navigate to the Summary tab.
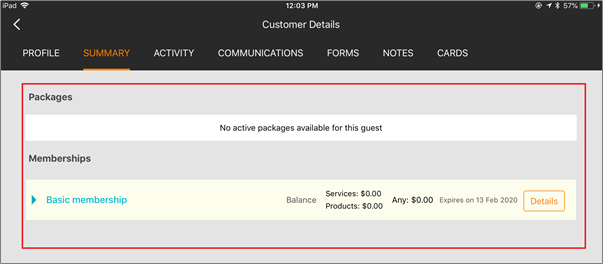
The Packages and Memberships of a guest appears.
Tap Details against a membership listed under the Memberships.

The membership page appears and displays the Details tab and the Redemption tab.
Tap View in the Membership Agreement Forms section in the Details tab.
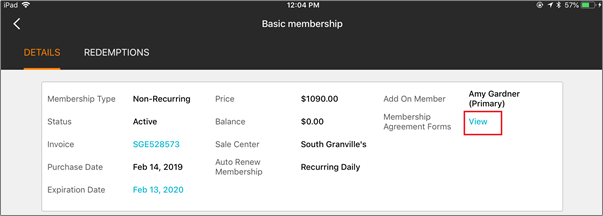
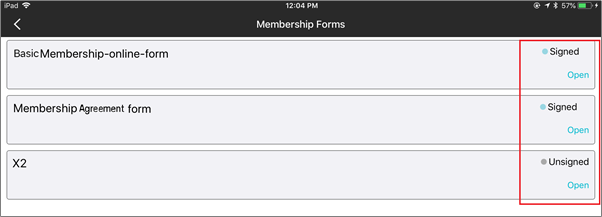
The Membership Forms page appears and displays all of the membership forms for a guest.
Tap Open against one the following status for a membership form:
Signed: This indicates, the form is completed. You can open and view the details of the form.
Unsigned: The form is incomplete.
Do the following steps to complete the form:
Tap Open. The Membership form appears.
Enter the required details
Capture the guest’s signature in the text box under Signature.


Tap Submit.
Zenoti saves the details and signature of the guest.