Auto-pay
Set up Auto-pay
Auto-pay is a safe, contactless checkout experience where guests pay using their mobile devices.
To use auto-pay, your guests must:
Enable Auto-pay on their mobile app (Customer Mobile App or CMA).
Save their card details.
Specify a tip amount.
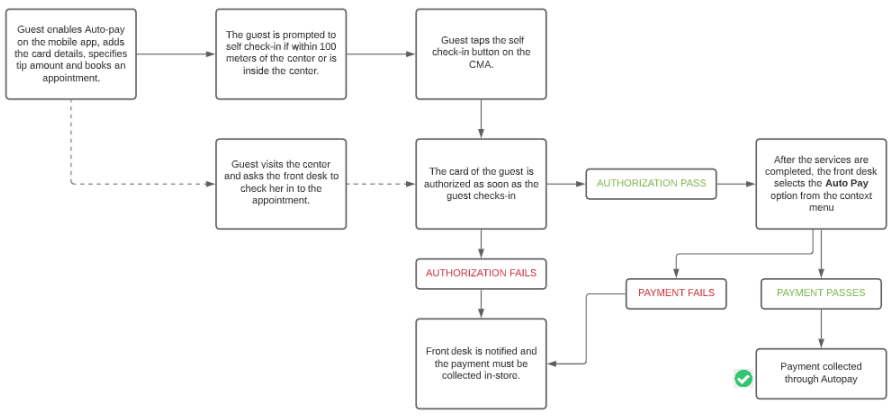
After your guests enable Auto-pay on their mobile app and book an appointment, your front-desk staff can see the Auto-pay enabled booking on the Appointment Book page.
As soon as the guest checks in (via self-check-in or the front desk), the guest's card is authorized. This lets you quickly process the saved card for payment.
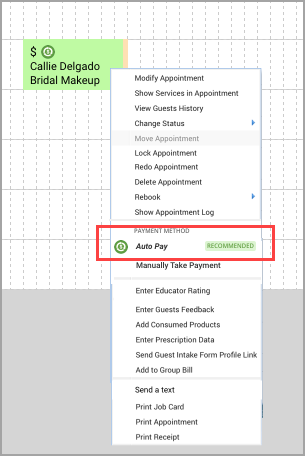
After the services are completed, the guest can walk out of your center, and your front-desk staff can collect the payment by clicking Auto Pay from the context menu of the appointment.
To accept bookings for a guest with Auto-pay, you must do the following on Zenoti (Web POS):
Contact your Zenoti Customer Success Manager to enable Auto-pay for your organization.
Configure the terms and conditions to display.
Configure the tips to display to the guest when they are enabling Auto-pay.
Note
You must configure tips for each of your centers where Auto-pay is enabled.
Configure notifications to send to the guest when a transaction is processed using Auto-pay.
After you configure Auto-pay for your organization, your guests can enable Auto-pay on their mobile app.
Enable Auto-pay in Consumer Mobile App (CMA)
Auto-pay allows your guests to experience a touch-less checkout, by skipping the queues. On their mobile app, the guests need to enable Auto-pay, save their card details, and set a tip amount.
Your guests will do the following:
Tap the three lines on the top of the app to open the settings menu.
The settings menu opens.
Select Account.
The guest profile screen appears.
Scroll down to locate Auto-pay.
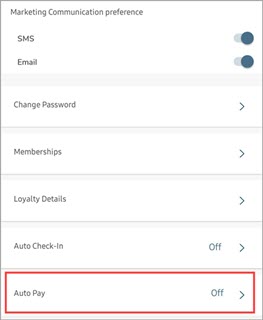
Tap Auto-pay.
The Auto-pay screen appears.
Enable Auto-pay by tapping the slider.

Tap Add a New Payment Method.
The Save Card screen appears.
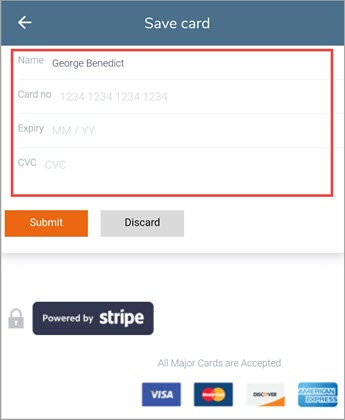
Enter the card details and tap Submit.
Select the amount of the tip.
Tap Done.
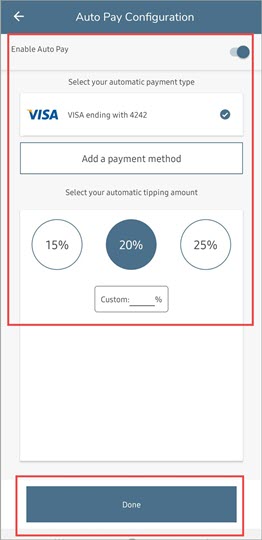
Auto-pay is enabled for the guest.
Configure tips to be displayed to the guest
When your guests enable Auto-Pay, they must also specify the tip that they would like to give to the providers. You can specify what tip options are presented to the guest.
Note
You must configure tips for each of your centers with Auto-Pay enabled.
At the center level, click the Configuration icon.
Search for and select Suggested Tips on Zenoti Mobile and in the Payment link.
The text Tips is a label set at the organization level. For example, if it is set as Tip amount, the setting will be called Suggested Tip amount on Zenoti Mobile and in the Payment link.
In the three suggested tips fields, enter flat or percentage amounts (add the % symbol as a suffix).
Click Save.
Configure Auto-pay email, text, and app notification templates
Zenoti allows you to configure email templates and notifications sent to your guests when they enable Auto-pay on their mobile app.
At the organization level, click the Configuration icon.
Search for and select Templates for email and text under Notifications.
Expand Zenoti Go and configure the following notifications.
To customize the message, click Edit.
Auto-pay Failure: This notification goes to the guest when the payment fails.
Auto-pay Success: This notification goes to the guest when the payment is successful.
Learn how to create the mail, text, and push notification templates for Auto-pay.
Note
You can send an email, a text message, a push notification, or all of them to your guests. Zenoti recommends you switch ON all types of notifications.
Create Auto-pay email, text, and app notification templates
Zenoti allows you to create templates to send email, text, and app notifications to your guest. The template editor allows you to send emails, texts, and push notifications to your guest in two instances:
When Auto-Pay is a success
When Auto-Pay is a failure
Important
You must create templates for both instances.
To create the email template
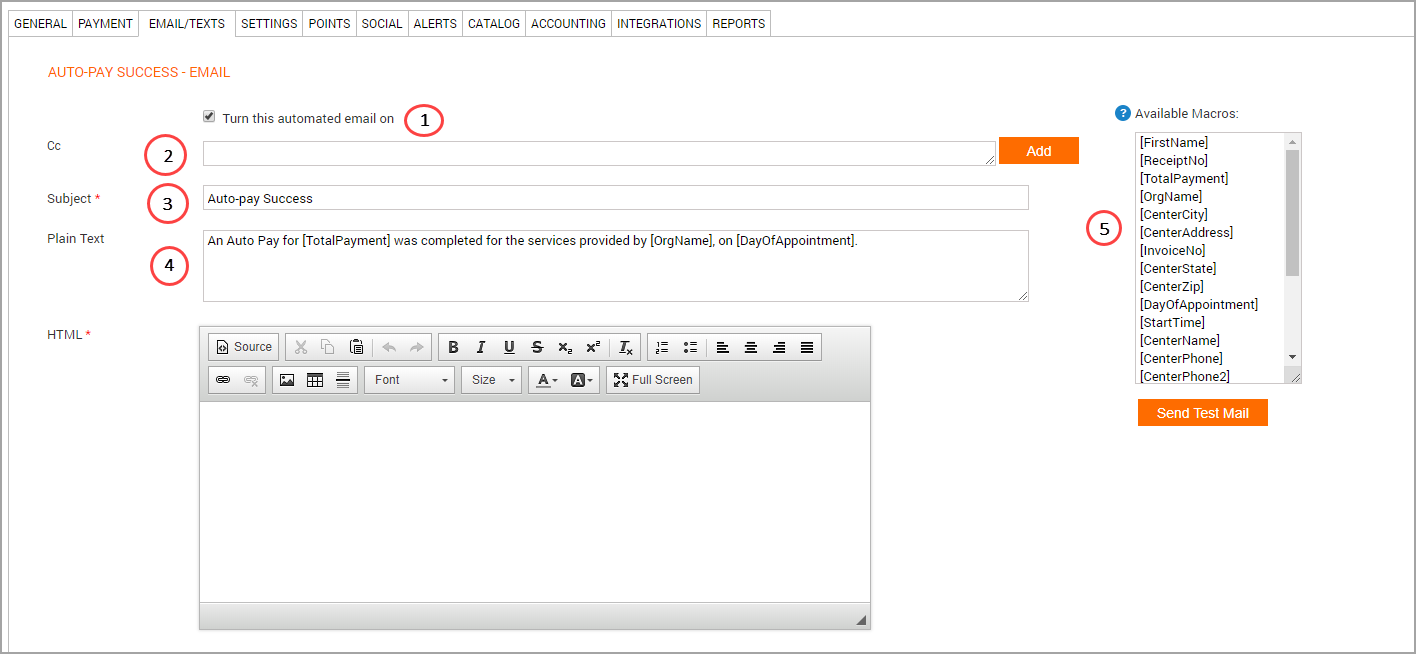
On Template Editor, set Email to Yes.
Scroll down to the Email section.
To send the notification to relevant employees, add them in the CC field using the Add button.
You can add employees by username, role, or email.
Enter the message.
Use the Plain Text box to compose the message without any formatting. This will be used if the recipient can't receive formatted text.
Use the HTML box to compose the message with formatting. You can format the message using the options on the toolbar.
You can personalize your message for the recipient using the macros in the Available Macros box. To use a macro, copy the code exactly as it is, including the square brackets ([ ])
Click Save.
To create the text template
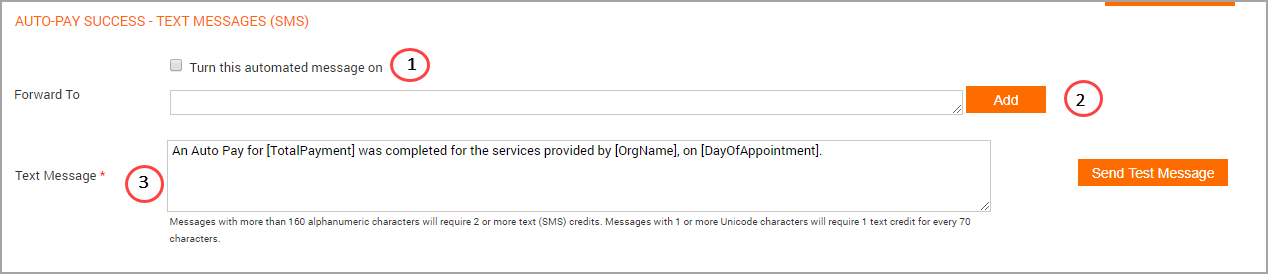
On Template Editor, set Text to Yes.
Scroll down to the Text section.
To send the notification to relevant employees, add them in the Forward to field using the Add button.
You can add employees by username, role, or phone number.
Enter the message.
You can personalize your message for the recipient using the macros in the Available Macros box. To use a macro, copy the code exactly as it is, including the square brackets ([ ])
Click Save.
To create the push notification template
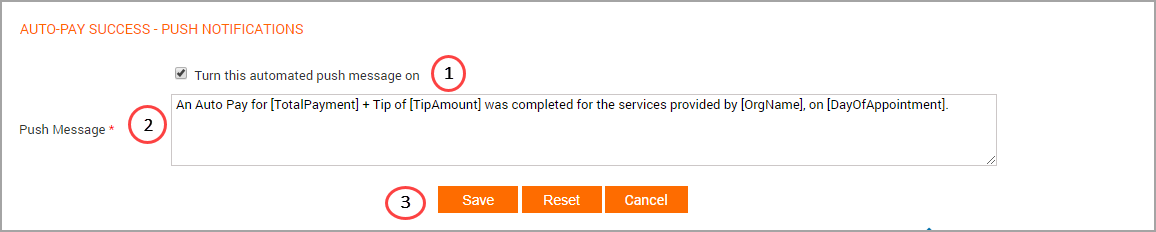
On Template Editor, set Push to Yes.
Scroll down to the Push section.
Enter the message.
You can personalize your message for the recipient using the macros in the Available Macros box. To use a macro, copy the code exactly as it is, including the square brackets ([ ])
Click Save.
To create the WhatsApp notification template
On Template Editor, set WhatsApp to Yes.
Scroll down to the WhatsApp section.
Enter the message.
You can personalize your message for the recipient using the macros in the Available Macros box. To use a macro, copy the code exactly as it is, including the square brackets ([ ])
Click Save.
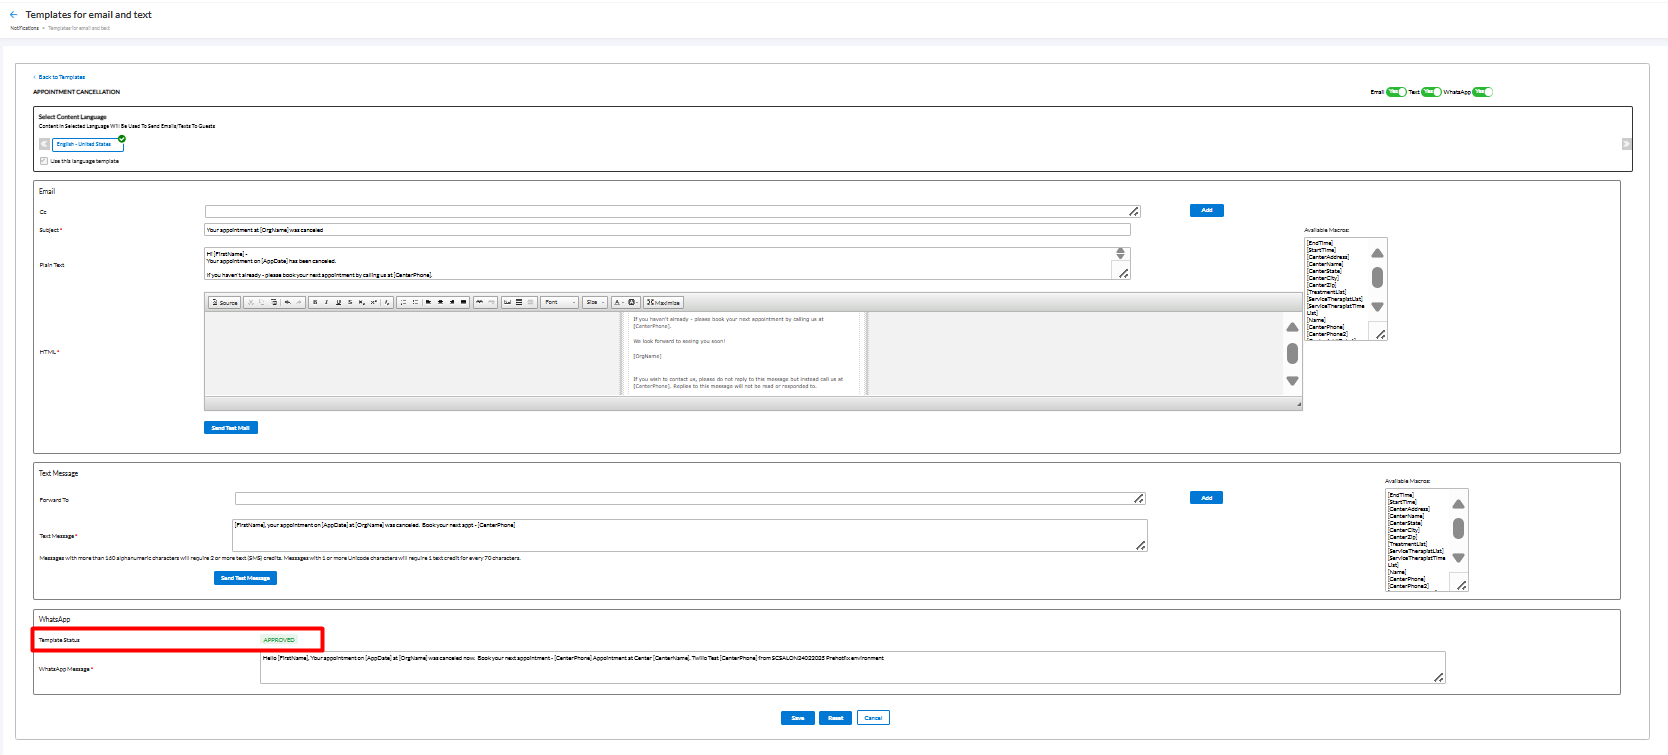
Impacts and considerations
If Twilio is the provider of WhatsApp messages for an organization, the message template must be approved by Twilio. The approval status of the message template will be displayed on the Templates for Email and Text page under WhatsApp.
Available macros
Macro | Description |
|---|---|
[FirstName] | Displays the first name of the guest. |
[ReceiptNo] | Displays the receipt number. A receipt is generated only after full payment is made against an invoice. |
[TotalPayment] | Displays the total payment made by the guest. |
[OrgName] | Displays the name of the organization or the name of the franchisee. |
[CenterCity] | Displays the name of the city where the center is located. |
[CenterAddress] | Displays the street address of the center. |
[InvoiceNo] | Displays the invoice number generated for the appointment. An invoice number is generated as soon as the appointment is booked. |
[CenterState] | Displays the name of the state where the center is located. |
[CenterZip] | Displays the ZIP code of the location where the center is located. |
[DayOfAppointment] | Displays the day when the appointment was taken. |
[StartTime] | Displays the start time of the appointment. |
[CenterName] | Displays the name of the center where the services were taken. |
[CenterPhone] | Displays the primary phone number of the center. |
[CenterPhone2] | Displays the secondary phone number (if any) of the center. |
[DueAmount] | Displays the pending amount in the current invoice. |
[CenterCountry] | Displays the country where the center is located. |
[AppCost] | Displays the total charges for the services. |
[TipAmount] | Displays the tips given to the providers by the guest. |
[TimeZoneCenter] | Displays the time zone in which the center is located. |
Auto-pay transactions report
You can use the Auto-pay Transactions report to:
View details of all the transactions done using Auto-pay at your center.
View the status of payments done using Auto-pay.
Take action on the pending and failed Auto-pay transactions.
Ensure you have selected the center for which you want to run the report.
On the main menu, click Reports.
Navigate to Finance > Collections > Auto-Pay.
Make your selections in the filter criteria and click Refresh.
The report opens.
To export the report, on the top right side of the report, click the Excel or the .CSV icon.
Criteria | Options | Description |
Invoices Status | All, Open, Closed | Filter invoices by invoice status |
Date Range | Today, Last 7 Days, Last 14 Days, 1 Month, 2 Months, 3 Months, 6 Months, Custom | Filter invoices by date |
Status | All, Successful, Failed, Voided, Released | Filter invoices by payment status |
Auto-Debit Status | All, Pending, Failed, Successful, NA | Filter invoices by the status of the auto-debit |
*Authorization - Credit card authorization is approval from a card issuer, usually through a credit card processor, that the customer has sufficient funds to cover the cost of the transaction.
Column | Description |
Invoice Number | This column displays the invoice number. Click the invoice number to open the invoice details. |
Invoice Status | This column displays if the invoice is currently open or closed. |
Guest Code | This column displays the code of the guest as per Zenoti. |
Guest Name | This column displays the name of the guest. |
Sale Date | This column displays the date of the date or the date of the transactions. |
Card Info | This column displays the last four digits of the guest card. The rest of the details are crossed out. |
Base Amount for Authorization | This column displays the base amount sent to the bank for authorization. |
Default Tip Amount for Authorization | This column displays the base tip amount sent to the bank for authorization. |
Additional Amount for Authorization | The additional amount for authorization is charged to the merchant if the guest purchases additional products or takes additional services. The unused additional amount is released after the invoice is closed. |
Total Authorization Amount | This column displays the total authorization amount. This includes Base Amount + Default Tip Amount + Additional Amount. |
Authorization Date and Time | The date and time of receiving Authorization from the bank. |
Authorization Status | The status of authorization received from the bank. |
Actions | This column displays the actions that can be taken on an invoice that is not authorized. |
Auto-Debit Status | This column displays the status of Auto-Debit. Success, Pending, Failure. |
Base Amount for Auto-Debit | This is the total amount of transactions or the invoice. |
Tip Amount for Auto-Debit | This column displays the tips that are included in the invoice. |
Total Auto-Debit Amount | This is the total amount of charges to the guest. This is the Base Amount of Auto-Debit + Tip Amount for Auto-Debit. |
Comments | Additional comments for the transactions |
Auto-pay in Zenoti Mobile
To take payment using Auto-Pay on Zenoti Mobile
From the Zenoti mobile app, access Appointments.
Tap the Auto-pay guest’s appointment.
Change the appointment status to Check-in.
The guest’s saved card is authorized at check-in.
While taking payment, at the bottom of the appointment screen, tap Auto Pay.
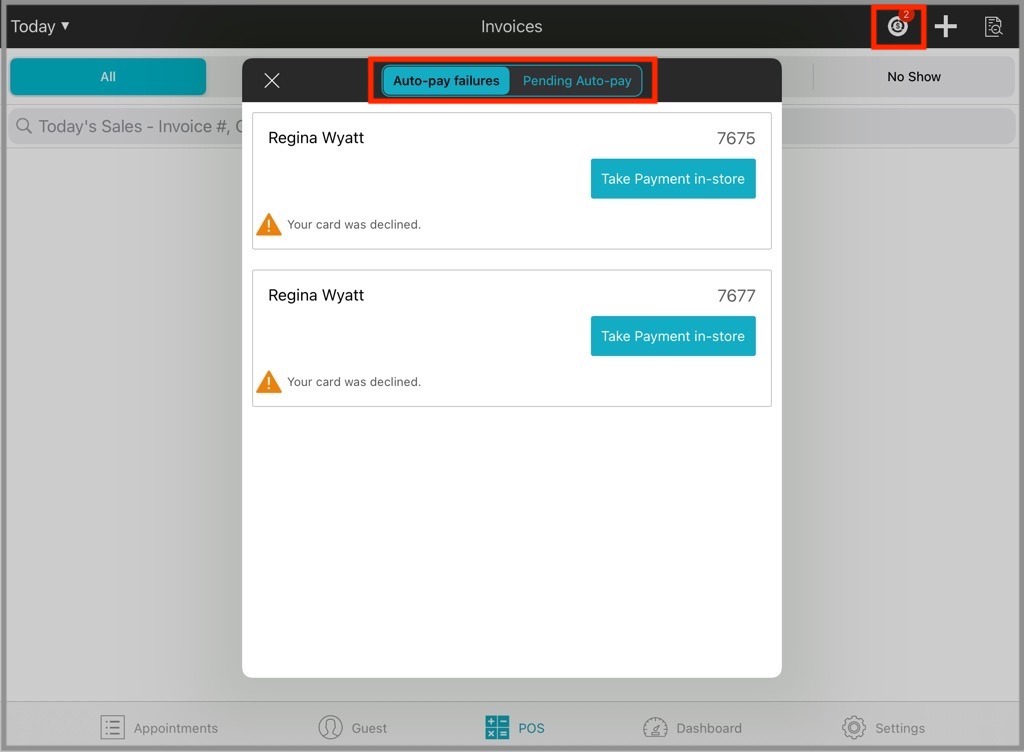
If the card authorization fails at check-in, the Auto Pay option is disabled, and the Authorization failed for this invoice. Please collect payment in-store. failure message appears in the lower panel of the appointment screen
To collect the payment, click Take Payment Manually.
You can view failed and pending Auto-pay transactions on Zenoti Mobile by navigating to the POS screen and tapping Complete Auto-pay to revise the payment.
Auto-pay is also available on the Appointment book and Queue.