Google Analytics and Google Tag Manager
Google provides many solutions for you to monitor your web traffic and to track visitors to your Webstore. On top of the list are Google Analytics and Google Tag Manager - these tools are easy to access and use. These tools provide in-depth analysis of your business (that is routed through your Webstore) in the form of dashboards.
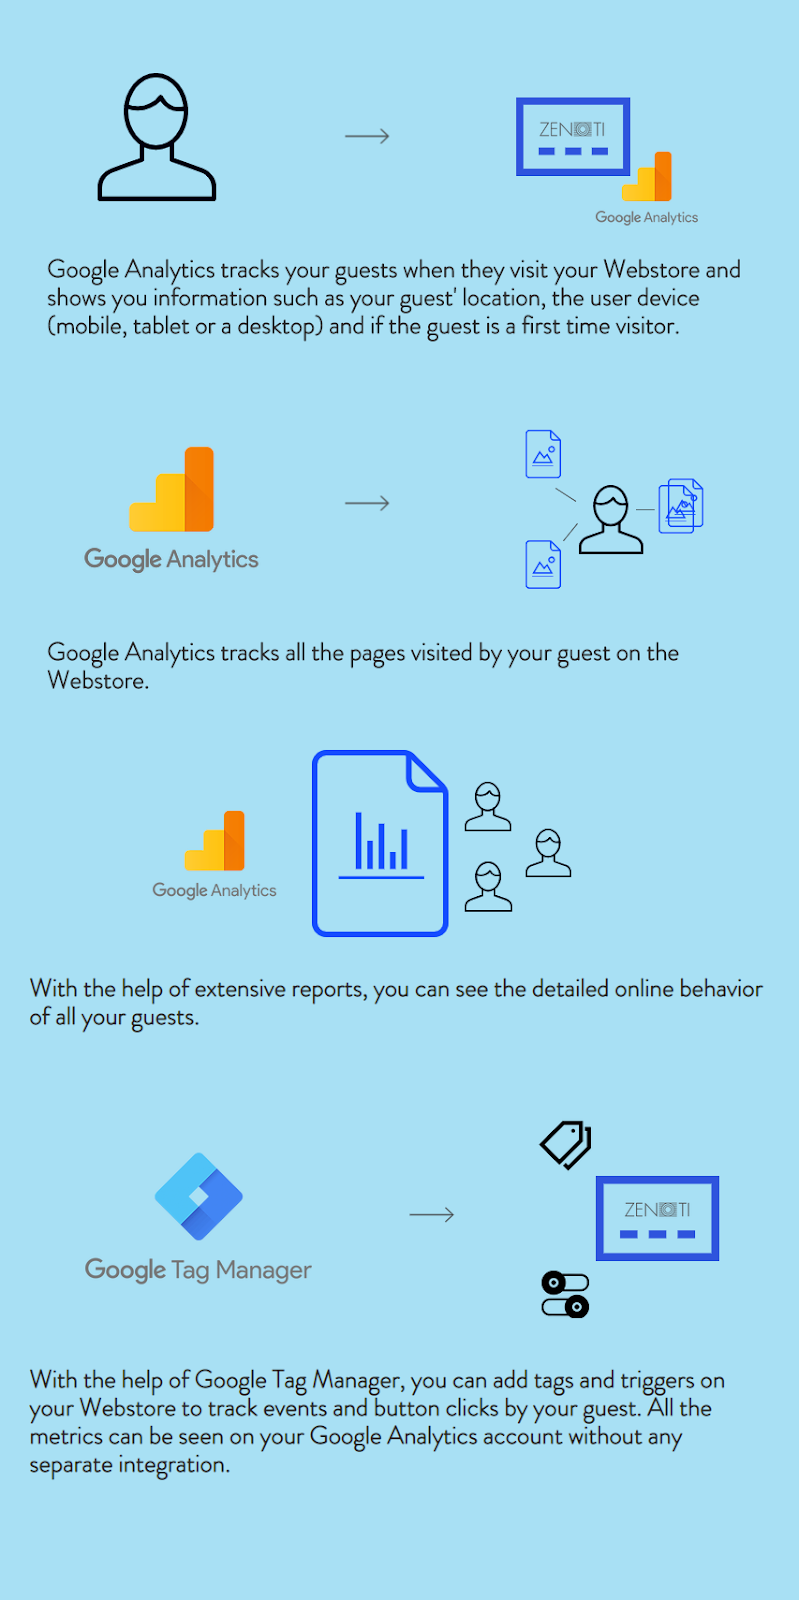
Refer to the following graphic to understand what Google Analytics and Google Tag Manager do.
Set up a Google Analytics (GA4) account
Warning
The procedures and links to external resources provided in this article are for informational purposes only. Zenoti bears no responsibility for the accuracy, legality, or content of the external site or subsequent links.
Google Analytics 4 (GA4) tracks event-based data where each event constitutes a specific action. As opposed to Universal Analytics (GA3) where session-based data was tracked.
Open the Google Analytics web page.
If you have a Google account, click Sign in. If not, click Create an account.
If you do not have an existing analytics account, click Start measuring.
In the Account name field, enter the name of your business.
Under the Account data sharing settings section, select the appropriate options and click Next.
Under Property setup, in the Property details section, enter the required property details.
For example, Josh has a business named Spa Bliss and wants to track the analytics of its webstore. The account name would be Spa Bliss, and the property name would be Webstore.
Under About your business, enter relevant information about your business.
If you already have a Google Analytics account, you must set up a property.
Click the Admin icon.
Under Property, click Create property.
In the Account name field, enter the name of your business.
Under the Account data sharing settings section, select the appropriate options and click Next.
Under Property setup, in the Property details section, enter the required property details.
For example, Josh has a business named Spa Bliss and wants to track the analytics of its webstore. The account name would be Spa Bliss, and the property name would be Webstore.
Under About your business, enter relevant information about your business.
Click Create.
Log in to the Google Analytics home page.
Click the Admin icon.
Under the Property list, select the GA4 property that you have created.
Select Data streams and the data stream set for your property.
Save the measurement ID.
You must update the measurement ID in the analytics section of Webstore v2.
At the organization level, click the Configuration icon.
Search for and click Online booking settings from the Online booking section.
Click theWebstore v2 template.
Expand Analytics.

In the GA4 measurement ID field, enter the Google Analytics 4 measurement ID from your GA4 account.
Click Publish.
Things to remember
When upgrading Universal Analytics (GA3) to Google Analytics 4 (GA4), the data collected in GA3 will not get transferred or copied to GA4.
The old data will remain in GA3 while new data will be collected in GA4.
For GA4, by default, the data retention is two months. If you want to retain data for longer, you must change it to 14 months.
Set up your Google Analytics (UA) account
Google Analytics helps you to analyze the incoming traffic to your Webstore and CMA. It provides detailed information about which page has the most visits and during which time. It also shows which geographical region your visitors are from (Example: USA, India, Australia) and how many unique visitors your Webstore or CMA has during a given day.
To set up a Google Analytics account
Open the Google Analytics web page on your browser.
The Google Analytics web page opens and prompts you to log in to your Google Account.
Note
If you have a Google Account, click Sign In. If not, click Create an Account.
Enter your Google Account Credentials and click Sign In.
The Google Analytics homepage opens.
Click Sign Up.
Since you are using a new Google product, you need to sign up separately for the product.

Enter your account information in the fields given.
All the information such as Account Name, Website Name, Website URL, Industry Category, Reporting Time Zones, and Data Sharing Settings should be entered. They are mandatory.
Click Get Tracking ID.
The Google Analytics dashboard appears.

A sample image of the Google Analytics Dashboard.
Your Google Analytics account is now set up. To track all the events of your guests on your Webstore, you need to extract the tracking id of Google Analytics and use it while creating tags and triggers in Google Tag Manager.
To extract the tracking ID of Google Analytics
Click Admin on the main menu.
The Admin page opens with three sections. Account, Property, and View.
Click Tracking Info in the Property section.

The Tracking Info sub-menu appears.
Click Tracking code in the sub-menu.

A new screen appears, with Tracking ID info and a Javascript code.

Make a note of the Tracking ID.
You will need it when you are creating tags and triggers in Google Tag Manager.
Next steps
Add Google Tag Manager to Zenoti Webstore
Google Tag Manager is an e-Marketing tag tool that adds analytics and audience measurement functionality to your Webstore. Zenoti allows you to add this tool to your Webstore in two steps.
Before you begin
You must set up an account with both Google Analytics and Google Tag Manager individually. You can have the same account credentials for both of the tools.
Step 1: Generate Google Tag Manager Code Snippets
Log in to Google Tag Manager home page.
Click the hamburger icon and click Sign in to Tag Manager.
Sign in with your credentials.
Click the name of your website.
Google Tag Manager dashboard opens with your tracking id that begins with GTM followed by seven digit alphanumeric code.
For example, GTM-A1B2C34.

Click the tracking id.
Copy both the codes present in the window (the codes are highlighted in the image below) and paste them into a notepad. You will need them when you are pasting the code snippets into Zenoti Webstore.

Step 2: Paste the Code Snippets in the Webstore Analytics Settings
At the organization level, click the Configuration icon.
Search for and click Online booking settings from the Online booking section.
Click the Webstore v2 template.
Expand Analytics.

Turn ON the Enable Ecommerce Transaction Tracking For Google Analytics setting.
In the Google Tag Manager box, paste both the code snippets you copied in Step 1.
Note
Ensure that there is no space between both code snippets.
For tracking e-commerce transactions for Google Analytics, you must paste the Google Analytics script in the same box below the Google Tag Manager script.
To publish, click Publish.
How to set up triggers in Google Tag Manager
In Google Tag Manager, Tags and Triggers function collectively to report the behavior of your guests on your Webstore and CMA. If you want to know the number of guests who clicked on the sign-up button but did not complete the process, or the number of guests interested in a particular product, then you can get such information by setting up Triggers and Tags.
You need to set up the Triggers first and then proceed to set up the Tags.
Important
Before you set up triggers and tags, it is important that you figure out the elements on your Webstore and the CMA (Buttons, Forms, Pages) that you want to track.
Log in to Google Tag Manager by navigating to its home page
Click Sign in to Tag Manager.
The Login page appears.
Sign in with your credentials.
The All Accounts page opens with the name of your website.

Click the name of your Website.
Google Tag Manager dashboard opens.
Click Triggers in the main menu.

The Triggers page opens.
Click New to create a new trigger.
Trigger Configuration page opens.

Give a name to the trigger on the top of the screen where it says Untitled Trigger.
Click the circular trigger icon in the Trigger Configuration box.

The Choose Trigger Type window opens with a list of triggers such as Page View and Window Loaded. See the following screenshot for reference.

Based on your requirement, choose a Trigger Type.
Trigger Type is added to the Trigger Configuration page.
Note
To track button clicks, you must use Click All Elements as the Trigger Type.
For page views use Page View as the Trigger Type. Likewise, you have other trigger types to track various elements on your Webstore.
Note
If you are creating tags on Google Tag Manager for a mobile app (Android or iOS) you will see the following trigger types that are Firebase events:

We have selected the Trigger Type as Click All Elements for the examples that follow.

After you set the Trigger Type as Click All Elements, based on your requirement, you can proceed with either Scenario 1 or with Scenario 2.
Scenario 1: Track all the clicks and buttons
If you want to track all the buttons and the clicks that your guest makes on your Webstore, use the following steps.
Select All Clicks radio button in the Trigger Configuration page.
Click Save.
Your trigger will be saved.
If you have not named the trigger, Tag Manager will prompt you to name the trigger and then save it.
Click Publish.
All your changes will be published.
Scenario 2: Track a single button
If you want to track a single button such as a Buy Now button or an Add to Cart button on your Webstore, use the following steps.
Select Some Clicks radio button in the Trigger Configuration page.
The Trigger condition drop-down lists open.

Based on your requirement, select any one of the options from the first drop-down list.
ExampleElements, ID, Classes, Target, Text.
Note
The options available in the first drop-down are various HTML elements.

Select the element conditions from the second drop-down list.

Type the value for the trigger condition in the third field.
Example: If you selected Click Id in the first drop-down list, you need to enter the HTML element id in the third field.

Click Save.
Your trigger will be saved.
Click Publish.
All your changes will be published.
You have successfully set up Triggers in your Google Tag Manager.
You can now proceed to set up the Tags.
How to set up tags in Google Tag Manager
Prerequisite: You should have already set up Triggers in Google Tag Manager.
Log in to Google Tag Manager by navigating to its home page
Click Sign in to Tag Manager.
The Login page appears.
Sign in with your credentials.
The All Accounts page opens with the name of your website.

Click the name of your Website.
The Google Tag Manager dashboard opens.

Click Tags in the main menu on the left side of the dashboard.
Click New to create a new tag.
Tag Configuration page opens.

Give a name to the tag on top where it says Untitled Tag.
Click the grey circular tag icon in the Tag Configuration box.

The Choose Tag Type page opens.
Select Google Analytics - Google Universal Analytics as the tag type.
The Tag Configuration page is updated with the selected Tag type.
Select the desired Track Type from the track type drop-down list.
Select the checkbox Enable Overriding Settings in this Tag.
A new field Tracking ID appears.
Enter your Google Analytics tracking id in the Tracking ID field.
Click the Trigger icon.

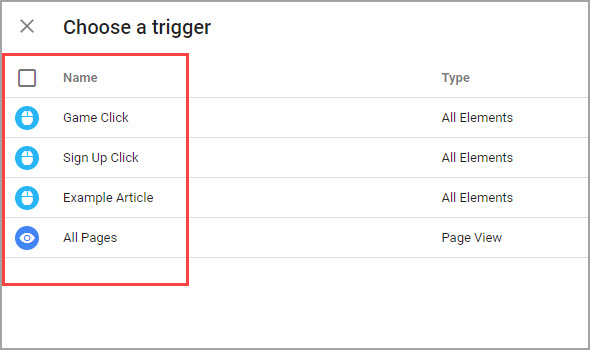
The Choose a Trigger page opens.
Choose a Trigger from the list of already created triggers.
Learn more: Create a Trigger.
Click Save.
Your tag will be saved.
Click Publish.
All your changes will be published.
You have successfully set up the Tags in Google Tag Manager.
Overview of preconfigured tags and triggers in Zenoti
Zenoti has created tags and triggers that you can download and use to track and analyze your guests' behavior on your Webstore. All the tags and triggers are compatible with your Webstore and are ready to go.
List of preconfigured tags and triggers
To use preconfigured tags and triggers
Download the Pre-configured Tags and Triggers JSON file (Right click and select Open Link in New Tab )
Update your Google Analytics Id in your Google Tag Manager account
Import the Zenoti preconfigured tags and triggers file into your GTM Account
After you download the Pre-configured tags and triggers JSON file, you must import it to your Google Tag Manager account.
Note
For Android and iOS GTM files of the Consumer Mobile App (CMA), use the following links:
Note
The links redirect you to the file download page. To download the file, click Download.

To import the preconfigured tags and triggers file
Log in to your Google Tag Manager account by navigating to its home page.
The All Accounts page with the name of your Website/Workplace opens.
Click the name of your Workplace/Website.
The Google Tag Manager dashboard opens with your tracking id that begins with GTM followed by 7 digit alphanumeric code. For example, GTM-A1B2C34.
Click Admin on the dashboard.
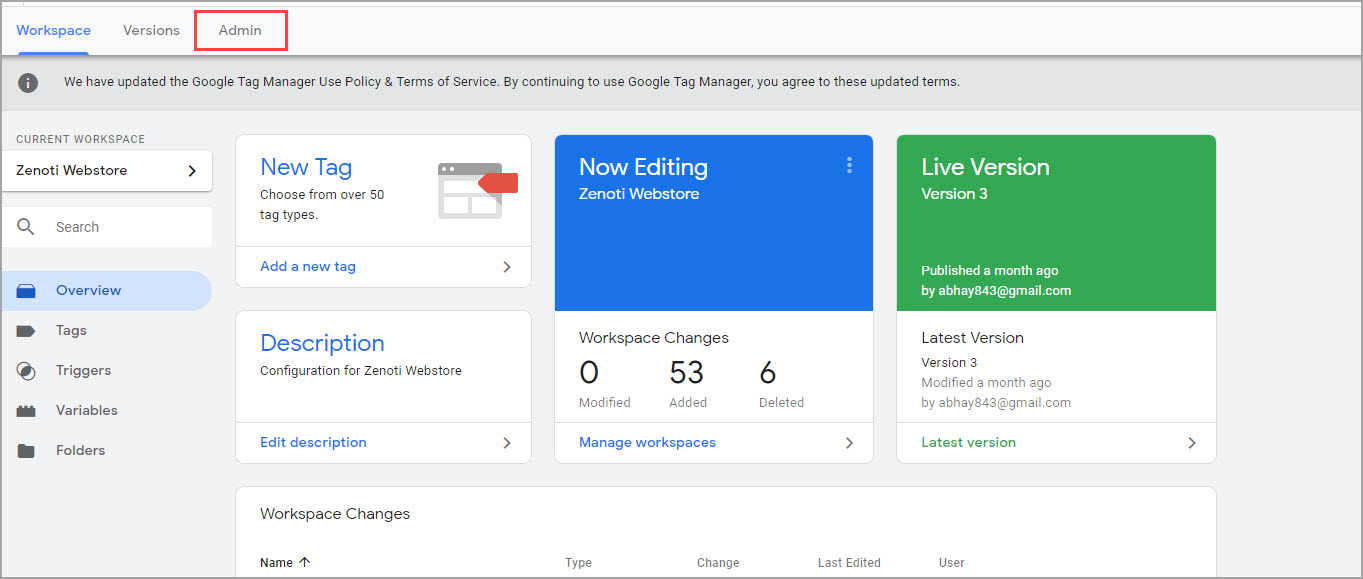
The Admin page opens.
Click Import Container.

The Import Container page opens.
Click Choose Container file.
A new window to select the downloaded JSON file opens.
Locate and select the JSON file.
The Container File is imported.
Select Existing for the Choose Workspace setting.
The Workspaces window opens.
Select your current workspace.
The workspace is updated.
Select Merge as the Import Option.
Important
Choosing the Overwrite as the Import Option will erase all the existing information.
Merge options appear.

Based on your preference, select any one of the following as Merge option.
Overwrite conflicting tags, triggers and variables.
Rename conflicting tags, triggers and variables.

A preview of all the Tags and Triggers appears.
Click Confirm.

The Google Tag Manager Dashboard re-opens with all the new pre-configured tags and triggers added to your workspace.
Next Step: Update Your Google Analytics ID in the Google Tag Manager Dashboard
Update your Google Analytics ID and GA4 measurement ID in the Google Tag Manager dashboard
After you have imported the pre-configured tags and triggers file onto your Google Tag Manager, it is important that you update your Google Analytics ID.
Open the Google Tag Manager dashboard.
Click Variables on the side menu.

Scroll down to locate User-defined Variables.

Under User-defined Variables perform the following steps.
Scroll down, select GA4 Measurement Id, and click Value.
In the Value field, enter your GA4 measurement ID and click Save.
Your GA4 measurement ID starts with G followed by numerals.
Example: G-BE3LFS3LZE
Click Submit.
How to track the Webstore Thank You page
Your Webstore shows a Thank You page after your guest confirms a booking. This page also allows you to show a custom message. Using the tags and triggers of Google Tag Manager, you can track the number of guests who have actually booked services and have reached the Thank You page.
Tracking the Thank You page is a two-step process:
Set up the Thank You page Trigger
Set up the Thank You page Tag
Set up the Thank You Page Trigger
Log in to Google Tag Manager by navigating to its home page
Click Sign in to Tag Manager.
The Login page appears.
Sign in with your credentials.
The All Accounts page opens with the name of your website.

Click the name of your Website.
The Google Tag Manager dashboard opens.

A sample image of the Google Tag Manager dashboard.
Click Triggers in the main menu on the left side of the dashboard.

The Triggers page opens.
Click New to create a new trigger.
The Trigger Configuration page opens.

Give a name to the trigger on top where it says Untitled Trigger.
Click the circular trigger icon in the Trigger Configuration box.

The Choose Trigger Type window opens.

Select Element Visibility as the Trigger Type.
New fields for this Trigger Type appear.
Select ID from the Selection Method drop-down list.
Enter the name of the HTML container for Element ID.
Example: If you have named your Thank You page HTML container as ThankYouContainer, then enter it in the field.
Select Every time an Element Appears On Screen as the value for When to Fire this Trigger.
Enter 50 as the value for Minimum Percent Visible.
Select the Observe DOM Changes checkbox.
Select All Visibility Events checkbox for This Trigger Fires On setting.

Click Save.
You have successfully created the Thank You page trigger.
Set up the Thank You Page Tag
After you have set up the Thank You page trigger, you must set up the Thank You page tag.
Click Tags in the main menu on the left side of the dashboard.

Click New.
The Tag Configuration page opens.
Give a name to the Tag.
Select Google Analytics as the Tag Type.
Select Page View as the Track Type from the drop-down list.
If the Google Analytics Settings field contains a text which looks like #{{Analytics Id}}, then leave it as it is. If not, select Enable Overriding Settings in this Tag and enter your Google Analytics ID.
Select the Thank You page trigger (created in the first step) in the Triggering section.

Click Save.
You have successfully created the Thank You page tag.
Track the user behavior while booking an appointment
When your guests book a service or purchase a product on your Webstore, you can place tags and triggers in each of the pages to identify which pages your guests visited and also know how many of them successfully completed the booking of an appointment. This tracking helps you collect data on the guest behavior on your Webstore and provides an in-depth analysis of sales and appointment bookings.
This is done with the help of Google Tag Manager and Google Analytics.
Ensure you have added the Google Tag Manager to your Webstore.
Learn how to Add Google Tag Manager to your Webstore.
To track the user behavior
In Google Tag Manager, you must create the following:
You must create the following triggers to track the user behavior for appointment booking:
Home Page: Create this trigger to track the number of home page views.
Book Appointment Button: Create this trigger to track the number of clicks on the Book Appointment button.
Confirm Booking Button: Create this trigger to track the number of clicks on the Confirm Booking button.
Thank You Page: Create this trigger to track the number of guests visiting Thank You page after they book the appointment.
You must create the following variables to track the user behavior for booking an appointment:
Service Listing: Create a variable which tracks the listing of the services through a custom Javascript.
Book Appointment Button: Create a variable which tracks the book appointment button through a custom Javascript.
Confirm Booking Button: Create a variable that tracks the clicks on confirm booking button through a custom Javascript.
Thank You: Create a variable that tracks the Thank You page through a custom Javascript.
Tags:
You must create the following tags for tracking the user behavior for booking an appointment:
Step 1 - Service Listing: Create the service listing tag and associate with the Service Listing variable and Home Page trigger.
Step 2 - Book Appointment Button: Create the Book Appointment Button tag and associate with Book Appointment Button variable and Book Appointment Button trigger.
Step 3 - Confirm Booking Button: Create the Click on Confirm Booking tag and associate with the Confirm Booking Button variable and Confirm Booking Button trigger.
Step 4 - Thank You: Create the Thank You tag and associate with the Thank You variable and Thank You trigger.
Create tags to track the user behavior
A tag collects event information from triggers and variables to send the same data back to Google servers. You can see this information reflected in Google Tag Manager and Google Analytics.
You need to create the following tags in the Google Tag Manager:
Step 1 - Service Listing
Step 2 - Book Appointment Button
Step 3 - Confirm Booking Button
Step 4 - Thank You
To create the service listing tag
Log in to Google Tag Manager.
Google Tag Manager dashboard opens.
Select Tags in the side menu.
Click New.
Untitled Tag page appears.
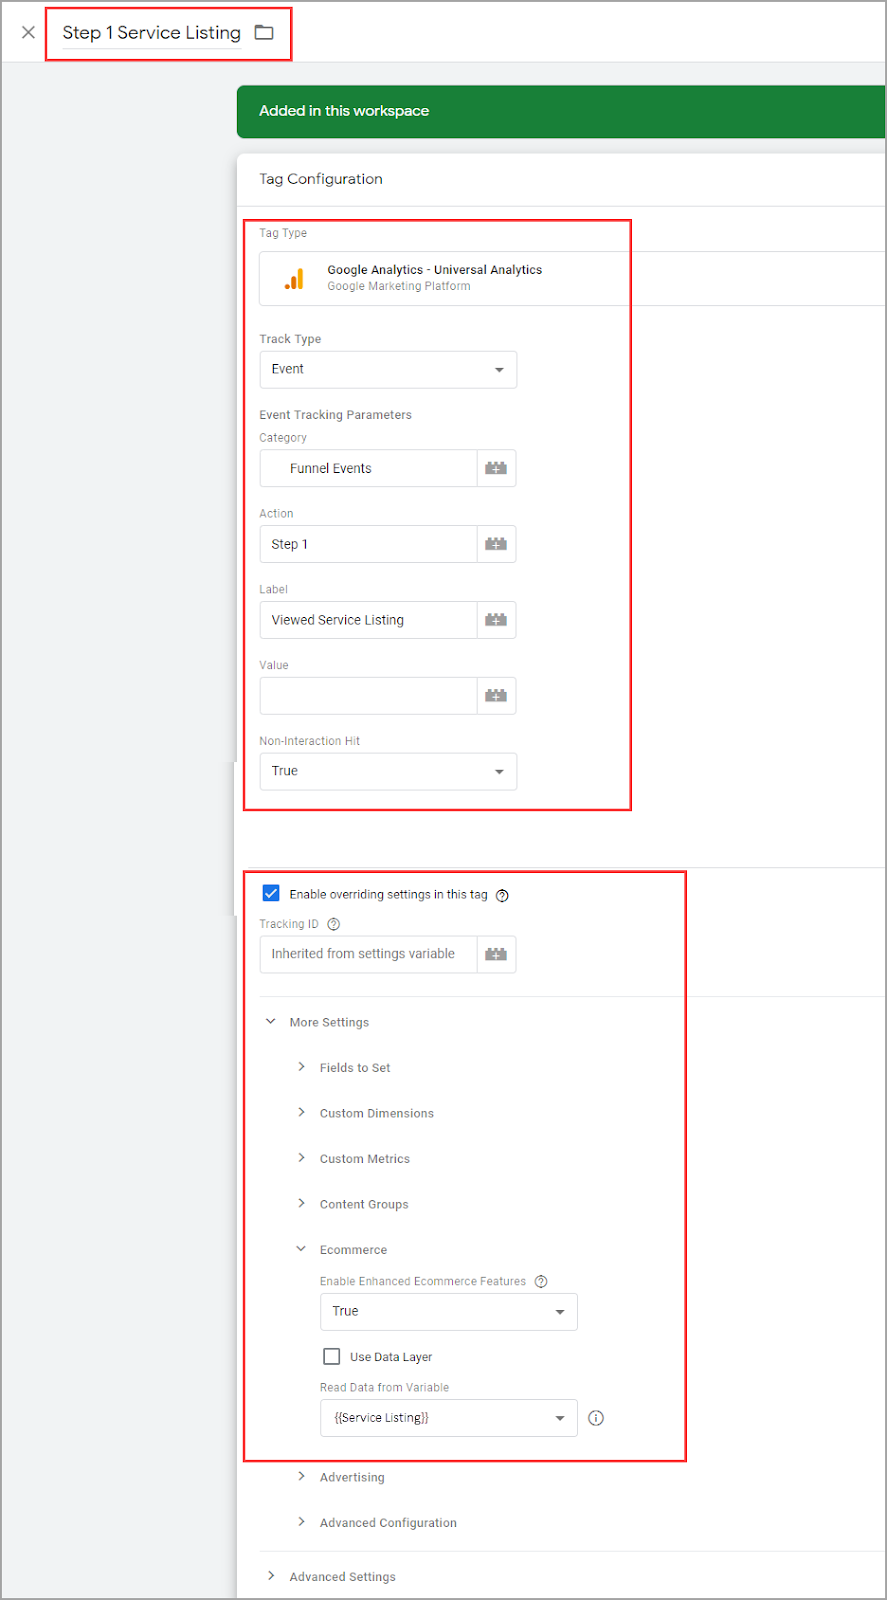
Enter the name of the tag as Step 1 Service Listing.
Click the Tag Configuration.
Select Google Analytics > Google Analytics: GA4 Event
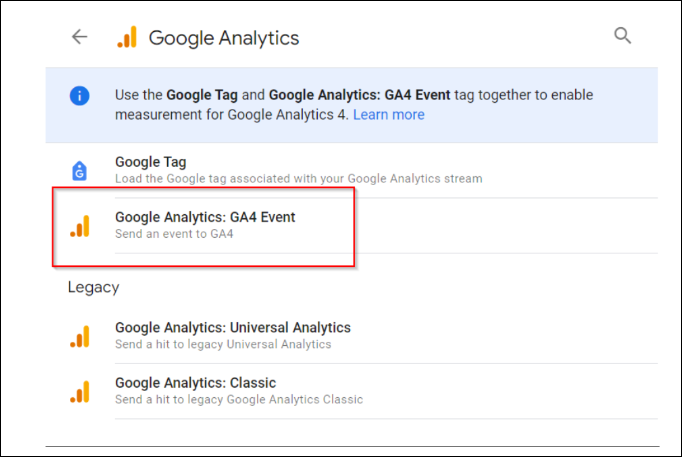
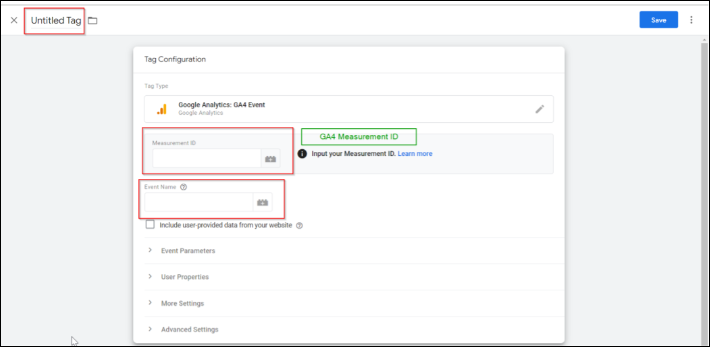
Measurement Id - Select GA4 measurement Id from the list of variables.
Event name - Specify the name of the event.
Scroll down to see the Trigger section.
Click the Trigger icon.
Choose a Trigger page opens.
Select Home Page as the trigger.
Click Save.
The Service Listing tag is created.
Refer to the following image.
To create the book appointment button tag
Select Tags in the side menu.
Click New.
Untitled Tag page appears.
Enter the name of the tag as Step 2 - Book Appointment Button.
Click the Tag Configuration.
Choose Tag Type page appears.
Select Google Analytics > Google Analytics: GA4 Event


Measurement Id - Select GA4 measurement Id from the list of variables.
Event name - Specify the name of the event.
Select the Track Type as Event.
Under Event Tracking Parameters select the following:
Category: Funnel Events
Action: Step 2
Label: Click on Book Appointment

Value: Leave it blank
Non-Interaction Hit: True
Google Analytics Settings: #{{Analytics id}}
Select the Enable Overwriting Settings in this Tag checkbox.
Tracking ID: Inherited from the settings variable.
Navigate to More Settings > E-Commerce.
E-Commerce settings appear.
Set Enable Enhanced E-commerce Features as True.
Select Book Appointment Button in the Read Data from Variable dropdown.
Scroll down to see the Trigger section.
Click the Trigger icon.
Choose a Trigger page opens.
Select Click on Book Appointment as the trigger.
Click Save.
The Book Appointment Button tag is created.
To create confirm booking button tag
Select Tags in the side menu.
Click New.
Untitled Tag page appears.
Enter the name of the tag as Step 3 - Click on Confirm Booking.
Click the Tag Configuration.
Choose Tag Type page appears.
Select Google Analytics > Google Analytics: GA4 Event


Measurement Id - Select GA4 measurement Id from the list of variables.
Event name - Specify the name of the event.
Select the Track Type as Event.
Under Event Tracking Parameters select the following:
Category: Funnel Events
Action: Step 3
Label: Click on Confirm Booking.
Value: Leave it blank
Non-Interaction Hit: True
Google Analytics Settings: #{{Analytics id}}
Select the Enable Overwriting Settings in this Tag checkbox.
Tracking ID: Inherited from the settings variable.
Navigate to More Settings > E-Commerce.
E-Commerce settings appear.
Set Enable Enhanced E-commerce Features as True.
Select Click on Confirm Booking in the Read Data from Variable dropdown.
Scroll down to see the Trigger section.
Click the Trigger icon.
Choose a Trigger page opens.
Select Click on Confirm Booking as the trigger.
Click Save.
The confirm booking button tag is created.
To create Thank You page tag
Select Tags in the side menu.
Click New.
Untitled Tag page appears.
Enter the name of the tag as Step 4 - Thank You.
Click the Tag Configuration.
Choose Tag Type page appears.
Select Google Analytics > Google Analytics: GA4 Event


Measurement Id - Select GA4 measurement Id from the list of variables.
Event name - Specify the name of the event.
Select the Track Type as Event.
Under Event Tracking Parameters select the following:
Category: Funnel Events
Action: Step 4
Label: Thank You.
Value: Leave it blank
Non-Interaction Hit: True
Google Analytics Settings: #{{Analytics id}}
Select the Enable Overwriting Settings in this Tag checkbox.
Tracking ID: Inherited from the settings variable.
Navigate to More Settings > E-Commerce.
E-Commerce settings appear.
Set Enable Enhanced E-commerce Features as True.
Select Thank You page in the Read Data from Variable dropdown.
Scroll down to see the Trigger section.
Click the Trigger icon.
Choose a Trigger page opens.
Select Thank You page as the trigger.
Click Save.
The click on confirm booking tag is created.
Next Step: Track the User Behavior on Google Analytics.
Create triggers to track the user behavior
Triggers allow you to track the behavior of different elements on a web page. For example, if you select a button as a trigger, then every time the button is clicked, Google Tag Manager registers this action.
You must create the following triggers to track the booking of an appointment:
Home Page
Book Appointment Button
Confirm Booking Button
Thank You Page
To create the home page trigger
Log in to Google Tag Manager.
Google Tag Manager dashboard appears.
Select Triggers in the side menu.
The existing triggers table appears.
Click New.
The Untitled Trigger window opens.
Enter the name for the trigger as Home Page.
Click Trigger Configuration.
The Choose Trigger Type side window opens.
Select the trigger type as Page View.

This Trigger Fires On setting appears.
Select Some Page Views.
The Event Condition dropdown appears.
Select Page Path from the first condition dropdown.
Select Contains from the second condition dropdown.
Enter /webstoreNew in the third column.

Click Save.
The Home Page trigger is now created.
To create the book appointment button trigger
Select Triggers in the side menu.
The existing triggers table appears.
Click New.
The Untitled Trigger window opens.
Enter the name for the trigger as Book Appointment Button.
Click Trigger Configuration.
The Choose Trigger Type side window opens.
Select the trigger type as Click - All Elements.

This Trigger Fires On setting appears.
Select Some Clicks.
The Event Condition dropdown appears.
Select Choose Built-In Variable from the first condition dropdown.
The Built-In Variables side window opens.
Select Click ID.
Select contains from the second condition dropdown.
Enter ws_bookreservation in the third column.

Click Save.
The Book Appointment Button trigger is now created.
To create the confirm booking button trigger
Select Triggers in the side menu.
The existing triggers table appears.
Click New.
The Untitled Trigger window opens.
Enter the name for the trigger as Confirm Booking Button.
Click Trigger Configuration.
Select the trigger type as Click - All Elements.

This trigger fires on setting appears.
Select Some Clicks.
The Event Condition dropdown appears.
Select Click ID from the first condition dropdown.
Select contains from the second condition dropdown.
Enter wsConfirmBook in the third column.

Click Save.
The Confirm Booking Button trigger is now created.
To create the Thank You page trigger
Select Triggers in the side menu.
The existing triggers table appears.
Click New.
The Untitled Trigger window opens.
Enter the name for the trigger as Thank You page.
Select the trigger type as Element Visibility.
More settings appear.

Select ID in the Selection Method dropdown.
Select thankYouContainer for Element ID.
Select Every time an element appears on screen radio button for When to fire this trigger.
Select 50 as the Minimum Percent Visible value.
Select Observe DOM changes checkbox.
Select All Visibility Events radio button for This trigger fires on setting.

Click Save.
The ThankYou page trigger is now created.
Next Step: Create Variables for Tracking the Booking of an Appointment.
Create variables to track the user behavior
The variables in Google Tag Manager are named placeholders for values whose name will change. For example, you can assign a variable for tracking a Product Name, Price Value or a Date. For such elements, we create the variables and assign them to respective tags.
You must create the following variables to track the user behavior:
Service Listing
Book Appointment Button
Confirm Booking Button
Thank You page
To create the service listing variable
Log in to Google Tag Manager.
Google Tag Manager dashboard appears.
Select Variables in the side menu.
The Built-In Variables table appears.
Scroll down to click New.
Untitled Variable page appears.
Name the variable as Service Listing.
Select Custom Javascript as the Variable Type.
Custom Javascript code box appears.
Enter the following code in the code box.
                  function(){
  return {
   'ecommerce': {
      'checkout': {
        'actionField': {'step': 1},
      }
    }
  }
}
Click Save.
The service listing variable is created.
Refer to the following image.

To create the book appointment button variable
Log in to Google Tag Manager.
Google Tag Manager dashboard appears.
Select Variables in the side menu.
The Built-In Variables table appears.
Scroll down to click New.
Untitled Variable page appears.
Name the variable as Book Appointment Button.
Select Custom Javascript as the Variable Type.
Custom Javascript code box appears.
Enter the following code in the box.
                  function(){
  return {
  'ecommerce': {
      'checkout': {
        'actionField': {'step': 2},
      }
    }
  }
}
Click Save.
The book appointment button variable is now created.
To create a confirm booking button variable
Log in to Google Tag Manager.
Google Tag Manager dashboard appears.
Select Variables in the side menu.
The Built-In Variables table appears.
Scroll down to click New.
Untitled Variable page appears.
Name the variable as Confirm Booking Button.
Select Custom Javascript as the Variable Type.
Custom Javascript code box appears.
Enter the following code in the box.
                  function(){
  return {
  'ecommerce': {
      'checkout': {
        'actionField': {'step': 3},
      }
    }
  }
}
Click Save.
The confirm booking button variable is now created.
To create thank you page variable
Log in to Google Tag Manager.
Google Tag Manager dashboard appears.
Select Variables in the side menu.
The Built-In Variables table appears.
Scroll down to click New.
Untitled Variable page appears.
Name the variable as Thank You page.
Select Custom Javascript as the Variable Type.
Custom Javascript code box appears.
Enter the following code in the box.
                  function(){
  return {
  'ecommerce': {
      'checkout': {
        'actionField': {'step': 4},
      }
    }
  }
}
Click Save.
The Thank You page variable is now created.
Next Step: Create Tags for Tracking the Booking of an Appointment.
Enable e-commerce tracking in Google Analytics
After you create the triggers, variables, and tags in Google Tag Manager, you can log in to Google Analytics to see how many of your guests booked an appointment successfully, along with the services they booked.
You can also view the e-Commerce sales performance and product performances in Google Analytics which show you a plethora of e-Commerce information about your business.
To view the e-Commerce numbers of your business in Google Analytics, you must:
In Google Analytics, navigate to Admin > Property > Data streams > Click on your stream > View tag instructions > Install manually.
Copy the Google Analytics script.
In Zenoti, at the organization level, click the Configuration icon.
Search for and click Online booking settings from the Online booking section.
Select Webstore v2 template and expand Analytics.

Turn on the Enable e-Commerce Transactions for Google Analytics setting.
Paste the Google Analytics script in the Google Tag Manager field. (You must paste this code beneath the Google Tag Manager script).
In Google Analytics, navigate to Admin > View > e-commerce Settings.
Switch on the Enable e-commerce toggle.
Switch on the Enable Enhanced e-commerce Reporting.

Create the following funnel step labels:
Service Listing
Book Appointment Button
Click on Confirm Booking
Thank You Page
Click Save.
In Google Analytics, navigate to Admin > Property > Conversions.

Under Conversion events, ensure that the Purchase event is marked as conversion.

Note
If there are any other conversion events that you would like to track, then you must mark them as conversion events manually.
Log in to Google Analytics.
Go to Reports > Monetization > Ecommerce purchases.
Product performance: Shows the number of times the items were viewed, added to the cart, and purchased, along with the revenue generated from each item.

Log in to Google Analytics.
Go to Reports > Engagement > Conversions.
Scroll to find Event name and click the + sign.
Search for and select Invoice ID.

