Configure General Settings
This article explains how to access the configured voice, messaging, and SmartBot numbers in HyperConnect, and enable banner alerts, and customize timeline views in HyperConnect. These settings ensure optimal communication flow and visibility of key events for your business.
Overview
HyperConnect’s General Settings enable businesses to centrally manage communication numbers and notification preferences.
Key Terms:
SmartBot: AI-based bot used for automating customer interactions.
Banner Alerts: Non-intrusive notifications that display at the top of the platform to inform users about key events.
Timeline Events: A customizable feed that shows events related to guest interactions and operational activities.
Access Voice, Messaging, and SmartBot Numbers
To access the phone numbers for voice, messaging, and SmartBot, navigate to Settings > General tab.
In the General tab, you can see a list of the phone numbers that are currently set up for voice calling, messaging, and SmartBot functionalities. Review these numbers to ensure they are accurate and correctly configured for your business operations.

Why is this important?
Having the correct numbers for voice, messaging, and SmartBot functionalities is essential for seamless communication with clients. This ensures that calls, messages, and chatbot interactions are directed through the right channels. Proper setup reduces the risk of miscommunication and enhances customer satisfaction.
Troubleshooting tips
If the numbers listed do not match the intended configuration, ensure the correct ones are set in the respective service's settings.
For changes or updates to these numbers, consult your system administrator to avoid disruption in services.
Configure Banner Alerts in HyperConnect
The Banner Alerts feature in HyperConnect helps businesses stay informed about critical events and interactions in real time. By enabling banner alerts, users receive instant notifications for important updates such as customer ratings or negative sentiments detected during voice interactions. This ensures teams are aware of key issues as they arise, allowing them to respond promptly and improve customer satisfaction. Banner alerts are designed to be noticeable without interrupting workflows. They appear at the top of the platform and provide actionable information at a glance.
Within the Banner Alerts settings, users can configure the following options:
Customer Ratings Alerts: Get notified when a customer leaves a 5-star or 1-star rating. This helps teams acknowledge positive feedback and address concerns quickly when ratings are low.
Negative Sentiment Detection: Receive alerts when negative sentiment is detected in voice interactions.
How to Configure Banner Alerts
Launch HyperConnect.
Click the Settings icon.
Navigate to the General tab.
Toggle the Enable banner alerts option to turn alerts on or off across the platform.
Check or uncheck the types of alerts you wish to receive:
Receive banner alert when a 5-star or 1-star rating is given on Google or Zenoti.
Receive banner alerts when negative sentiment is detected in voice interactions.
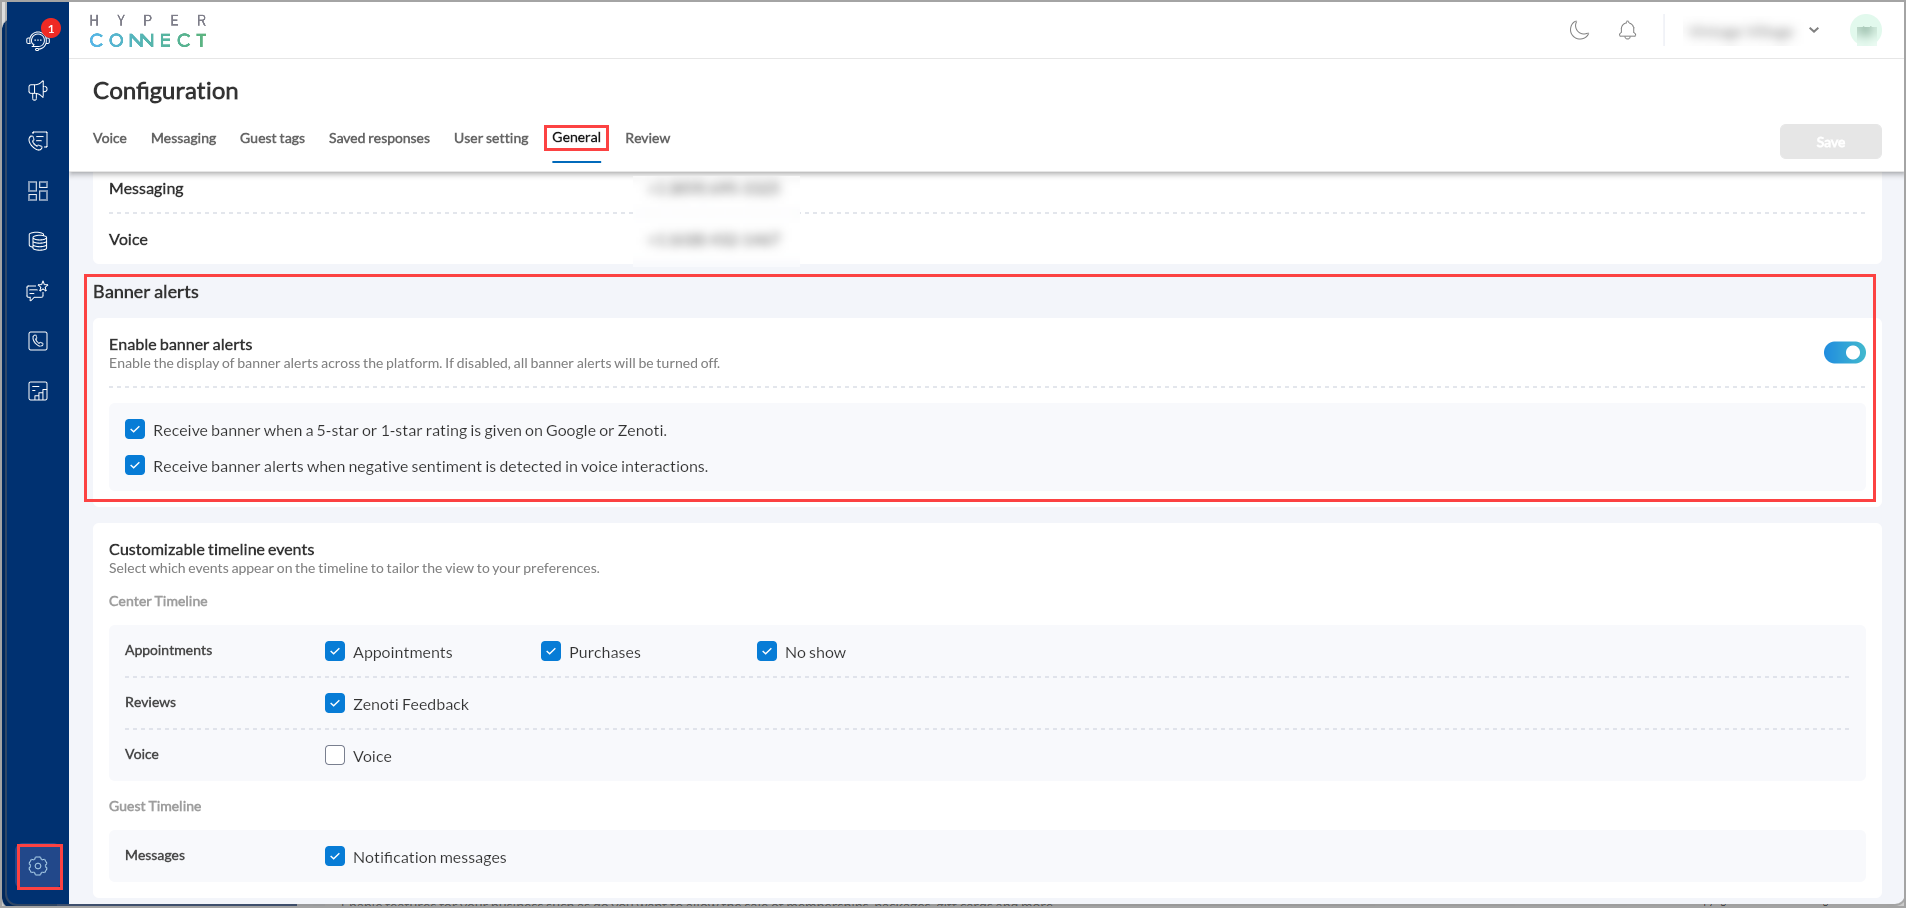
After selecting the relevant options, click Save to apply your preferences
Customize Timelines in HyperConnect
HyperConnect offers businesses the flexibility to customize timeline events, providing control over what information is displayed on both the Center Timeline and Guest Timeline. This feature is designed to reduce clutter, enhance usability, and allow businesses to focus only on the events most relevant to their operations. It helps businesses manage this information overload by enabling them to selectively display events that matter most, improving efficiency and user experience.
For example, a business with high customer interaction might want to prioritize appointments and two-way communication while hiding less critical notifications like feedback or review summaries. Customizable timelines empower users to tailor their views to suit their workflows. Users can choose which events appear on their timeline view. Each event category can be enabled or disabled depending on the user's preferences.
How to Configure Timeline Events
Launch HyperConnect.
Click the Settings icon.
Navigate to the General tab.
Scroll to the Customizable Timeline Events section.
You will find two sections: Center Timeline and Guest Timeline.
Use checkboxes to choose which events to display. For example, you can enable “Appointments” and “Purchases” while hiding “Voice” interactions or “Reviews.”
After making your selections, click Save to apply the settings.
HyperConnect’s customizable timeline feature empowers businesses with greater control over how information is displayed, ensuring teams can focus on what’s essential while minimizing distractions. By enabling tailored views for both internal and customer-facing interactions, this enhancement helps improve efficiency, user experience, and operational effectiveness across all business environments.
Configure Call Center Capacity
Businesses using Zenoti's call center capabilities can link up to 30 locations under a single contact center. This supports larger enterprises that require centralized communication across a wider network of locations.
Note
If you are grouping multiple centers as part of one contact center setup for centralized guest management (with or without booking integration), the maximum number of supported centers is 30.
Launch HyperConnect.
Click the Settings icon.
Navigate to the General tab > Centers for call centers.
From the dropdown list, add up to 30 centers that you wish to associate with the call center.
Click Save.