Create and Manage Photo Sequences
This article explains how to create and manage photo sequences for capturing patient treatment photos.
Overview
Photo sequences let you create structured, service-specific workflows to capture guest photos. Using body-outline visual guides, these sequences help providers follow a consistent format and order—making the capture process faster, clearer, and more accurate.
Note
This feature is available by default for businesses with Photo Manager enabled.
Prerequisites
Configure role permissions to manage photo sequences
Note
The Owner and Admin roles have all permissions for managing photo sequences enabled by default.
At the organization level, click the Configuration icon.
Search for and select Security roles from under Security.
Select a role and click the Permissions tab.
Expand the Administrator section, and for Photo Sequence, select the Add, Edit, and Delete checkboxes, as required.
Add: Users with this permission can create photo sequences.
Edit: Users with this permission can edit photo sequences.
Delete: Users with this permission can delete photo sequences.
Click Save.
Create a photo sequence
You can create a photo sequence for a service, such as acne treatment, by adding guidelines for the relevant body areas in the desired capture order. To do so, follow these steps:
At the organization level, navigate to Configuration > Photo management > Photo sequence.
Click Add new sequence.
Enter the Sequence name.
Enter the Sequence description.
Select Allow user to skip through sequence to let the provider skip through the sequence when capturing photos. For example, in an acne treatment sequence, photos of the back are only needed if lesions are present. If not, the provider can skip that step and continue with the rest of the sequence.
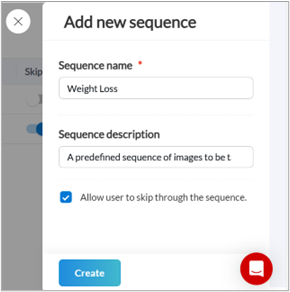
Click Create.
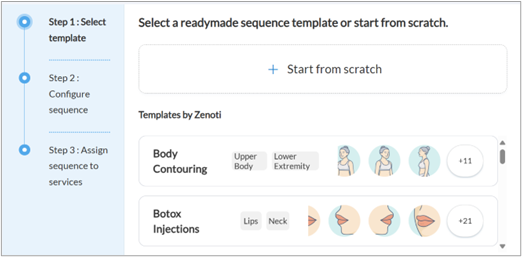
Select template
At this step, you can create your own sequence from scratch or choose a preset template from the available options.
Select Start from scratch to create a photo sequence from scratch.
Click Use template to use a readymade template provided by Zenoti.
Configure sequence
To add guidelines to your sequence:
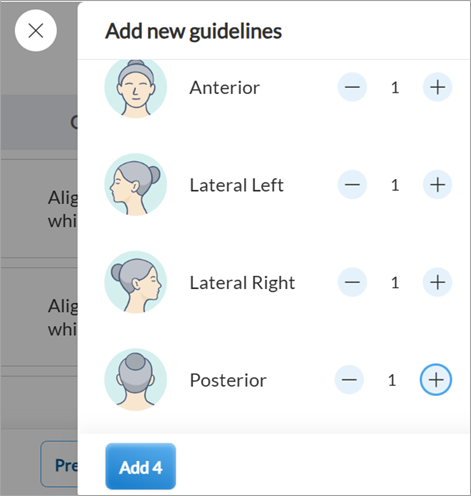
Click Add guidelines.
Select the body area and then the view associated with the guideline.
Examples: Lateral Left CloseUp (Abdomen), Anterior CloseUp (Abdomen), etc.
Click Add.
Note
You can add up to 30 guidelines to a sequence.
After you’ve added a guideline, you can edit the View and Guideline Instruction by clicking the edit icon next to them.
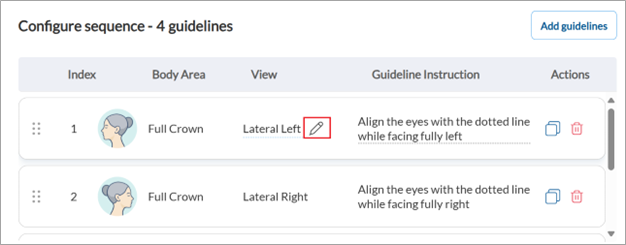
Use the Drag
 icon to reorder the guidelines, the Copy icon to duplicate a guideline, and the Delete icon to remove a guideline from the sequence.
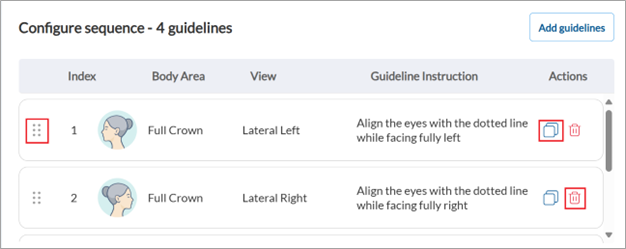
Click Save and continue.
Note
Click Save as draft to save the sequence as a draft at any stage of configuring the sequence.
Click Preview to preview how the photo sequence will appear in ZMA.
Assign sequence to services
Note
Each service can be linked to only one photo sequence, but a sequence can be assigned to multiple services. For example, if a service named “Hair Loss Treatment” is linked to a sequence named “Full Crown Sequence”, that sequence could also be assigned to a different service named “Hair Transplant” as both the services are performed on similar areas of the body.
Search for the service or service category using the search field.
Enable the toggle next to the service or service category.
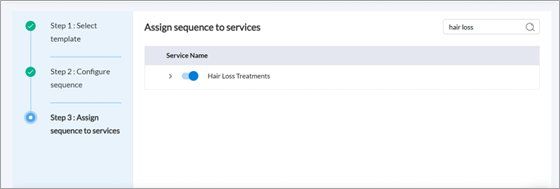
Click Save and Activate to make the photo sequence active.
Note
If a sequence previously linked to a service has been deactivated, you can associate the service with a different active sequence. The service will no longer be linked to the deactivated sequence.
Edit photo sequences
At the organization level, navigate to Configuration > Photo management > Photo sequence.
Search for the sequence using the search field.
Edit the Sequence name and Description, if required.
Make the sequence active or inactive using the Status toggle. If a sequence is inactive, it won’t be available for its linked service or anywhere else in Photo Manager.
Make the sequence skippable or non-skippable using the Skippable toggle.
Click the Clone icon to clone the sequence.
Click the Delete icon to delete the sequence.
Click the
 icon to open the sequence and edit the guidelines and service assignments.
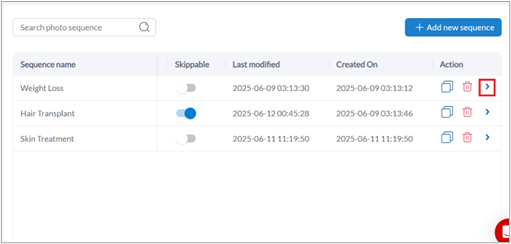
Note
Changes to photo sequences appear in the ZMA app only after it is relaunched.
Key terms
Photo Sequence: A predefined set of photo guidelines used to capture guest images in a specific order during a service.