Capture and manage treatment photos with Photo manager
Use Zenoti Photo Manager to take consistent guest photos and track their transformation over time.
Note
The Photo Manager feature is available only on forms created using the Form Builder.
Tip
Prerequisites to use Photo manager
Role permissions to capture and manage photos
At the organization level, click the Configuration icon.
Search for and select Security roles from under Security.
Select a role and click the Permissions tab.
Expand the Appointment book section, and for Photo manager, select the Camera access, Gallery view, Download, and Delete checkboxes, as required.

Camera access: Users with this permission can take photos using the photo manager.
Gallery view: Users with this permission can view photos and edit photo details in the guest gallery.
Download: Users with this permission can download photos from the guest and global galleries.
Delete: Users with this permission can delete photos from the guest gallery.
Expand the Guest manager section, and against Guests, enable at least one of the following role permissions.
Add
Edit
Access Photo manager on tablets and iPads
From ZMA
On the Zenoti Mobile app, open Appointment book.
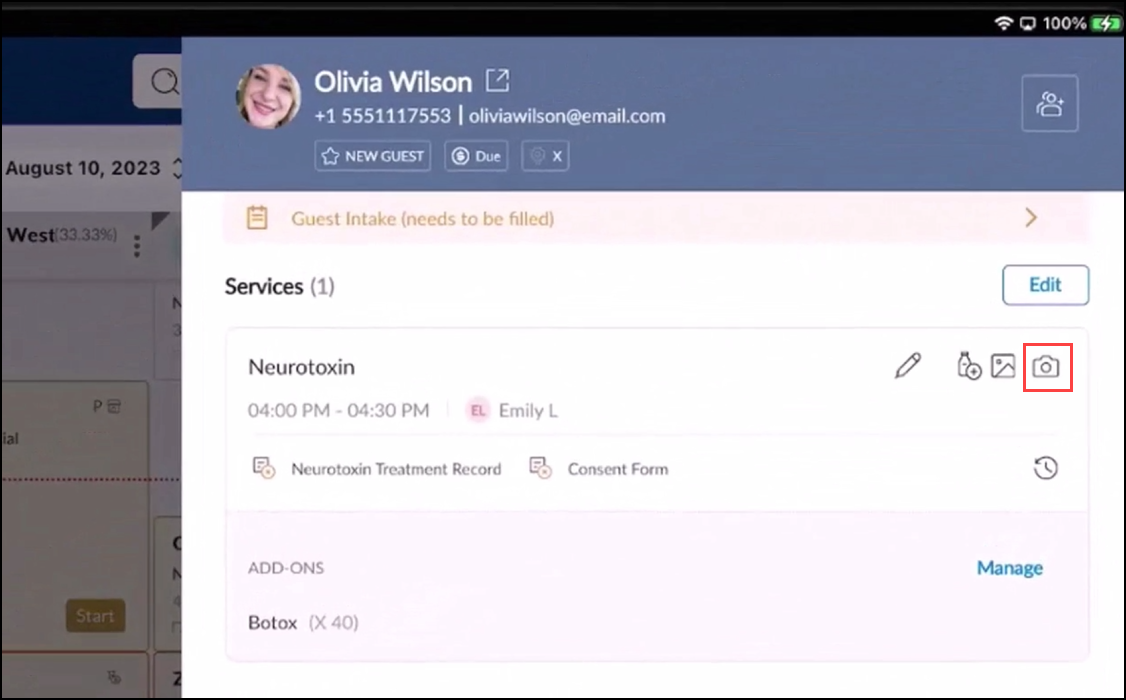
Select an appointment and click Details.
Alternatively, you can also click the camera icon from the Calendar view.
To click images from ZMA, tap the camera icon.
Through forms
On the Zenoti Mobile app, open the form you want to fill out.
As a part of filling out the form, look for fields that have an option of uploading a file.
From the file upload field, click the Take photo button.
Capture photos and upload them to the form.
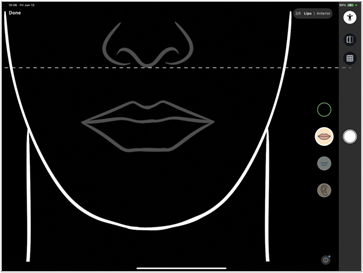
Click consistent photos using Photo manager
Then take a photo of the guest the guest's image using any of the following options:
Guidelines: Align the guest's face with the different face angle guidelines.
Grids: Use the frame space effectively with grids.
Photo overlay: Overlay an older image and click pictures with alignment to compare the difference.
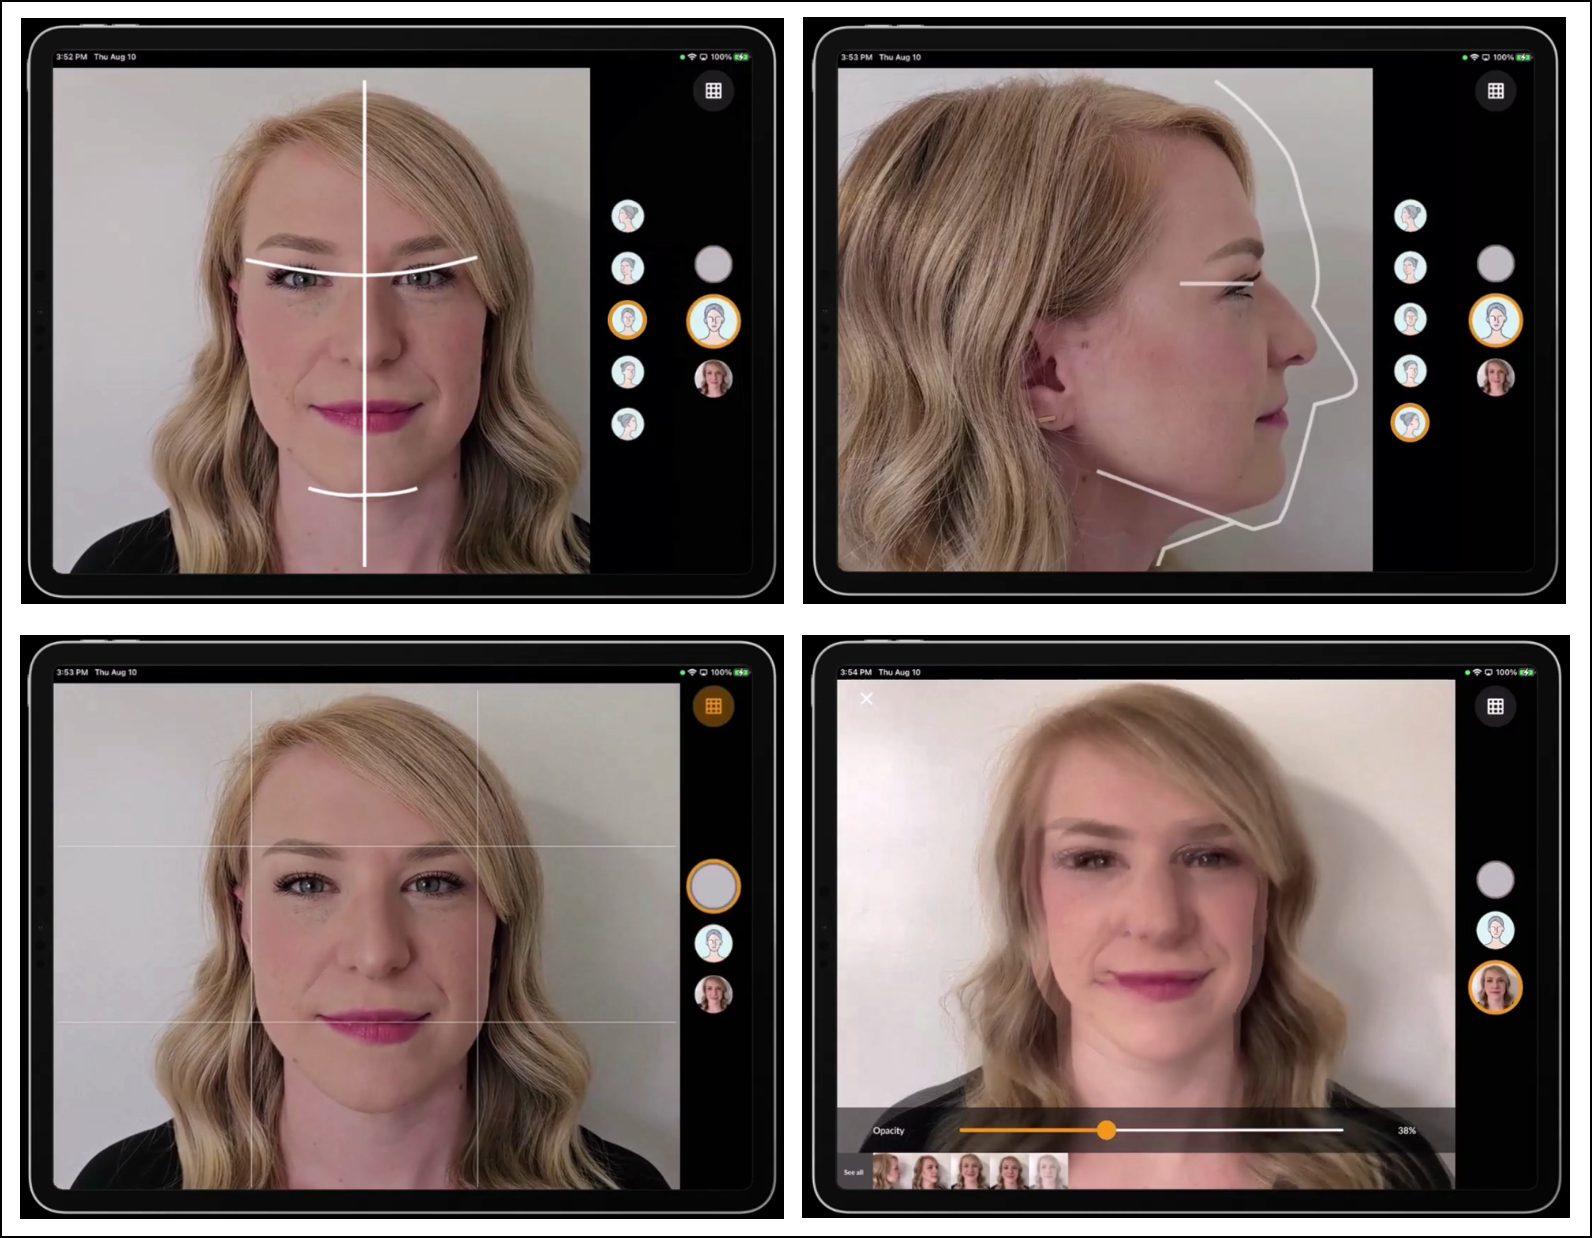
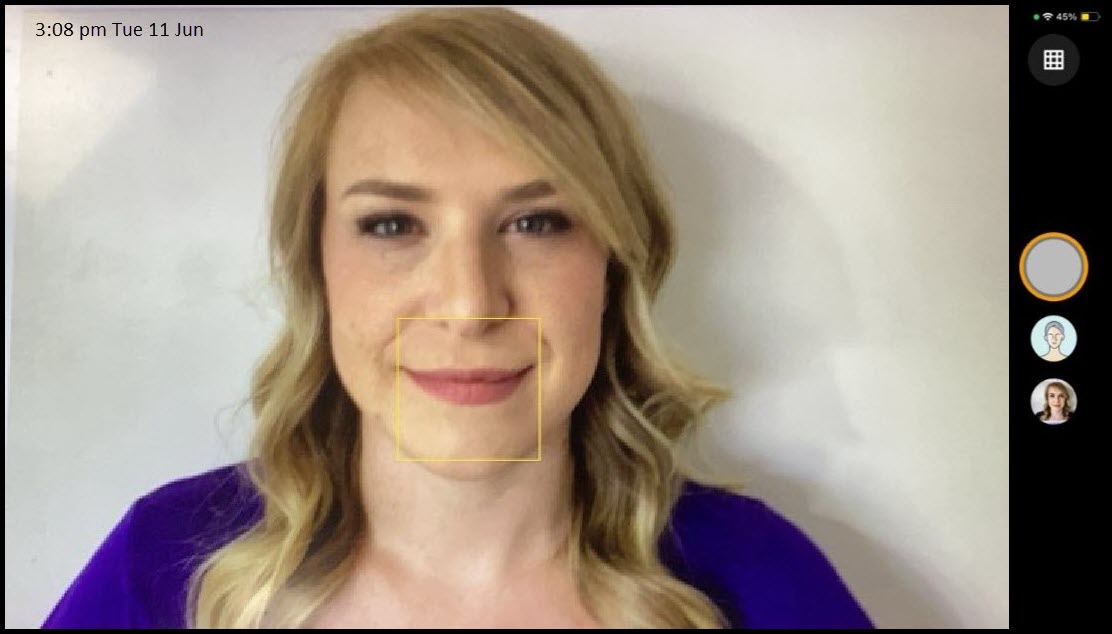
After you launch the photo manager camera, you can manually touch the screen to focus on a specific part or let the camera app focus automatically.
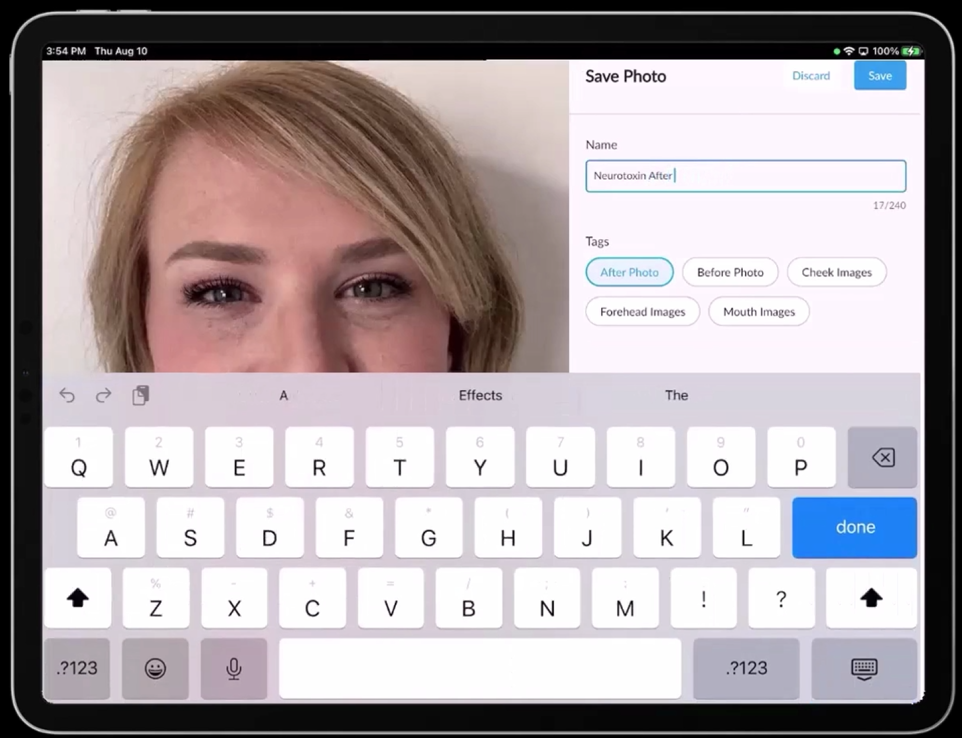
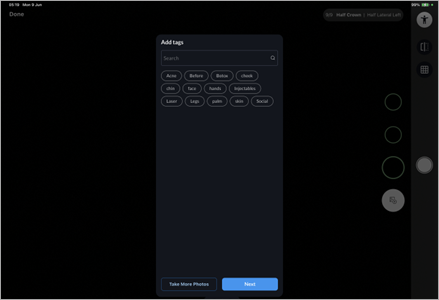
Save photos with tags on Photo manager
Adding tags to clients' photos helps you easily filter by treatment type, stage, area, and highlights. You can choose to add tags while clicking photos, and/or after they are saved.
To choose from tags, you must first create file tags at the organization level on Zenoti.
Important
You can click multiple images in one go using the photo manager.
If you are using forms to access photo manager, all images you click will be uploaded onto the form.
The pictures uploaded here can be accessed from the form and the gallery.
You can review the images before saving or submitting the form. When you click Save, the images automatically get uploaded to the image gallery.
You can download images to your device. To do so, click the image to open the detailed image view, and click Download.
You can only download files of the following file types: .gif, .jpg, .png, .jpeg, .tiff, .mp4, .mov.
Ensure that the ZMA app has permission to access photos on your device.
You can also add tags to images after they are saved. To do this, while previewing a photo, click Edit and add/remove tags.
Here you can also rename the photos according to your requirements.
Add tags to files in bulk
You can add tags to multiple images at once to organize your gallery efficiently.
To add tags in bulk, select up to 10 images and tap Add Tag.
Note:
The Bulk Add Tags feature is only available in Zenoti Web and ZMA for tablet.
The Bulk Add Tags feature is not available in ZMA for mobile, Global Gallery, or MyZen.
You can add multiple tags at once, but you cannot remove tags in bulk.
Existing tags do not appear on the Add Tag screen, even when you select a single image.
For organizations with Photo Manager disabled, you can bulk add tags, but the Edit option for individual files isn’t available.
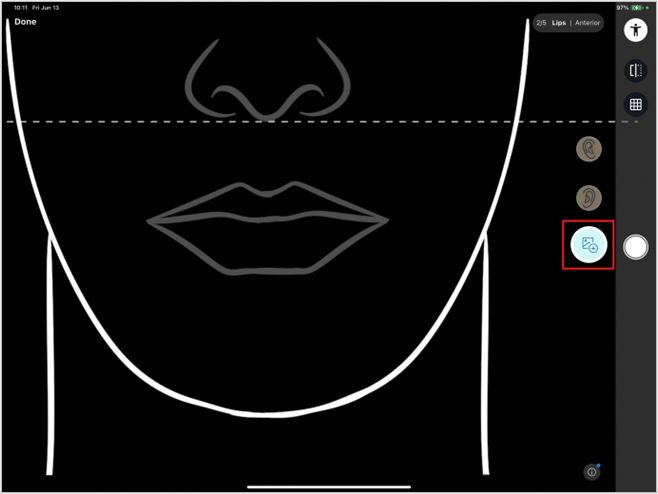
Capture photos using photo sequences
Note
To learn how to set up photo sequences and manage related role permissions, see the Create and Manage Photo Sequences article.
Photo sequences allow you to systematically document a patient’s condition before, during, and after treatments. These photo sequences are predefined per service and use anatomical visual guides to standardize the photo-taking process. Depending on the service configuration, sequences may be:
Skippable: Providers can skip steps in the sequence. That is, providers need not take all the photos in the sequence for a given service.
Non-skippable: Providers must complete each step before proceeding. That is, providers must take each and every photo in the sequence.
Not linked to a service: Providers can manually add guidelines or sequences.
Launch the photo manager camera and begin capturing photos for the service.
Follow the guided sequence visible on the right-hand side.
After completing the last guideline in the sequence, you will see the Add tags popup with options to:
Select the applicable Tags.
Tap Next to upload.
Tap Take More Photos to include additional shots.
Tap Add guidelines at the end of the sequence to insert extra individual guidelines or even entire sequences, if needed.
Launch the photo manager camera and begin capturing photos for the service.
Each guideline must be completed in order. If you try to skip one, a message will inform you at the last guideline, that skipping is not allowed.
The Add tags popup appears only after all required guidelines have been completed, regardless of their sequence order.
Tap Add guidelines if you need to insert additional photo steps.
Note
In non-skippable sequences, completion is mandatory for all required steps—not just reaching the last one in order.
Launch the photo manager camera for a service without a preassigned sequence.
Tap Add guidelines to select individual guidelines (for example, Lips, Ear) or apply full sequences from the Sequences tab.
Once added, the flow continues just like in skippable or non-skippable sequences depending on what is selected.
After completing the last added guideline:
Select the applicable Tags.
Tap Next to upload.
Tap Take More Photos to include additional shots.
Note
The Add guidelines button is always available—at the end of a sequence or in standalone mode—and allows users to:
Add single photo guidelines (for example, for specific body areas)
Insert entire sequences (for example, Full Crown, Abdomen series)
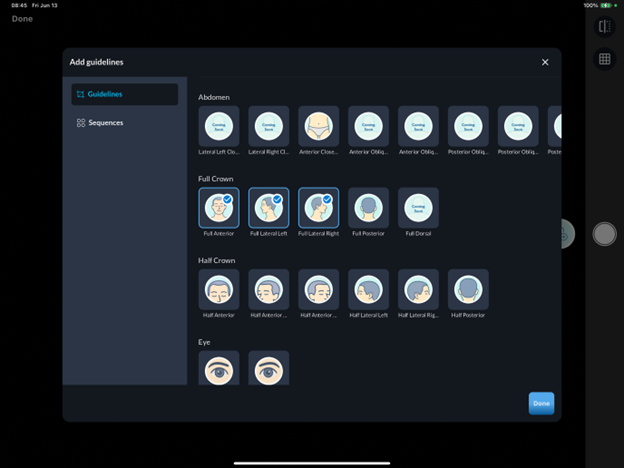
This offers flexibility during the appointment and helps ensure complete documentation.
Compare before and after images using filters
To open the image gallery, click the Gallery icon from the appointment view.
Alternatively, you can also open the guest profile, click the Forms tab, and click the Image icon.
You can perform the following actions in the image gallery.
Filter photos by services, guideline views, tags, and date ranges.
Compare pictures to track the treatment journey
Select two images and click Compare.
Use one of the below options to compare images.
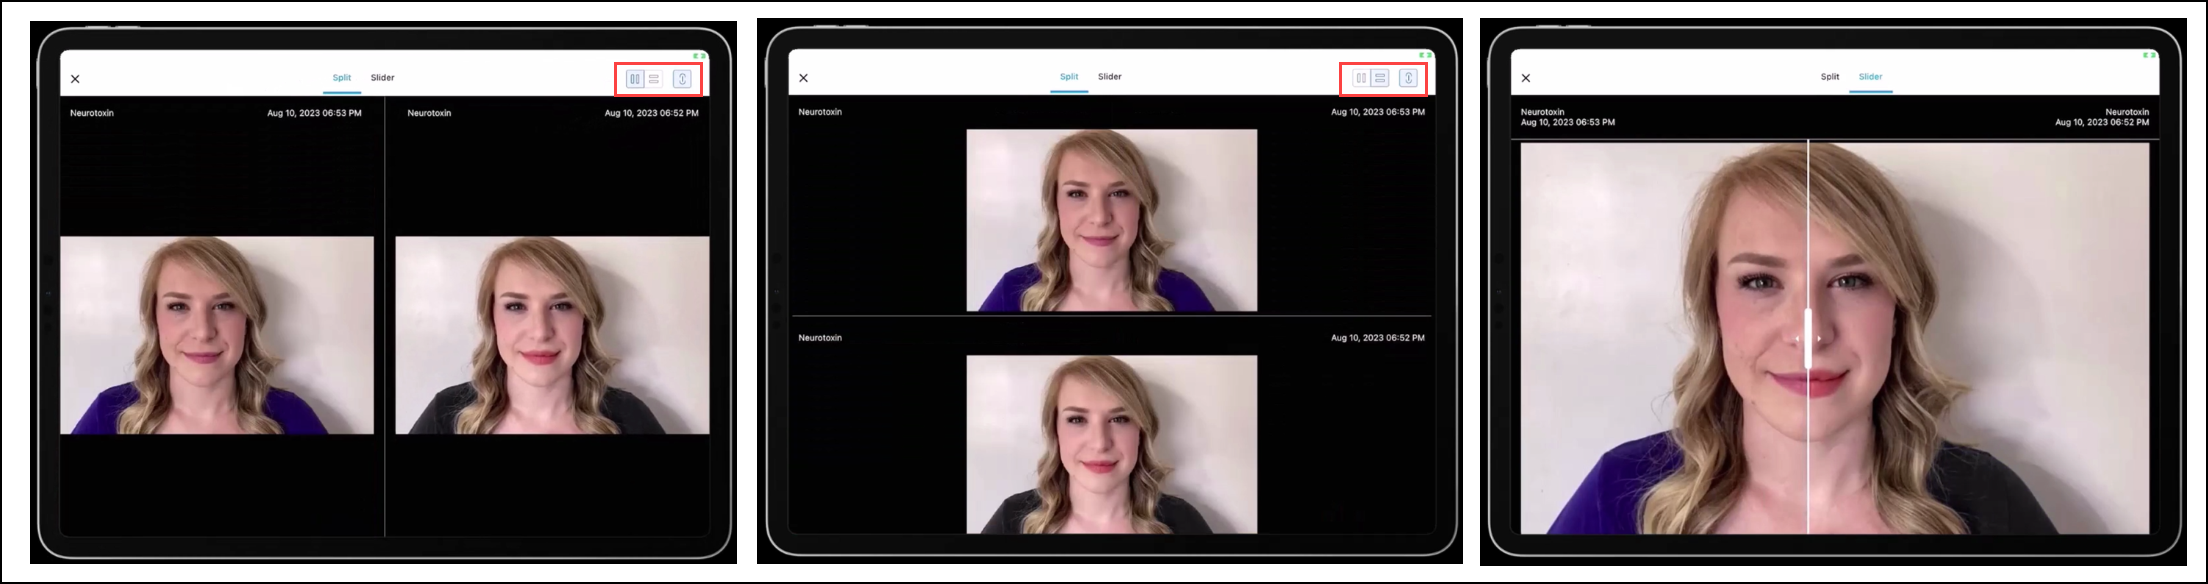
Split: Selected images appear next to each other for comparison.
In this view, you can compare photos vertically, horizontally, and with linked zoom.
Slider: Selected images overlap each other on either side of a slider bar. Treatment progress can be compared by sliding the bar.
You can save the comparison view as an image by clicking Save to device to store it locally on your device, or Save to gallery to save it to the guest gallery.
Delete photos from the patient gallery
Note
To delete images from the patient gallery, the user role must have the Delete permission enabled.
The Delete feature is available only on iPads, phones and tablets with ZMA. It is not supported on MyZen.
Select the images you want to delete.
Tap the More options
 icon, then tap Delete.
Tap Yes to confirm.
Note
If you delete a photo from the image gallery, it will not be removed from the corresponding form; the image will still appear in the form.
If you submit a form containing images that were previously deleted from the gallery, those images will reappear in the gallery.
If you delete a photo from the patient gallery, it will not be removed from the global gallery if it was previously added there.
If you are using the Gallery tab in the guest profile on Zenoti Web, you cannot delete photos from it.
Access Photo manager from myZen
Providers can easily track guest transformations with before-and-after photos captured on their phones and stored securely in myZen's Photo Manager.
At the organization level, click the Configuration icon.
Search for and select Photo management.
Turn on the Enable photo manager for myZen setting.
If you wish to stop using Photo manager on the myZen app, turn this setting off. If you disable photo manager here, you will not see the options for camera and gallery from the Appointment details page on MyZen. However, all the photos captured previously will be available in the gallery.
Click Save.
On MyZen, go to the guest's appointment.
Select the plus sign next to Add Photos.
You can also tap the three vertical dots in the appointment details and select Take Photo. This opens the camera - you can either click a photo or select a photo from the gallery.
Click the guest's image and tap Save.
On the guest's appointment, go to the image gallery.
Select photos and click Compare.
You will only be able to use the split view to compare photos on myZen. If you wish to use other options to compare photos, use Photo manager on tablets.