Add an annotation pad to a form
An annotation pad is majorly used for medical or cosmetic procedures.
It helps the therapist in marking the exact areas of a body part on which the procedure is to be performed.
For example, a form for botox treatment can have an annotation pad to mark the areas of a guest's face where the implants are to be injected.
To view an example of this component, from sample forms, visit the Botox Treatment form. View the annotation pad under the Annotations for toxins section.
From the Tools list, drag and drop the Annotation pad component onto the form.
To customize the component, place the mouse pointer on the component and click Edit.
Under the Basic tab, customize the details listed below:
For the src attribute, copy the URL of your image and paste it into the Value field.
Important
Use URLs of images from Zenoti's image gallery as an image for the annotation pad. Refer to Step 1: Upload the image to Zenoti Image Gallery from How do I Add an Image for Annotation to a Digital Form?
For the alt attribute, enter the description of the image into the Value field.
If you want to customize other settings, refer to the table below.
Click Save.
Action | Perform these steps |
|---|---|
Ensure that the guest cannot change the contents of the field For example, the annotation pads that are used for marking acne or pores on the skin. In this case, the doctor can only mark the areas after examination of the skin. So, this field can be made read-only on the guest's end. | Under the Basic tab, select the Make field read-only for guest (on CMA, Kiosk, Webstore, Zenoti Mobile guest mode) check box. |
To not display the field to the guests on CMA, Kiosk, Webstore, ZMA guest mode In some cases, you can use annotation pads for making notes which are appointment specific or for office use. You can hide the field from the guest's view in that case. | Under the Basic tab, select the Hide field from guest (on CMA, Kiosk, Webstore, Zenoti Mobile guest mode) check box. |
Note
You can make a field appear or disappear on the form based on the value of another field.
How to use the annotation pad for injectables photo markup
The annotation pad provides a streamlined interface for selecting injectables, adjusting quantities, marking injection sites, and viewing summaries, all in one place. This enables providers to finish markups for injectables much faster.
How to set up it up
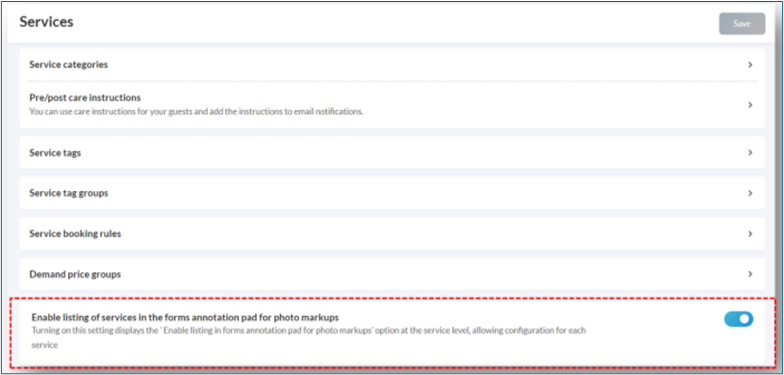
Enable the org level setting 'Configuration > Services > Enable listing of services in the forms' annotation pad for photo markups'.
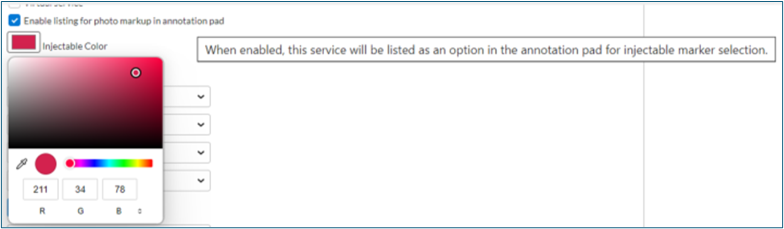
Enable the service level setting for services which should appear in the injection marker drop-down list 'Enable listing in forms annotation pad for photos markups'.
The injection color for a service is auto assigned when the setting is enabled and can be manually changed.
Note: Available only on form builder forms annotation pad.
Markup photos for injectables
Click the Injection icon.
Click Choose to access the search box for injectables.
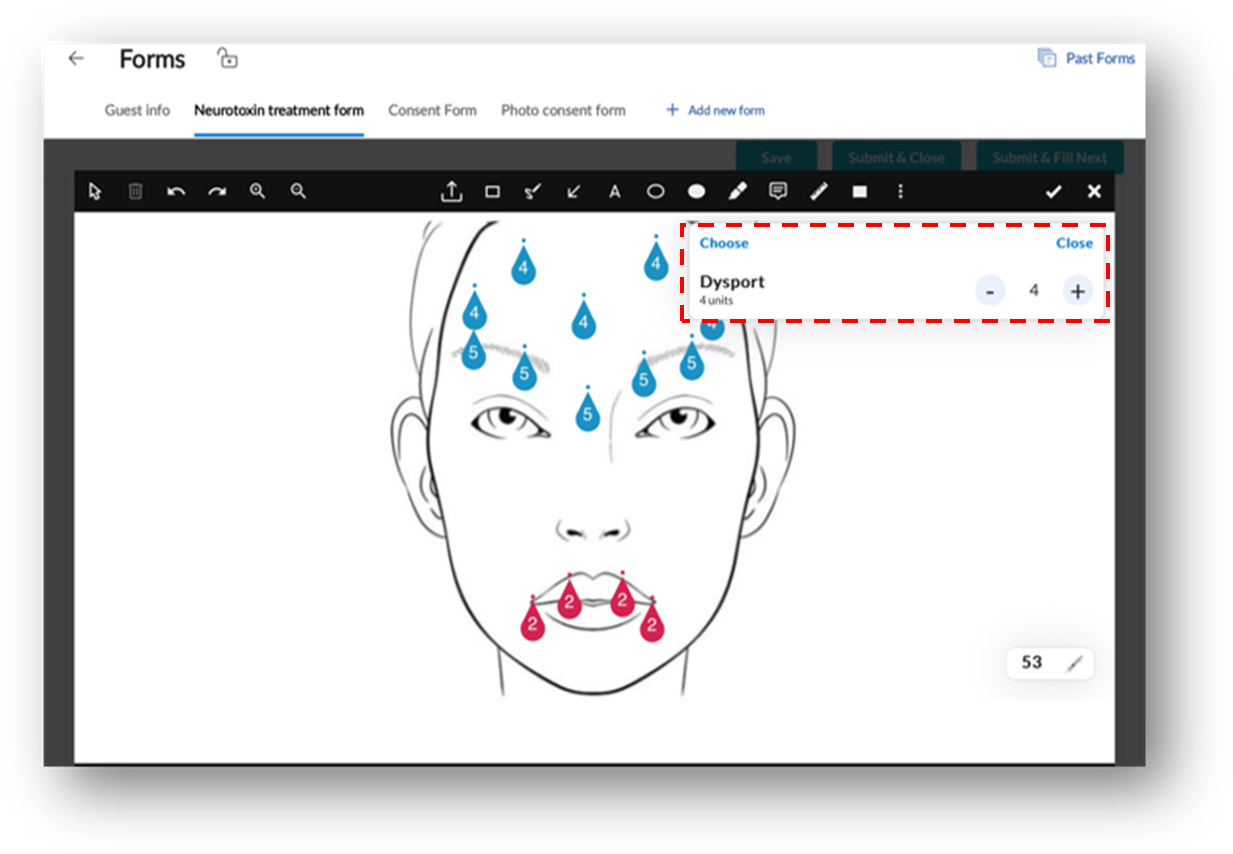
The list of injectables is populated.
Auto-search shows results as you type, with frequently used services listed at the top for quick access.
Once you select an injectable, an option to increase or decrease the number of injection units will appear.
Decimals are supported as before. You can also enter the quantity manually, including decimals up to 2 points.
Select the quantity and continuously tap to mark up the photo, avoiding the need to type the number of units every time.
Long press or press and hold on an existing marker to edit the number of units.
Injectables are color coded for easy visualization.
Repositioning, adding and deleting markups
Tap on the marker to edit the quantity.
Long press and drag the marker to move or reposition it.
You can select the injection marker and use the delete icon to remove it as needed. Alternatively, drag the marker out of marker image area to delete.
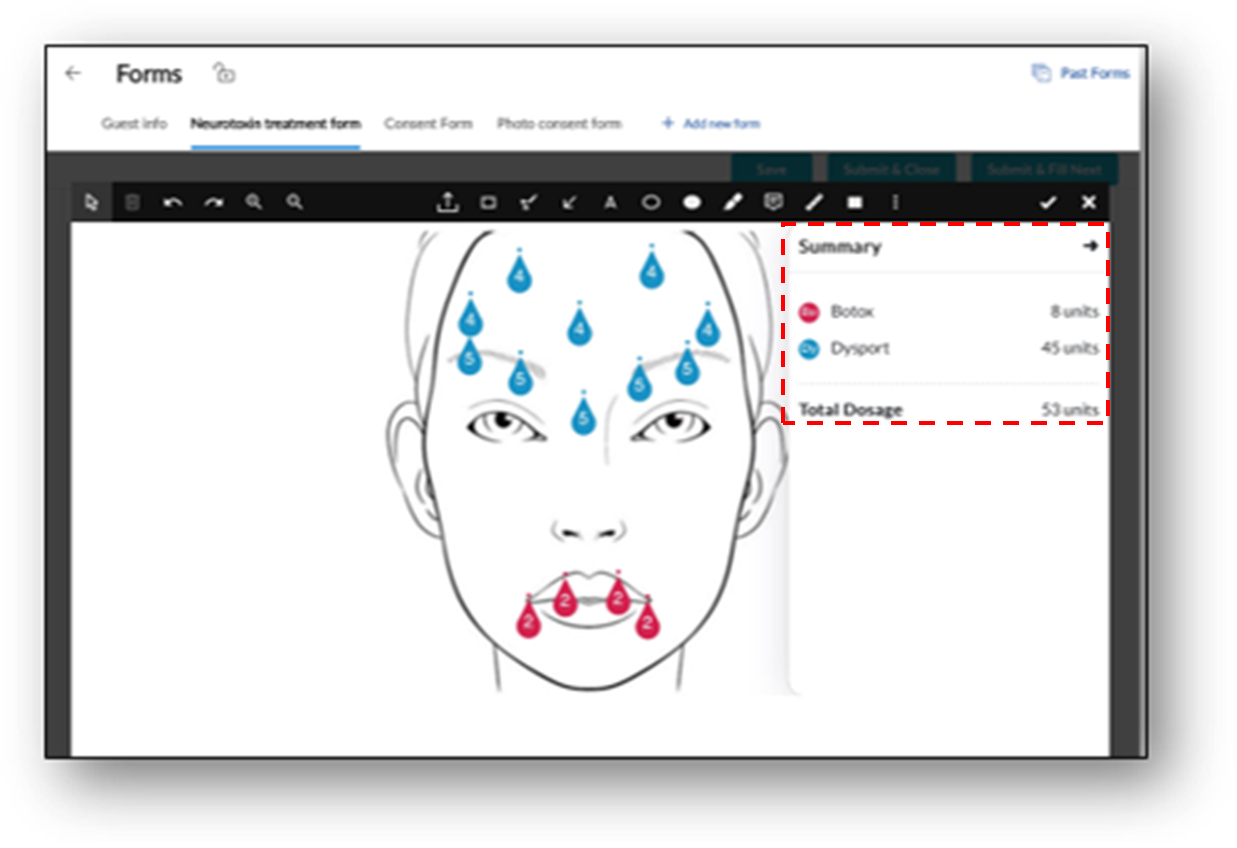
Real-time summary
A summary of injections is displayed in the bottom right corner of the annotation pad.
Click on the summary icon to expand and view detailed information, including the name of the injection and quantity (total number of injections), with a clear break up.
Impacts and considerations
To use the enhanced annotation pad feature, the employees should have form-editing role permission.
The default marker value is set to 1, with the most recent selection retained for convenience.
Real-time summaries and injection details provide instant insights, making the annotation process more efficient and user-friendly.