Create and Manage Quotes
This article explains how to create and manage the Quotes feature—from enabling the feature and setting permissions to customizing designs. You’ll learn how to create, edit, share, and convert quotes, apply discounts, and track quote history.
Note
The Quotes feature is available on Zenoti Web and on ZMA for iPads only.
Overview
The Quotes feature in Zenoti enables you to share personalized pricing with guests before they commit to a service.
Whether you're building long-term treatment plans or providing custom estimates, quotes help guests make informed decisions and improve your chances of converting leads into bookings. They also enhance trust by offering clear, upfront details on services and pricing.
Prerequisites
Enable quotes
At the organization level
At the organization level, click the Configuration icon.
Search for and select Enable quote.
Turn on the Enable quote toggle.
To allow centers to override organization-level quote settings and configure their own quote preferences, turn on the Allow center override for quotes toggle.
Enter the number of days after which a quote should automatically expire in the Quote default expiry (days) field.
Note
You can turn on the Allow center override for quotes setting even if quotes are turned off for the organization. This allows centers to still use the feature, if needed.
At the center level
Note
The following settings show up only if the Allow center override for quotes setting is turned on at the organization level.
At the center level, click the Configuration icon.
Search for and select Enable quotation.
Use organization default: Select to apply the default settings configured at the organization level.
On: Select to override the organization-level settings and configure quote settings for the center. If you select On, enter the default quote expiry (in days) for the center.
Off: Select to turn off quotes for the center.
Click Save.
Role permissions to manage quotes
Role permissions to view quotes
To grant a user permission to view quotes, follow these steps:
At the organization level, click the Configuration icon.
Navigate to Security > Security roles.
Select a role and click the Permissions tab.
Expand the Appointment Book section, and for Quotes, select the View checkbox.
Role permissions to add quotes
To grant a user permission to add or create quotes, follow these steps:
At the organization level, click the Configuration icon.
Navigate to Security > Security roles.
Select a role and click the Permissions tab.
Expand the Appointment Book section, and for Quotes, select the Add checkbox.
Role permissions to edit quotes
To grant a user permission to edit quotes, follow these steps:
At the organization level, click the Configuration icon.
Navigate to Security > Security roles.
Select a role and click the Permissions tab.
Expand the Appointment Book section, and for Quotes, select the Edit checkbox.
Role permissions to share quotes
To grant a user permission to share quotes with the guest through Email, SMS or Text, or WhatsApp, follow these steps:
At the organization level, click the Configuration icon.
Navigate to Security > Security roles.
Select a role and click the Permissions tab.
Expand the Appointment Book section, and for Quotes, select the Communication checkbox.
Role permissions to create custom packages in quotes
Note
The custom package flow must be enabled for your organization for this setting to appear.
To grant a user permission to create custom packages in quotes, follow these steps:
At the organization level, click the Configuration icon.
Navigate to Security > Security roles.
Select a role and click the Permissions tab.
Expand the Appointment Book section, and for Quotes, select the Allow custom package flow checkbox.
Additional quote settings
Configure custom package flow for quotes
Zenoti allows you create custom packages when adding items to a quote to enable the guest to use the included services and products across multiple visits.
To allow the creation of custom packages in quotes:
Go to Configuration > POS.
In the Quotes section, turn on the Allow custom package creation in quotes toggle.
To have the custom package flow enabled by default when creating quotes, turn on the Enable custom package flow by default toggle.
Note
If turned off, you can still enable the custom package flow for a specific quote when creating it.
Click Save.
Customize quote design
You can customize the header and footer of your quote to include details of your center or organization and relevant quote details. To do so:
Go to Configuration > Notifications > Templates for email or text.
Click Edit next to the Quote Header and Quote Footer templates to open them.
Use the macros available to customize your quote header or footer.
The customized header and footer will appear on the quote when you print or email it.
Enable guests to accept a quote
You can allow to users to accept a quote when they are notified of the creation or revision of a quote. To do so:
Go to Configuration > POS.
In the Quotes section, turn on the Enable Quote Acceptance Flow toggle.
To customize the label that is displayed on the button the guest clicks to accept the quote, use the field next to Quote Acceptance Default Label.
Click Save.
Note
If the Allow center override for quotes setting is turned on at the organization level, you can enable and manage the quote acceptance flow at the center level.
Note
When the quote acceptance flow is enabled:
When a guest accepts a quote, the quote status changes to Accepted.
If you edit an accepted quote, the status changes to Revised. The guest must accept the revised quote again for the status to return to Accepted.
If you try to convert a quote that the guest has not accepted into an invoice, a warning pop-up appears. You can review the warning and still proceed with the conversion if needed.
On ZMA, open an active quote and click Present to guest to enter Guest mode. The guest logs in and signs in the signature field to accept the quote. After the guest returns the tablet, log in again using your credentials to continue.
Create quote
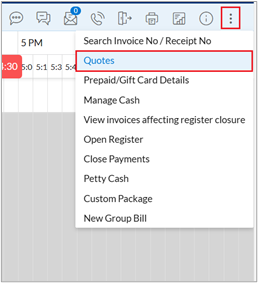
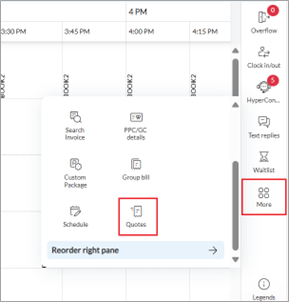
Navigate to the Appointment Book.
On the far-right of the Appointment view, click More (or the three-dots icon in the old Appointment Book) and then click Quotes.
By default, the Quotes page lists all quotes created for the current day. You can filter the list by creation date or creator, as needed.
You can switch between searching by guest details, such as name, email, or mobile number, or by quote ID. Select the desired option from the drop-down list next to the search field, then enter the relevant details.
Click Create quote.
Search for and select an existing guest for whom you want to create the quote.
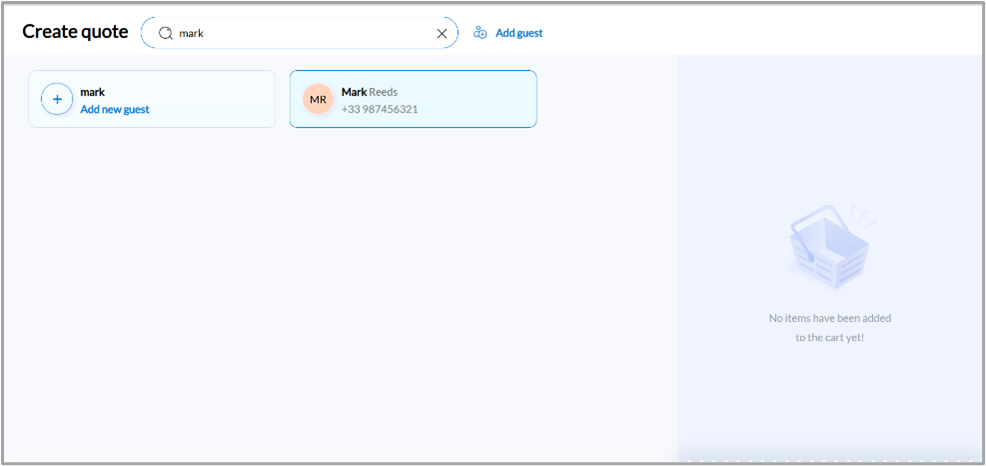
Alternatively, you can directly add a guest by clicking Add guest and filling in the necessary details of the new guest.
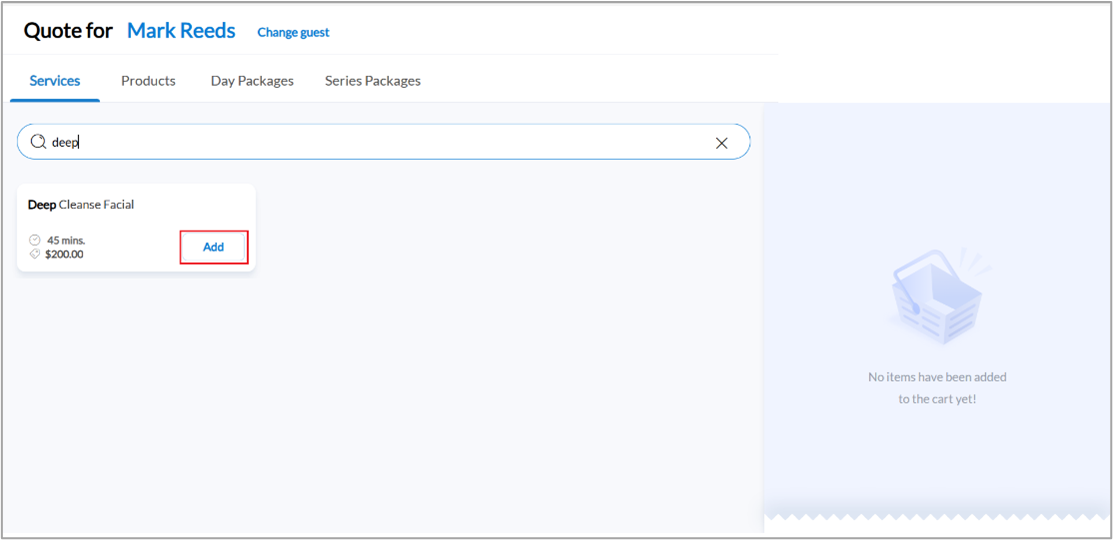
Search for and add the required items to the quote from one of the following tabs:
Services
Products
Day Packages
Series Packages
The items appear under the section for their associated item category.
Note
To include an associated add-on service to the quote, click Add ons under the main service item in the quote, and in the Include add ons panel, click the Add button next to the add-on service.

Note
You can add day packages to quotes only if individual services are part of the package.
You cannot add series packages with bundled products to quotes.
Click Generate quote.
Set expiry for a quote
By default, the expiry date of the quote is set at the organization or center level, under Configuration. To edit the expiry date, follow these steps:
On the New Quote panel, click the date or the Edit icon next to Expires on.
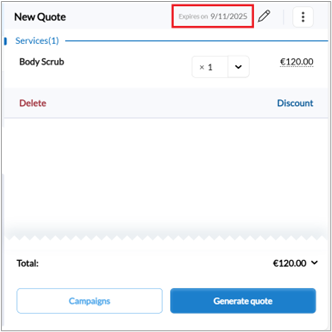
Select the date from the calendar.
Click Save.
Add description and internal notes to a quote
On the New Quote panel, click the More options
 icon.
icon.Click Description or Internal notes.
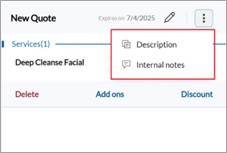
Enter the required details and click Save.
Note
Internal notes are not visible to guests.
Manage quotes
Search for a quote
Navigate to the Appointment Book.
On the far-right of the Appointment view, click More and then click Quotes.
By default, the Quotes page lists all quotes created for the date selected at the Appointment view. You can filter the list by creation date or ‘Created by’, as needed.
You can search by Guest or Quote ID by selecting it from the drop-down list next to the search field and entering the relevant details.
Click the Quote ID of the quote to open it.
Convert a quote into an invoice
Open the quote by searching and selecting it.
Click Create invoice.
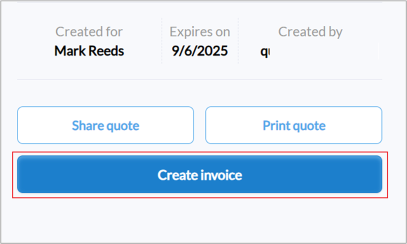
Review and book the appointment from the Booking Wizard.
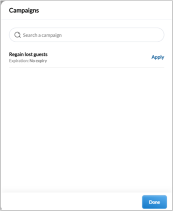
Apply campaigns to a quote
On the Quote panel, click Campaigns.
On the Campaigns panel, search for the campaign and click Apply.
Note
To remove any campaigns applied to an item, click the Remove discount (trash can) icon below that item.
To reapply a campaign to a quote, click Campaigns and Reapply.
Note
If a quote includes campaigns that are no longer active because they were deleted or turned off, you will see a warning message. Inactive campaigns cannot be applied to the final invoice.
Add discounts to a quote
Note
Enable the Allow adjustments to discounts configuration setting to let the front-desk staff adjust discounts on items in a quote.
Enable the Make it mandatory to get manager authorization to adjust discounts configuration setting to require manager authorization for any discount changes.
Enable the Mandate comment for manual discounts configuration setting to require the front-desk staff to add a comment when applying discounts manually.
The discount amount that can be applied is limited by the discount limit defined at the job role level.
To add a discount to an item in a quote:
Click Discount below the item.
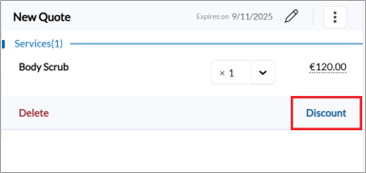
Select the type of discount:
Percent (%): Percentage discount on the item
Amount ($): Flat discount on the item
Enter the value of the discount.
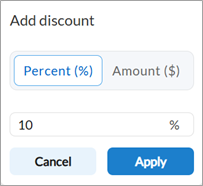
Click Apply.
Note
To remove any discounts applied to an item, click the Remove discount (trash can) icon below that item.
Manually adjust the price of an item in a quote
Note
Enable the following settings to allow the front-desk staff to manually adjust the price of items in a quote:
Click the price of the item.
Enter the new price.
Click the Tick icon or press Enter on your keyboard to save the updated price.

Create a custom package in quotes
Custom packages allow guests to use the services included in a quote across multiple visits.
Note
The custom package flow must be enabled to create custom packages in quotes.
If the custom package flow is not enabled by default, turn on the toggle at the top of the quote creation page, and then follow these steps:
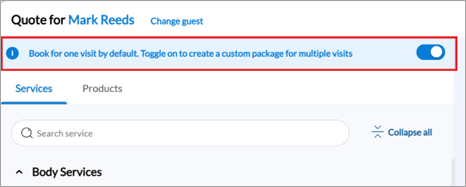
Select a custom package template, if needed. When you select a template, only the services and products included in that template are shown.
Note: You cannot use templates that include service or product categories when creating custom packages through quotes.
Add the services or products.
You can also add service add-ons, or entire categories or subcategories, directly while creating a custom package in quotes. When you add categories or subcategories to a quote, their price is calculated as the average price of the items they contain.
Apply an item-level discount, if needed. The discount is included in the quote price.
Click Proceed.
On the Create a custom package side panel:
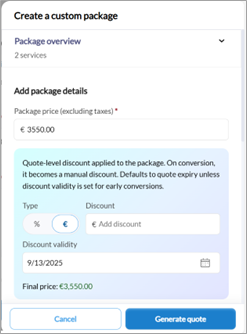
Expand Package overview to review the items added to the package.
Manually adjust the package price, if needed.
Add a quote-level discount by specifying its type, value, and validity.
Enter package details such as name, category, business unit, and description.
Add package expiry details, if needed.
Optionally, select the checkboxes to:
Allow purchasing the package with a gift card.
Close the package once the benefits are consumed.
Click Generate quote.
Note
You cannot apply campaigns when creating custom packages in quotes.
You cannot manually adjust item prices when creating custom packages in quotes.
If the quote-level discount expires before the quote itself, the discount appears separately before the 'Total' value on the printed quote to indicate that it applies only if the quote is converted before the discount’s expiry date.
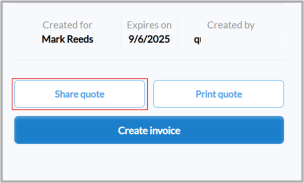
Send a quote to the guest
Open the quote.
On the Quote preview screen, click Share quote.
Select the communication channels that you want to use to send the quote to the guest.

If the email address or phone number is not available for a guest, you can enter it before sharing the quote. This will be updated in the guest profile.
Note
You can customize the Quote Create and Quote Update notification templates used when a quote is created or updated. To learn how to edit email notification templates, refer to Configure email and text templates.
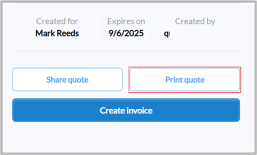
Print a quote
Open the quote.
On the Quote preview screen, click Print quote.
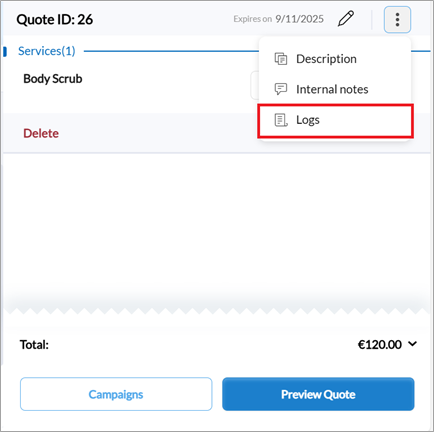
Access quote logs
Open an active quote.
Click Edit quote.
On the Quote panel, click the More options
icon.Click Logs. You can review the list of actions performed on the quote from the Quote Log screen.
Edit an expired quote
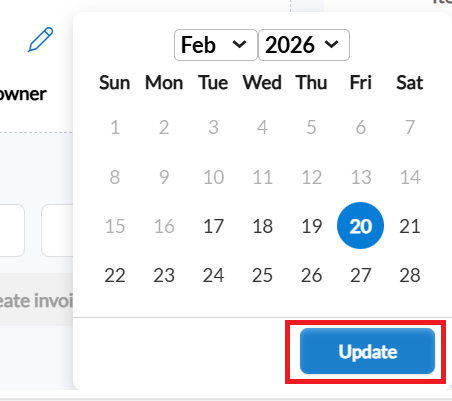
You can make an expired quote active again by changing its expiry date. To edit the expiry date of an expired quote, do the following:
Click the Edit icon next to the expiry date.
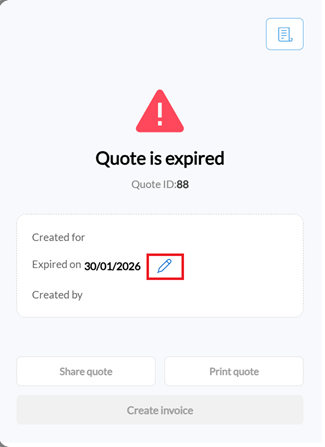
Select a future date when you want the quote to expire and click Update.
The quote is now active. You can also edit the details of the quote, if needed, by clicking Edit quote.