FAQ and troubleshooting
Troubleshoot image rendering issues in Microsoft Outlook (Email campaigns)
When you send email campaigns that contain images, your subscribers may face a plethora of image-rendering problems in Microsoft Outlook.
In this article, we will discuss the most common image-rendering issues that occur in Outlook and the steps you can take to tackle such difficulties.
Furthermore, you will learn about various guidelines to preemptively stop campaign image issues from arising in Outlook.
Image-display issues
The images in an email campaign are not displayed in Outlook due to a whole host of reasons. Here, we will discuss some common issues and provide guidelines to fix such problems.
Lack of space or extra space between images and accompanying text
If you add content along with an image in your email campaign, Outlook may not display an appropriate amount of space between the image and accompanying text. In addition, the formatting of the text could go awry as shown here.
To prevent such issues from arising, you must add a line break after the image or text in the following manner:
In Zenoti, go to Marketing > Campaigns > Email/Text Message.
Select your existing email campaign, and then click Edit campaign.
Alternatively, to create a new email campaign, click Add Scheduled Campaign.
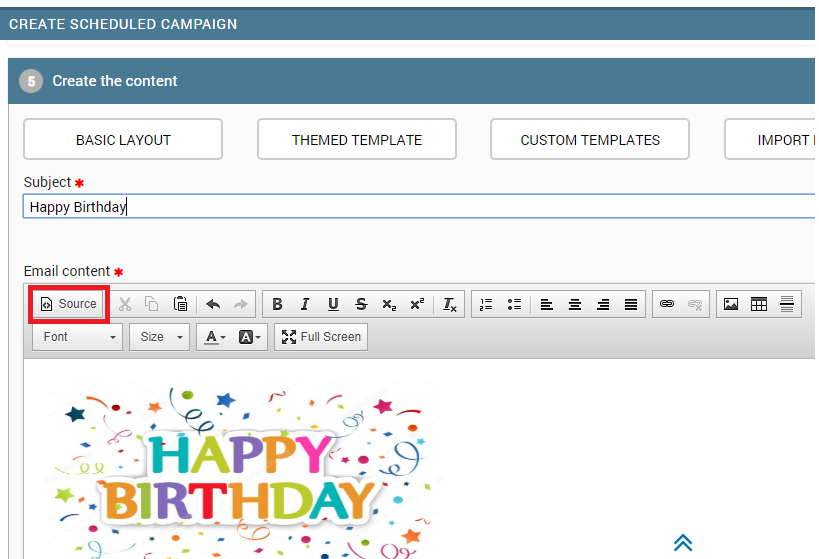
In the Create the content section, under Email content, add an image (if you have not added one already).
After you have added the image, on the content editor, click Source.
The HTML editor of your email content appears.
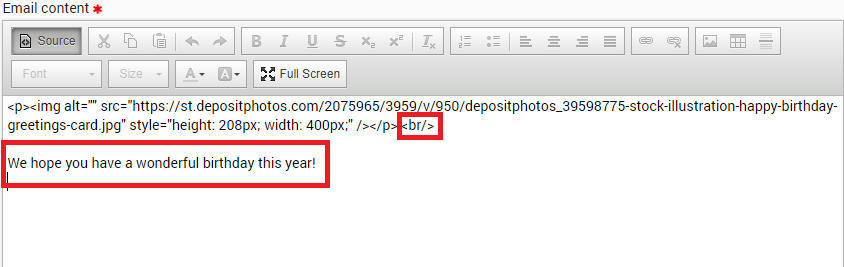
At the end of the image tag details, after the </p> tag, type <br/>.
This adds a line break after the image. For more information, refer to the subsequent screenshot.
Type the required content after the line break.
To return to the default content editor, click Source.
Save, test, and publish the email campaign.
This process enables you to add well-defined spaces between your campaign images and accompanying text.
After adding a line break, the campaign image and accompanying content appear like this in Outlook:
Images with wrapped text appear distorted
Outlook does not consider the padding and margins that you may have set for images. Consequently, the wrapped text sticks to the image and the entire content appears distorted.
In addition, the text may not appear like you intended and the formatting could go for a toss as shown here.
To prevent such issues from arising, you must set border, horizontal space, vertical space, and alignment values for the image by following these steps:
In Zenoti, go to Marketing > Campaigns > Email/Text Message.
Click your existing email campaign, and then click Edit campaign.
Alternatively, to create a new email campaign, click Add Scheduled Campaign.
In the Create the content section, under Email content, add an image (if you have not added one already).
You can modify the image properties by using any one of these methods:
Right-click the added image, and then click Image Properties.
The Image Properties dialog box appears.
On the Image Info tab, specify the following values:
In the Border box, type 0.
Always set this value as zero to remove the display of any unnecessary image borders in Outlook.
In the HSpace box, type 5.
In the VSpace box, type 5.
Specify the HSpace and VSpace values depending on how much white space you want between the image and the text.)
In the Alignment list box, select Left or Right.
The image will be aligned to the left or right based on your selection.
Click Ok.
Save, test, and publish the email campaign.

The HTML editor allows you to add image properties such as border dimensions and styles, margin dimensions, and alignment of the image with respect to the text.
On the content editor, click Source.
The HTML editor of your email content appears.
Add the following parameters in the image tag:
border-width: 0px;
Always set this value as zero to remove the display of any unnecessary image borders in Outlook.
border-style: solid;
margin-top: 15px;
margin-bottom: 15px;
margin-left: 15px;
margin-right: 15px;
Specify the margin values depending on how much white space you want between the image and the text.
float: left;
The image will be aligned to the left or right based on your specified value.
For more information, refer to the subsequent screenshot.
To return to the default content editor, click Source.
Save, test, and publish the email campaign.

This process enables you to send campaign images containing wrapped text without any risk of image distortion or corruption.
After adding these image properties, the campaign image and accompanying wrapped content appear like this in Outlook:

Background images are not displayed
Outlook does not support the display of background images. This drawback occurs not only on Outlook but also on some other email clients. There is no quick solution to this problem.
If you want to force the display of a background image in a custom-coded template, you must modify the template code as per your requirement.
Request customers to allow automatic download of images in Outlook
Consider a scenario where the subscribers of your campaigns are receiving your email, but the images are not displaying appropriately.
You can request them to enable the feature to automatically download pictures in Outlook by following these steps:
In Outlook, go to File > Options > Trust Center.
Under Microsoft Outlook Trust Center, click Trust Center Settings.
In the Automatic Download section, clear the Don't download pictures automatically in HTML email messages or RSS items check box.
If this process does not resolve the issue, request your customers to disable the text-only emails option:
In Outlook, go to File > Options > Trust Center.
Under Microsoft Outlook Trust Center, click Trust Center Settings.
Click the Email Security tab.
Under Read as Plain Text, clear the Read all standard mail in plain text check box.
Request clients to add your email address to their address book
Sometimes, Outlook continues to block the images in your campaign even after your subscribers enable automatic download of pictures.
To fix this issue, request your customers to create an address book in Outlook (if they do not have one already) and then add your email address to their address book.
Images do not appear properly
Outlook may face cache issues from time to time. Consequently, Outlook sometimes will not download your campaign image or the image may appear broken.
If this snag occurs, you can request your subscribers to restart their computer to clear Outlook's cache.
Broken-image issues
Here are some tips to fix problems that make your campaign images appear broken in Outlook.
Use absolute image paths
Always specify the absolute path of images in your campaigns. You must follow this guideline to ensure that images are not broken in all email clients.
For example, you must always specify image URLs in this format:
http://www.website.com/html-email/images/image.gif
Do not enter just the partial path of your image as shown here:
images/image.gif
Do not host images on a hosting or file-sharing website
Avoid hosting your email campaign images on a free file-hosting site or free website account such as Dropbox or Tumblr. These systems often block outside links to images that they host to keep their bandwidth costs down.
Instead, host the images on your own server or website, or use an image that you have already uploaded to Zenoti Image Gallery.
Do not host images on a secure server
Avoid hosting images on a private secure server that requires a login and password.
Slow loading of images
At times, the images in your campaign take a long time to load in your subscribers' inboxes or in test emails. Here are some reasons that may cause this issue to occur.
Image size is too large or image resolution is too high
To modify the file size and improve load time of the image, use an image optimizer tool.
Presence of multiple large images
We recommend that you use as few large campaign images as possible to optimize the loading time of images.
Best practices for the display of campaign images in Outlook
Use either .png, .jpg, or .gif file formats
This ensures that your image can be displayed in every major email client, including all versions of Outlook. While formats such as WebP and SVG have good support in web browsers, they are not well supported in email clients.
Do not add images that exceed 650 pixels in width
For the best display experience on mobile and Outlook, ensure that image widths are between 300 and 650 pixels. Outlook does not scale down images that are 1000 or more pixels wide. Instead, the image will be displayed at its actual size, causing the width of your template to expand and become distorted.
Break tall images into smaller pieces
If the height of your image is more than 600 pixels and you do not want to reduce it further, the best alternative is to crop the image into separate, shorter images. This will enable Outlook to load individual images faster and the images will retain their original quality.
Avoid text in your images
If images are blocked by a subscriber's inbox, they will not see the text included in your image. In addition, the image may become distorted on mobile as it will need to be scaled up or down to fit the mobile viewpoint.
Use Alt Text
Specifying alternative text provides useful contextual information about your images. So if Outlook blocks images from automatically displaying, your subscriber can still understand the context of the missing campaign image.
To add alt text to your image in Zenoti's email campaign content editor, follow these steps:
In Zenoti, go to Marketing > Campaigns > Email/Text Message.
Click your existing email campaign, and then click Edit campaign.
Alternatively, to create a new email campaign, click Add Scheduled Campaign.
In the Create the content section, under Email content, add an image (if you have not added one already).
You can add alt text to the image by using any one of these steps:
Right-click the added image, and then click Image Properties.
The Image Properties dialog box appears.
In the Alternative Text box, type the required description for your image.
For example, “Wish you a very happy birthday!”.
Click Ok.
Save, test, and publish the email campaign.

On the content editor, click Source.
The HTML editor of your email content appears.
In the image tag, for the img alt parameter, type the required description for your image.
For example, img alt="Wish you a very happy birthday!".
For more information, refer to the subsequent screenshot.
To return to the default content editor, click Source.
Save, test, and publish the email campaign.

This process enables you to add relevant alt text, which especially comes in handy if Outlook blocks images from automatically displaying.
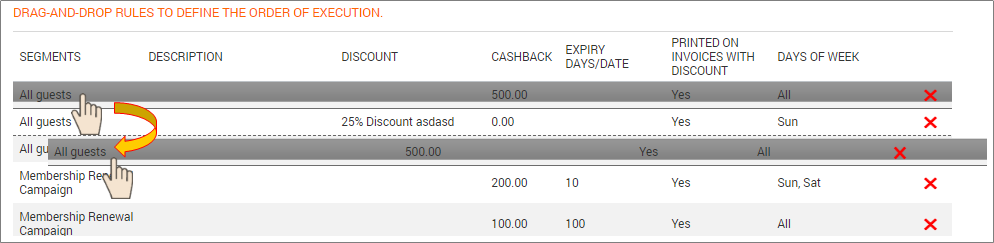
How do I change the sequence in which coupons are applied?
You can drag the coupons within the list view to reorder them.
I have created two coupons, 50 cashback first, followed by 10% discount. If a guest has visited our center twice, which one applies to the guest?
If the guest is eligible for both the coupons, guest receives $50 cashback first. Guest will never get the same coupon again.
While creating $50 cashback coupon, if you have selected the checkbox: Do not print a coupon on an invoice receipt with a discount then, though the guest is eligible for ‘10% discount’ coupon in their second visit, they will not receive it, if they have redeemed $50 cashback in that visit.
In the third visit, if 10% discount coupon has not expired or is not deleted then, guest can receive the 10% discount coupon on the receipt generated from their current invoice.
What is the difference between a discount or cashback offered by a custom coupon and that of a campaign?
Refer to the article What is the difference between discount or cashback offered by a custom coupon and that of a campaign Comparison of custom coupons and cashback campaigns to learn about the differences.
When do you use cashback coupons and discount coupons?
If you want to give a cashback in terms of a fixed amount, on services and day packages or products then, you can use the cashback coupons.
If you want to give a discount in terms of percentage or a fixed amount on purchase of services, products, memberships, or packages then, create the discount coupons.
Discount coupons can be redeemed only on the future visit of a guest while discount campaigns can be redeemed by the guest in the current visit.
Will a guest receive the same coupon again on a later visit?
An eligible guest receives a coupon only once.
How to pause a campaign at a center level?
If you've created a campaign at a center level and you want to pause it or make it temporarily inactive, follow these steps:
Ensure you are at the desired center.
At the center level, click the Marketing icon and navigate to Campaigns > Email/Text Message.
Note
To view media, opportunity, and notes campaigns, select these options from Campaigns menu.
From the filters, ensure you select Always On or Scheduled, All Channels, and Live from to view a list of Always On or Scheduled campaigns that are currently live.

Open the desired campaign for editing and click Stop to pause the campaign.

The status of the campaign changes to Paused.
How to pause a campaign at the organization level?
If you've created a campaign at the organization level and you want to pause it or make it temporarily inactive, follow these steps:
At the organization level, click the Marketing icon.
Go to Campaigns > Email/Text Message.
Note
To view media, opportunity, and notes campaigns, select these options from Campaigns menu.
From the filters, ensure you select Always On or Scheduled, All Channels, and Live from to view a list of Always On or Scheduled campaigns that are currently live.
Open the desired campaign for editing and you can do one of the following:
Click Stop to pause the campaign for all the centers
Click Update, uncheck the desired centers, and click Save.
Important
You must have the campaign active for at least one center.

The status of the campaign changes to Paused.
FAQ: Why can't I see the option to schedule a campaign in Zenoti?
Why can't I see the option to schedule a text campaign on the campaign summary page?
If you cannot see the options to schedule a campaign, this is likely due to permission settings. Ensure that the appropriate permissions are enabled for your user role.
To resolve this:
Navigate to Configuration > Security > Security Roles.
Open the relevant user role (for example, Administrator or Marketing Manager).
Navigate to the Permissions tab.
Expand the Marketing Manager section and enable the following permissions:
Send/Schedule SMS Campaign
Send/Schedule Email Campaign
Send/Schedule Push Campaign (if applicable)
Click Save.
Log out of Zenoti and log back in for the changes to take effect.
What should I do if the scheduling option still doesn't appear after updating permissions?
If the issue persists after updating permissions:
Confirm permission updates: Verify that the permissions were configured correctly.
Check role assignments: Compare your role assignments with a user who has access to scheduling options and request necessary adjustments.
If you lack the required permissions, contact an administrator or a user with owner-level access to enable them on your behalf or assist in scheduling the campaign directly.
How do quiet hours affect campaign delivery in Zenoti?
Quiet hours directly influence when your SMS campaigns are delivered in Zenoti. If you've scheduled a campaign and your customers haven’t received it yet, it’s likely due to quiet hour restrictions, either set by your business or automatically enforced by telecom carriers in compliance with regional regulations.
What does this mean for your campaign delivery?
Zenoti integrates with providers like Twilio, which adhere to local regulations by automatically delaying messages that fall within state-specific quiet hours. Even if you've scheduled a campaign for a specific time, if that time falls within a quiet hour window, delivery will be postponed until the restriction ends. For example, states like Texas and Florida prohibit marketing texts between 8 PM and 8 AM local time.
Why this matters:
Even if you've configured campaign delivery settings within Zenoti correctly, messages won’t be sent during these restricted periods. This is to ensure compliance with consumer protection laws and to improve message deliverability by avoiding potential blocks or penalties from carriers.
FAQ: What time do "Always On" campaigns start processing in Zenoti?
What are Always On campaigns?
Always On campaigns in Zenoti provide automated, recurring email and SMS functionality based on a defined target segment. These campaigns run in the background, continuously evaluating target segments against predefined criteria and sending notifications automatically to eligible guests.
What time do Always On campaigns start processing?
All Always On campaigns start processing at 4:00 AM UK time. Messages can be sent at any point during the day depending on the number of recipients and system load.
How often do Always On campaigns run?
Always On campaigns operate daily and evaluate their target segments each day to ensure messages are timely and relevant.
Can an Always On campaign become active on the same day it is created?
No. Always On campaigns cannot become active on the same day they are set up. They start processing the next day.
What happens if I pause an Always On campaign?
If a campaign is paused, emails will not resume until you manually reactivate the campaign.
Are emails resent to guests who did not engage?
Yes. For non-signup profiles, email campaigns are resent automatically after 61 days to improve engagement opportunities.
Can I control how often a guest receives an Always On campaign?
Yes. You can control recurrence per guest using the Send campaign to the guest only once in [X days] setting.
Why is there a delay in delivering a campaign?
When you schedule a campaign, Zenoti starts delivering the campaign to the providers at the scheduled time.
However, your guests may not receive the campaign immediately. This delay occurs due to several external factors that are beyond Zenoti’s control.
Why is my Zenoti campaign not appearing or applying?
Campaigns in Zenoti help manage promotions and discounts for guests. If a campaign is not appearing or applying to an invoice or booking, review the following common causes and solutions.
Timing and Activation Issues
Why doesn't the campaign appear on an invoice created before the campaign activation date?
Campaigns apply only to invoices created after the campaign becomes active. If the invoice was created before the activation date, the campaign will not appear. To resolve this, create a new invoice after the campaign activation date.
Why doesn't the campaign apply to appointments booked before the campaign start date?
Campaigns configured to apply only to appointments booked after a specific date will not cover earlier bookings. For example, if a campaign starts on July 24th, bookings made before that date are ineligible, even if the invoice is generated afterward.
Why doesn't the campaign apply when the invoice start date is before the campaign activation date?
If the campaign activation date and invoice start date do not align, the campaign will not apply. For example, if a campaign starts on June 28th but the invoice start date is June 22nd, the campaign is ineligible. Ensure both dates align.
Discount Overlap Restrictions
Why doesn't my campaign apply when another discount is already on the invoice?
Zenoti restricts applying multiple discounts to the same invoice. If an item-level discount or another offer is already applied, the campaign may not apply. Adjust the existing discounts to avoid overlap if you want to apply the campaign-specific discount.
Campaign Booking Windows
Why doesn't the campaign apply to appointments outside the booking window?
Campaigns with a specific booking window apply only to appointments scheduled within that period. For example, a campaign valid for bookings between July 1st and July 31st will not apply to appointments outside this range.
To resolve this, either expand the booking window in the campaign settings or remove the date restriction. Alternatively, apply a manual discount as a workaround.
Redemption Limits
Why doesn't the campaign appear for a guest who has used it before?
Campaigns can be limited by the number of redemptions per guest. If the campaign allows only one redemption per guest, it will not appear after the first use. To allow multiple redemptions, increase the limit in the campaign settings.
General Troubleshooting Tips
Verify campaign settings to ensure they align with your intended use.
Check the timing of invoice creation, booking dates, and campaign activation settings.
Review restrictions such as discount overlap limitations and redemption thresholds.
Test the campaign by creating a new invoice or appointment.
If configuration changes are not possible, consider applying a manual discount as a temporary solution.
FAQ: How do I manage segmentation, email frequency, and unsubscribe options in Zenoti campaigns?
Zenoti offers tools to help you manage customer communications effectively. This FAQ covers best practices for segmentation, controlling message frequency, and ensuring compliance with unsubscribe protocols.
Segmentation and Exclusion Rules
How do I exclude members from marketing emails?
To ensure marketing emails target only relevant recipients, use the following strategies:
Exclude members with future appointments: Add rules to your segments that filter out guests who already have scheduled appointments.
Focus on non-members or non-purchasers: Use segmentation criteria under Type to exclude guests who have purchased memberships or booked future services.
Prevent re-targeting of existing members: Modify your workflow to ensure campaigns do not include returning members who submit their information again.
How do I remove a specific guest from a segment?
To remove a specific guest from a marketing segment:
Edit the guest's profile and assign a guest tag.
Navigate to Marketing > Segmentation > Target Segments.
Locate the segment using the search field.
Add an exclusion rule specifying the guest tag.
Save your changes.
Campaign Cadence and Frequency Management
How do I set frequency limits for campaigns?
Zenoti allows you to limit the frequency of campaign messages to prevent over-messaging:
Set a campaign interval (for example, 14 days). Recipients who have already received the campaign will not be included in new sends within the specified timeframe.
Note: Guests will only re-enter the segment if they meet the remaining eligibility criteria beyond this interval.
How do I avoid sending multiple campaigns to the same guest on the same day?
Zenoti limits advanced marketing campaigns to one per guest (email or SMS) per day. However, transactional and core marketing campaigns operate separately.
To prevent multiple emails on the same day:
Monitor daily delivery reports: Use reporting tools to track all communications sent to each guest.
Manually align critical campaigns: Advanced marketing campaigns follow a set cadence (for example, 14 days). Be mindful of transactional email distribution within the same timeframe.
Managing Unsubscribe Options
How do I add an unsubscribe button to my campaign emails?
To include an unsubscribe option:
Open the email content editor (rich-text or professional).
Insert the [MailUnsubscribeLink] macro within your email content.
Customize the accompanying text (for example, "Click here to unsubscribe").
This enables recipients to opt out of further communications and ensures compliance with opt-out regulations.
What should I do if a guest requests to unsubscribe directly?
If a recipient reports difficulty unsubscribing or requests an opt-out directly, manually remove them from the target segment promptly.
Reporting and Monitoring
How can I monitor campaign frequency to avoid over-messaging?
Export email send data periodically to monitor the volume and type of emails sent to individual guests. This allows you to fine-tune your segmentation and frequency rules, reducing the likelihood of over-messaging.
How to publish a campaign to your Webstore?
If you have a Zenoti Webstore for your business, you can publish a campaign to the webstore to reach out to your online customers.
Before you begin
Ensure that you've created an email/text campaign (always-on or scheduled).
At the organization level, click the Marketing icon.
Navigate to Campaigns > Email/Text Message.

For the campaign that you want to publish to Webstore, click the Catalog icon.
The setup page for Webstore appears.

Select the Show in Catalog checkbox.
In the Page Title box, enter the text that you want to display on the browser tab.
In the Meta Keywords box, enter the SEO keywords that you want this campaign to be searchable by.
In the Meta Description box, enter the description that you want to display on the campaign page.
To add an image that you want to display for this campaign on the Webstore, click Upload and add an image.
Click Save.
The campaign is published on your Zenoti Webstore.
How to Enable Permissions for Employee Check In or Check Out from Zenoti Mobile?
An employee must check in or check out at the center during the start and end of the day, respectively. Failure to effectively check in or check out may result in payroll errors.
As a business owner or manager, make sure your employees with specific roles have permission to check-in and check-out.
At the organization level, click the Configuration icon.
Search for and select Security roles from the Security section.
Choose the role.
Click the Permissions tab.
Expand Employee Manager section.
From Other Settings, select Check_in_out.
Click Save.
How to restrict employees from seeing other’s schedules in Zenoti Mobile?
As a business owner or manager, you may want your providers to see only their services in an appointment and not everyone else’s.
At the organization level, click the Configuration icon.
Search for and select Security roles from the Security section.
Choose the role.
Click the Permissions tab and expand the Zenoti Mobile section.
Clear the View all guest services in a day checkbox.
Click Save.
Cannot send intake forms to some guests
If you’re not able to email the intake forms to some of your guests, it may be because the option to receive emails from your business is not selected for your guest.
If your guest wants to receive intake forms or other updates via email, you need to enable the setting from the Guest Profile page after guest confirmation.
Open the guest profile.
The General tab opens by default.
Under Preferences, select the Receive Transactional Emails checkbox.

Click Save.
The guest will receive the intake forms.
How can a manager manage appointments from home
If you are a business owner or center manager, you can access Zenoti Mobile application from your mobile and manage the appointments at your convenience.
For example, you can be at home, a grocery store, or doctor's office, but still connect remotely to check the appointments scheduled for the day, edit or modify the appointments, and manage guest details.
What will not work outside the geofence
If an employee is outside the specified radius, the employee will not have access to all of the functionalities of Zenoti Mobile. However, if you want your employees to access appointments data when they are outside of Geofence range, you need to do the following:
Enable the Can access all data outside geofence region on Zenoti Mobile setting for an employee role permission.

Enable the Allow check-in from mobile setting at the organization level.

Employees who have the appropriate permissions enabled can perform the following actions when outside the Geofence range except check-in or check-out.
Modify online bookings for my center
You can pause the bookings flow done from Webstore, Zenoti Mobile, or Customer Mobile Application (CMA) for your business. Depending on your role permissions, you can temporarily disable online bookings for all of your centers until required.
At the center level, click the Configuration icon.
Click Online Booking tab.
Click to expand Settings.
To block bookings, in Block online bookings from, enter a start and end date.
This allows you to block online bookings from a particular date until whenever you want to resume your business.
To ensure you don’t want to receive bookings during this period, uncheck Allow Appointment Booking box.
Click Save.
Go to the Hours tab.
To make sure that your guests don’t book any openings when using CMA, change the Center Start and End Time for all days in a week.
For example, change the Start time to 0.00 and End time to 1.00 am.
Click Save.
Note
If you get a User consent for card on file is mandatory error message, when saving the start and end time as mentioned in the example, make sure the Enable user consent for card on file is unchecked at the center level.
How can I audit using Zenoti Mobile
You can use the camera in your iPad or iPhone, or use a Zenoti compatible bar code scanner to scan the products and conduct stock count.
Note
You can neither view the current stock nor reconcile from Zenoti Mobile.
Use Zenoti web version to know about your current stock count and to perform reconciliation.
If you are using the Manager application, we recommend you use the latest version of Zenoti Mobile to conduct your store or floor audits.
Important
The Manager application will soon be deprecated so we recommend you use Zenoti Mobile for conduct stock count.
Create segments for COVID-19-related campaigns
Segments let you create target groups so that your guests see messages that are appropriate for them. For instance, if you want to let guests with appointments scheduled for the next two weeks know that their appointments are canceled, you can create a segment of only those guests who had appointments scheduled for this time period. In this way, your guests are not inundated with messages that don’t affect them.
Here we will look at some segments that you may want to create to communicate information about center closure and canceled appointments.
To create segments
Go to the Marketing tab, under Segmentation, select Target Segments.
The Manage Target Segments page appears.
Click Add.
The Create a New Segment page appears that has a list of predefined segments.
Select Create Custom Segment and then click Create.
The Create a Custom Segment page appears.
Enter a name for the segment and then click Create.
The Edit Custom Segment page appears.
Use the Create the Rules section to set up the filters to find the guests to add to this segment. After you define a filter, click Add.
You can add as many rules as are necessary to define the target segment.
Click Save.
Target segments during COVID-19
The following sections show you how to create segments that might be useful when you send out COVID-19-related announcements.
All guests
This segment will contain all your guests irrespective of whether they purchased a service or product at the center.
To create this segment:
On the Edit Custom Segment page, in the Create the Rules section, from the Create the rule based on … list, select Demographics.
From the Select Criteria list, select Gender.
From the Select Operator list, select All.
Click Add.
Click Save.

Guests who visited the center in the last month
To create this segment:
On the Edit Custom Segment page, in the Create the Rules section, from the Create the rule based on … list, select Visits.
From the Select Criteria list, select Last Visit.
From the Select Operator list, select less than.
Set the value to 2 months ago
Click Add.
Click Save.

Guests who visit the center more than once a month
To create this segment:
On the Edit Custom Segment page, in the Create the Rules section, from the Create the rule based on … list, select Visits.
From the Select Criteria list, select Frequency.
From the Select Operator list, select more than.
Set the value to 1 visits per month.
Click Add.
Click Save.

Guests who have appointments in the next two weeks
To create this segment:
On the Edit Custom Segment page, in the Create the Rules section, from the Create the rule based on … list, select Visits.
From the Select Criteria list, select Next Visit.
From the Select Operator list, select less than.
Set the value to 2 weeks.
Click Add.
Click Save.

Guests who had appointments in the previous two weeks
To create this segment:
On the Edit Custom Segment page, in the Create the Rules section, from the Create the rule based on … list, select Visits.
From the Select Criteria list, select Last Visit.
From the Select Operator list, select less than.
Set the value to 2 weeks.
Click Add.
Click Save.

These are just a few segments you may want to create and use when sending update communications to customers.
How to create my first email with the simplified email editor?
Disclaimer
This is article is applicable for the new editor that was released in August 2020.
Before you start creating your first email with our enhanced email editor, you can check out the best practices for email marketing.
Click the Marketing icon and navigate to Campaigns > Email/Text Message.
The Email/Text Message Campaigns page appears.

You can see that the Simplified Email Editor switch is turned on, which means that you are using the enhanced editor.
Important
To use this editor, each user must enable the switch.
Based on your requirement, click Add Scheduled Campaign or Add Always On Campaign.
The Create New Email/Text Message Scheduled Campaign page appears.

Enter the details in the Enter campaign info, Communication channel, Select campaign type, and Select recipients sections.
Select the Create the content section.

Select a template layout.
Enter the subject for your message.
For better view of your editor, you can open the editor in fullscreen mode.
To do this, click Enable Full Screen.

To exit the full screen, you can do one of the following:
Click the x button on the upper-right corner of the screen.
Hit the
Esckey on your keyboard.Move your mouse to the top of the editor screen and you can see that the X button appears. Click the X button.

To learn about the editing area, read our help article: Enhanced Email Editor: Editing area.
Choose the general settings for the email from the Appearance tab.
Add blocks such as box, image, video, and buttons from the Content tab.
You can use the following editor options while you are customizing the content.

Test the email.

Enter a valid email address and click Send Test Mail.

Hooray! You are ready to publish the email.
You can track the performance of your campaign on the Marketing > Campaigns > Dashboard.
How does Zenoti calculate credit consumption?
How are credits calculated in Zenoti?
Zenoti calculates credits based on the type of communication you send. Each communication channel consumes credits differently.
How many credits does an email consume?
Email: 1 credit per email sent
Every email sent to a recipient consumes one credit.
How are SMS credits calculated?
SMS credit consumption depends on character length and content type.
Standard SMS (English characters only)
1 credit for up to 160 characters
If your message exceeds 160 characters, Zenoti splits it into multiple messages, and each part consumes additional credits.
Unicode SMS (Non-English characters or emojis)
1 credit for up to 70 Unicode characters
Zenoti treats a message as Unicode if it contains:
At least one word in a language other than English
Any emoji
Unicode messages have a lower character limit, so they may consume more credits.
Does the final SMS length always match what I created?
No. The final SMS length may differ at the time of delivery.
Zenoti replaces macros (such as guest name, appointment details, etc.) when sending the message. If the substituted values are longer than expected, the final message may exceed the original character limit and consume additional credits.
How does language preference affect SMS credits?
When you send a campaign, Zenoti automatically adjusts the message language based on this hierarchy:
User language preference
Center language preference
Organization language preference
Default to English (if none are set)
If the translated message contains Unicode characters, Zenoti applies Unicode limits (70 characters per credit), which may increase credit consumption.
How are MMS credits calculated?
MMS: 2 × SMS credit consumption
MMS messages consume twice the credits of an SMS. Since MMS supports images, Zenoti automatically charges double the SMS rate.
Do Push Notifications consume credits?
Push Notifications: No credit consumption
Zenoti does not deduct credits for push notifications.
How are WhatsApp messages charged?
WhatsApp Message: 1 credit per message
Each WhatsApp message sent to a recipient consumes one credit.
How can I manage my Zenoti credit usage and reduce the number of text messages being sent?
How can I check my Zenoti credit usage?
You can review your credit usage through the Credit Usage Report or the Credit Consumption Report.
Follow these steps:
Go to Reports > Credit Usage Report, or
Go to Marketing > Credit Consumption Report.
These reports shows detailed information about your email and text credit consumption.
How can I check my available credit balance?
To view your current credit balance:
Go to Configuration > Business details > Credit Balance.
Monitoring your balance helps you plan campaigns and avoid service interruptions.
How can I reduce the number of text messages being sent?
You can reduce outgoing messages by adjusting your notification and campaign settings.
How do I disable specific notifications?
You can turn off notifications at the center level.
At the center level, go to Configuration > Notifications.
Click Templates for Email and Text.
Switch the toggle from Yes to No for the notifications you want to disable.
This prevents those messages from being sent automatically.
What does the alert “Your organization is critically low on text message (SMS) credits” mean, and can this alert be turned off?
The alert “Your organization is critically low on text message (SMS) credits” indicates that your organization’s available SMS credit balance has dropped below the minimum threshold required to continue sending text messages.
When this alert appears:
Your remaining SMS credits are nearly exhausted.
Upcoming SMS campaigns, reminders, or notifications may fail.
You may receive an “Insufficient Credits” error when attempting to send messages.
This alert helps prevent unexpected communication disruptions.
Can this alert be turned off?
No. You cannot disable this alert.
Zenoti displays this notification to ensure uninterrupted communication and prevent failed SMS campaigns or appointment reminders. It acts as a safeguard for your organization.
What should I do when I see this alert?
Follow these steps:
Go to Configuration > Business details > Credit Balance.
Check your available SMS credits.
Purchase additional credits if necessary.
Review recent campaigns or notification settings to optimize usage.
FAQ: What should I know about managing SMS credits, permissions, and campaign processing in Zenoti?
SMS Credit Balance
What does a negative SMS credit balance mean?
A negative SMS credit balance indicates that the system allowed you to continue sending messages after your available credits were exhausted. To continue sending messages, purchase additional credits to bring the balance back to zero or above.
What happens to newly purchased credits if I have an overdraft balance?
When your SMS credit balance is negative, newly purchased credits are first used to offset the overdraft balance. For example, if you purchase 5,000 credits but have an overdraft of 3,828 credits, the system allocates credits to cover the overdraft before making the remaining credits available for new usage.
Campaign Processing
What happens if I don't have enough SMS credits to send a campaign?
If SMS credits are not available at the organization level, the campaign will not be sent to your guests. Zenoti recommends purchasing SMS credits before sending out your campaign.
Permissions
Why can't I view my SMS credit balance?
Viewing credit balances requires specific permissions. Typically, only the Administrator of your location has the authority to view credit balances. If you need to view credits, contact an administrator to associate the required role with your profile.
Monitoring and Troubleshooting
How do I check how my SMS credits are being used?
Navigate to the Reports tab and access the Credit Usage Report. This report shows how credits are being utilized, including deductions for overdrafts and credits used by individual campaigns.
What should I do if purchased credits are not reflecting correctly?
If purchased credits are not displaying correctly:
Review the Credit Usage Report to check allocations and overdrafts.
If discrepancies persist, contact Zenoti Support to resolve the issue and prevent further imbalances.
Best Practices
To avoid SMS credit issues:
Regularly monitor the Credit Usage Report.
Ensure your campaigns align with available credits before sending.
Set up usage alerts if possible.
Maintain open communication with Zenoti Support to manage and clarify any discrepancies.
How can I manage email credits effectively for sending targeted emails and newsletters?
To manage email credits efficiently, follow these best practices:
Monitor your credit usage regularly using the credit usage report. Email credits are allocated monthly and may vary by location. Keeping track of usage helps avoid unexpected limitations.
Use one-time campaigns strategically. One-time campaigns are an effective way to send scheduled emails without relying on “Always on” campaign credits, which may be limited.
Avoid overusing "Always on" campaigns. These campaigns may consume credits continuously, which can lead to credit shortages, especially for high-frequency communication.
Purchase additional credits if needed. You can buy more email credits through the Zenoti Marketplace to support larger or more frequent campaigns.
Plan and schedule email sends. Strategic scheduling ensures better control over credit consumption and helps maximize campaign effectiveness.
By using credits mindfully and planning campaigns in advance, you can ensure successful delivery of targeted emails and newsletters.
How can I activate and manage WhatsApp Marketing for my business using Zenoti?
How do I activate WhatsApp Marketing for my business?
To enable WhatsApp Marketing, contact Zenoti Support and request activation for your organization.
WhatsApp Marketing must be enabled at the organizational level before you can create templates or send campaigns.
Why don’t I see the “Manage WhatsApp Template” option?
If the Manage WhatsApp Template button is not visible, you do not have the required role permissions. Contact your manager to request the permission to Send/Schedule WhatsApp Campaigns.
For more information on creating and managing WhatsApp Marketing templates and campaigns, refer to the Create and Publish WhatsApp Campaigns help article.
FAQ: How do I troubleshoot common issues with gift voucher codes in Zenoti?
Gift voucher codes play a key role in promotions, referrals, and gift programs. If you encounter issues such as invalid codes, upload errors, or redemption failures, follow the guidance below to resolve them quickly.
Why is the voucher code not recognized?
If Zenoti does not recognize a voucher code, check the following:
Was the voucher linked to a guest?
For walk-in purchases, the voucher may not be associated with a guest profile.
If the voucher is not sent automatically, notify the recipient manually using your email provider.
Is the voucher code entered correctly?
Verify that the code matches the expected format.
Some programs require specific prefixes (for example, referral codes starting with “RF”).
Cross-check the code against your campaign sheet or data source.
If the code still fails, validate it against the original uploaded voucher file.
Why do I see a “Voucher Already Redeemed” error?
This error may appear if:
The voucher was already used.
The campaign automatically applies a discount, and you do not need to manually enter the voucher code.
Review the campaign configuration to confirm whether the system applies discounts automatically.
Why are guests unable to use their voucher codes?
If guests report that voucher codes are not working:
Collect specific voucher code examples.
Note the guest names and profiles involved.
Check if the voucher is expired, already redeemed, or restricted to certain services.
Having exact examples helps you investigate and resolve the issue faster.
What should I do if voucher codes fail during upload?
If you encounter errors while uploading voucher codes:
Use the official sample template provided by Zenoti Support.
Ensure your file follows the required format (column structure, code format, and data consistency).
Test with a smaller, corrected subset of data to identify formatting errors.
Re-upload the corrected file.
Most upload issues occur due to formatting inconsistencies.
Subscribe to the Smart Marketing report
The Smart Marketing report summarizes the revenue and other key performance metrics of your campaigns. You can opt to subscribe to the report for your organization or center. You can also specify when recipients should get this report.
Subscription options: Points to consider
To receive the Smart Marketing report, recipients must either have an active role in Zenoti or a valid email address. This is because Zenoti Support can set up recipients based on either Role or email addresses.
While talking to Zenoti Support, you can specify whether you want the recipients to receive the organization or the center-level report. For example, if you subscribe to get this report for a recipient at the center level, then Zenoti sends only the center level report.
You can ask Zenoti Support to send this report either Monthly or Biweekly.
Monthly: If you choose this option, recipients get that month’s report on the 1st of the next month.
For example, Zenoti sends the monthly report for June on the 1st of July to its recipients.
Biweekly: If you choose this option, recipients get the report twice for a specific month.
For example, the recipient gets the first report on the 15th of June which consists of data from 1st till 14th, and the second report on the 1st of July that has data for the entire month of June (1st to 30th of June).
FAQ
I contacted Zenoti Support and subscribed to the Smart Marketing report. When will I receive it?
When you subscribe to the monthly report, you receive the previous month’s report on the 1st of the next month at 6 AM center time. For example, you have subscribed to the monthly report for your center located in Boston. The recipients get the monthly report for April on 1st May at 6 AM Eastern Standard Time (EST).
Similarly, if you have subscribed to a bi-weekly report for your Boston center, the recipients get the first report for the month of May on 15th May at 6 AM (EST) and the second report on the 1st of June 6 AM (EST).
When subscribed to receive the organization-level report, when will the recipients receive the report?
If you subscribe to get the organization-level report, Zenoti considers the highest number of centers that belong to a time zone and sends the reports based on that center’s time.
For example, you have subscribed to receive the organization-level report - you have three centers in the UK and two in the Middle East. In this case, you have more centers in the UK and therefore, Zenoti sends the organizational level report based on the UK time (Greenwich Mean Time).
How do I change the sequence in which coupons are applied?
You can drag the coupons within the list view to reorder them.
How many times can a guest use a coupon?
Only once.
I have created two coupons, 50 cashback first, followed by 10% discount. If a guest has visited our center twice, which one applies to the guest?
If the guest is eligible for both the coupons, guest receives $50 cashback first. Guest will never get the same coupon again.
While creating $50 cashback coupon, if you have selected the checkbox: Do not print a coupon on an invoice receipt with a discount then, though the guest is eligible for ‘10% discount’ coupon in their second visit, they will not receive it, if they have redeemed $50 cashback in that visit.
In the third visit, if 10% discount coupon has not expired or is not deleted then, guest can receive the 10% discount coupon on the receipt generated from their current invoice.
What is the difference between a discount or cashback offered by a custom coupon and that of a campaign?
Refer to the article What is the difference between discount or cashback offered by a custom coupon and that of a campaign Comparison of custom coupons and cashback campaigns to learn about the differences.
When do you use cashback coupons and discount coupons?
If you want to give a cashback in terms of a fixed amount, on services and day packages or products then, you can use the cashback coupons.
If you want to give a discount in terms of percentage or a fixed amount on purchase of services, products, memberships, or packages then, create the discount coupons.
Discount coupons can be redeemed only on the future visit of a guest while discount campaigns can be redeemed by the guest in the current visit.
Will a guest receive the same coupon again on a later visit?
An eligible guest receives a coupon only once.
How to view the Campaign Status report data?
The Campaign Status report gives you a snapshot of guests who received promotional emails or SMS notifications sent via Zenoti. The report data includes guest code, guest name, email address, email address/number to which the notification was sent, the status of notification delivery, whether the recipient guest has opened the notification or not, whether the recipient guest has clicked the campaign or not, and name of the center that launched the campaign.
Click the Marketing icon.
Navigate to Campaigns > Email/Text Message.
Open a campaign delivered to the guests.
Click the Status tab. Here you can view details such as the type of notification sent, the status of delivery, the number of guests in the target segment, the number of guests eligible for the campaign, and the number of guests who opened and clicked the campaign.
Note
To know why some guests are excluded and get the respective count, in the Eligible field, click the info icon. 'Inactive email' suggests that the previous email bounced.
To view details of the guests who received the campaign notification, click Sent Date.
Note
You can export the guest data to an Excel or .CSV file.
How do I stop a discount?
When you create a media campaign, you may or may not have set the start and end dates during which the campaign and the discount is applicable.
At times, you may want to stop a discount that you do not wish to continue.
At the organization level, click the Marketing icon.
Navigate to Campaigns > Media.
The Media Campaigns page appears.
Search for the campaign and open it.

Click Edit Campaign.
The campaign is opened for editing.
Expand the Select campaign type section.

For Offer is valid between, enter the Start Date and the End Date.
Tip
If you want to stop the campaign right away, enter yesterday's date for End Date.
Expand the Save and publish section and click Save and close.
