Redesigned Guest Profile
Note
This feature is available only if the Redesigned Appointment Book is enabled at both the organization and center levels.
Redesigned guest profile offers a modern, intuitive, and consolidated view of your guest’s details. Accessible from multiple touchpoints such as Appointment Book, POS, Booking Wizard, and other modules, it enables front desk staff and providers to efficiently manage guest information without leaving their workflows. This interface significantly reduces navigation between screens, letting you focus more on delivering an exceptional guest experience.
As a front desk operator or service provider, this allows you to quickly and efficiently access critical guest information such as contact details, appointments, memberships, and purchase history in one consolidated view. You can access all this information without leaving the calendar view.
The redesigned experience minimizes navigation across multiple screens, helping staff focus more on delivering exceptional service and less on managing fragmented information.
Recommended system requirements
Use a device with a minimum of 8 GB RAM. For optimal performance, 12 to 16 GB RAM is recommended.
Run Zenoti in a single tab to maintain optimal performance, especially when working with limited device memory.
Accessing redesigned guest profile
You can launch redesigned guest profile from any of the following touchpoints:
Appointment Book (Right-click appointment block or search bar)
POS
Booking Wizard
Other integrated modules
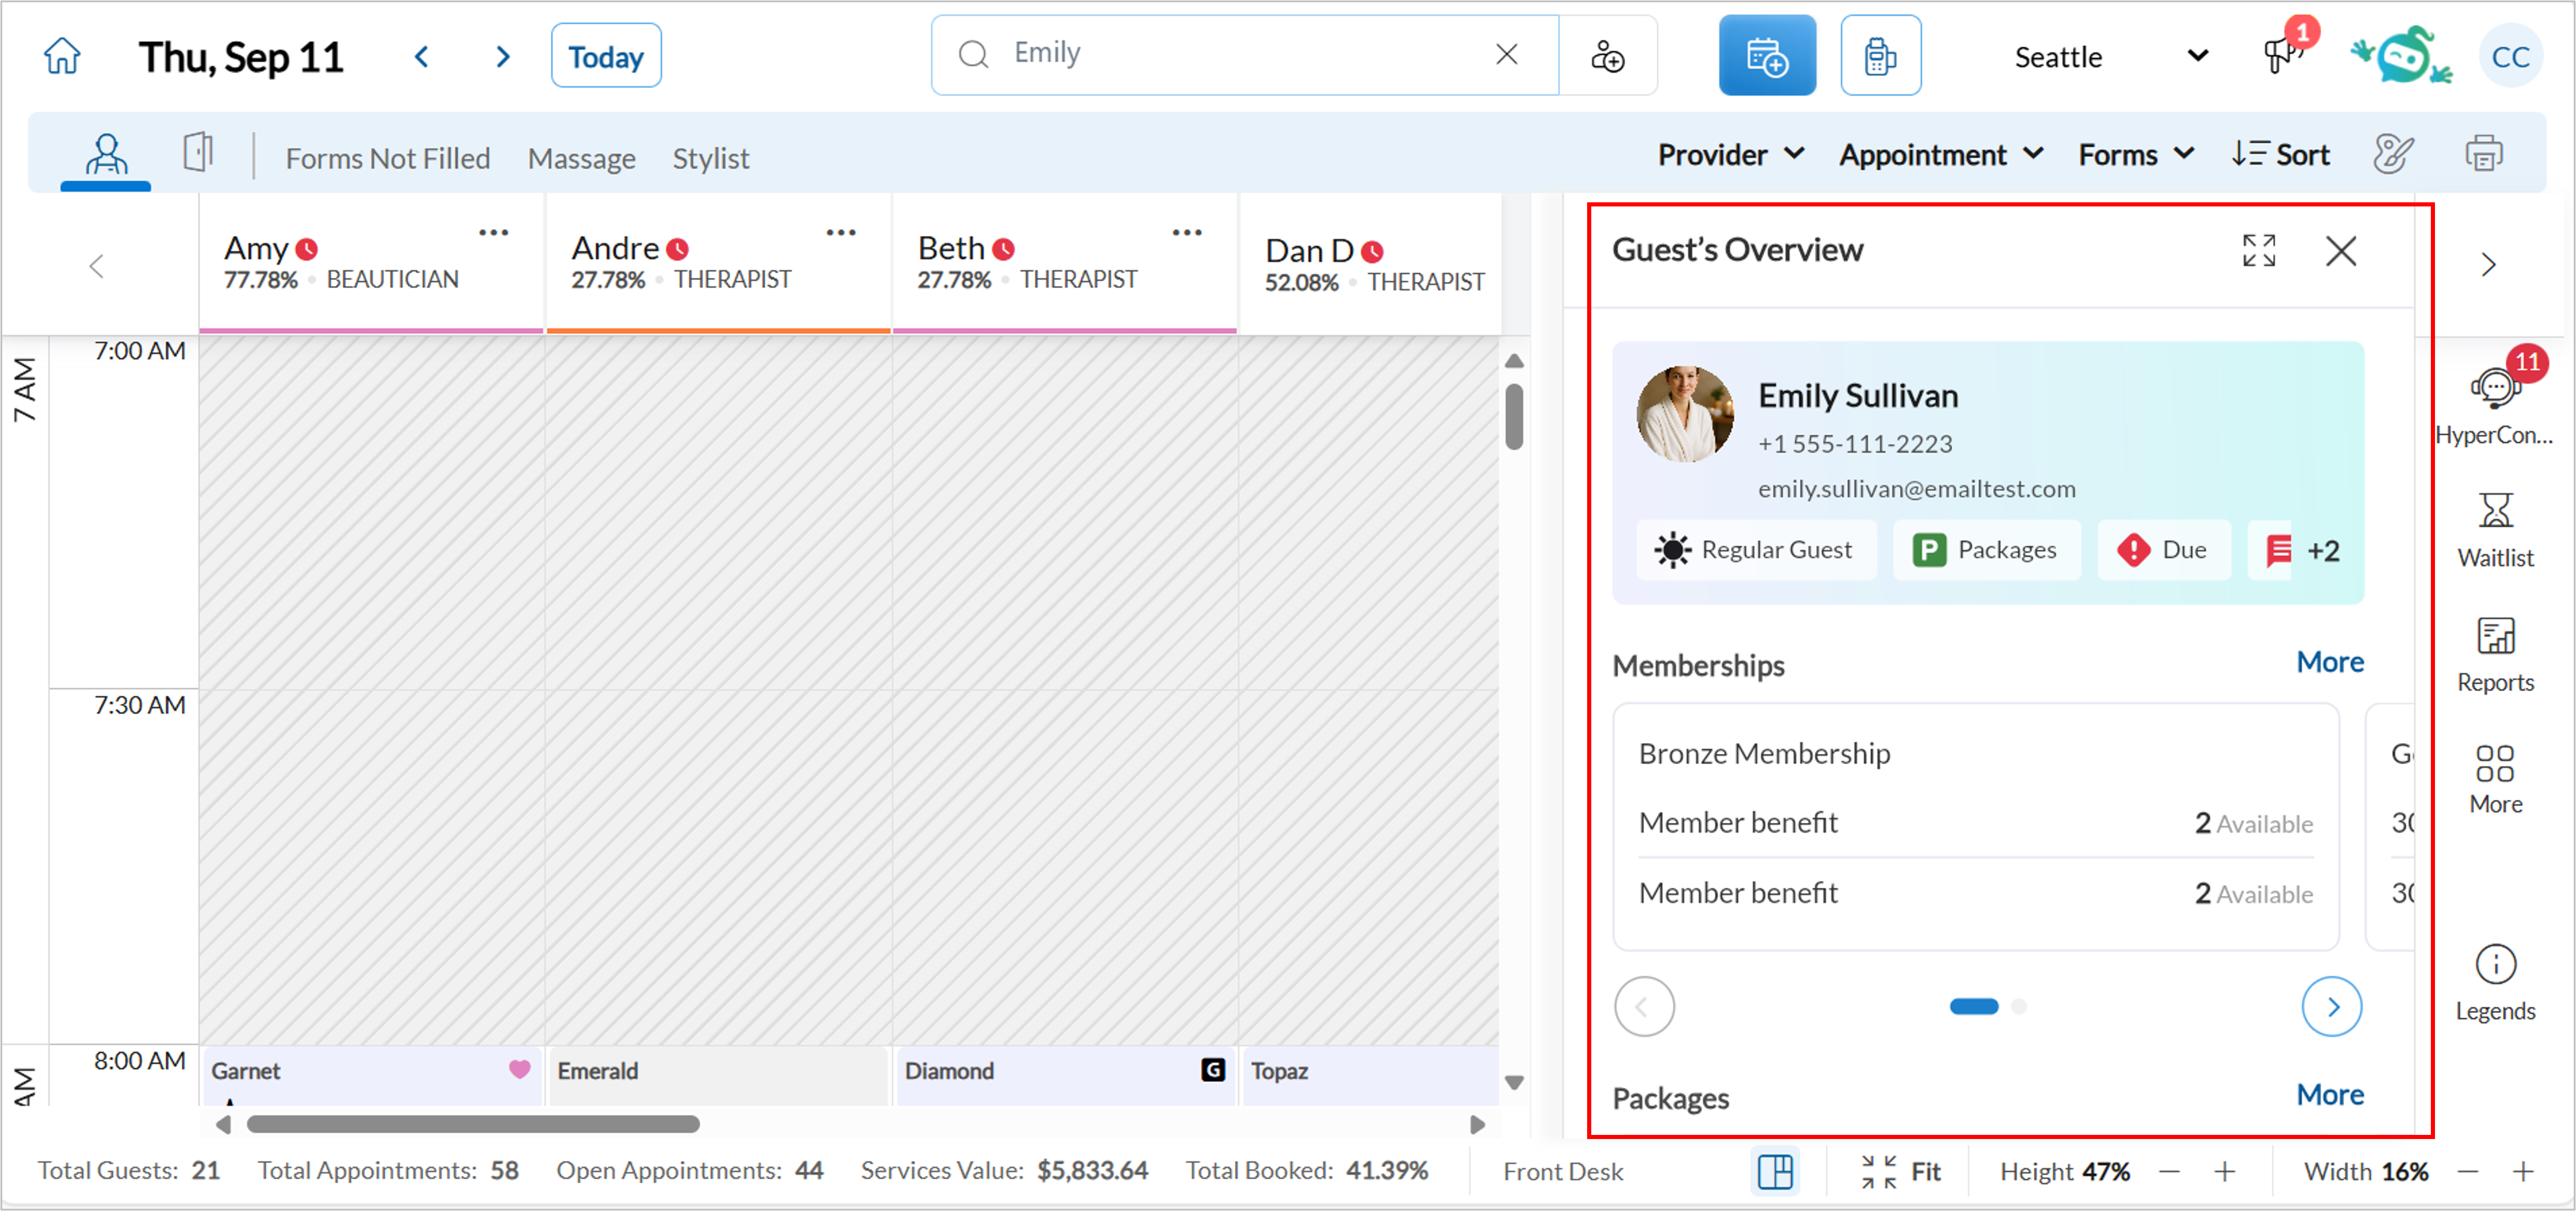
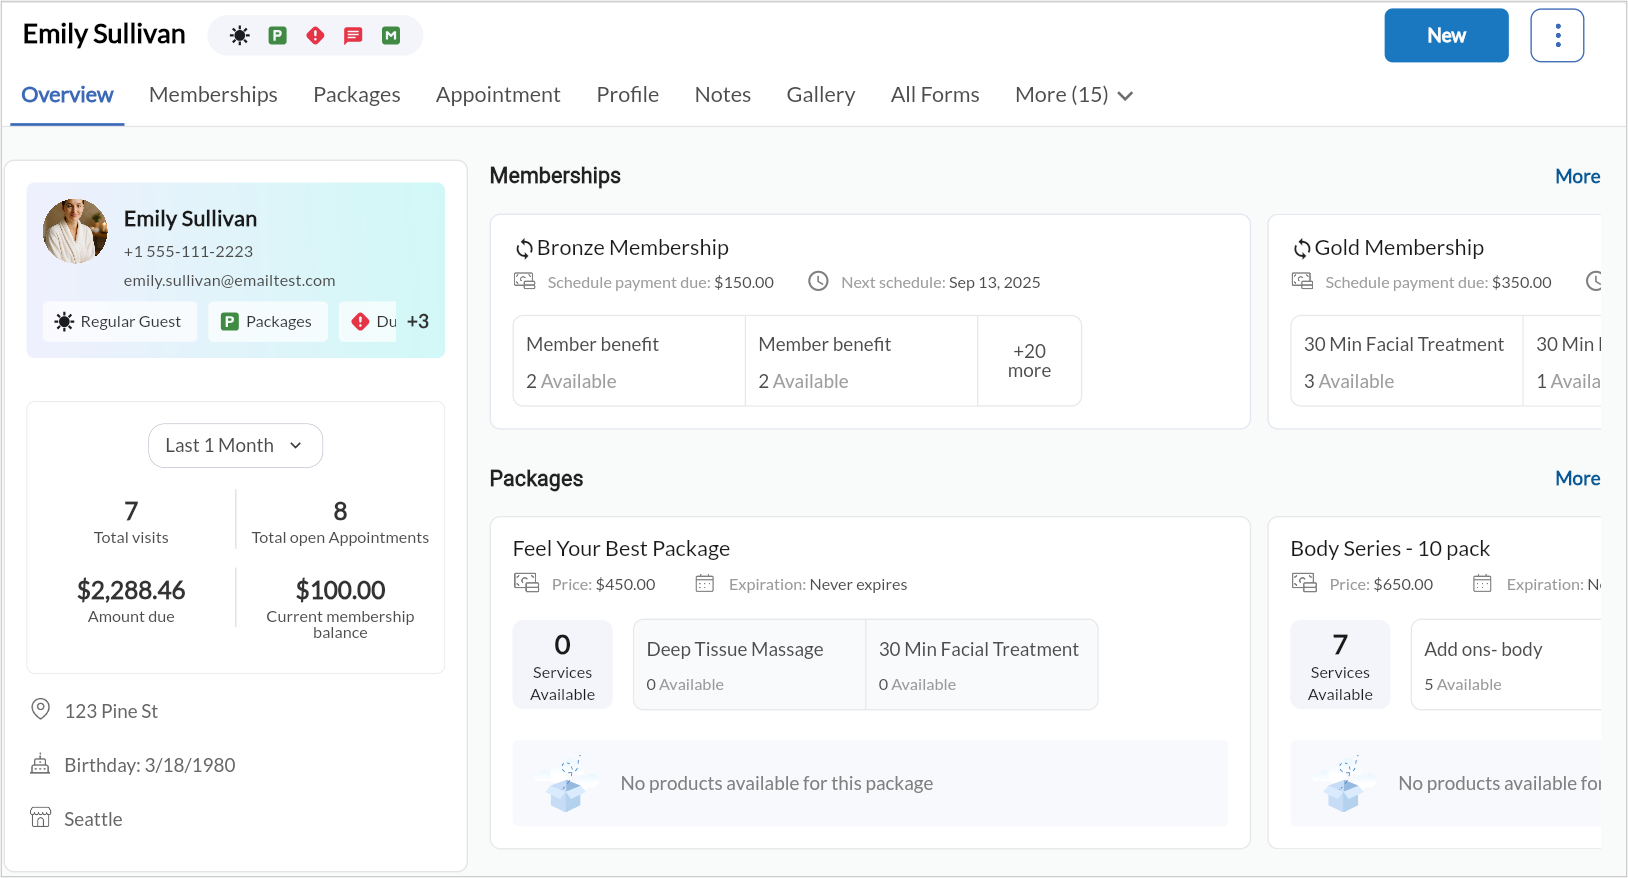
The Overview tab in the guest profile slider presents a consolidated view of essential guest details, including:
Contact information
Upcoming and past appointments
Packages
Purchase history
Visits
Analytics
Total Visits: Displays the number of completed visits by the guest, giving a quick view of their engagement level.
Total Appointments: Indicates all appointments (completed, cancelled, no-show), helping assess overall appointment frequency.
Amount Due: Shows the outstanding payment the guest owes, helping staff prioritize collections.
Total Memberships Balance: Reflects any remaining balance tied to the guest’s active memberships.
Gift Cards Balance: Indicates the current balance of any gift cards linked to the guest.
Last Visit: Shows the most recent date the guest received a service, useful for rebooking prompts and engagement.
Tags
The PMS Guest tag indicates that the guest profile originated from an Opera PMS integration. This will appear in the Profile tab in the guest profile.
All these details are now accessible in a single view, saving significant time and effort.
Note
The guest profile slider is only available in the redesigned appointment book.
Currently, the Prescription (available from March 2026), Classes (coming soon), and Room reservations tabs are not available in the slider.
The Service entities tab has been deprecated.
Configure redesigned guest profile
To configure redesigned guest profile at the organization level, follow these steps:
At the organization level, click Configuration.
Click Appointments > Interface.
Switch on the New guest profile toggle.
Click Save.
After you have configured it at the organization level, the center setting will appear.
To configure redesigned guest profile at the center level, follow these steps:
At the center level, click Configuration.
Click Appointments > Interface.
Switch on the New guest profile toggle.
Click Save.
To quickly view a guest’s information from the redesigned Appointment Book, follow these steps:
Navigate to the redesigned Appointment Book.
From the search bar, enter the guest’s name.
Select the guest whose profile you want to view from the search results. You can also right-click on a guest’s appointment block and click the icon next to the guest’s name in the context menu.
Quick actions in the guest profile
The redesigned guest profile also allows you to take quick actions that are commonly required in guest management. These actions are accessible across all tabs within the guest profile, providing convenience without forcing users to leave the profile view or open additional screens.
Manage appointments
The Appointments tab shows your appointments in chronological order, showing upcoming appointments with their date, time, and services. It also lists past appointments, including no shows and cancellations. Filters allow sorting by status (completed, cancelled and more) making it easy for staff to reference service history or rebook services.
To manage appointments, follow these steps:
From the top-right corner of the screen, click New > New appointment.
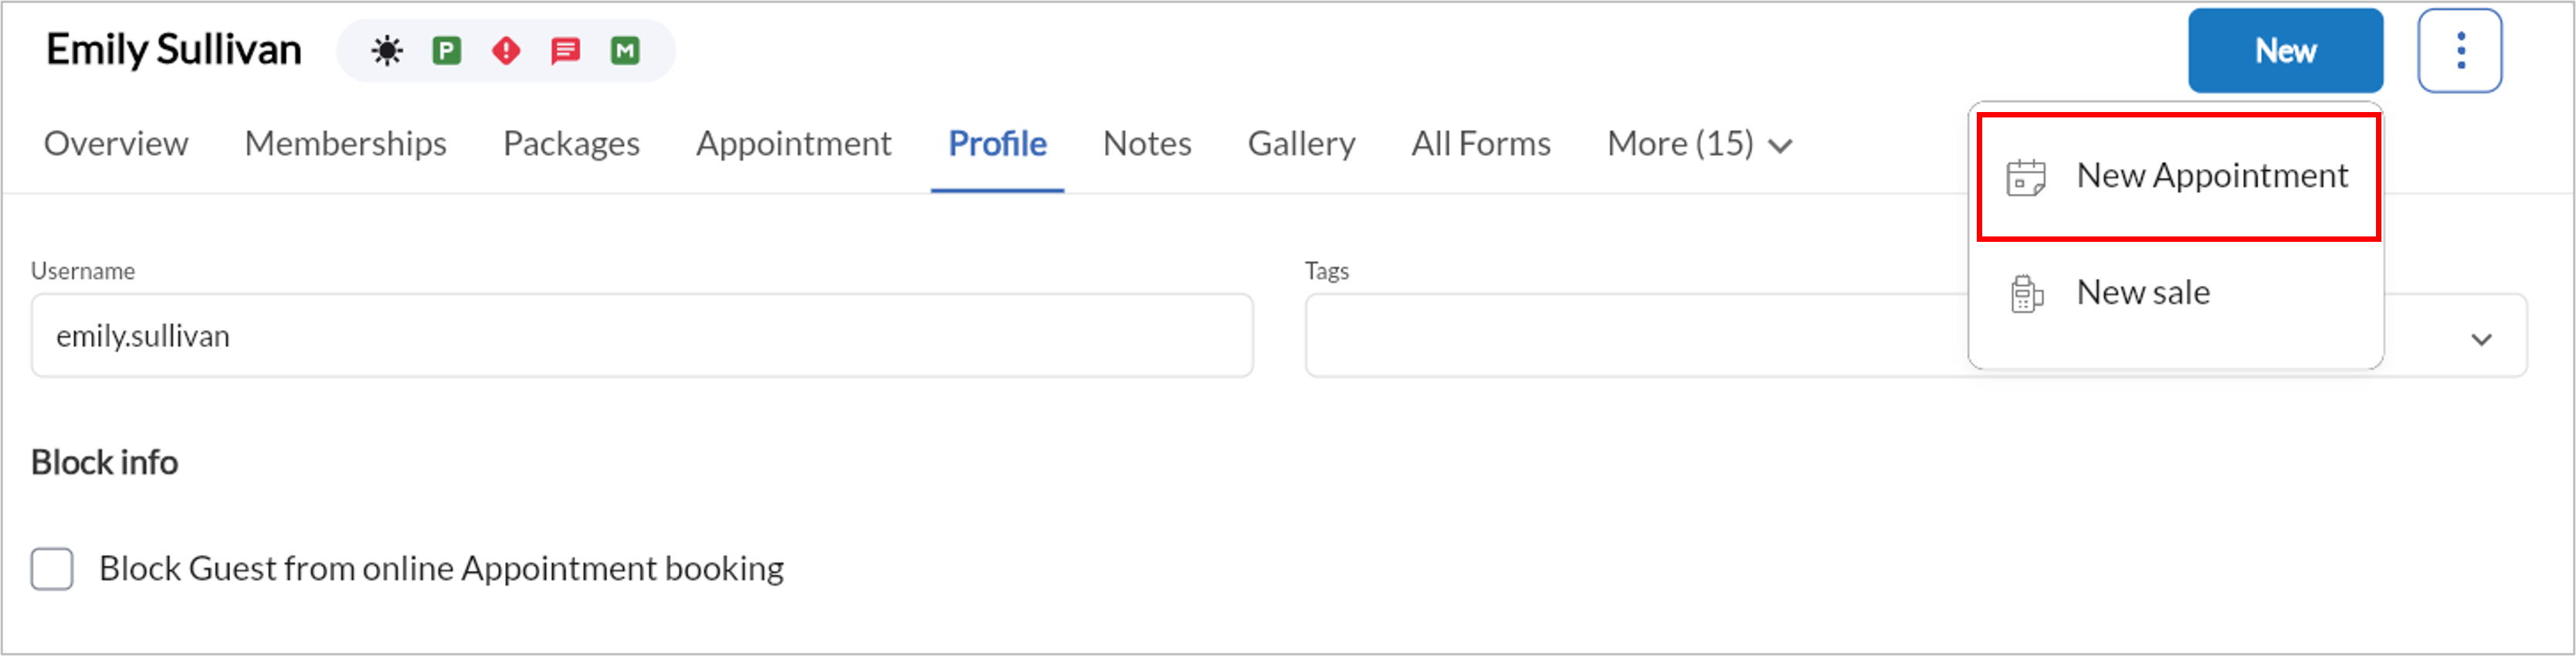
Enter the details as required.
Click Save.
Click the three dots next to New to manage the appointment, edit the guest profile, add a credit card, add notes, or reset the guest password.
Click the Appointments tab to view upcoming and past appointments.
From Upcoming appointments, click the email icon to send emails of twenty upcoming appointments to the guest.
Edit or cancel upcoming appointments as needed.
Access HyperConnect
In Guest Profile V1, HyperConnect can be accessed via an icon next to the guest’s phone number. In redesigned guest profile, it can be accessed from the header.
To access HyperConnect, follow these steps:
Click the Profile tab.
Click HyperConnect.
For more information on HyperConnect refer to Overview of HyperConnect article.
Manage guest memberships
The Memberships tab in the redesigned guest profile provides a clear and structured view of all memberships associated with a guest. It helps staff quickly understand what each membership includes, especially when memberships have multiple benefit types such as service credits and monetary balances.
When a membership includes multiple benefit types, Zenoti clearly displays each benefit separately:
Credit-based benefits show the total credits available and highlight the base services covered by those credits.
Amount-based benefits show the total monetary balance available, broken down by services, products, or both.
To manage guest memberships, follow these steps:
Click the Memberships tab.
In this tab, you can view the membership name and collection status (for example, Next collection or Collection overdue), along with the total credits available, displayed separately from monetary balances. When a membership includes amount-based benefits, the total available balance is also shown. Clear indicators specify whether the membership includes credits only, amount only, or a combination of credits and amounts. This separation ensures that credits and currency values are never mixed, making it easier for both staff and guests to understand what can be redeemed.
View active and inactive memberships.
Click a membership card to view detailed information, including:
Invoice and receipt details
Sale or refund date
Expiration details, including any applicable grace period
Next scheduled collection date
The center where the membership was sold
Within a selected membership, use the Credits section to track:
Service credits earned through the membership
Credits used, remaining, transferred, or refunded
A detailed history of service credit redemptions
Click Collect Membership Invoices to view and collect pending installments.
Click + Membership to add a new membership. You will be redirected to the POS screen.
Manage loyalty points and enroll guests
The Loyalty Points tab displays a complete history of reward points earned and redeemed by the guest. This enables staff to encourage redemptions or educate guests about reward opportunities.
To add loyalty points, follow these steps:
Click the Loyalty Points tab.
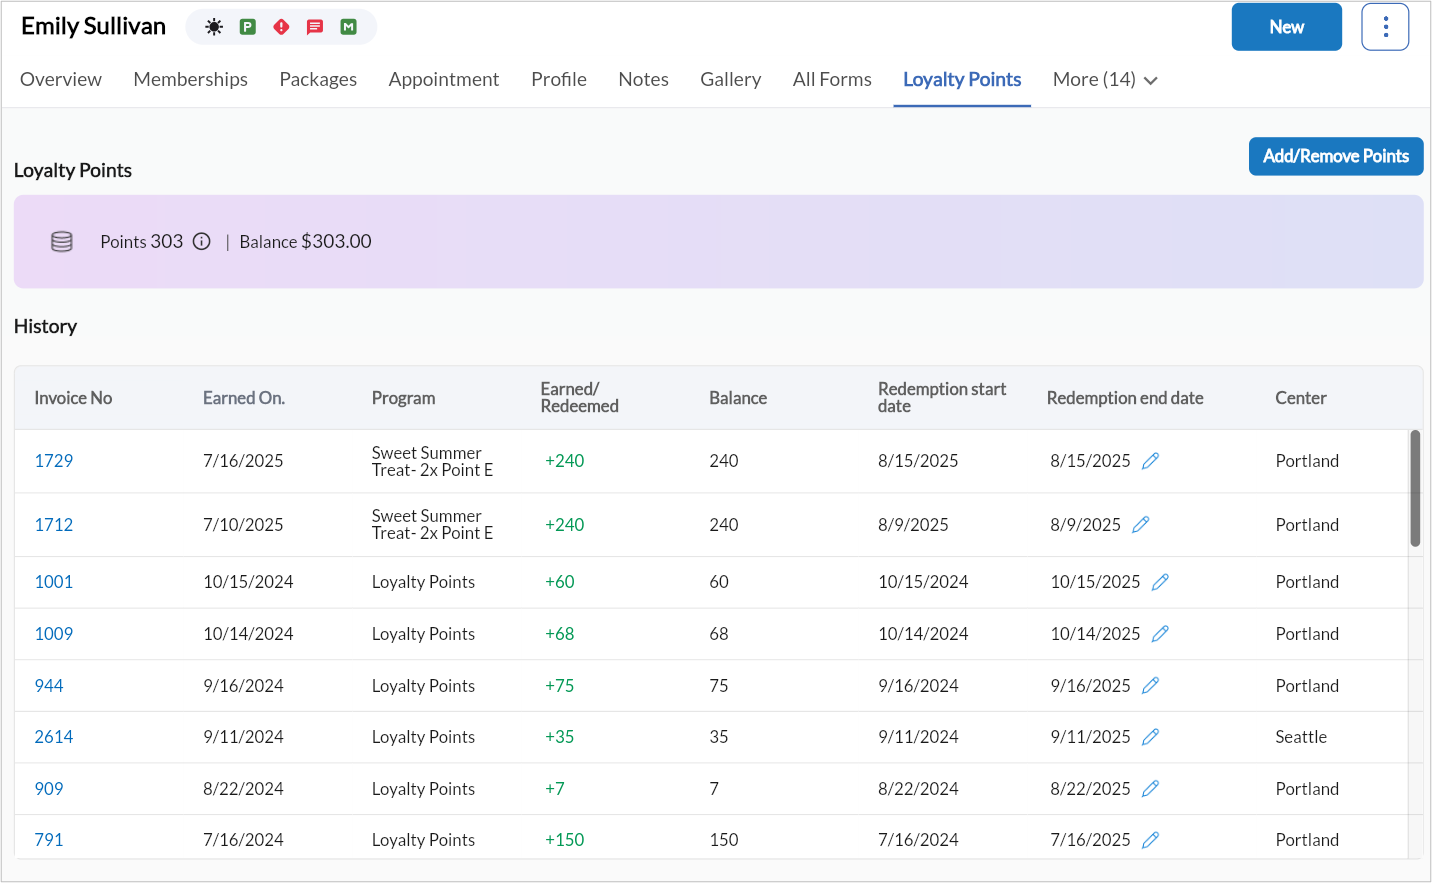
Click Add/remove points.

Enter the number of points you want to add.
Set the expiry date.
Select the reason and add comments.
Click Save.
To remove loyalty points, follow these steps:
Click the Loyalty Points tab.
Click Add/remove points.
Enter the number of points you want to remove.
Choose how Zenoti should deduct points, either from a specific expiry date or starting with those closest to expiring.
Choose the reason.
Add comments and click Save.
To enroll guests to loyalty program, follow these steps:
Click the Loyalty Points tab.
Click Enroll to add the guest to a loyalty program.
In the Enroll Guest window, choose a tier:
Highest Tier: Points awarded without considering the amount spent.
Applicable Tier: Points awarded based on the amount spent.
To modify redemption end date, follow these steps:
Click the Loyalty Points tab.
Click the pencil icon against the redemption end date.
Update the date and add comments.
Click Update.
Edit guest profile
The Profile tab allows you to view and update the guest details such as, name and contact details, communication preferences, birthdate, gender, and address, and custom fields, if configured.
To edit guest profile, follow these steps:
Click the Profile tab.
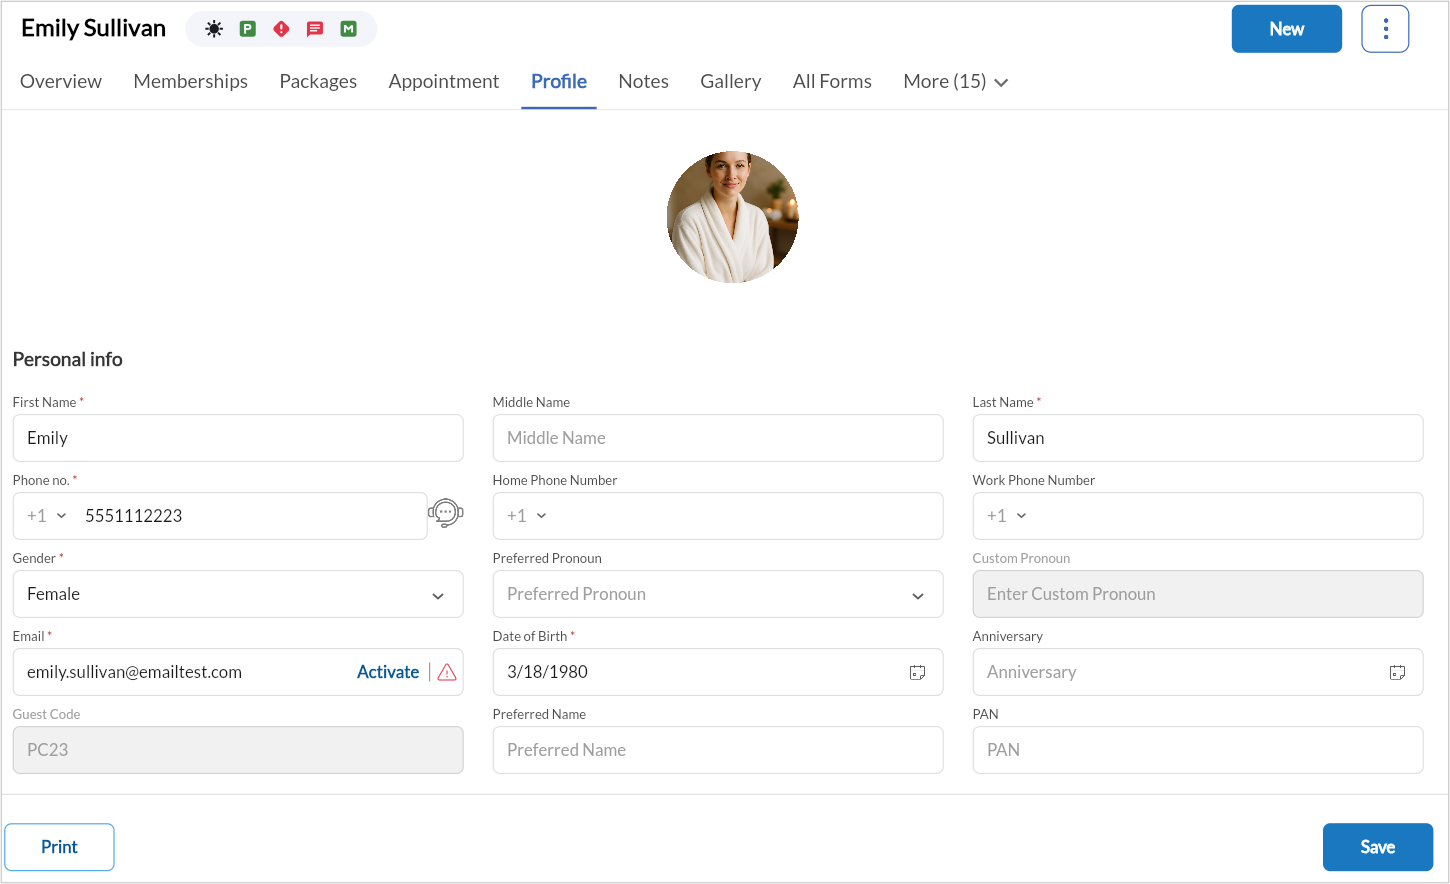
Update Personal Info, Contact Info, Referral Info, and Login Info.
Under Preferences, enable checkboxes for:
Receive Marketing Emails
Receive Marketing SMS
Receive Transactional Messages
Note
As per TCPA compliance, guests must provide consent to receive marketing communications.
Click Save.
To print the profile details, click Print.
To manage cards and relationships from the Profile tab in the guest profile, follow these steps:
Click the Profile tab.
Click the card icon. A list of people the guest shares the card with appears.
To discontinue card sharing with the related guest, switch off the share card toggle next to the guest's name.
To delete a related guest, click the Delete icon next to the guest’s name.
To add a new guest relation, click Add new.
Enter the receiving guest’s name and select the relationship type.
To share the card with the newly added guest, switch on the Share card toggle.
Click Save.
Note
To update an existing guest relationship, delete the relation and re-add it with the new details.
Manage product purchases
This tab displays all retail items bought by guests. For each item, you can view the product name, type, purchase date, quantity, and price (if configured). This information can be used to make tailored retail recommendations, support inventory forecasting, or review purchase trends for loyalty rewards.
Click the Products tab to view purchased items.
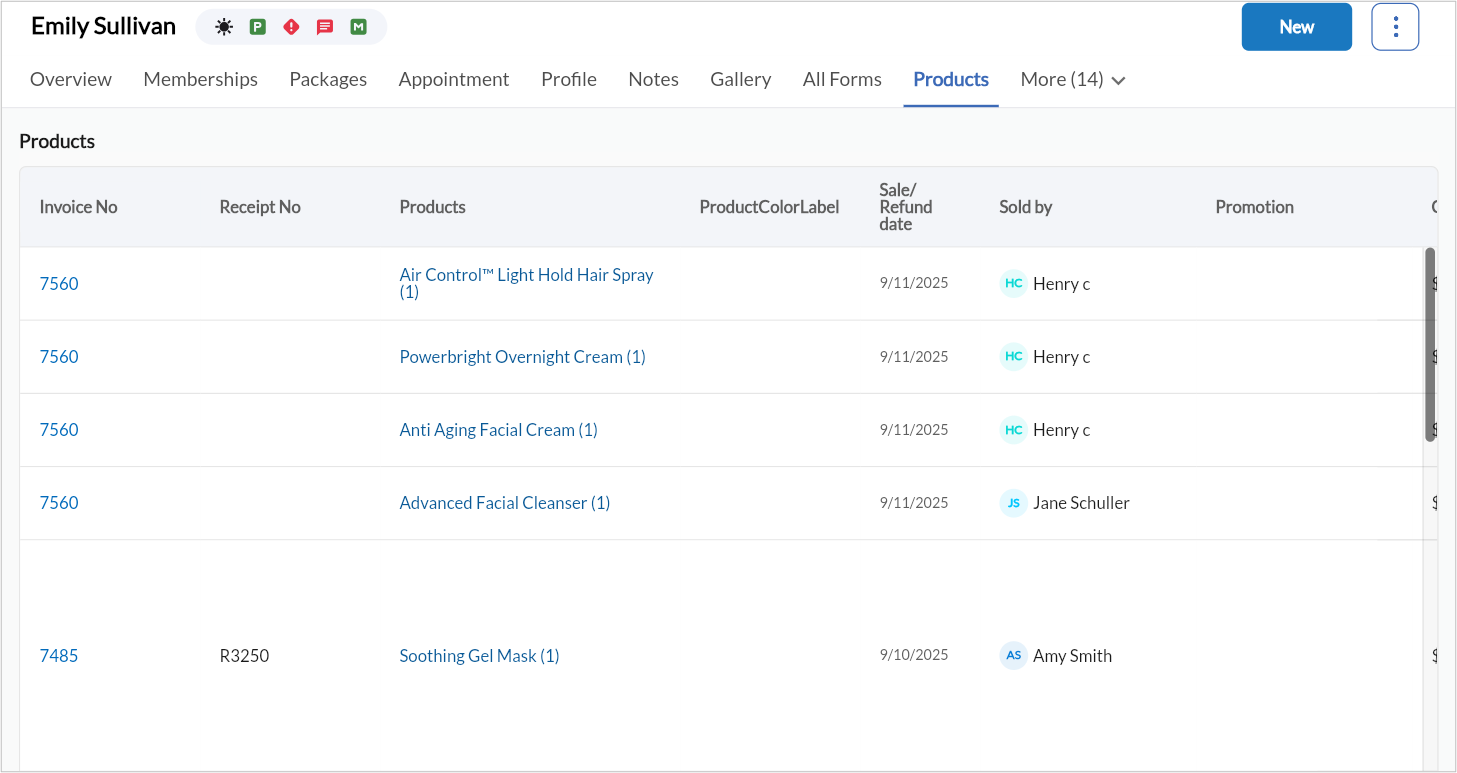
Click a product to see and edit product details as required.
Click the exchange or refund icons against a product to initiate an exchange or refund process.
Click + Product to record a new purchase.
Manage guest packages
This tab displays details of all service packages, including active and expired packages. It also displays when individual services within a package were redeemed, including the dates of usage and remaining balance.
Note
The Balance Amount column reflects the monetary value of unused service credits when the package was sold and is not adjusted when a refund is processed. The Refunded field in the package summary shows whether a refund has occurred, but the Balance Amount column continues to display the original remaining value.
Click the Packages tab to view active or inactive packages.

Filter and view packages by their status.
Click + Packages to add a new one.
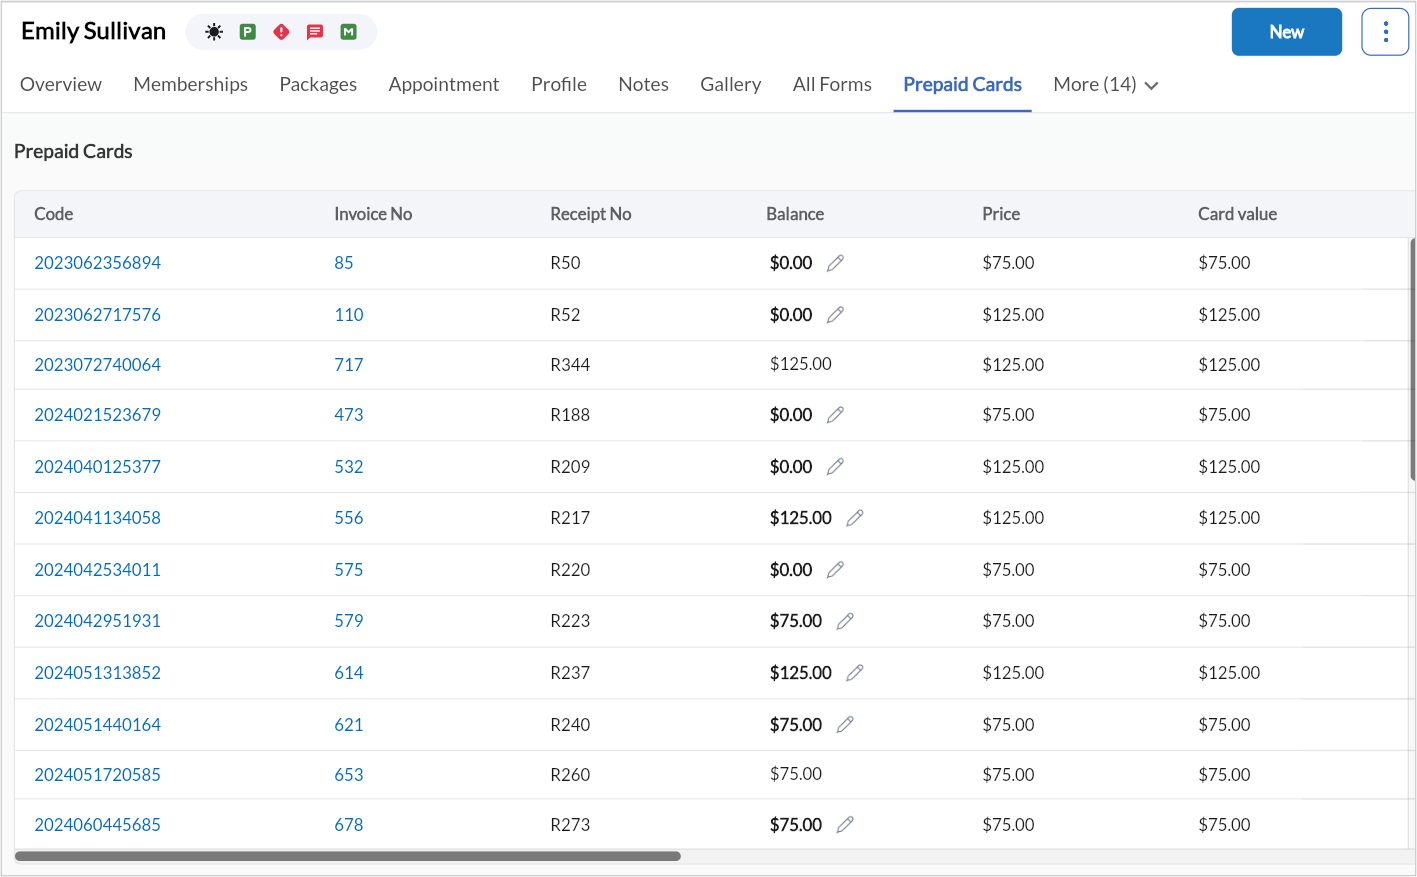
Manage prepaid cards
This tab shows the list of all stored value cards linked to the guest profile. For each card, the balance, issue date, and expiration date are displayed. This tab is particularly helpful during checkouts or when guests inquire about payment options and available credits.
Click the Prepaid Cards tab to view all cards associated with the guest.
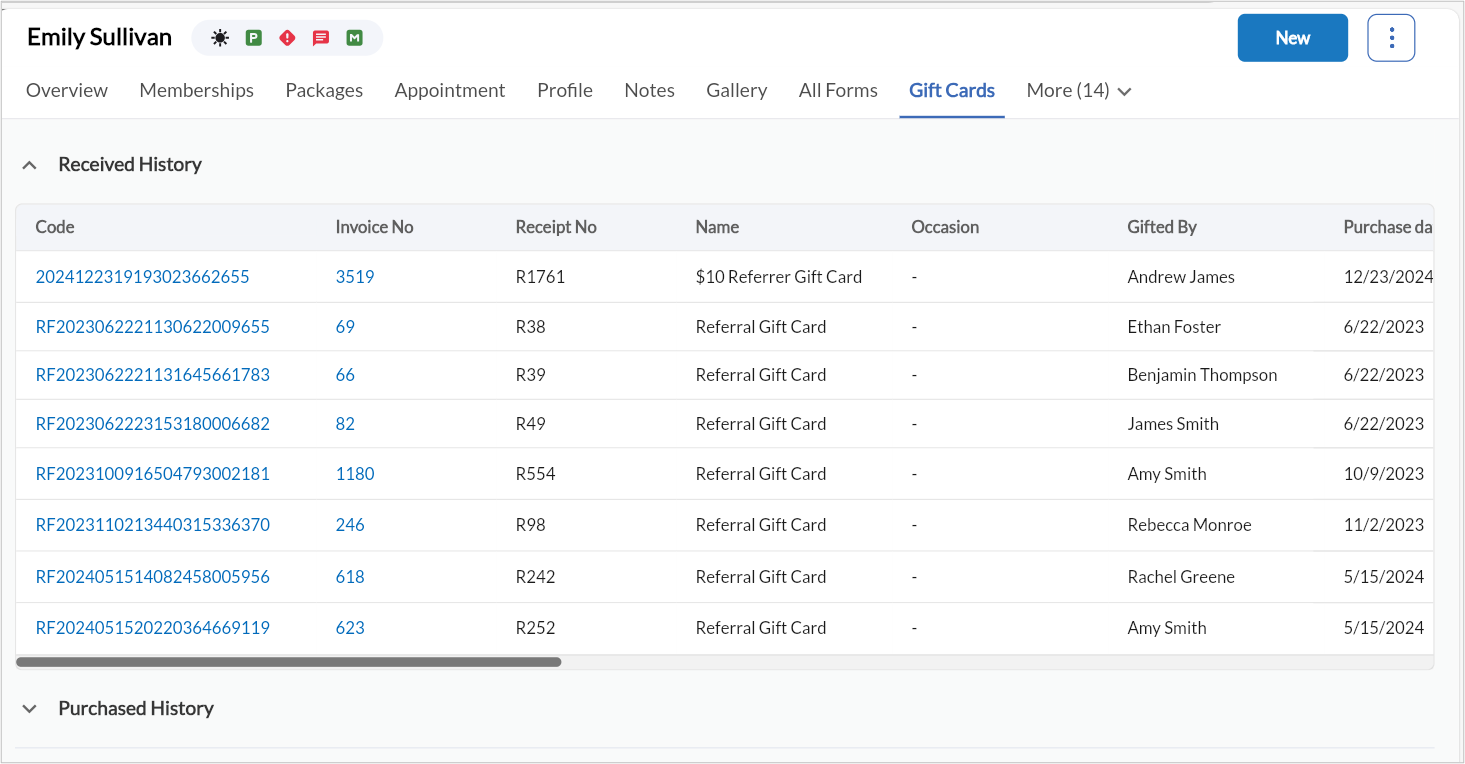
Manage gift cards
The gift card tab allows you to track all gift card activity including gift cards purchased by the guest, gift cards received, remaining balances and expiration (if any). This is useful for redemption tracking or upselling during visits.
Click the Gift Cards tab to view Received History and Purchased History.
View wallet credits
Click the Wallet tab to track received and used credits.
Manage guest issues
Click the Issues tab to review or log service concerns.
View existing issues or click to create a new one.
Manage coupons
Click the Coupons tab to view available discounts and promotions.
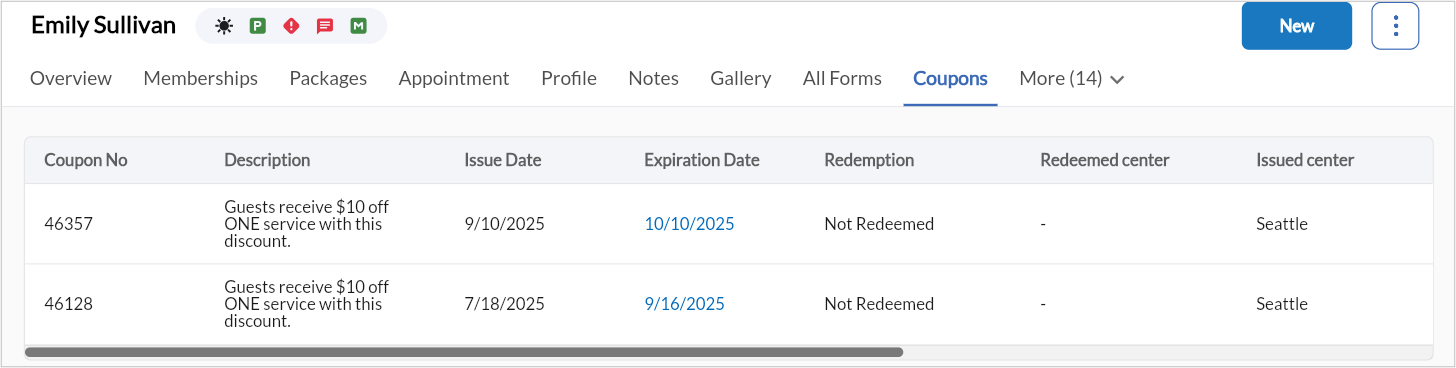
Apply an existing coupon or add a new one to the guest profile.
Manage open invoices
Click the Open tab to view outstanding invoices or pending transactions.
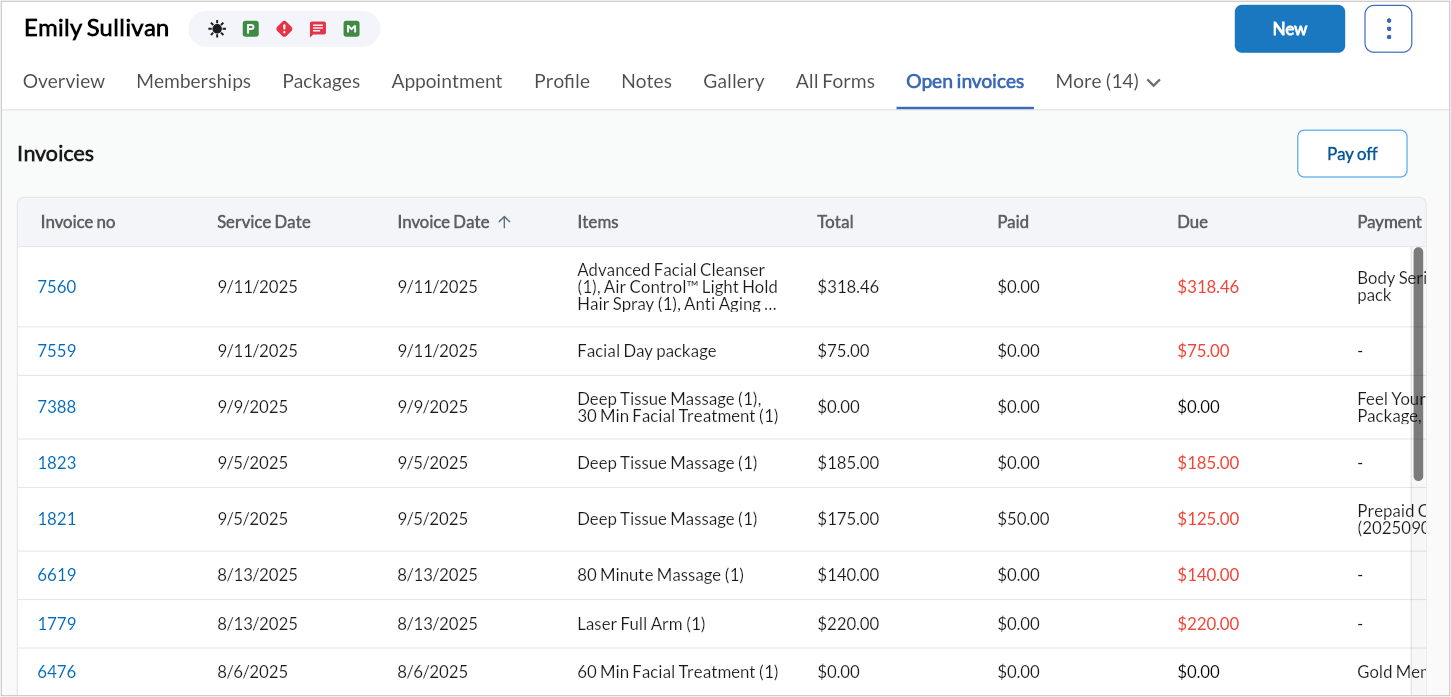
Click Pay off to pay all outstanding invoices.
Manage guest payments
Click the Payments tab to view saved cards and payment history.
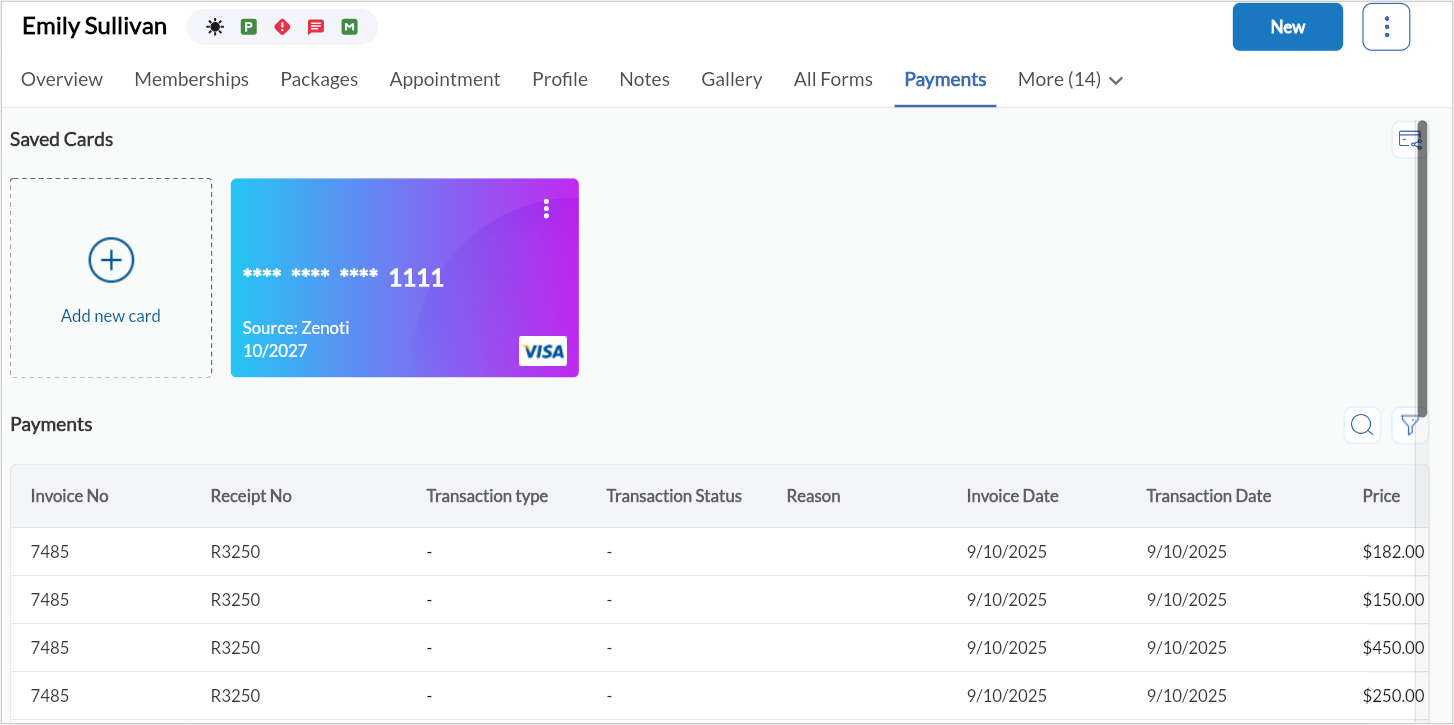
Click Add New Card to store a new card.
Click Open Invoices to view and process payments.
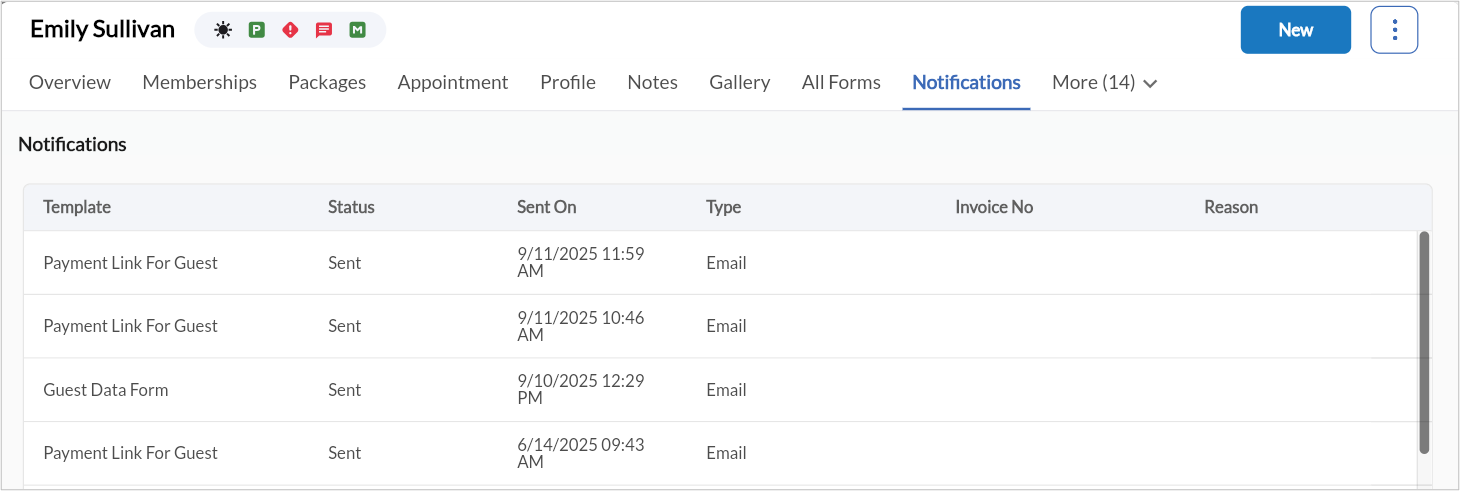
Manage notifications
The Notifications tab shows the history of messages sent to the guest, including appointment reminders, marketing communications, or feedback requests. It may also show delivery status or read receipts.
Click the Notifications tab to view message status, delivery date, and channel (email/SMS).
Upload and compare guest photos
The Gallery tab stores media files associated with the guest, such as before-and-after treatment photos or diagnostic images. These can be used for consultations, service planning, or progress tracking.
Click the Gallery tab.
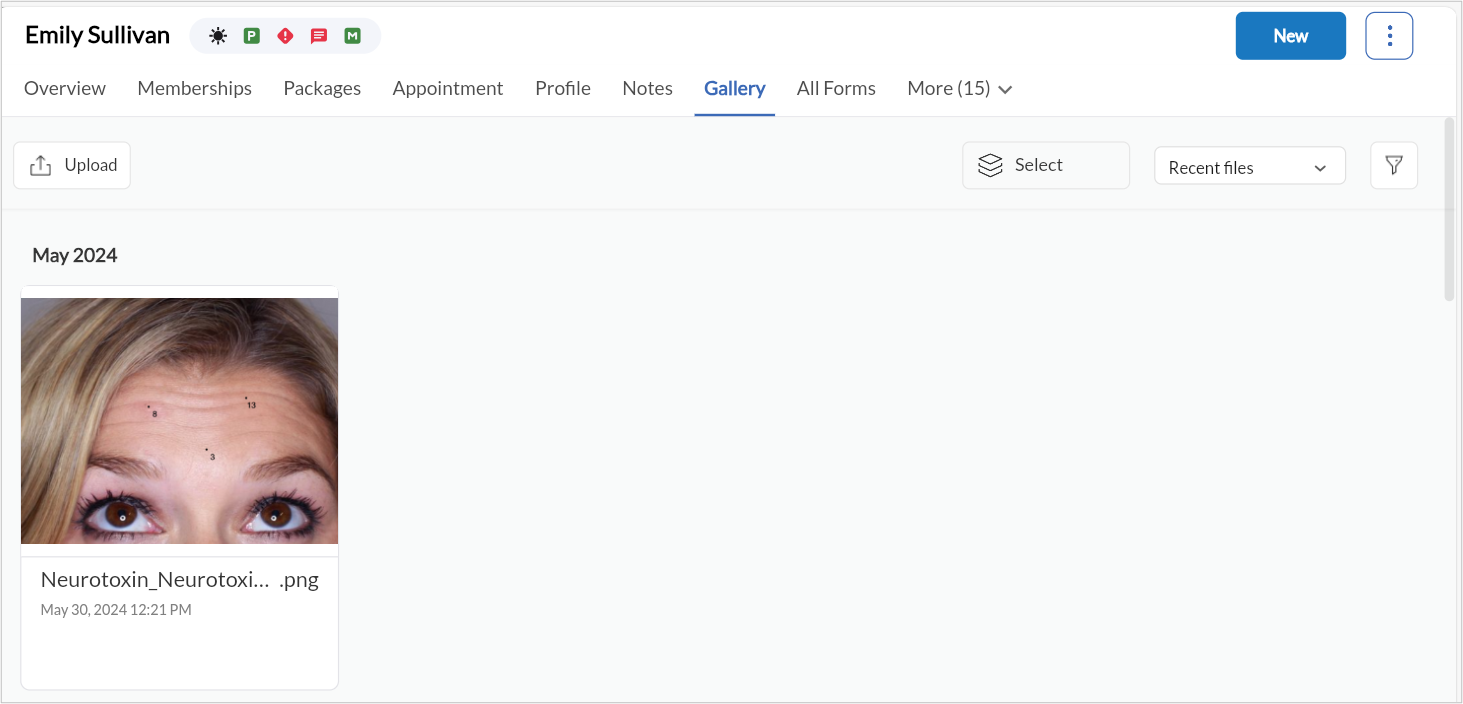
Click Upload and choose from:
Take Photo
Select Files
Select Photos
Upload up to 10 files (.gif, .jpg, .png, .jpeg, .tiff, .pdf, .mp4, .mkv, .mov, .avi).
Select two images and click Compare to analyze differences.
Manage opportunities
The Opportunities tab shows potential sales opportunities such as upsells, cross-sells, or re-engagement campaigns relevant to the guest.
Click the Opportunities tab to view service or product recommendations and upsells.

Manage referral history
This tab shows if the guest has referred other customers to your business, along with the status and rewards (if any) tied to those referrals. It’s useful for understanding the guest’s influence and engagement.
Click the Referral History tab to view referrals made by or for the guest.
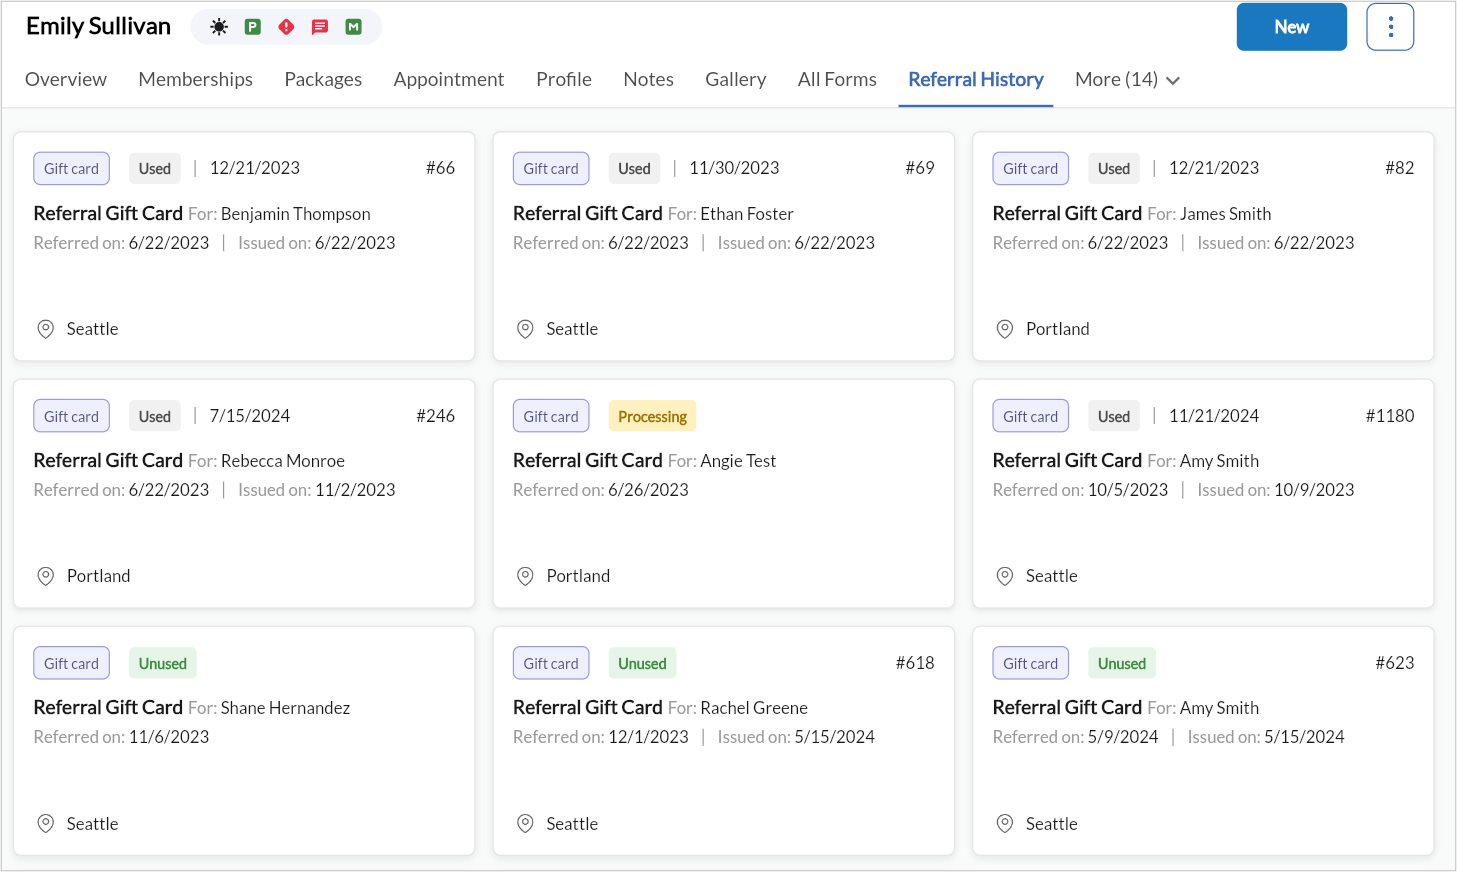
Click + Referral to add a new entry.
Manage guest campaigns
Click the Campaigns tab to review guest engagement in marketing campaigns.
Add the guest to a new campaign if eligible.
Manage adjustments
Click the Adjustments tab to review price or service adjustments.
Click Add New, select service/provider, and add notes.
Manage guest notes
This tab allows you to capture notes about guests. This includes preferences, cautions, feedback from past appointments, or anything else that might inform future interactions. Entries are timestamped and can be marked as private for sensitive observations. Notes help the team deliver consistent service by sharing context across appointments and providers.
Click the Notes tab to review past notes.
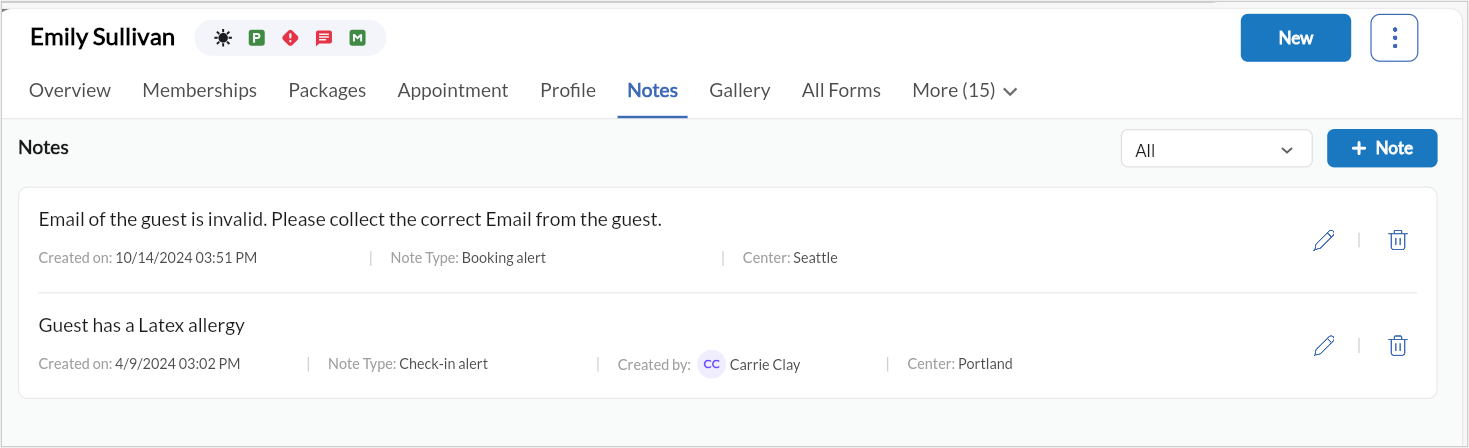
Click + Note to create a new one.
Choose a note type:
None (Generic): General information visible to all employees.
Profile Notes Displayed when viewing the guest profile.
Check-in Notes: Appear when guest checks in for an appointment.
Appointment Notes: Show during appointment booking.
Payment Notes: Appear when collecting payment.
Private Notes: Visible only to authorized employees.
Manage guest forms
This tab catalogs all forms that have been associated with the guest, including consultation forms, medical waivers, and post-visit feedback forms. You can view the form's status, submission dates, and contents (if enabled), that helps ensure compliance and preparedness for certain service types.
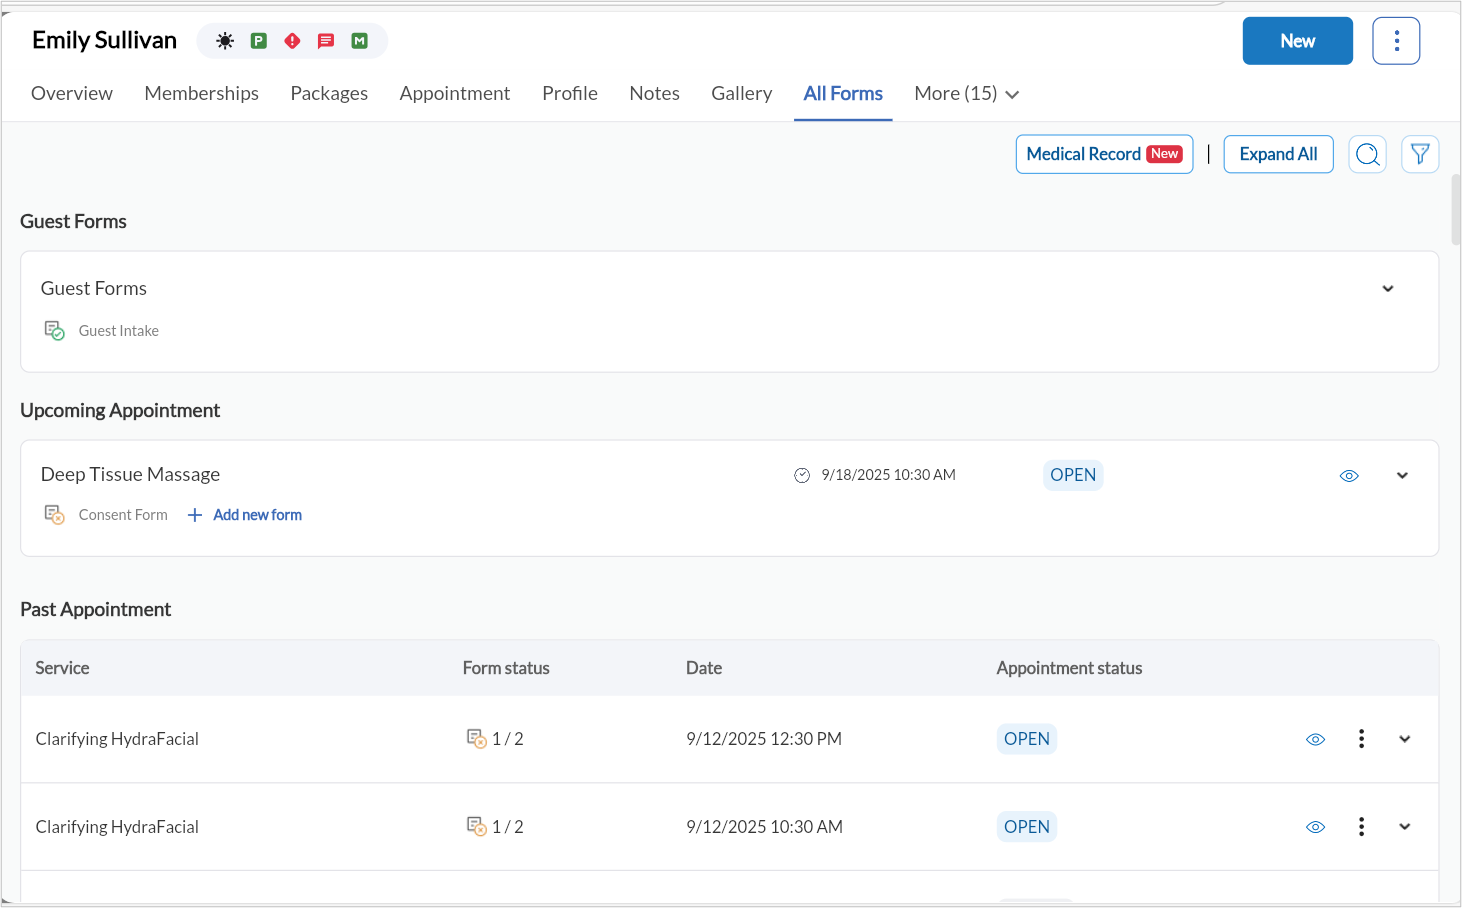
You can:
Filter and search forms
View history
Access logs
Edit or submit forms (based on permissions)
Note
The redesigned guest profile currently does not support fitness businesses.
Fitness tabs on the Redesigned Guest Profile
The redesigned guest profile now supports fitness businesses with four dedicated tabs: Visits, Guest Pass, Payments, and Statements. These tabs give front desk staff a consolidated view of a guest’s check-in history, guest pass activity, payment records, and House Account billing details without leaving the guest profile.
This update extends the redesigned guest profile experience, already available for appointment-based businesses, to organizations with the Fitness module enabled. All existing data and functionality from the previous guest profile are preserved.
Prerequisites
The New guest profile toggle is enabled at the organization and center level.
The Fitness module is enabled for your organization.
Enable the redesigned guest profile
To configure the redesigned guest profile at the organization level:
At the organization level, click Configuration.
Click Appointments > Interface.
Switch on the New guest profile toggle.
Click Save.
After you enable it at the organization level, the center-level setting appears.
To configure the redesigned guest profile at the center level:
At the center level, click Configuration.
Click Appointments > Interface.
Switch on the New guest profile toggle.
Click Save.
Access the guest profile
Click the Guests tab from the left pane.
Search for the guest by name, phone number, or membership code.
Click the guest’s name to open the profile.
Select the Visits, Guest Pass, Payments, or Statements tab.
Visits
The Visits tab displays the guest’s check-in history. It provides a summary of visits grouped by center and membership, along with a detailed log of individual visits. Use this tab to verify how many visits a guest has used and how many remain on their membership.
The following information is displayed in the summary section.
Field | Description |
Center Name | The center where the visits were recorded. |
Membership Name | The membership associated with the visits. |
# Visits | The total number of completed visits. |
# Allowed Visits | The maximum number of visits permitted under the membership. |
The details section lists each individual visit with the following information.
Field | Description |
Visit Date | The date the guest checked in. |
Center Name | The center where the visit occurred. |
Membership Name | The membership used for the visit. |
Owner Name | The membership owner, if the visit was made using a shared membership or guest pass. |
Click the Visits tab on the guest profile.
Click Export to PDF.
Use your browser’s print options to save or print the report.
Guest Pass
The Guest Pass tab provides a complete view of the guest’s guest pass activity. It organizes pass records into four expandable and collapsible sections. The Available Guest Passes section is expanded by default.
Displays the guest passes currently available for the guest to share. The following information is shown for each pass.
Field | Description |
Membership Name | The membership that provides the guest pass benefit. |
Available | The number of guest passes remaining. |
Total | The total number of guest passes allocated for the current period. |
Start Date | The date from which the guest pass is valid. |
Expiration Date | The date the guest pass expires. |
Shows the guest passes that the guest received from another member. The following details are available for each pass.
Field | Description |
Received Date | The date the guest pass was received. |
Received From | The name of the member who shared the pass. |
Membership Name | The membership associated with the pass. |
Expiration Date | The date the pass expires. |
Status | The current status of the pass. |
Guest Pass Code | The unique code for the guest pass. |
Services | Services the pass can be redeemed for. |
Classes | Classes for which the pass can be redeemed. |
Workshops | Workshops for which the pass can be redeemed. |
# Visits | The number of visits allowed on the pass. |
Displays guest passes that the guest has shared with others. The following details are shown for each pass.
Field | Description |
Sent Date | The date the pass was shared. |
Recipient | The person the pass was shared with. |
Membership Name | The membership associated with the pass. |
Expiration Date | The date the pass expires. |
Status | The current status of the pass. |
Shows guest passes that have been redeemed. The following details are recorded for each redemption.
Field | Description |
Redemption Date | The date the pass was redeemed. |
Invoice | The invoice number associated with the redemption. |
Class Name | The class attended using the pass. |
Instructor | The instructor for the class. |
Redemption Center | The center where the pass was redeemed. |
Membership Name | The membership associated with the pass. |
Status | The redemption status of the pass. |
For more information on configuring guest passes, refer to the Enable Guest Pass article.
Payments
The Payments tab displays the guest’s invoice and payment history. Staff can search for specific transactions, filter records by category, and export data for reporting or reconciliation.
Use the search bar at the top of the tab to find records by invoice number, amount, or the last four digits of the card used for payment. Use the filter option to display data by category.
Click the Payments tab on the guest profile.
Apply any required search or filter criteria.
Click the export icon and select Export to Excel, Export to CSV, or Export to PDF.
Statements
The Statements tab shows the guest’s wallet balance and House Account billing position. Staff can review current and past billing statements, add wallet funds, set spending limits, and email statements to the guest.
The Wallet section displays the guest’s available prepaid credit balance. Wallet funds are automatically applied toward outstanding House Account balances during statement processing.
To add funds to the guest’s wallet:
Click the Statements tab on the guest profile.
In the Wallet section, click Add Balance.
Enter the amount and complete the payment through POS.
To set a wallet limit, click Set Wallet Limit and enter the maximum permitted balance.
The House Account section displays the following information about the guest’s current billing position.
Field | Description |
Gross Due | The total value of all unpaid transactions on the guest’s House Account. |
Net Due | The amount payable after the wallet credit is applied. Net Due = Gross Due minus Wallet Balance. |
Payment Type | The payment method used to settle House Account balances. |
To set a spending limit, click Set Spending Limit and enter the required amount.
The current statement reflects charges accumulated during the active billing cycle. Click View to open the statement details. Click Email to send the statement to the guest.
Past statements list billing records from previous cycles. Click View next to any past statement to review its details, or click Email to send it to the guest.
For more information on House Account statements, refer to the House Account Statements article.
All existing data and functionality from the previous guest profile fitness tabs are preserved in the redesigned interface.
The Guest Pass tab sections are expandable and collapsible. The Available Guest Passes section is expanded by default.
The Statements tab requires the guest to have a House Account. Wallet and statement sections are visible only for guests with active House Account profiles.