AI Dispute Manager
This article explains how to use the Disputes Management feature in Zenoti to track, manage, and defend payment disputes (chargebacks) raised against your business. It covers the Disputes Management dashboard, dispute detail views, AI-powered dispute defense options, filtering, exporting, and AI configuration settings.
Permissions
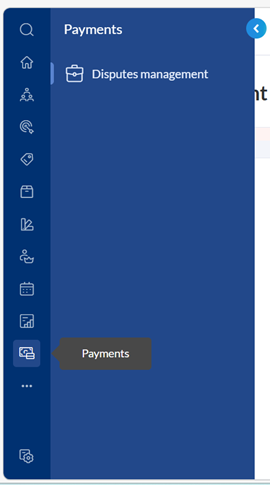
To access Disputes Management, you need the appropriate user role and permissions configured by your organization administrator. Navigate to Payments & Disputes Management from the left-hand menu.
Overview
The Disputes Management page provides a centralized view of all payment disputes across your centers. From here, you can monitor dispute statuses, review evidence packages, configure AI-powered defense, and submit responses to your payment processor.
Zenoti offers three modes for handling disputes:
Standard – A free, baseline option. When a dispute is raised, Zenoti automatically generates three to four key documents (invoice, payment history, and CC receipt). You can manually add additional documents or write a cover letter before submission. If no manual action is taken, the pre-populated documents are auto-submitted one day before the processor’s due date.
AI with Manual – AI generates a standard set of documentsbut leaves the cover letter blank for you to complete. You have a defined window (a set number of days before the cut-off) to review, edit, and manually submit the evidence before AI takes over. Once AI takes over, it generates a comprehensive package with guest details (name, email, mobile number), security check details (AVS, CVV), transaction history on same card, all other relevant documents, and AI-written cover letter. In case the evidence is not manually submitted the AI auto-submits the package one day before the processor’s due date.
Instant AI – As soon as a dispute is raised, AI generates the full evidence package within minutes. This includes an AI-written cover letter, all required documents, past transaction history on the same card, and security checks (CVV, AVS). The package is auto-submitted four hours after generation. During those four hours, you can review and make changes if needed.
Note
By default, all users start on the Standard (free) plan. You can upgrade to an AI plan at any time from the dispute management dashboard.
Data analysis shows that disputes submitted on the same day they are raised have approximately 1.5x higher chance of winning. Instant AI is designed to capitalize on this advantage by preparing and submitting evidence as quickly as possible.
Upgrading from Standard to AI Dispute Management
When your organization is on the Standard (free) plan, AI Dispute Management is not active. Zenoti prompts you to upgrade through two touchpoints on the Disputes Management dashboard: an activation prompt and an activation banner.
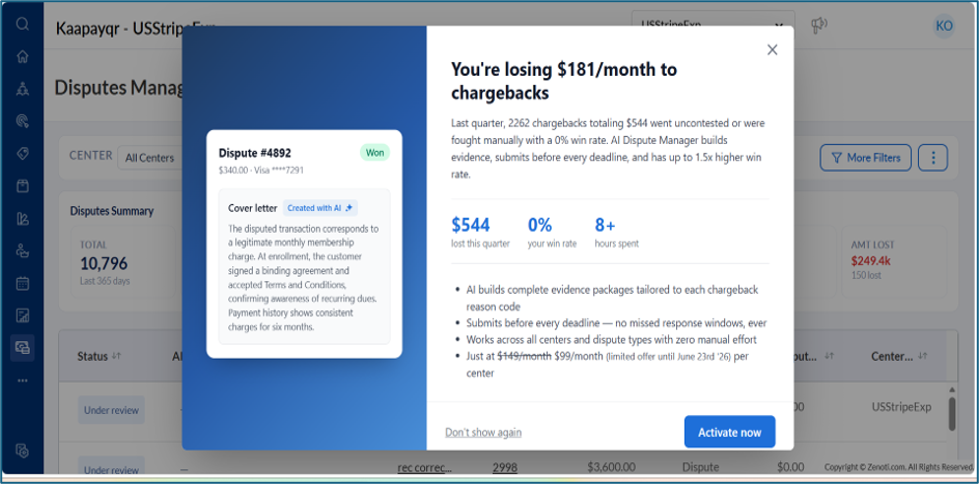
When you’re on the Disputes Management page, a prompt appears showing your recent chargeback losses, current win rate, and estimated manual hours spent on disputes. Click Activate now to begin the setup, or click Don’t show again to dismiss it permanently.
Note
If you close the prompt without selecting either option, it will reappear the next day. Clicking Don’t show again stops it from appearing again.
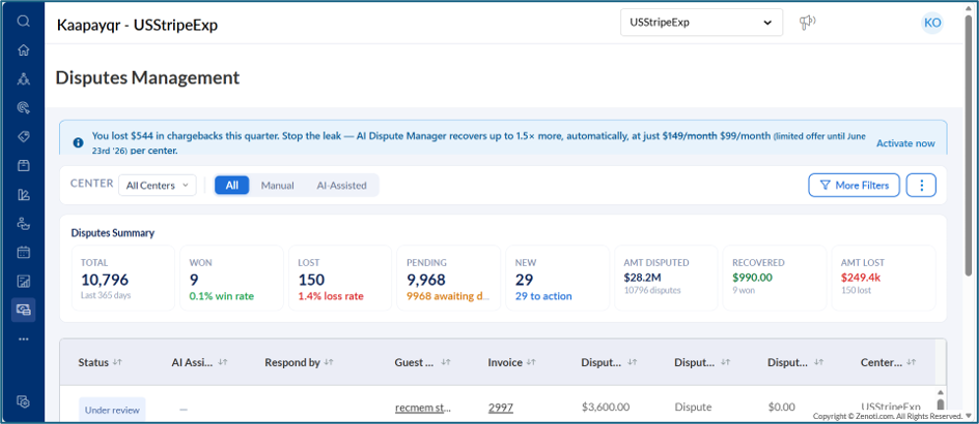
After the activation prompt is closed, a blue banner remains at the top of the dashboard showing your recent chargeback losses and the current pricing. Click Activate now on the banner to begin the setup.
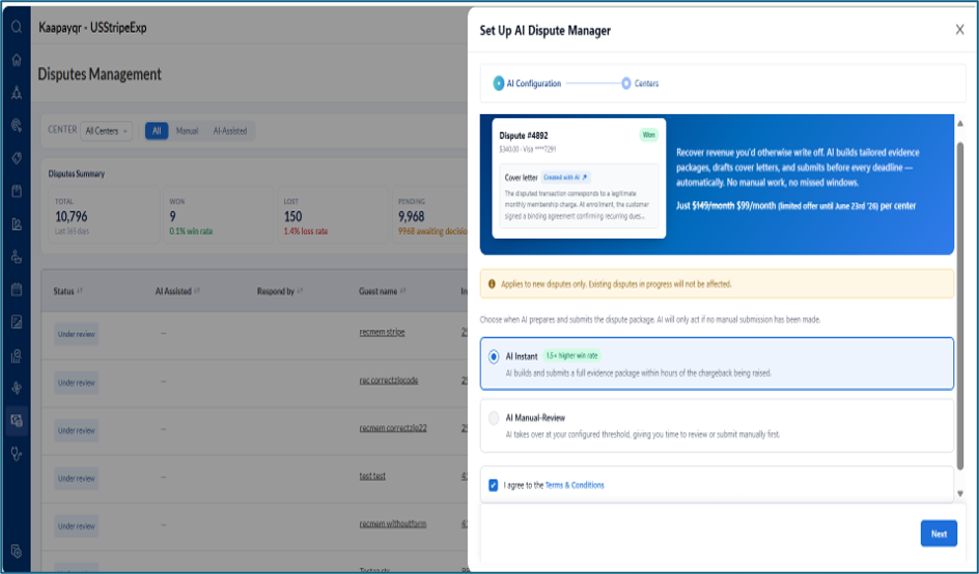
Clicking Activate now from either the activation prompt or the activation banner opens the Set Up AI Dispute Manager wizard, which has two steps.
AI Configuration
Review the subscription pricing and promotional offers displayed at the top of the panel: AI Dispute Management is available at a flat fee of $49 per center per month (limited-time promotional rate, sign up now to lock in this rate for next 12 months; list price is $149 per center per month). Once subscribed, all disputes raised within the billing month are handled by AI, and you retain 100% of the recovered amount.
Choose your preferred AI preparation mode:
AI Instant – AI builds and submits a full evidence package within hours of the chargeback being raised. A “1.5× higher win rate” badge is displayed for this option.
AI Manual-Review – AI takes over at your configured threshold, giving you time to review or submit manually first.
Select the I agree to the Terms & Conditions checkbox. You can click the Terms & Conditions link to read the full terms before agreeing.
Click Next to proceed to center selection.
Note
A notice at the top of the panel confirms that AI settings apply to new disputes only. Existing disputes in progress will not be affected.
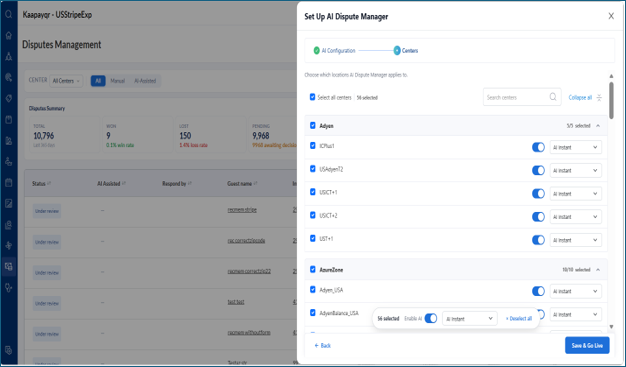
Centers
Choose which centers AI Dispute Manager should apply to. Click ‘select all centers’ checkbox to select all applicable centers
For each center, use the toggle to enable or disable AI, and select the AI mode (AI Instant or AI Manual-Review) from the dropdown.
To apply the same settings to multiple centers at once, use the bulk action bar at the bottom of the panel.
Click Save & Go Live to activate AI Dispute Management for the selected centers.
Note
The promotional rate of $49 per center per month is available for a limited time. Standard processor dispute fees continue to apply to all disputes regardless of AI mode.
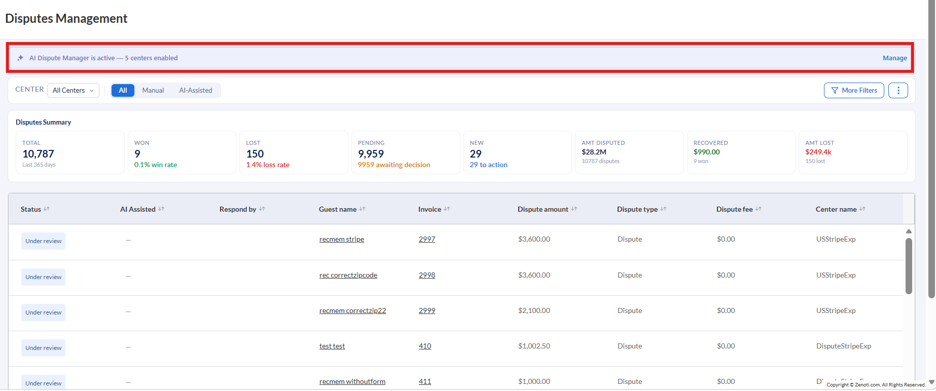
Once you complete the setup, the activation prompt and the upgrade banner are replaced with an active banner that reads "AI Dispute Manager is active" along with the number of centers where AI is enabled. The banner includes Manage button to update center selections, or AI configuration.
Disputes Management Dashboard
When you navigate to Payments > Disputes Management, the dashboard displays an overview of all disputes across your selected centers.
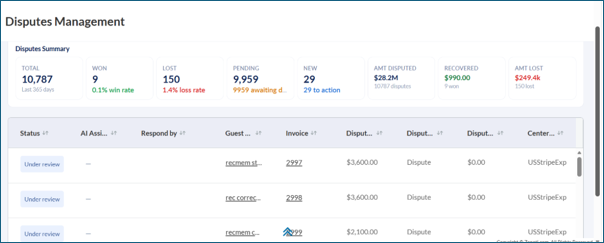
You see whether AI Dispute Management is active on the green bar of the dashboard, along with how many centers currently have AI enabled. The banner includes two actions:
Manage – Opens the center selection screen where you can edit the AI configuration from the drop down for selected centers or upgrade other centers to AI Dispute Manager.
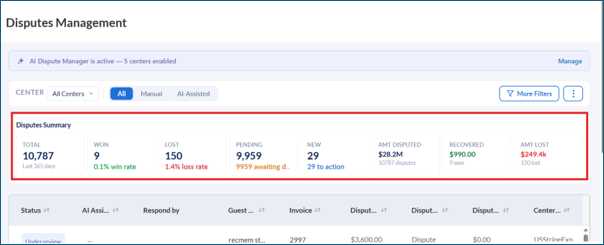
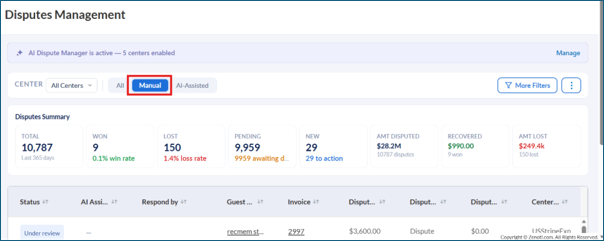
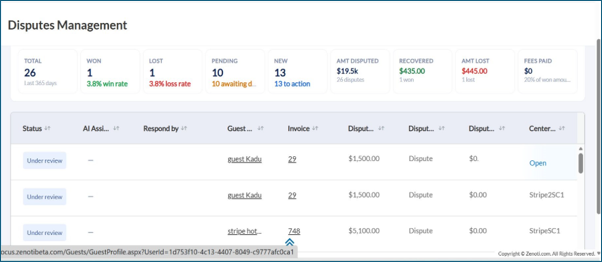
Below the banner, the Disputes Summary section displays key metrics for the selected time period (last 365 days by default):
Metric | Description |
TOTAL | Total number of disputes in the selected period. |
WON | Number of disputes won, with the win rate percentage displayed below. |
LOST | Number of disputes lost, with the loss rate percentage displayed below. |
PENDING | Number of disputes awaiting a decision from the payment processor. |
NEW | Number of new disputes that require action. |
AMT DISPUTED | Total monetary value of all disputes and the count of disputes. |
RECOVERED | Total amount recovered from won disputes, with the count of disputes won. |
AMT LOST | Total amount lost from lost disputes, with the count of disputes lost. |
FEES PAID | Total fees paid, shown as a percentage of the won amount. |
Use the CENTER dropdown at the top-left of the dashboard to filter disputes by one or more centers. By default, All Centers is selected. Click the dropdown to search for and select specific centers.
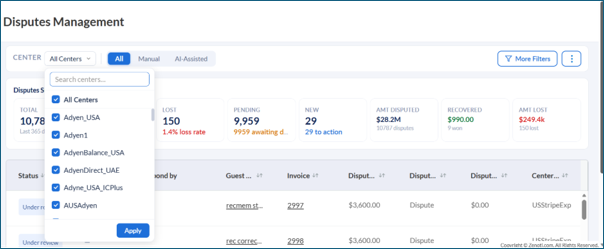
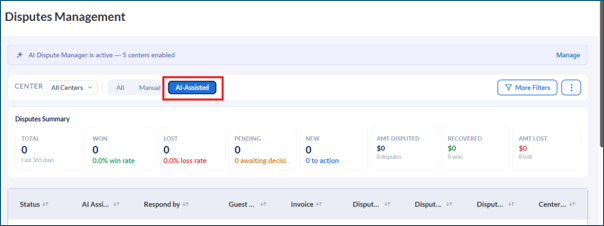
Use the tabs next to the Center filter to switch between different dispute views:
All – Displays every dispute, regardless of how it was handled.
Manual – Shows only disputes that were handled without AI assistance (Standard mode).
AI-Assisted – Shows only disputes where AI was involved in generating evidence or submitting the response.
Dispute List
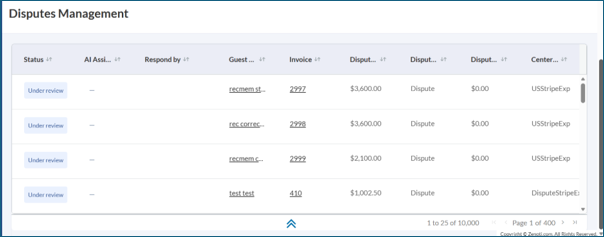
Below the summary cards, the dispute list table displays all disputes matching your current filters. The table includes the following columns, all of which are sortable:
Column | Description |
Status | The current status of the dispute (e.g., Under review, Won, Lost, Needs Response, Pending). |
AI Assisted | Indicates whether AI was used for this dispute. Displays “Yes” or “—”. |
Respond by | The deadline by which evidence must be submitted to the payment processor. |
Guest Name | The name of the guest associated with the dispute. Click the guest name to navigate to the Edit Guest page. |
Invoice | The invoice number linked to the disputed transaction. Click the invoice number to open the invoice. |
Disputed Amount | The monetary value of the dispute. |
Dispute Type | The type of dispute (e.g., Dispute, Chargeback). |
Dispute Fees | Any fees charged by the payment processor for the dispute. |
Center | The center where the original transaction took place. |
Note
The table supports pagination. The total number of records and page count are displayed at the bottom-right corner (e.g., “1 to 25 of 2,253 – Page 1 of 91”).
Advanced Filters
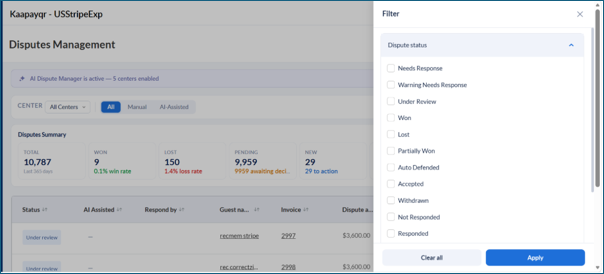
Click the More Filters button on the top-right of the dashboard to open the advanced filter panel. You can filter disputes by:
Select one or more statuses to narrow down the list:
Needs Response
Warning Needs Response
Under Review
Won
Lost
Partially Won
Auto Defended
Accepted
Withdrawn
Not Responded
Responded
You can further refine results by selecting a date range and specifying a minimum and maximum dispute amount.
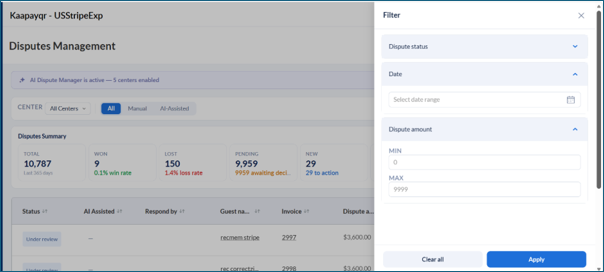
After selecting your filters, click Apply to update the dispute list, or click Clear all to reset all filters.
Exporting Disputes
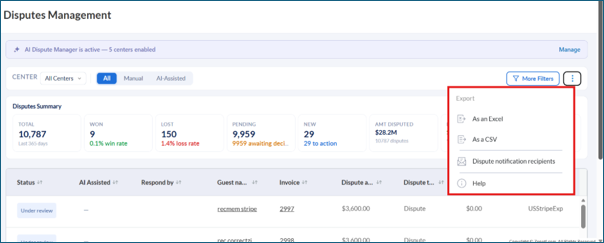
To export the dispute list, click the three-dot menu icon (⋮) at the top-right of the dashboard. The following options are available:
As an Excel – Downloads the dispute list as an Excel (.xlsx) file.
As a CSV – Downloads the dispute list as a CSV file.
Dispute notification recipients – Manage who receives email notifications when new disputes are raised.
Help – Opens the help documentation for Disputes Management.
Viewing Dispute Details
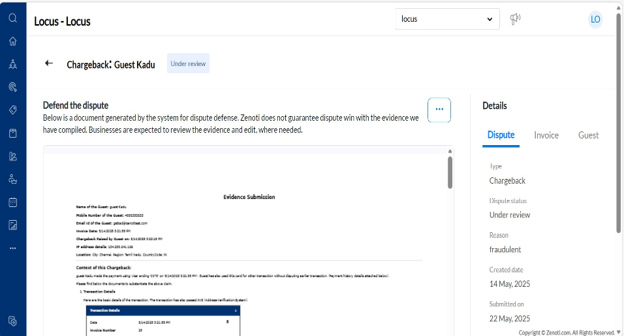
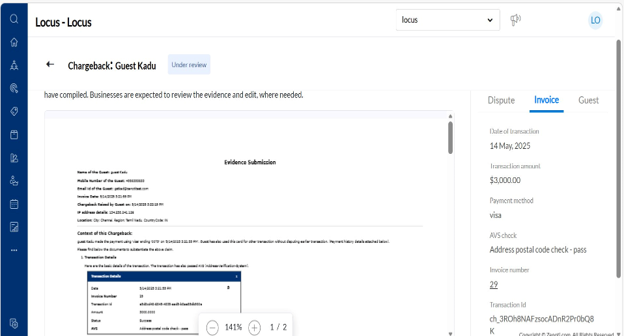
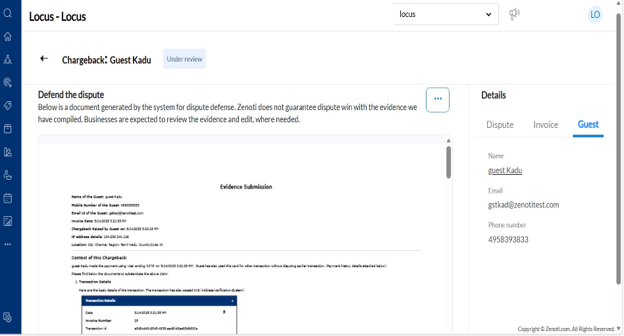
Click on any dispute row in the list to open the dispute detail page. This page is divided into two main sections: the evidence document preview on the left, and the Details panel on the right.
The left section displays the evidence submission document that has been generated for this dispute. The document header reads “Defend the dispute” and includes a note that the document is generated by the system for dispute defense, and that businesses are expected to review and edit the evidence where needed.
The evidence document typically includes:
Guest name, mobile number, and email
Invoice date and chargeback date
IP address and location details
Context of the chargeback
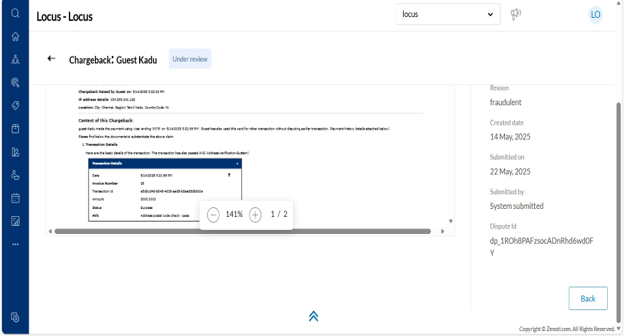
Transaction details table (date, invoice number, transaction ID, amount, status, and AVS check result)
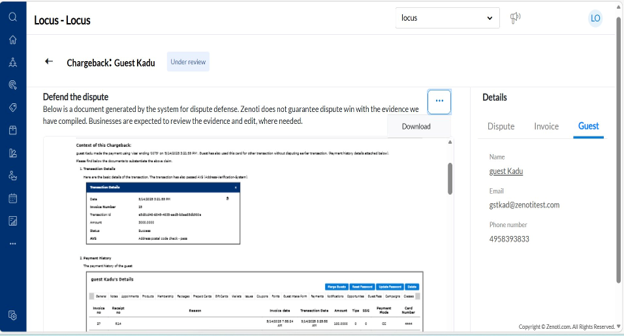
Payment history of the guest
Use the zoom controls at the bottom of the document preview to adjust the zoom level. The page indicator shows the current page (e.g., “1 / 2”).
To download the evidence document, click the three-dot menu (…) at the top-right of the evidence preview area and select Download.
Details Panel
The Details panel on the right side of the dispute detail page has three tabs: Dispute, Invoice, and Guest.
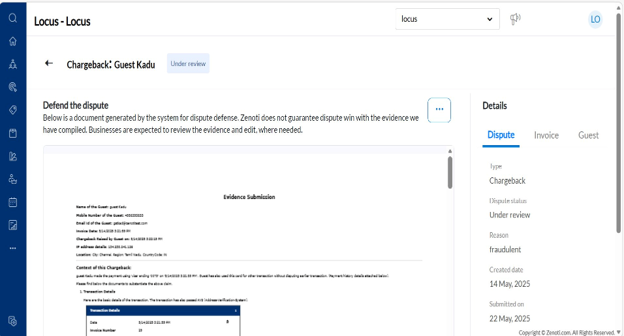
Dispute Tab
The Dispute tab displays the following information:
Field | Description |
Type | The dispute type (e.g., Chargeback). |
Dispute status | Current status (e.g., Under review). |
Reason | The reason provided by the cardholder or processor (e.g., Fraudulent). |
Created date | The date when the dispute was created. |
Submitted on | The date when the evidence was submitted. |
Submitted by | Indicates whether the evidence was submitted manually or by the system (e.g., System submitted). |
Dispute Id | The unique identifier for the dispute from the payment processor. |
The Invoice tab shows details about the original transaction:
Field | Description |
Date of transaction | The date and time the payment was made. |
Transaction amount | The amount of the original transaction. |
Payment method | The payment method used (e.g., Visa). |
AVS check | The result of the Address Verification System check (e.g., Address postal code check – pass). |
Invoice number | The Zenoti invoice number (clickable link to the invoice). |
Transaction Id | The unique transaction identifier from the payment processor. |
The Guest tab displays the guest’s contact information associated with the disputed transaction:
Field | Description |
Name | The guest’s name (clickable link to the guest profile). |
The email address on file for the guest. | |
Phone number | The phone number on file for the guest. |
How dispute defense works for each mode
When a dispute is raised, Zenoti sends an email notification to the configured recipients.
The system automatically populates three to four basic documents: invoice, payment history, and CC receipt.
You can optionally upload additional documents or write a cover letter (as a free-text Word document upload) before the due date.
If no manual action is taken, the pre-populated documents are auto-submitted one day before the processor’s due date.
Note
In Standard mode, there is no auto-generated cover letter or guest detail section. You can upload a cover letter manually if needed.
When a dispute is raised, Zenoti sends an email notification.
A set number of days before the cut-off, AI generates three to four standard evidence documents like invoice, payment history and CC receipt.
A blank cover letter field is provided for you to complete manually.
On AI takeover date, the system generates a comprehensive evidence package with guest details, transaction history on same card, AI-written cover letter, and other supporting documents
You can also edit the AI-generated content, add or remove documents, and write your cover letter before saving changes.
If you do not submit manually before the AI take-over date, AI auto-submits the package one day before the processor’s due date.
Note
If you have manually drafted a response and AI takes over before you submit, your draft is preserved for reference. The system clearly labels it as “Custom” and indicates that it will not be submitted. You can copy your draft content and paste it into the AI version if needed.
Once AI prepares the package, the dispute will be recorded as AI-submitted - regardless of any edits or changes made to the package thereafter.
Once AI prepares the package, the dispute will be recorded as AI-submitted - regardless of any edits or changes made to the package thereafter.
As soon as a dispute is raised, AI begins generating the full evidence package (within approximately 5 minutes).
The package includes an AI-generated cover letter, all required documents, past transaction history on the same card, and security checks (CVV, AVS, guest details).
The generated evidence is auto-submitted four hours after preparation.
During the four-hour window, you can review, add, or remove documents and make edits.
Note
Once AI prepares the package, the dispute will be recorded as AI-submitted - regardless of any edits or changes made to the package thereafter.
Regardless of the mode you are on, you can add custom documents to the dispute evidence package. On the dispute detail page, use the “Add custom document” option to enter a document name and upload the file. Custom documents are included alongside the system-generated evidence in the submission.
Keyword | Related Term |
Dispute Management | AI Dispute Management |
Chargeback | Evidence Submission |
Instant AI | AI with Manual |
Standard Dispute | Dispute Defense |
Cover Letter | Transaction Details |
Payment History | CC Receipt |
Invoice | Dispute Filters |
Dispute Status | Auto-Submit |
AI Toggle History | Dispute Notification |
Export Disputes | Dispute Summary |