Manage employee blockouts on the Employee Schedule page
Center managers can create, edit, and delete blockouts directly on the Employee Schedule page for any employee — not just providers. Blockouts are periods when an employee is unavailable for bookings or work, such as breaks, training, leave, or meetings.
For provider employees, the Employee Schedule page and the Appointment Book stay in sync — a blockout added, edited, or deleted on one surface is reflected on the other immediately. Non-provider employees do not appear on the Appointment Book, but their blockouts can now be added, edited, and deleted from the Employee Schedule page.
Before you begin
You must have the role permissions required to manage employee schedules and blockouts at the center. The same permissions used for blockouts in the Appointment Book apply on the Employee Schedule page.
The new scheduling experience must be enabled at your center.
Enable blockouts on the Employee Schedule page
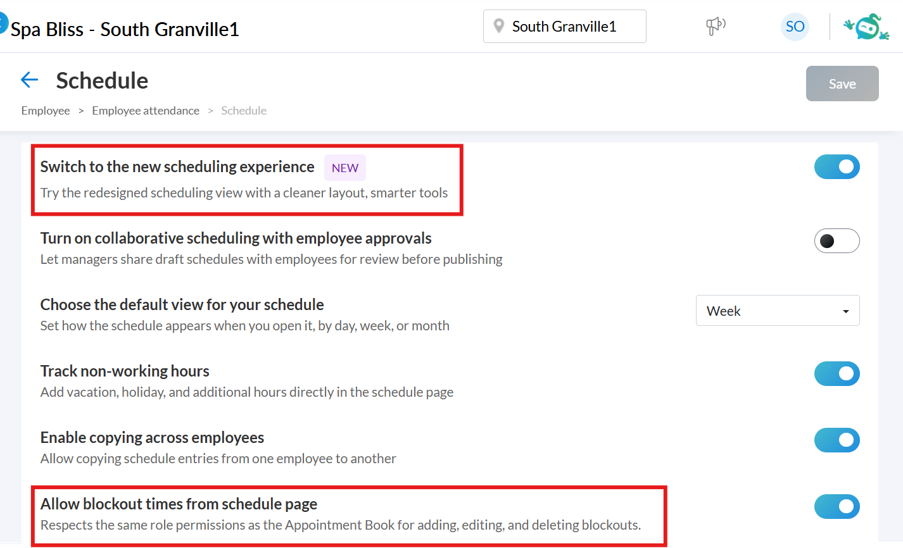
At the center level, go to Configuration > Employee > Employee attendance > Schedule.
Turn on the Switch to the new scheduling experience toggle.
Scroll to the bottom of the page and turn on the Allow blockout times from schedule page toggle
Click Save.
Once both toggles are on:
Blockouts can be created, edited, and deleted directly on the Employee Schedule page.
All existing blockouts created from the Appointment Book appear on the Employee Schedule page for the same employees and dates.
Bi-directional sync is active between the Employee Schedule page and the Appointment Book.
The Allow blockout times from schedule page setting is off by default. Turning it off again hides the blockout controls on the Employee Schedule page but does not remove or modify any blockouts that already exist.
Set your default Day view (optional)
You can choose what the Day view shows the first time it loads each session.
On the top-right of the Employee Schedule page, click the Settings icon.
In the User Preferences panel that appears, under Default Day View Display, select one of:
Schedule: Day view loads showing schedules only
Schedule and Blockouts: Day view loads showing schedules with blockouts overlaid
Click Save. The setting is retained the next time you access the Employee Schedule page.
You can revert to system defaults by clicking Reset.
You can also switch between the two views at any time using the toggle on the Employee Schedule page. This preference only controls what loads by default.
Note
This is separate from the center-level Choose the default view for your schedule setting (under Configuration > Employee > Employee attendance > Schedule), which controls whether the page opens in Day, Week, or Month view.
Show or hide blockouts
On the Employee Schedule page, use the view toggle to switch between:
Schedule: Schedules only. Cleaner view, useful when planning working hours.
Schedule and Blockouts: Schedules with all blockouts overlaid.
The toggle is available in Day, Week, and Month views. In Week and Month view, the default load is always Schedule regardless of the Day view preference; switch to Schedule and Blockouts to see them.
Create a blockout in Day view
You can create a blockout in Day view using any of these methods:
Method | How it works |
|---|---|
Right-click | Right-click an empty time slot on the employee's row, then select Create Blockout. |
Click and drag | Click and drag across a time range on the timeline. Use this when a blockout already exists nearby and you want to add another adjacent block. |
Side panel | Open the side panel, select the employee and date, and enter the blockout details. |
In the blockout form, set:
Blockout type: Lunch, Meeting, Personal time, or any other configured type.
Start time and Duration: Set the start time and duration. The end time is calculated automatically.
Recurrence: None, Daily, Weekly, Monthly, or Yearly. Recurring blockouts display the same recurring icon used in the Appointment Book.
Notes: Optional context.
All existing rules apply: overlap checks, recurrence patterns, and time validations work exactly as they do in the Appointment Book.
Overlap alerts when scheduling blockouts
When you create or move a blockout into a time slot that already has a blockout or appointment, Zenoti may display an alert depending on how your organization level settings are configured. These alerts behave consistently across both the Employee Schedule page and the Appointment Book.
The alert behavior is determined by two organization level settings:
Scenario 1: Both settings Book overlapping appointments for providers as a safeguard against cancellations and Show alert for overlapping appointments are enabled.
You see the alert: Jane is already booked at this time. Are you sure you want to continue? You can choose to proceed or cancel.
Scenario 2: Book overlapping appointments for providers as a safeguard against cancellations is enabled and Show alert for overlapping appointments is not disabled.
No alert is shown. Blockouts can be scheduled over other blockouts or appointments without any prompt.
Scenario 3: Book overlapping appointments for providers as a safeguard against cancellations is disabled.
You see the alert: Jane is busy at this time. The blockout cannot be placed in the occupied slot.
Note
If you see an overlap alert, this is expected behavior based on your organization level configuration. This is not a defect. To verify, check that the two settings above are configured as intended, or test the same action in the Appointment Book. If the same alert appears in both places, the behavior is consistent and working as designed.
Edit a blockout
Drag and drop (Day view)
In Day view, you can adjust an existing blockout directly on the timeline:
Extend: Drag the right edge to a later time.
Shorten: Drag the left edge to a later time.
Move: Drag the center of the block to a different time slot.
Changes are saved immediately. For provider employees, changes are also synced to the Appointment Book in real time. For non-provider employees, the Employee Schedule page is the only place these blockouts appear.
Side panel
Click any blockout to open the side panel. From there you can update:
Start time
Duration (End time recalculates)
Recurrence
Notes
The side panel uses the same validation rules as the Appointment Book.
Delete a blockout
Single blockout (Day view)
Right-click the blockout and select Delete. If the blockout is part of a recurring series, you are prompted to choose:
Delete this occurrence: Removes only the selected day.
Delete all occurrences: Removes the entire series.
You can also delete a blockout from the side panel using the Delete option.
All blockouts for a day (Week and Month views)
In Week and Month views, each employee's day is shown as a single consolidated block.
Click the block to open the side panel, which lists every blockout for that day. From here, you can edit or delete individual blockouts.
Right-click the block and select Delete All Blockouts to remove every blockout on that day for that employee. A confirmation is required.
Copy schedules forward with blockouts
When you use Copy Forward to replicate a schedule to future days, weeks, or months, you can choose whether to include blockouts.
On the Employee Schedule page, start the Copy Forward action.
Set the target date range as usual.
Select the Copy Blockouts checkbox.
Click Confirm.
The Copy Blockouts checkbox is off by default — copying a schedule forward without selecting it preserves the existing behavior. When selected, all blockouts within the source range are copied with their recurrence rules intact.
How the Employee Schedule page and Appointment Book stay in sync
For provider employees, the following actions are synced between the two surfaces in real time:
Create a blockout
Edit a blockout (side panel or drag-and-drop)
Delete a single blockout
Delete an entire recurring series
Copy a schedule forward with blockouts
A blockout created on the Employee Schedule page appears on the Appointment Book at the next refresh, and vice versa.
For non-provider employees, there is no sync because these employees do not appear on the Appointment Book. Blockouts for non-providers are created, edited, and deleted only from the Employee Schedule page, which is the single source of truth for them.
Color coding and icons
Blockouts on the Employee Schedule page use the same color codes and recurring icon as the Appointment Book. The color of each blockout reflects the Block Out Time Type configured at the organization level.
Note
The blockout type name (for example, Lunch, Meeting, or Personal time) is not displayed on the Employee Schedule page — blocks are identified by color only. To see the type name for a specific blockout, view it on the Appointment Book (provider employees only). For non-provider blockouts, the type name is visible in the side panel on the Employee Schedule page.
Permissions
Creating, editing, and deleting blockouts from the Employee Schedule page respects the same role permissions used for blockouts in the Appointment Book. No new permission settings have been added.
If a user can create a blockout in the Appointment Book today, they can do the same on the Employee Schedule page after the center setting is enabled — for both provider and non-provider employees.
Reports
Blockouts created from the Employee Schedule page flow into the same blockout reports and report columns as blockouts created from the Appointment Book. No separate filter or report is needed. The existing Block Out Time Details report includes them automatically, including blockouts created for non-provider employees.