Release Notes - January 07, 2025
Revision History
The table below lists the updates made to this document after the initial software release, including details of revisions made.
Date | Feature/Module Name | Section | Change Description |
|---|---|---|---|
01-28-2025 | Employee and Payroll - Employee termination | Removed “employment history” as the feature has been deprecated. | |
02-27-2025 | Admin - Enhancements for tax-inclusive | Added Release Notes snippet |
We’ve enhanced the structure of our release notes to better serve your needs. Updates are now categorized under clear headings based on Add-ons, Core Product, Product Edition, Personas, and Modules.
We’ve enhanced the structure of our release notes to better serve your needs. Updates are now categorized under clear headings based on Add-ons, Core Product, Product Edition, Personas, and Modules.
This new format ensures you can quickly find updates most relevant to your role, understand the value each change delivers, and seamlessly adopt new features or enhanced workflows.
This Release Notes contains the following sections:
Announcements: Key updates and important information related to the release.
New Features: Newly introduced functionalities designed to enhance the product experience.
Enhancements: Improvements made to existing features for better usability and performance. Categorized features as Core Product, Product Editions, and Add-ons.
Additional Resources: Links to supporting materials such as guides, training, and documentation. This also includes references to the release notes for the patches included in this update.
Icons used in this document
Icon | Description |
|---|---|
 | Automatic update for all users. |
 | Localization available. |
 | Employee: Enhancements or features for employee and payroll. |
 | Admin: Features specifically enhanced for admin users who manage the system configuration, including user roles, permissions, and system integrations. |
 | Business Owner/Center Manager: Updates implemented for the business owners or managers who are responsible for overall business strategy, growth, and decision-making. |
 | Front Desk Operator/Service Provider: Features that enhance the usability for front-desk staff who handle appointments, customer queries, payments, and guest interactions. |
 | Guests: Improvements made for the end-users or customers of the business who interact with Zenoti through online booking systems, self-service kiosks, and branded mobile apps. |
Announcements
Module: Marketing
 Simplified Email Editor is now the default for campaign creation
We’re excited to announce that the Simplified Email Editor is now set as the default for all marketing campaigns. The simplified editor, available to users for over three years, offers an intuitive and beginner-friendly solution for designing campaigns. This upgrade ensures consistent and effortless campaign creation for businesses in Salons, Spas, Medspas, and Fitness, modified to meet the needs of Admins, Front Desk Operators, and Marketing Teams.
What's new?
Simplified Editor by Default:
Enabled automatically for all new organizations and employees.
Migrated to default for existing organizations at both organization and employee levels.
IMPORTANT: Campaigns created in old editors will remain editable in their original format. However, new campaigns cannot be created using the old editor.
Learn More: To learn more about Simplified Email Editor, refer to Simplified Editor.
Module: Fitness
Module: ePrescribe
Introducing ePrescribe: Simplify your Electronic Prescription ManagementStreamline prescription workflows with ePrescribe, a paid add-on available in the US region. This feature enables providers to create and manage electronic prescriptions directly from the patient profile on Zenoti Web and ZMA on tablet.
ePrescribe allows providers to manage both non-controlled and controlled substances (EPCS) through a dedicated Prescriptions tab in the guest profile, offering quick access to summaries and seamless pharmacy selection.
ePrescribe empowers providers by:
Increasing Efficiency: Simplifying prescription workflows and reducing manual errors.
Improving Patient Experience: Streamlining pharmacy selection to ensure a hassle-free prescription process.
Learn More: To learn more about ePrescribe, refer to Onboard and Manage ePrescribe.
Module: Appointment Book
Improved layout on the gift cards tab in guest profilesThe layout of the Gift Cards tab in guest profiles is improved by displaying the Received Gift Cards section above the Purchased Gift Cards section. This change prioritizes gift cards most relevant to the guest, specifically those received as gifts, streamlining the process for front desk staff to assist with redeeming or tracking gifted balances efficiently.
This updated layout is now available by default for all organizations.
Module: CMA
Module: Admin
Business Owners
One of Zenoti’s latest enhancements prevents tax-exclusive items from being added to invoices in organizations that use tax-inclusive pricing. For tax-inclusive organizations, prices are set to include taxes at the master data level. This eliminates pricing discrepancies and ensures a streamlined billing process.
Organizations with tax-inclusive pricing can now maintain accurate billing without manual adjustments. This new enhancement automatically aligns all items with tax-inclusive settings, preventing pricing mismatches.
New Features
Add-On Product
Optional, specialized tools and integrations that extend the functionality of the core product. These add-ons cater to specific needs such as advanced marketing, e-prescriptions, digital forms, or integrations with platforms like Shopify and accounting systems. They help businesses scale operations and address industry-specific challenges. Contact your Customer Success Manager (CSM) to find out more about these paid features.
Module: ePrescribe
Streamlined multi-center onboarding for prescribers
 Admins, Providers
This feature allows an existing prescriber, already registered at one center, to get onboarded at additional centers effortlessly. Prescriber licenses are auto populated for additional centers, saving time and reducing data entry errors.
Learn More: For detailed instructions and further context, refer to Onboard and Manage ePrescribe.
Enhancements
Core Product
This includes foundational features and tools that are essential for running day-to-day business operations. These features cover appointments, POS, employee management, inventory, reporting. They are designed to provide a seamless experience for users across all industries Zenoti serves.
Module: Appointment Book
 Admins, Business Owners
This enhancement ensures greater flexibility in managing room assignments for parallel services, reducing restrictions for standalone service associations. By enabling this feature, businesses can optimize resource utilization and improve booking efficiency without compromising the functionality of parallel groups. You can now configure rooms for both parallel services and one standalone service from the same parallel group.
Example use case: A parallel service group includes manicure and pedicure. If both the parallel group and pedicure as an individual service are assigned to the same room, the room can be booked for:
Manicure and pedicure together (in parallel).
Pedicure alone.
However, the room cannot be booked for manicure alone.
Please note, the room can still be set up to provide only manicure services. However, with the new feature, you can choose to prevent manicures from being offered as standalone services in the room.
How to use:
At the organization level, click Configuration.
Navigate to Appointments > Bookings > Booking rules.
Switch on the Allow parallel rooms to be associated to only one standalone service from the associated parallel group toggle.
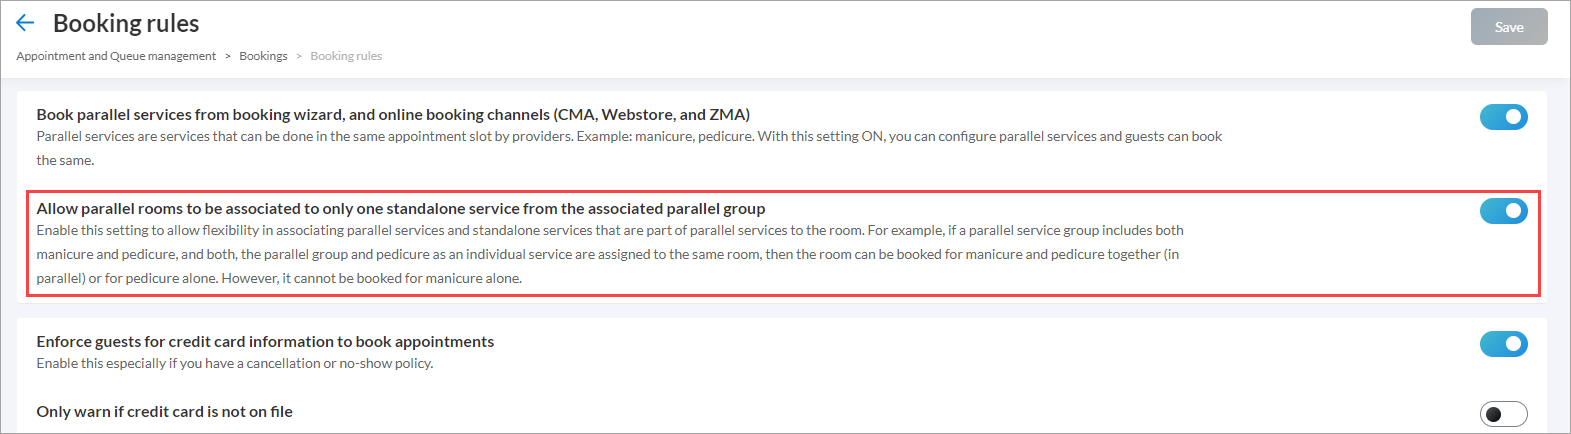
Click Save.
Learn more: For detailed instructions and further context on how to enable this setting, refer to the Flexible room association article.
Admin, Business Owners, Center Managers
This enhancement introduces a configurable setting to the UI, providing centers with greater control over waitlist notifications. By enabling center-level configuration directly in the Zenoti interface, admins/center managers can conveniently adjust the notification lead time for guests, improving operational flexibility and guest communication.
Example use case: A salon wants to manage how close to an appointment slot waitlist notifications are sent, ensuring efficient scheduling and better guest communication. The Send waitlist notifications with a lead time of X mins field allows centers to define a cutoff time. For example, if set to 30 minutes, guests receive notifications only up to 30 minutes before the appointment slot.
Value:
Avoids last-minute scheduling conflicts.
Improves guest experience with timely notifications.
Available only for centers with Automatic Waitlist enabled.
How to use:
At the organization level, click Configuration.
Navigate to Appointment and Queue Management > Personalization > Toolbar.
Enter the time in the field against the Send waitlist notifications with a lead time of X mins setting.
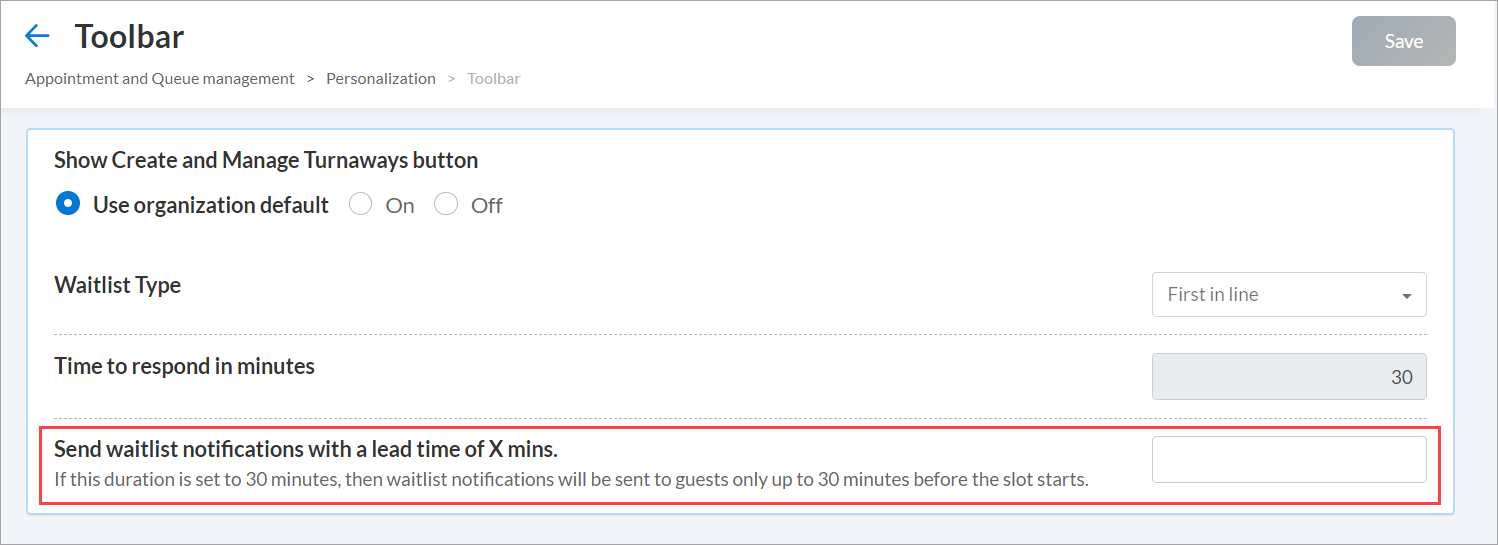
Click Save.
Learn more: For detailed instructions and further context on how to enable this setting, refer to the Set time to stop waitlist notifications article.
Module: Memberships
Prioritize membership actions over scheduled collections Admin, Business Owners, Center Managers
Zenoti now ensures membership actions such as cancellation, freeze, upgrade, or downgrade take priority over collections. If an action and a payment are scheduled on the same day, the system automatically prioritizes the action first. This approach maintains business continuity while avoiding duplicate transactions.
Advantages of prioritizing membership actions:
Ensures payments go through even if scheduled actions such as cancellations, freezes, or upgrades, fail due to system errors. This prevents revenue loss and keeps operations running smoothly.
Minimizes operational disruptions, reducing the need for manual intervention by admins.
Safeguards revenue and reduces administrative workload, ensuring smooth operations without generating additional collections.
Module: Online Booking
 Administrators, Guests, Front Desk Operators
To enhance user experience and streamline access to purchased product details, the CMA now includes a dedicated Products tab. This feature allows guests to view products purchased during checkout or booked for later directly within their profile.
It offers a clear and organized view of product details, including Invoice number, Name, Purchase date, Quantity, Price, Total amount, and Status enabling guests to easily track their product history.
IMPORTANT: Admins can enable the settings by following these steps:
At the organization level, click Configuration.
Navigate to Online Booking > Online booking settings > CX V3 > General > User Profile.
Switch on the Display Products in profile toggle.
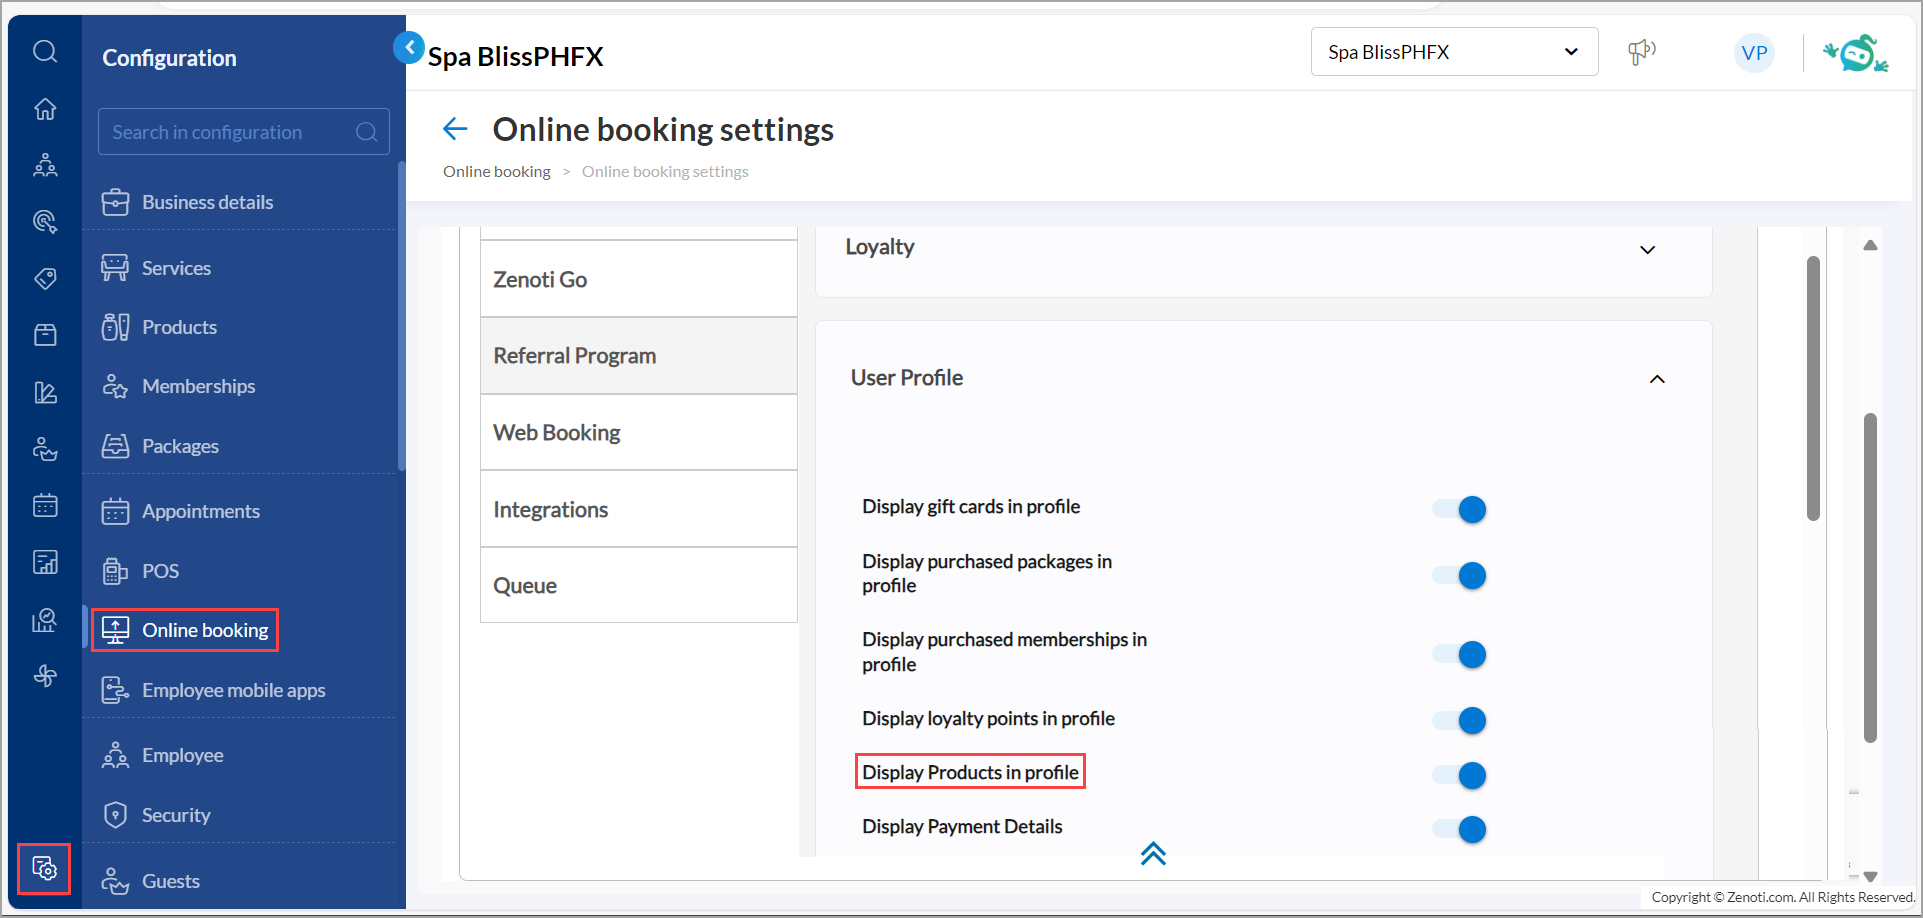
Click Save.
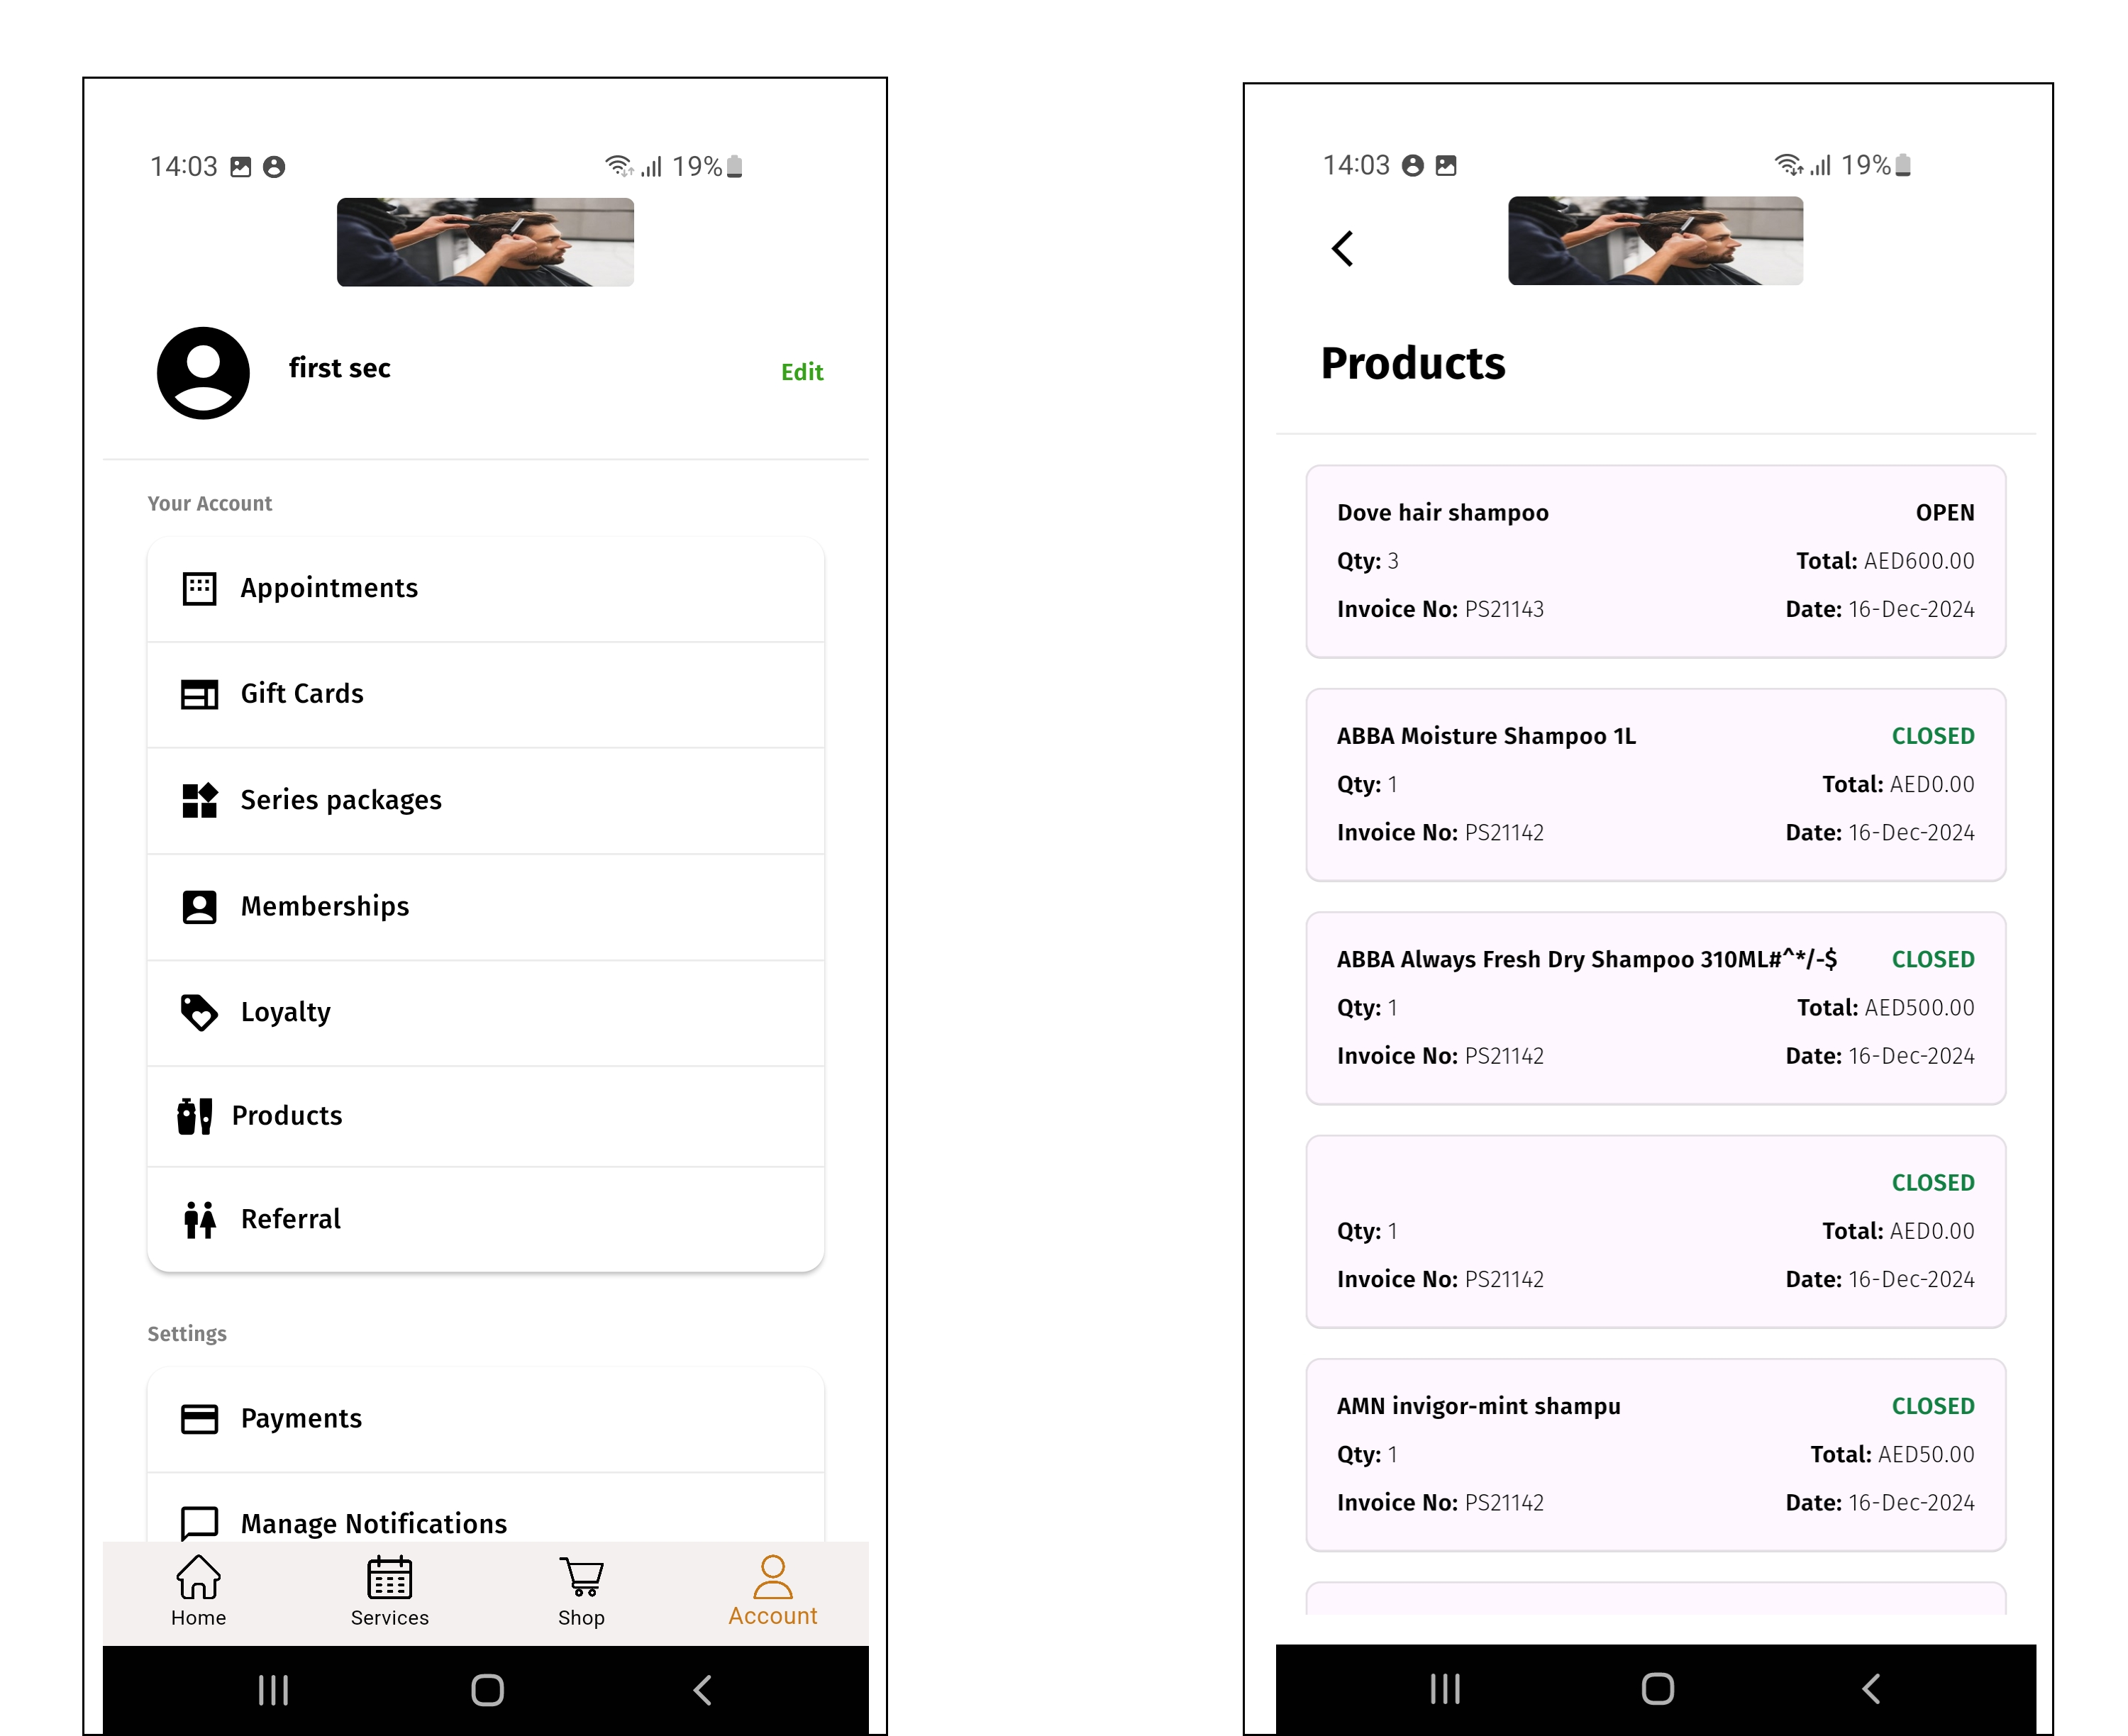
How guests can use:
Log in to the CMA application with your credentials.
Click the guest profile icon.
Navigate to the Products tab to view a list of purchased or booked products displayed as tiles.
Learn More: For detailed instructions and further context on how to enable this setting, refer to the Display products in guest profile document.
Administrators, Business owners
Businesses can now add custom warning text to the account deletion process in the CMA application. This capability enables businesses to clearly communicate the consequences of deleting their profiles, enhancing transparency and ensuring compliance with privacy regulations. It also provides businesses with greater control over the information shared with guests.
Pre-conditions for account deletion:
Guests can proceed with account deletion only if the following conditions are met:
No ongoing appointments
No loyalty points
No active memberships or packages
No active gift cards
No outstanding payments
If any of these conditions are unmet, the account deletion process will be restricted.
Note
Only CMA guests can delete their accounts. Employees using CMA are not authorized to perform this action.
How to use:
Admins can enable the settings by following these steps:
At the organization level, click Configuration.
Navigate to Online Booking > Online booking settings > CX V3.
Click Guest Privacy.
Enter the desired custom warning text in the Guest Account Deletion Policy text box.
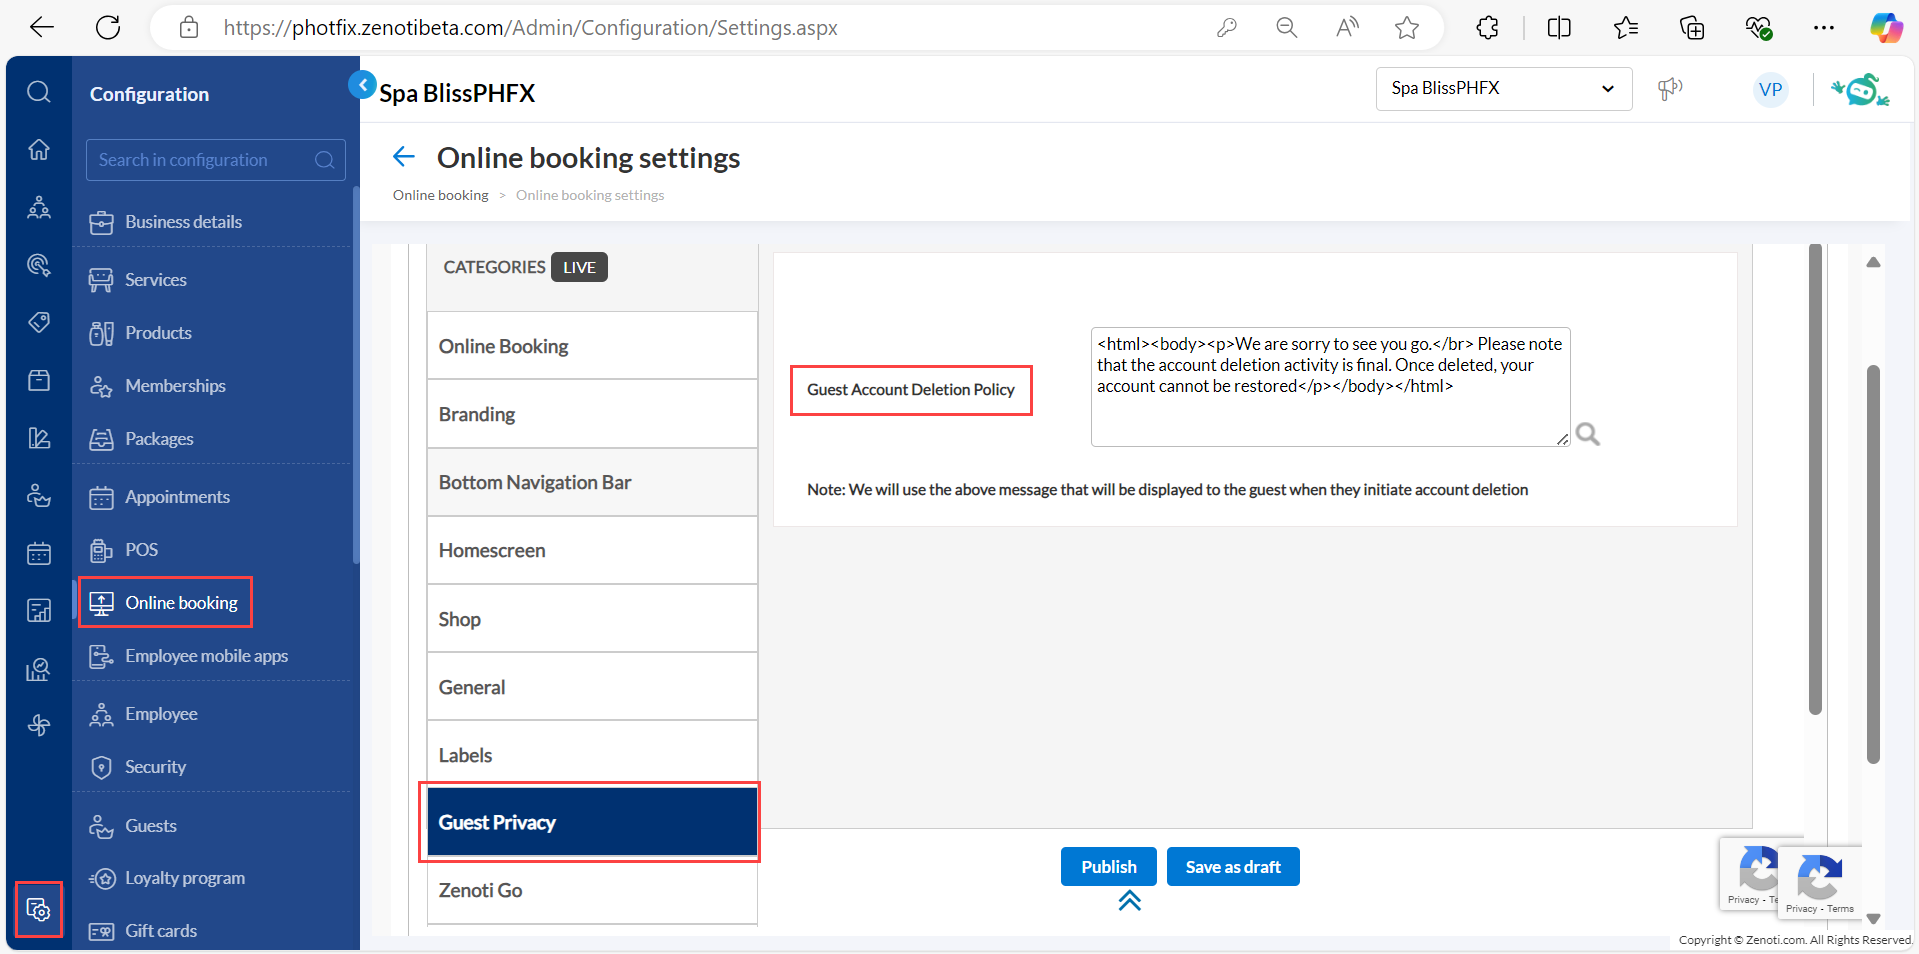
This message will appear to guests when they log in to the CMA app and click Initiate Deletion to request account deletion. Ensure the warning text clearly outlines the organization’s account deletion policy.
Learn More: For detailed instructions and further context on how to enable this setting, refer to the Configure Guest account deletion settings document.
Administrators, Business owners
Businesses can now collect referral source data directly from guests on the CMA sign-up page. This allows you to seamlessly gather insights into how guests discovered your services, whether through social media, online ads, word-of-mouth, or other channels. By tracking referral sources, you can identify high-performing customer acquisition channels and refine your marketing strategies.
Guests can select a source from the How did you hear about us? dropdown list or type and search for options.
If a guest arrives through a referral link, the referral source and referral code fields are automatically filled with the linked data. These fields are non-editable when populated through a referral link.
How to use:
At the organization level, click Configuration.
Navigate to Online Booking > Online booking settings > > CX V3 > Online Booking .
Select the Enable Referral Source checkbox.
Add the desired custom label for the referral source field. For example: “How did you hear about us?”
Mark the field as mandatory by selecting the Mark it as Required checkbox.
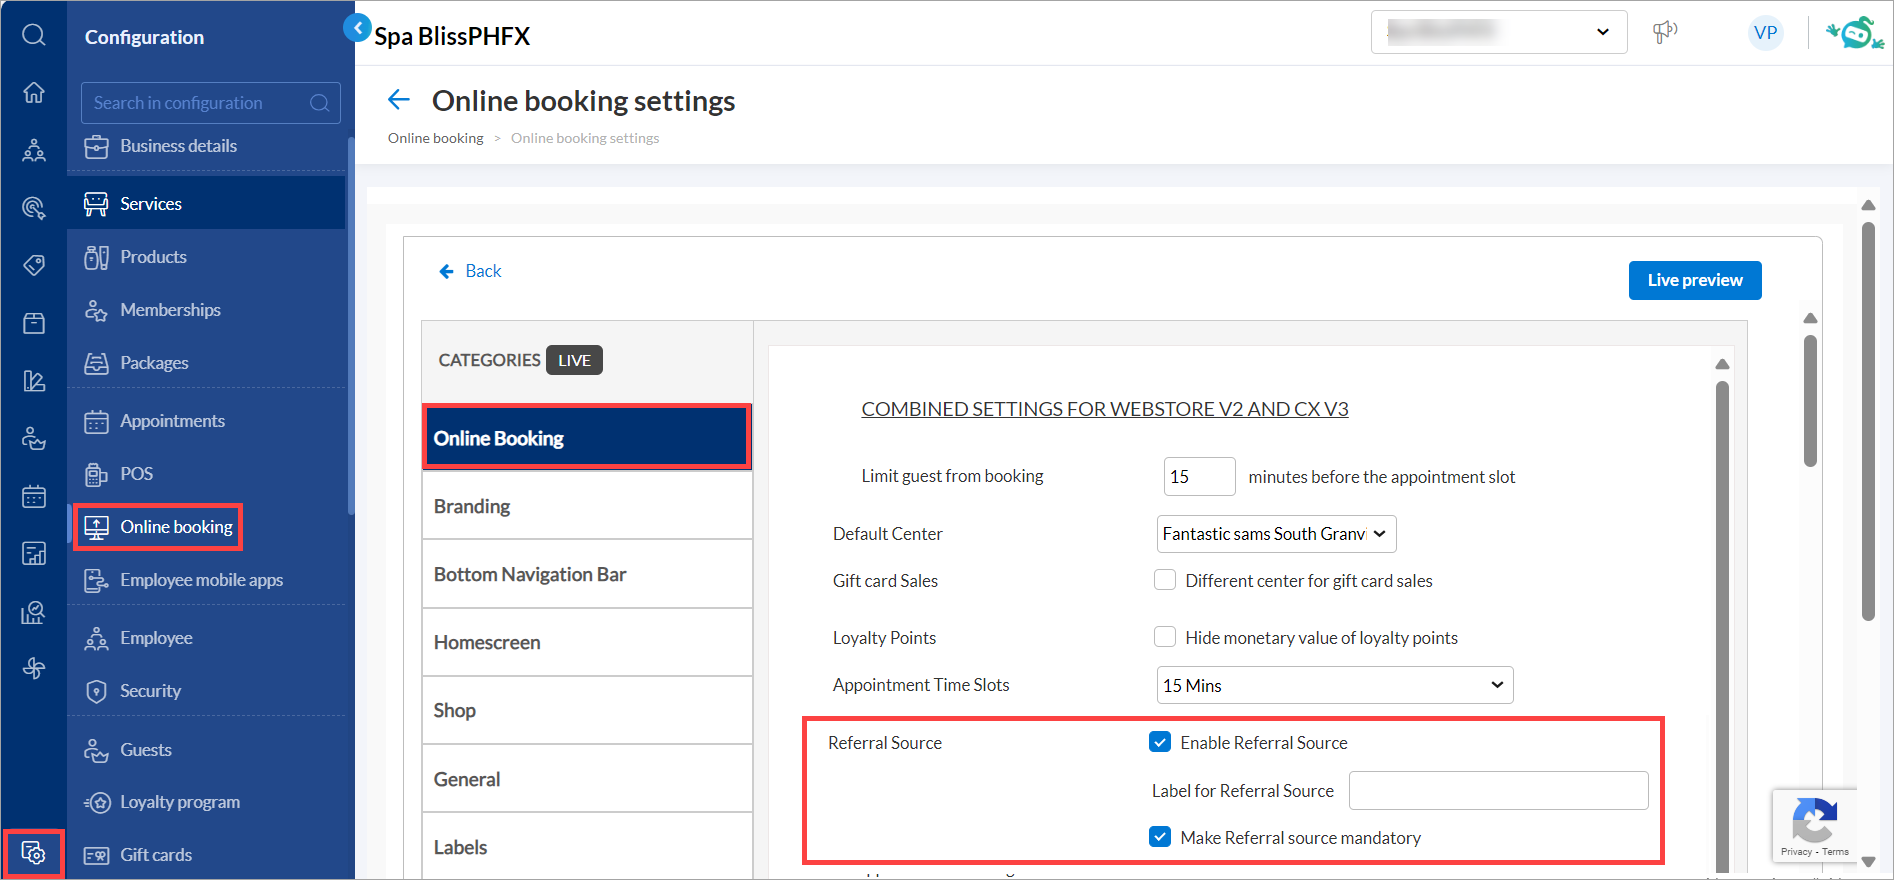
Click Save.
Learn More: For detailed instructions and further context on how to enable this setting, refer to the Configure referral source document.
Administrators, Guests
To enhance guest experience and simplify the booking process, we have introduced the Hybrid Queue mode in the CMA application. This capability allows guests to join a queue for same-day services or reserve a future time slot, giving them the flexibility to choose what works best for them. Whether they want to skip the wait and secure their spot today or plan ahead by booking services for themselves or their group, the Hybrid Queue ensures a seamless and personalized experience tailored to your needs.
IMPORTANT: Admins can enable the settings by following these steps:
At the organization level, click Configuration.
Navigate to Online Booking > Online booking settings > CX V3.
Select Queue and switch on the Enable queue mode toggle to allow customers to join a virtual queue for their appointments. After this go to the bottom navigation bar section and link the Home button to Queue. Click Publish .
By default, the toggle for the Enable queue mode setting is off.
Switch on the Marketing Page with Banner toggle to display a promotional page as the application's default landing page.
Switch on the Allow Multiple Bookings Over Existing Queue Bookings toggle to allow customers to book new appointments (standard or queue-based) even if they already have an active queue booking.
Click Save.
How guests can use:
Log in to the CMA application with your credentials.
Select the desired service center you wish to visit.
You can select centers on the map view based on the wait time.
Click Join queue.
To include additional guests in the booking, from the Number of guests dropdown list, select the required option. You can add up to 5 guests.
To provide information about the guests, add details such as their name and preferred pronoun.
Click Select services.
To add a service for the first guest, select the required services from the list and click Continue.
To select a therapist for the chosen services, pick the required therapist from the list and click Continue.
In summary view for the guest with cart, guest can click continue to move to the next guest.
To proceed, select services and a therapist for each additional guest and then click Continue.
In the summary view, validate the required details such as services, price, and guest details. Click Join Queue.
The application will book the earliest available appointment slot for all guests, confirming the spot in the queue.
Learn More: For detailed instructions and further context on how to enable this setting, refer to the Hybrid queue mode document.
Administrators, Business Owners
Businesses can now create discount-based gift card promotions at the organization level, offering discounts on gift card purchases when guests use a promo code. This allows businesses to apply discounts, either as a percentage or a fixed amount, to both online and in-store gift cards, making it easier to run sales during holidays or special events.
How to use:
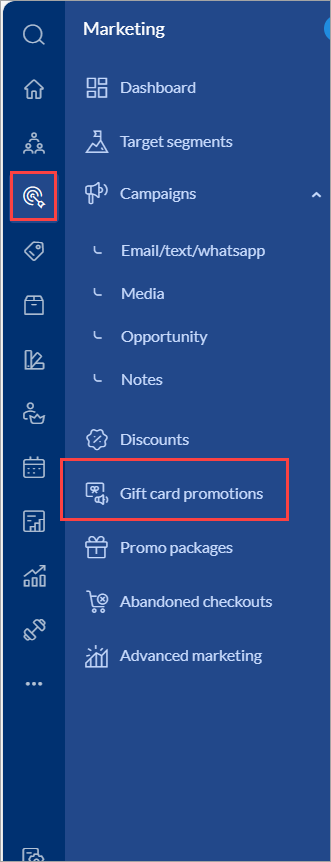
At the organization level, click the Marketing icon and navigate to Gift card promotions.
Click Add on the Manage Gift Card Promotions page.
Select Discount from the Gift card type dropdown menu of the General tab.
You can set up an Amount based gift card promotion or a Service/Day Package gift card promotion.
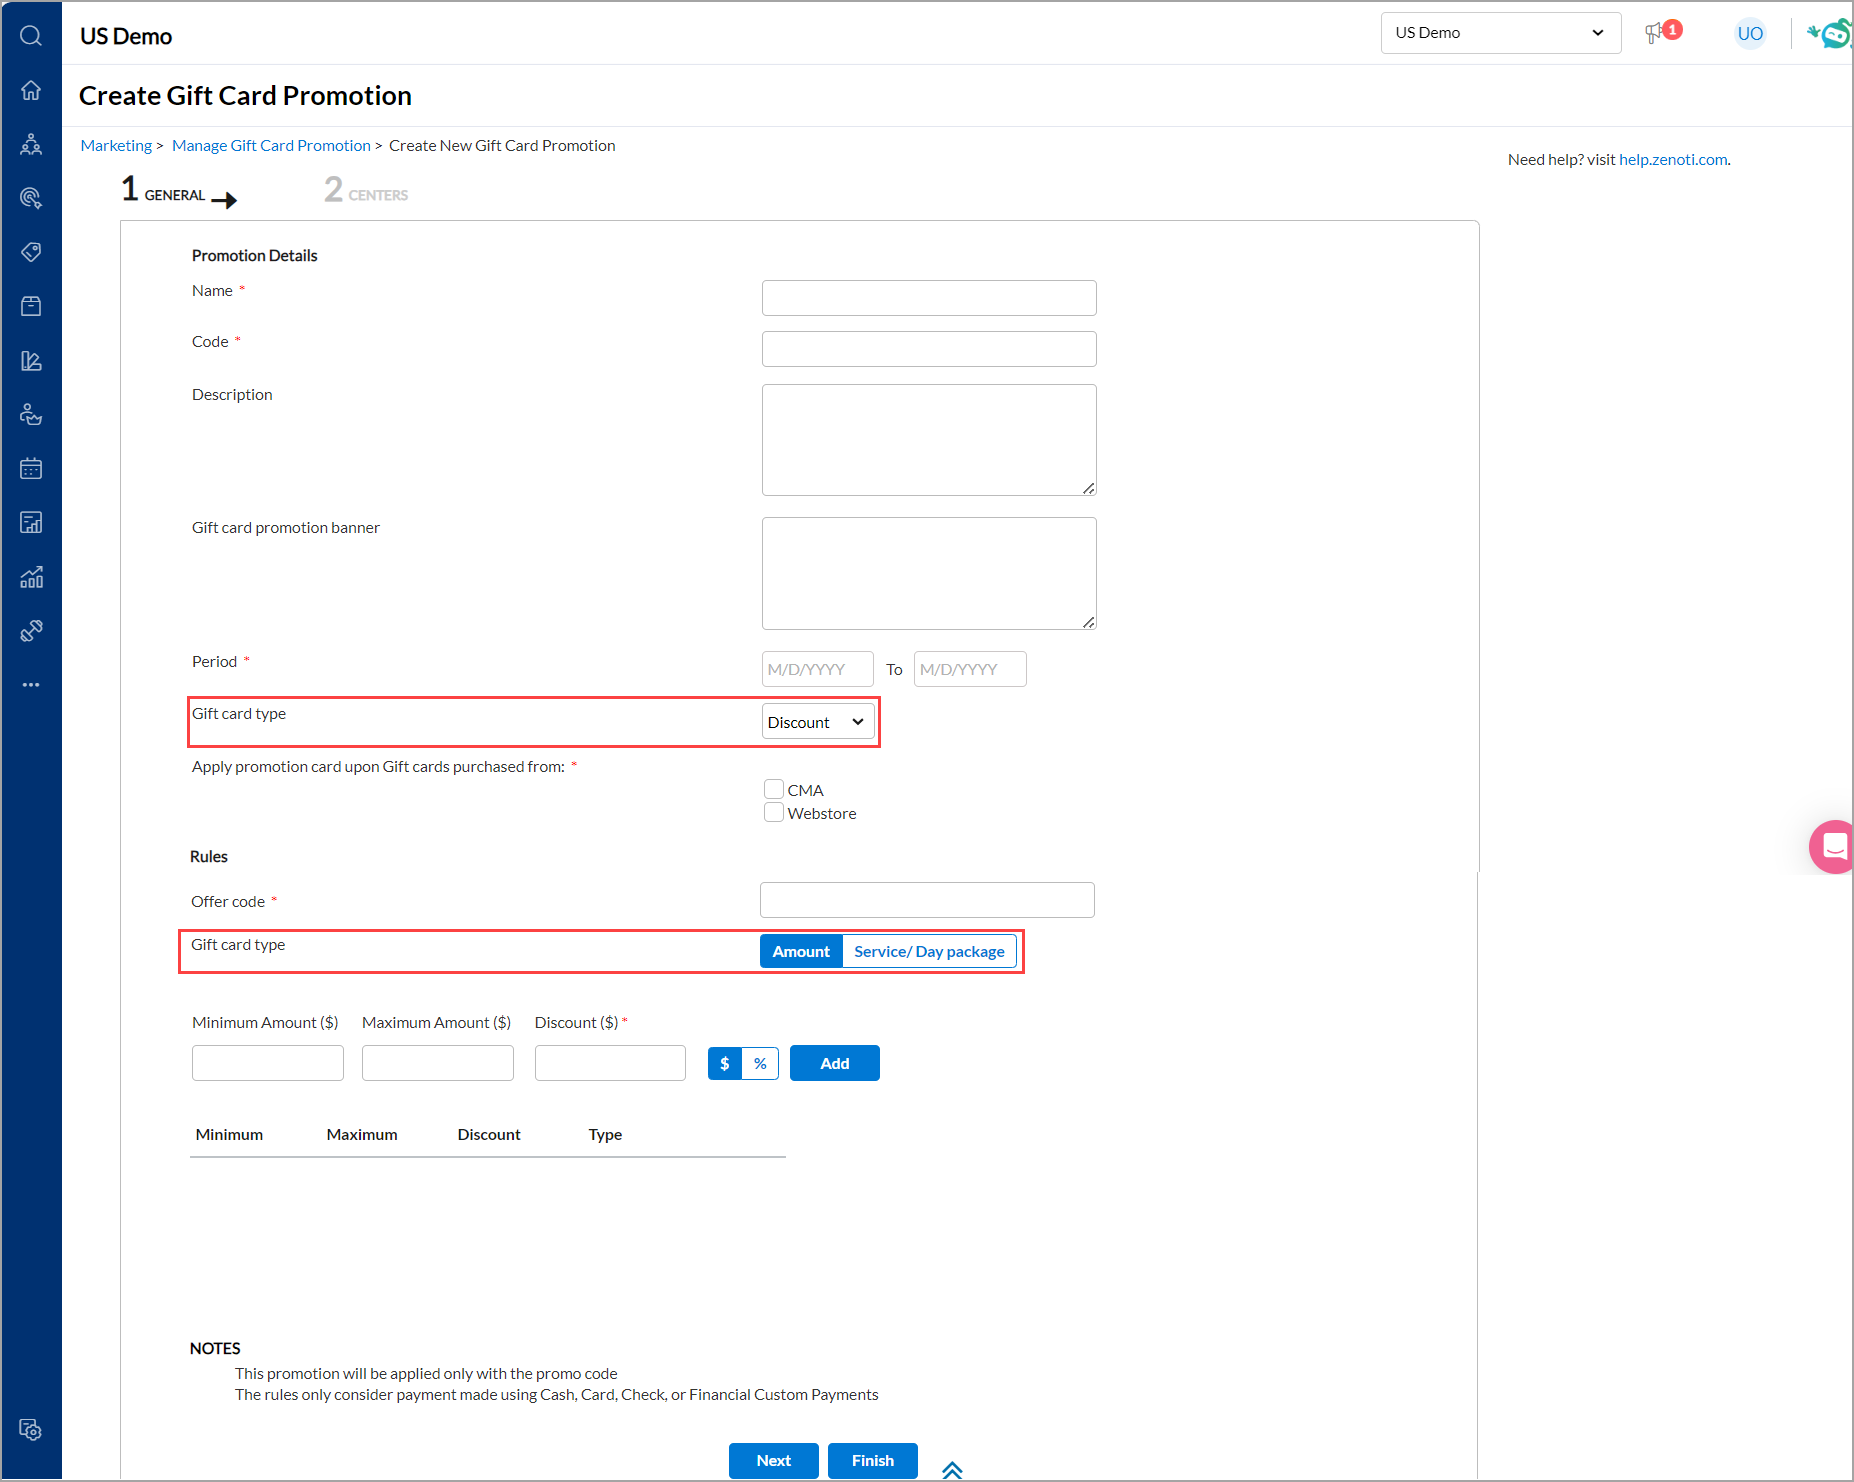
Select the CMA and Webstore checkbox to make the gift card available for purchase online.
Enter or select the relevant details across the two tabs in the setup wizard and click Save.
When a guest purchases a gift card, they will be prompted to enter a Promo code on the Review page of the CMA application.
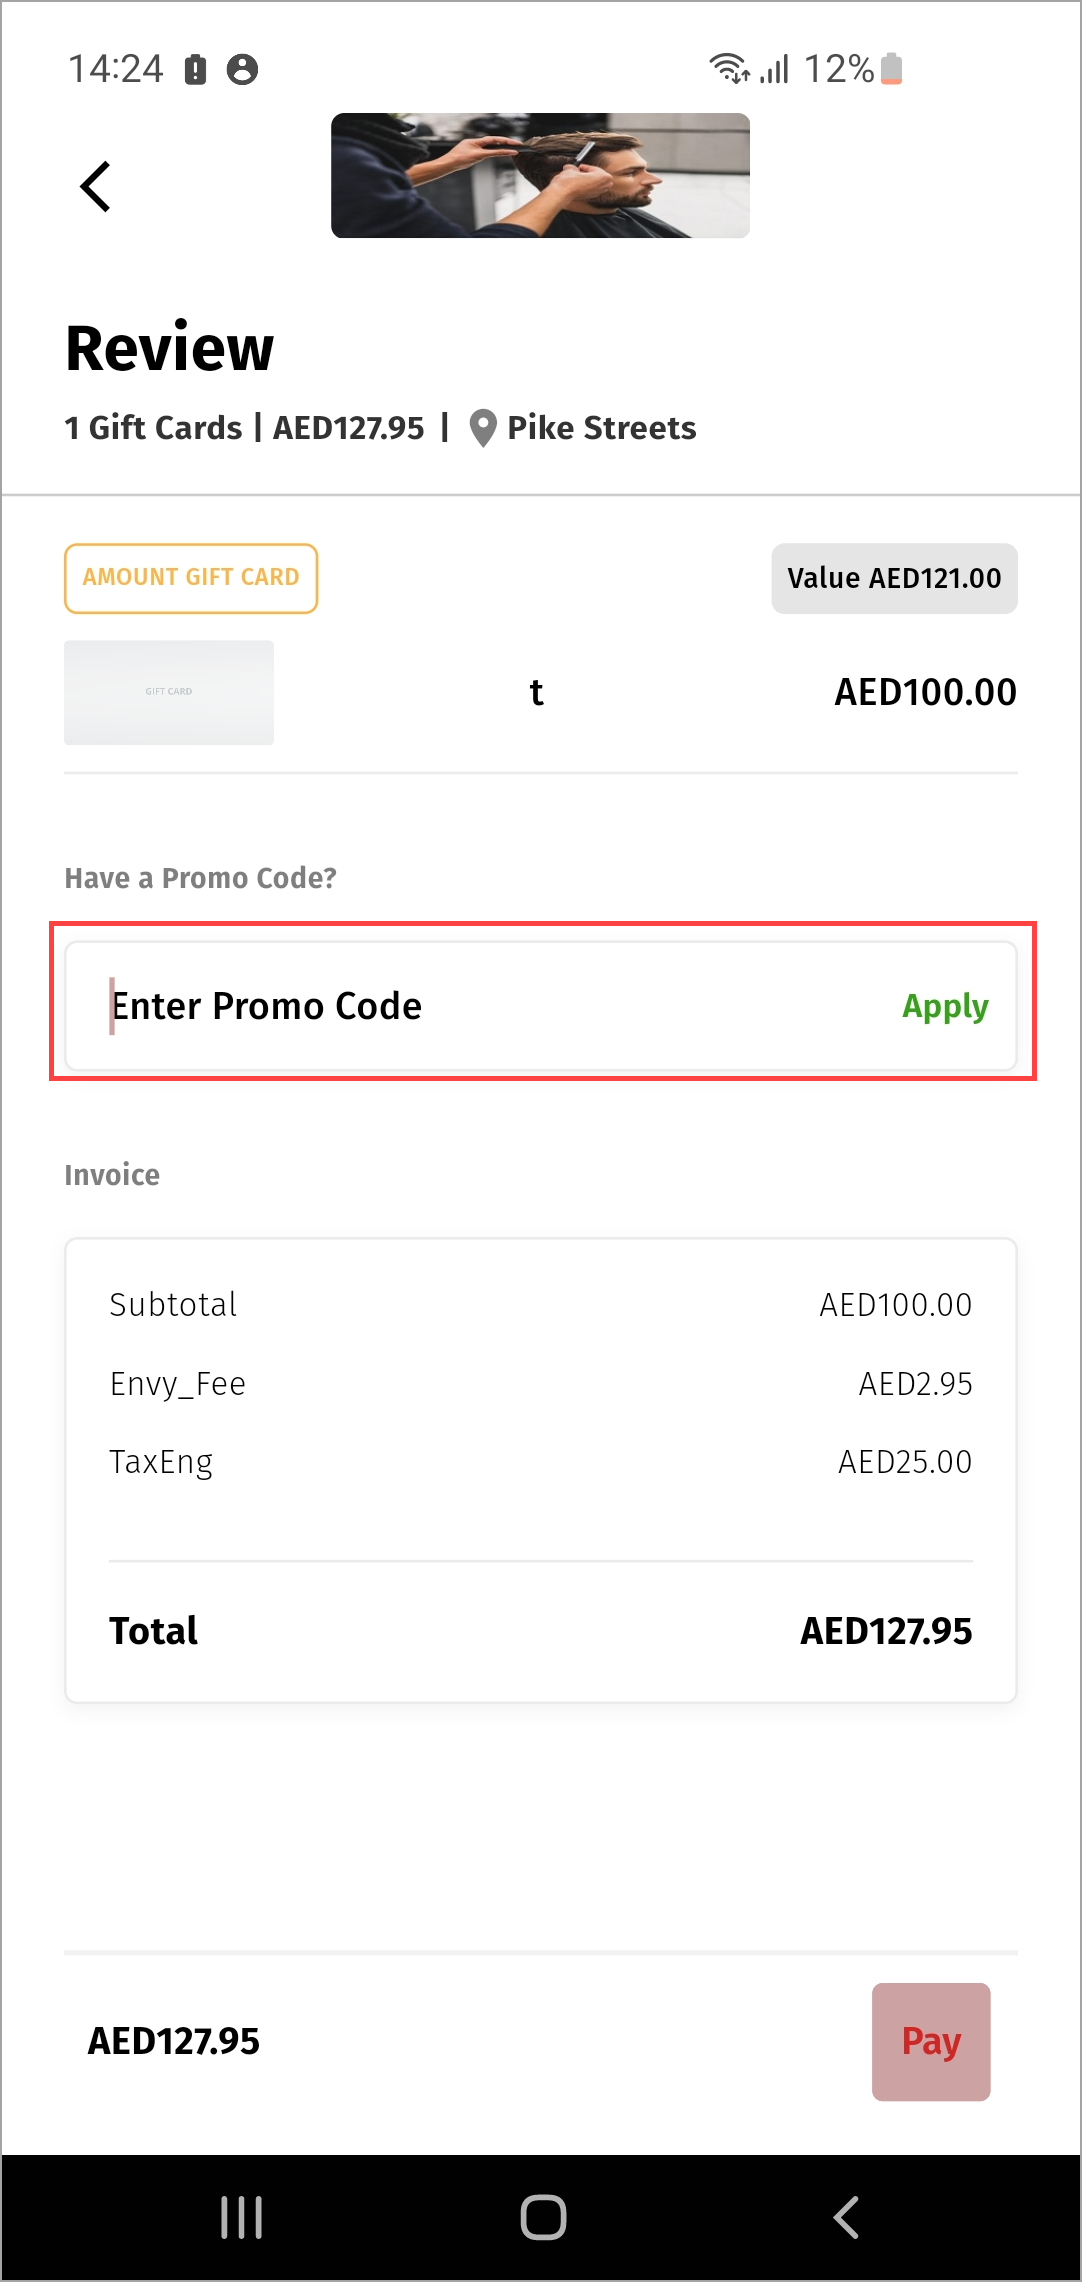
Learn More: For detailed instructions and further context on how to enable this setting, refer to the Create discount gift card promotions document.
Module: Employee and Payroll
 Administrators, Employees, Center Managers
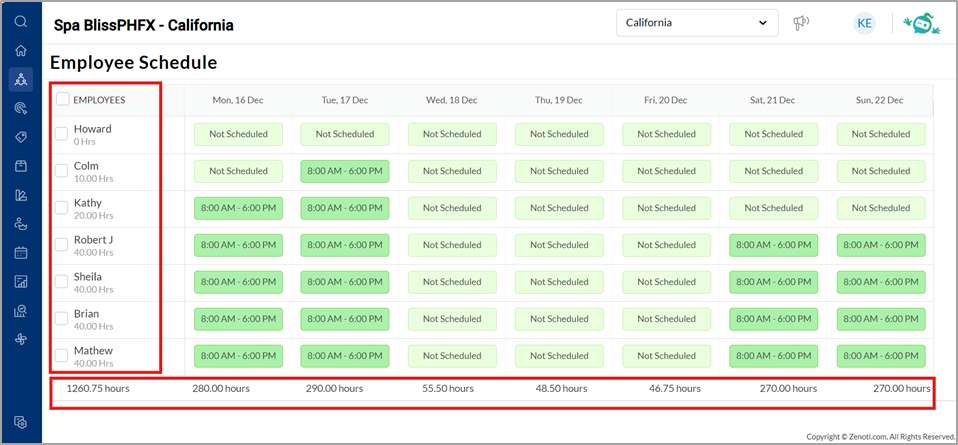
Previously, administrators and center managers had to rely on printing the schedule to get a complete view of scheduled hours by day or week for each employee. With this enhancement, users can now view the entire schedule directly within the week view screen. This update makes the process more user-friendly, reduces the need for multiple clicks, and improves overall efficiency.
How to use:
Navigate to Schedule from Employees at center level.
In the Week View, you can now see:
Scheduled hours per day.
Total weekly hours per employee.
Total weekly scheduled hours for the entire center.
Learn More: For detailed instructions and further context on employee schedules, refer to the Set up employee schedules article.
Administrators, Employees
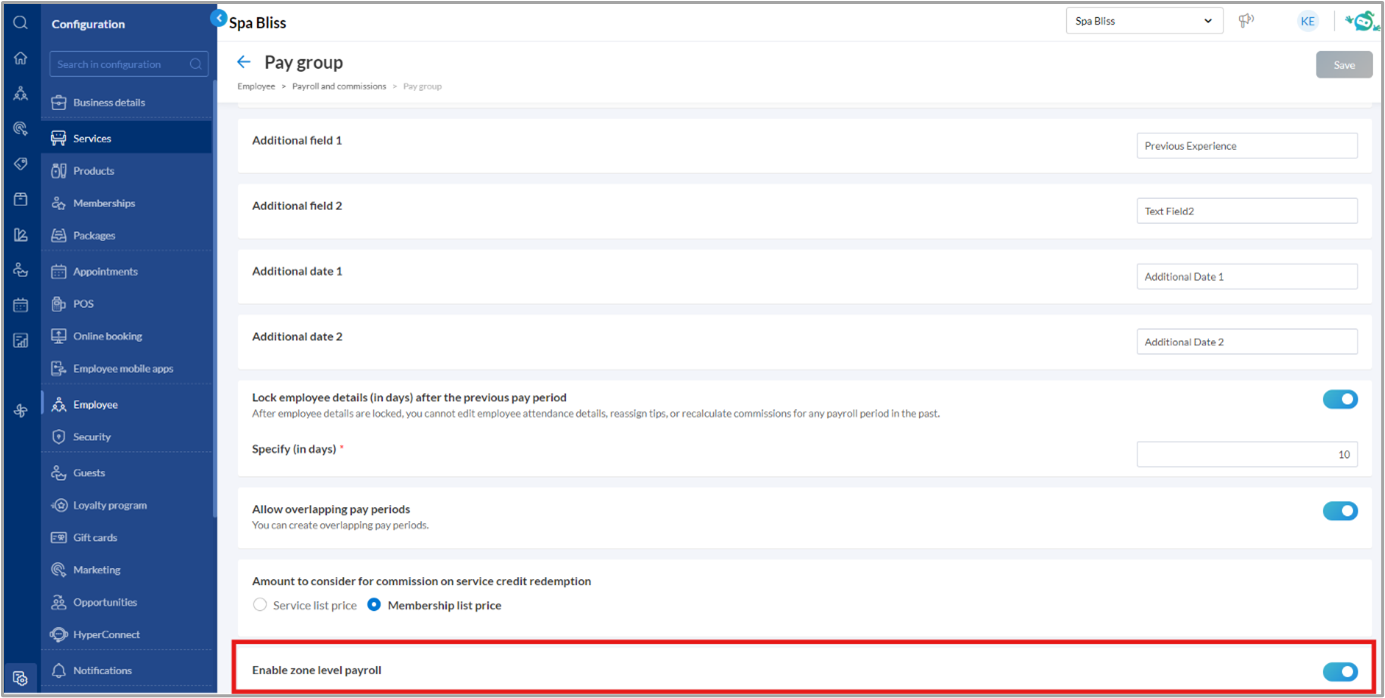
Customers can now enable and manage zone-level payroll directly from the UI using the Enable zone level payroll setting, eliminating the need for backend configurations.
How to use:
Navigate to Configuration>Employee>Payroll and Commissions>Pay Group tab.
Switch on the new Enable zone level payroll toggle.
Click Save.
Learn More: For detailed instructions and further context on pay group, refer to the Configure Pay Groups in Zenoti article.
Administrators, Employees
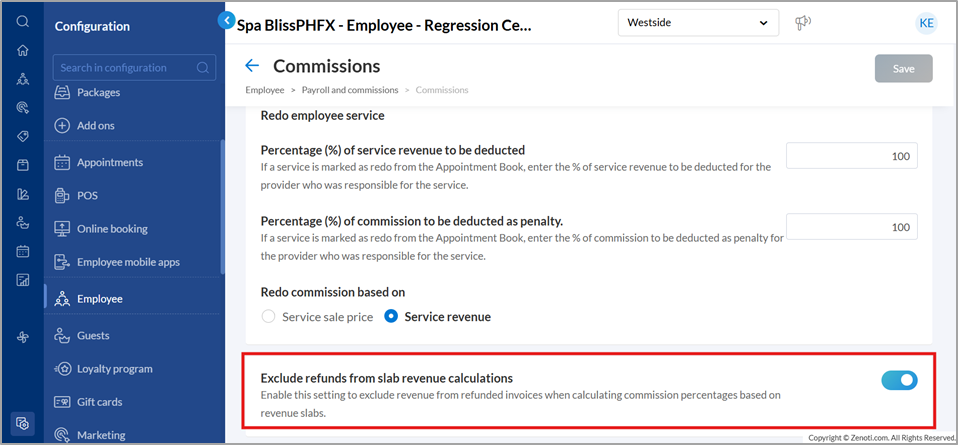
Customers can now accurately calculate commissions by using net revenue (service revenue minus refunds) to determine commission slabs. It ensures fair compensation by automating refund impact calculations, including commission reversals. This saves time, ensures financial accuracy, and provides transparency for employees.
Customers can now view refund details and reversed commissions directly in the employee-wise commission Excel reports, providing greater transparency and accuracy in commission calculations while clearly showing the impact on total revenue.
Impact of refunds on commission slabs:
Imagine a spa that generates $10,000 in service revenue during a pay period. However, $2,000 worth of services are refunded. This reduces the net revenue to $8,000, placing it in the 8% commission slab ($5,001–$8,000). The final commission calculated is $640.
How to use:
Navigate to Configuration>Employee>Payroll and Commissions>Commissions tab.
Switch on the Exclude refunds from slab revenue calculations toggle.
Click Save to apply the setting.
Learn more: For detailed instructions and further context on slab revenue calculations, refer to the Exclude Refund Details from Slab Revenue Calculations article.
Administrators, Center Managers
Administrators can now manage employee separations and rejoining effortlessly from the employee profile. This feature streamlines the termination process and allows managers to track employment dates under the Employment Details tab.
How to use:
To terminate an employee:
Navigate to Configuration>Employee at the center level.
Open the employee’s profile and click Terminate.
Enter the reason for termination, termination date, and communication address.
Select Proceed.
Confirm by clicking OK to remove all future blockouts or schedules associated with the employee.
To reinstate an employee:
Navigate to the profile of a terminated employee.
Click Reinstate.
Enter the joining date to reinstate the employee.
Learn more: For detailed instructions and further context on employee termination, refer to the Terminate an employee article.
Module: Inventory
Inventory Manager, Administrators
Zenoti’s Shopify integration now supports the automatic addition of vendor details when products are added from Shopify. This enhancement eliminates the need for manual vendor updates, saving time and reducing errors for administrators. It ensures seamless vendor association and simplifies inventory management.
How to use:
Contact Zenoti Support: Reach out to Zenoti Support to enable the capability.
Upon enabling:
Vendor details are automatically pulled from Shopify’s product addition webhook and mapped to the product in Zenoti.
If the vendor already exists in Zenoti, it is mapped to the product.
If the vendor does not exist, a new vendor is created and assigned to the product.
The following details are added:
Vendor Name: Pulled from Shopify.
Center: Default center for online booking in the organization.
Price: Defaulted to 0 (manual update required before raising purchase orders).
A vendor code is autogenerated for new vendors.
Learn more: For detailed instructions and further context on Shopify integrations, refer to the Capturing vendor details for products added from Shopify via the integration article.
Module: Payments
Admins, Business Owners
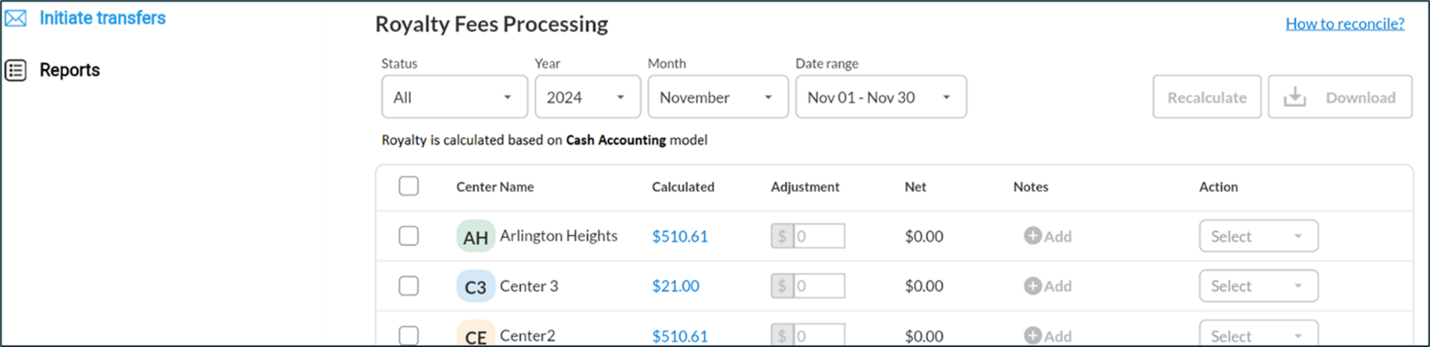
Businesses can now configure their accounting model during the onboarding process, ensuring accurate and unified royalty calculations.
How to use:
At the organization level, navigate to Configuration > Payments > Business payments > Setup royalty.
Choose an accounting model—Cash or Accrual — during onboarding.
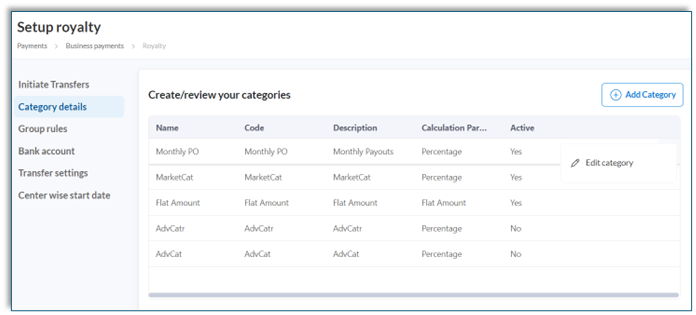
View the accounting model and royalty calculations on the Initiate Transfers screen. The calculated royalty fees displayed will be aligned with your selected accounting model.
Learn More: For detailed instructions and further context, refer to the Set up royalty payments v2 article.
Product Editions
Enhanced versions of the core product customized to meet the specific needs of different businesses. These editions include advanced tools like analytics, benchmarks, marketing, and integrations to optimize operations, track performance, and drive growth.
Module: Analytics
Access historical Quarterly and Year in Review reports Business Owners, Admins
You can now access and download Quarter and Year in Review reports anytime from the Performance Review screen. Previously available only for a limited time after the quarter or year-end, these reports are now accessible on demand, enabling comprehensive retrospective analyses of your historical business performance.
How to Use:
At the organization or center level, navigate to Data & insights > Business review > Performance review.
To access the desired report, click View or Download for the specific Quarter or Year.
For extended guidance, refer to View and Download Quarter and Year in Review Reports.
 Detailed Growth Features dashboard
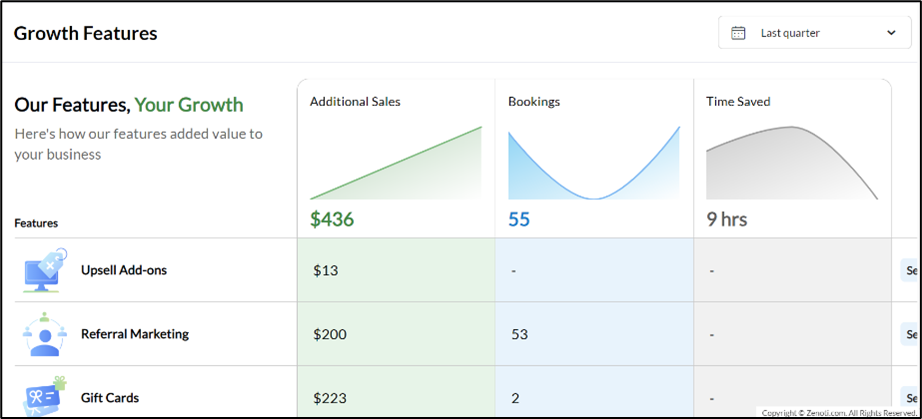
 Business Owners, Admins
Gain deeper insights into how Zenoti features contribute to your business growth with the new detailed Growth Features dashboard. This enhanced dashboard goes beyond the existing growth summary, offering a comprehensive breakdown of feature-wise usage and benefits tracked over time, along with tailored feature recommendations to maximize your growth potential.
How to Use:
On the organization or center level, navigate to Admin Dashboard.
On the How’s Zenoti working for your business summary panel, click the More Insights button to navigate to the Growth Features dashboard.
For extended guidance, refer to Growth Features.
Add-On Product
Optional, specialized tools and integrations that extend the functionality of the core product. These add-ons cater to specific needs such as advanced marketing, e-prescriptions, digital forms, or integrations with platforms like Shopify and accounting systems. They help businesses scale operations and address industry-specific challenges. Contact your Customer Success Manager (CSM) to find out more about these paid features.
Module: Accounting Integration
Admins, Business Owners
This enhancement enables you to categorize financial data by departments and classes when posting them to NetSuite and Sage Intacct.
Departments: Track income, expenses, and performance metrics by functional units, allowing for detailed profit and loss reporting.
Classes: Monitor specific projects or product lines for precise financial insights.
This enhancement improves financial visibility, optimizes resource allocation, and supports informed decision-making, driving better business outcomes.
How to use:
At the organization or center level, click Configuration.
Navigate to Integrations > Integration Settings.
Click Accounting and select the provider.
From Configuration > Invoice > Financials, select Post departments and Post classes.
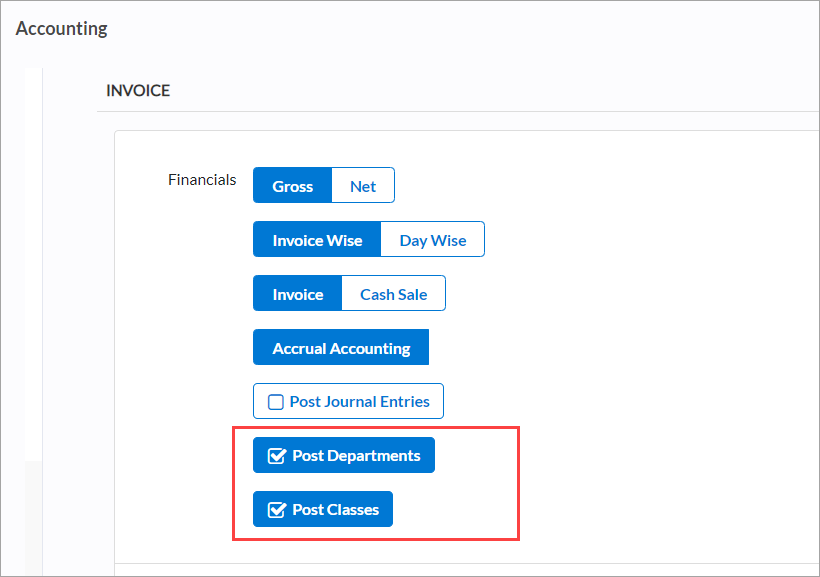
Click Save.
Learn more: For detailed instructions and further context, refer to the Financials section in the Configure accounting integration by invoice article.
Module: Fitness
Front Desk Operator, Service Provider, Admins
We’ve updated the Visits page to improve visibility, navigation, and overall efficiency for front desk operators and service providers. Key changes include:
Prominent profile pictures along with the zoom functionality improve visibility for recent member check-ins.
Profile picture outlines and highlights now match member profile alerts, such as red for warnings, enabling quick identification of critical actions.
Guest notes are overlaid on the profile picture for quick access to essential details.
Recent Check-Ins and All Check-Ins sections are now collapsible, enabling a more organized view of checked-in members on the Visits page.
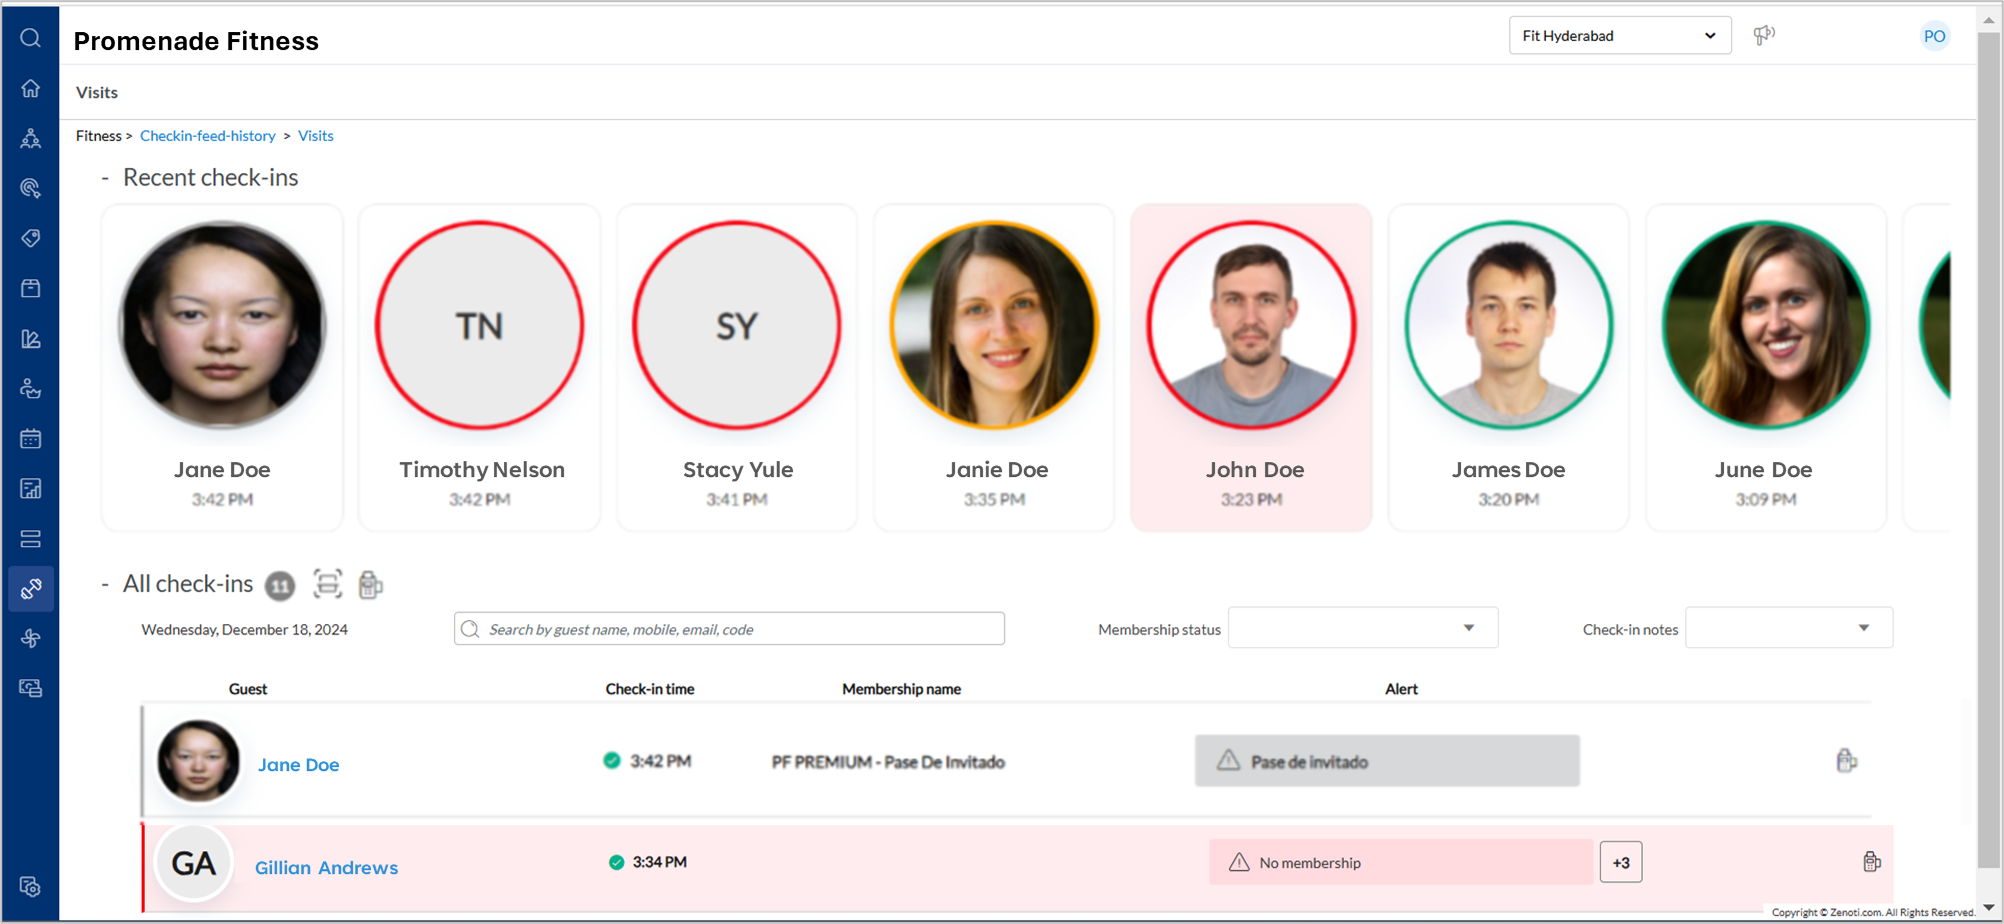
The UI updates for the Visits page are now available on both the web platform and the Zenoti Mobile Application (ZMA).
Learn More: For detailed instructions and further context, refer to the Actions on the visits page.
Module: Marketing
New target segment for guests who have never purchased a packageMarketing Teams
You can now configure target segment rules to include guests who have never purchased a package. This enhancement allows you to run more targeted and effective marketing campaigns by avoiding communications to guests who already have active packages.
Learn More: For detailed instructions on how to create this target segment, refer to Configure Rules for Custom Target Segments.
Enhanced security for marketing campaign contentMarketing Teams
Zenoti now helps secure your marketing efforts by automatically detecting and blocking malicious links or phishing content in campaigns. This safeguard ensures your communications remain trustworthy and protected.
Detailed revenue insights in Advanced Marketing campaign reports Marketing Teams, Business Owners
Analyze your Advanced Marketing campaigns more effectively with an enhanced report that categorizes revenue from completed bookings. Revenue from services, products, gift cards, memberships, and packages are now displayed in separate categories for a comprehensive view of campaign performance.
How to Use:
On the organization or center level, navigate to Marketing > Advanced Marketing.
On the top right, click the Campaigns button.
Select the desired date range and click Download.
Learn More: For detailed instructions and further context, refer to Advanced Marketing Dashboard.
Module: Digital Forms and Photos
Dynamically add forms to appointments Admins, Service Providers
This feature enables providers to dynamically add forms to an open appointment during consultations. This flexibility ensures that unforeseen requirements, such as obtaining photo consents or filling out specific medical histories, can be addressed on the spot without permanently associating forms with services.
Note: This feature is available on Web and ZMA on tab.
Disclaimer: The dynamic form addition feature is in controlled beta and available exclusively to select customers.
Learn More: For detailed instructions on how to add forms dynamically to an appointment, refer to Dynamically Add Forms during Consultations.
Improved search and filter experience for appointment forms Admins, Service Providers
We have enhanced the search and filter experience for users managing appointment forms on ZMA, ensuring faster, more intuitive access to required information. This feature reduces time spent searching for forms while providing a consistent user experience across both Web and ZMA platforms.
Learn More: For detailed instructions and further context, refer to View Forms.
Additional Resources
This section includes recently published patch release notes and a comprehensive up to date glossary for your reference.
Document type | Release date |
|---|---|
N/A |