Set up cash drawers
A cash drawer is a physical compartment where cash, coins, and other forms of payment are stored during transactions. The drawer contains a till, which is a removable tray with compartments for organizing different denominations of currency.
The cash drawer connects to your receipt printer and opens when you finish a cash or a check (cheque) transaction. A receipt printer generates printed receipts for customers after a transaction.
Learn more: Add a cash register for your center
Set up your cash drawer for a Windows PC
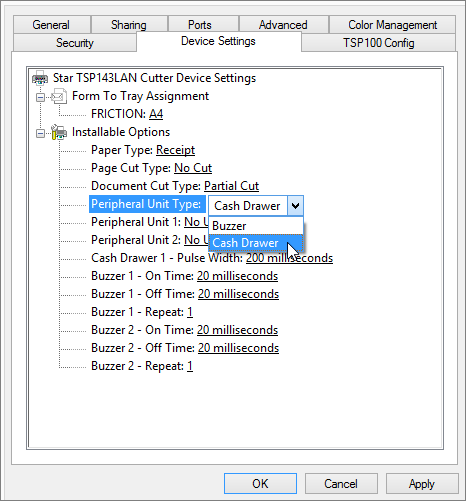
Set up Star TSP100 cash drawer
Plug the RJ12 connector cable from the cash drawer into the receipt printer.
Tip
The RJ12 connector cable looks like to a phone line.
Go to Devices and Printers.
Right-click your receipt printer, select Printer properties > Device Settings.
Update the Peripheral Unit Type to Cash Drawer.
This tells the printer that it is attached to a cash drawer.
Set the Peripheral Unit 1 and Peripheral Unit 2 options to Document Bottom.
The cash drawer opens after the receipt is printed.
Tip
If you want your cash drawer to open before the receipt is printed, select Document Top.
Click Apply.
Set up Epson TM -T88VI cash drawer
Plug the RJ12 connector cable from the cash drawer into the receipt printer.
Tip: The RJ12 connector cable looks like a phone line.
Go to Devices and Printers.
Right-click your receipt printer, select Printing Preferences > Peripherals.
Select Cash Drawer from the drop-down list.
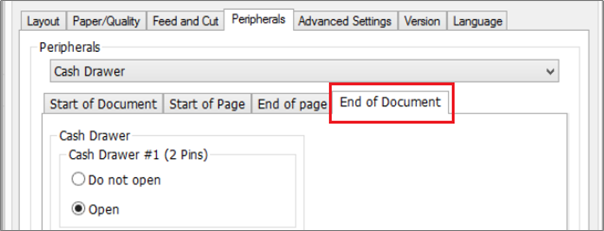
Select End of Document.
The cash drawer opens after the receipt is printed.
Tip
If you want your cash drawer to open before the receipt is printed, select Start of Document.
Select Open for both, Cash Drawer #1 and Cash Drawer #2.
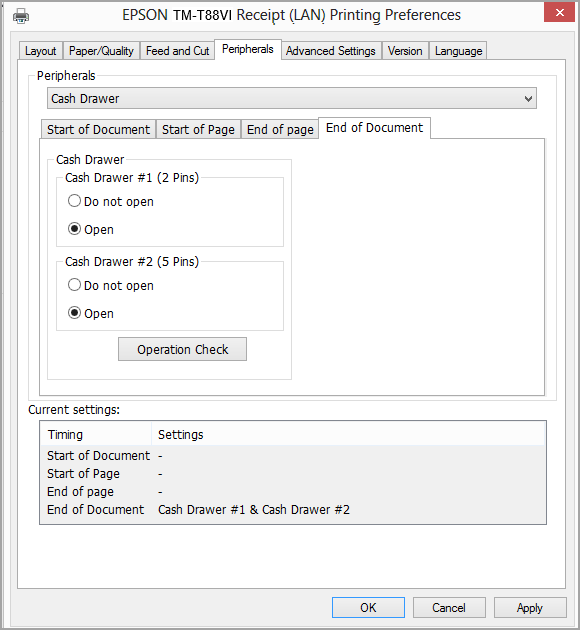
Click Apply.
Note
The cash drawer opens after the full payment is made and the receipt is closed and printed or closed and mailed based on your organization level setting Default action post closing an invoice.
Set up Epson TM-m30 cash drawer
You may want to configure printer settings to print receipts as per your business requirements. You can manage a specific cash register, receipt printing properties, or ports.
Note
To update printer settings, you must have system administrator access to your device (PC or MAC). If not, reach out to your IT team.
Go to Start > Control Panel > View Devices and Printers.
Right-click your printer and click Printer Properties.
Note
In the General tab, you should see settings selected by default under Features as shown in the following image.
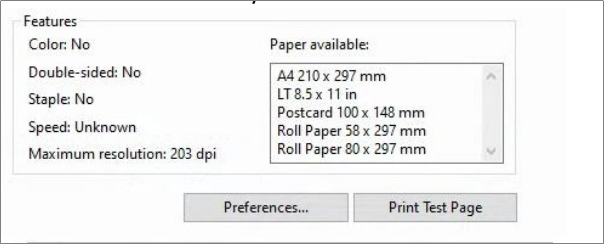
In the General tab, click Preferences
To add a cash drawer, click the Peripherals tab, select the Peripherals drop-down list, and then select Cash Drawer.
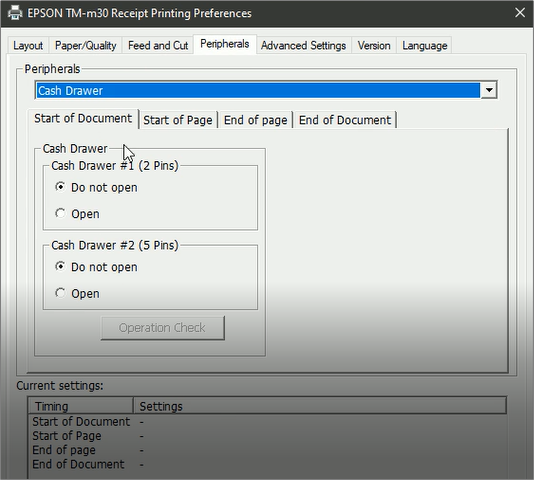
To open the cash drawer after the receipt is printed, do the following:
a. Select End of Document tab.
b. Under Cash Drawer, select Open for Cash Drawer # 1 (2 Pins).
c. Click Apply.
Alternatively, to open the cash drawer before the receipt is printed, do the following:
a. Select Start of Document tab.
b. Under Cash Drawer, select Open for Cash Drawer # 1 (2 Pins).
c. Click Apply.
To save the changes, click OK.
Set up Epson TM-T82 cash drawer
Note
To update any printer settings, you must have system administrator access to your device (PC or MAC). If not, reach out to your IT team.
Learn how to configure TM-T-82 printer settings to print receipts as per your business requirements. You can manage a specific cash register, receipt printing properties, or ports.
Go to Start > Control Panel > View Devices and Printers.
The Devices and Printers page opens.
Right-click your printer and click Printer Properties.
Note
In the General tab, you should see settings selected by default under Features as shown in the following image.
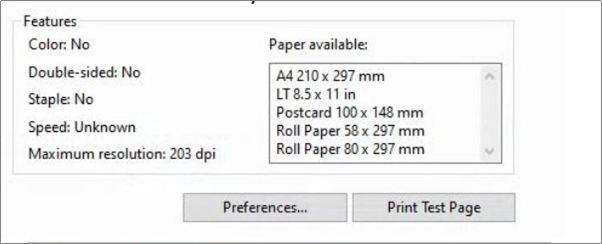
In the General tab, click Preferences.
To add a cash drawer, click the Peripherals tab, select the Peripherals drop-down list, and then select Cash Drawer.
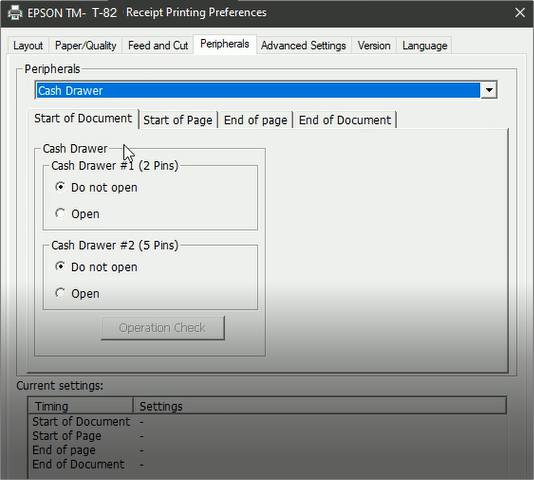
To open the cash drawer after the receipt is printed, do the following:
a. Select End of Document tab.

b. Under Cash Drawer, select Open for Cash Drawer # 1 (2 Pins).
c. Click Apply.
Alternatively, to open the cash drawer before the receipt is printed, do the following:
a. Select Start of Document tab.
b. Under Cash Drawer, select Open for Cash Drawer # 1 (2 Pins).
c. Click Apply.
To save the changes, click OK.
Set up Epson TM-U220 cash drawer
Disclaimer: The links provided here belong to external sites; Zenoti bears no responsibility for the accuracy, legality, or content of the external site or for that of subsequent links.
Note
To update any printer settings, you must have system administrator access to your device (PC or MAC). If not, reach out to your IT team.
You may want to configure printer settings to print receipts as per your business requirement. You can manage a specific cash register, receipt printing properties, or ports.
Go to Start > Control Panel > View Devices and Printers. The Devices and Printers page opens.
Right-click your printer and click Printer Properties. The Printer Properties window opens.
Note: In the General tab, you should see settings selected by default under Features as shown in the following image.
In the General tab, click Preferences
To add a cash drawer, click the Peripherals tab, select the Peripherals drop-down, and then select Cash Drawer.
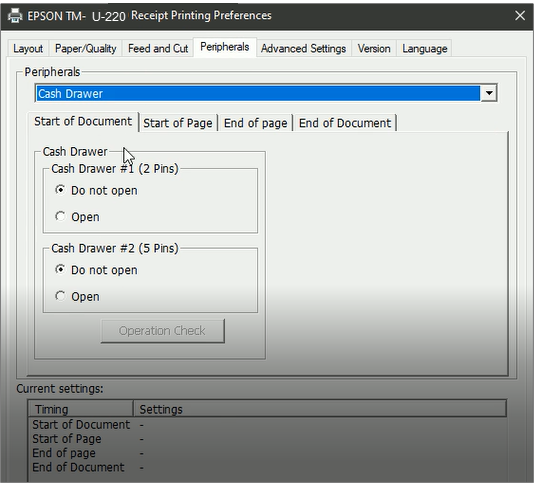
To open the cash drawer after the receipt is printed, do the following:
a. Select End of Document tab.
b. Under Cash Drawer, select Open for Cash Drawer # 1 (2 Pins).
c. Click Apply.
Alternatively, to open the cash drawer before the receipt is printed, do the following:
a. Select Start of Document tab.
b. Under Cash Drawer, select Open for Cash Drawer # 1 (2 Pins).
c. Click Apply.
To save the changes, click OK.
You can use Epson TM-U220 to print your invoices.
Set up Posiflex Aura 6800U cash drawer
You must configure printer settings to print receipts as per your business requirements. You can manage a specific cash register, receipt printing properties, or ports.
On your machine, click Start > Control Panel > View Devices and Printers
Right-click your printer and click Printer Properties.
In the General tab, click Preferences.
To add a cash drawer, click the Peripherals tab, select the Peripherals drop-down list, and then select Cash Drawer.
To open the cash drawer after the receipt is printed, do the following:
Select the End of Document tab.

Under Cash Drawer, select Open for Cash Drawer # 1 (2 Pins).
Click Apply.
Tip
If you want your cash drawer to open before the receipt is printed, select the Start of Document tab.
Click OK to save the changes
Set up your cash drawer for an iPad
Plug the RJ12 connector cable from the cash drawer into the receipt printer.
Tap Settings and select Hardware.
Select the printer you want to attach to the cash drawer.
On the Printer Settings page in Register, update Cash drawer enabled to On.
Update Open cash drawer on Sale to On.
Set up your cash drawer for a Mac
Set up Star TSP100 cash drawer for a Mac
Plug the RJ12 connector cable from the cash drawer into the receipt printer.
Tip
The RJ12 connector cable looks like a phone line.
Go to: http://localhost:631/printers/.
You can now view the CUPS screen. CUPS is an open source, network printing service for Mac computers.
It allows you to set up your printers on a network, and customize options such as cash drawer setup.
Enter the login credentials for your computer (your browser prompts you for these credentials).
Tip
To check your Username, go to System Preferences > Users & Groups.
Select Star TSP100 as your printer model.
Select Set Default Options from the drop-down list.
From Cash Drawer Control, select Open Drawer 1 and Open Drawer 2 under Cash Drawer and click Set Default Options.
Your cash drawer is now set up.
Set up Epson TM - 88VI cash drawer for a Mac
Plug the RJ12 connector cable from the cash drawer into the receipt printer.
Tip
The RJ12 connector cable looks like to a phone line.
Go to: http://localhost:631/printers/.
You can now view the CUPS screen. CUPS is an open-source, network printing service for Mac computers. It allows you to setup your printers on a network, and customize options such as cash drawer setup.
Enter the login credentials for your computer (your browser prompts you for these credentials).
Tip
To check your username, go to System Preferences > Users & Groups.
Select Epson TM - T88VI as your printer model.
Select Set Default Options from the drop-down list.
From Cash Drawer Control, select Open after printing for Cash Drawer #1 and Cash Drawer #2 and click Set Default Options.
Your cash drawer is now set up.
Note
The cash drawer opens after the full payment is made and the receipt is closed and printed or closed and mailed based on your organization level setting Default action post closing an invoice.
Open cash drawers from ZMA
In ZMA, from the appointment book, click the three vertical dots on the top right corner.
Click Cash Drawer. You can also open the cash drawer by tapping Take Payment for invoices with cash payment.
Impacts and considerations
If an error message appears when you tap the Cash Drawer option, check whether the devices are connected via Bluetooth.
You can only view the cash drawer option if your role has the Collect Payments permission enabled.