Redesigned Appointment Book
Overview
Note
This is only applicable to the redesigned appointment book and does not affect the legacy version of the appointment book.
Note
If you have been onboarded to Zenoti after April 29, 2025, the redesigned Appointment Book is available to you by default. If you are an existing organization, you can switch to the redesigned Appointment Book and avail new register plus new guest profile.
The redesigned Appointment Book offers a more efficient and visually appealing experience, prioritizing performance, usability, and streamlined navigation. Key features include:
Modern design: A sleek, intuitive interface with refreshed color themes, and icons for primary and secondary elements.
Improved visual cues: Enhanced legends make information more accessible at a glance. Scheduled hours and block-out times now have improved readability and consistent formatting, helping teams quickly understand availability and time blocks. The Waitlist icon displays a red notification flag with the count of waitlisted items that require attention.
Enhanced navigation: New filters, customizable views, and week view parity with day view for easier planning.
Focus mode: Highlight all services and appointments for a guest with a simple hover for greater visibility. When front-desk staff hover over an appointment block for a set duration, the "focus mode" activates. This highlights all services associated with the guest’s visit, making it easier to see what is scheduled. Meanwhile, other appointments in the calendar will be grayed out to minimize distractions. Additionally, all appointments or visits for the same guest on that day will also be highlighted, even if they are not part of the current visit. To return to the normal view, the front-desk staff can click anywhere outside the highlighted appointments. This functionality enhances visibility and streamlines appointment management for staff.
Streamlined guest search: Quickly locate a guest's profile and their upcoming appointments, reducing search time.
Zoom levels: The zoom in (+) and zoom out (–) controls now change in 5% intervals (instead of 10%). This allows for finer control when adjusting the zoom level.
Recommended view: When the redesigned Appointment Book loads, it automatically adjusts the zoom level based on the number of providers and the duration of your appointment slots. You can manually adjust the zoom as needed, and easily return to the recommended view by clicking the recommended view icon next to the zoom controls at the bottom right.
Fit options: Next to the Recommended view option at the bottom right, you will now see a Fit option.
Fit height: Adjusts the Appointment Book to fit the height of your screen.
Fit width: Adjusts the Appointment Book to fit the width of your screen.
Responsive appointment card design: The appointment cards automatically adjust ensuring key information remains visible with respect to the screen size or zoom level. Card layouts adapt to preserve important details, even when viewing an entire day's schedule.
Better visual info: Appointment cards support up to four appointment icons (previously limited to three) and four guest icons on onboarding cards, providing better visual information at a glance.
Edit view: You can filter appointments by provider, job role, form, or appointment status, and save these filtered views, which will appear at the top left of the Appointment Book. In the redesigned version, you can easily edit saved views and choose to update or save them as new views.
Display interval: Set the default interval for time markers on the Appointment Book or calendar through the Set Default Display Interval setting. Choosing a longer interval shows fewer time markers.
For example, if appointments are set in 15-minute slots but the display interval is set to 60 minutes, you’ll see time markers at each hour (9:00 am, 10:00 am, 11:00 am) while still being able to book appointments at 15-minute intervals (9:15 am, 9:30 am, 9:45 am).
Updates on move appointments: Front-desk staff can now drag and drop appointments to new times, even if payments, discounts, or redemptions (such as membership credits, package benefits, gift cards, or loyalty points) have been applied. Appointments can be rescheduled to a different day or provider as long as the price remains the same after the move.
Toggle appointment colors: A toggle in the top-right toolbar lets you instantly switch appointment card colors between appointment status colors and category colors, without updating center-level settings. To use it, click the Toggle appointment color icon in the toolbar. The card colors update immediately across the calendar view.
The image below shows the redesigned Appointment Book:
Vertical view:

Horizontal view:

In the list view, you can filter appointments based on your preferences using the Status drop-down list. Available options include Past, Upcoming, Past and upcoming, Cancellation and No-show, Virtual appointments with details, and Virtual appointments without details.
Note
When a user clicks the guest name hyperlink from the list view, the New Booking Experience panel opens.
The redesigned appointment block layout has been redesigned for clarity, with improvements to make essential details more prominent and customizable. Here are the key features:
Guest name visibility: The guest's name is more prominent on the block, allowing front-desk staff to quickly identify the guest without additional clicks or searches. The PMS Guest tag shows that the guest profile originates from an Opera PMS integration. An icon appears on the appointment block in the Appointment Book, indicating that the guest is linked to Opera PMS.
Customizable icons: Front-desk staff have full control over which icons appear on the block, enabling them to display only the most relevant information. The placement of these icons has also been optimized for better organization:
Guest-related icons: Positioned just above the guest’s name, these icons help to easily access information specific to the guest.
Appointment-related icons: Placed in the top-right corner, these icons provide quick insights into appointment details, making it simple to differentiate between guest and appointment-specific indicators at a glance.
Note
All icon updates apply to the redesigned appointment book and are visible in the following locations:
Context menu
Booking wizard (guest search)
Appointment follow-up
Bottom panel
POS
Waitlist
Appointment labels: Labels can be added directly to the appointment block to indicate the status of the appointment. For example, confirmed, checked-in, and rescheduled. These visual cues add clarity, making it easier to manage appointments effectively.
Expand icon: The expand icon allows you to enlarge the appointment block for a comprehensive view of all the details in one place. This feature is particularly useful when you want to review complete appointment information without navigating away from the calendar.
Unsupported features in redesigned appointment book
The following are the unsupported features on the redesigned Appointment Book.
Appointment block details
Unsupported feature: The appointment block no longer displays some details such as the guest’s phone number, provider name, appointment code, check-in time, receipt number, booking creator, and previous visits.
Alternative solution: All these details can be accessed through a tooltip or the context menu on the appointment blocks. This reduces visual clutter while ensuring you can still access all essential details quickly.
Appointment block icons
Unsupported feature: The resigned appointment block limits the display of appointment and guest icons to 7 icons per block.
Alternative solution: Customize the icons to show only the ones most relevant to your business, keeping the interface focused on essentials.
Enable redesigned Appointment Book
To enable the redesigned appointment book, you must first enable it at the organization level and then proceed to enable it at the center level.
Organization level
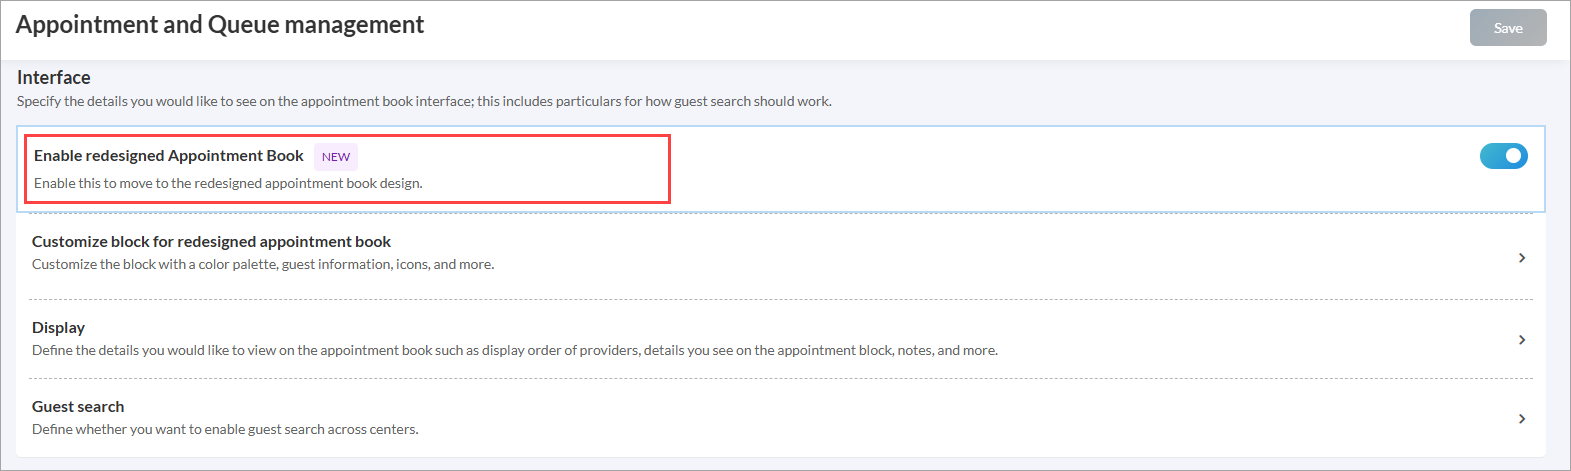
At the organization level, click Configuration.
Navigate to Appointment and Queue management > Interface.
Switch on the Enable redesigned appointment book toggle.
Click Save.
Businesses that join Zenoti on or after April 29, 2025, are defaulted to the redesigned Appointment Book.
The Enable focus mode when hovering on an appointment option is visible only after the Enable redesigned appointment book setting is turned on.
If a front-desk operator hovers over an appointment for more than 2 seconds, focus mode is activated. In focus mode, all other appointments will fade out, and only the appointments related to that guest or group will stay highlighted for the day.
Click anywhere on the screen to move out of focus mode.
At the organization level, click Configuration.
Navigate to Appointment and Queue management > Interface.
Switch on the Enable focus mode when hovering on an appointment in the redesigned Appointment Book toggle.
Click Save.
Impacts and considerations
Centers will not notice any changes until they actively enable and onboard to the redesigned appointment book.
If the Redesigned Appointment Book is enabled, the queue UI visually updates to align with the redesigned appointment book. The Walk-in button has been removed to avoid duplicate actions. Walk-ins can now be created using the Book option, which follows the same flow. There are no other functional changes.
Center level
At the center level, click Configuration.
Navigate to Appointment and Queue management > Interface.
Enable this setting to avail:
Redesigned Appointment Book
New guest profile
New register
Click Save.
Note
Starting April 29, 2025, we will automatically enable the redesigned Appointment Book for all new businesses (organizations and their centers) that are going live on Zenoti. These organizations can still switch to the existing Appointment Book anytime through the user interface, ensuring operational flexibility.
After saving, you can customize the redesigned Appointment book to suit your center's needs. The customization page opens automatically, providing options to adjust settings and features. For detailed steps, refer to customize appointment blocks to ensure it aligns with your preferences.
Customize appointment blocks
Note
This is only applicable to the redesigned appointment book and does not affect the legacy version of the appointment book.
The Customize block for redesigned appointment book setting is visible only if the Enable redesigned appointment book setting is enabled at the center level.
You can customize the appointment blocks by choosing a color palette, changing the block color, adding labels, and configuring details and icons for both appointments and guests. These options allow you to tailor the display of the appointment book to better suit your needs and preferences.
To customize the appointment block for the redesigned appointment book, follow these steps:
At the center level, click the Configuration icon.
Search for and select Customize block for redesigned appointment book.
Configurable base theme of the block: The redesigned appointment book enables you to personalize the appearance of appointment blocks by selecting one of two base color palettes: Modern or Classic.
Both palettes are crafted to provide a cohesive visual style, enhance clarity, and streamline the display of appointment information.
Classic Palette: Retains the existing bright, bold colors for a vibrant, familiar look.
If you select the Classic base theme during onboarding, the current appointment colors and existing icons for appointments and guests are retained.
Modern Palette: Introduces lighter, pastel shades for a softer, more soothing aesthetic.
If you select the Modern base theme during onboarding, the system updates to pastel-colored appointment blocks and replaces all appointment and guest icons with a new icon set.
Only when the Modern base theme is selected, you can further choose between:
Pastel (default): Uses lighter, low-contrast colors for a calm visual experience.
Bold: Enables high-contrast colors and an alternate icon set for improved accessibility and readability.
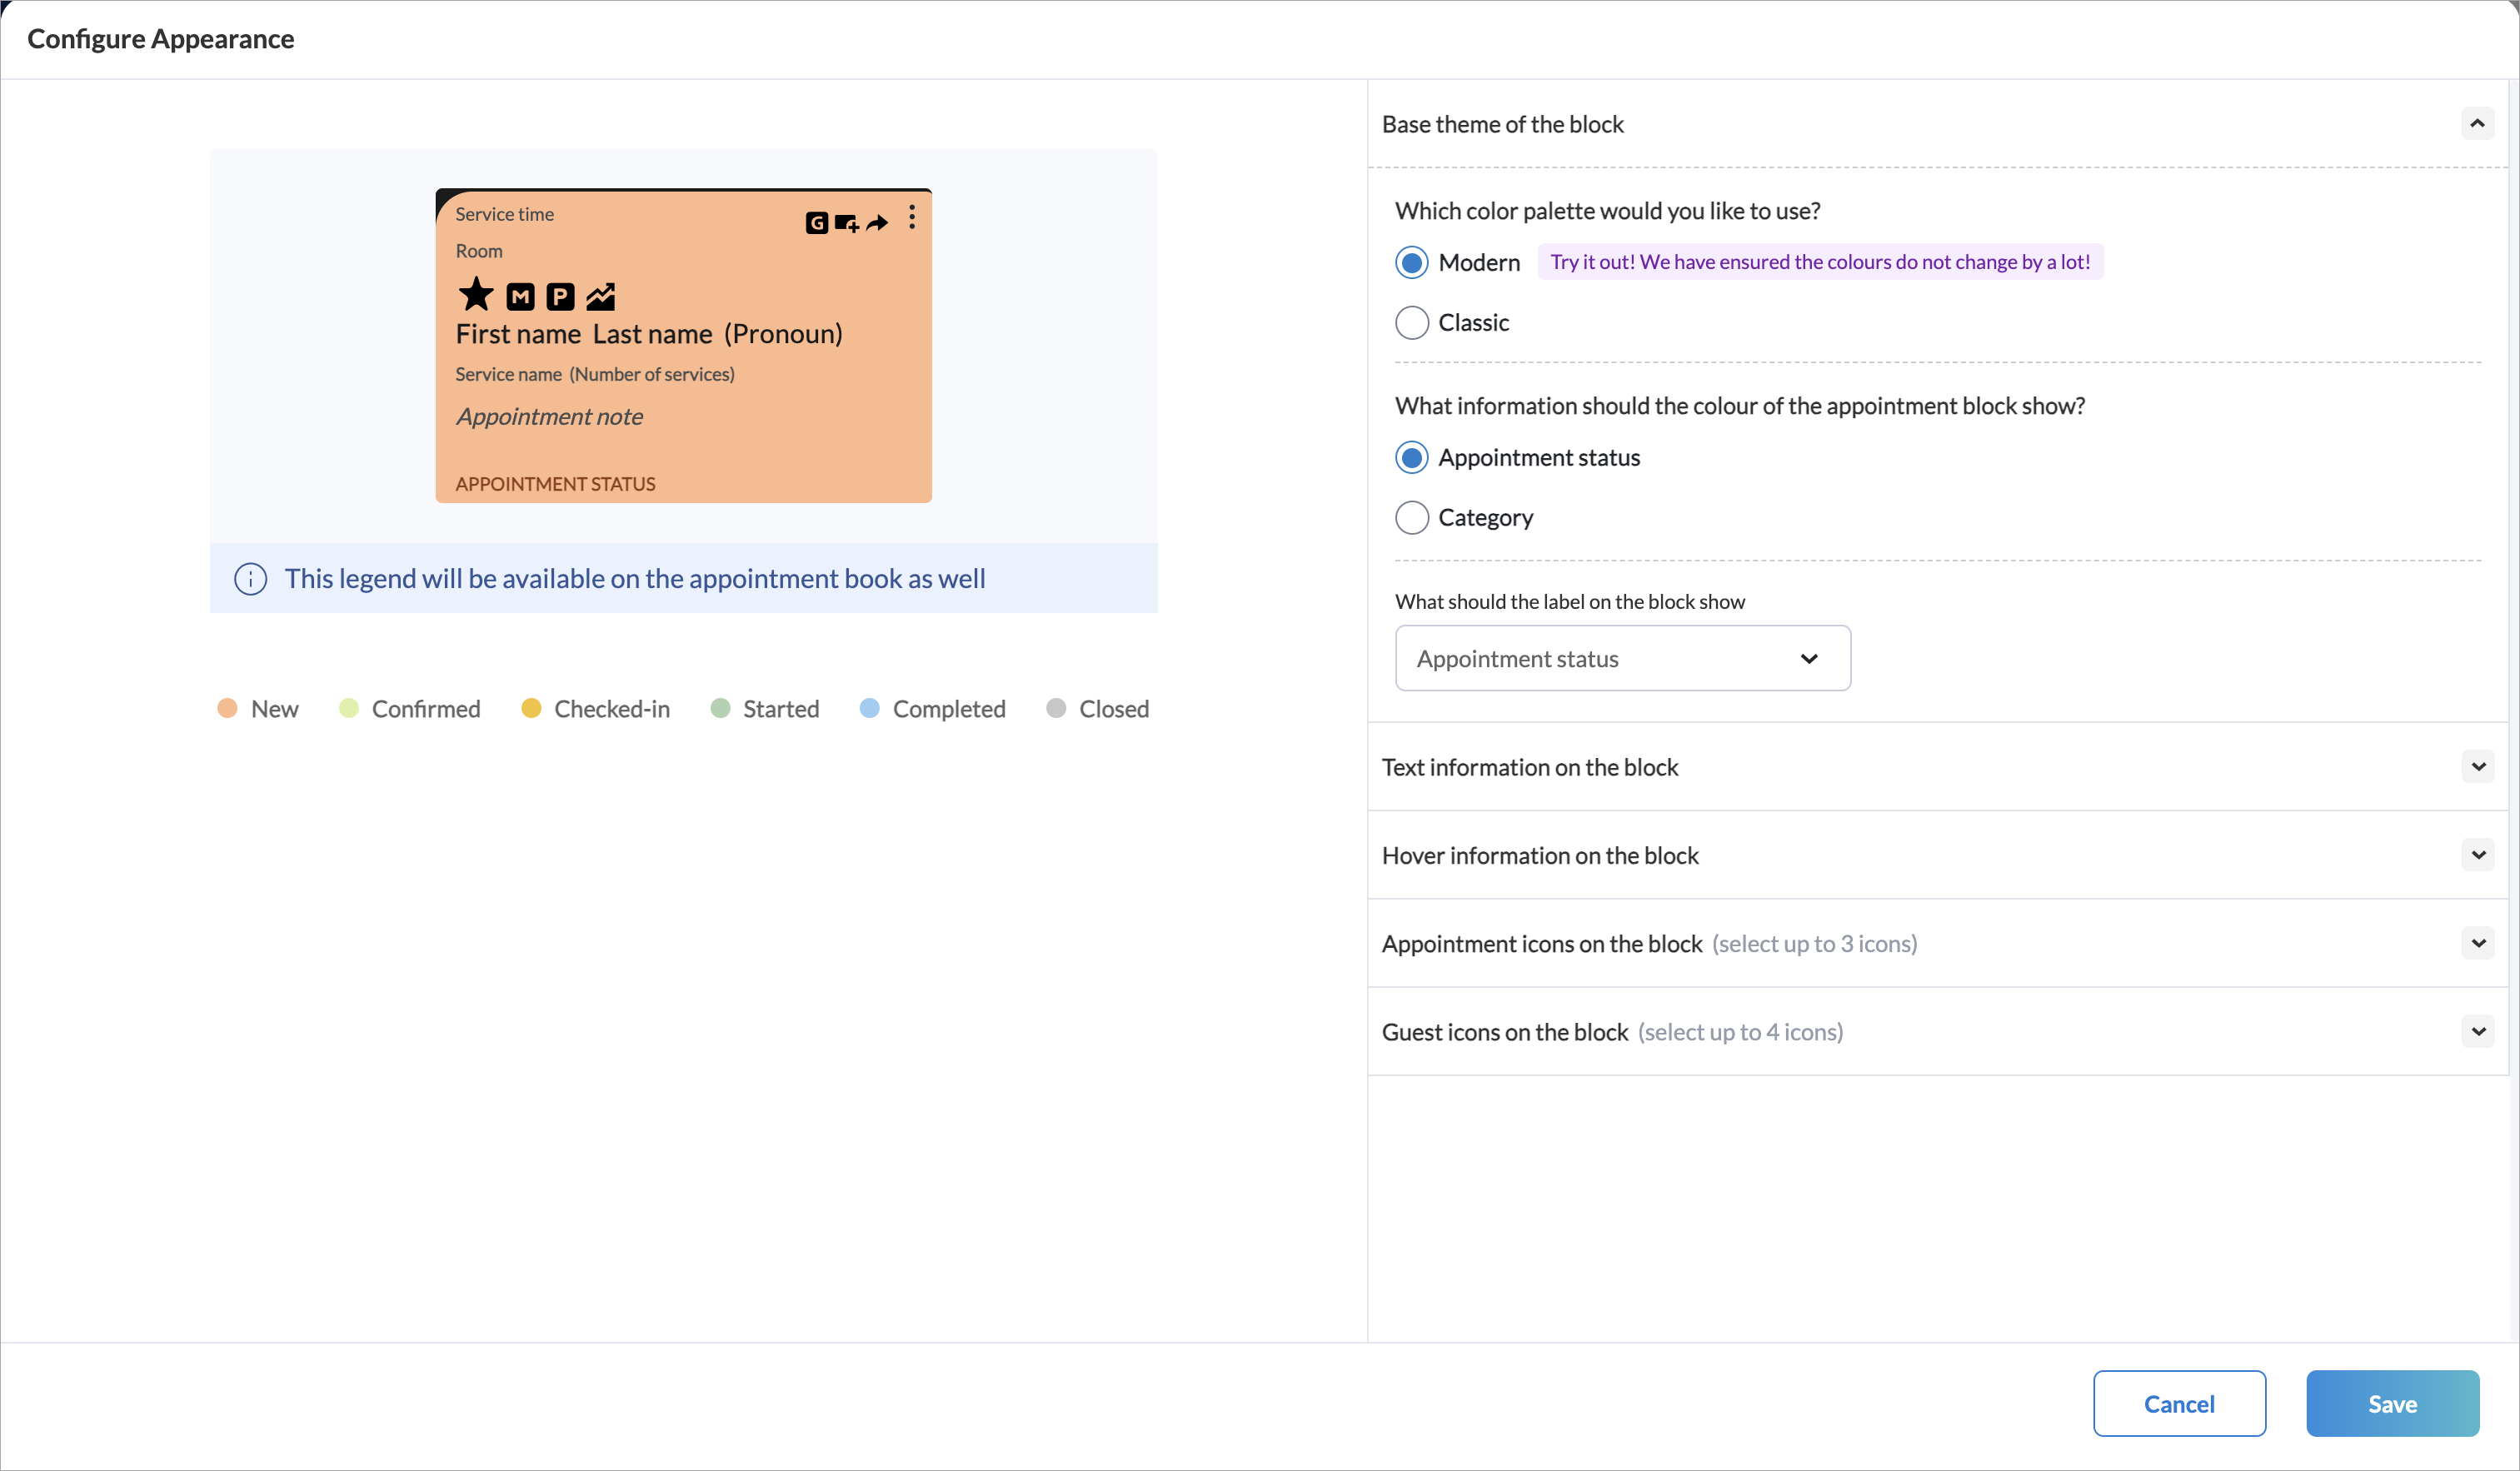
The image below shows the Modern theme palette with block colors representing Appointment status and labels set to show status:
Note
The Bold vs Pastel appearance option is available only for the redesigned Appointment Book when the Modern theme is selected in center settings.
After you choose a palette, you can configure the color of the appointment block to represent either the status or the category of the appointment.
Under What information should the colour of the appointment block show?, select Appointment status or Category.
For example, if set to reflect status, the color will show the current state such as confirmed, checked in, or completed, allowing front-desk staff to track appointment progress easily.You can also configure the label of the appointment block to show category, appointment status, or none.
Under What should the label on the block show, select Appointment status, Category, or None, then click Save.
If Appointment status is selected, the appointment block label can display statuses like NEW, Confirmed, and Checked-in. If Category is selected, the block label displays the appointment category assigned during booking. If None is selected, no label is shown on the appointment block.
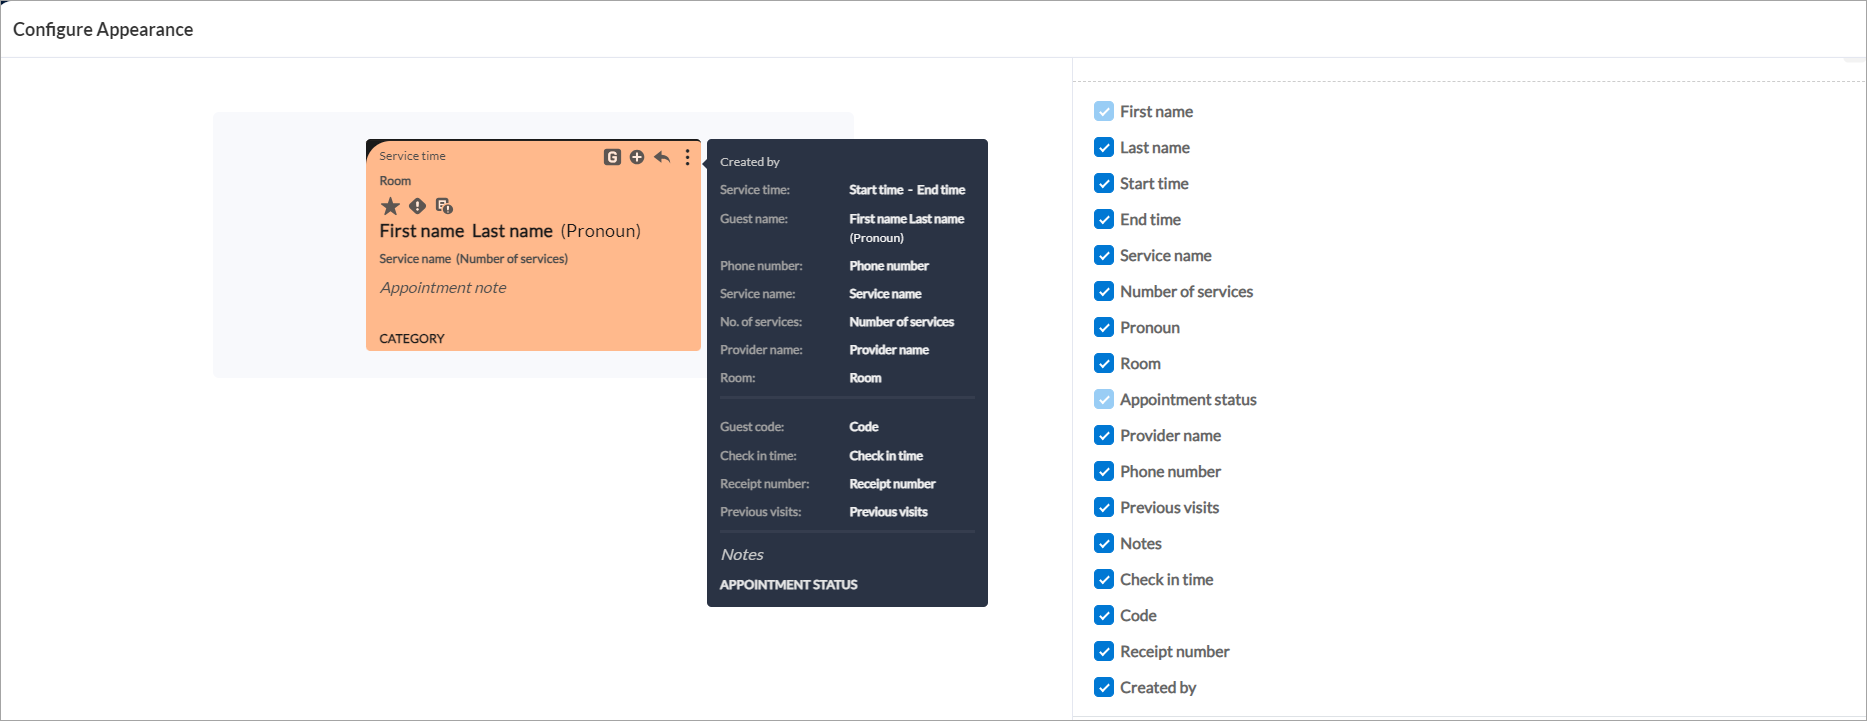
Configurable text information on the block: You can configure the details that should appear within the appointment block. Some details are mandatory, while others are optional and customizable for each business.
Mandatory details:
Guest’s first name
Service name and the number of services (if multiple services are booked in the same appointment)
Optional details:
Notes: Shows appointment-related notes can be added to the appointment block to provide additional information, such as specific guest needs or preferences. These notes help ensure that the provider is aware of any unique requirements, supporting a seamless guest experience.
Pronoun: Shows the guest's pronoun. Including the guest’s preferred pronoun shows that you value their preferences and helps create a welcoming environment by ensuring staff address them correctly.
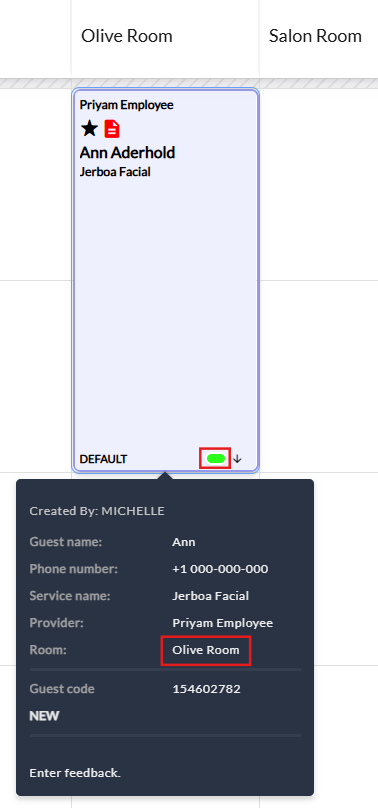
Room assignment: Shows the assigned room that helps staff track scheduled appointments and manage room availability. In the room view, appointment blocks show the provider's name. In the provider view, appointment blocks show the room name. If a room is assigned to the appointment and the room has a color configured, a small colored capsule appears on the appointment block. This provides a quick, visual cue to identify the room at a glance.
Guest's last name: Shows the last name that can be useful in differentiating between guests with similar first names, helping staff avoid mix-ups.
Configurable hover text information on the block: You can configure the details that appear as hover text on the appointment block.
This hover text provides additional information without cluttering the block itself, allowing staff to quickly access relevant details.
For example, hover text can include guest notes, specific requests, or other important information that enhances communication and efficiency during appointments.
Note
In Hover information on the block, First name and Appointment status are pre-selected by default.These fields are mandatory and cannot be removed.
Configurable appointment icons: Appointment icons offer a quick visual summary of key aspects of an appointment.
You can select more than 4 appointment icons and set their display priority. The appointment block displays a maximum of 4 appointment icons at a time, shown from left to right based on your defined order. Zenoti automatically displays the top applicable icons according to the priority you set.
You can choose from icons such as Add-on, Group booking, Family booking, Recurring appointment, Rebooked appointment, Source of booking (Webstore/Mobile/Bot), and Appointment Note. None of these icons are mandatory, and there is no minimum. If fewer than 4 icons are selected, only those selected will be displayed. If no configuration is set, the default icons will appear.
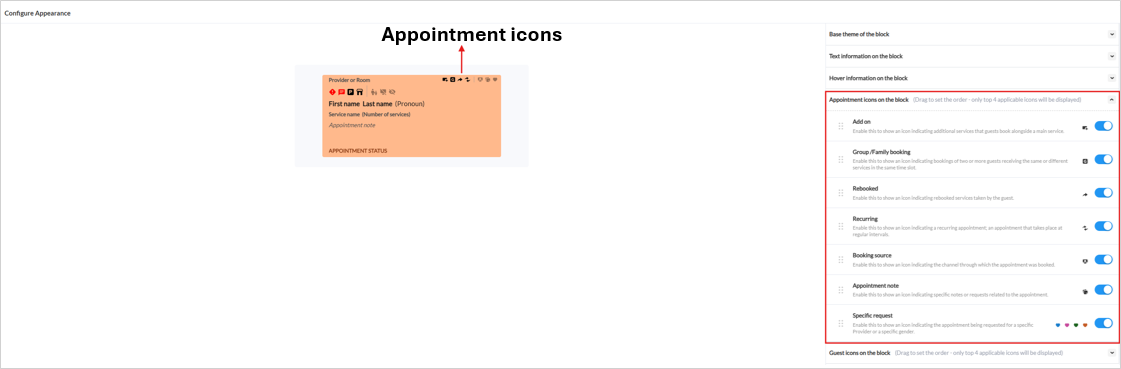
In the redesigned Appointment Book, the specific request indicator now uses heart icons instead of bars. A green heart represents a specific provider request, a blue heart indicates a request for any male provider, and a pink heart indicates a request for any female provider. This update helps staff quickly identify guest preferences and allocate providers efficiently, ensuring a smoother booking and service experience.
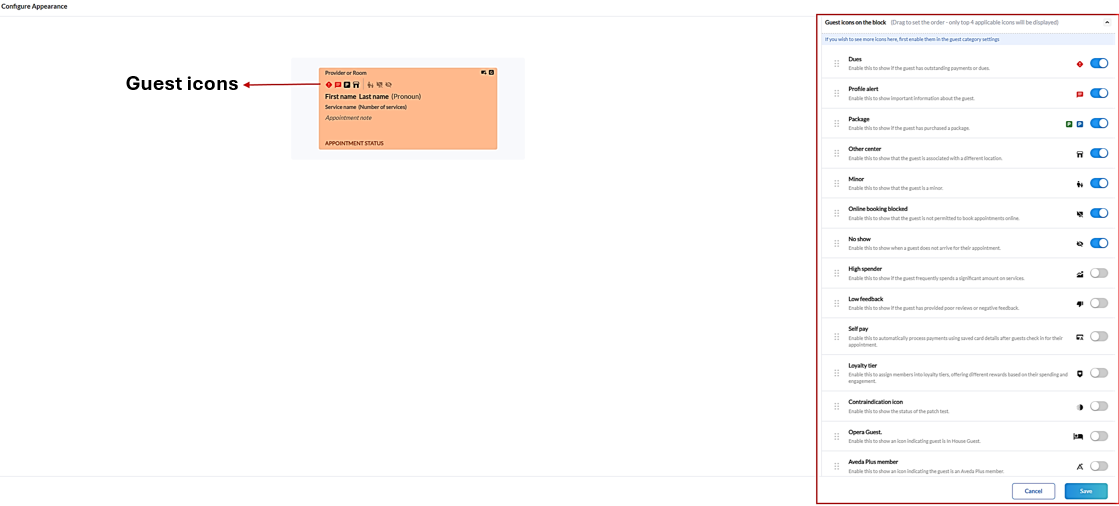
Configurable guest icons: Guest icons provide important information about the guest associated with an appointment.
You can select more than 4 guest icons and set their display priority. The appointment block displays a maximum of 4 guest icons at a time, shown from right to left based on your defined order. Zenoti automatically displays the top applicable icons according to the priority you set.
You can choose from icons such as New Guest, Member, Package, Birthday, Due (Outstanding payments or services), Profile alert, Other center guest, Minor, Online booking blocked, Allergy test, Regular/Not recent, No show, High spender, Low feedback, Loyalty tier, Guest custom data not filled, and Opera guest. None of the icons are mandatory, and there is no minimum. If fewer than 4 icons are selected, only those selected will be displayed. If no configuration is set, the default icons will appear.
Note
You must customize each section, save your changes, and then view them in the appointment book.
Display order of category colors in the Appointment Book
Understanding how category colors appear in the Appointment Book helps manage bookings efficiently and identify appointment types at a glance. Here is how Zenoti determines which color to display:
Appointment Category Color
If an appointment category color is defined and the Override Appointment Color when in category color view setting is enabled, the Appointment Book displays that color.
Service Category or Sub-Category Color
If no appointment category color is defined, the Appointment Book displays the service category or sub-category color.
Discount Color
If the appointment has an associated discount with a color, it will appear accordingly.
Business with no memberships
For businesses that do not use memberships, the category color defaults to the service category. This means if an appointment category color is not set, the color assigned to the service category will display in the Appointment Book.
Business with memberships
For businesses with memberships, the rules are slightly different:
If an appointment category has the box checked and it is assigned to a membership, its label and color will display on the appointment.
If an appointment category without the box checked is assigned to a membership, it will default to showing the service sub-category color.
If an appointment category with the box checked is assigned during booking, it overrides the service sub-category color.
Note
Appointment category color takes priority when available.
Membership settings control which category color displays, especially if the appointment category box is checked.
Service category colors ensure visual clarity when appointment category colors are not defined.
If the Override Appointment Color when in category color view setting is enabled, it overrides service category colors only when the Appointment Book is in category view. It does not override appointment status colors. You must switch to category view (by toggling) for the Override Appointment Color when in category color view setting to apply.
If you prefer to see category colors, you can set this preference during onboarding.
Icons on Appointment Book
The redesigned appointment book features updated icons in pastel shades and a refreshed color palette. This offers a sophisticated and visually appealing experience while maintaining functionality and clarity.
Distinct appointment and guest icons ensure intuitive navigation, providing a seamless and professional user experience.
Existing Appointment book icons | Redesigned appointment book icons |
|---|---|
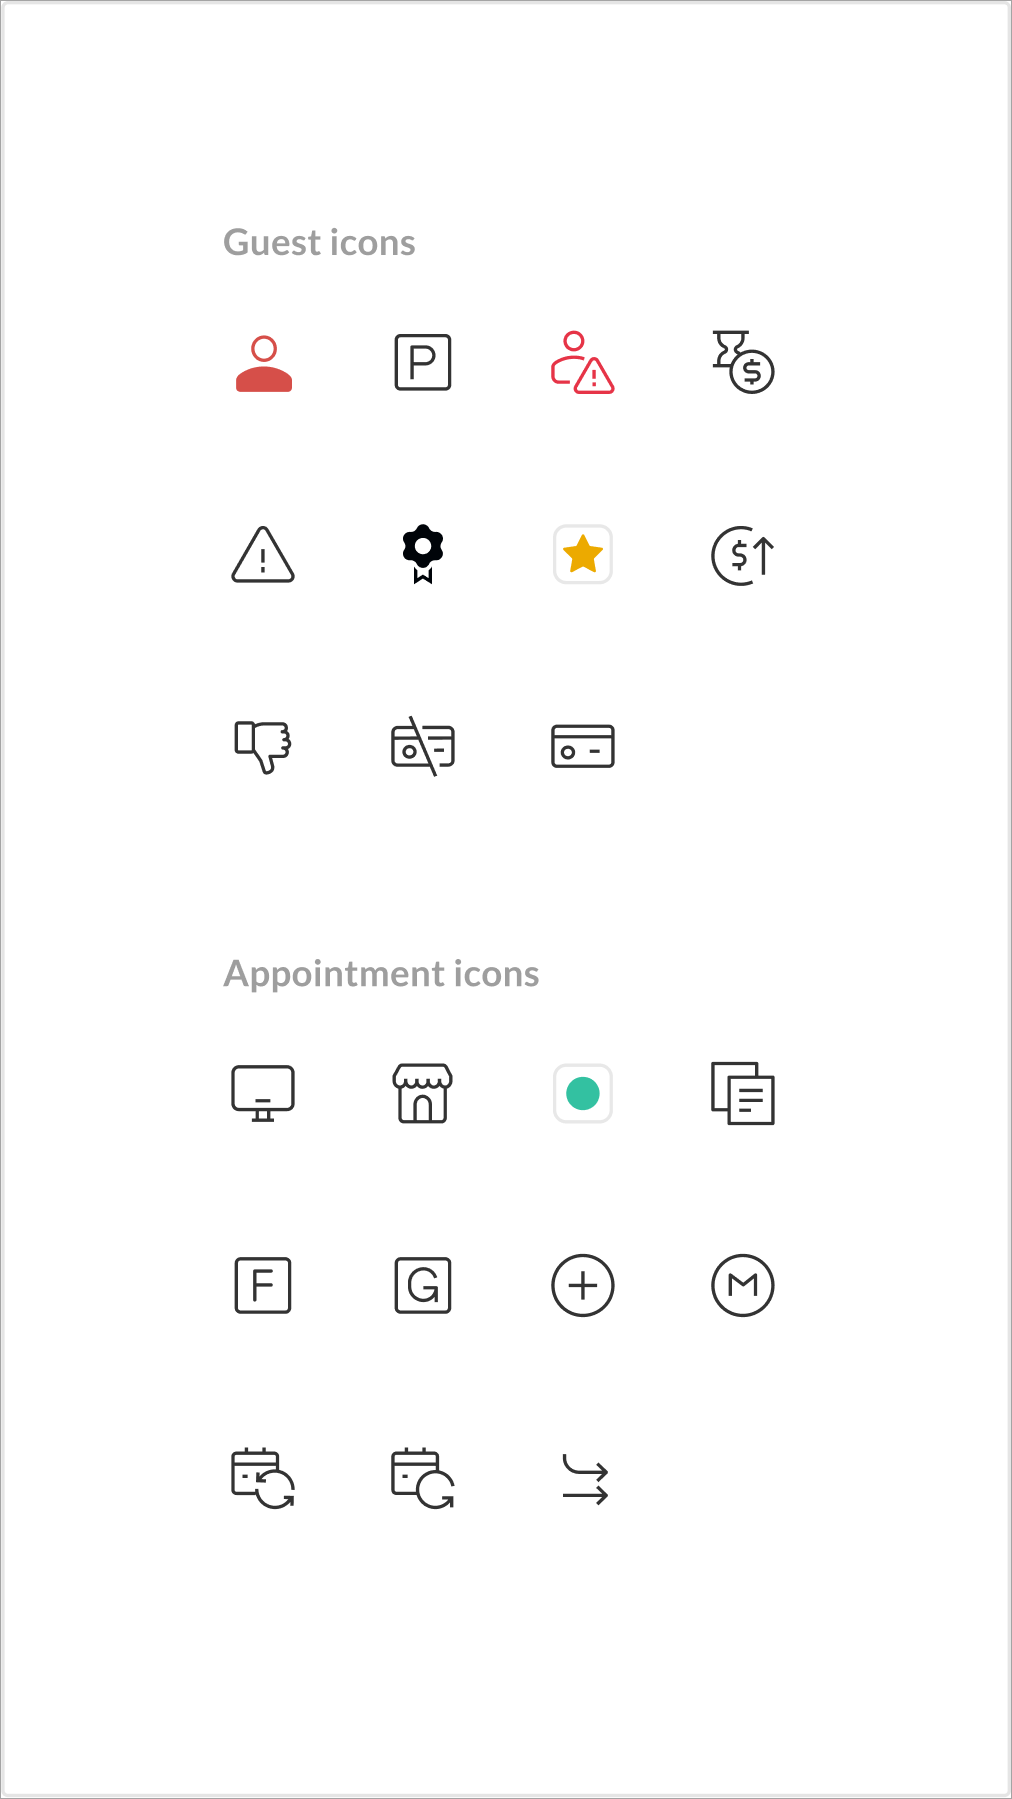 | 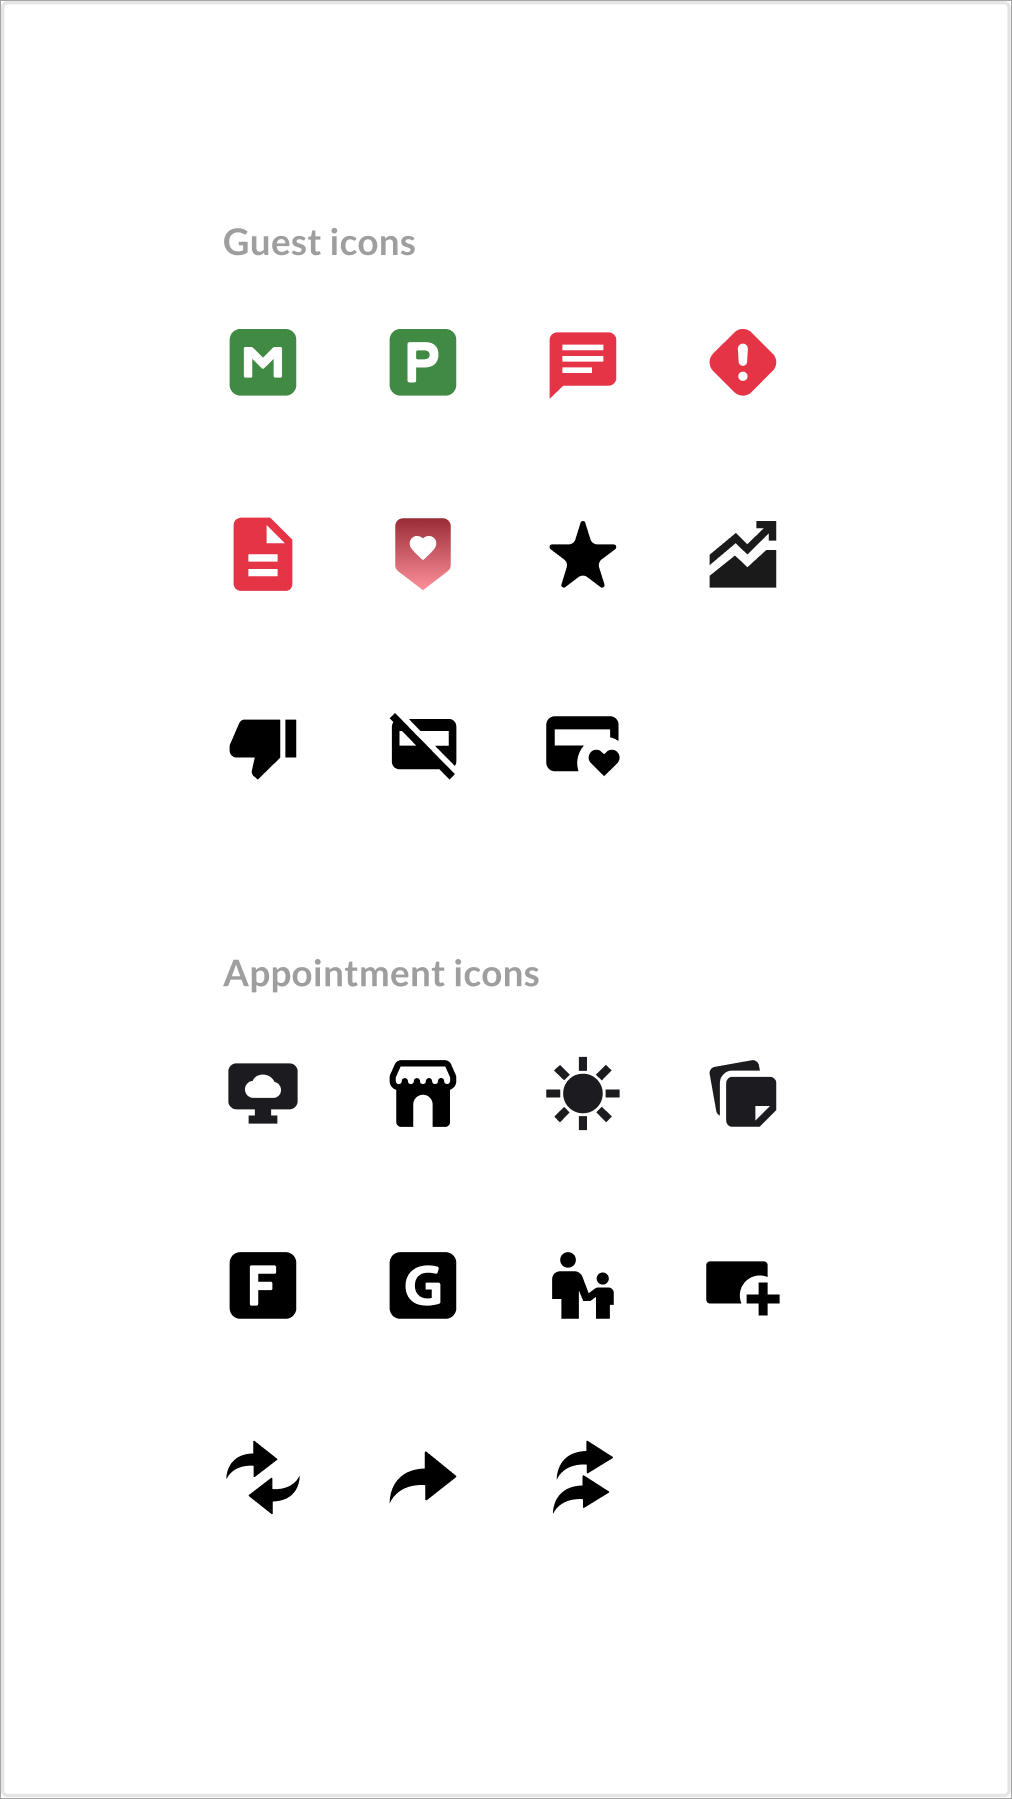 |
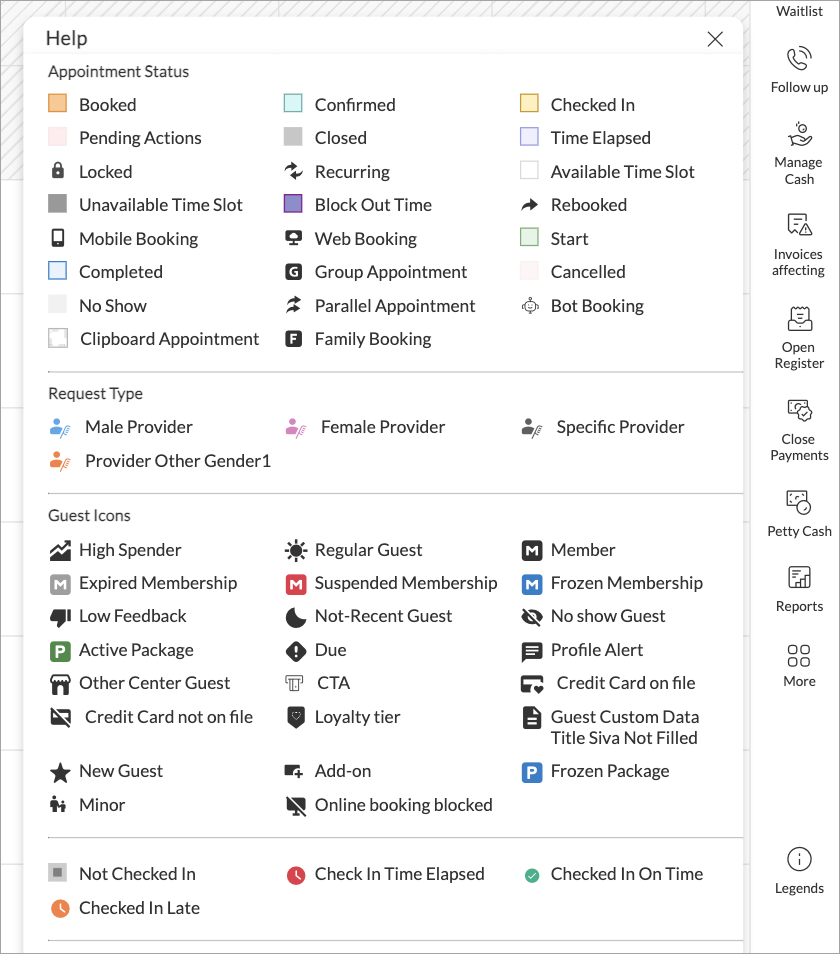
To view all the guest icons, follow these steps:
Navigate to the appointment book.
Click Legends on the bottom right corner.
Highlight Guest’s Appointments
Note
This is only applicable to the redesigned appointment book and does not affect the legacy version of the appointment book.
The redesigned appointment book offers multiple ways to highlight guest appointments, whether they are individual bookings or part of a group.
If a guest has an individual appointment, only that appointment will be highlighted. However, if the guest is part of a group appointment, all appointments within the group will be highlighted.
You can highlight guest appointments using the following methods:
Search and Locate
Search for the guest.
Click the Locate icon to highlight their appointments.
Note
This setting is enabled by default, and you cannot disable it.
Context Menu Option
Right-click the guest’s name.
Select Locate services > Show services in visit to highlight their appointment.
Note
This setting is enabled by default, and you cannot disable it.
Hover to Highlight
Hover over an appointment for more than 2 seconds.
Note
This setting is turned on by default. If you prefer, you can turn off this setting.
To disable this setting, follow these steps:
At the organization level, click Configuration.
Navigate to Appointments > Personalization > Interface.
Switch off the Hover over an appointment to highlight that guest’s appointments for the day toggle.
Click Save.
Navigate between dates on Appointment Book
Note
This is only applicable to the redesigned appointment book and does not affect the legacy version of the appointment book.
Efficient date navigation helps front-desk staff manage appointments quickly and accurately. The redesigned Appointment Book includes multiple ways to move across dates and weeks.
The Today button takes staff directly to the current date with a single click. This is useful when they have been reviewing past or future appointments and need to return to today quickly.
Front-desk staff can also jump ahead in the calendar using Skip Week options. For example, if a guest requests an appointment three weeks from today, staff can select +3 weeks to move directly to that date instead of manually calculating it. This makes booking future and repeat appointments faster.
Configure Skip Week options
Skip Week options can be customized to match a center’s booking patterns. This is especially useful for centers that frequently take bookings at longer intervals, such as 8 or 12 weeks.
To configure Skip Week options, follow these steps:
At the center level, go to Configuration.
Click on Appointments.
Scroll to the Interface section and expand Display.
Go to Configure skip weeks option to define up to three skip week intervals. You can select any value between 1 to 52 weeks.
Note
Default values for centers are +2, +3, and +4 weeks.
If fewer than three values are configured, only the configured options will appear in the redesigned Appointment Book.
These settings control navigation only and do not affect calendar behavior.
Use Skip Week options in the Appointment Book
Open the Appointment Book.
Click the date picker.
Select a Skip Week option (for example, +4 weeks).
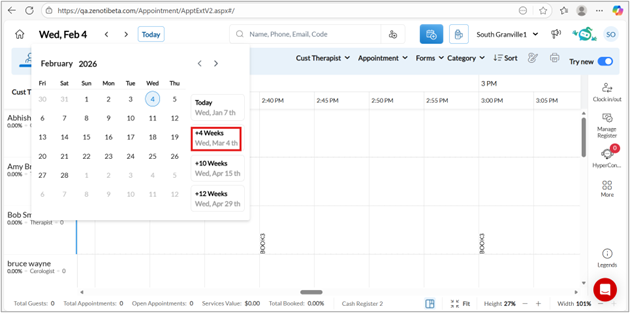
The calendar skips to 4 weeks from today when you select +4 weeks. If you then select another Skip Week option, the calendar moves forward from the currently selected date, not from today, making it easy to navigate multiple intervals in sequence.
Sort and reorder providers
Note
This is only applicable to the redesigned appointment book and does not affect the legacy version of the appointment book.
Front-desk staff can easily sort and reorder the service providers with just one click.
The sort option is more visible, allowing them to arrange the providers in the preferred order. This reordering works in both horizontal and vertical views.
For example, suppose providers like Dorothy and James are frequently requested by guests, but in the default order based on names, they appear after Alfredo. In this case, staff can quickly reposition Dorothy to the first column, making her name more accessible for bookings. They can then place Alfredo in the second column, regardless of where he initially appeared in the list. This capability allows staff to prioritize the most sought-after providers, ensuring that appointments with popular providers are booked more efficiently. As a result, this streamlined process not only improves staff productivity but also enhances the overall guest experience by reducing wait times and making it easier to secure appointments with preferred providers
Provider details in the redesigned Appointment Book
The redesigned Appointment Book makes it easier to view and scan provider information, especially when managing a large number of providers in vertical view. Provider details are presented more clearly to help front-desk staff understand availability, status, and booking context with minimal visual clutter.
When you hover over provider-related elements, the following information is clearly visible:
Provider name
Clock-in status
Other details (if enabled)
This helps staff quickly assess provider availability and make scheduling decisions without navigating away from the Appointment Book.
Benefit from guest search enhancements
Note
This is only applicable to the redesigned appointment book and does not affect the legacy version of the appointment book.
The guest search feature helps front-desk staff quickly access important guest information and appointment details. Search results show guest details, including their phone number and, if applicable, the number of services for that day's appointment.
The guest search has the following capabilities:
Search history: Display the last five past searches for quick access.
Search results: Hovering over guest names shows a tooltip such as "Open guest profile", and a "Locate" tooltip appears on hover over the locate icon.
Clicking the guest’s name takes the user to the guest profile.
Locate feature: This feature is only available if the guest has an appointment on that day. It operates like a focus mode, applicable to both single and group appointments. When front-desk staff hover over an appointment block for a set duration, the "focus mode" activates. This highlights all services associated with the guest’s visit, making it easier to see what is scheduled. Meanwhile, other appointments in the calendar will be grayed out to minimize distractions. Additionally, all appointments or visits for the same guest on that day will also be highlighted, even if they are not part of the current visit. To return to the normal view, the front-desk staff can click anywhere outside the highlighted appointments. This functionality enhances visibility and streamlines appointment management for staff.
Phone number formatting: Front-desk staff can search for guests using phone numbers that include country codes and special characters, ensuring proper formatting. This enables staff to quickly and accurately locate guest profiles.
Book or modify links: Displayed based on whether the guest has an appointment that day.
Use filters and views in redesigned Appointment Book
Note
This is only applicable to the redesigned appointment book and does not affect the legacy version of the appointment book.
Redesigned Appointment Book makes it easier for front-desk staff to find and manage appointments. You can filter by appointment status, form status, and provider.
You can also save your filters as views, then quickly update, sort, or delete them from the toolbar. It’s easy to reschedule appointments, manage block-outs, and view guest profiles. Plus, setting up recurring block-out times is now simpler with the updated calendar interface.
Filter by Provider, Tag, Jobs
To filter appointments by provider in the redesigned appointment book, follow these steps:
Navigate to the redesigned Appointment Book.
From the toolbar, click the Provider drop-down option.
Filter by Provider, Tag, or Jobs.
For example, you can select a provider from the Provider tab.
Click Apply.
Note
You can choose to filter either by Provider, Tag, or Job.
You can clear the filter by clicking Provider > Clear all.
Filter appointments
To filter appointments in the redesigned appointment book, follow these steps:
Navigate to the redesigned Appointment Book.
From the toolbar, click the Status drop-down option.
Filter appointments using the following options:
Cancelled/No-shows
Virtual appointment with meeting details
Virtual appointment without meeting details
Click Save.
You can clear the filter by clicking Status > Clear all.
Filter by appointment categories and subcategories
Filters appointments by appointment category or subcategory.
Examples:
Categories: Hair, Spa, Nails, Skin, Makeup
Subcategories: Haircut, Color, Blowout, Massage, Facial, Manicure, Pedicure, Waxing, Bridal Makeup
All options are multi-select, searchable, and include All and Reset options.
Filter by service categories and subcategories
Filters appointments by service category or subcategory.
Examples:
Categories: Hair Services, Body Treatments, Skincare, Makeup Services
Subcategories: Shampoo and Cut, Balayage, Deep Tissue Massage, Express Facial All filters are multi-select, searchable, and include All and Reset options.
Once filtered, only the relevant appointments are displayed; others are hidden. When multiple filters are used together, the Appointment Book displays results that match all selected filters (intersection logic).
Click Save. You can clear the filter by clicking Status > Clear all or by using the Reset option.
Filter by forms
To filter appointments by forms in the redesigned appointment book, follow these steps:
Navigate to the redesigned Appointment Book.
From the toolbar, click the Forms drop-down option.
To view only forms that are not filled in, switch on the Only unfilled forms toggle.
Use the search bar to search for forms or scroll to select the forms as required.
Click Save.
You can clear the filter by clicking Forms > Clear all.
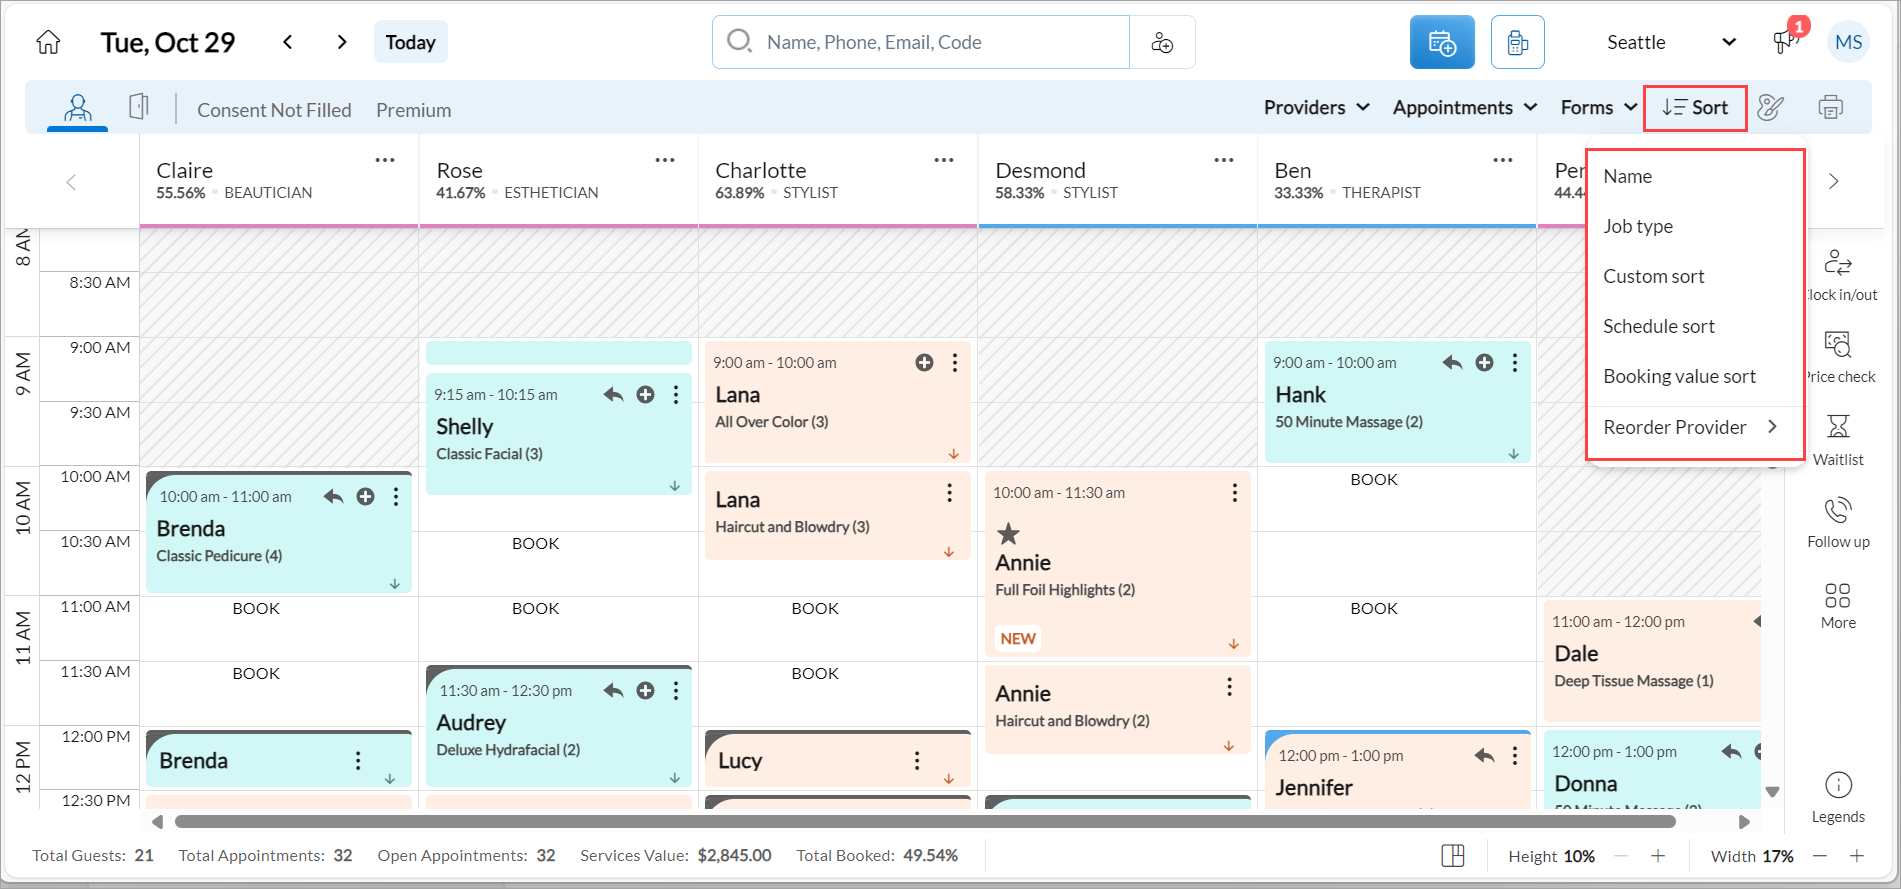
Sort appointments
To sort appointments in the redesigned appointment book, follow these steps:
Navigate to the redesigned Appointment Book.
From the toolbar, click the Sort drop-down option.
You can sort the appointments using the following options:
Name: Sort providers alphabetically.
Job Type: Sort based on provider jobs.
Custom sort: Apply a pre-defined custom order configured by the business.
Schedule sort: Sort providers based on their scheduled hours for the day.
Booking value sort: Sort providers by their total booking value for the day.
Reorder provider: Reorder provider columns by dragging and dropping.
Reorder Provider
To reorder provider in the redesigned appointment book, follow these steps:
Navigate to the redesigned Appointment Book.
From the toolbar, click the Sort drop-down option.
Click Reorder provider.
From the side panel, select the provider’s name, then drag and drop it to your desired position.
Click Save.
Manage views
To create a view in the redesigned appointment book, follow these steps:
Navigate to the redesigned Appointment Book.
Use the available options to filter or sort the data.
Click the Save icon.
Enter the name you want to use for saving the view.
Click Save view.
To switch between saved views in the redesigned Appointment Book, follow these steps:
Navigate to the redesigned Appointment Book.
On the toolbar, click the view you want to switch to.
If your saved view is not visible, click the down arrow next to the view names to see the full list.
Click the desired view to switch to it.
To edit an existing view in the redesigned appointment book, follow these steps:
Navigate to the redesigned Appointment Book.
Click the name of the view you want to modify.
Use the available filter and sort options to update the view as needed.
Click the Save icon
If you would like to rename the view, enter the new name in the field provided.
To overwrite the current view, click Save view.
To create a new view based on your changes, click Save as new view.
To reorder a view in the redesigned appointment book, follow these steps:
Navigate to the redesigned Appointment Book.
Click Configure icon > Manage views.
Select the view, then drag and drop it to your desired position.
Click Save.
To delete an existing view in the redesigned appointment book, follow these steps:
Navigate to the redesigned Appointment Book.
Click Configure icon > Manage views.
Click the Delete icon next to the view you want to remove.
A confirmation pop-up will appear, click Ok to confirm deletion.
View a provider’s weekly schedule
To view a provider’s weekly schedule in the redesigned Appointment Book, follow these steps:
Navigate to the redesigned Appointment Book.
Click the more options icon next to the provider’s name.
Select Week View.
The provider’s weekly schedule appears.
To return to the daily schedule, click the Back to Day View button.
Enable the redesigned Appointment Book for ZMA v2
At the organization level, go to Configuration > Appointments > Personalization and switch on the Enable redesigned Appointment Book toggle.
At the center level, click Configuration.
Navigate to Appointment and Queue Management > Interface.
Switch on the Enable redesigned Appointment Book toggle.
Switch on the Enable New Appointment Book for Zenoti Mobile App toggle to view it in ZMA.
Click Save.
Note
Businesses that have been onboarded after November 4, 2025 will have this toggle enabled by default.
Classes in New Appointment Book
The Classes tab provides direct access to the class roster from the appointment book. It offers a quick visual view of scheduled classes, which helps staff review class details and perform common actions without opening additional pages.
Front desk staff can use this tab to efficiently monitor class schedules and stay informed about upcoming sessions while managing daily appointments.
For more information on how to manage classes and workshops, refer to the Roster View article.
Equipment view in Appointment Book
Note
Appointments appear in this view only if equipment has been booked against them.
The Equipment tab in the redesigned Appointment Book displays appointments grouped by the equipment booked against each appointment. This view helps staff at medspas and similar businesses manage equipment-dependent bookings efficiently, ensuring that resources such as laser devices or treatment machines are allocated without conflicts.
To view appointments by equipment in the redesigned Appointment Book, follow these steps:
Navigate to the Appointment Book.
Click the Equipment tab in the toolbar.
The view updates to display appointments grouped by the equipment booked against each appointment.
The Equipment tab supports a subset of the filters available in other Appointment Book views. Appointment status, Forms, and Category filters work as expected. The Sort filter supports sorting by Name only; other sort options are not available in this view. The Providers filter and the Print option are not supported in the Equipment tab.