Manage issues
Issue tracking
As you manage your day-to-day operations such as appointments, sales, services, financials and other business processes, you also need to deal with the issues arising out of these multiple processes.
Issue tracking is a feature that allows you to create, monitor, and resolve the issues. Issues are created in the following ways:
Manually: When an employee or a guest reports an issue. Learn how to create an issue manually.
Automatically: When a guest gives a feedback rating that is less than a certain number that you specify or submits a comment in the feedback form. Learn how to configure the automatic issue creation
Permissions required to create or update an issue
You will need Add and Edit permissions for Issues enabled for a role to either create or update an issue.
At the organization level, click the Configurations icon.
Search for and select Security Roles from Security.
Select the role for which you want to enable the permissions.
Click Permissions.
Expand the Loyalty Manager section.
Locate Issues and enable the following:
Add: Allows you to create issues and add notes.
Edit: Allows you to modify the status of the issue.
Create an issue manually
As you manage your day-to-day operations such as appointments, sales, services, financials, and other business processes, you also need to deal with the issues arising out of these multiple processes.
When an employee or a guest reports an issue, if your role has the required permissions, you can create an issue manually.
Important
You can create an issue only at the center level.
At the center level, click the Guests icon.
Click Issues.
From the Manage Issues page, click Add to start creating an issue.
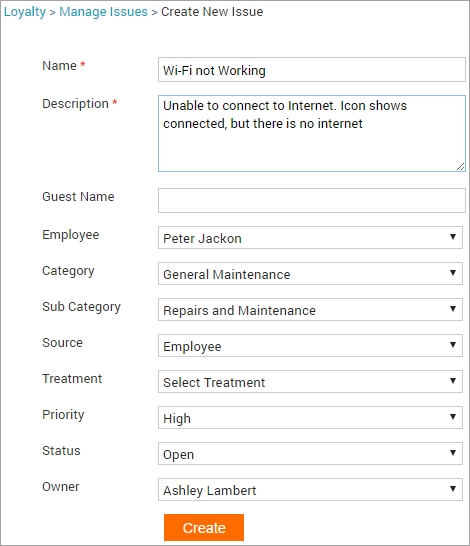
Enter the required information in the following fields:
Note
Only Name and Description fields are mandatory. The rest of the fields are optional.
Name: Enter the title that summarizes the issue.
For example, Wi-Fi not working.
Description: Enter the description of the issue.
For example, Unable to connect to internet.
Guest Name: Start entering the name of the guest. Select the name of the relevant guest from the list that appears.
Employee: Select the name of the employee creating the issue.
Category: Select the category of the issue.
For example, General Maintenance.
Note
For categories to appear in the list, you must have created categories at the Organization level.
For subcategories to appear in the list, you must have created subcategories at the Organization level and assigned the Category under which this subcategory must appear.
Subcategory: Select the subcategory of the issue.
For example, internet.
Source: Select the source for the issue.
For example, Employee.
Treatment: Select the Treatment type.
For example, Body Wax procedure.
Priority: Select the priority as follows:
- High
- Medium
- Low
Status: Select the status as follows:
- Open: Issue is not worked on yet.
- Deferred: Issue resolution is put off to a later time.
- Resolved: Issue is fixed.
- Closed: When it is verified that the issue is resolved.
Owner: Select the employee who is responsible to resolve the issue.
Click Create.
You have successfully created an issue.
Automatic issue creation
Zenoti enables you to configure automatic issues in the following cases:
When the guest gives a feedback rating that is less than a number that you specify
When the guest submits a comment in the feedback form.
At the organization level, click the Configuration icon.
Search for and select Issues from the Guests section.
In the Create an issue if any rating in the feedback from is below box, enter a number.
An automatic issue is created when a guest gives a feedback that is less than this number.
Example: if you enter 3 in the box, an automatic issue is created for all ratings less than 3 (1 and 2 ratings).
If you want an issue to be created when a comment is submitted in the feedback form, select the Create an issue if a comment is submitted checkbox.
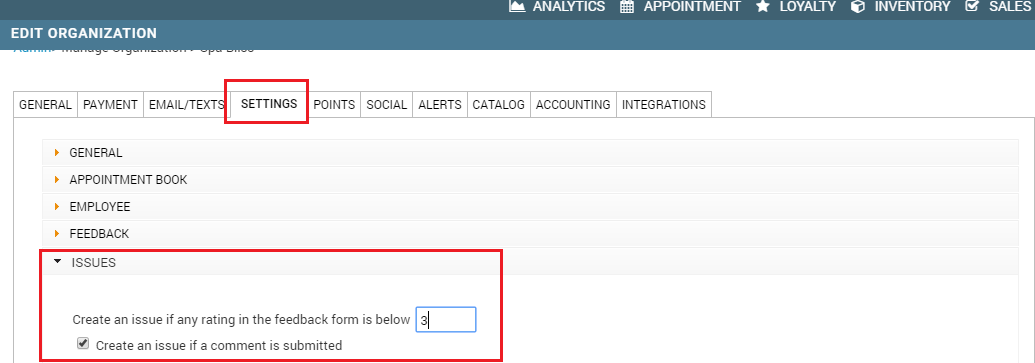
Click Save.
You have successfully completed the automatic issue configuration. Zenoti now creates an issue automatically and the issue owner gets notified by a text message or email.
Identify an issue created automatically
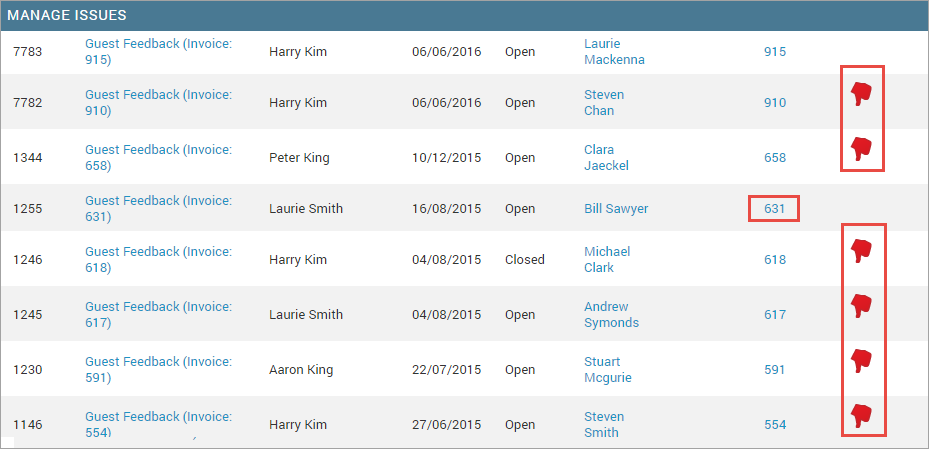
The Manage Issues page shows all the issues (both automatic and manual) created for you center.
You can access the Manage Issues page either at the center or organization level by navigating to Guests > Issues > Manage Issues.
Note
If you access the Manage Issues page from the organizational level, Zenoti shows all the issues (both automatic and manual) created across all your centers.
On the Manage Issues page, an automatic issue can be identified with an invoice number, a thumbs-down icon, or both.
To set who gets notified when an automatic issue is created, see Configuring the recipients of Automatic Issue notifications.
Modify an issue
You can modify or update an existing issue to change the type, priority, status and owner both at the center and organization level.
Note
To modify an issue, your role should have the required permissions,
Click the Guests tab.
Navigate to Issues > Manage Issues.
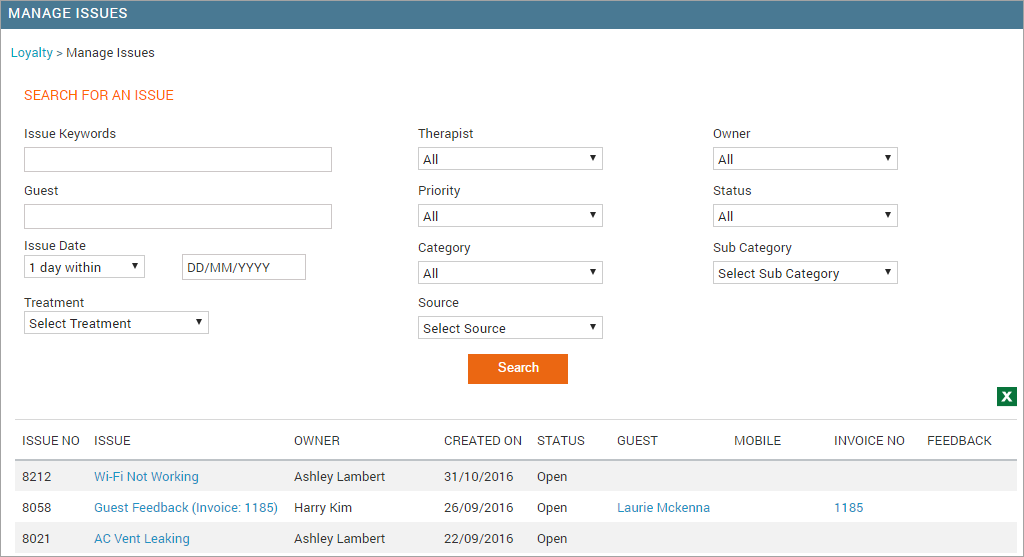
From the list of issues, search the issue that you want to modify.
You can use one or more of the following fields as search criteria to search an issue:
Issue Keyword: Enter a keyword to find the issue that contains this specific keyword.
Guest: Select the guest name from the auto-complete drop-down that appears as you type in the field.
Issue Date: Select the required value and date. You can specify the following values:
- 1 day within: To find those issues that are 1 day within the specified date.
- 3 days within: To find those issues that are 3 days within the specified date.
- 1 week within: To find those issues that are 1 week within the specified date
- 1 month within: To find the issues that were created in the last 1 month from
the specified date.
- 2 months within: To find the issues that were created in the last 2 months from
the specified date.
- 6 months within: To find the issues that were created in the last 6 months from
the specified date.
- 1 year within: To find the issues that were created in the last 1 year from
the specified date.
Treatment: Select the treatment type.
Therapist: Select the name of the therapist.
Priority: Select the priority of the issue.
Category: Select the category of the issue.
Source: Select the source of the issue.
Owner: Select the name of the owner.
Status: Select the status of the issue.
Note
You can change the status of the issue from the guest profile as well.
Sub Category: Select the sub category of the issue.
Click Search to perform a search by using the criteria that you specified.
Click the issue's name to open it.
Modify the fields that you want to update and in the Add
Note
You can add notes to an issue from the guest profile as well.
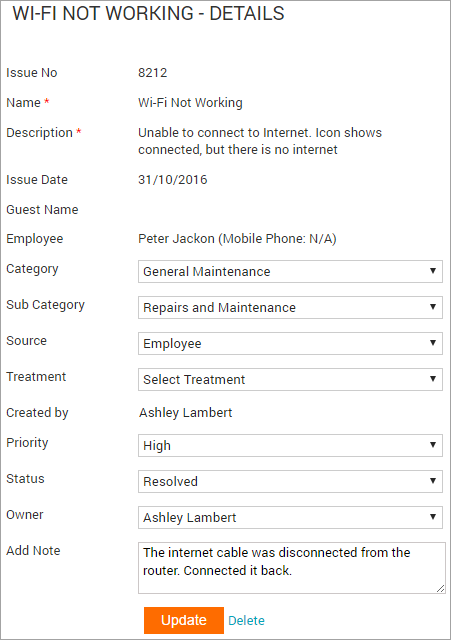
Click Update.
The issue is updated.
Note
The home page displays an alert, which shows the number of open issues that are assigned to you. When you click the alert message link, it displays the Manage Issue screen with all the open issues. To modify an issue, click the name of the issue you wish to modify.
Permissions required to create or update an issue
You will need Add and Edit permissions for Issues enabled for a role to either create or update an issue.
At the organization level, click the Configurations icon.
Search for and select Security Roles from Security.
Select the role for which you want to enable the permissions.
Click Permissions.
Expand the Loyalty Manager section.
Locate Issues and enable the following:
Add: Allows you to create issues and add notes.
Edit: Allows you to modify the status of the issue.
Create an issue manually
As you manage your day-to-day operations such as appointments, sales, services, financials, and other business processes, you also need to deal with the issues arising out of these multiple processes.
When an employee or a guest reports an issue, if your role has the required permissions, you can create an issue manually.
Important
You can create an issue only at the center level.
At the center level, click the Guests icon.
Click Issues.
From the Manage Issues page, click Add to start creating an issue.
Enter the required information in the following fields:
Note
Only Name and Description fields are mandatory. The rest of the fields are optional.
Name: Enter the title that summarizes the issue.
For example, Wi-Fi not working.
Description: Enter the description of the issue.
For example, Unable to connect to internet.
Guest Name: Start entering the name of the guest. Select the name of the relevant guest from the list that appears.
Employee: Select the name of the employee creating the issue.
Category: Select the category of the issue.
For example, General Maintenance.
Note
For categories to appear in the list, you must have created categories at the Organization level.
For subcategories to appear in the list, you must have created subcategories at the Organization level and assigned the Category under which this subcategory must appear.
Subcategory: Select the subcategory of the issue.
For example, internet.
Source: Select the source for the issue.
For example, Employee.
Treatment: Select the Treatment type.
For example, Body Wax procedure.
Priority: Select the priority as follows:
- High
- Medium
- Low
Status: Select the status as follows:
- Open: Issue is not worked on yet.
- Deferred: Issue resolution is put off to a later time.
- Resolved: Issue is fixed.
- Closed: When it is verified that the issue is resolved.
Owner: Select the employee who is responsible to resolve the issue.
Click Create.
You have successfully created an issue.
Identify an issue created automatically
The Manage Issues page shows all the issues (both automatic and manual) created for you center.
You can access the Manage Issues page either at the center or organization level by navigating to Guests > Issues > Manage Issues.
Note
If you access the Manage Issues page from the organizational level, Zenoti shows all the issues (both automatic and manual) created across all your centers.
On the Manage Issues page, an automatic issue can be identified with an invoice number, a thumbs-down icon, or both.
To set who gets notified when an automatic issue is created, see Configuring the recipients of Automatic Issue notifications.
Modify an issue
You can modify or update an existing issue to change the type, priority, status and owner both at the center and organization level.
Note
To modify an issue, your role should have the required permissions,
Click the Guests tab.
Navigate to Issues > Manage Issues.
From the list of issues, search the issue that you want to modify.
You can use one or more of the following fields as search criteria to search an issue:
Issue Keyword: Enter a keyword to find the issue that contains this specific keyword.
Guest: Select the guest name from the auto-complete drop-down that appears as you type in the field.
Issue Date: Select the required value and date. You can specify the following values:
- 1 day within: To find those issues that are 1 day within the specified date.
- 3 days within: To find those issues that are 3 days within the specified date.
- 1 week within: To find those issues that are 1 week within the specified date
- 1 month within: To find the issues that were created in the last 1 month from
the specified date.
- 2 months within: To find the issues that were created in the last 2 months from
the specified date.
- 6 months within: To find the issues that were created in the last 6 months from
the specified date.
- 1 year within: To find the issues that were created in the last 1 year from
the specified date.
Treatment: Select the treatment type.
Therapist: Select the name of the therapist.
Priority: Select the priority of the issue.
Category: Select the category of the issue.
Source: Select the source of the issue.
Owner: Select the name of the owner.
Status: Select the status of the issue.
Note
You can change the status of the issue from the guest profile as well.
Sub Category: Select the sub category of the issue.
Click Search to perform a search by using the criteria that you specified.
Click the issue's name to open it.
Modify the fields that you want to update and in the Add
Note
You can add notes to an issue from the guest profile as well.
Click Update.
The issue is updated.
Note
The home page displays an alert, which shows the number of open issues that are assigned to you. When you click the alert message link, it displays the Manage Issue screen with all the open issues. To modify an issue, click the name of the issue you wish to modify.