Take payments
For an existing appointment
Tip
Click the appointment block and from the menu, select Take Payment Manually. Alternatively, in the Appointment Info panel, from the context menu, select Modify Appointment and then click Take Payment.
Important
Ensure that the center name displayed next to the invoice number is verified and correctly selected to mitigate potential revenue impacts.
During checkout, front-desk staff can upsell to customers using real-time product recommendations in POS. They can scan the barcode or manually add the product to the invoice.
In the Collect Payment section, select the payment option.
Enter the amount.
If the guest is paying using a gift card, prepaid card, package, membership, or loyalty points click Send OTP to validate the transaction.
Click Add Payment.
If the Open register from POS for cash payments setting is enabled, the print dialog box will appear when you click Add Payment. The front desk staff must click Print to open the register.
If they do not click Print, the register will not open.
Close the invoice.
If your business relies on rebookings, you can add a prompt to remind front-desk staff to rebook when closing an invoice by enabling the Prompt front-desk staff to rebook appointments setting.
Front-desk staff can also rebook appointments for guests by clicking the Rebook button.
Note
The Rebook button is available by default for businesses using the booking wizard for rebooking appointments.
For walk-in businesses that do not require rebookings, contact Zenoti to remove the Rebook button from the POS.
If you disable the rebooking via the booking wizard setting, you can still rebook through the context menu in the appointment book. However, you will need to manually enter the date, and the frequency setting will not be applied.
Impacts and considerations
To allow the guest to review and pay the invoice, enable the Mirror mode toggle while taking manual payments.
If the guest wants to pay using a card, you can collect the tip amount as Cashback and give the cash to the guest for paying tips.
Repeat steps 2 - 4 if the guest wants to pay using multiple payment options.
Take payments for future and past dates
To take payments for past dates, the visit or booking must have an active or open invoice. For more information, refer to verify and close invoices in the past.
You cannot close payments for past dates directly from the Appointment book or Queue view.
Zenoti does not support taking payments for future bookings or invoices. However, Zenoti enables businesses to collect advanced deposits for services during booking, which can help reduce the risk of no-shows and last-minute cancellations. For more information, refer to booking deposits.
Payment options
Payment method | Perform these steps |
|---|---|
Cash |
|
Debit/credit card payments online |
|
Offline card payments |
|
Check |
|
Custom payments |
|
Gift card |
|
Prepaid card |
|
Loyalty points |
|
Membership |
|
In POS, you can add products, memberships, and packages at any time. However, services are available only when POS is accessed for today’s date from the Appointment Book calendar. If you are viewing a past or future date, the option to add a service will not be displayed. Additionally, if POS is opened from the Guest Profile using an open invoice, the Services tab will not be available.
For a group invoice
Tip
As a Front-desk Operator (FDO), follow these steps to efficiently process payments for group invoices. This includes adding invoices, selecting payment methods, managing tips, and finalizing the transaction seamlessly.
Initiate Group Payment
On the Appointment Book or Queue view, locate and select the group booking for payment.
From the context menu, select Take Payment (Group Bill).
If any guest wants to redeem a benefit, select Take Payment instead.
Add Invoices to Group Payment
To include other open invoices in the group payment, search using the invoice number or guest’s details, or click Today’s Open Invoices to view all open invoices for the day.
Select Payment Methods
In the Collect Payment section, select the payment option.
If a deposit was collected during the group booking, select Gift Card as the payment type and enter the prepaid card number.
If the guest is paying with a gift card, prepaid card, package, membership, or loyalty points, click Send OTP to validate the transaction.
If the guest is paying by cash, you can also choose the currency in which the payment is made. From the Select Currency dropdown, select the appropriate option before adding the payment.
Enter the amount to be collected.
If the guest wants to pay using multiple payment options, repeat steps 4 to 8 for each method.
Handle Tips
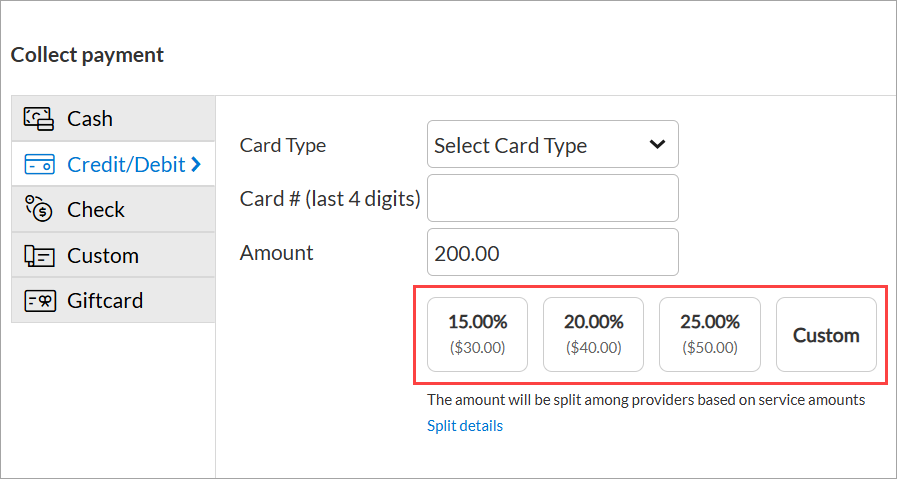
Select how to distribute tips across invoices:
Split a total tip amount among service providers based on service price.
Apply a percentage-based tip such as 10%, 15%, 20% across all invoices. In the following screenshot, see how the percentage-based tip shows the actual tip amount in $ value.
Assign tip amounts to each provider manually. In the following screenshot, click Custom to assign tips to each provider manually.
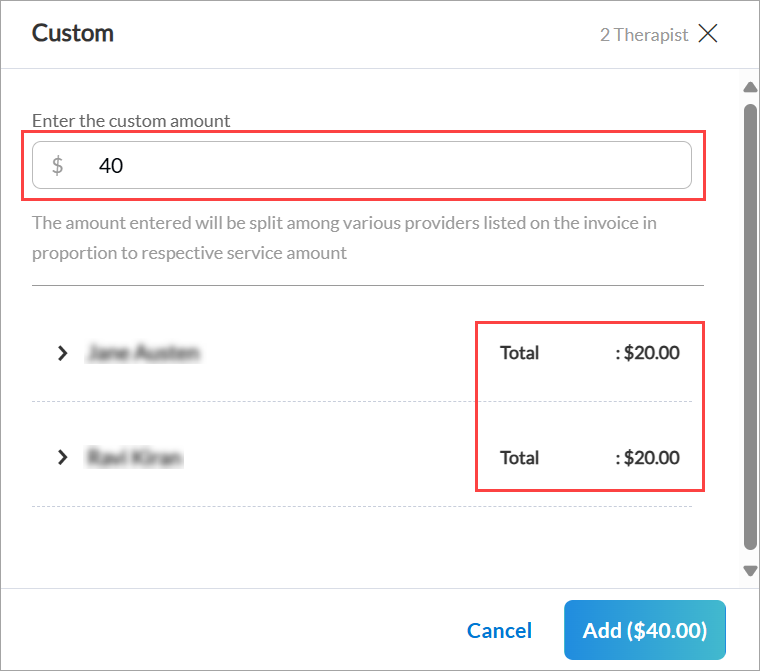
If Custom is selected, enter the total tip amount in the pop-up window. Zenoti automatically distributes the amount based on service prices.
To manually adjust individual provider tips:
Expand the guest’s name and enter the custom tip amount next to the service provider’s name.
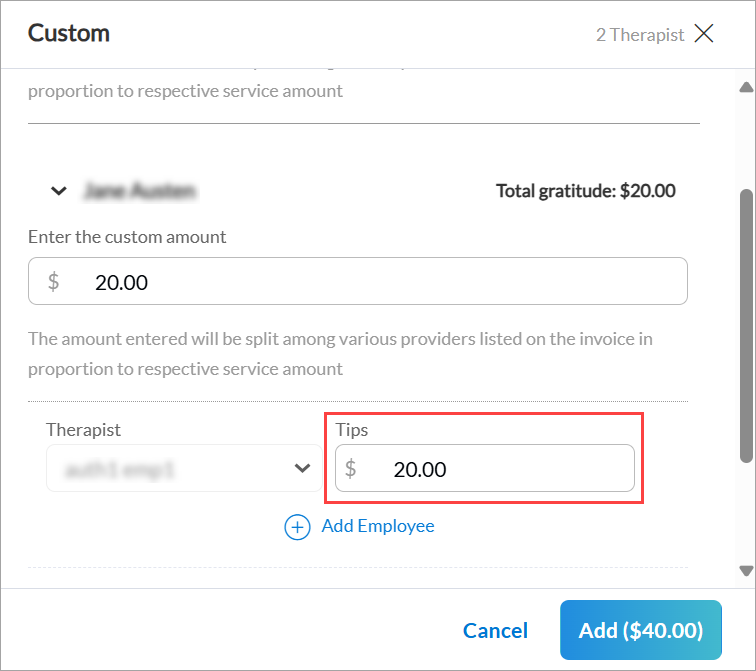
If needed, click Add Employee to allocate tips to additional providers.
Click Add ($X.XX) to confirm the tip amount.
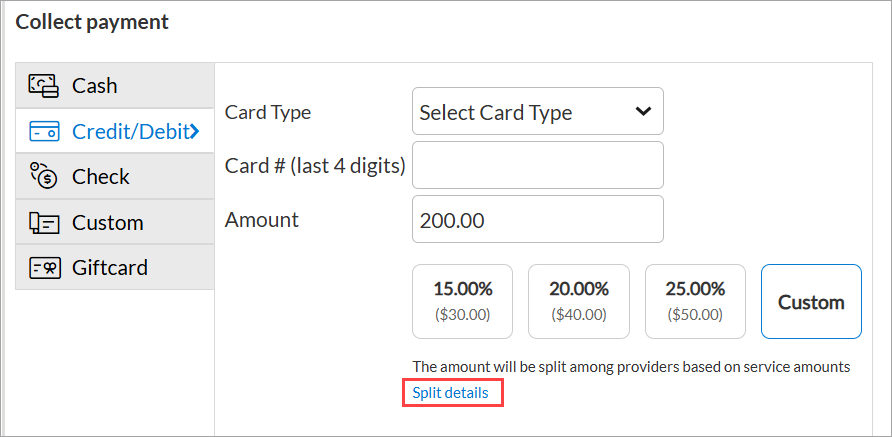
Click the Split details link to view the distribution of tips among service providers.
Note
Tip allocation is available only on the web version and can be enabled upon request. To enable this feature, contact your CSM or Zenoti representative.
Finalize Payment
Click Add Payment to process the transaction and close the invoice.
Impacts and considerations
Enable the Mirror mode on the booking window so guests can review and pay the invoice.
Assign a donation to at least one guest when adding donations to a group invoice.
Collect the tip amount as Cashback and provide cash for tipping when a guest pays with a card.
Click the delete icon next to the invoice number to ungroup a guest from a group bill and allow individual payment.
Access the group bill from the POS screen while viewing an associated invoice.
Issue a full refund and reopen the invoice by enabling the Remove single invoice from group invoice on reopening setting to modify guest details after payment.
Preconfigure suggested tip amounts at the center level.
Add prepaid cards to group invoices only for deposits from online bookings.
In Queue
Mode | Steps | Notes |
|---|---|---|
Advance (Before starting the appointment) |
| CautionDo not close the invoice after you take the payment. Invoice must be closed after the services are rendered and after the appointment is marked as Complete. |
Auto-Pay (After starting the appointment) |
|
|
Checkout (After completing the appointment) Tip |
| |
Group Checkout (After completing the appointment) |
| If the services for the entire group are not completed, you can either choose to wait or proceed with taking the payment. |


Redeem a gift card
Note
This article provides instructions for redeeming gift cards that are sold without tax. If your center applies tax on the sale of gift cards, then read Redeem a Taxed Gift Card.
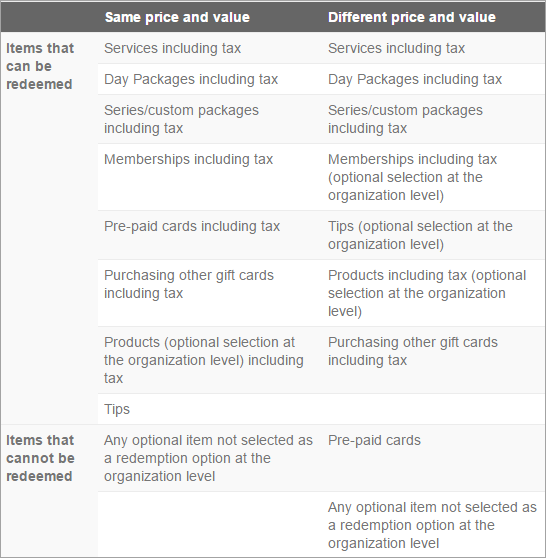
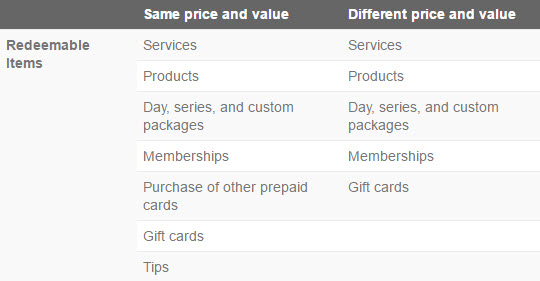
The following gift cards are sold and they are redeemable only for the items configured at the organization level:
Same price and value
Different price and value
The guest can redeem the card only for the items provided in the following table:
Note
If you are unable to apply a gift card in the POS window, verify if your organization allows the gift card to be redeemed for the selected item.
If your organization allows redemption of gift cards across the centers then, ensure your Admin has selected the checkbox: Enable cross center redemptions for gift cards at organization level.
Note
This article provides instructions on redeeming gift cards sold with tax. If your center does not apply tax on the sale of gift cards, then read Redeem a Gift Card.
A taxed gift card is a card purchased with tax included in its sale price. For instance, a guest purchased a gift card for a $50, which included a 10% tax. The guest thus paid, a total of $55 to purchase the gift card.
Gift cards are redeemed by selecting them as a payment option in the point of sale (POS) window. They are sold with the same or different price and value and are redeemable by default only for services and day packages (excluding tax, if any).
Taxed gift cards are sold with one of these options:
Same price and value or
Different price and value
Based on the gift card sold (same or different price and value), the guest can redeem the card only for the items provided in the following table:

Note
You must be aware of the following:
The guest needs to separately pay for the tax component and/or any applicable tips or gratuity.
If you have the setting Allow sale of gift cards inclusive of tax enabled, the guest is not required to separately pay for the tax component.
Example: If a guest pays $100 for service gift card and the tax is charged at 10%, the guest can use the tax gift card to purchase a $100 (inclusive of tax) service.
If your organization allows redemption of gift cards across the centers then, ensure the Admin has selected the checkbox: Enable cross center redemptions for gift cards at the organization level.
Redeem a taxed gift card in the POS window
Launch the POS from the appointment book.
In the guest details section at the top of the POS, enter either the mobile number, email address, first name, or last name of the guest, and select a matching record from the list of suggestions.
If the guest record does not exist in the system, then create a new guest record.
In the lower-left pane of the POS screen, select the service or package and add it to the invoice.
Note
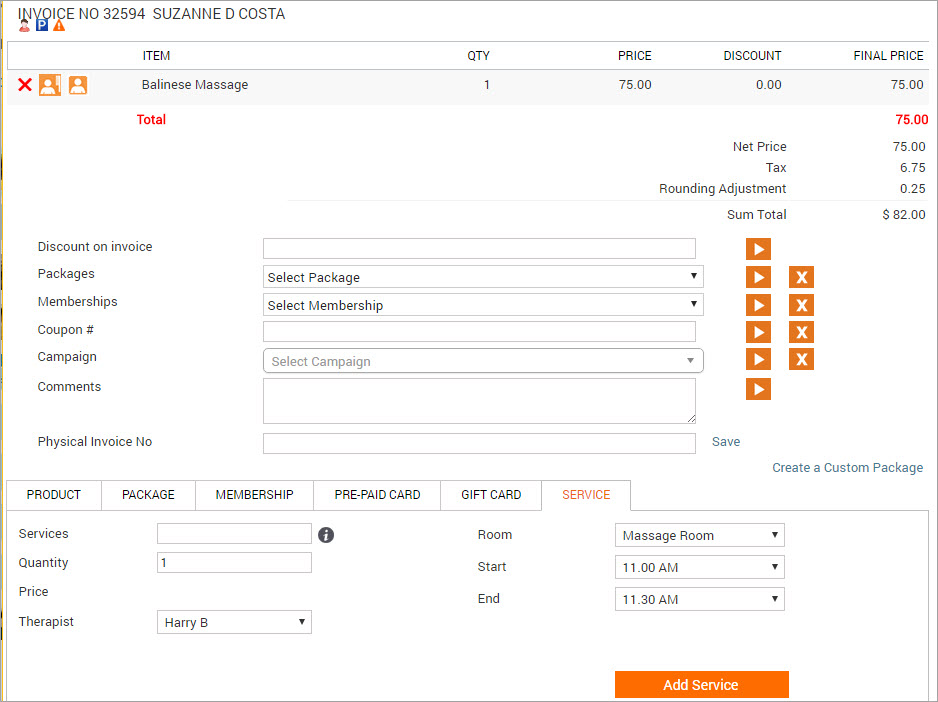
If the service and package include a tax component, then the item invoice shows the sum total (net price + tax) of the service or package selected.
Example: The following image is an example of a taxed service.
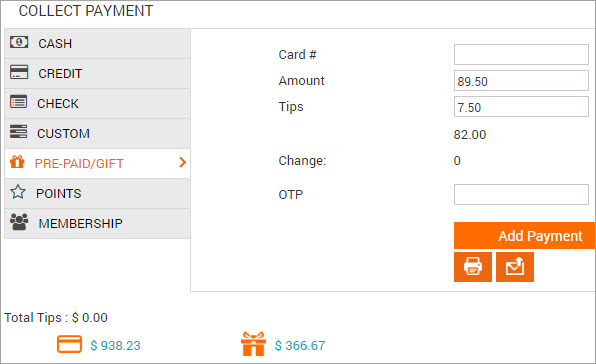
Select PRE-PAID/GIFT as the payment option in the Collect Payment section.
The sum total and any applicable tips (or gratuity) automatically populate in the Amount and Tips fields respectively.
Note
A gift card sold with tax cannot be used to pay for the tax component of the purchased service or package, tips, or gratuity.
Example: Below is an example image of a taxed service.
If no tax or tips (or gratuity) is applicable to the invoice, then proceed to step 8 below.
Edit the Amount field and replace the sum total with the net price amount (net price is the service/ or the package amount before tax.
Obtain this information from the invoice section in the POS window.
Delete the amount from the Tips (or Gratuity) field (if applicable).
Delete the amount from the Service Charge field (if applicable).
Authentication may be required to edit this field.
Do one of the following:
In the Card # field, enter the gift card number manually
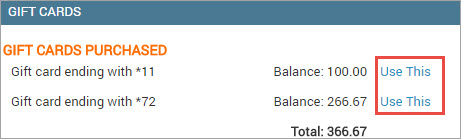
Click the gift card balance link beside the gift icon to select a gift card from the list of gift cards that the guest owns.
Click the Use This link beside a gift card number and the card information automatically populates in the Card # field. Note: If the gift card numbers are masked, refer to section below on: How to apply a masked gift card number to an invoice?.
Click Add Payment.
The payment is shown on the left side as pre-paid Card Redemption.
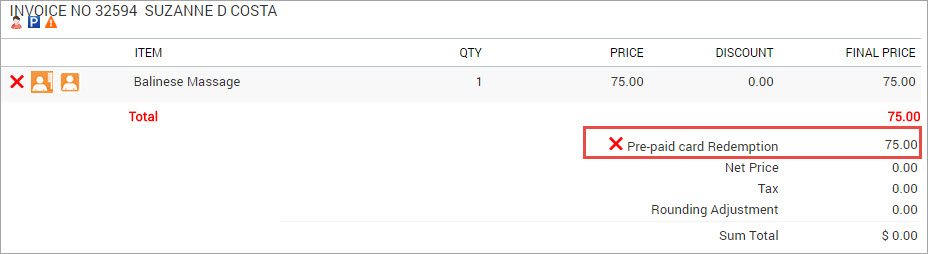
The guest needs to pay any remaining service tax amount, tips and gratuity using another mode of payment. Choose the payment method to take any remaining payment.
Note
The Collect Payment section reflects the pending amount.
Close the invoice.
How to apply a masked gift card number to an invoice?
Based on your organization settings and role permissions, only the last two digits of the gift card number or redemption code is visible and the remainder of the gift card number is masked with an '*' .
If the number is masked, clicking the Use this link does not populate the card number, but opens a field for you enter the gift card number. In such cases, either the guest must provide the number, or you must contact a staff member who has permission to view the complete number (by default, the owner role has the permission enabled).
Note
If the guest or owner cannot provide the number, the gift card cannot be redeemed.
Example:
The following image is an example of masked gift cards. Click the Use This link beside a gift card number.
A field to enter the card number appears.
Enter the complete card number in the field and click Apply.
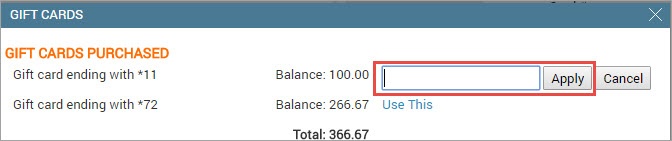
The card information automatically appears in the Card # fields.
Note
This article provides instructions for redeeming gift cards sold without tax. If tax was applied to the sale of the gift card, the card cannot be redeemed for a membership or a membership service.
If your organization offers membership programs, gift card holders can use their card to pay for a membership or a membership service. Gift cards can be redeemed to pay for memberships when price and value is equal on the gift card. If the gift card has a different price and value, it can be used to pay for the membership only if it is selected as a payment option at the organization level.
If tax is applied to the membership during its purchase, then the services associated to it cannot be taxed when they are redeemed. When a guest redeems a service that is part of the taxed membership, any tax applicable to the service is automatically removed from the invoice at the time of payment.
Launch the POS from the appointment book.
In the guest details section at the top of the POS, enter either the mobile number, email address, first name, or last name of the guest, and select a matching record from the list of suggestions. If the guest record doesn't exist in system, then create a new guest record.
In the lower left pane of the POS screen, click the Service tab and select the service that is part of the membership.
Click Add Service to add the service to the invoice.
In the Memberships field, select the membership that applies to this service (the drop-down lists all the active memberships for the guest).
Apply the membership to the invoice.
Any applicable tax component for the service displays below the net price.
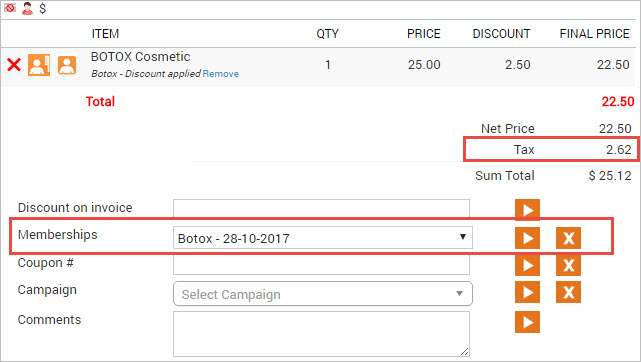
In the Collect Payment section, select PRE-PAID/GIFT as the payment option. The sum total (net price + tax) and applicable tips automatically populate in the Amount and Tips fields respectively.
Edit the Amount field and replace the sum total (net price + tax) value with just the net price.
Enter the Card# manually (or)
click on the gift card balance link beside the gift card icon . The purchase/received gift card information populates in the Gift cards page. Click the Use This link beside the appropriate Gift Card number.
Click Add Payment.
The tax component of the service gets removed from the payment section. It appears as pre-paid card Redemption in the invoice.

Close the invoice.
Redeem gift cards online
If your organization sells gift cards online, then guests can use their gift cards to pay for items they purchase online. However, guests can redeem only the items that are configured at the organization level (read: Redeem a Gift Card).
When guests enter their gift card numbers to redeem an item, the system either recognizes the card and adds it to the payment, or displays the following message: "In this invoice, you cannot pay more than $0.00." This indicates that the gift card cannot be used to pay for the item the guest has selected.
Log on to the website with the username and password.
Click the appropriate category tab such as Gift Card, Services, Products, Memberships, Packages that the guest wants to redeem.
Based on the organization settings, the card can be redeemed only for specific items.
Browse the catalog and select an item to purchase.
Click Buy Now to make payment.
Verify the personal and delivery information displayed.
On the Payments page:
Select GiftCard from the Do you have a drop-down box.
Enter the gift card number.
Multiple gift card numbers can be entered for the purchase.
Enter the amount of the selected item (not the gift card amount, but the price of the selected item).
Click Apply.
Click Confirm Order.
Impacts and considerations
If your organization has enabled the Restrict redemption to the center where it was sold setting, the guest can only redeem gift cards at the same center where they purchased the gift card. For more details, refer to set up gift cards.
If the guest requires to redeem the gift card at a different center even when the Restrict redemption to the center where it was sold setting, is enabled, there is a possible workaround. Please consult your manager or administrator before proceeding. This workaround is helpful when
Guests are required to access restricted gift cards.
Redeem gift card value or privileges at different locations or centers.
The front desk staff can provide a manual discount on the invoice as the exact value of the gift card and then set the expiration date to a past date from the guest profile to expire the gift card. Add necessary comments on the invoice to avoid confusion and notify the center manager or admin about the manual discount to adjust payments for your center.
Zenoti allows you to refund an amount to a gift card that was used to make a purchase. For instance, if a guest used a gift card to pay for a service and then requests a refund, you can process the refund to the same gift card.
Important
You can only refund to the same gift card that the guest had used for the payment.
If the purchase appears as a Redemption, then you cannot process a refund (gift card purchased with tax included in its sales price, appears as redemption when used as a payment method).
Below is an example of how a gift card appears as a redemption:
The refund amount must be equal to or less than the payment made with the gift card. If necessary, you can split the amount between the gift card and other payment methods.
Before you begin
The Allow gift card amount to be refunded to same card option is selected at the organization level.
To learn more read: Setting up Gift Cards.
The employee has the required permission to process a refund to a gift card.
Note: Administrator and owner roles have this permission enabled by default.
Search for an invoice or receipt.
From the I want to menu, select Refund Invoice.
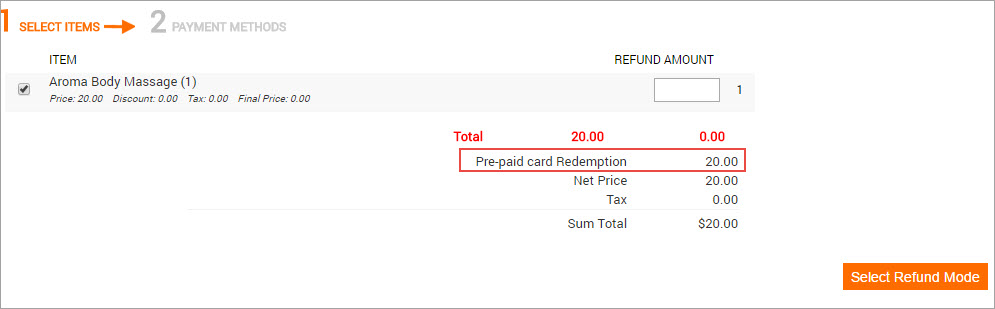
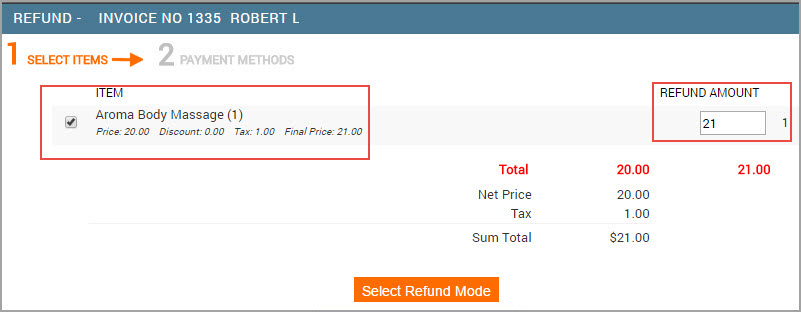
Select the item to refund.
In the Refund Amount field , enter the amount to refund.
If there are many items in the invoice, enter the refund amount against each item selected.
Click Select Refund Mode.
Select the option Refund amount can be split across one or more below options and enter the refund amount in the Paid Amount field adjacent to the Gift card payment type.
Note
The refund amount must be equal to Total Refund Amount entered in the Select Items section.
The refund amount must be equal to or less than the amount used on the gift card.
You can split the refund amount between the gift cards and other payment methods such as cash, check, credit card, custom, or issue a prepaid card for the amount.
Click Refund.
Verify the details and click Close & Print on the invoice.
An Invoice Refund pop-up window opens.
Click OK.
Redeem a prepaid card
What is in this article?
This article provides instructions on the following:
What items are redeemable with a prepaid card?
How to redeem a prepaid card in the POS?
This article is especially useful for front desk employees who process payments when guests use prepaid cards.
What items are redeemable using prepaid cards?
Prepaid cards may be of one of the following types:
Same price and value
Different price and value
Depending on the prepaid card type (same or different price and value), only the items provided in the following table are redeemable, by default.
FAQs
When can prepaid card be applied to an invoice?
Prepaid card can be applied to an invoice when there was a deposit collected and prepaid card created during the booking.
Which invoices can the prepaid card be applied on?
Prepaid card can be applied only on individual invoices.
Can you apply prepaid card in a group invoice on ZMA?
No, you cannot apply prepaid card in a group invoice on ZMA.
If the individual invoice is separated from the group invoice, can the prepaid card still be applied to the group invoice?
No, the prepaid card can only applied to the individual invoice, and not to the group invoice.
Redeem a Prepaid Card Online
Note
The aim of this article is to assist guests in redeeming their prepaid cards online. Guests must perform all the actions themselves.
As a guest, you can use prepaid cards to pay for any service or product purchased from your center’s webstore.
To redeem a prepaid card online:
Log on to the website with your username and password.
Click the appropriate category tab such as Gift Card, Services, Products, Memberships, or Packages.
Browse the catalog and select an item to purchase.
Click one of the following options:- Add: Click to add the item to the shopping cart and continue browsing the website for other items.- Buy Now: Click to make the payment.
Verify the personal and delivery details displayed, and click Continue.
Do the following on the Payments page.a) Select Gift Card from the Do you have a drop-down menu.b) Enter the prepaid card number.c) Enter the amount to pay for the selected item.d) Click Apply. Note: Guests can pay using multiple prepaid card numbers.
Click Confirm Order.
 |
Manage prepaid card deposits for guests
In Zenoti, prepaid cards can only be redeemed under the same guest profile that originally purchased the gift card. The system will not allow a direct transaction from a prepaid card if an appointment is booked under one guest's name but the card deposit is owned or purchased by a different guest profile.
However, as a workaround, you can use the prepaid card to purchase a gift card under the new guest profile. Please consider taxes and other fees associated with your business or region that may reflect as a difference in the final amount after the conversion. For example, If Guest A booked an appointment for Guest B and the gift card deposit is under Guest A's profile, follow these steps:
Open the POS for Guest A's profile.
Sell a gift card to Guest B using the prepaid card from Guest A's profile.
Apply the gift card under Guest B's profile to pay for their booking or appointment.
Collect recurring membership dues
Using a gift card
Guests can use the balance in their gift card to pay towards the recurring membership dues in Zenoti. If the balance in the gift card becomes zero or if the card expires, Zenoti automatically uses the payment mode configured in the Default Payment Type to collect the membership dues.
For example, the guest wants to pay the recurring membership due of $40 per month using their gift card that has a balance of $100 from January. When the balance in the gift card becomes $20 in March, Zenoti collects the remaining dues using the card on file. When there is no balance in the gift card, the card on file becomes the default payment mode to collect dues for the membership.
Open the guest profile page for a guest.
The General tab appears.
Navigate to the Memberships tab.
The list of memberships that your guest has purchased appears.
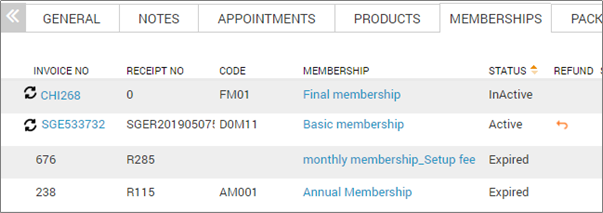
Select a membership.
The membership details page appears.

Click Use Gift Card/Prepaid Card to pay for Membership dues.
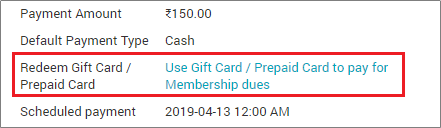
The Use Gift card/Prepaid card window appears with the Gift Card option selected by default in Collect Membership dues.
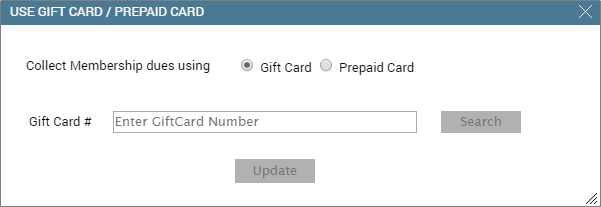
In the Gift Card # field, enter the gift card number the guest provides.
Note
You can only use gift cards/prepaid cards sold in the same center where the membership was sold. To use cards from different centers, cross-center redemption has to be enabled.
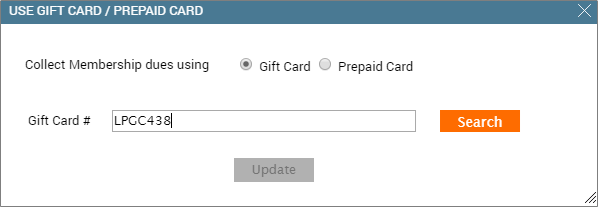
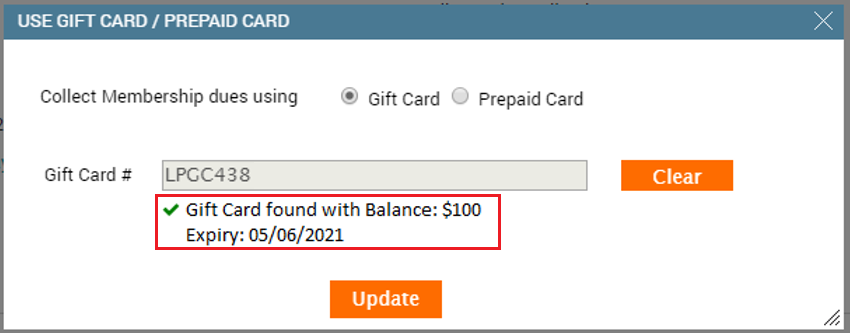
Click Search.
Zenoti shows the balance and expiry date of the gift card under the Gift Card# field.
Note
You cannot use a gift card with tax for a guest to pay the membership dues.
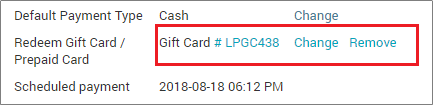
Click Update.
The gift card number appears in the Membership details page and indicates that it is used to pay the membership dues.
Using a prepaid card
Guests can use the balance in their prepaid card to pay towards the recurring membership dues in Zenoti. If the balance in the prepaid card becomes zero or if the card expires, Zenoti automatically uses the payment mode configured in the Default Payment Type to collect the membership dues.
For example, the guest wants to pay the recurring membership due of $40 per month using their prepaid card that has a balance of $100 from January. When the balance in the prepaid card becomes $20 in March, Zenoti collects the remaining dues using the card on file. When there is no balance in the prepaid card, the card on file becomes the default payment mode to collect dues for the membership.
Open the guest profile page for a guest.
The General tab appears.
Navigate to the Memberships tab.
The list of memberships that your guest has purchased appears.
Select a membership.
The membership details page appears.
Click Use Gift Card/Prepaid Card to pay for Membership dues.
The Use Gift card/Prepaid card window appears with the Gift Card option selected by default.
Select Prepaid Card.
A list of available prepaid cards for a guest appears.
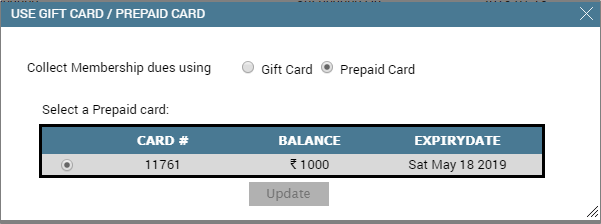
Select a prepaid card according to the guest’s preference.
Note
You can only use gift cards/prepaid cards sold in the same center where the membership was sold. To use cards from different centers, cross-center redemption has to be enabled.
Click Update.
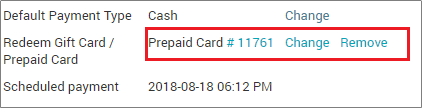
The prepaid card number appears in the Membership details page and indicates that it is used to pay the membership fees based on the payment cycle.
Apply product discount for the guest
A membership may offer service discounts, membership credits, product discounts, service credits (free services), or a combination of these. If a guest has a membership that includes a product discount, Zenoti applies the discount to the invoice while taking payment.
Product discount defined for a membership
If your guest’s membership has a product discount defined, the discount is automatically applied to the invoice, depending on the type of membership.
Example: You sell guests a Gold Premium Membership that offers a 10% discount on the product, Sea Weed Hair Shampoo.
Assume that the guest wants to use this membership. In this case, Zenoti automatically applies a 10% product discount in the invoice, when the guest purchases Sea Weed Hair Shampoo.
Conditions to apply product discounts
You can apply a product discount to an invoice, only when the following conditions are met:
Guests should have a membership that offers discount for the product the guest wants to purchase.
Guests should have an active membership.
If the membership is expired and the organization setting does not allow benefit redemption after membership expiry, guests cannot use product discount.
Guest’s with frozen membership cannot use discounts if the organization settings does not allow benefit redemption.
How are product discounts applied to an invoice
Product discounts are applied in one of the following two ways:
Product Discount Applied Automatically: Automatically applied by Zenoti when a guest uses the membership to apply product discount on a purchase.
As long as the membership has the product benefits defined, Zenoti automatically applies the product discounts to the invoice for the guest.
If your guest has enabled Autopay, the product discount is automatically applied in the invoice and the guest is charged with any pending amount when the front desk selects Complete Autopay.
Product Discount Applied Manually: Manually applied by the front desk by selecting a membership type to apply the product discount.
Usually, Zenoti automatically applies the product discount to an invoice if a product discount is set up for the guest’s membership.
In some scenarios, the front desk may want to select a different membership that allows discount on products purchased by the guest or if the front desk has accidentally deleted the auto-applied membership, and they need to manually apply discount to the invoice.
Click the Appointment block and select Take Payment from the menu.
The Invoice page appears.
In the Invoice page, select the product the guest wants to purchase.

Select a membership from the Membership drop-down list.
Click the Apply button.
The product discount is applied and appears on the invoice.
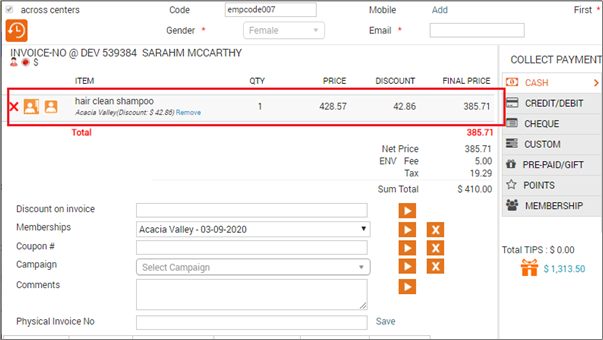
Hint: To remove membership and add another, click Remove and repeat steps 3 to 4.
Collect payment and close the invoice using one of the following options:
Close and Print (Zenoti closes the invoice and generates a print preview of the invoice)
Close and Email (Zenoti sends out an email to the registered email address of the guest).
Sell and apply benefits for membership in one invoice
Usually if a guest likes a particular service (say, Body massage), while taking payment, the front-desk staff can upsell a membership (recurring or non-recurring) in the same invoice along with the service.
Using Zenoti, the front-desk staff can add the appropriate membership directly to the service invoice and then redeem the benefit from it for the guest. This helps the guest buy the service with the membership benefit which can include reduced cost for the service taken or product discounts.
Important
Make sure you have enabled the setting Enable Redemptions on Open Memberships at the organization level.
Click an open time slot of a service provider, and then select New Appointment.
Specify guest details
Add service for a guest
Click Save to complete the booking, or click Take Payment if you want to proceed to the payment directly.
Zenoti adds the service to the invoice.
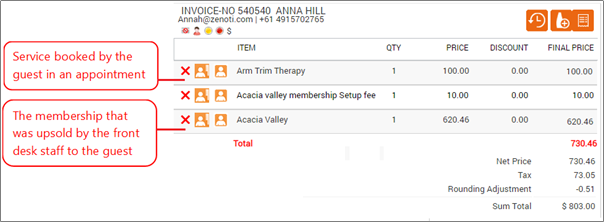
Upsell a membership by selecting the Membership tab.
Click Add Membership.
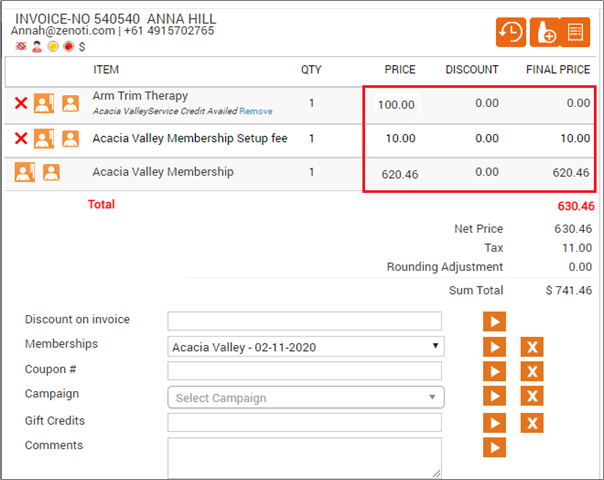
The membership is added along with the service in the appointment.
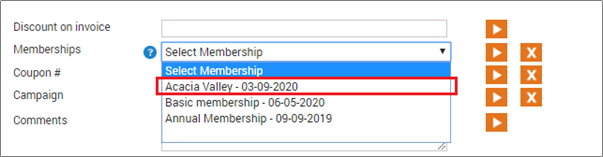
Note
The ‘Acacia Valley’ membership includes the ‘Arm trim therapy’ service.
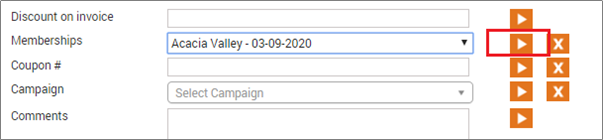
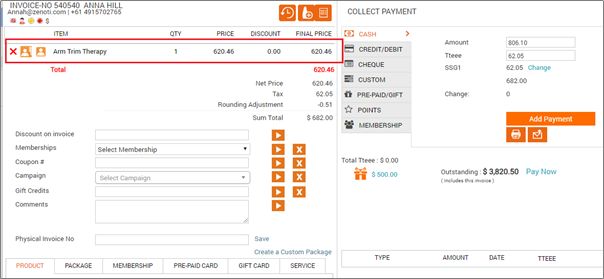
Click Memberships.
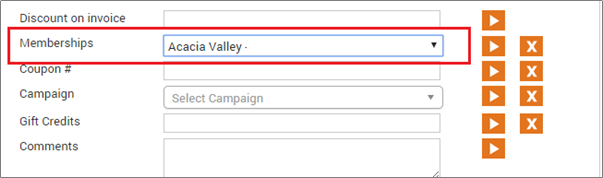
Select the membership from which you want to redeem the benefits and click Apply button.
Since the service that the guest had selected is part of the membership, Zenoti automatically applies the service credits to the invoice.
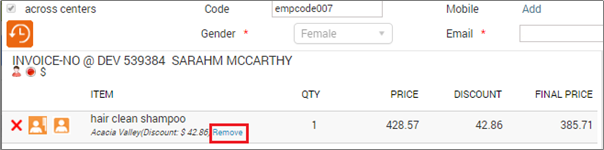
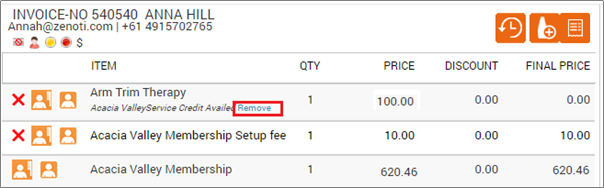
Note
If you wish to remove the membership and its benefits, click Remove for the membership in the invoice.
You can optionally do the following while selling the membership:
To apply any discount, enter the amount in the Discount on Invoice box and click Apply next to it.
If the customer has a cashback or a custom coupon which is redeemable on the membership, enter the coupon number in the Coupon # field and click Apply.
If there is any active marketing campaign going on for the membership, click Campaign list and select the campaign.
Note
If you apply any of the above on the first recurring payment, the same offer applies to all the remaining membership drafts. For example, if you applied a discount of $50 on the first payment of a $300 recurring membership, all the following invoices for recurring payments would be generated for $250.
FAQ
Is this feature available for both recurring and non-recurring memberships?
Yes. You can sell and redeem benefits of recurring and non-recurring memberships in one invoice.
Can I apply membership discounts while redeeming membership benefits?
Yes. You can apply discounts.
Can I apply membership benefits in the invoice for a membership which will be active on a future date?
No. To apply membership benefit for a guest, the membership must be active.
If Enable Redemptions on Open Memberships is selected, can I redeem credits?
No. You can use the available service credits and discounts though.
Why am I not able to apply a membership benefit to an invoice?
Apply transferred package service credits for recipients
If a guest is a recipient of a package service credit, the front desk can book the service (that was transferred) so that the recipient redeems the service credits.
Book the service (that was transferred) from the Appointment Book bottom panel, Booking Wizard, or the POS.
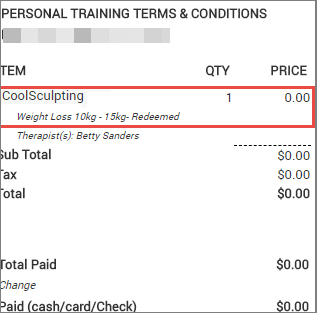
On the Take Payment page, notice that Zenoti automatically applies the benefit where applicable. The cost of the service appears in the Price column.
If Zenoti does not apply the package benefit automatically, select the relevant package and click Apply (orange button) next to Packages. You redeem the service credit by doing so.
Once you redeem the service, the Price appears as zero in the Collect Payments section (since the guest is a recipient of the service credit).
Close the invoice (Print or Email the invoice, as required).
Note that the price appears as zero in the invoice.
Change or remove the service credits from an invoice
Guest prefers not to use credits in this visit (Remove the service credits)
Sometimes, guest may prefer to pay for the service instead of using up service credits.
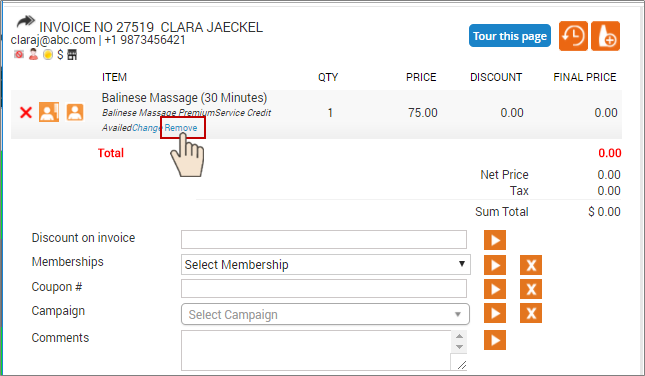
Example: John is a primary member and he added his friend Marie as add-on member so that she can get member pricing for services. Marie used a service offered as a membership benefit but preferred to use just the discount and not the service credits. In such a scenario, remove the redemption so that service would be discounted.
Click Remove (link below the membership guidance text). Zenoti removes the membership service credit and shows the list price of of the service.
Proceed to the Collect Payment section and click Add Payment.
Close the invoice using one of the following options: Close and Print option (Zenoti closes the invoice and generates a print preview of the invoice) or Close and Email option (Zenoti sends out an email to the registered email address of the guest provided the guest has not unsubscribed from our notifications).
Guest wants to use the credits partially (Change the service credits)
Sometimes, guests might prefer to use only few service credits in this visit, and pay the balance amount by cash, check, custom mode, or card.
Important
Options for partial credits such as 0.25, 0.5, and 0.75 are available only when your Administrator has selected ‘Enable partial redemption using service credits’ checkbox in the Organization-level Membership settings).
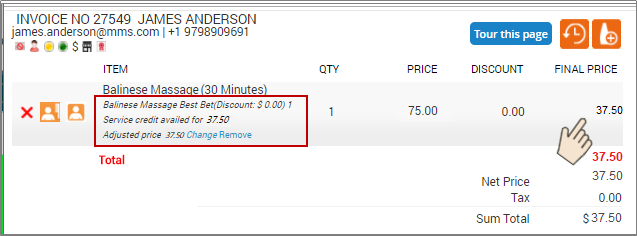
Example: Assume that the guest has ‘Balinese Massage Best Bet’ membership that offers one '30-min Balinese Massage' as a service credit. The guest has taken a '30-min Balinese Massage' but, would like to use only 50% of the service credit offered by the membership and pay the balance price.
To apply partial credits to the invoice:
Click Change (below the membership guidance text) in the invoice.
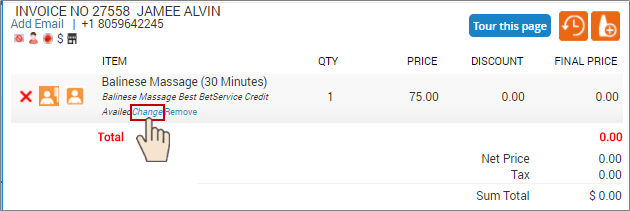
The Service Credits box appears.
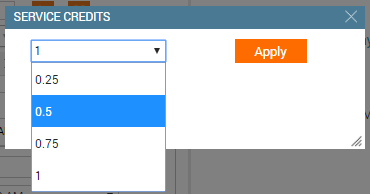
Select the proportion of credit the guest would like to use from the Service Credits drop-down list. (As per our example above, select 0.5 to mean 50% of the credits).
Click Apply.
As per our example above, 50% of the price of the massage comes to $37.5. Zenoti deducts $37.5 from the invoice and shows the Final Price of the service.
A guidance text below the service name in the invoice, explains the applied service credit.
Under Collect Payment section, select the preferred payment option.
Click Add Payment.
Close the invoice using one of the following options: Close and Print option (Zenoti closes the invoice and generates a print preview of the invoice) or Close and Email option (Zenoti sends out an email to the registered email address of the guest).
A guest with a membership is also eligible for a discount from a campaign
Guests can get the double benefit of using service credits offered by a membership and also any other discount they are eligible for, from a campaign.
Example: Assume a guest has taken a ‘120 min-Balinese massage’. While generating the invoice, guest prefers to use two ‘30 min-Balinese massage’ service credits offered by a membership. The guest shows a discount offer received from an SMS/Email campaign and requests you to apply the discount too. In this case, you can pass on both the benefits to the guest.
To apply double benefits of a discount and service credits to an invoice:
In the Invoice page, ensure that the service credits from the membership are already applied to the service. If not, manually apply the membership.
Select a campaign from the Campaign drop-down list.
Click the Go icon.
The discount from the campaign is applied on the price, after service credits are applied.
Under Collect Payment section, select the preferred payment option.
Click Add Payment.
Close the invoice using one of the following options: Close and Print option or Close and Email option.
Apply membership service credits
Service credits are applied in two ways:
Automatically applied at checkout when a guest has enough service credits in the membership and redemption on open membership is allowed.
Manually applied by the front-desk staff when enough service credits are not available for the guest to fully redeem the service received.
The service credits are not applied automatically for memberships that are redeemable only at the centers where it was purchased. So, the front desk must apply the credits manually in the invoice.
Note
Membership credit amount can be used only to pay for products and services and cannot be used when invoice amounts in decimals are rounded off.
Apply service credits manually to an invoice
Usually, Zenoti automatically applies the service credits to an invoice if the guest has a membership with sufficient service credits. There could be scenarios when auto-apply does not work and you will have to manually apply the service credits to the invoice.
When the membership has insufficient service credits and does not have any service equality template.
When the membership has enough service credits but does not have a service equality template.
When a guest has multiple memberships that offer service credits for the same service.
Example: Assume a guest has a ‘Toned Face Skin’ membership that offers 4 service credits for ‘20-min Facial’ and does not have a service equality template associated. If the guest takes a ‘40-min Facial’ then, Zenoti does not automatically apply the service credits to the invoice. You need to apply service credits manually.
When a guest has multiple memberships and the membership that Zenoti applied automatically has fewer benefits.
Example: Assume a guest has a ‘Proud User’ membership, which is due to expire soon and gives a discount of 5% on all services. The same guest also has a ‘Balinese Best Bet’ membership that offers service credits for Balinese massage. The guest avails of the Balinese massage service, and Zenoti applies the ‘Proud User’ membership automatically to the invoice as this membership is due to expire soon. In such a case, you can remove the ‘Proud User’ membership and apply the ‘Balinese Best Bet’ membership manually.
If you have removed the auto-applied membership from the invoice by mistake, you can manually apply the membership back to the invoice.
Right-click the Appointment block and click Take Payment. The Invoice page appears.
On the Invoice page, select a membership from the Membership list.
Click Add.
Under the Collect Payment section, select the preferred payment option of the guest.
Click Add Payment.
To complete the payment, click Submit to complete the payment.
Close the invoice using one of the following options: Close and Print (Zenoti closes the invoice and generates a print preview of the invoice) or Close and Email (Zenoti sends out an email to the registered email address of the guest).
You can use membership credits to buy prepaid cards.
On the Invoice page > Prepaid Card tab, enter the prepaid card details.
Click Add.
Under the Collect Payment section, click Membershipand select a membership from the list.
Click Add Payment.
On the Membership Redemption window, specify the amount you want to pay for services, products, and prepaid cards .
To complete the payment, click Submit .
Close the invoice.
Apply service credits to an older appointment
You can apply service credits of a newly purchased membership, to a service taken 2 or 3 days ago, by backdating the sale date of the membership under the following conditions.
Conditions
If the membership is already redeemed you cannot backdate the sale date.
You must have the Manager role to change the sale date. Contact your Admin or Center owner for the permissions.
Example: Assume a guest has a monthly membership that is charged on the 18th of every month. The guest requested you to apply the service credits on the 16th. If the guest prefers to backdate instead of paying out of pocket then, follow these steps to backdate the membership payment date.
From the Client History page (Appointment Block > View Client/Guest History > Membership tab > Click Invoice No.).
In the invoice, from the I want to menu, select Edit the Invoice.
Change the Sale Date and Payment Date to the date of appointment.
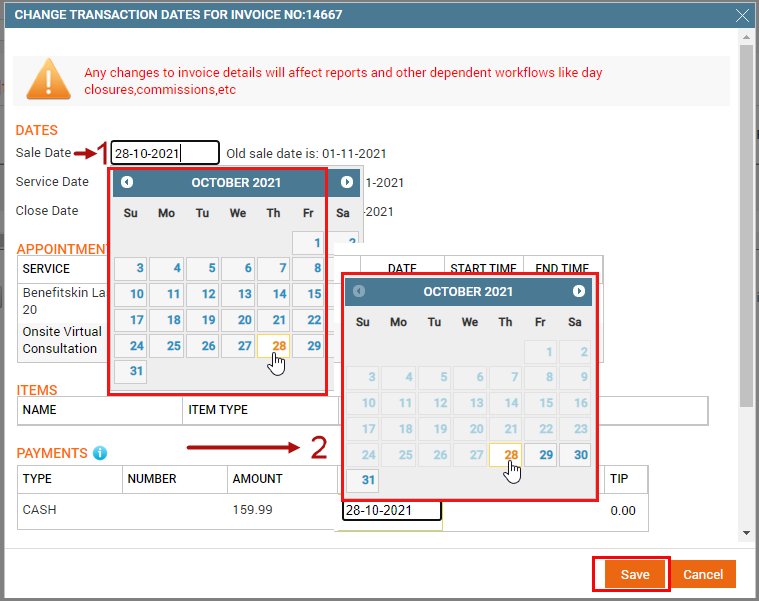
Click Save.
A warning message appears that says ‘Changes will override existing invoice details. Do you want to continue?’ Click OK to continue. Close Date of the invoice is automatically updated to the Sale Date.
Click the appointment block and select Take Payment from the menu.
In the invoice, service credits are auto-applied. If not then, apply the service credits manually to the invoice.
You can also sell and apply membership benefits in a single invoice, when appropriate settings are enabled.
Apply service credits to a previous appointment
You can apply service credits of a newly purchased membership, on an invoice that is generated 2 or 3 days ago, by advancing the purchase date of membership to the date when you used the service under the following conditions:
The membership was never applied on any invoice to date (from the date of purchase).
You should have the Manager role for your center to advance the Purchase Date. Contact your Admin or Center owner for the permissions.
Example: Assume a guest had a Balinese massage for 60 min on Jan 15, 2018, and is sure of purchasing a membership in 2 to 3 days. The guest purchased the ‘Balinese Massage Premium’ membership on Jan 18, 2018, and requested you to apply the service credits to the invoice of the Balinese massage service availed earlier.
Go to the previous invoice.
There are two ways to go to the previous invoices:
From the Client History page (Appointment Block > View Client/Guest History > Membership tab > Click Invoice No)
From the Sales Report page.
Select I want to ‘Edit the Invoice’ option.
Change the Sale Date to a past date (as per the date of the previous appointment).
Change the Payment Date to be the same as Sale Date.
Click Save.
A warning message appears that says ‘Changes will override existing invoice details. Do you want to continue?’ Click OK to continue. Close Date of the invoice is automatically updated to the Sale Date.
Verify the membership Purchase Date by opening the View Client/Guest History page again. The membership Purchase Date is automatically updated to the Sale Date.
Click the previous Appointment block and select Take Payment from the menu.
In the Invoice, if the membership is not automatically applied, select the membership name from the Membership drop-down list and click the Go icon. Zenoti applies the Service credits to the invoice.
Take payment and close the invoice using any one option: Close and Print or Close and Email.
Apply service credits using the hybrid model
If the member has unused service credits for a membership, these will be shown when the membership is applied. To apply the dollar value of the service credit, enter the number of credits to redeem in the QTY to Redeem column. Then click Apply.
Note
Zenoti will allow the partial redemption of a service (for example, a 120-minute massage) by using another credit (for example, a 60-min massage). However, you cannot split a credit. For example, you cannot use half a credit to pay for a service. If no redemption is possible using both these methods, and hybrid membership is enabled, then Zenoti allows you to apply the hybrid membership and use the dollar amount of the service credit.
Important
When you are redeeming a service using existing service credits, the benefit service must be associated with the center where a different service is being redeemed. For instance, if a membership includes a 90-minute service as a benefit and you attempt to redeem it for a 30-minute service, the 90-minute benefit should be associated with the center where you are redeeming the 30-minute service.
When you apply service credits in the hybrid model, the order of applying redemption and payment is important.
The recommended order of payment types or redemption to be followed:
Loyalty points (if any)
Campaigns
Membership (hybrid model) or Gift Card
Custom, Cash, or Cheque payment
Credit Card payments
This is because the payment that is applied first gets apportioned on the existing items on the invoice and leaves the due amount to be less than what you could have redeemed had you used redemption before the card payment.
Take payment for no-shows and cancelations
On Appointment Book, on the views bar, click the three dots.

Select View cancelled/no shows.

On the appointment block, right-click and select Take payment.
Important
You can also use package benefits to pay no-show and cancellation fees. Zenoti applies the package benefits automatically. If a package is not selected automatically, contact your Administrator.
Collect no-show or cancellation fee set by your business.
Close the invoice.
Redeem package benefits
When guests book services that are part of a package, Zenoti automatically applies the package benefits to the invoice during checkout.
When the front desk staff clicks Take Payment from the context menu, the invoice page appears and shows how Zenoti applies the package benefit automatically.
Sometimes, the front-desk staff may want to manually apply a package in the invoice and redeem the benefit; they can also waive other fees for the guests during subsequent package redemptions. For taking payments manually, follow the instructions given below.
On the Appointment Book, select the required booking.
From the context menu, select Take Payment manually.
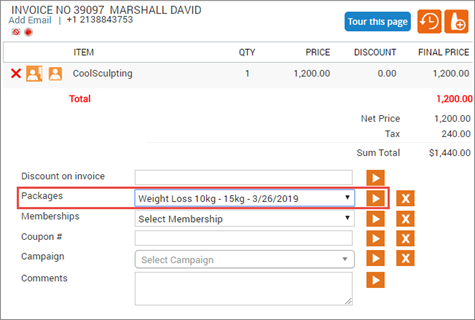
From the Packages list, select the required package.
To utilize the package benefits, click Apply.
To collect additional payments, select the payment method.
Click Add Payment.
Click Close Invoice.
Impacts and considerations
You can also use package benefits to pay no-show and cancellation fees. Zenoti applies the package benefits automatically. If a package is not selected automatically, contact your Administrator.
If the package was created and sold on the same day, Zenoti cannot apply the package benefits in the invoice generated on the same day. To apply benefits, select the previous date as the redemption date.
When cross center redemptions for packages are disabled
If you disable cross-center redemptions for packages, refer to manage cross-center payments, the following changes take place:
When you open the Appointment Info panel, the Package indicator appears only if the guest purchased a package at the current center and the package is currently active.
The appointment block of the guest shows the package indicator or icon only if the guest purchased a package at the current center and the package is currently active.
When you click the package link in the Appointment Info panel, all the active packages of the guest appear. However, the option to redeem the package only appears if the guest has purchased the package at the current center.
If a guest avails a service or purchases a product that is part of a package, when you open the POS screen to collect payment, the package is auto-applied only if the package was purchased at the current center.
The POS screen shows only the active packages that are purchased by the guest at the current center.
If you allow partial payments for packages, guests can make partial payments for packages only at the center where they originally purchased the package.
Honor package benefits for past expiration date
Front desk staff can honor the package benefits for a guest even when the expiry is set for a past date.
Access the guest profile from the POS screen.
You can also access the guest profile from the Guests section.
On the guest profile, navigate to the Packages tab.
All packages aligned to the guests are listed here. Select the required package.
To modify the expiry, click Expiration Date and update the field with a future date.
To confirm the date change, click Ok.
Use cards when cross center redemptions are disabled
When cross center redemptions for prepaid cards is disabled
If you disable cross center redemptions for prepaid cards, the following changes take place:
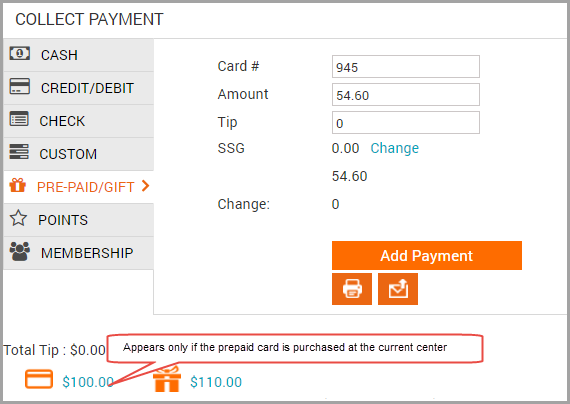
You can collect payment using a prepaid card only if the prepaid card was purchased at the current center.
The prepaid card icon in the Collect Payment section of the POS screen appears only if the guest has a valid prepaid card and if it was purchased at the current center
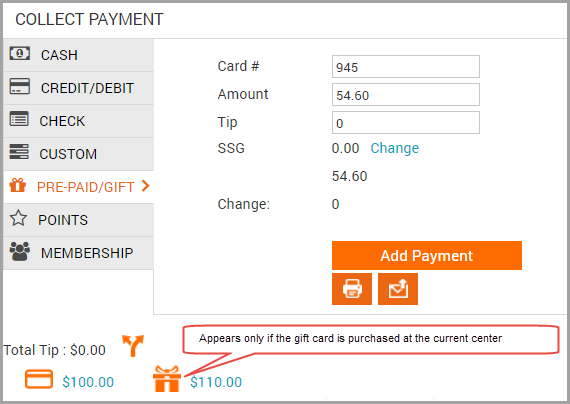
You can collect payment using a gift card only if the gift card was purchased at the current center.
The gift card icon in the Collect Payment section of the POS screen appears only if the guest has a valid gift card and if it was purchased at the current center.
When cross center redemptions for gift cards is disabled
If you disable cross center redemptions for gift cards, the following changes take place:
You can collect payment using a gift card only if the gift card was purchased at the current center.
The gift card icon in the Collect Payment section of the POS screen appears only if the guest has a valid gift card and if it was purchased at the current center.
Guests can redeem gift cards online only if they are purchasing items from the same center that issued the gift card.
Note
If you disable cross center redemptions for gift cards, corporate-issued gift cards will not work. Hence, you must sell the gift cards only at the individual centers and not online.
Invoice level actions
If you want to… | |
|---|---|
Redeem a benefit |
|
Apply a campaign | Select the campaign and click the Apply icon. If you select a voucher campaign, the Voucher code field will appear, in which you can enter the voucher code. |
Apply a coupon/ voucher | Enter the code in the Coupon/ Voucher box and click the Apply icon. If you have multiple voucher campaigns, then entering the voucher code will auto select the campaign without you having to manually scroll through the list of campaigns from the Campaigns drop-down field. Note
|
Give discount on an item | Click in the Discount box and enter the desired discount. |
Give discount on all items | Enter the amount in the Discount on invoice box and click the Apply icon. NoteTo give a percentage discount, enter the amount and enter ‘%’. |
Add another item to the invoice |
|
Take outstanding payment | Click Pay Now to take payments for all invoices, including the current invoice. |
Split tips | For a group bill, you can split tips among therapists by clicking the split icon. |
Add discount for an individual invoice |
|
View group invoice comments | On the individual invoice, refer to the Comments for Group Invoice box. |
Store card details | Select the Store checkbox. |
Add donations | In the Donation box, enter the donation amount, and then collect payment. NoteYou can collect donations using only cash, credit card, or custom payments.
ImportantFor each donation, you must assign the donation to a donation type and to an employee. You can see the unassigned donation amount and add details accordingly. Unassigned amount = Collected amount - Assigned amount |