Purchases
Purchase a membership online
Important
Ensure you have set up the required configurations and enabled the membership sales in the Webstore catalog, to allow your guests to purchase a membership.
The guest can purchase a recurring membership only if the card is saved on file and the payment processor is enabled.
Navigate to the Webstore.
To purchase a membership online as a guest, click Membership.
The text for the membership icon on the main menu is configurable as per the business requirements.
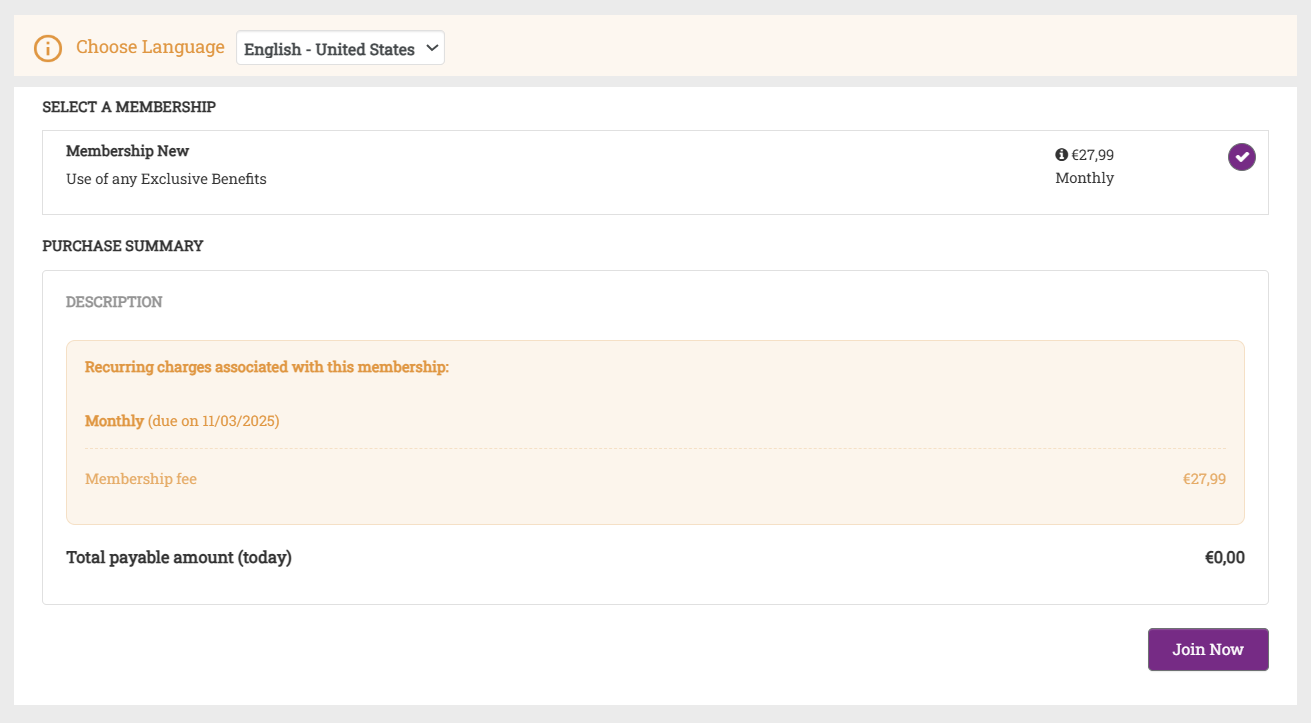
Select a membership from the available list.
Memberships with future start dates are also listed. Guests can only redeem the benefits of these memberships on or after the start date.
Note
If a guest has redeemed all available service credits under their membership, the Webstore immediately displays the actual service price instead of the membership price. This behavior applies throughout the guest journey, starting from the service catalog view and continuing through checkout.
Certain memberships might require the guest to agree to your terms and conditions.
To read and agree to the terms your guest can click Accept Terms and Conditions link.
If the guest does not read the terms and conditions on this page, then after selecting a membership plan, the guest will see a pop-up of the terms and conditions.
To proceed, the guest must click Agree.
The cart is updated with membership and price information click Continue to Checkout.
If the guest is not already signed in, enter the email id or mobile number and password.
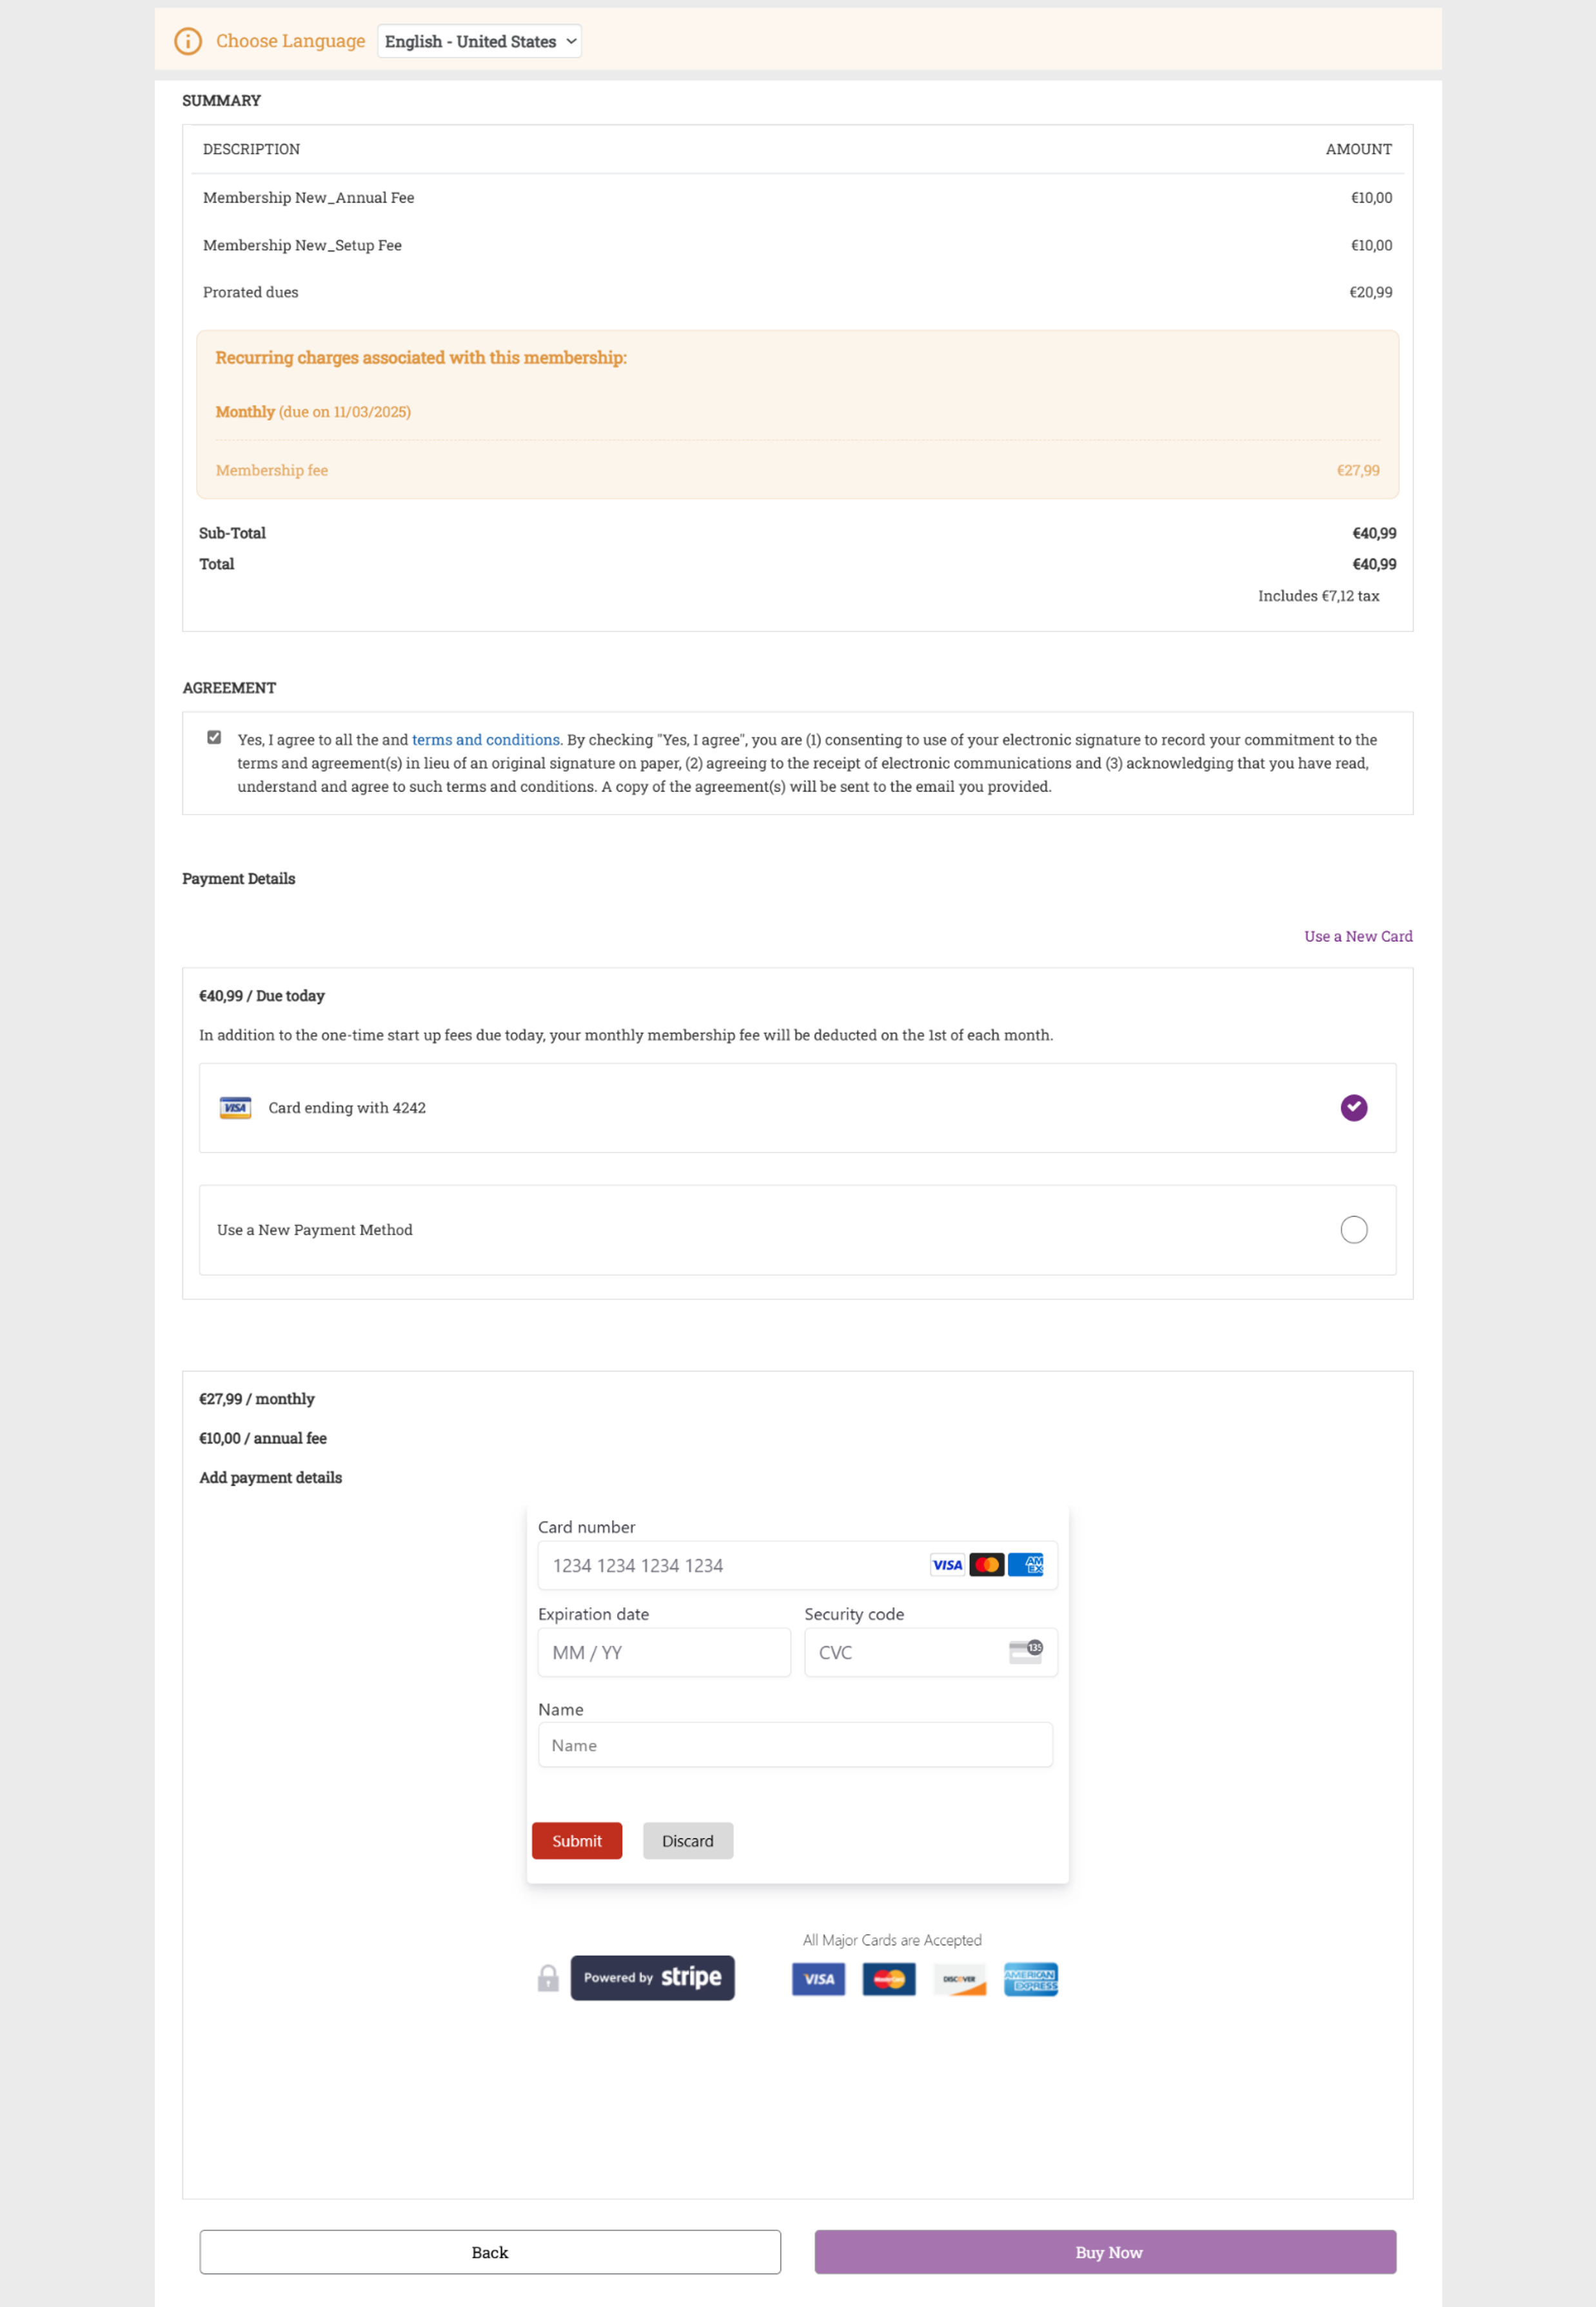
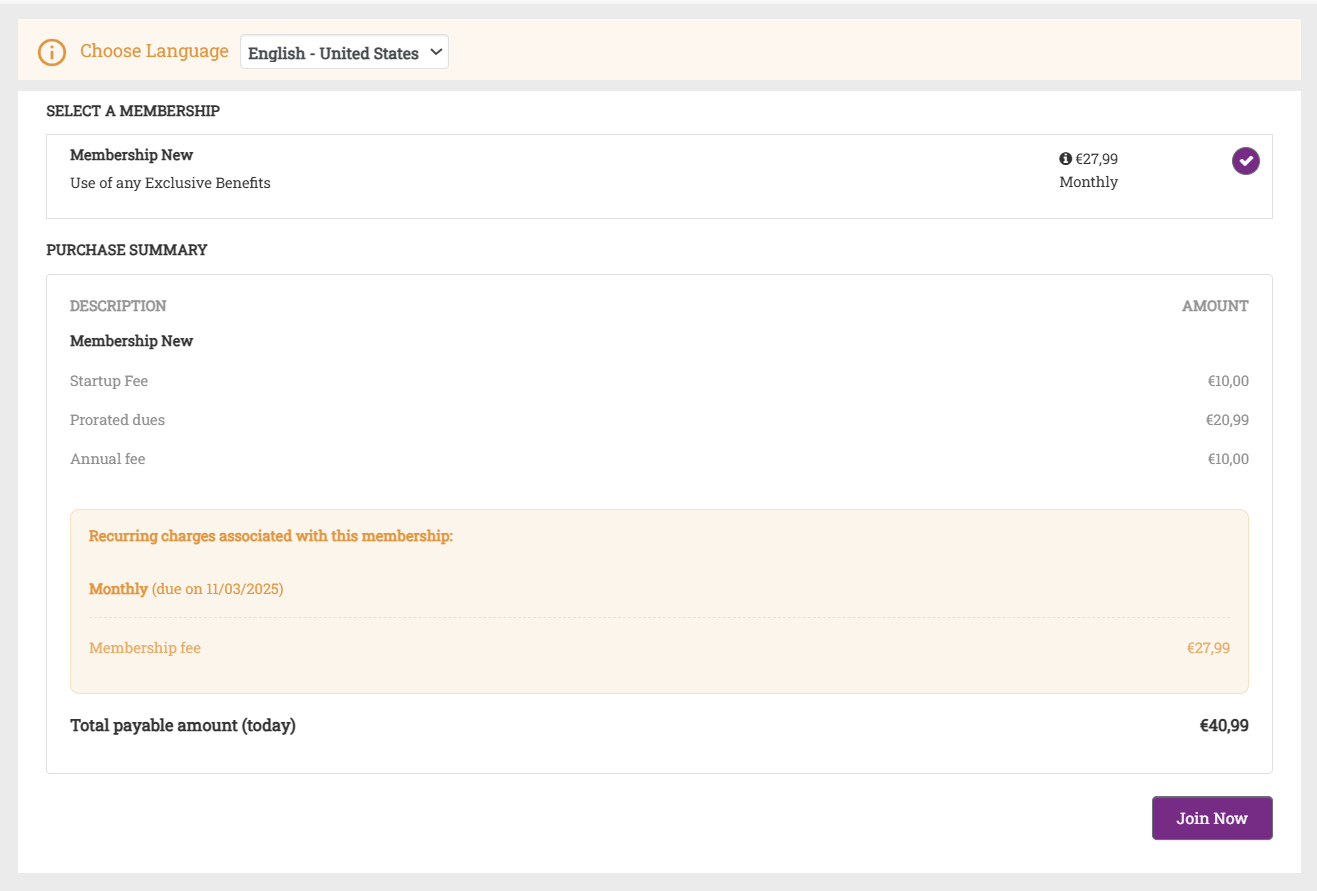
Verify the required details in the summary page and provide the billing details.
The invoice shows all the applicable fees for the membership. If the membership includes an annual fee then the annual fee is displayed as a line item in the invoice.
Click Next.
Optionally the guest can add a new payment method.
Click Save Card to save the payment method.
Click Place Order.
To send a copy of the T&C to the guest in an email as a PDF, the Memberships Terms and Conditions Guest Copy template, in the Mobile/Webstore section, should be enabled at the organization level.
Important
When a guest accesses a private membership via a shared group invite link, they can purchase it directly on the Webstore. The membership does not appear in the general Webstore catalog — access is only through the shared link.
Book a day package online
A day package combines services guests can book at a discounted price, thus encouraging higher average invoice prices. Unlike series packages, where services are spread out over multiple visits, all the services included in the day package happen in just one visit. For instance, you might get a facial, a massage, and a pedicure all in one package.
Example: You can offer a day package with a manicure ($25) and pedicure ($25). Normally, they'd cost $50, but you can sell them together for $42. Similarly, you can create a day package that combines a scrub ($70), manicure ($25), pedicure ($25), and a deep tissue massage ($60), normally totaling $180. By offering this package for $160, you can encourage guests to try out all these services at a lower price.
Prerequisites
Assign the packages to the appropriate centers when creating them.
To allow day package sales, turn on the Enable Day Packages Sale option in the Webstore settings.
If your business has configured a deposit for this day package, guests are required to pay the deposit at the time of booking. The deposit policy is set at the organization level and may vary by location.
Important
Employee Specific Pricing is not applicable for booking a day package.
The day packages are not available for group bookings.
The following steps outline how a guest can book a day package on the Webstore:
The guest navigates to the Webstore URL.
The URL will be www.<businessname>/zenoti.com/webstoreNew.
To change the center's location, the guest selects the required option from the list.
To book a day package, from the Select a category drop-down list the guest selects Day packages.
To select a service, from the list of services available as part of the package the guest selects the required option.
In the list of providers, Any therapist will be selected by default if the Select any therapist by default setting is enabled.
When the Allow guest to select gender specific therapists is enabled:
To choose a preferred stylist, the guest selects the Specific therapist option from the With drop-down list.
Each service and its corresponding therapist will be displayed, allowing the guest to select specific providers for all the services in the day package.
When the Allow guest to select gender specific therapists is disabled:
To select a provider, the guest opens the With drop-down list. The first service will be expanded showing its corresponding list of therapists, allowing guests to choose a specific provider.
Choose add-ons based on guest preferences from the suggested options provided exclusively for the selected services.
If the option to include add-ons for chosen services is not visible, ensure that the Display service add-ons inside Day packages setting is enabled at the organization level.
To add more services, the guest can click Add another service.
To select an available slot for the appointment, from the Select date and time calendar the guest chooses the desired option.
If the preferred stylist is unavailable on the selected date, they will be prompted to select a different provider.
If a deposit is required for the day package, the Summary page displays:
Deposit Due Today: The amount to be paid now to confirm the booking.
Remaining Balance: The balance payable on the day of the appointment.
Review the amounts and click Continue.
The guest signs into the Webstore using their email or phone number.
On the payment screen, the guest enters their card details.
If a deposit is required, the guest pays the deposit amount shown. The remaining balance is due at the appointment.
If no deposit is required, the guest confirms the booking without payment.
Click Confirm Booking.
The booking confirmation screen appears. If a deposit was collected, the confirmation email includes the deposit receipt and the remaining balance due at the appointment.
Book a series package online
Series Packages are long-term packages that require guests to take multiple services or products. For example, a weight loss package may require the guest to come in for three sessions per week for say, eight months. You can allow your guests to purchase such series packages from your Webstore V2.
Before you begin
Ensure that you enable Sale of Series Packages in the catalog settings at the organization level.
Learn more: Enable Sale of Series Packages.
To book a series package
Navigate to the Webstore by opening the URL.
Click Sign In.
Enter the Username and Password to login.
Click Packages on the main menu.

Search for the desired series packages using the search bar or select a Category to view the packages.
Note
Packages that do not have a category appear under Othersin the Webstore.
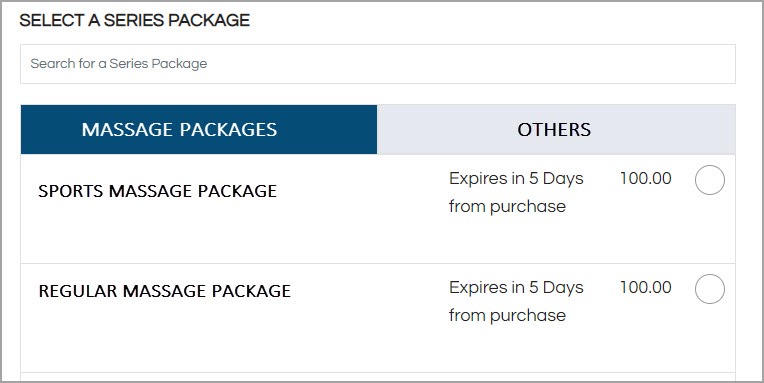
Select a series package.
To add another series package, click Add Another Series Package, or click Continue to checkout.
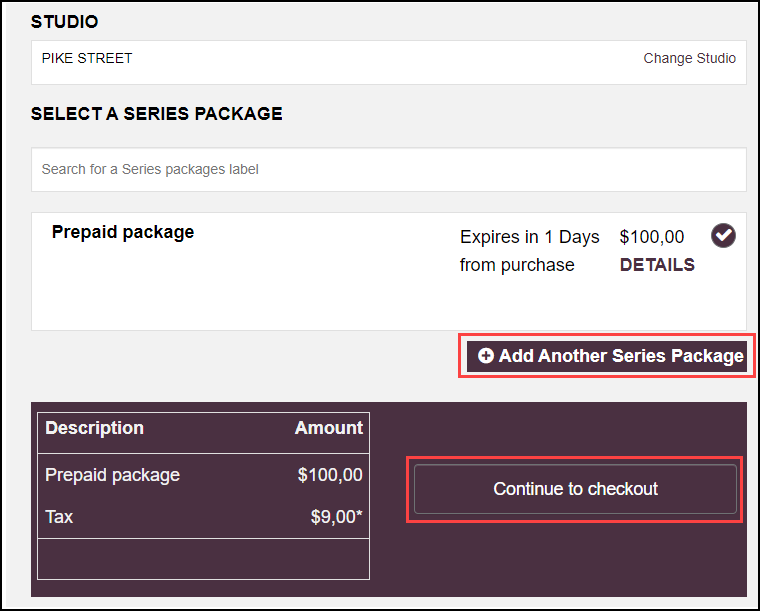
Click Proceed.
The Review page opens. This page shows your order summary, any applicable taxes and fees, a coupon field, and a 5-minute reservation countdown timer.
(Optional) To apply a discount, enter a coupon code in the Coupon field and click Apply. The order total updates to reflect the discount. You can add or remove coupons at any time on this page before proceeding.
Note: Coupons can only be applied on the Review page. Once you proceed to payment, the order total is locked and cannot be changed.
Buy and use gift cards
Purchase a gift card online without signing in
Note
All actions in this article are performed by the guest who is purchasing the gift card.
Guests can purchase gift cards online without signing in to their online account. The Continue as guest option available online helps the guest to speed up the gift card checkout process. A guest can purchase a gift card by simply providing their email address and optionally their phone number. The gift card purchase invoice is delivered to the email address provided.
On the website, click the Gift Cards tab.
Select a gift card from the available options.
The gift card gets added to the cart.
The purchase screen displays the price of the card, its value, and the expiration date of the card (if applicable) selected.
Enter the following:
Select a template: Select a gift card template from the available options.
Quantity: Enter the number of gift cards to be purchased.
Name: Enter the name (purchaser’s name).
Email address: Enter the recipient's email address.
Message: Type a message for the recipient. This is the message that the recipient will receive, along with the gift card.
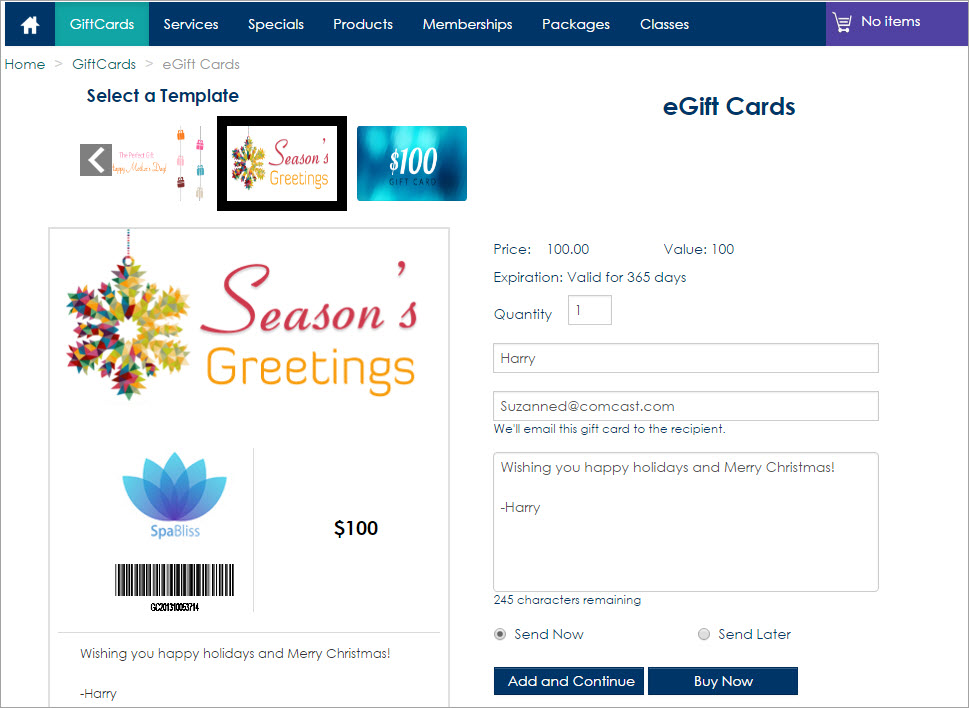
Select any one of the following options:
Send Now: Sends the gift card email to the recipient immediately.
Send Later: Sends the gift card email to the recipient on the chosen date and time.
Click Buy to proceed to make the payment.
During the checkout process, opt to Continue as guest, and enter the email address and phone number (optional).
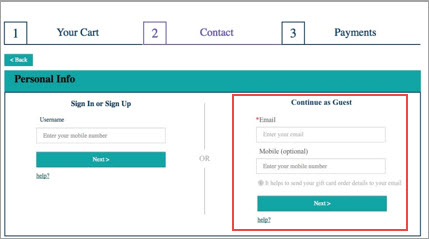
Click Next.
Enter the payment information and click Submit.
Redeem gift cards online
If your organization sells gift cards online, then guests can use their gift cards to pay for items they purchase online. However, guests can redeem only the items that are configured at the organization level (read: Redeem a Gift Card).
When guests enter their gift card numbers to redeem an item, the system either recognizes the card and adds it to the payment, or displays the following message: "In this invoice, you cannot pay more than $0.00." This indicates that the gift card cannot be used to pay for the item the guest has selected.
Log on to the website with the username and password.
Click the appropriate category tab such as Gift Card, Services, Products, Memberships, Packages that the guest wants to redeem.
Based on the organization settings, the card can be redeemed only for specific items.
Browse the catalog and select an item to purchase.
Click Buy Now to make payment.
Verify the personal and delivery information displayed.
On the Payments page:
Select GiftCard from the Do you have a drop-down box.
Enter the gift card number.
Multiple gift card numbers can be entered for the purchase.
Enter the amount of the selected item (not the gift card amount, but the price of the selected item).
Click Apply.
Click Confirm Order.
Impacts and considerations
If your organization has enabled the Restrict redemption to the center where it was sold setting, the guest can only redeem gift cards at the same center where they purchased the gift card. For more details, refer to set up gift cards.
If the guest requires to redeem the gift card at a different center even when the Restrict redemption to the center where it was sold setting, is enabled, there is a possible workaround. Please consult your manager or administrator before proceeding. This workaround is helpful when
Guests are required to access restricted gift cards.
Redeem gift card value or privileges at different locations or centers.
The front desk staff can provide a manual discount on the invoice as the exact value of the gift card and then set the expiration date to a past date from the guest profile to expire the gift card. Add necessary comments on the invoice to avoid confusion and notify the center manager or admin about the manual discount to adjust payments for your center.
View the gift card balance online
Guests can check their gift card balance on the webstore. Details such as the card balance, its validity period, and the price and value of a gift card can be obtained.
Login to the website using the username and password.
Click My Account at the top right corner.
Click the Prepaid cards tab.
The gift card name (displays the card number and purchase location), validity, and balance details).
Resend a gift card email without signing in
Note
This option is available only for gift cards purchased online. To resend a gift card email that was purchased in-store, the guest needs to contact the center.
Guests can easily resend a gift card email that was purchased online. From the website, the guest can instantly resend the gift card email to anyone, without having to log in to their online account. This is especially useful in situations when a gift card recipient cannot find the gift card email or has not received the gift card email during its initial purchase.
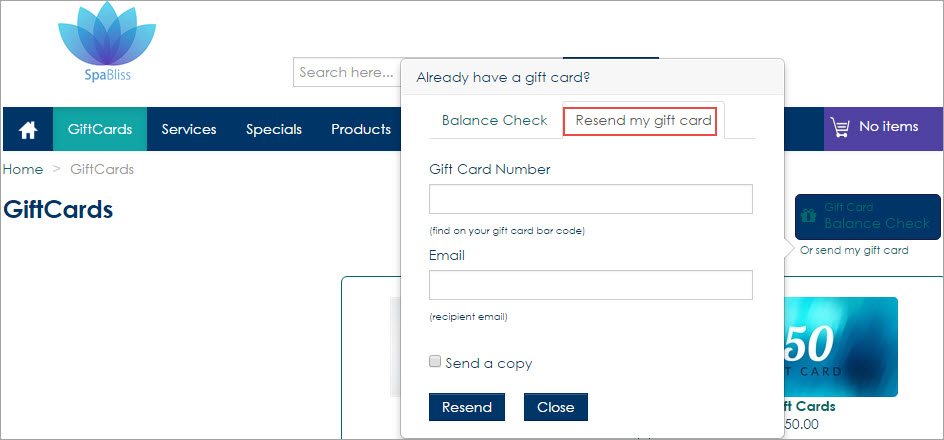
On the website, click the Gift Cards tab.
Click the Gift Card Balance Check or resend my Gift card option at the top right corner of the page.
Click the Resend my Gift card tab.
Enter the following details:
Enter the gift card number.
Enter the recipient’s email address entered at the time of purchase.
Select the Send a Copy checkbox to email a copy of the gift card to another email address.
Click Resend.
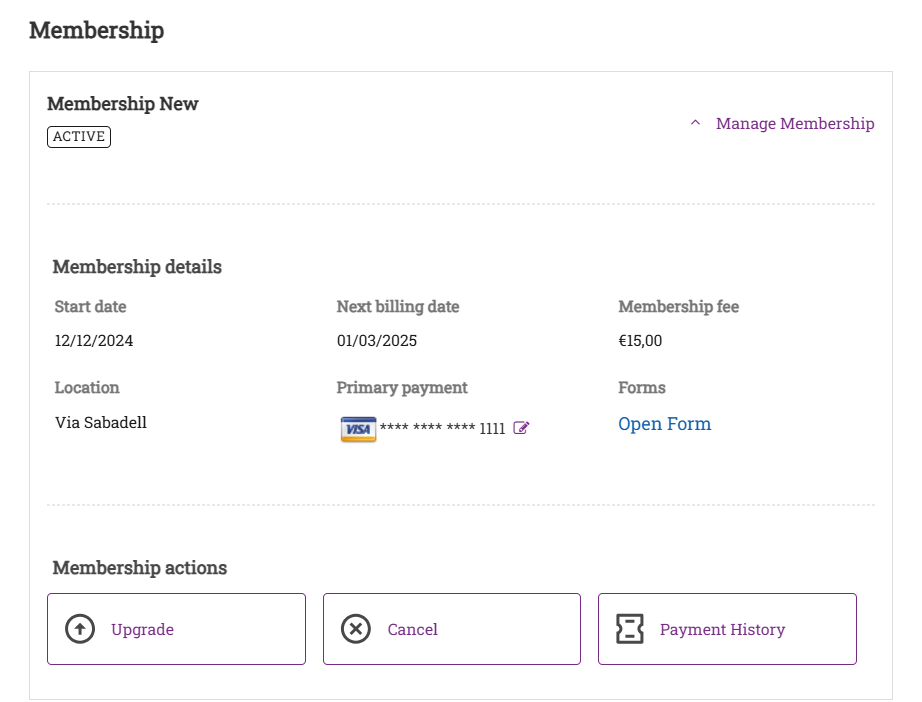
Improved Membership Management on Webstore
Overview
The new membership workflow is designed to streamline membership management, enhance customer engagement, and improve operational efficiency. It enables businesses to offer pre-sale memberships, automate billing, and provide customers with a better self-service experience. This workflow integrates with the Zenoti Webstore and POS, ensuring smooth onboarding, and payment processing.
Businesses can leverage this workflow to offer memberships before a location is operational, enabling early access and customer acquisition. It supports multiple billing configurations combined with normal, fixed, and prorated billing, allowing for flexible pricing structures. Additionally, automated recurring charges for monthly dues and annual fees reduce manual processing and provide a predictable revenue stream.
Prerequisites
To start working with the new membership workflow, you must:
Reach out to your Zenoti representative to enable this feature. The new membership workflow is not enabled by default.
To enable Webstore configurations for your business, first activate the new membership feature for Webstore. Reach out to your Zenoti representative to configure dependent configurations.
Dependent membership configurations
To enable members to perform cancellations on Webstore, the admin or owner of the business must configure the following dependent settings. These settings ensure the Webstore is customized according to your business rules and aligns with requirements.
Set the membership termination rules to define the conditions for membership cancellations.
Configure the number of days to offset cancellation from the current date.
Enable your business to allow cancellation of memberships with open invoices.
Configure collection of annual fees for membership cancellations. Refer to the enforce upfront collection of annual fee (if applicable) article.
Configure cancellation policies to include a review step before finalizing the request. Refer to the cancellation reasons article for more information.
Configure the Buy-Out fee option for memberships to collect charges for membership cancellations. Refer to the cancellation fees for memberships article.
Define the lock-in period while creating or modifying a membership.
Key features
Pre-sale Memberships: Pre-sale memberships allow businesses to generate revenue and gauge customer interest before a location is operational. This feature is useful for businesses launching a new center, offering early access incentives, or promoting limited-time membership pricing. During the presale period, customers can enroll without making immediate payments, and their payment details are securely stored until the center officially opens. A founding fee may be charged upfront as an option and members are notified about activation and future charges upon the location's launch.
Flexible Payment Methods: This feature provides businesses with the flexibility to configure payment collection methods. Depending on the business model, payment processing can be structured to align promotional offers or standard membership policies.
Single Payment Method: The member’s stored payment method is charged on the activation date.
Dual Payment Method: Businesses can collect an initial nominal amount (such as a founding fee) and schedule the main membership charge for a later date.
Billing Configurations: Businesses can define whether customers are billed immediately or on a specific recurring schedule.
Normal Billing: Members are charged on the date they sign up, ensuring a rolling renewal cycle.
Fixed Billing: All members are charged on a designated date every month, regardless of when they sign up. Invoices are automatically generated based on the selected billing model. Businesses can configure prorated billing within membership settings. Refer to the fixed billing for memberships article for more information on billing cycles.
Prorated Billing: If a member joins mid-cycle, they are charged only for the remaining days in the cycle before their full membership period begins. Future payments, including annual fees, are displayed clearly in the checkout summary. The membership discount applies to pro-rated fees, and the discount amount is also pro-rated accordingly based on the reduced membership fee.
Enhanced Checkout Flow: The new workflow introduces a more intuitive checkout experience, making it easier for members to review their payments and for businesses to communicate charges. Enhancements include:
Transparent pricing display: Members see an itemized breakdown of their charges, including future payments.
Custom labels and descriptions: Businesses can modify checkout labels and descriptions to align with their branding.
Flexible payment methods: Members can securely add and store payment methods for future transactions.
Self-Service Membership Management: Members now have more control over their memberships through the Webstore. The workflow supports:
Online cancellation: Members can initiate cancellation requests directly, ensuring compliance with FTC Click-to-Cancel regulations. When a member initiates cancellation in the Webstore, the cancellation date is always set to today's date. Any offsets, including termination offsets, are calculated based on this date. This ensures that the cancellation process follows a fixed timeline without delays.
Upgrading memberships: If enabled, members can switch to a higher-tier membership plan without administrative intervention.
Upgrades can happen at the end of the billing term or immediately depending on the billing model selected.
Payment method updates: Customers can modify their stored payment details to ensure uninterrupted billing.
Upgrades can happen at the end of the billing term or immediately depending on the billing model selected.
Partial Freeze and Cancel for Family Memberships
Overview
Zenoti supports partial freeze and partial cancellation for family memberships, giving primary members the flexibility to freeze or cancel individual members, rather than the entire membership, directly from the webstore.
Partial Freeze for Family Memberships
Previously, freezing a family membership froze all members, primary and add-on with no option for selective freeze. Primary members can now choose which members to freeze, with freeze fees calculated individually based on the Membership Pricing Template.
Key capabilities:
Primary members can freeze themselves, select add-on members, or any combination
Freeze fees are applied per member based on age bucket or relationship, as configured in the Membership Pricing Template
When the primary member is frozen, the system prompts selection of a new primary from eligible remaining members (adult or senior add-on members)
Supports both Immediate Freeze and Scheduled Freeze flows
Freeze Reason and Freeze Form submission are supported when configured
Note
Freeze fees are collected in the billing cycle only. Payment method is not shown during the webstore freeze flow.
Before You Begin
Freeze rules must be configured at the Organization or center level before guests can initiate a freeze from the Webstore.
Cancellation rules must be configured at the Organization or center level before guests can initiate a cancellation.
The membership pricing template must specify freeze fees and buy-out fees per member type (age-based or relationship-based).
The Webstore v2 must have freeze and cancellation options enabled.
Freeze reasons and cancellation reasons must be set up if you want guests to provide a reason during the process.
Freeze forms and cancellation forms must be configured if your business requires guests to sign or submit a form.
How to Freeze Individual Members in a Family Membership
The steps below apply when a primary member logs in to the Webstore v2 to freeze one or more members.
Immediate Freeze
Use this when the freeze should take effect at the next billing cycle.
The primary member logs in to the Webstore.
They navigate to their family membership and select the option to freeze.
A pop-up appears asking them to choose which members to freeze.
They select the members whose membership they want to freeze.
For each selected member, the freeze start date is shown as the next billing cycle date. This date is not editable in immediate freeze mode.
The primary member chooses a freeze end date for each member.
The applicable freeze fee is displayed for each member based on the pricing template.
Note
For age-based pricing templates, the fee shown depends on the member's age bucket. For example, if the primary member is an adult (18–55), their freeze fee is $20. A minor (0–18) has a freeze fee of $10.
If the primary member is being frozen, the Webstore prompts them to choose a new primary member. Only add-on members whose age bucket or relationship type has Consider for primary member enabled are shown as options.
The primary member selects a freeze reason.
If a freeze form is required, the primary member submits the form before continuing.
The primary member clicks Continue to complete the freeze.
Note
The default freeze type for family memberships is always freezing benefits. Freeze fees are not collected through the Webstore, and no payment method is shown during this flow.
Scheduled Freeze
Use this when the primary member wants to choose a specific future start date for the freeze.
The primary member logs in to the Webstore.
They navigate to their family membership and select the option to freeze.
A pop-up appears asking them to choose which members to freeze.
A pop-up appears asking them to choose which members to freeze. They select the member or members they want to freeze.
For each selected member, a calendar is shown with available future dates. The primary member selects the desired freeze start date.
The primary member selects a freeze end date from a dropdown. The dropdown shows dates at the configured interval (for example, every 15 days), with four date options available.
The applicable freeze fee is displayed for each member based on the pricing template.
If the primary member is being frozen, the Webstore prompts them to choose a new primary member from eligible add-on members.
The primary member selects a freeze reason.
If a freeze form is required, the primary member submits the form before continuing.
The primary member clicks Continue to complete the freeze. Freeze fees are not collected through the Webstore, and no payment method is shown during this flow.
How to Cancel Individual Members in a Family Membership
The steps below apply when a primary member logs in to the Webstore v2 to cancel one or more members.
The primary member logs in to the Webstore.
They navigate to their family membership and select the option to cancel.
A prompt appears asking them to choose which members to cancel.
For each selected member, the cancellation start date is shown by default. The primary member can choose a different start date if needed.
The primary member selects a termination date for each member.
If they want to apply the same start and end dates to multiple members, they can do so.
The applicable buy-out fee is displayed for each member based on the pricing template.
Note
Buy-out fees follow the same age-based or relationship-based logic as freeze fees. The Consider for primary member setting determines eligibility for primary member promotion.
If a buy-out fee applies, the payment method is displayed.
The primary member selects a cancellation reason for each member.
If cancellation forms are required, the primary member is prompted to sign and submit them before the cancellation is finalized.
When the Primary Member Is Being Cancelled
If the primary member includes themselves in the cancellation, whether cancelling just themselves with some add-ons remaining, or cancelling all members, the following additional steps apply:
The Webstore prompts the primary member to designate a new primary member from the remaining add-on members. Only members eligible under the Consider for primary member setting are shown.
If all members are being cancelled and an annual fee collection is scheduled between the cancellation date and the termination date, the annual fee is collected before the cancellation is processed. This applies even if the primary member is the last member being cancelled.
Verification for New Guest Membership Purchases
When a new guest purchases a membership through Webstore V2, they will be required to verify their identity with a one-time password (OTP) before completing registration. This verification step is enforced when the Mandate OTP for Sign-Up setting is enabled in Webstore V2. It adds a layer of security to account creation without changing how the rest of the sign-up and membership purchase flow works.
Before You Begin
The Mandate OTP for Sign-Up setting must be enabled in your Webstore V2 configuration.
This behavior applies only to new guests, users who do not already exist in the Zenoti system.
How the Membership Sign-Up Flow Works with OTP Enabled
The following flow applies only when Mandate OTP for Sign-Up is enabled.
The guest enters their initial details on the membership purchase screen.
The guest clicks Continue.
Zenoti checks whether the guest already exists in the system.
If the guest exists: The flow proceeds as usual.
If the guest does not exist: An OTP verification screen is displayed before registration can continue.
The guest enters the OTP on the verification screen.
If the OTP is valid: The guest proceeds to the sign-up screen and completes registration normally.
If the OTP is invalid: An error message is displayed. The guest must re-enter a valid OTP to proceed.
After successful OTP verification, the membership purchase flow continues as normal.
How the Membership Sign-Up Flow Works without OTP Enabled
When Mandate OTP for Sign-Up is OFF, the original behavior applies:
The guest enters their initial details and clicks Continue.
Zenoti checks whether the guest exists in the system.
If the guest does not exist, the sign-up screen is displayed immediately — no OTP step occurs.
The guest completes registration and continues with the membership purchase.