Create a package
Clone a package
Business owners may look to create packages with similar services and benefits with some tweaks here and there. For example, an existing package may have a manicure and pedicure at $50. You may want to add a hair spa to the package at $75. Or, you may want to copy an existing package and change the price. In such cases, you can clone the existing package, make the necessary updates to the services and price, and sell the package.
At the organization level, click the Master data icon.
Navigate to Packages.
On the Manage Packages page, select the name of the package you wish to clone.
On the Edit Package page, click Clone.
Edit basic details such as Package Name and Package Code.
If you want the new package to be active and available to guests, switch the Active setting to On.
Select the configurations to copy from the existing package.
Some configurations are already selected for you. Clear the ones you don’t want and select the ones you want to keep.
Click Create.
A confirmation message indicates that you have successfully cloned the package.
You can now edit the cloned package and make further tweaks to suit your business needs.
Impacts and considerations
You can clone day packages, promo packages, regular series packages, series offer packages, and series templates.
You cannot clear the General option while cloning a package. It is selected and locked by default.
To avoid confusion, ensure services have distinct names. Similar service names can complicate bookings, memberships, and package redemptions for guests and staff. Ensuring that service names are clear and distinct will help to prevent such issues.
Create and manage packages at the zone level
If your business uses zones, you can create and manage packages at the zone level. This is not enabled by default. Contact your Zenoti representative to enable zone-level package management. Once enabled, zone managers can set zone-specific pricing and benefits and restrict redemption within their zone, while organization-level users retain oversight and can edit, administer, and govern packages across zones.
You can create Series, Day, and Offer packages at the zone level.
Reports reflect the zone where a package is managed and redeemed.
To create a package:
At the zone level, click the Master data icon.
Navigate to Packages.
On the Manage Packages page, click Add.
Fill in the required fields and Save to create the package.
Considerations
Zone Managers can configure zone-specific pricing and benefits.
You can restrict redemption within the zone to keep usage localized.
Organization-level users maintain governance and may view and edit packages across zones.
Reports reflect zone ownership and redemption, improving accuracy for multi-zone businesses.
Create a custom package from the Appointment Book
Each custom package is unique in the sense that each custom package is tailor-made for a specific guest keeping that guest’s personal wellness goals in mind. While creating a custom package, the front desk has the flexibility to add only those services or products to the package that the guest needs and adjust quantities or sessions (sittings) for each depending on the consultation or the treatment stage of the guest.
While creating a custom package, the front desk or receptionist may or may not use existing custom package templates. There are therefore two methods by which the front desk may create a custom package:
You follow the same methods to sell custom packages without or without template on Zenoti Mobile.
Important
The organization level setting related to template selection for custom packages controls whether the front desk can create custom packages that are not based on templates.
Set up an offer package
Add a series package
Ensure that you are at the organization level.
Click Master data > Packages.
Click Add Series Package.
Note
Notice that the package is active by default (the Active switch is on).
Enter the following:
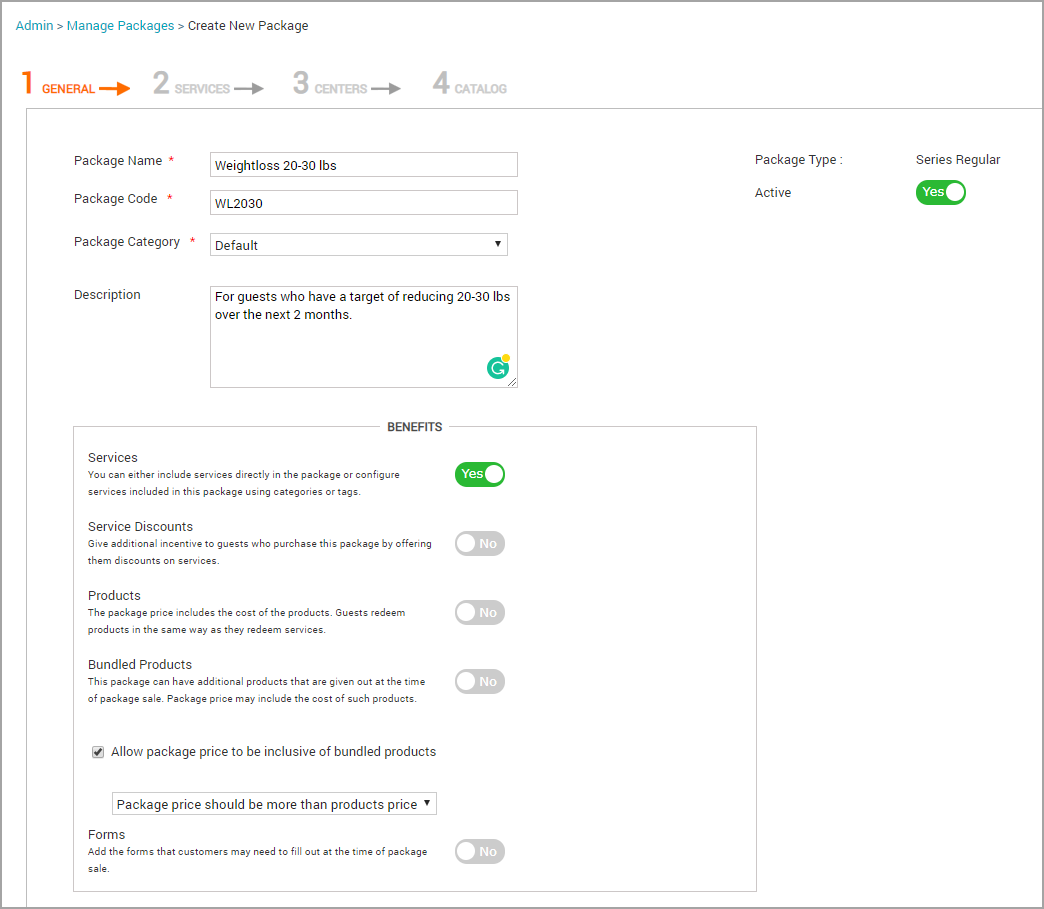
In the Package Name field, enter a name for the package. Example: Weight Loss 10-15 kg.
Note
Category name can have the following special characters as well:
ÀÂÄÆÇÈÉÊËÎÏÔŒÙÛÜàâäæçèéêëîïôœùûü
plus (+) symbol to allow service names in category names
In the Package Code field, enter a code for the package so that it is easy for the front-desk staff to search for series packages quickly during booking.
In the Package Category field, enter a category that the package belongs to such as Skin Care, Hair Care, or Massages.
Note
You can create package categories from the Configuration menu. Package categories help the front desk find series packages more quickly during booking.
If you want to enter a description, click the Add link next to the Description field and enter the plain text description for the package.
Note
The plain text description appears in mobile apps and the POS.
In the General tab, Benefits section:
Services: The Services switch is on by default. This means you can configure further details about services in this package in the Services tab.
Day Packages: If you wish to include day packages as part of your package, turn on this switch. You will see an additional tab for Day Packages where you can configure further details.
Service Discounts: If you wish to configure service discounts, turn on this switch. You will see an additional tab for Service Discounts where you can give additional incentives to guests who purchase this package by offering them discounts on services.
Products: If you wish to include products as part of your package, turn on this switch. You will see an additional tab for Products where you can configure further details. The package price includes the cost of the products. Guests redeem products in the same way as they redeem services.
Bundled Products: If you wish to include bundled products as part of your package, turn on this switch. You will see an additional tab for Bundled Products where you can configure further details. Bundled products are additional products that are given out at the time of package sale. Package price may include the cost of such products.
Allow package price to be inclusive of bundled products: Select this checkbox if you want the package price to be inclusive of bundled products. When you select this, the package price displayed on the POS will include taxes.
You can further select one of the following options:
Package price should be more than products price (selected by default)
Package price can be less than products price: If you select this option, then you can also enter details for Percentage of price to be allocated to products __ %.
Example: If the package cost is $1000 and you specify 70% as the Percentage of price to be allocated to products, Zenoti allocates $700 as product sale and $300 as the service sale.
Tip
You can include bundled products in the Products tab when you are setting up a package.
Forms: If you wish to include forms that customers may need to fill out at the time of package sale, turn on this switch. You will see an additional tab for Forms where you can configure further details.
In the General tab, Definition section:
Validity: Define the validity of the package - guests must use the services of the package within the time frame. You can define the validity as Fixed Expiry (enter the number of days), Define Expiry Date (use the calendar to specify the date), or Never expires.
Validity starts: Specify whether you want the validity of the package to start from the date of sale (From sale date) or the date when the guest first redeems a service from the package (At first redemption). For example, a guest may buy a package on 1 June but come in to redeem the first service of the package on 15 June - the validity of the package will start depending on your configuration here.
Note
The At first redemption option is available only when you set the Validity to Fixed Expiry.
Grace period: Note that the Grace period is not set by default. To set Grace period, click the Not Set link. In the Grace Period field enter the number of days you will allow for redemption past the expiry date. Optionally enter a percentage if you want the grace period to be calculated on validity. For example, if you sell a series package with a validity of 360 days, and you enter 10% here, Zenoti calculates the grace period as 36 days.
Note
Users with the Extend Grace Period permission can extend the grace period of a package. More information
Close Package when all benefits are consumed: Switch on this setting if you wish to close the package after all service and product benefits are consumed. This will help declutter the POS screen and will make it easier for front-desk staff to find the relevant packages faster (closed packages do not appear in the POS).
Tip
Points to consider
After a package status is Closed, you can reopen the package by removing a redemption from the appropriate invoice. If the package end date is in the future, the status of the package goes back to Active.
If the package end date is in the past, the status of the package changes to Expired.
If versioning is enabled for your business and an admin changes this setting, Zenoti creates a new version of the package.
If versioning is disabled for your business you cannot change this setting if a package has been sold.
One-time offer: Indicate whether the package is a one-time offer. You can choose to sell the package only to new guests or to both new and existing guests. If you do not see this option, check your administrator settings.
Freeze: The Freeze option is useful if a customer is out of town for an extended period of time. This preserves package validity until the package is unfrozen. If you want authorized staff to have the ability to freeze packages, turn this switch on. In the Freeze Count field, you can further specify whether users will be able to freeze the package for a fixed number of times (Limited) or unlimited number of times (Unlimited).
Important
You will see this setting only if the organization level setting, Enable package freeze is selected.

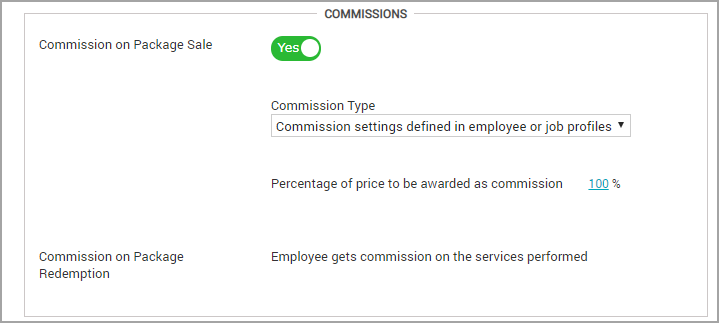
In the General tab, Commissions section:
Commission on Package Sale: Note that Commission of Package Sale is turned on by default. This means employees who sell this package will earn a commission on it. You can further specify the Commission Type to be based on:
Commission settings defined in the employee or job profile
Flat amount, or
Percentage of revenue.
Percentage of price to be awarded as commission: Note that 100 is the default value here and it means that you will award the standard commission the employee earns on the sale of this package. The standard commission is defined at the Employee level (Packages tab). You can override the commission an employee earns for the sale for this specific package here. For example, to double the standard commission, enter '200'. Leave this blank if you do not want to modify the standard commission an employee earns on the sale for this package.
Commission on package redemption: Employee gets commission on the service performed
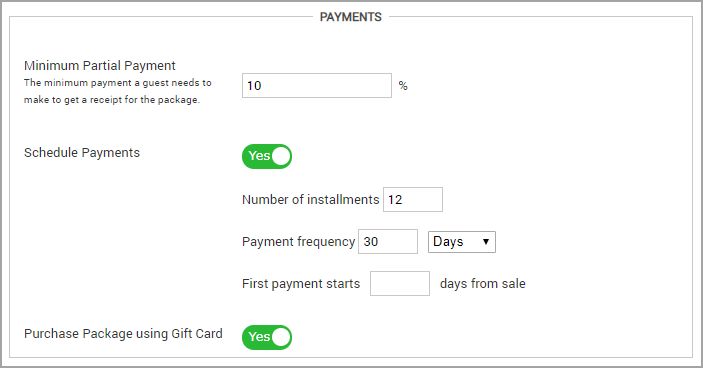
In the General tab, Payments section:
Minimum Partial Payment: Enter the minimum amount a customer must pay to book the package. Important: You will see this setting only if the organization level setting, Enable redemptions on open packages is selected.
Note
In the Centers tab (the tab after the current General tab that you are viewing), you will be able to enter the total price for the package in each center it is sold in. Also if bundled products are included in a package and a partial payment is made, Zenoti first recovers the cost towards the products; the remainder is calculated towards the cost of the package.
Note
Guests must pay for bundled products that are part of the package.
Schedule payments: Turn this switch on if you want to allow guests to pay for the package in installments and as per a schedule. You will see further settings. Specify the Number of installments, Payment frequency, and when the First payment starts(number of days from the sale).
Note
Item-level commissions are not supported for series-scheduled packages. So, payments cannot be scheduled when the Commission Type is Flat amount or Percentage of revenue.
Purchase Package using Gift Card: Specify whether you want to allow guests to use a gift card to purchase a package. This setting is turned on by default.
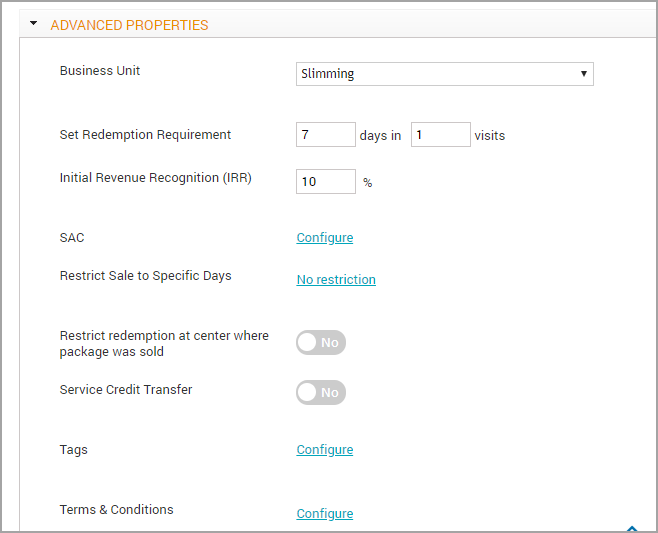
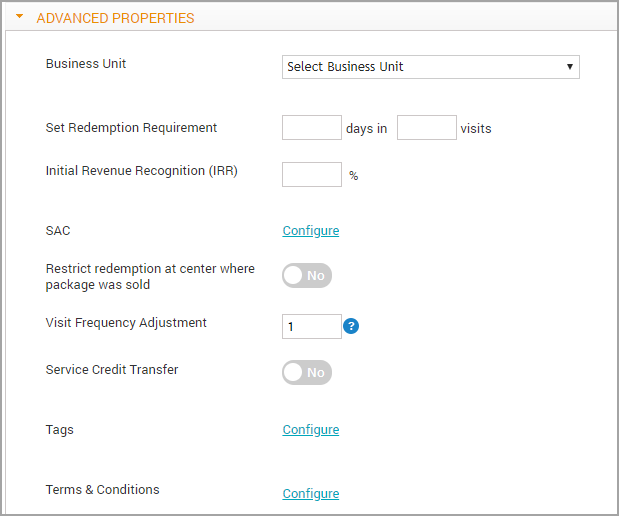
In the General tab, Advanced Properties section:
Business Unit: In the Business Unit drop-down box, select the appropriate business unit.
Set Redemption Requirement: For Redemption Requirement, enter the Number of days and in the Visits field enter the number of visits required. Both these fields are taken into consideration to calculate if the guest is regular or not
Initial Revenue Recognition (IRR): In the Initial Revenue Recognition field enter how much of the package price should be recognized at the time of the package sale. For example, if you enter 50% here, the remaining 50% will be recognized when the guest redeems each sitting of the service.
Restrict sale to specific days: By default, there is no restriction on the sale of the package - indicated by the No restriction link. If you do want to restrict the sale to specific dates, click the link and specify the dates from the calendar controls.
Restrict redemption at center where package is sold: If you want to restrict the redemption of the services that belong to this package to the center where package is sold, turn on this switch. This is useful when a particular center is running promotions.
If you wish that your guests can redeem the services in any of your centers, leave this setting as off.
Enforce OTP on package redemption: If you want to enforce that a One-Time Password (OTP) is required during the redemption of a package credit, adding an extra layer of security to the process, and this occurs when closing the invoice, provided the setting is enabled at the package level.
Service Credit Transfer: Turn on this setting if you want guests to be able to transfer accumulated service credits to their family and friends. This is useful if you want to entice new guests to visit your centers. You can track such guests as Sales Opportunities and also attract such guests using Campaigns.
Tags: Click the Configure link if you wish to configure tags for this package. Using tags, Zenoti groups packages together. For example, once you create a tag “slimming” you can use it when creating all your weight loss packages. Then when running a sales report you can filter packages sold using the “slimming” tag. You can create new tags from the organizational level from the Configuration> Packages menu.
Terms and Conditions: Click the Configure link if you wish to configure terms and conditions for this package. If needed these can be configured to be printed on the receipt when a package is sold.
Note
If you sell this package in the Webstore, customers will have to agree to these terms & conditions before adding the package to their cart.
Next Steps: Depending on further configurations you have chosen for your business, you must enter details in the Services, Products, Discounts, Centers, Forms, Catalog, and Social tabs to complete the set up process for Series Packages.
Set up series templates
You can set up series templates as a series of services and sittings (or sessions) to help guests meet their individual wellness targets.
In Zenoti, this is a two-step process:
Step 1
The administrator sets up series templates with details about different services and the number of sittings (sessions) required.
For example, you could have three different templates for weight loss programs. One template that has a target of 5 kg - 7 kg weight loss goal, one template that has a target of 8 kg - 10 kg weight loss goal, and one more template that has a weight loss goal of 11 kg - 15 kg. For each template, you can specify the relevant number of services and sittings (or sessions).
Step 2
The front-desk staff then creates the actual custom packages using one of these series templates and sells them to guests.
For example, if a guest has a weight loss goal of 11- 15 kg, the receptionist simply uses the appropriate template to create a custom package for the guest and charges the guest accordingly.
Note
Important
Organizational level settings control whether the front-desk staff can use templates or not to sell custom packages.
The front-desk staff can create packages not based on templates too.
At the organization level, click the Master data icon.
Go to Packages.
Click Add Series Template.
Enter General information for the custom package template.
Enter Service details for the custom package template.
Enter Product details that are part of the custom package template.
Add Discounts for services not part of the package.
Specify the centers where you want the custom package (template) to be available, with details of costs.
Upload details to the Catalog so that guests can view and buy the custom packages from the Webstore and customer mobile app .
Click Save.
The series template is now available for the front-desk staff; they can use this template to create customized packages for guests based on their individual needs.
Enter details such as package benefits, definition, and payment details for a custom package based on the series template
To set up a series template so that the front-desk staff may use these templates to customize packages for guests, you first need to enter general information.
At the organization level, click the Master data icon and navigate to Packages.
Click Add Series Template.: Notice that the series template is active by default (the Active switch is on).When the front desk searches for custom package templates while creating custom packages, they can view only Active packages.
Enter the following information under the General tab:
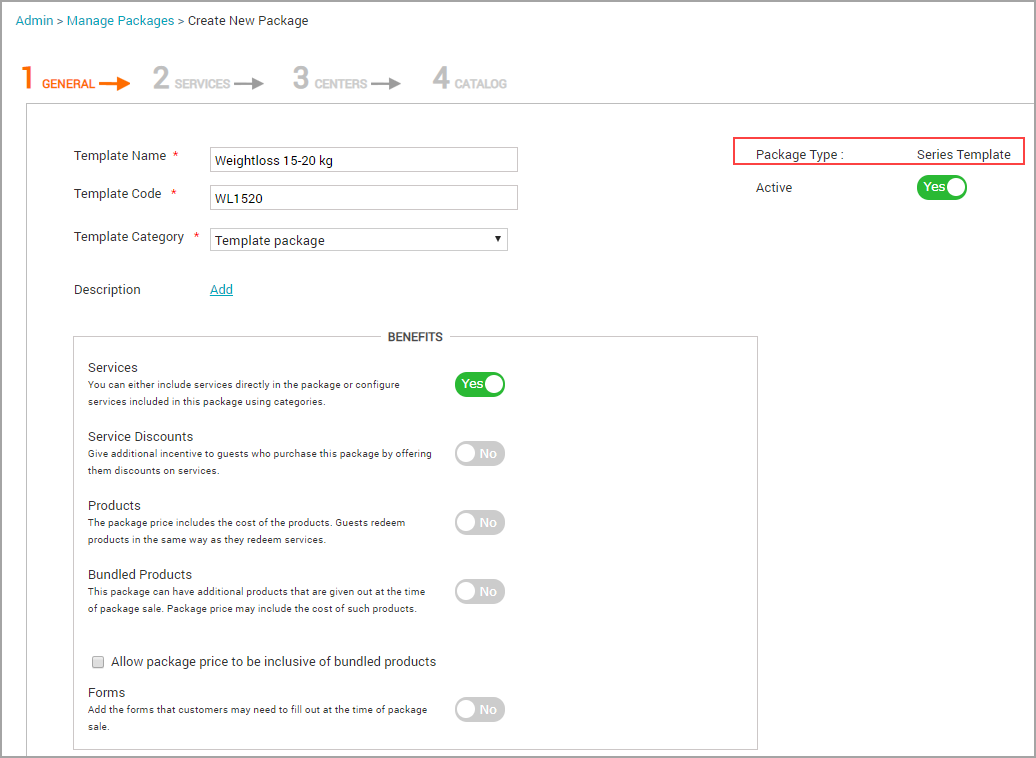
Template Name: Enter a name for the template. For example: Weight loss 15 kg - 20 kg.
Template Code: Enter a code for the series template. You can use this code to easily search for the template.
Template Category: Select the appropriate template category such as Weight Loss Programs.
Description: Click the Add link if you wish to enter a description for the series template. Other users may find such descriptions useful as they can understand why you created this series template.
In the Benefits section, enter the following information:
Services: The Services switch is on by default. This means you can configure further details about services in this series template in the Services tab
Service Discounts: If you wish to configure service discounts, turn on this switch. You will see an additional tab for Service Discounts where you can give additional incentives to guests who purchase this series template by offering them discounts on services.
Products: If you wish to include products as part of your series template, turn on this switch. You will see an additional tab for Products where you can configure further details. The series template price includes the cost of the products. Guests redeem products in the same way as they redeem services.
Bundled Products: If you wish to include bundled products as part of your series template, turn on this switch. You will see an additional tab for Bundled Products where you can configure further details. Bundled products are additional products that are given out at the time of package sale. Package price may include the cost of such products.
Allow package price to be inclusive of bundled products: Select this checkbox if you want the series template price to be inclusive of bundled products. When you select this, the package price displayed on the POS will include taxes.
You can further select one for the following options:
Package price should be more than products price (selected by default)
Package price can be less than products price: If you select this option, then you can also enter details for Percentage of price to be allocated to products __ %.Example: If the series template cost is $1000 and you specify 70% as the Percentage of price to be allocated to products, Zenoti allocates $700 as product sale and $300 as the service sale.
Tip
You can include bundled products in the Products tab when you are setting up a series template.
Forms: If you wish to include forms that customers may need to fill out at the time of package sale (when the package is based on this series template), turn on this switch. You will see an additional tab for Forms where you can configure further details.
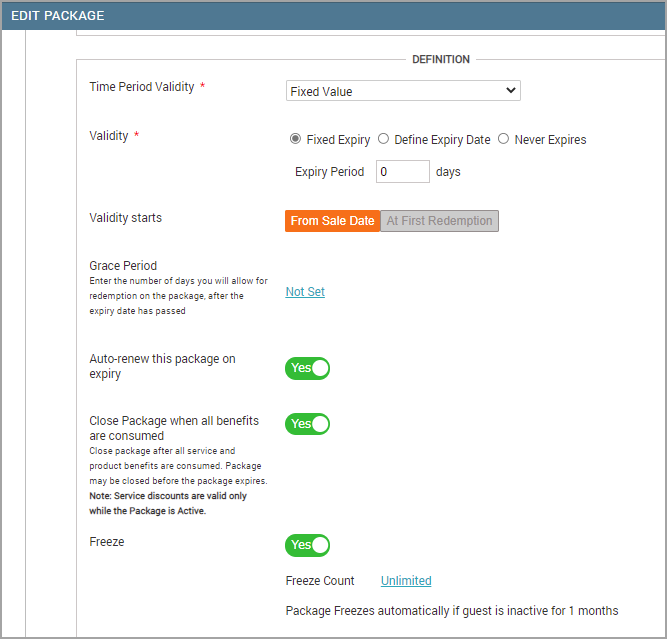
In the Definition section, select or enter the following details:
Time Period Validity: You can use this option to specify details about the validity of the series template. Select any one of these options from the drop-down list.
Select validity model
Fixed value
Maximum service frequency among all
Sum of all service frequencies
Mixed model
Note
You can view these options only if the organization level setting Show validity models is enabled.
Validity Starts: Specify whether you want the validity of the series template to start from the date of sale (From sale date) or the date when the guest first redeems a service from the package (At first redemption).
For example, a guest may buy a package on 1 June but come into redeem the first service of the package on 15 June - the validity of the package will start depending on your configuration here.
At times, guests may purchase a package but may not be able to redeem package benefits for a few months due to personal circumstances (illness, travel). In such cases, you may specify that the validity of the package should start only after the guest redeems some benefit.
Grace Period: Click the Not Set link to offer a grace period. The Grace Period is the number of days you want to allow the guest to be able to avail the benefits of the package after the package expires. Specify the number of days that you want to offer as Grace Period to the guest.
Auto-renew package on expiry (Yes/No): Specify Yes if you want Zenoti to auto-renew the package on expiry (the default setting is No).
Renewing packages in this way makes it easier for you to retain your guests and also saves time on administrative tasks. If you choose to auto-renew the package, Zenoti renews the package with exactly the same properties as of the date of expiry. This includes the services, visit frequency, and the name of the employee who was responsible for selling the package (Sold by employee name).
Note that the front-desk staff can alter some properties of custom packages (based on a template) such as payment schedules.
For example, if the template Schedule has 3 installments to be paid monthly, and a guest wants to pay in 5 monthly installments, the front desk can edit the custom package suitably when selling the package.
Note
You can offer discounts (flat amount or as a percentage) to guests who agree to auto-renew their package from the Centers tab (using the Discount on Renewal option).
Note
When you auto-renew packages, Zenoti does not copy the bundled products from the original package.
Close Package when all benefits are consumed: Switch on this setting if you wish to close the package after all service and product benefits are consumed. This will help declutter the POS screen and will make it easier for front-desk staff to find the relevant packages faster (closed packages do not appear in the POS).
Points to consider
After a package status is Closed, you can reopen the package by removing a redemption from the appropriate invoice.
If the package end date is in the future, the status of the package goes back to Active.
If the package end date is in the past, the status of the package changes to Expired.
If versioning is enabled for your business and an admin changes this setting, Zenoti creates a new version of the package. If versioning is disabled for your business you cannot change this setting if a package has been sold.
Freeze: Select one of the options from the drop-down list to indicate if you want an administrator or owner to be able to freeze the package. At times guests may be unable to avail the services of the package due to long travel or illness. In such cases, administrators may freeze the package so that the validity of the package is extended and the guest can avail the benefits of the services of the package.
None: If you select None it means you don’t want administrators to be able to freeze the custom package. Limited: If you select Limited, you need to specify the number of times an administrator can freeze the custom package. For example, if you enter 2 here, it means an administrator can freeze the custom package only two times. Unlimited: If you select Unlimited, it means an administrator can freeze the package any number of times.
Important
The organization level setting Enable package freeze controls whether you view the Freeze Count option while creating the series template.
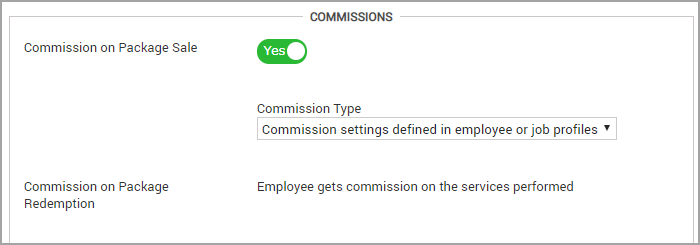
In the Commissions section, select or enter the following details:
Commission on Package Sale: Note that Commission of Package Sale is turned on by default. This means employees who sell this package will earn a commission on it. You can further specify the Commission Type to be based on:
Commission settings defined in the employee or job profile
Flat amount, or
Percentage of revenue.
Commission on package redemption: Employee gets commission on the services performed
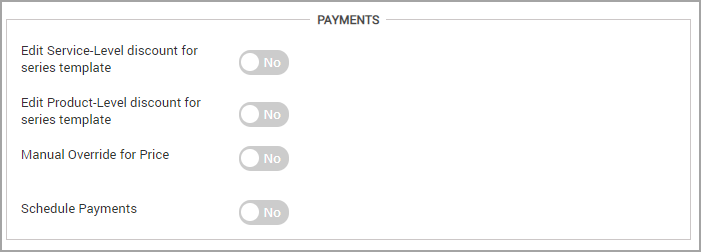
In the Payments section, specify the following details:
Edit Service-level discount for series template: Turn this setting on if you want to allow the front-desk staff selling a custom package (based on this series template) to be able to change the discount amount configured for a service.
Edit Product-level discount for series template: Turn this setting on if you want to allow the front-desk staff selling a custom package (based on this series template) to be able to change the discount amount configured for a product.
Manual Override for Price: Turn this setting on if you want to allow the front-desk staff selling a custom package (based on this series template) to be able to override the price configured.
Schedule Payments: Turn this switch on if you want to allow guests to pay for the package based on this series template in installments and as per a schedule. You will see further settings. Specify the Number of installments, Payment frequency, and when the First payment starts (number of days from the sale).Specify the number of days from the date of sale when the guests’ payment schedule will start. For example, if you enter 7 days here, Zenoti charges the guest the first installment, 7 days after the guest purchases a custom package that uses this series template.
Important
The organization level setting Enable redemptions on open package controls whether guests can make partial payments towards packages and redeem package benefits. At any point in time, the guest can redeem services up to the amount they have paid for.
Note
These settings that you configure to collect recurring payments for packages and memberships are called Dunning settings. For packages, these settings apply only to collections made by card payments, while Dunning settings for memberships apply to collections made by all payment types.
Purchase Package using Gift Card: Enable this option to let guests buy packages using a gift card.
In the Advanced Properties section, enter the following details:
Business Unit: Select the business unit for the package. For example, Slimming.
Redemption Requirement ____ days in ____ visits: Enter the redemption requirement details which is the gap between service redemptions in days. Zenoti calculates guest regularity based on this. For example, if you enter 7 days and 4 visits, and there is a gap of 10 days between two redemptions for a particular guest, Zenoti considers such a guest as irregular.
Initial Revenue Recognition (IRR): Indicate how much value in percentage do you want to recognize from the sale of a custom package that is based on this custom package template. For example, if the cost of the package is $200 and you enter 20% here, Zenoti recognizes $40 as the Initial Recognition at the time of the sale of the package. This figure reflects in all revenue-related reports. Learn more: Sales, Collection, and Revenue in Reports
SAC: Click the Configure link if you wish to enter the Service Accounting Code (SAC) for the package. Applies only if you have enabled GST, India for your organization.
Restrict redemption at center where package is sold: If you want to restrict the redemption of the services that belong to this series template to the center where package (based on this series template) is sold, turn on this switch. This is useful when a particular center is running promotions.
If you wish that your guests can redeem the services in any of your centers, leave this setting as off.
Visit Frequency Adjustment: Define how frequently a guest must take a service. For example, after a guest avails one service of the package (laser hair removal) then the guest should not avail the next service before 30 days. If there are 5 such sessions of this single service in the package, then the validity of the package is 150 days (5*30=150).
Service Credit Transfer: Turn on this setting if you want guests to be able to transfer accumulated service credits to their family and friends from a custom package (that is based on this series template).This is useful if you want to entice new guests to visit your centers. You can track such guests as Sales Opportunities and also attract such guests using Campaigns.
Tags: Click the Configure link if you wish to configure tags for this package. Using tags, Zenoti groups packages together. For example, once you create a tag “slimming” you can use it when creating all your weight loss packages. Then when running a sales report you can filter packages sold using the “slimming” tag. You can create new tags from the organizational level from the Configuration> Packages menu.
Terms and Conditions: Click the Configure link if you wish to configure terms and conditions for this package. If needed these can be configured to be printed on the receipt when a package is sold.Note: If you sell this package in the Webstore, customers will have to agree to these terms & conditions before adding the package to their cart.
Click Next.
Next step: Enter Service details for the series template.
Create a custom package template
To set up a custom package template so that the front desk may use these templates to customize packages for guests, you need to enter service related details.
At the organization level, click the Master data icon.
Go to Packages.
Click Add.
Enter General information for the custom package template.
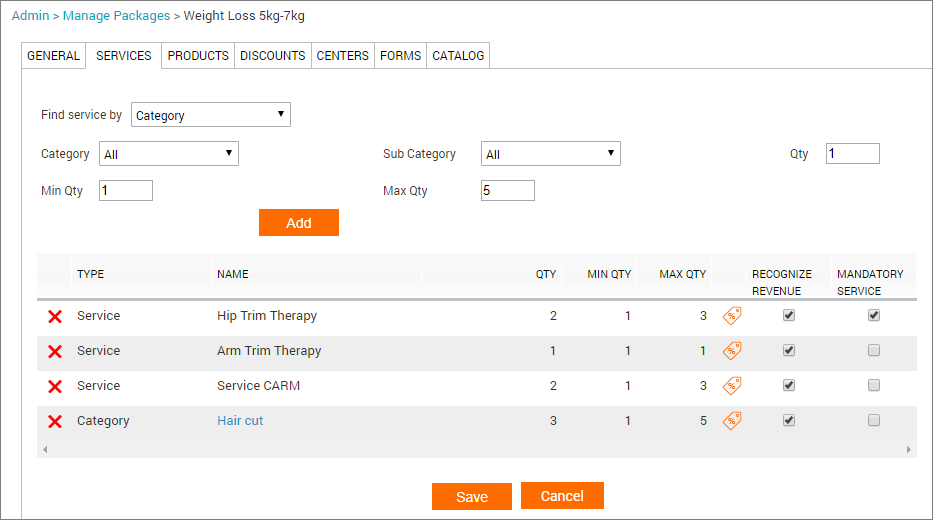
Enter the following information under the Services tab: See screenshot for reference.
Find Service by: Select either Category or Service from the drop-down list.
If you select Category: You need to further specify the Category, Sub Category, Quantity, Minimum Quantity and Maximum Quantity. Example: You could have Body Services as the Category, Slimming Services as the Sub Category.
Quantity: Enter the number of times the guest must avail the service as part of the package benefits. Example: 5 times
Minimum Quantity: Enter the minimum number of times the guest must avail the service as part of the package benefits. Example: 1 time
Maximum Quantity: Enter the maximum number of times the guest can avail the service as part of the package benefits. Example: 7 times
If you select Service: Start entering the name of a service and select a service from the drop-down list. Example: Arm Trim Therapy
Quantity: Enter the number of times the guest must avail the service as part of the package benefits. Example: 5 times
Minimum Quantity: Enter the minimum number of times the guest must avail the service as part of the package benefits. Example: 1 time
Maximum Quantity: Enter the maximum number of times the guest can avail the service as part of the package benefits. Example: 7 times
Click Add.
Note
If you selected Category and Sub Category in the previous step, then the subcategory name appears in the bottom panel. For example, if you selected Hair Services as the Category and Hair Cut as the Sub Category, then Hair Cut appears in the bottom panel. You can click this subcategory name (Hair Cut) to view the associated services (such as Crimping and Blowdry).
Select the checkbox for Recognize Revenue if you want that service to contribute to package redemption revenue.
Similarly, if you do not want a service to contribute to package redemption revenue, ensure that the corresponding checkbox for the service is not selected (or it is cleared). Usually, such services are complimentary services that you offer as part of the package. See screenshot for reference.
Example: You sell a custom package for $300 with 2 sessions each of three different services (S1, S2, and S3). The original price of all services is $100 and the Initial Revenue Recognition (IRR) of the package is set to 0. When the guest avails each of these services from the package, $50 is recognized as package revenue.
Now, if you have configured only S1 and S2 for revenue recognition, then Zenoti recognizes $75 when the guest avails S1 or S2 from the package and $0 is recognized when the guest avails S3. In this case, S3 is a complimentary service.
Select the checkbox Mandatory Service to indicate mandatory services in packages sold based on this template.
Important
When the front desk creates custom packages based on this custom service template, they cannot delete services that are marked mandatory. See screenshot for reference.
Example: If you mark Hip Trim Therapy as a Mandatory service, the front desk cannot delete this service while creating a custom package based on this custom package template. See screenshot for reference.
Note that if you have another service such as Arm Trim Therapy that is not a mandatory service (the Mandatory Service checkbox is not selected for this service), when the front desk creates a custom package based on this template, they can delete such a service from the custom package.
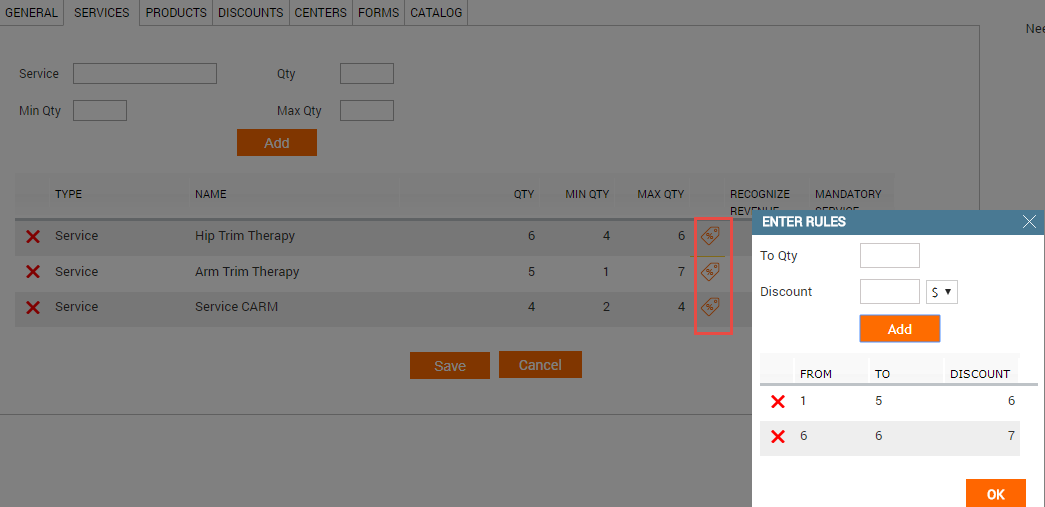
[Optional]: Click the Setup discount icon to set up discounts for each service separately. See screenshot for reference.
Click Next.
Next step: Enter Product details for the custom package template Previous step: Enter General information for the custom package template
Screenshots for reference
Specify the services from which you want to Recognize Revenue and services from which you don’t want to recognize revenue (complimentary services). Also, indicate if a service is a Mandatory Service:
The front desk cannot delete a Mandatory Service while customizing the package for a guest:
Click the Setup Discount icon to set up discounts for services that are part of the custom package template:
To set up a custom package template so that the front desk may use these templates to customize packages for guests, you need to enter product related details.
At the organization level, click the Master data icon and navigate to Packages.
Click Add.
Enter General information for the custom package template.
Enter Service details for the custom package template.
Enter the following information under the Products tab:
Find Products by: Search for products by Category, Product Name, or Tag.
Depending on your choice, Zenoti provides further settings for you to configure.
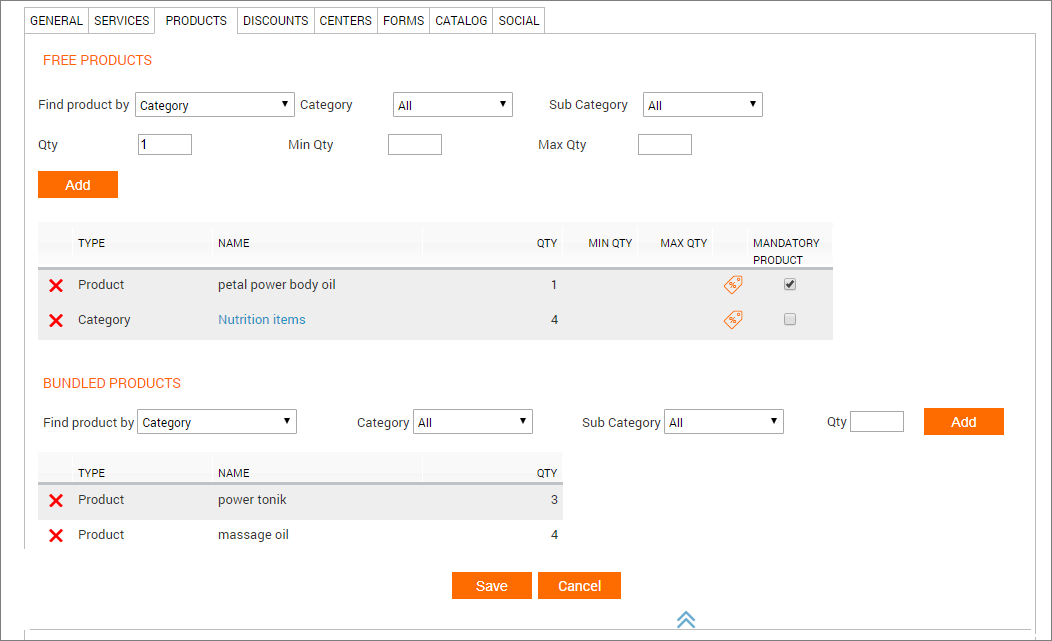
Free Products: For instance, if you select Category, then you get further options to specify the Category (name), Subcategory (name), and details of the Quantity (Minimum Quantity, Maximum Quantity).
If you select Products, then you can start entering the names of free products and the number of units of these free products. For example, if you enter a product such as a body oil of say 1 unit or quantity, it means the cost of this product (of 1 unit) is part of the package cost - guests need not pay for this product (for the quantity specified) separately.
You can also specify Discounts for products that you configure under this section - this is a good way to boost sales of retail products. You can configure these discounts as either a flat amount or a percentage value. For example, if a custom package template includes 10 units of a hair serum, you can define a 7% discount if guests buy 4-6 units and 10% discount if they buy 7-10 units.
Bundled Products: Enter the names of bundled products and the number of units of these bundled products. Guests pay separately for bundled products. For example, if you specify a product such as a massage oil of 4 units as a bundled product, it means that the guest has to pay for this product separately. This cost is over and above the cost of the package itself.
Click Add.
The details of the free products and bundled products appear in the respective sections. For free products, you can further specify whether the product is Mandatory. This means that when the front desk sells a custom package based on this template, the mandatory product is part of the package.
Note
If you choose to Find Products by Category (say Body Services) in the previous step in the Free Products section, then the corresponding subcategory name (say, Body Lotions) appears in the bottom section of the Free Products panel. You can click this subcategory name (Body Lotions) to view the associated products (such as Aloe Vera Body Lotion, Herbal Body Lotion).
Click Save.
Next step: Add Discounts on services that are not part of the custom package template
Previous step: Enter Service details for the custom package template
You can specify the centers where you want to make the custom package template available. In addition, you can specify the price of the custom package template for each center. The cost or the sale price can vary from center to center.
At the organization level, click the Master data icon and navigate to Packages.
Click Add.
Enter General information for the custom package template.
Enter Service details for the custom package template.
Enter Product details for the custom package template.
Add Discounts for services not part of the custom package template.
Enter the following information under the Centers tab:
Select the name of the center where you want this custom package template to be available
Enter the Sale Price of the custom package template.
Enter the Discount on Renewal either as a flat amount (25) or as a percent (10%).
Select the appropriate Tax Group from the drop-down list.
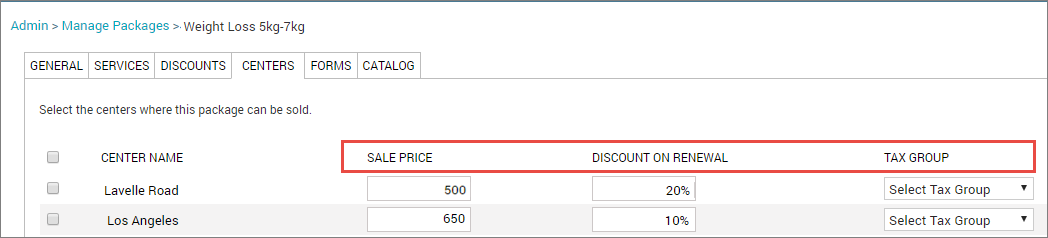
Click Save.
Next step: Associate forms to the custom package template.
Previous step: Add discounts for services that are not part of the custom package template
Create a custom package
Tip
Once the front desk understands the kind of services a guest needs, it is easy to customize the package to cater to individual needs. To make this task easier still, the front desk can choose to use custom package templates.
Administrators pre-configure these templates with:
Service details: Includes details of service names, sittings (or sessions), mandatory services, and services from which revenue must be recognized.
Product details: Includes details of free products and bundled products (where product price is not included in price of the package).
Discounts: Includes details of discounts on services not included in the package - this is to promote the sale and use of some services.
Pricing details: Includes the price of the package.
Expiration details: Includes information on the validity period of the package.
The front desk can, therefore, use these prebuilt templates to quickly create custom templates from the Appointment Book.
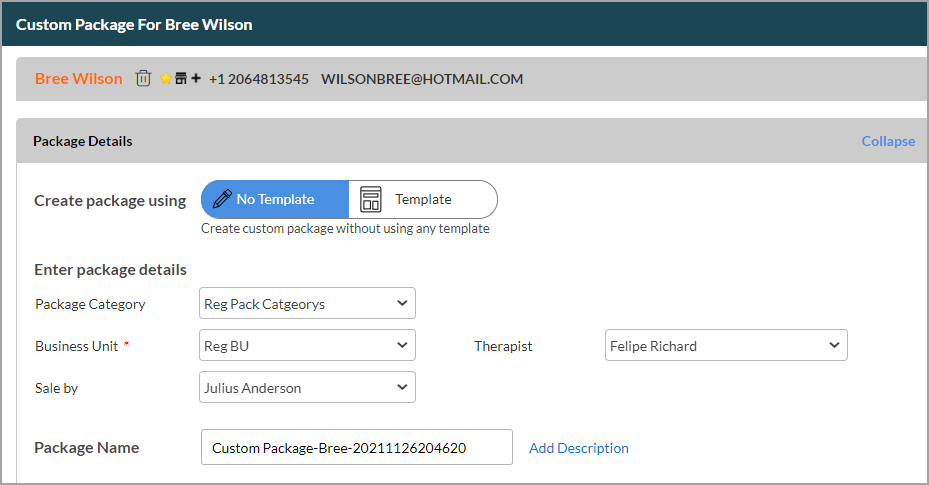
Click any open slot on the Appointment Book and select Custom Packages from the context menu.
The Create Custom Package window opens.
Enter guest details.
For existing guests:
Select the checkbox Search for customers across centers if you want to search for guests belonging to all your centers.
Start entering a guest’s name and select a name from the list of matching results.
For new guests:
Click Create new guest. A new window opens. You need to enter guest details in this window.
Note
If you choose to create a new guest, you need to enter the new guest’s details in a new window.
Once you enter a guest’s name, the guest’s name appears in the top panel. You can change the guest by clicking the ‘X’ icon that appears after the guest name.
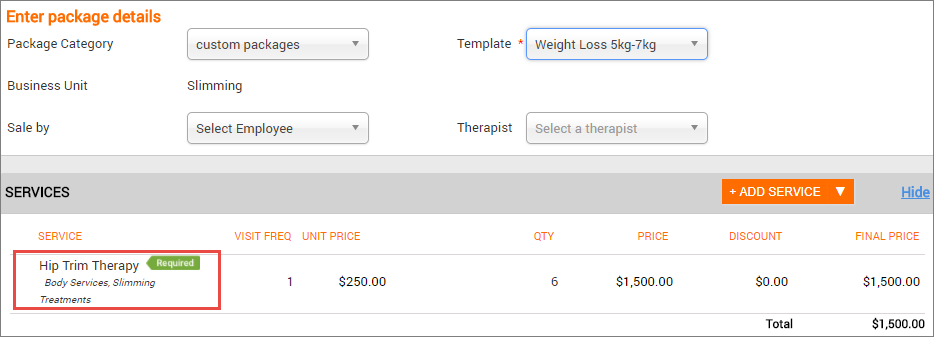
Enter a Package Name or continue with the auto-filled name.
If you choose to enter a different name, first select the Package Category and
Template from the Package Details section before entering the Package Name.
Click Add Description to enter a short description for the custom package.
From the option Create package using, select Template.
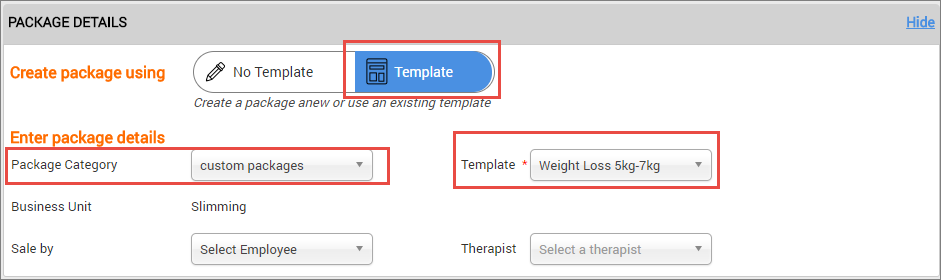
Select an option from the Package Category drop-down list depending on the kind of package you are creating for the guest.
The Templates drop-down list displays the templates available for the Package Category you chose.
Select a template from the Templates drop-down list. See screenshot above.
Zenoti autofills the details for services, products, price, and expiration (based on the custom package template).
For example, if you use a template called Weight Loss 5 kg - 7kg, then Zenoti autofills details such as the Business Unit (Slimming), the mandatory services (Hip Trim Therapy), and other services (Arm Trim Therapy), the unit price, total price (based on the number of sittings), discounts, and final price. Similarly, Zenoti also picks up details about the products, package price, and expiry details from the template.
Important
You cannot remove services marked as Mandatory (in the template) or products marked as Mandatory (in the template) from the custom offering.
Select the name of the person who made the sale using the Sale By drop-down list. See screenshot above.
Select the name of person who will act as the primary counselor, guide or point of contact for the guest in his/her subsequent visits using the Therapist drop-down list. See screenshot above.
Click Add Service to add the services that the guest wants.
Note
What you see in this section depends on your organization level settings. If you want to add services with a discount above the assigned job level discount, ensure that the following settings are configured correctly:
Edit service level discount for series template must be disabled.
Template selection is Mandatory must be enabled.
Select a service from the drop-down list. Zenoti autofills the Quantity as 1 and displays the Price accordingly. Edit the Quantity as required.
Note
You can make edits to these services by changing the quantity or discount (if the setting Allow to change service-level discount for custom packages is enabled in the template under the General tab).
You can remove any services from the list that may not be relevant to the guest you are selling the package to.
Select Add Category to quickly add a bunch of services belonging to a category. This means you can add services that do not belong to the template.
Note
You will not see this Add Category option as this is dependent on your organization level settings. You will not see this option if your organization level setting While creating custom packages is set to Template selection is mandatory.
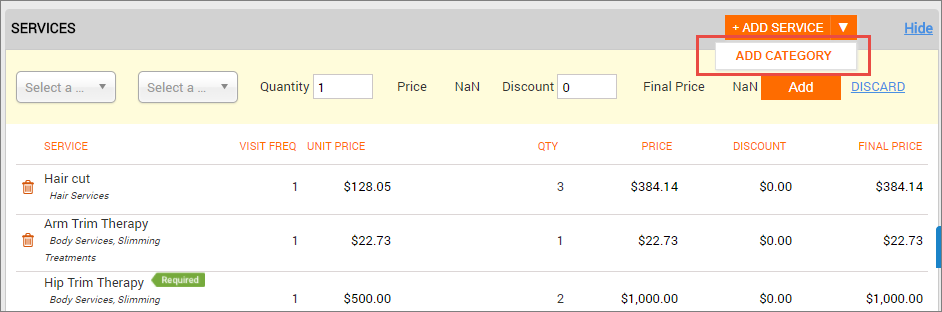
If you make any changes to this section such as change the quantity, discount, or add a new service, Zenoti updates the Final Price accordingly.
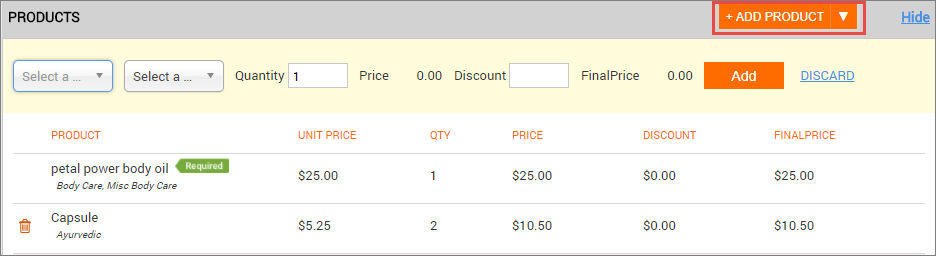
Add products by clicking Add Product or by selecting Add Category on the top right corner of the panel. Depending on your choice, you need to either select a product from the drop-down list or select a subcategory and then select the relevant product.
Zenoti autofills the Quantity as 1 and displays the Price accordingly. Edit the Quantity as required.
Note
If the template has any free products, the price of such a product appears as $0.
Note
You can make edits to these products by changing the quantity or discount (if the setting Allow to change product-level discount for custom packages is enabled in the template under the General tab).
You can remove any products from the list that may not be relevant to the guest you are selling the package to.
If you make any changes to this section such as change the quantity, discount, or add a new product, Zenoti updates the Final Price accordingly.
Select applicable discounts under the Discount section.
Any package discounts added to the template appear in this drop-down list. If there are no package discounts associated to the template the drop-down list will be empty.
Using this drop-down list, you can choose to provide an additional pre-configured discount for your guest.

Review the Package price that displays the pre-configured price at template level or the updated price depending on the changes you made to the package.
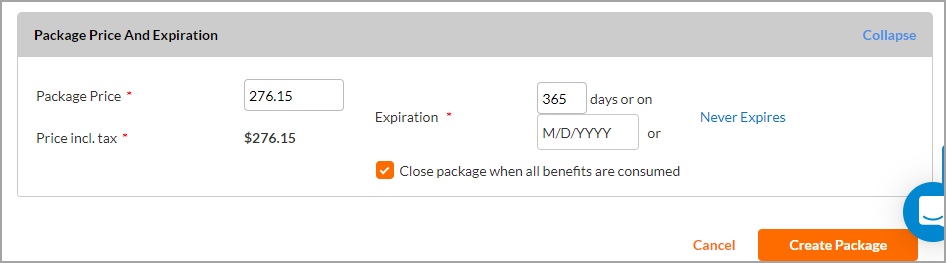
Under Package Price and Expiration, for Expiration, you can use the value configured at template level or pick an expiration period to customize it for the guest (you may need to have the corresponding security role permissions enabled to edit this field).

When creating a custom package from a template, the Purchase Package using Gift Card setting automatically inherits the template’s configuration. This setting cannot be overridden manually. This simplifies setup by auto-selecting the right default for custom packages.
Zenoti shows the Invoice/collect payments screen with the break-up of the cost.The guest needs to pay either the full amount or part of the amount to start redeeming benefits of the custom package.
The Close package when all benefits are consumed setting automatically inherits the template’s configuration. If disabled in the template, it will be disabled by default in the custom package, and vice versa. This can be overridden by clicking on the checkbox.
Click Create Package.
Important
The organization level setting Enable redemptions on open package controls whether guests can make partial payments towards packages and redeem package benefits. At any point in time, the guest can redeem services up to the amount they have paid for.
Tip
Important
The organization level setting for template selection while selling custom packages controls whether the front desk can create custom packages that are not based on templates.
Click any open slot on the Appointment Book and select Custom Packages from the context menu.
The Create Custom Package window opens.
Enter guest details.
For existing guests: Select the checkbox Search for customers across centers if you want to search for guests belonging to all your centers.Start entering a guest’s name and select a name from the list of matching results.
For new guests: Click Create new guest. A new window opens. You need to enter guest details in this window. Note: If you choose to create a new guest, you need to enter the new guest’s details in a new window.
After you enter a guest’s name, the guest’s name appears in the top panel.
Enter a Package Name or continue with the auto-filled name. If you choose to enter a different name, first select the Package Category and Template from the Package Details section before entering the Package Name.
Click Add Description to enter a short description for the custom package.
From the option Create package using, select No Template.
Select a Package Category depending on the kind of package you are creating for the guest.
Select the Business Unit relevant for the package.
Select the name of the person making the sale using the Sale By drop-down list.
Select the name of the person who will act as the primary counselor, guide or point of contact for the guest in his/her subsequent visits using the Therapist drop-down list.
Start adding services to the package using Add Service or Add Category button (click the arrow mark to the right of Add Service to view the Add Category button).
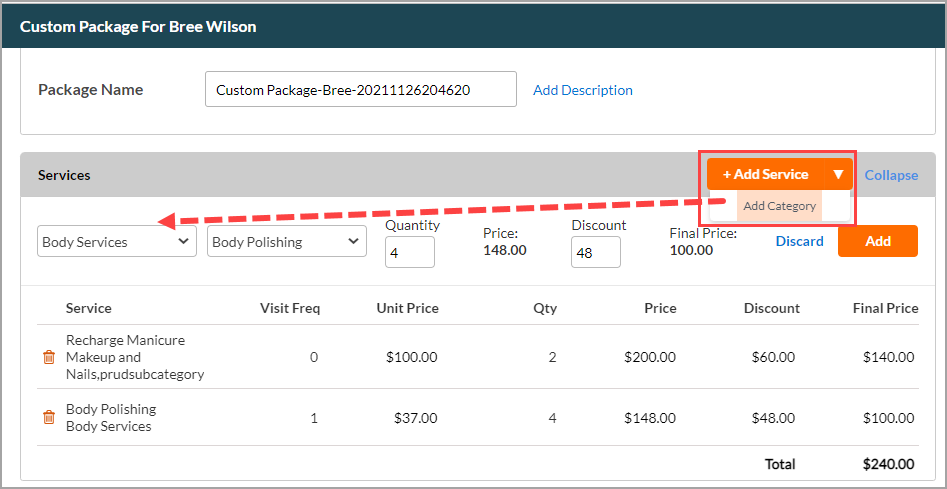
Select the service from the drop-down list. Enter the Quantity of the service and any Discount you would like to provide on the service. Click Add.
Add a service category or sub-category by clicking Add Category.
Select the Service Category and select the Sub-category. Enter the Quantity of services to be added to the package and enter the Discount value. Click Add.
You can add more services or categories depending on the guest requirements or make edits to services already added.
Start adding Products to the package using the Add Product or Add Categorybutton (click the arrow mark to the right of Add Product to view the Add Category button).
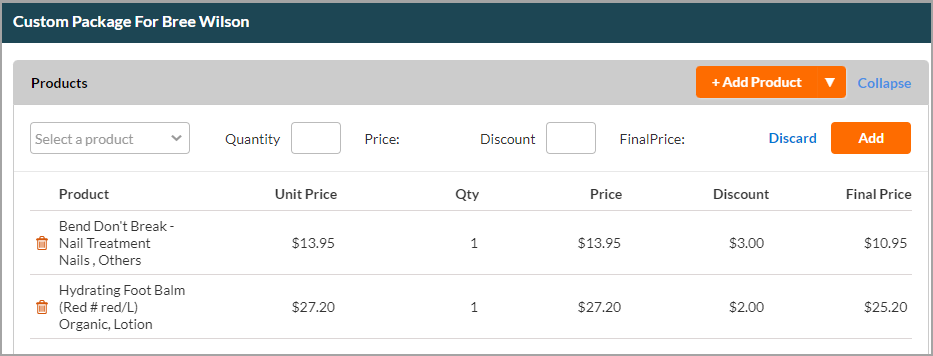
Select the Product from the drop-down list. Enter the Quantity of the Product and any Discount you would like to give on the product. Click Add .
Add a Product Category or Sub-category by clicking Add Category.
Select the Product Category and Sub-category. Enter Quantity of products to be added to the package. Enter the Discount value. Click Add.
You can add more products or categories depending on the guest requirements or make edits to products already added.
View the Package price that appears depending on the services/ products you have added to the package. You can edit the package price depending on the extent of discount you would like to provide to your guest on the package sale.
Select the Validity Model based on the nature of the package.
For example, if it’s a fixed term package you can choose Fixed Value or if the package validity depends on the frequency of guest visits and the number of treatments added to the package you can choose Maximum Frequency, Sum of All Frequencies, or Mixed Model.
If you selected Fixed Value in the previous step, choose the Expiration date or the Number of days in which the package will expire.
If you selected any other Validity Model in the previous step, Zenoti determines the expiration accordingly.
When selling a custom package without a template, the Purchase Package using Gift Card setting checkbox is selected by default. To disallow gift card-based purchases, clear this checkbox.
Select the Close package when all benefits are consumed check box if you wish to declutter the POS. If you select this check box, this package will not appear in the POS drop-down list after the guest redeems all the benefits of the package.
Note
This check box appears depending on package-level settings.
Click Create Package.
Zenoti shows the Invoice/collect payments screen with break-up of the cost.
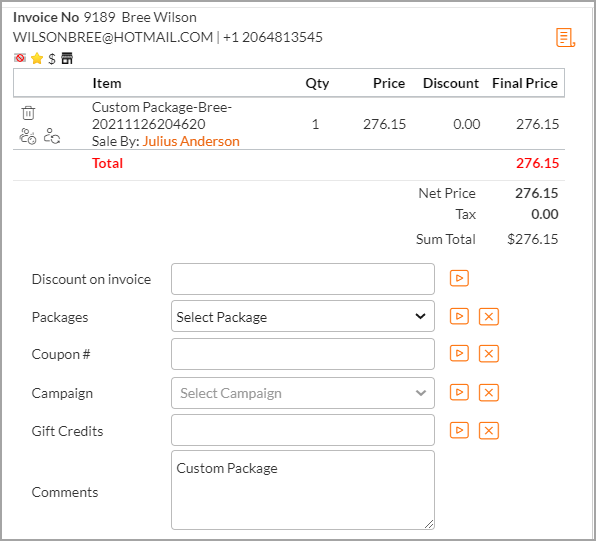
The guest needs to pay either the full amount or part of the amount to start redeeming benefits of the custom package.
Important
The organization level setting Enable redemptions on open package controls whether guests can make partial payments towards packages and redeem package benefits. At any point in time, the guest can redeem services up to the amount they have paid for.
Set up a day package
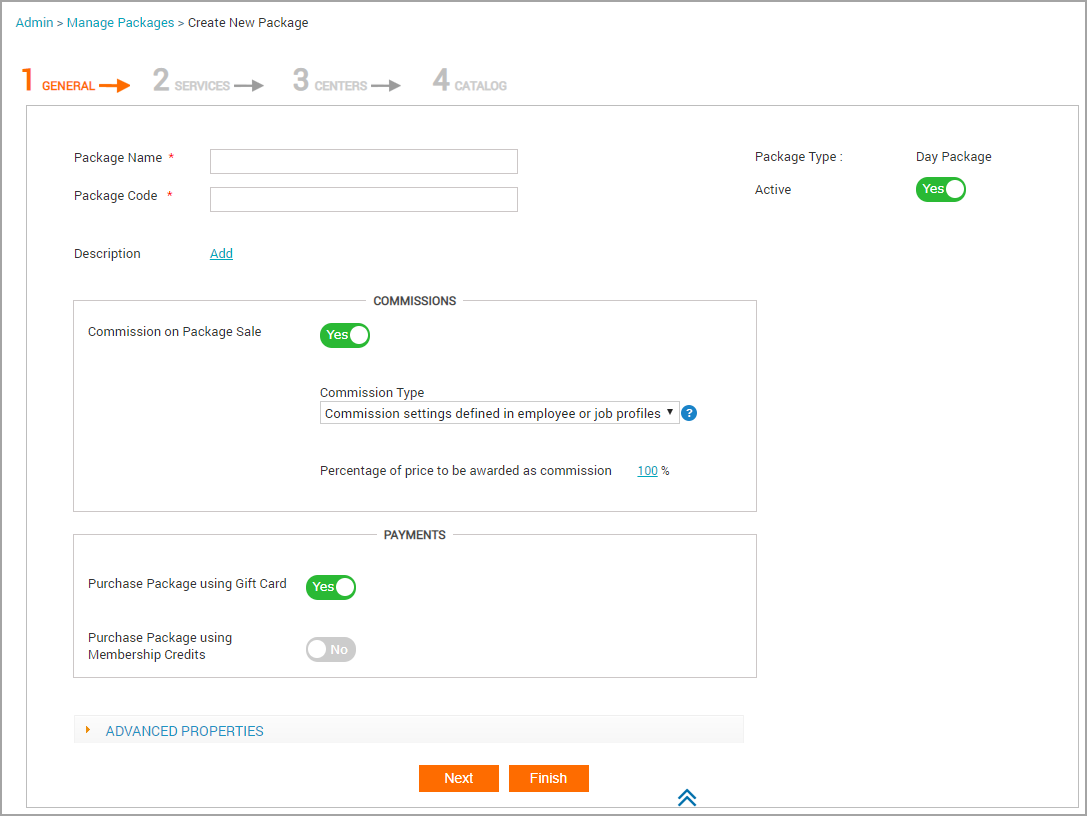
General tab
At the organization level, click the Master data icon and navigate to Packages.
Click Add Day Package.
Note
The status of the package is Active by default.
In the General tab:
In the Package Name field, enter a name for the package.
Note
You can add '/' in the package name. For example, Laser Pigmentation Removal 1/4 Legs Qty 6.
In the Package Code field, enter a code for the package so that it is easy for you to search and find later.
If you want to enter a description, click the Add link next to the Description field and enter the plain text description for the package.
Note
The plain text description appears in mobile apps and in the POS.
In the General tab, Commissions section:
Note that the switch Commission on Package Sale is turned ON by default. This means employees will earn a commission when they sell this package.
Important
If you turn OFF this setting, employees do NOT earn commission on services listed in the package. When you turn OFF the setting, you can no longer see the commission-related settings.
Assuming you proceed with Commission on Package sale being switched ON, you can further specify the Commission Type to be based on:
Commission settings defined in the employee or job profile
Flat amount, or
Percentage of revenue.
Percentage of price to be awarded as commission: Note that 100 is the default value here and it means that you will award the standard commission the employee earns on the sale of this package. The standard commission is defined at the Employee level (Packages tab).
You can override the commission an employee earns for the sale for this specific package here. For example, to double the standard commission, enter '200'. Leave this blank if you do not want to modify the standard commission an employee earns on the sale for this package.
Deductions for employee commissions: You will see options for deductions for employee commissions depending on the deduction-related settings you have turned on for your organization. For example, if you can choose to define deductions for Shop Cost and Labor Cost at the organization level, you can view options to define the deductions for Shop Cost and Labor Cost here as either a flat amount or as a percentage (add suffix ‘%’ say 5%, in such cases).
In the General tab, Payments section:
Purchase Package using Gift Card: Note that the switch Purchase Package using Gift Card is ON by default. This means guests can buy this package using a gift card. If you do not want guests to pay for this package using gift cards, turn OFF this switch.
Purchase Package using Membership Credits: Turn ON this switch if you want guests to be able to purchase this package using their membership credits.
In the General tab, Advanced properties section:
Business Unit: In the Business Unit drop-down box, select the appropriate business unit.
Restrict Sale to Specific Days: In the Restrict Sale to Specific Days, No restriction is the default value. If you want to configure specific sale dates, click No restriction to view the Start and End date fields; select the appropriate start and end dates from the calendar controls.
Cancellation fee: Turn this switch on if you want to charge a cancellation fee if the guest cancels an appointment.
Note
Once you turn this switch on, you can view another switch, Commission on Cancellation. Turn this switch on if you want the provider to get a commission even if the guest cancels a scheduled appointment. You may want to boost the morale of your providers by awarding a small commission for canceled appointments.
No Show Fee: Turn this switch on if you want to charge a no show fee if guests do not turn up for their appointment.
Note
Once you turn this switch on, you can view another switch, Commission on no show. Turn this switch on if you want the provider to get a commission even if the guest does not come in for a scheduled appointment.
Tags: Click the Configure link if you wish to enter relevant tags for this package. You can use tags to group packages. For example, once you create a tag “Slimming” you can use it when creating all your weight loss packages. Then when you run a sales report you can filter packages sold using the “Slimming” tag to check the health of your business in this area and take further business decisions around it. You can create new tags from the organizational level from the Configuration> Packages menu.
Next steps: Set Up a Day Package: Service and Other Tabs
Services and other tabs
At the organization level, click the Master data icon and navigate to Packages.
Click Add Day Package.
In the Services tab enter the following information:
In the Add service by field, if you select Service: Start entering the name of the service and relevant services will automatically show up, then select the service. Enter the order to be enforced during redemption as a number in the Order field. Click Add.
In the Add service by field, if you select Service Category: In the Category field select the category name from the drop-down box. In the Sub Category field select a specific subcategory using the drop-down box. Enter the order as a number in the Order field. Click Add.
In the Add service by field, if you select Service with same Tag: In the Tag field start entering a tag name and relevant tags will automatically show up. Then select the tag. Enter the order as a number in the Order field. Click Add.
Click the name of the Category to see the available Services.
Click Next.
In the Centers tab, select the centers that can sell this package.
Enter the sale price in each center in the Sale price column.
Select the tax group in the respective centers using the Tax Group drop-down box.
Click Next.
In the Catalog tab, do the following:
Upload an image that you want to showcase on your Webstore.
Select the Show in the Webstore and mobile app checkbox if you would like clients to be able to browse for packages on your Webstore or mobile app.
In the Display Name field, enter the name of the package.
In the Display Price field, enter the price of the package.
In the Display Order field, enter the position that this package should display with other packages in the Webstore.
Select the Show Price checkbox to display the price online.
Select the Allow customer to book this package checkbox to allow online booking for this package.
In the YouTube Video ID field, enter the URL for a video related to this package, if any.
In the Page Title, enter the title that you want your guests to see.
In the Meta keywords field, enter relevant meta keywords related to your package.
In the Meta description, enter a relevant description for your package.
In the HTML description field, enter a HTML description).
Click Finish.
The day package is now created and available for guests to buy. You will see two additional tabs after you have created the day package - these tabs are Forms and Social.
Impacts and considerations
If you specify an order for services - that’s the order the front desk staff sees by default while selling the package. The front desk can change the order of the services if required.
The Display Name is the name that will be seen on the Webstore and your mobile app and can be different from the name that you use to refer to the package internally.
The Display Price is the price that will be seen on the Webstore and the mobile app. This price can be different from the internal package price set at the center level.
Couple services and group services can't be added or availed for a day package.