Manage packages
On the Packages page, you can view the package status, balance, and redemptions. You can also collect payments, process refunds, transfer credits, extend expiry date, freeze, and unfreeze packages.
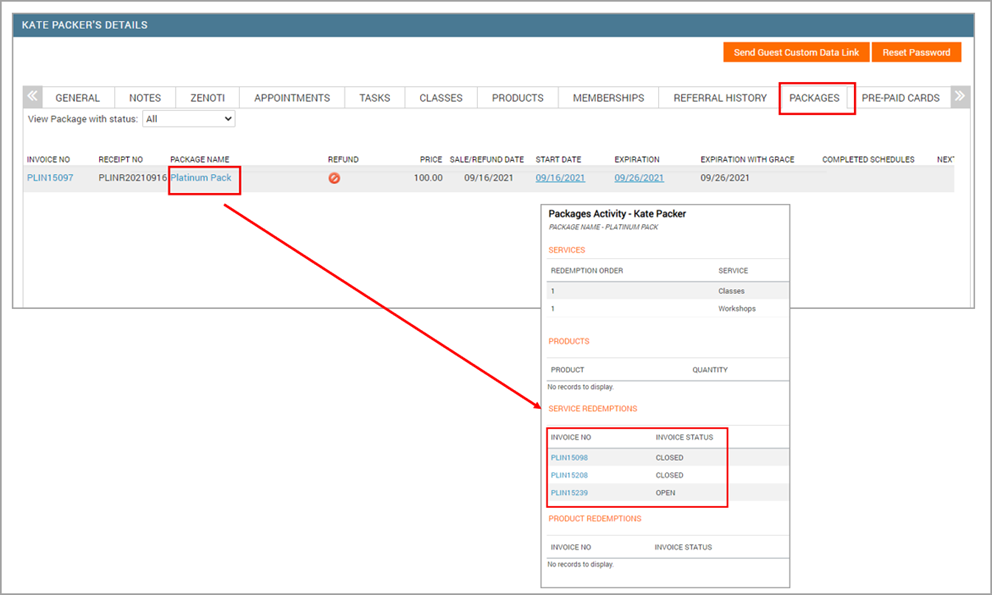
From the guest profile, click the Packages tab.
Click the name of the package.
You can view details such as services and products included in the package, service redemptions and balances, and product redemptions.
Note
For custom packages, the Balance Amount is displayed only if the package invoice has been closed.
Note
Many of these actions depend on the permissions enabled by your business.
Transfer service credits
Click the name of the package from which you want to transfer service credits.
In the Services section, under the Balance column, click Transfer. Note: Zenoti prompts you to enter your credentials.
Enter the following details:
Service: Shows the name of the service whose package credits you are about to transfer.
Note
Day packages included as benefits in series packages cannot be transferred.
Quantity: Enter the number of credits to transfer.
Expiration Date: Select the date on which the transferred credits will expire. The recipient must use them before this date.
Recipient: Enter the name of the guest who is to receive the service credits. The recipient can be a new or an existing guest.
Click Save.
If you do not see the Transfer button, you do not have the permissions to transfer packages.
You can transfer service credits only of a package that is configured to allow transfer of service credits.
The package must be Active.
The original guest (transferor) must have at least 1 credit to transfer.
Refund a package
Click the name of the package you want to refund.
Click the Refund icon next to the package charge you want to refund.
On the Select Items page, select the package you want to refund and enter the amount to be refunded in the Refund Amount field. Also, enter the reason for the refund in the Comments box. Note: The refund amount cannot exceed the package balance that remains. Also, when processing a refund, any tax that was received on the amount is deducted from the relevant accounts for the center. Select the check box next to the name of the package.
(Optional): Select the checkbox, Mark package ‘Closed’, if the guest wants to discontinue using the benefits of the package after the refund. Enter the reason for the refund in the Comments box and then click Save.
If the guest wants to continue to use the remaining benefits of the package, click Proceed to Refund after step 4.
The package remains in Active status and guests can continue to redeem the remaining benefits at a later time.
On the Payment Methods page, select the Refund amount can be split across one or more below option.
Based on the payment type you want to use, in the Paid Amount column, enter the amount in the corresponding box. Note: Click the icons for Check, Card, Issue Prepaid Card, or Custom Payment types and enter the relevant details.
Click Refund.
Note
If you do not see the Refund icon button, contact your manager.
For integrated credit processing, you are not required to enter the card details as Zenoti automatically refunds the amount to the card from which the amount was received. However, if the payment was made through a debit card, you will receive an alert to swipe the debit card, after which, Zenoti completes the refund process.
The refund invoice opens with the payment type details, showing the refund amount as a negative number.
Freeze a package
Go to the Packages tab in the guest profile, click the name of the package you want to freeze.
Click Freeze.
In the Freeze Package popup, choose how the package should unfreeze:
Unfreeze on: Select a calendar date for automatic unfreeze.
Unfreeze after: Enter the number of days after which the package automatically unfreezes.
Manual unfreeze: Proceed without selecting an automatic option if you prefer to unfreeze it manually later.
Enter a relevant comment.
Click Save and Proceed.
What happens next
Zenoti records the selected unfreeze date or duration and reactivates the package automatically if an automatic option was chosen.
Automatic unfreeze aligns with membership freeze behavior for consistent handling across the platform.
Unfreeze a package
Automatic unfreeze: If an automatic option was set during freeze, the package returns to Active on the scheduled date or after the specified number of days—no staff action needed.
Manual unfreeze:
Go to the Packages tab in the guest profile, click the name of the package you want to freeze.
Click Unfreeze.
Enter a relevant comment.
Click Save.
Considerations
Automatic unfreeze prevents packages from remaining frozen indefinitely and supports expiry-based revenue recognition.
Use automatic options for predictable reactivation; use manual unfreeze when you need full control over reactivation timing.
Permissions may affect your ability to freeze/unfreeze packages. Contact your administrator if you don’t see the buttons or options.
Automatic unfreeze:
Packages that are frozen automatically by Zenoti can also be unfrozen automatically when the conditions that caused the freezeare resolved.
Scenarios
Payment failure recovery
When a package is frozen due to a failed scheduled payment, Zenoti automatically unfreezes it if the guest later pays the failed schedule successfully.
Note
Only packages frozen automatically by the system are eligible for automatic unfreeze. If a package was manually frozen, it will remain frozen until a staff member manually unfreezes it.
Payment dispute resolution
When a package is frozen due to a payment dispute, Zenoti automatically unfreezes it if the business wins the dispute or the guest withdraws all disputes related to that package. If the guest wins any dispute, the package remains frozen for manual review.
Settings
The following options appear under Freeze Rules in the Admin configuration screen:
Freeze on payment failure
Sub-setting: Enable automatic unfreeze when payment conditions met (Default: On)
Freeze on payment dispute
Sub-setting: Enable automatic unfreeze if business wins dispute (Default: On)
Logs and audit
All freeze and unfreeze actions — whether manual or system-driven — are logged with the following details:
Timestamp
Reason (Example: Payment failure, Payment dispute)
Actor (System or user)
View package redemption status
Front-desk staff can view the status of a package redemption invoice (Open, No Show, Cancelled, Closed, Closed (No Show), and Closed (Cancelled)) from the Guest Profile (Packages tab).
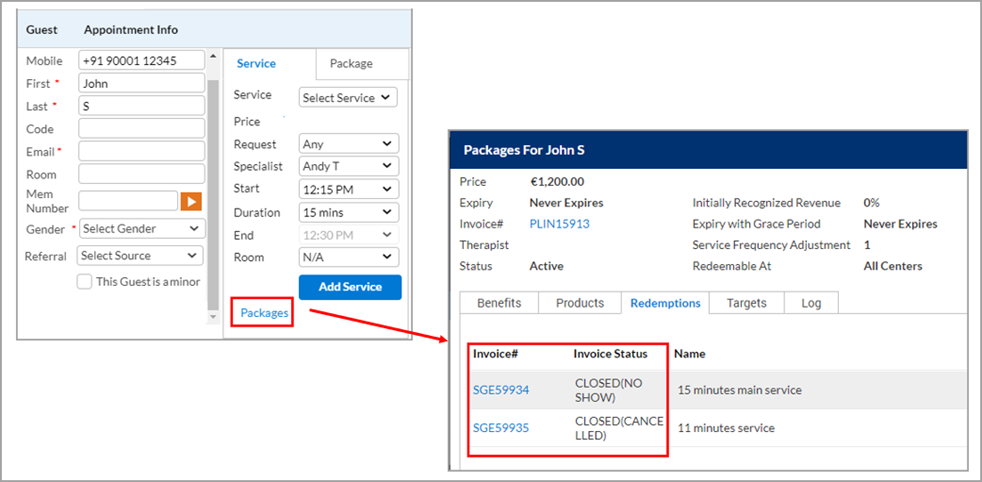
You can also view the same details from the Appointment Book -> Booking Panel (Service tab).The invoice numbers are hyperlinks, which enable you easily access further details.
Other actions on series and custom packages
Action | Perform these steps | Notes |
View the invoice number of the package sale |
| |
Change the package expiry date |
| If the date in the Expiration column is not editable, you do not have the permission to change the expiry date of packages. |
Change the package expiry date grace period |
| If the date in the Expiration with Grace column is not editable, you do not have the permission to change the expiry date of packages. |
View transferred service credits |
For more details on the transfer, in the Services section, in the Transferred column, click the link. You can view details such as date of transfer, recipient name, credits shared, balance, credit date expiry, transfer authorizer, and undo transfer | |
Undo transfer of service credits |
| |
View forms associated with packages |
| |
Modify a custom package |
|