Release Notes - February 18, 2025
Revision History
The table below lists the updates made to this document after the initial software release, including details of revisions made.
Date | Feature/Module Name | Section | Change Description |
|---|---|---|---|
02-24-2025 | HyperConnect | Added Release Notes snippet | |
02-24-2025 | HyperConnect | Added Release Notes snippet | |
02-24-2025 | HyperConnect | Added Release Notes snippet |
We’ve enhanced the structure of our release notes to better serve your needs. Updates are now categorized under clear headings based on Add-ons, Core Product, Product Edition, Personas, and Modules.
We’ve enhanced the structure of our release notes to better serve your needs. Updates are now categorized under clear headings based on Add-ons, Core Product, Product Edition, Personas, and Modules.
This new format ensures you can quickly find updates most relevant to your role, understand the value each change delivers, and seamlessly adopt new features or enhanced workflows.
This Release Notes contains the following sections:
Announcements: Key updates and important information related to the release.
New Features: Newly introduced functionalities designed to enhance the product experience.
Enhancements: Improvements made to existing features for better usability and performance. Categorized features as Core Product, Product Editions, and Add-ons.
Additional Resources: Links to supporting materials such as guides, training, and documentation. This also includes references to the release notes for the patches included in this update.
Icons used in this document
Icon | Description |
|---|---|
 | Automatic update for all users. |
 | Localization available. |
 | Employee: Enhancements or features for employee and payroll. |
 | Admin: Features specifically enhanced for admin users who manage the system configuration, including user roles, permissions, and system integrations. |
 | Business Owner/Center Manager: Updates implemented for the business owners or managers who are responsible for overall business strategy, growth, and decision-making. |
 | Front Desk Operator/Service Provider: Features that enhance the usability for front-desk staff who handle appointments, customer queries, payments, and guest interactions. |
 | Guests: Improvements made for the end-users or customers of the business who interact with Zenoti through online booking systems, self-service kiosks, and branded mobile apps. |
Announcements
Module: HyperConnect
Module: Admin

 Admin, Business Owners
Zenoti now allows businesses to set two-factor authentication based on job titles, roles, and specific employee profiles. Two-factor authentication can be activated for only those employees whose job title or role mandates it or for specific employee profiles if necessary. This enhancement applies uniformly across all modes of two-factor authentication, including text messages, emails, and authenticator applications.
Key benefits:
Improved data security through the enforcement of two-factor authentication for employees in roles with access to sensitive information.
Faster logins for non-critical employees, as two-factor authentication may not be required for their roles.
This feature is enabled by default.
Module: Payments
Business Owners, Employees
Zenoti is introducing the full-service payroll solution that simplifies payroll processing for businesses while providing their employees with easy access to their pay information.
Businesses can experience an efficient payroll that enhances operational efficiency and reduces costs with a single platform, ensuring timely payments to employees and greater transparency. Employees can now receive their salaries directly into their bank accounts through various payment methods, including bank transfers, digital wallets, and physical checks.
Key features :
For businesses:
Automated earning calculations.
Tax compliance across 50 states – W2s and 1099s.
Unlimited Payroll runs and on-the-fly adjustments.
Next day direct deposits with flexible payroll options and comprehensive payroll insights.
For employees:
Detailed paycheck break-down.
Centralized payroll access (from either myZen app or web app).
How to enroll?
Reach out to your Zenoti representative or email us at payrolloperations@zenoti.com.
Early adopter pricing is available at a discounted rate for a limited time.
Learn more: For detailed instructions, refer to the Payroll Payouts articles.
New Features
Core Product
This includes foundational features and tools that are essential for running day-to-day business operations. These features cover appointments, POS, employee management, inventory, reporting. They are designed to provide a seamless experience for users across all industries Zenoti serves.
Module: Fitness
 Business Owners/Center Managers, Service Providers
We are excited to introduce Challenges, a new sub-feature designed to enhance student engagement for class-based fitness businesses. Challenges allow businesses to set short-term, time-bound goals encouraging students to stay consistent, track their progress, and earn rewards.
This feature is not enabled by default. Reach out to your administrator to enable this feature.
Key benefits:
Increase student participation with personalized goals that keep students engaged and motivated.
Improve retention by offering incentives or rewards to encourage participation.
Enhance communication through real-time notifications on mobile devices, keeping students informed and engaged.
Streamline performance tracking with automated insights and reporting to measure success effectively.
Learn more: For detailed instructions, refer to the following articles:
Enable Class Challenges for your business to improve student engagement
Create and manage Class Challenges as an admin or front desk staff
Business Owners/Center Managers, Service Providers
Zenoti is now integrated with Huzzard, a leading door access hardware solution, enabling seamless control and tracking of member access through Columbia Fitness, Huzzard’s software partner. This integration enhances operational security and efficiency by ensuring only eligible members can access facilities, simplifying guest access management, and maintaining accurate check-in records within Zenoti.
Huzzard integration is not enabled by default. Reach out to your Zenoti representative to enable this feature.
Active Members Data Synchronization Huzzard’s Columbia Fitness software can now fetch all active members’ information directly from Zenoti, ensuring member access decisions are always up to date.
Member Check-Ins
Huzzard integrations can now notify Zenoti whenever a member checks in, enabling real-time tracking and accurate visit logs.
Module: Memberships
 Business Owners/Center Managers, Guests
The new Membership Management Workflow empowers members to manage memberships through the Webstore or Customer Mobile Application (CMA), without relying on front desk staff. This workflow reduces operational overhead while enhancing the customer experience and driving revenue through new pre-sale opportunities.
This feature is not enabled by default. Reach out to your Zenoti representative to enable this feature.
Key Updates
Pre-sale of memberships for new locations Businesses can now enable discounted memberships for new studio or location launches. These memberships can be purchased directly from the Webstore, driving early sales and creating excitement for new centers.
Manage memberships seamlessly through Webstore
Members can now manage their membership directly through the Webstore. This includes the following actions on memberships such as upgrading to a better plan or canceling a membership.
Transparent Annual Fee Management
Annual fee collection has been streamlined to provide clarity:
Members who have already paid the annual fee for their current membership are not charged again during an upgrade or downgrade.
• Members who have not yet paid the annual fee are shown the exact timing of the next collection.
This ensures that annual fee schedules align with either the original membership or the upgraded configuration, based on business-defined settings.
Enhanced Pricing Transparency
The Webstore now provides a detailed breakdown of all applicable fees, taxes, and pricing for membership renewals and new purchases. The applicable fees such as annual fees, decline fees, transfer or freeze fees are highlighted in the final invoice based on the model of your business. This clarity ensures members are fully informed during transactions, building trust and confidence.
Learn more: For more information, refer to the Improved Membership Management on Webstore article.
Module: Zenoti Mobile
 Front Desk Operators
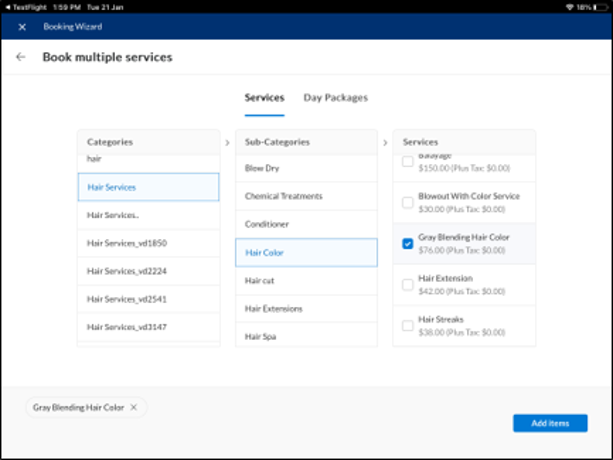
The enhanced Booking Wizard on ZMA v2 for iPads and tablets makes appointment scheduling smoother and more intuitive for front-desk staff.
Front Desk Operators can benefit from improved booking capabilities on tablets and iPads, making scheduling more efficient and consistent. These updates are to bring ZMA closer to parity with the Zenoti web, help reduce errors and streamline appointment management for better operational outcomes and guest satisfaction.
Key updates:
Keep the calendar visible for seamless time slot selection.
Highlight past slots for better scheduling clarity.
Mark double-booking days for quick identification.
Enforce service prerequisites for correct booking order.
Notify FDOs of group appointment updates.
Allow optional guest details for faster group scheduling.
Support multiple service bookings in a single workflow.
Learn more: For more information, refer to the Book an appointment in ZMA v2 article.
Module: Marketing
Business Owners, Marketing Teams
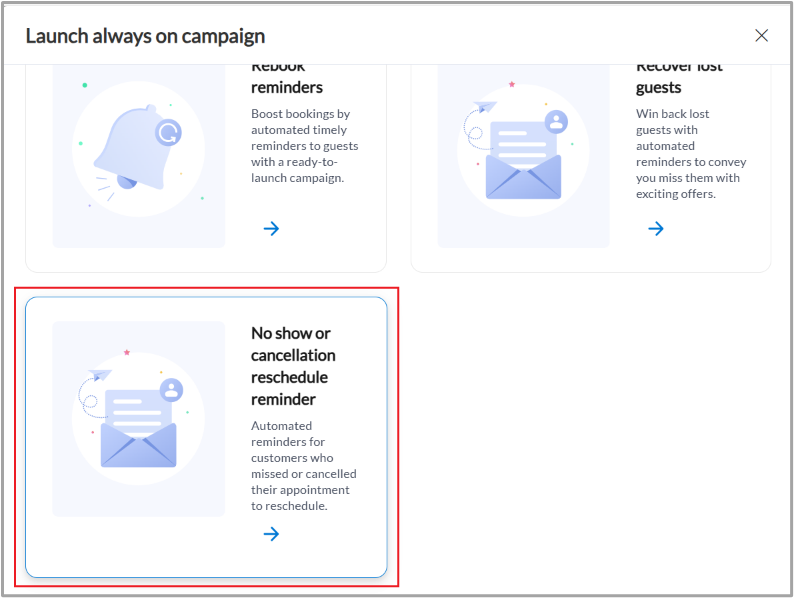
This always-on campaign enables you to target no-shows and guests who cancel their bookings, and send automated reminders to reschedule. By re-engaging these guests, businesses can recover lost opportunities, strengthen client relationships through personalized communication, and drive revenue recovery with minimal effort.
This feature is enabled by default.
How to use:
At the organization or center level, navigate to Marketing > Campaigns.
Click Create always on campaign.
On the Launch always on campaign pop-up, click No show or cancellation reschedule reminder.
Edit the campaign details, if required, and click Launch campaign.
You can also click Customize campaign to further customize the campaign according to your requirements.
Learn more: For more information, refer to the Goal-based campaigns article.
Business Owners, Marketing Teams
The Recover lost guests always-on campaign now includes the ability to create segments based on average spend. This enhancement addresses a key gap, enabling you to target lapsed guests who have no upcoming appointments but had a high average spend in the past.
With this added capability, you can craft more effective campaigns by focusing on high-value guests who are most likely to deliver significant returns but may require stronger incentives to re-engage.
This feature is enabled by default.
How to use:
At the organization or center level, navigate to Marketing > Campaigns.
Click Create always on campaign.
On the Launch always on campaign pop-up, click Recover lost guests.

Edit the campaign details, if required, and click Launch campaign.
You can also click Customize campaign to further customize the campaign according to your requirements.
Learn more: For more information, refer to the Goal-based campaigns article.
Module: Payments
Center Managers, Business Owners
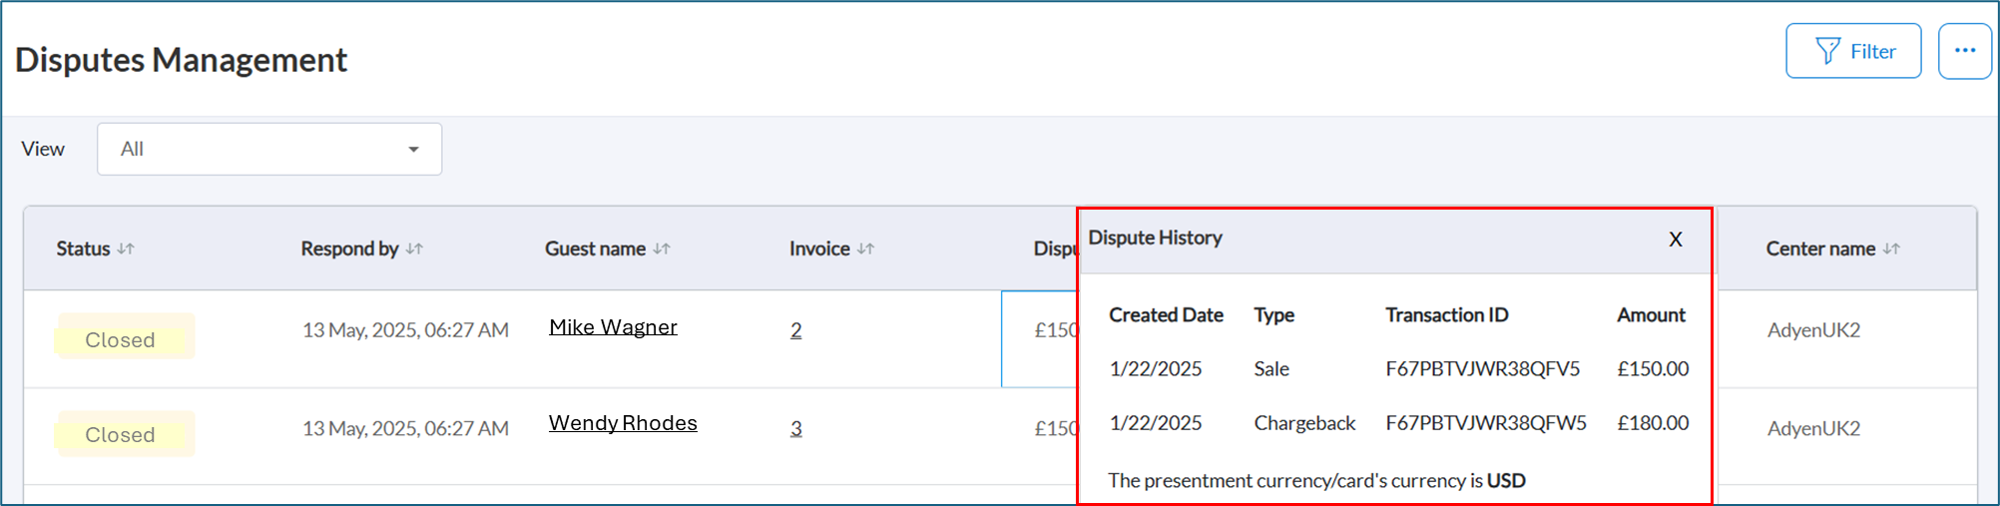
This enhancement ensures Zenoti correctly depicts disputes arising from cards whose currency is different from the customer’s settlement currency. By accounting for correct representations of chargeback amounts, it improves financial transparency and helps customers reconcile their books accurately.
When a customer uses a card issued in one currency (example, USD) to make a purchase or refund in another currency (example, GBP), discrepancies may arise due to exchange rate differences. For example, a customer swiping a USD card for a GBP 500 transaction might see $655.95 on their statement. If the customer disputes the charge or requests a refund, exchange rate fluctuations may lead to mismatched amounts. This enhancement addresses such scenarios by:
Highlighting currency differences.
Providing accurate transaction details.
Displaying a history of payment and refund movements for transparency.
How to use:
Navigate to the Payments section at the organization or center level.
Click Disputes Management.
Look for disputes that are flagged with an information icon.
Note: These represent cross-currency disputes where the transaction and settlement currencies differ
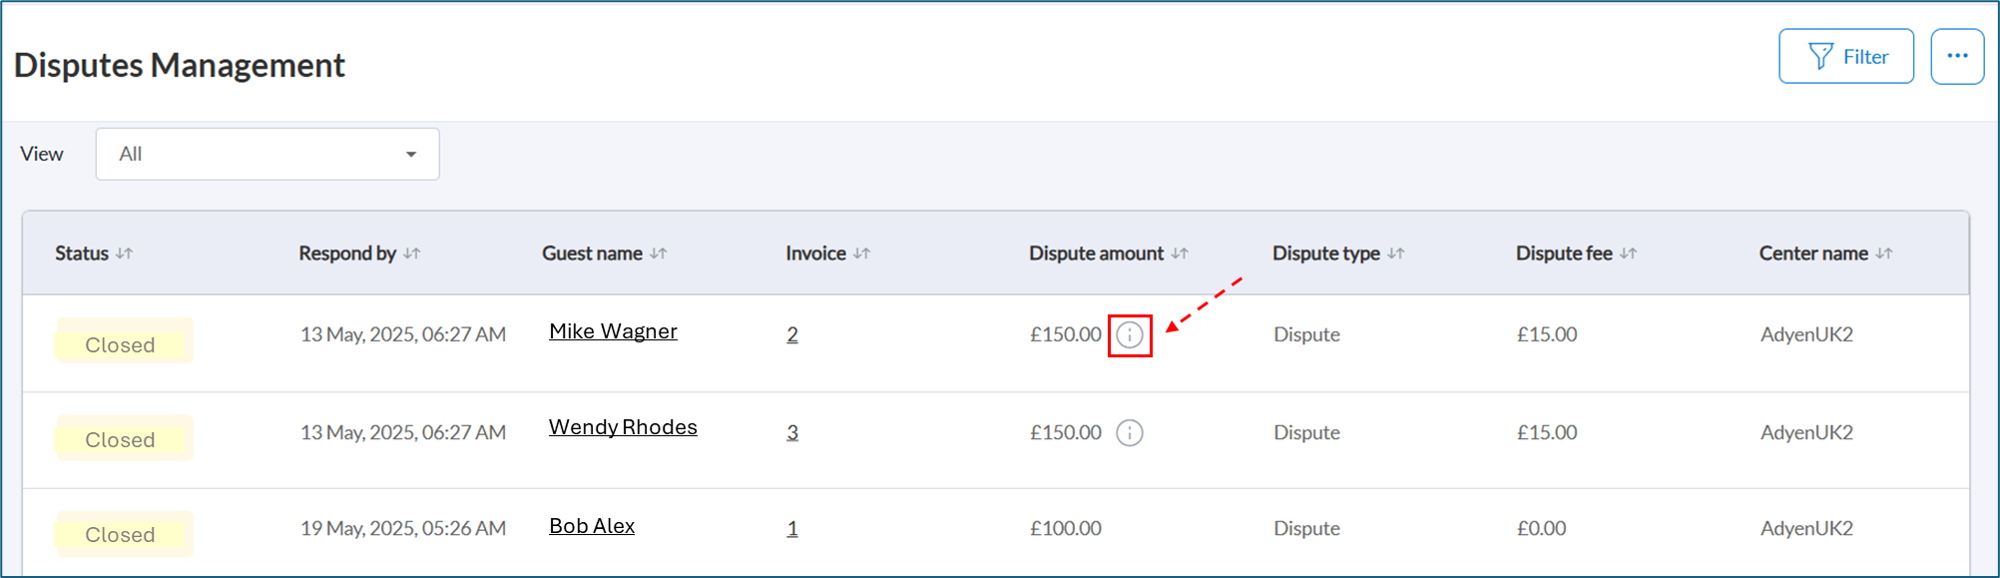
Click the information icon next to the dispute to open the Dispute History window. The window displays transaction details such as Transaction ID, Created Date, Amount, and Dispute Type.
Learn more: For detailed instructions, refer to the Cross-currency disputes article.
Module: Online Booking
Administrators, Guests
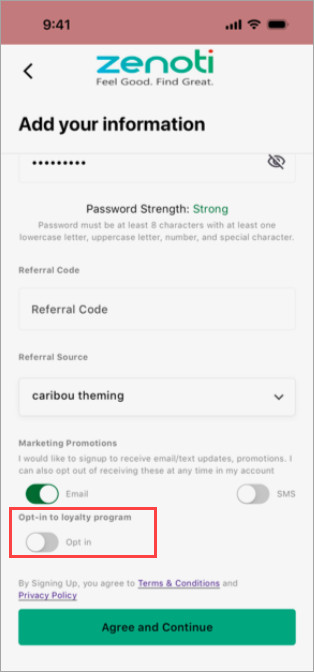
This enhancement enables businesses to improve customer engagement by providing guests with convenient options to enroll in Tiered Loyalty programs. This feature simplifies the loyalty opt-in process, making it more accessible and intuitive, while encouraging customer participation in rewards programs.
Guests can now opt into Tiered Loyalty programs either during the account creation process or later through their profile page on the Webstore or CMA. This functionality creates multiple touchpoints for loyalty enrollment, ensuring a seamless and user-friendly experience. Additionally, it allows guests to easily access and track their loyalty status and benefits, maintaining transparency and stronger customer relationships.
How to use:
To opt-in to the loyalty program from the sign-up page, perform the following steps:
On CMA:
Click Create Account, enter your details, and select Opt-in to loyalty program before submitting.
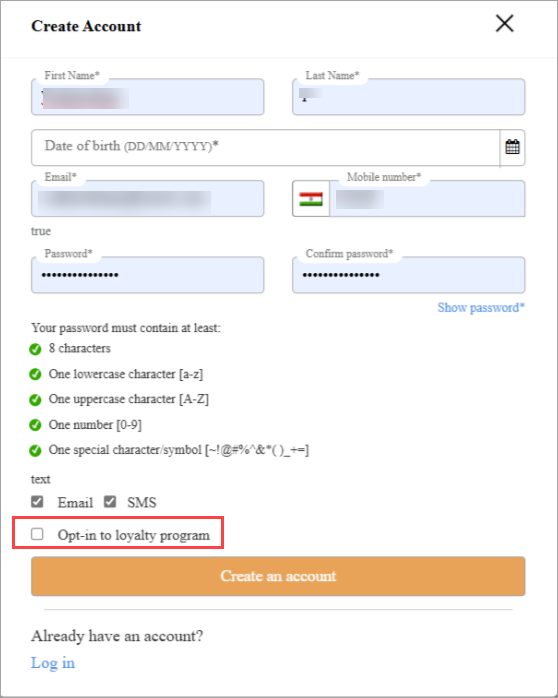
On Webstore:
Click Create Account, fill in the required fields, and select the Opt-in to loyalty program checkbox.
Note
This feature is not enabled by default. Reach out to your Zenoti representative to enable this feature.
Once enrolled in the loyalty program, guests can only opt out by contacting the center directly.
Learn more: For more information, refer to the Create an account for a new guest article.
Administrators, Guests
This feature enhancement, available only in Webstore and CMA, enables businesses to manage revenue more effectively by allowing guests to use their membership benefits to pay cancellation fees. This flexibility improves guest satisfaction while maintaining control over financial policies.
By enabling online cancellation fee collection, businesses can reduce the operational workload for their centers. By allowing guests to redeem membership service credits for cancellation fees, businesses can secure the fee upfront with certainty, avoiding issues such as payment failures or delays.
How to use:
At the organization level, click Configuration.
Navigate to Online Booking > Online booking settings > CX V3 > Online Booking.
Switch on the Auto-collection of Cancellation Fee toggle.
Select the Allow cancellation fee redemption from guest’s membership benefits checkbox.
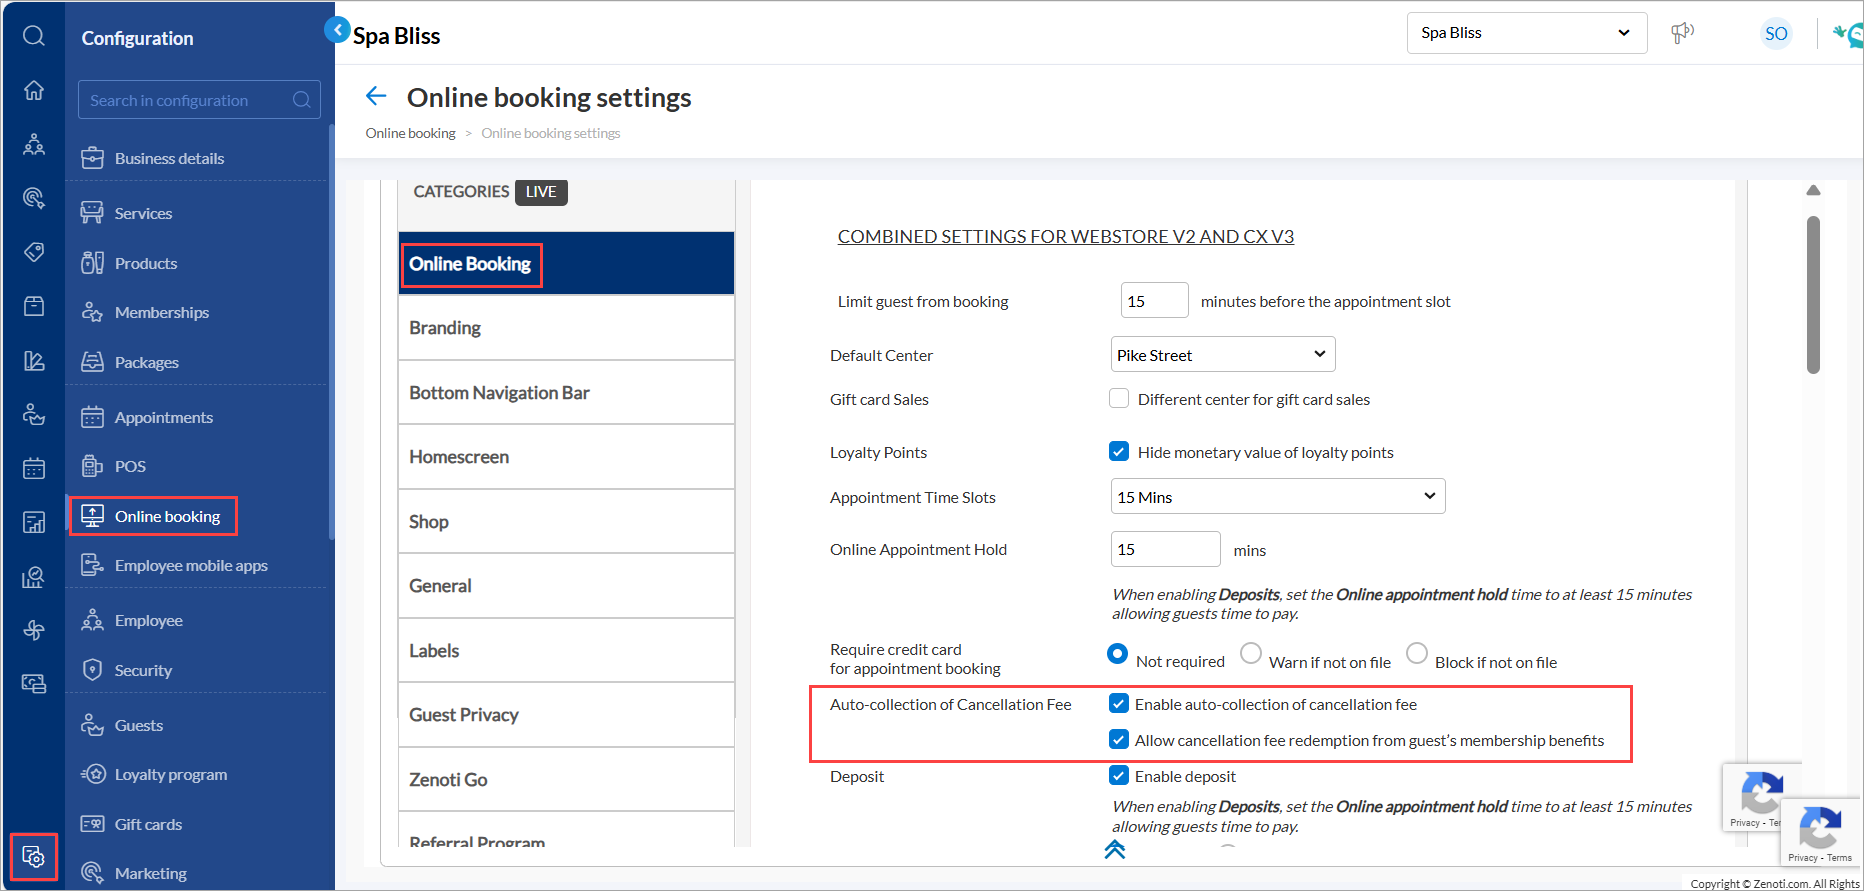
Click Publish.
Note
This feature is not enabled by default. Reach out to your administrator to enable this feature.
The option to redeem the cancellation fee from membership benefits will only appear after the Auto-collection of cancellation fee setting is enabled.
Learn more: For more information, refer to the Enable automatic collection of cancellation fee article.
Add-On Product
Optional, specialized tools and integrations that extend the functionality of the core product. These add-ons cater to specific needs such as advanced marketing, e-prescriptions, digital forms, or integrations with platforms like Shopify and accounting systems. They help businesses scale operations and address industry-specific challenges. Contact your Customer Success Manager (CSM) to find out more about these paid features.
Module: Photo Manager
Admin, Business Owners, Service Providers
This feature enables you to curate high-quality treatment photos for marketing and consultation purposes on ZMA. Providers and marketing teams can now easily select impactful photos from individual patient galleries and export them to a centralized organization-level gallery, making it simpler to showcase results and attract new clients.
The global gallery feature provides you with the following benefits:
Benefit | Description |
|---|---|
Enhanced Marketing | Centralize the best treatment photos for easy access, making it easier to boost marketing campaigns. |
Improved Consultations | Use compelling treatment photos to showcase results, building trust and increasing client conversions. |
Efficient Management | Streamline photo organization, minimizing time spent searching for reference materials. |
This feature is not enabled by default. Reach out to your administrator to enable this feature.
Learn more: For more information, refer to the Curate and Showcase Treatment Photos with Global Gallery article.
Enhancements
Core Product
This includes foundational features and tools that are essential for running day-to-day business operations. These features cover appointments, POS, employee management, inventory, reporting. They are designed to provide a seamless experience for users across all industries Zenoti serves.
Module: Appointment Book
Business Owners, Center Manager
This enhancement allows center managers and business owners to set pricing rules at the center level for more flexibility and control. It ensures alignment with individual center needs while maintaining consistency with organization-level settings.
Center-level configuration options include:
Use organization default settings: Select this option if you want to apply the organization-level configuration.
Enforce service base price: Select this option if you want to apply the service base price when a booking is made with no provider preference.
Enforce provider-specific price: Select this option if you want to apply the provider-specific price when a booking is made with no provider preference.
Business Use Case/Scenario: A center in the wellness space operates within a larger organization that sets pricing rules at the organization level. However, a particular center wants flexibility in setting the prices.
For example, when a guest books a massage without choosing a specific therapist, the center can enforce the service base price instead of the provider-specific price. Alternatively, for certain high-demand services, they can apply the provider-specific price even when no provider preference is selected.
This feature is enabled by default when the organization-level setting is enabled.
How to use:
At the center level, click Configuration.
Navigate to Appointments > Bookings > Booking rules.
Select the desired option under the Enforce service Base Price for Bookings Without Provider Preference setting to align pricing with your center's requirements.

Click Save.
Learn more: For more information, refer to the Enforce service base price article.
Administrators
We’ve introduced a new setting that prevents equipment from being booked for other services during the processing time of an ongoing appointment. When enabled, equipment remains assigned to a service throughout its processing time, preventing overlapping bookings and ensuring better equipment allocation.
This applies across all booking channels, including Booking Wizard, Webstore, CMA, and ZMA, giving you better scheduling control and ensuring equipment availability is accurately maintained.
This feature is enabled by default.
How to use:
At the organization level, click Configuration.
Navigate to Appointment and Queue Management > Bookings > Service rules.
Switch on the Mark equipment as unavailable for other bookings during the processing time of an ongoing appointment toggle.
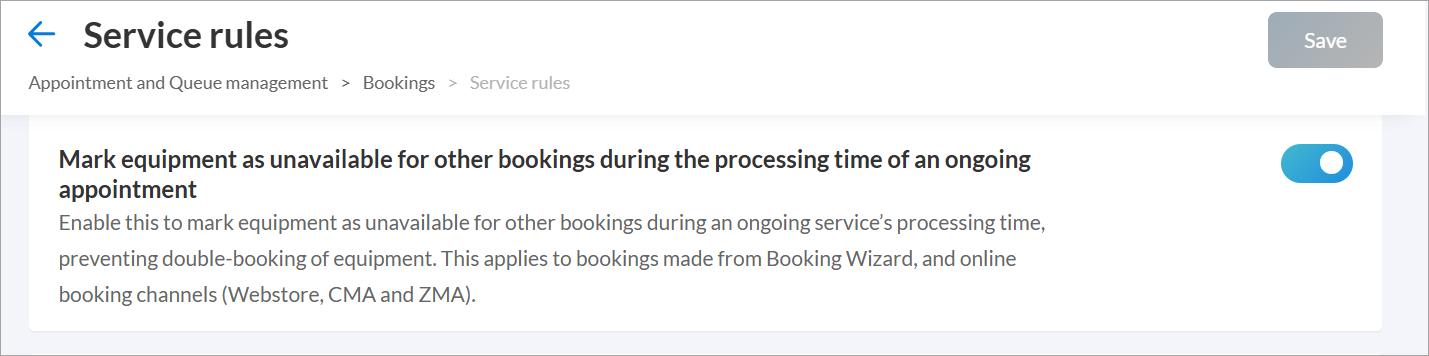
Click Save.
Learn more: To configure this setting, refer to the Prevent Double-Booking of Equipment article.
Front Desk Operator
This enhancement enables FDOs to efficiently manage parallel services by introducing drag-and-drop functionality for smaller duration services within the time frame of a parallel longer service.
This feature is enabled by default.
Learn more: To understand parallel services, refer to the Move an Appointment within a Parallel Service article.
Front Desk Operator
This enhancement allows users to click on a guest’s name in Sales report to open their profile instantly, eliminating the need for manual searches. This improves accessibility and workflow efficiency, enabling front-desk operators to quickly retrieve guest details without navigating away from the report.
This feature is enabled by default.
How to use:
Navigate to Appointment > Reports.
Click Sales.
If you don’t see the Reports option on your screen, click More to access it.
Click the guest's name to open their profile.
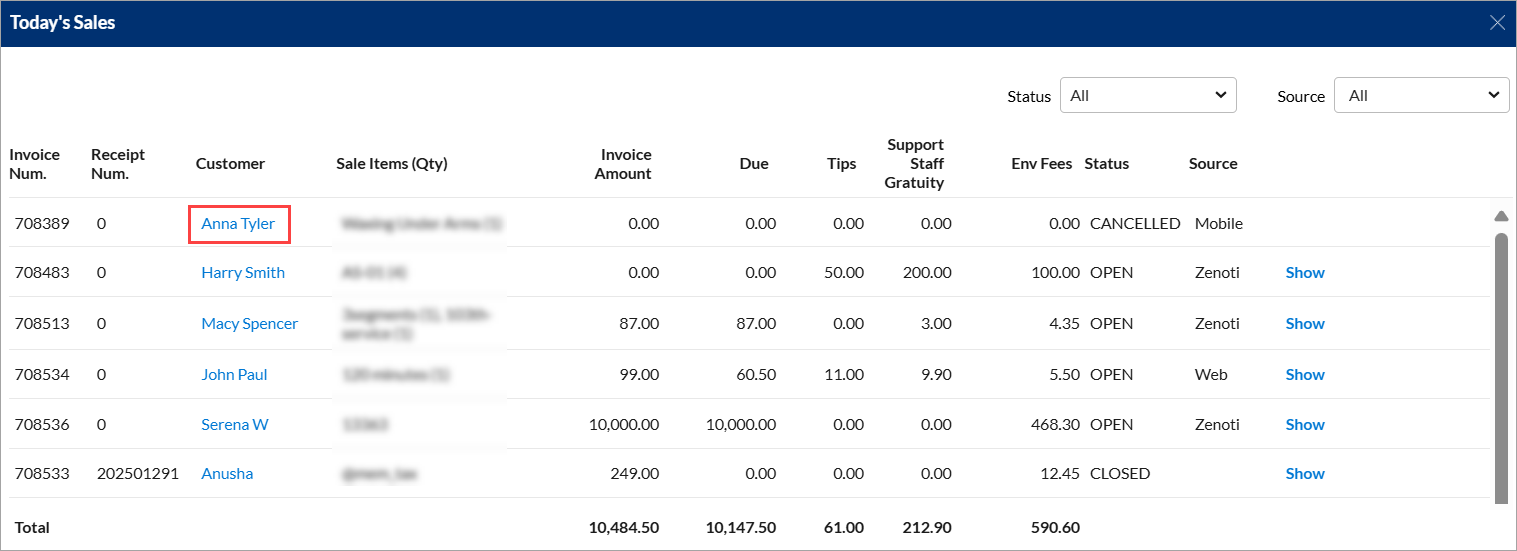
Learn more: For more information, refer to the View today's sales article.
Module: Queue
Front Desk Operator
This enhancement allows businesses to add, edit, and delete guest profile notes directly in Queue, improving workflow efficiency and guest experience.
Front-desk operators can update guest notes directly within the Queue, reducing manual effort, streamlining note management, and ensuring all relevant guest details are recorded and easily accessible for improved workflow.
This feature is enabled by default.
How to use:
Navigate to Queue.
Click the notes icon on the queue card against the guests’ name.
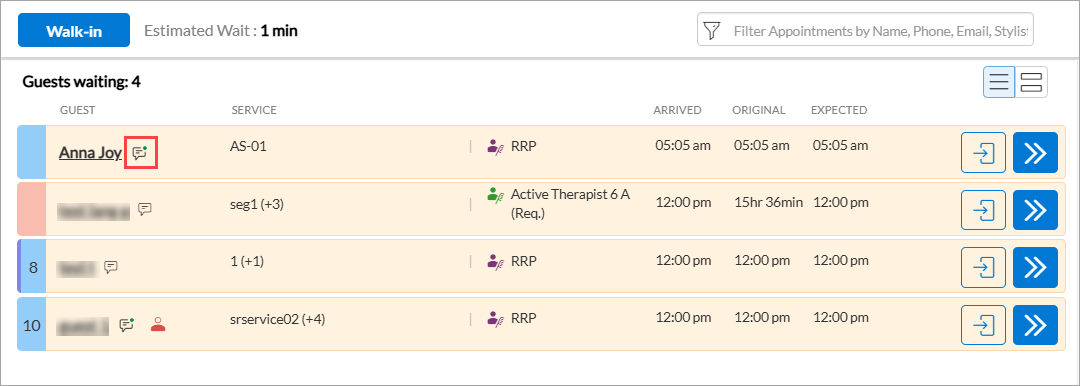
Click Add New.
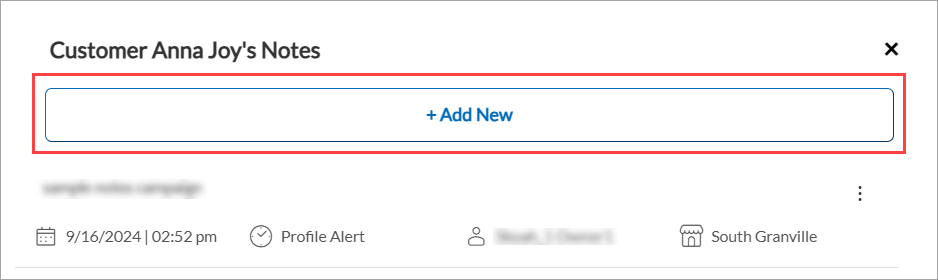
Enter the required details and click Save.
Learn more: For more information on managing notes, refer to the Manage visits on queue article.
Module: Gift Cards
Administrators
This enhancement allows businesses to control when bonus gift cards become active, ensuring they are redeemed on future visits rather than being immediately applied as discounts at the time of purchase. This helps drive repeat business.
A salon runs a holiday promotion offering a $25 bonus gift card for every $100 gift card purchase. However, customers often redeem the bonus card immediately, reducing revenue and defeating the goal of encouraging future visits.
With this enhancement, the salon can set a 7-day activation delay, keeping the bonus card inactive until the period expires. This prevents immediate use, excludes the bonus from the available balance, and encourages return visits, driving repeat business and long-term revenue growth.
This feature is enabled by default.
How to use:
At the organization level, click Marketing.
Select Gift Card Promotions and click Add.
Enter the promotion details.
In the Bonus Gift Card Details section, specify the activation date or set the activation period in days.
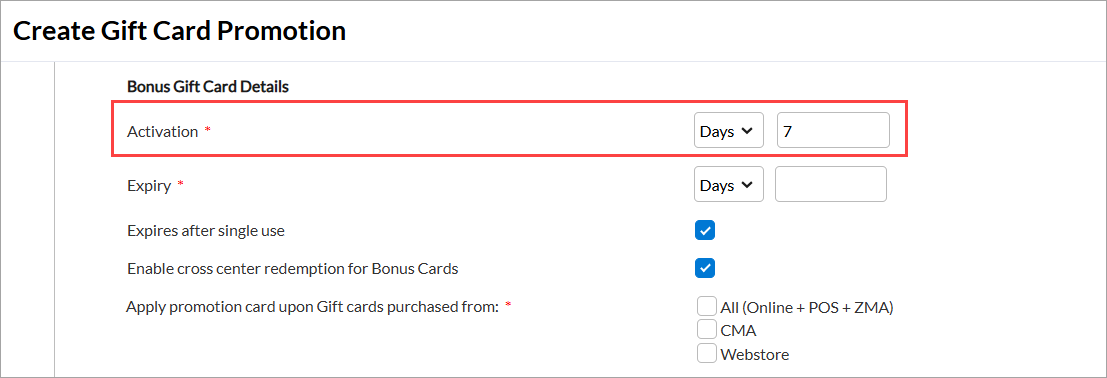
Click Finish.
Learn more: For more information on bonus gift card activation, refer to the Create gift card promotions article.
Module: Employee and Payroll
Administrators, Center Managers
This feature gives businesses more flexibility in rewarding service providers by allowing commissions to be based on total service sales instead of only post-deduction revenue.
It is ideal for high-margin industries like laser services, where costs are fixed, ensuring fair and accurate payouts while incentivizing providers. A center-level toggle lets businesses choose whether to match commission slabs before or after deductions.
This feature is not enabled by default. Reach out to your administrator to enable this feature.
How to use:
At the center level, navigate to Configurations > Employee > Payroll and commissions > Commissions
To configure how commission slabs are matched, use the Match commission slabs after deductions to calculate commissions toggle:
Off (default setting): Commission slabs are matched after deductions.
On: Commission slabs are matched before deductions.
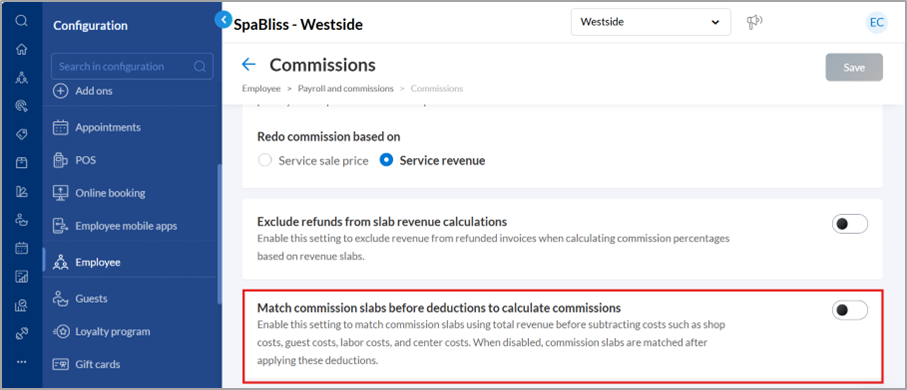
The Payroll Summary Report will display commissions calculated before deductions, ensuring transparency.
Learn more: For more information on configuring commission slabs, refer to Configure Commission Slabs article.
Administrators, Center Managers, Employees
The Employee Summary Report has been updated to reflect accurate revenue calculations by including applicable deductions. The Commissionable Revenue column now reflects revenue after accounting for deductions like shop costs and labor costs.
With this enhancement, employees can now see how deductions impact their commission payouts, while businesses gain accurate insights into revenue after deductions for better financial tracking.
This feature is enabled by default.
How to use:
Navigate to Reports > Employee Summary.
Review the Commissionable Revenue column to see post-deduction revenue values.
Use the report to analyze commission calculations accurately.
Learn more: To learn more about the revenue adjustments, refer to the Employee Summary Report article.
Module: Fitness
Business Managers
We’ve updated the Classes Visits report to make it more comprehensive and intuitive. Along with renaming it to Center - Visits, we’ve added new features to help you better analyze and track check-ins across all your centers. The report emphasizes data related to all check-ins across centers. The Check-In Type column is now included in all exports and saved views, ensuring seamless reporting.
New Column: Introducing a new column called Check-In Type that identifies whether check-in is for a Member or via a Guest Pass.
New Filter: The Check-In Type filter enables you to segregate and view only member check-ins, guest pass check-ins, or both.
How to Use:
Click the Reports icon from the main menu.
Search for Center – Visits using the search box on the Reports Dashboard page.
Click the Center – Visits option to access the report.
Select the desired filters as per your requirements.
Click Refresh to view the latest data.
Learn More: For detailed instructions and further context, refer to the Center - Visits report article.
Module: Inventory
Inventory Manager
These updates improve the usability of the Create - Purchase Order page by introducing sorting capabilities and contextual filtering options. Users can now sort items by vendor part number or product code, making it easier to find specific items in extensive inventories. When a specific vendor is selected, Zenoti dynamically displays only the categories tied to that vendor.
This feature is enabled by default.
How to use:
Navigate to Orders from Inventory at center-level.
Select Add Order on the Manage Purchase Orders & Transfers page.
Select a Vendor from the dropdown menu:
The Category and Brand fields will dynamically update to display only relevant options specific to the vendor’s products.
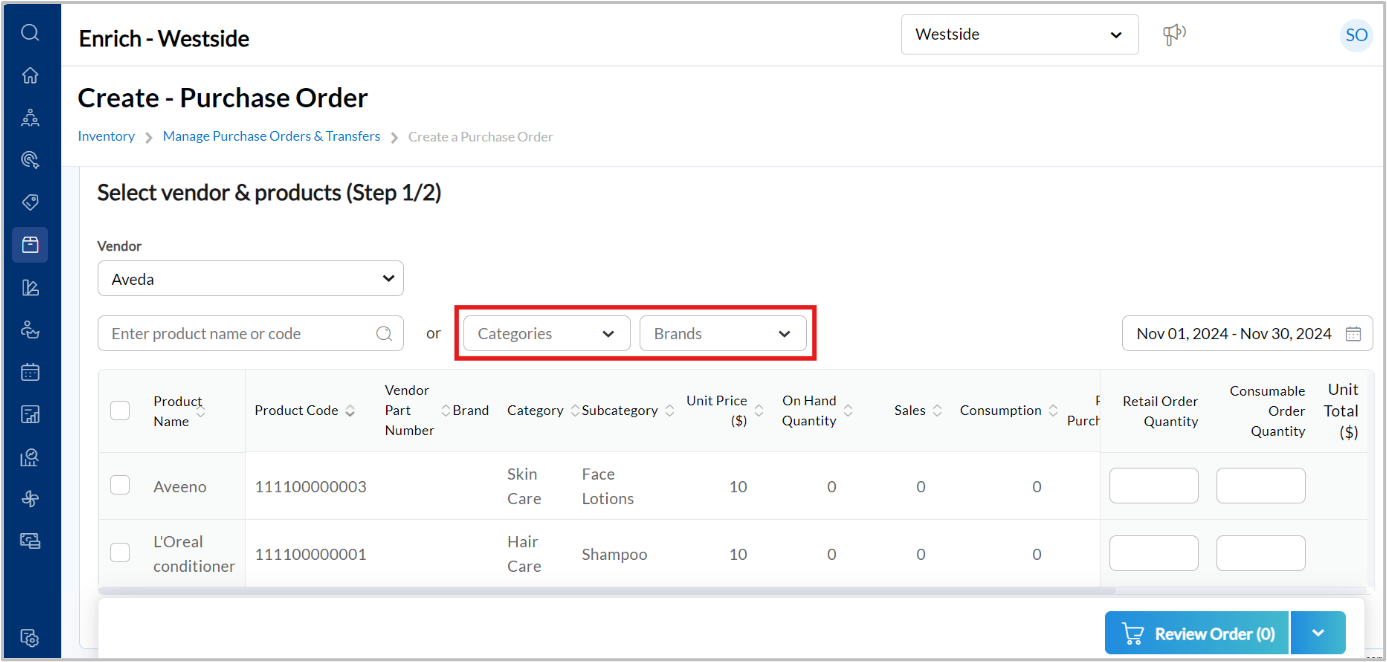
Use the column sorting options for Product Name, Brand, Category, Vendor Part Number, or Product Code to organize your view.
Continue configuring your purchase order as needed.
Learn more: For more information on these enhancements, refer to the Create and Raise a Purchase Order article.
Module: Payments
Managers, Business Owners and Front Desk Operators
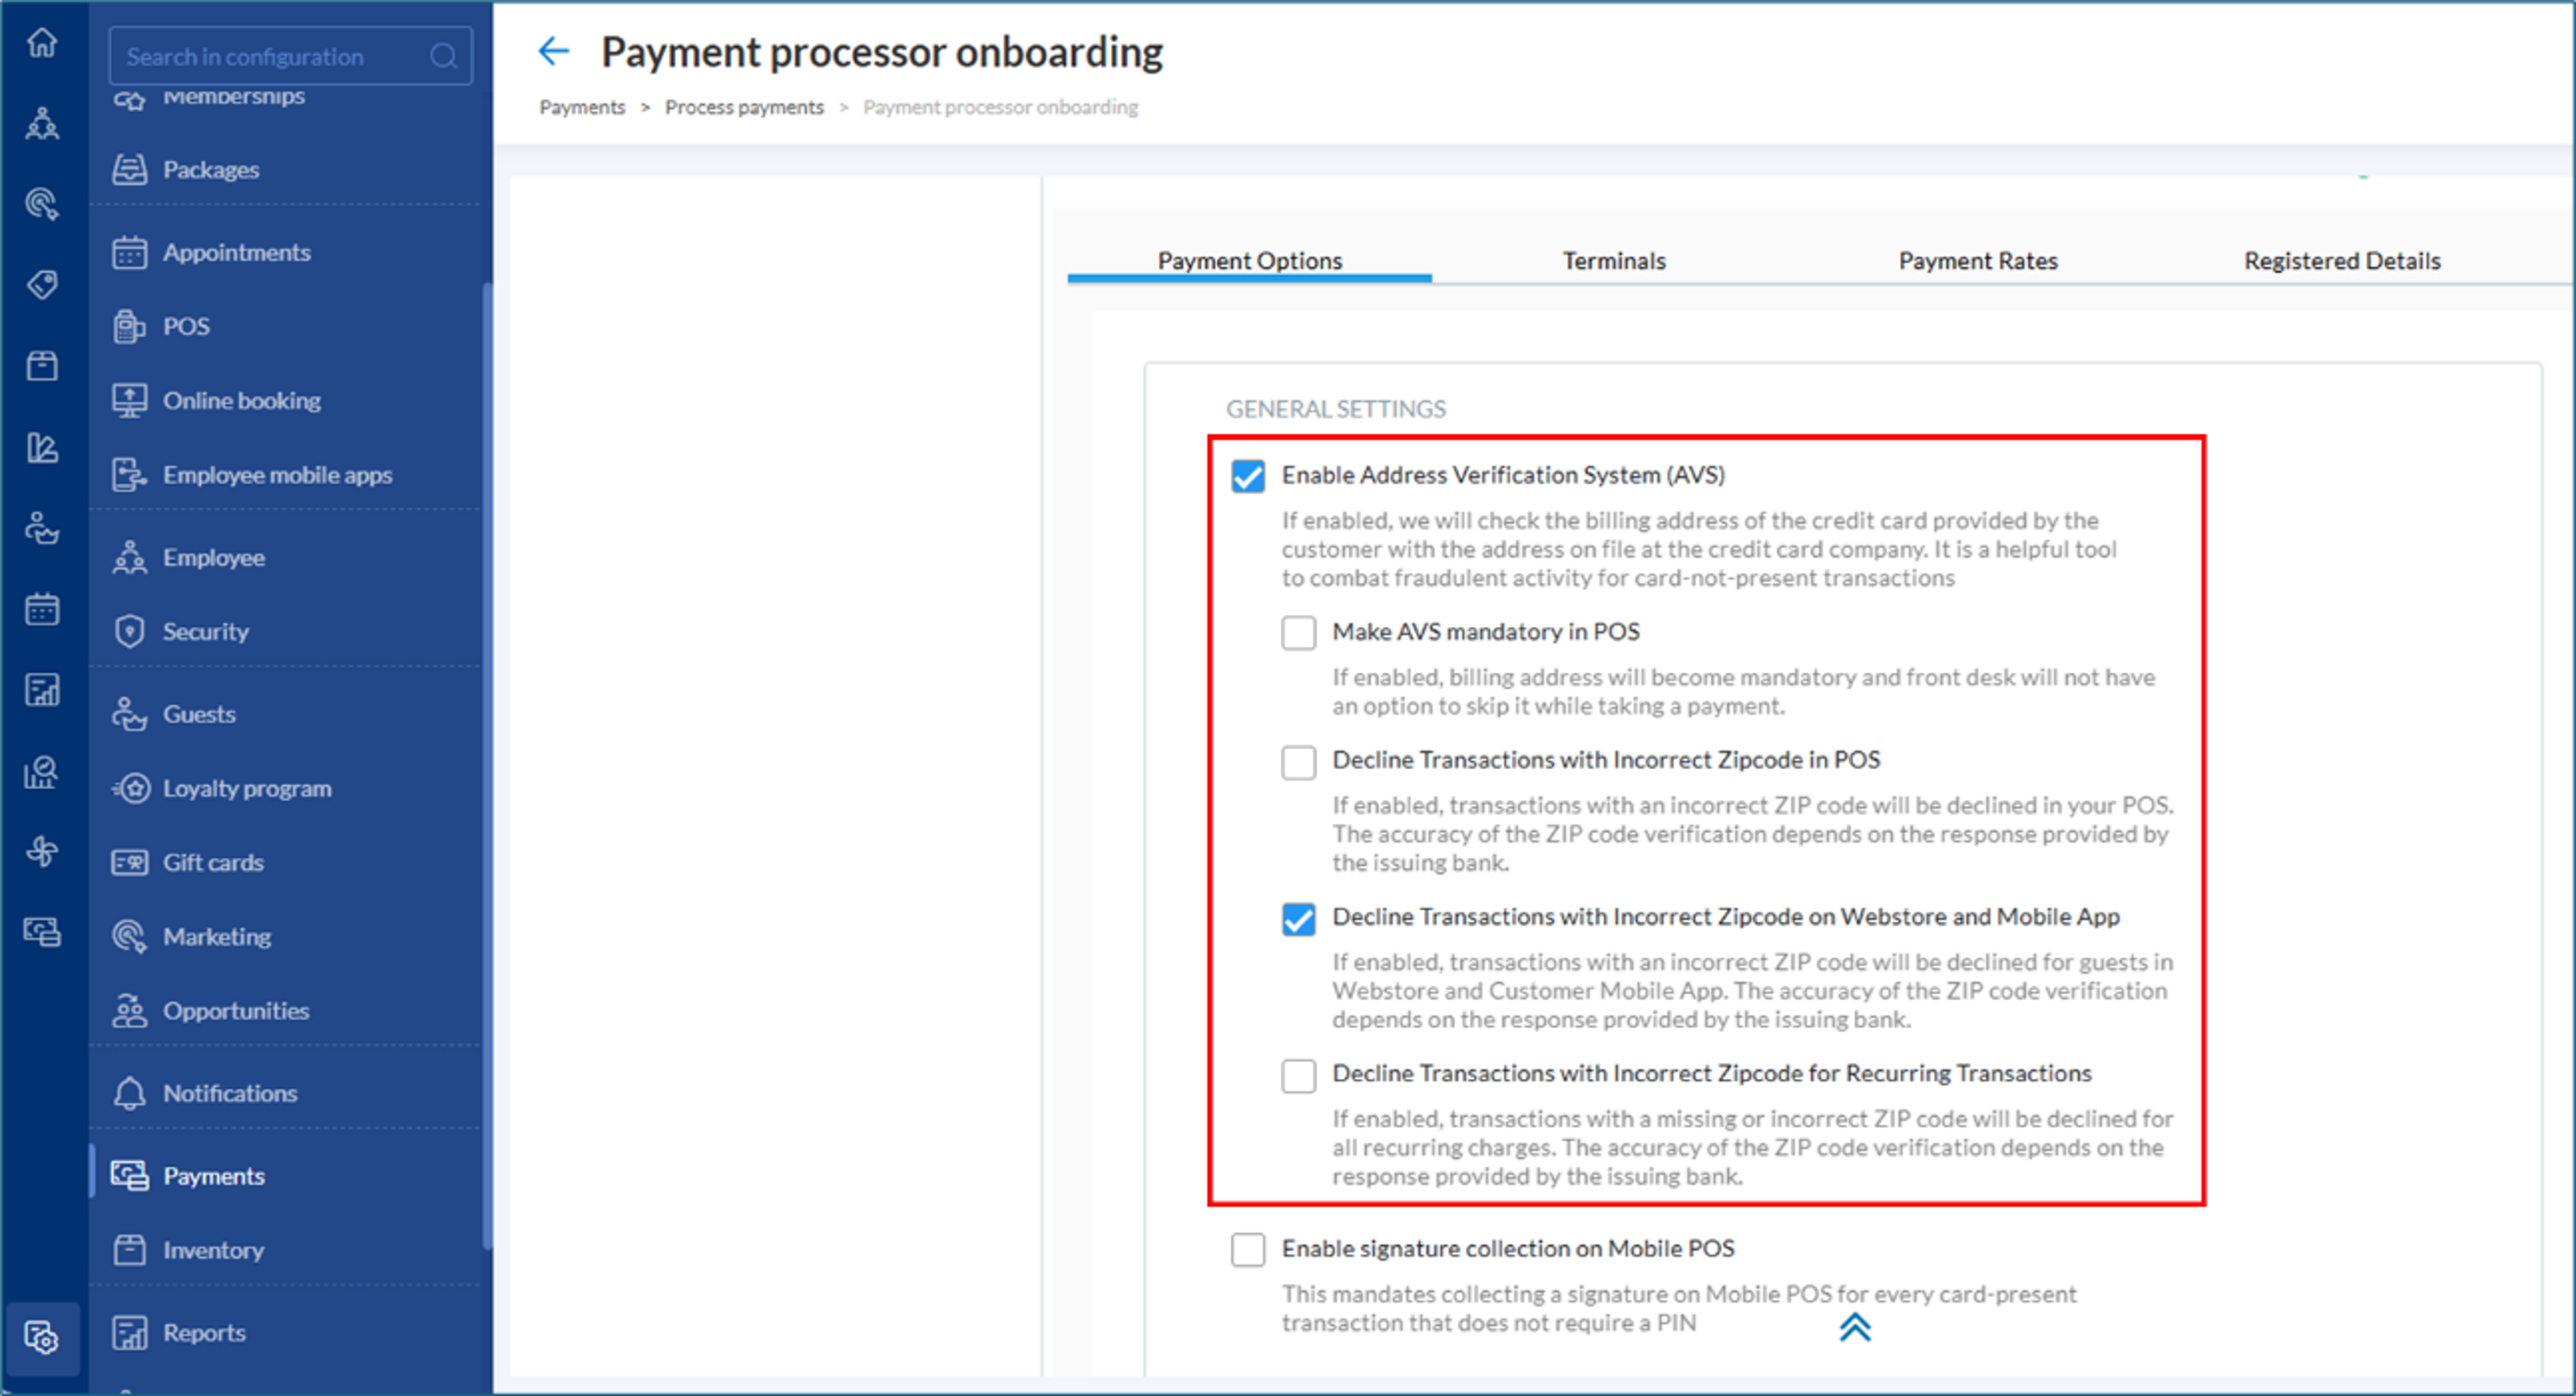
We are introducing updates to AVS configurations to strengthen fraud prevention, ensure compliance, and improve fee transparency. These updates align Stripe with Adyen standards and provide greater control to FDOs, Managers, and Business Owners.
Business Owners and Managers can now configure AVS to decline transactions with incorrect ZIP codes and enforce AVS checks. AVS failed fees apply only in the US and are based on settings. They are visible in the Payments Rate section. Notifications enhance clarity and help reduce fraud risks.
For FDOs, the updated AVS process displays only Country and ZIP. This is now supported on ZMA v2 as well.
How to use:
From the organization or center level, click Configuration > Payments > Process payments > Payment processor onboardings.
Under Payment Options > General settings, select the Enable Address Verification System (AVS) checkbox. Enable all other relevant configurations pertaining to AVS.
Click Save.
Learn More: For more information, refer to the Enable Address Verification System (AVS) article.
Module: Marketing
Business Owners, Marketing Teams
As part of a phased streamlining of target segment creation, we have enhanced navigation, highlighted the most frequently used predefined segments, and simplified custom segment workflows. These enhancements are designed to save time, improve usability, and help you efficiently create and manage your target segments.
This feature is enabled by default.
How to use:
At the organization or center level, navigate to Marketing > Target segments.
Select a predefined target segment from one of the Recommended segments or click Create custom target segment to create a custom segment that suits your needs.
Learn more: For more information, refer to the Create a Target Segment article.
Business Owners, Marketing Teams
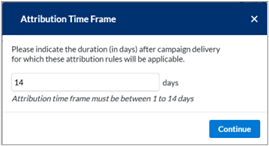
You can now customize the attribution period for Advanced Marketing data, selecting a range between 1 to 14 days. Previously, the attribution period defaulted to 14 days and could not be changed. This enhancement provides greater flexibility, allowing you to analyze campaign performance over a timeframe that best suits your business needs.
This feature is enabled by default.
How to use:
At the organizational or center level, navigate to Marketing > Advanced Marketing > Dashboard.
Enter the attribution time frame (in days) and click Continue.
Learn more: For more information, refer to the Advanced Marketing Dashboard article.
Module: Memberships
Administrators
The Membership Payments report now includes a new Invoice Age column and filter, allowing businesses to track overdue invoices, identify payment delays, and prioritize collections.
The Invoice Age column displays the number of days an invoice has been outstanding by calculating the difference between the report run date and the invoice generation date (Invoice Age = Report Run Date – Invoice Generation Date).
The new Invoice Age filter allows users to categorize invoices based on their age, making it easier to focus on overdue payments. The filter provides four aging brackets: 0-30 days, 30-60 days, 60-90 days, and 90+ days, enabling businesses to prioritize collections based on invoice aging.
How to use:
Click the Reports icon from the main menu.
Search for Membership Payments using the search box on the Reports Dashboard page.
Click the Membership Payments option to access the report.
Select the desired filters.
Click Refresh to view the latest data.
Learn more: For detailed instructions and further context, refer to the Membership Payments report article.
Front Desk Operators, Service Providers
We've enhanced the refund workflow, enabling businesses to offer members a more seamless and flexible experience when managing memberships. Refunds can now be easily processed for:
‘Not Started’ Memberships: Easily process refunds for memberships that have not yet begun, with no restrictions related to signed terms and conditions. Existing refund policies continue to apply.
Memberships with Redeemed Benefits: Businesses can now initiate refunds for memberships where benefits have already been used. The system ensures compliance by restricting refunds for redeemed amounts based on refund configurations.
Your front desk staff can now also reopen invoices for refunded memberships to accommodate any financial updates.
Guests/Members
Members can now easily upgrade their memberships from the Webstore with regular billing and a single payment method.
Key Benefits | Description |
|---|---|
Flexible Upgrade Options | Members can upgrade at the end of the current billing cycle or instantly activate the new membership immediately. |
Payment Convenience | No immediate payment for end-of-term upgrades; instant upgrades require a new fee upfront. |
Annual Fee Management | Businesses can maintain the original annual fee schedule or adjust it to fit the new membership configuration. |
Setup Fee Waiver | No additional setup fees are charged for upgrading between memberships. |
Secure Payment Updates | Customers can securely store a backup payment method to ensure uninterrupted renewals and charges. |
Module: Web POS
Business Owners, Center Manager
This enhancement enables businesses to process payments after a holiday, even if the register was not closed on the holiday. This can be done using the newly introduced Allow Taking Payments if Register is Not Closed on Holidays setting, which can be configured at the center level.
When enabled:
Businesses can continue to take payments without disruptions due to holidays.
Zenoti will not send email or SMS alerts for registers that remain open on holidays.
This provides greater flexibility in managing payments and register closures during holidays, while offering improved control over alerts based on register activity and closure status.
This feature is enabled by default.
How to use:
At the center level, click Configuration.
Navigate to POS > Register Management.
Switch on the Allow taking payments if register is not closed on holidays toggle.
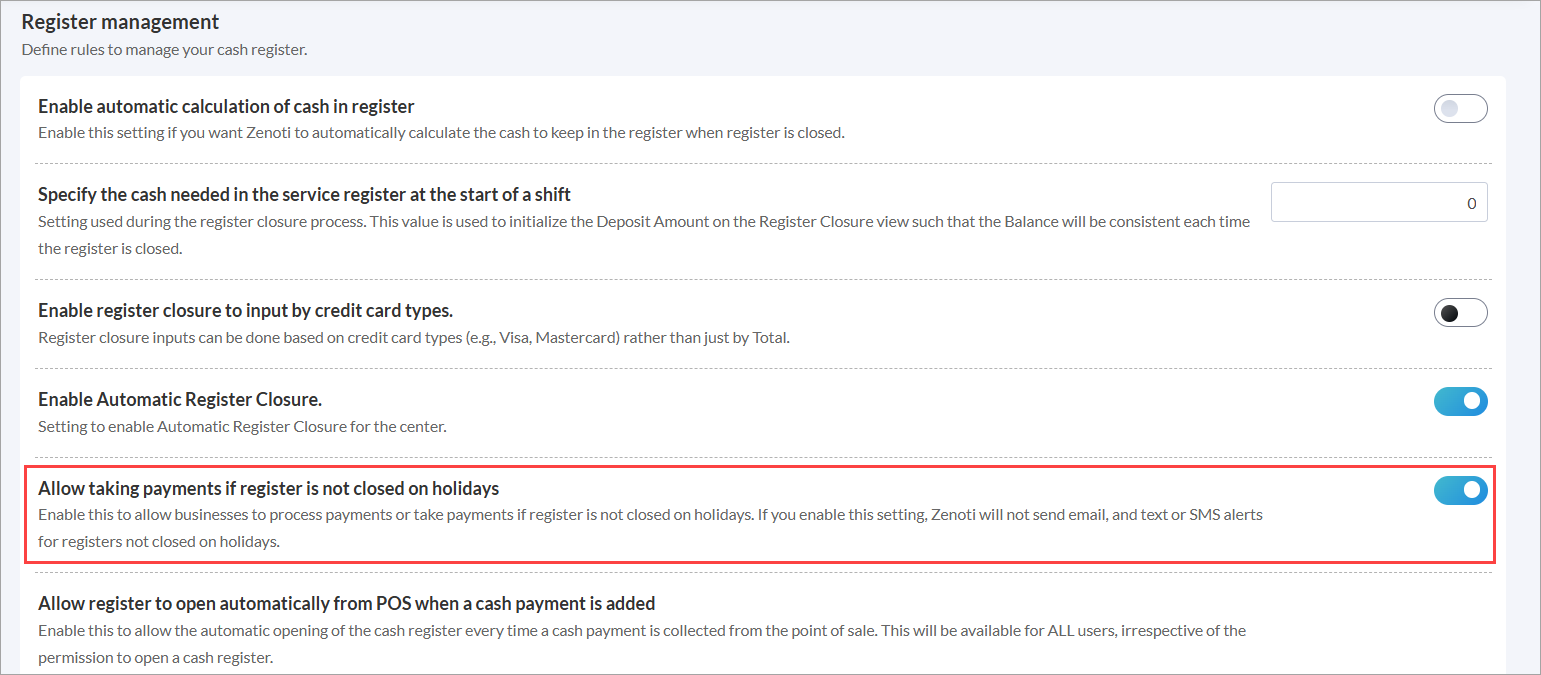
Click Save.
Learn more: For more information on allowing payments without register closure, refer to the Allow payments even if the register is not closed article.
Administrator, Business Owners
This enhancement allows businesses to maintain consistent tax details and footer settings for group invoices, ensuring clarity and transparency.
The following settings, previously applicable to individual invoices, will now be honored for group invoices as well:
Print tax amount on the invoice and receipt (org level).
Show the taxable amount for each tax row (org level).
Show printed by on the receipt (org level).
Show print time on the receipt (org level).
Show tax components on receipt (center level).
Enter a custom message (center level).
This feature is enabled by default if they are already active for individual invoices. This update ensures uniformity in tax and footer information across all invoice types.
Learn more: For more information on impacted settings, refer to the Print and email receipt - Organization level and Print and email receipt - Center level article.
Front Desk Operator
This enhancement streamlines the process of calculating and distributing tips for group invoices, enhancing operational efficiency and improving the guest experience. With clear instructions and predefined tip percentages, Zenoti ensures fairness and ease of use.
Front desk staff can now quickly select from predefined suggested tip percentages. They can assign tips across multiple invoices and providers in a single step. This feature is accessible only through the Zenoti web platform.
Business Use Case/Scenario:
A spa frequently handles group bookings, requiring fair and efficient tip distribution among multiple providers. Manually calculating and allocating tips slows down the checkout process and increases errors. The enhanced tip calculation for group invoices allows the front desk to automate tip distribution, apply a percentage-based tip, and quickly adjust tip allocations among providers.
This feature is currently in the beta phase. Contact your Customer Success Manager (CSM) to enroll in the beta program.
Learn more: For more information on enhanced tip calculation, refer to the Take payments for a group invoice article.
Module: Kiosk
Administrators, Business Owners
This enhancement introduces a new organization-level setting, Enable new kiosk for check-in only (limited functionality), that allows administrators or business owners to transition to the new kiosk experience. This feature empowers organizations to explore and adopt the new kiosk functionality as needed, ensuring a seamless transition at their own pace.
The setting is disabled by default, giving organizations the flexibility to enable it at their discretion. After the organization-level setting is enabled, organizations must also enable it at the center level, giving them control over which centers can use the new kiosk.
How to use:
At the organization level, click Configuration.
Navigate to Appointments > Kiosk.
Switch on the Enable new kiosk for check-in only (limited functionality) toggle.
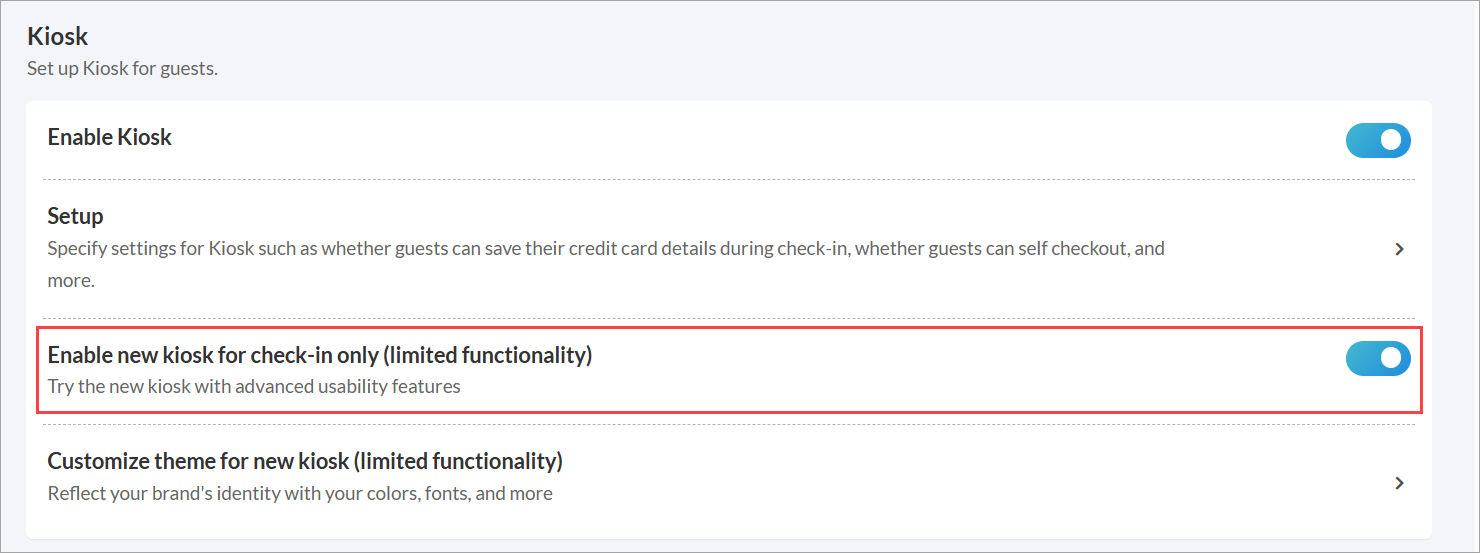
A confirmation pop-up window appears.
Click Confirm.
Configure the appearance as per your requirement and click Save.
Learn more: For more information on the changes, refer to the following articles:
Module: Online Booking
Administrators, Guests
To enhance security and prevent automated carding attacks on the webstore, we have introduced a new safeguard on the guest profile page. Guests can now save a credit or debit card only after completing at least one purchase. This helps protect against fraudulent activities, such as carding attacks, where stolen card details are tested through small transactions. By requiring a completed purchase, businesses ensure that only genuine users can store payment details.
Note: Guests can still save cards while booking an appointment or purchasing a membership/package, as this process remains unchanged.
How to use:
Log in to webstore account with your credentials.
Navigate to your profile and click Payment Details.
If you have at least one existing invoice, you will see the option to save your credit/debit card.
Learn more: For more information, refer to the Guest Profile article.
Administrators, Guests
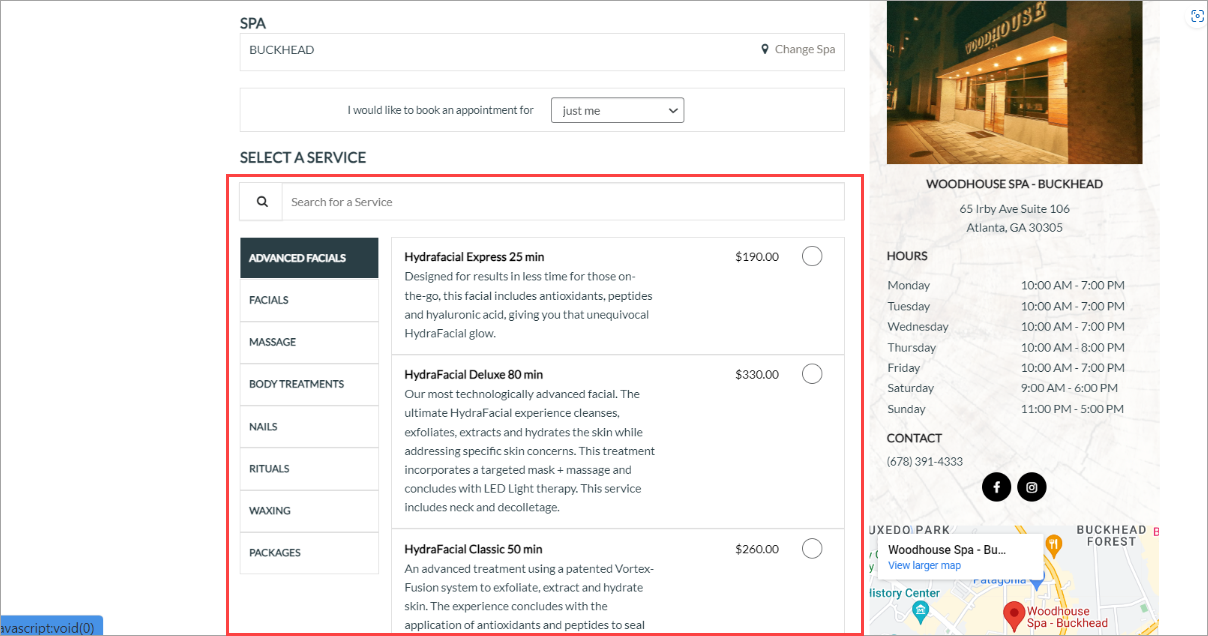
Businesses can now customize how service categories are displayed in their Webstore. They can choose between Horizontal or Vertical layouts. By default, categories are displayed in the horizontal layout.
This flexibility enhances usability and creates a seamless experience for guests browsing the Services menu or purchasing a Service Gift Card.
How to use:
At the organization level, click Configuration.
Navigate to Online Booking > Online booking settings > Webstore V2 > UI Settings.
Select the required option from Service Category Layout.
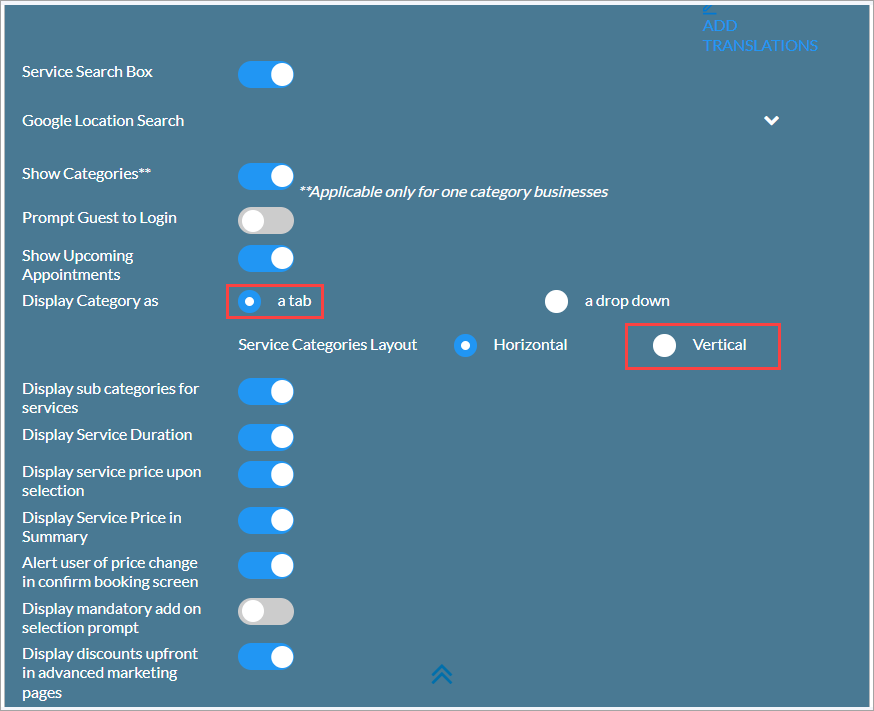
Click Save.
Note
The Service Category Layout setting is only available when the Display Category as option is set to A Tab.
 |
This feature is not enabled by default. Reach out to your administrator to enable this feature.
Learn more: For more information, refer to the Configure Service Category Layout in Webstore article.
Administrators, Guests
Business owners can now enable both Introductory Pricing for first-time guests and the Nearby Center Slot Availability Search simultaneously for online bookings. This allows them to boost bookings by offering discounted rates to first-time guests while also giving guests the flexibility to search for available appointment slots at nearby centers.
For guests, this means they can enjoy exclusive discounts on their first booking and conveniently explore appointment availability across nearby locations, ensuring a seamless and flexible booking experience.
How to use:
Organization-Level Setup:
Navigate to Configuration > Online Booking > Online Booking Settings > Webstore V2 > Appointment Booking Flow.
Switch on the Intro Pricing for first time guests toggle.
Enter your campaign code and customize the banner text.
If you want centers to override this setting, enable Allow Center Override.
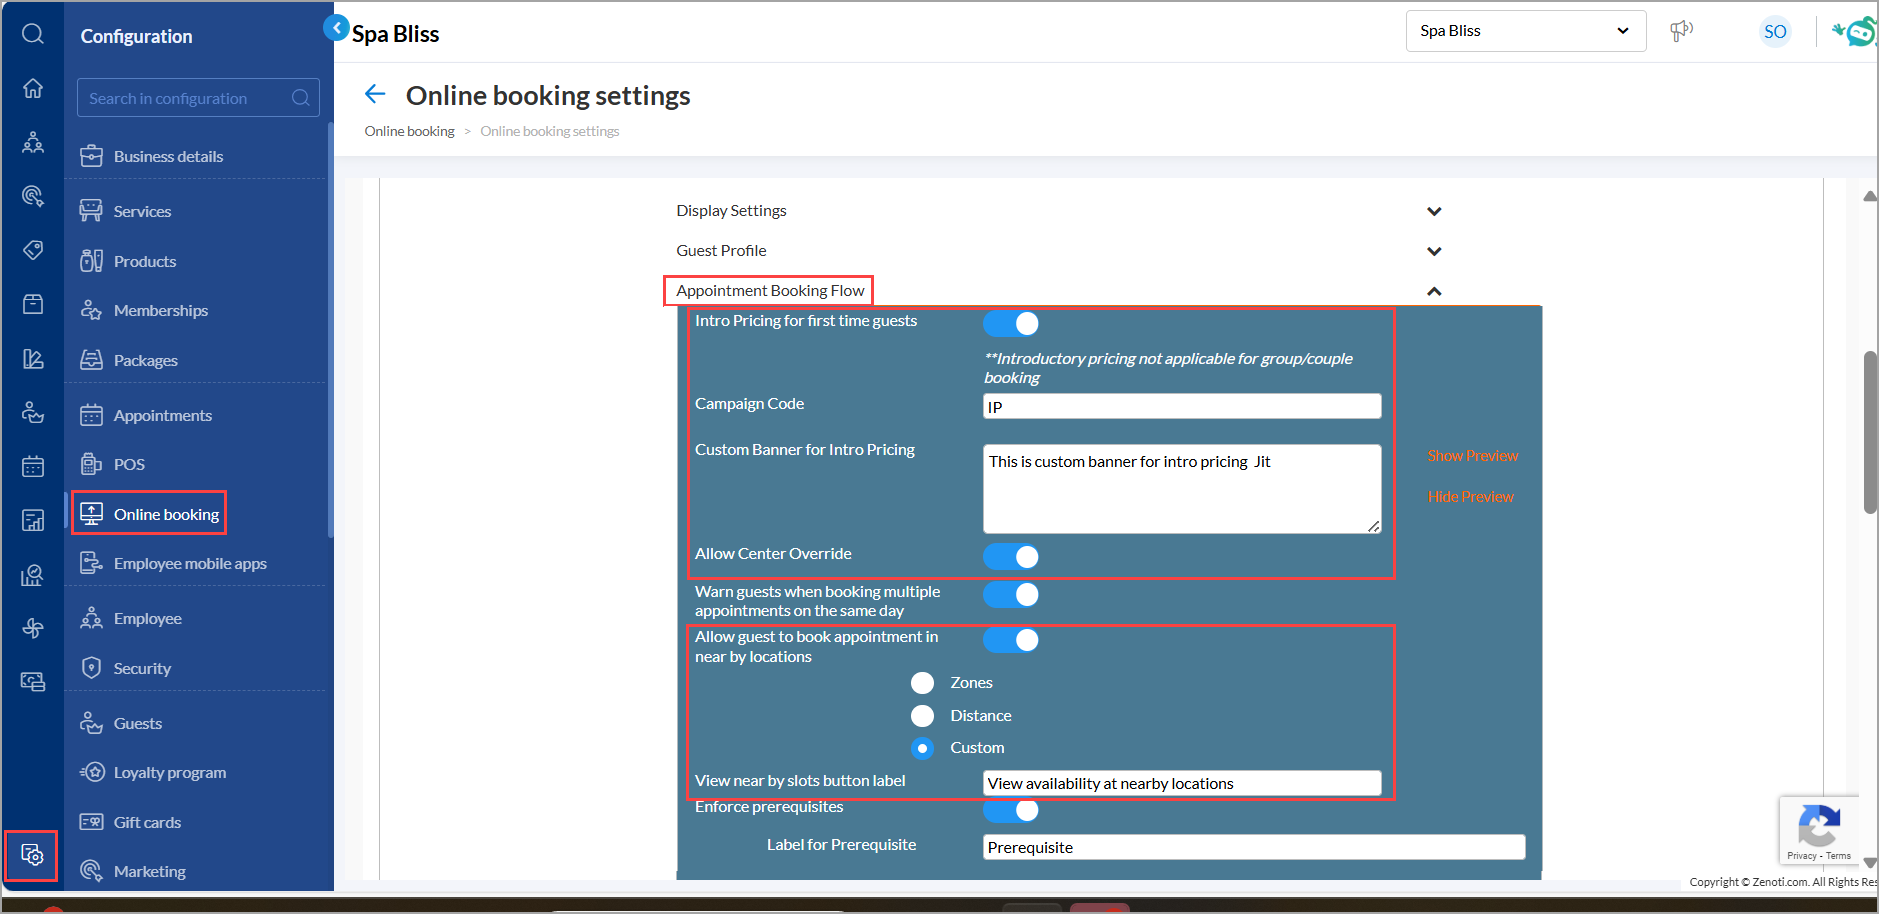
To allow guests to search for nearby locations, switch on the Allow Guest to Book Appointment in Nearby Locations toggle.
Select the required option as Zone, Distance, or Custom.
Click Publish.
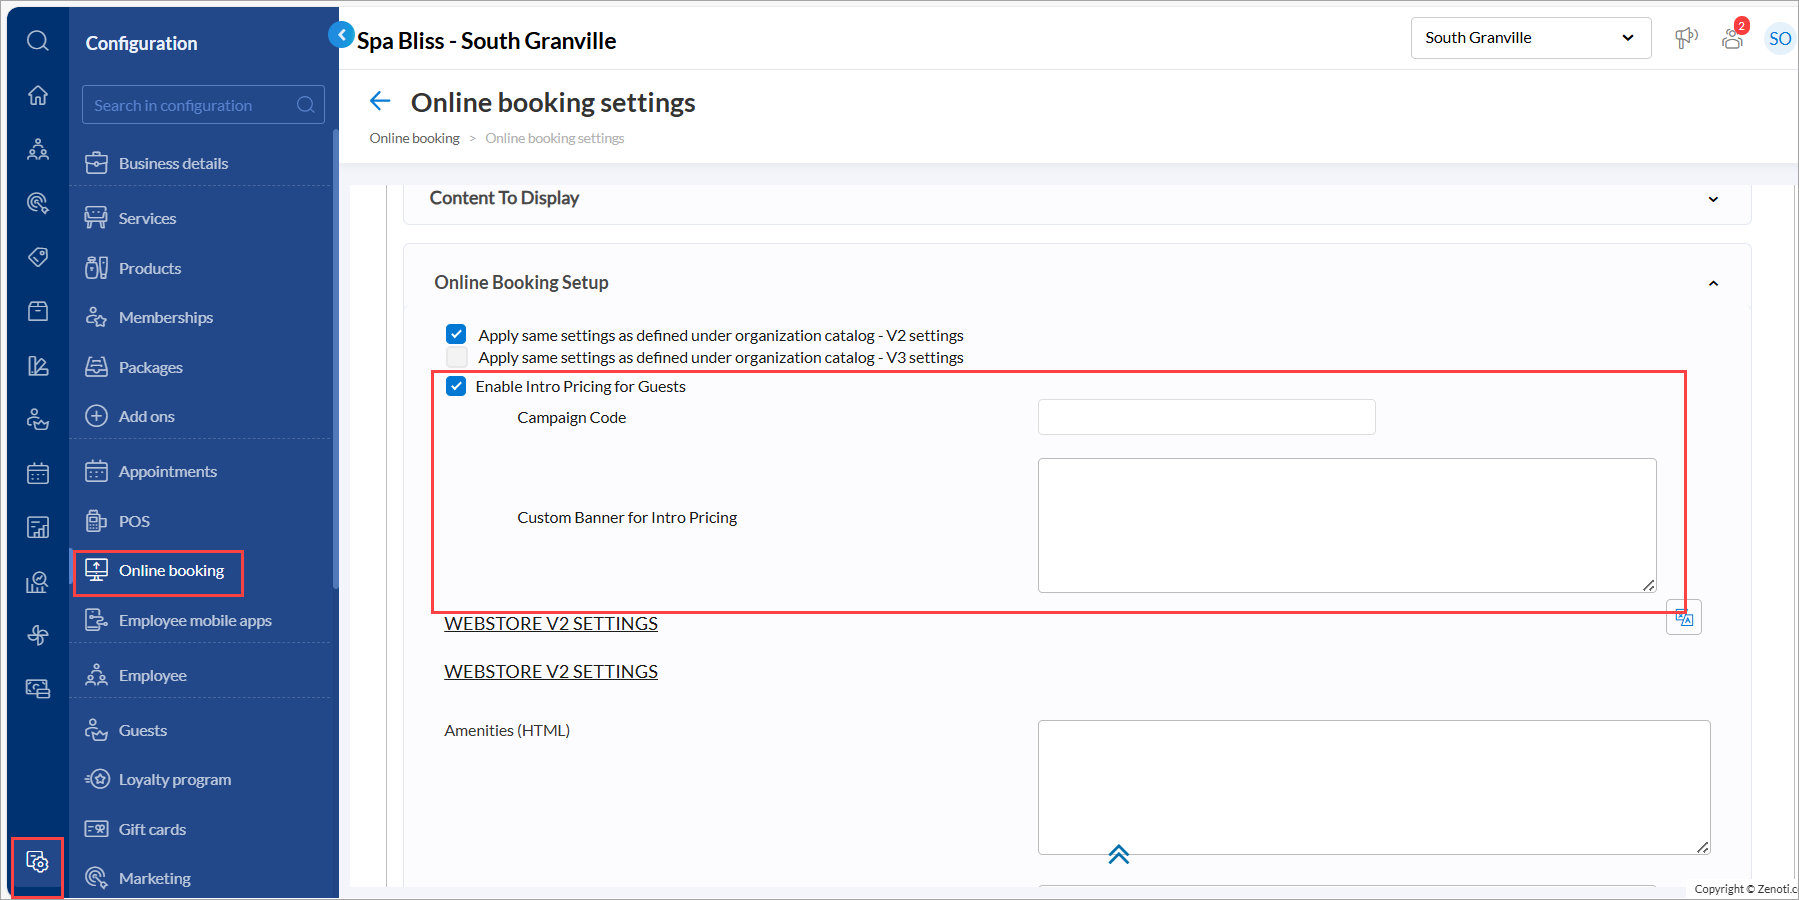
Enable Introductory Pricing for center:
Navigate to Configuration > Online booking > Online booking settings > Online booking setup.
Enable Intro Pricing for Guests, enter the campaign code, and set the custom banner text.
Enable Nearby Center Availability:
The center-level configurations are available only when Custom is selected in the Allow guest to book appointment in nearby locations setting at the organization level.
Navigate to Configuration > Online booking > Online booking settings > Online booking setup.
Select the Enable Appointment Slots Across Nearby Centers checkbox.
Choose all applicable nearby centers and click Add.
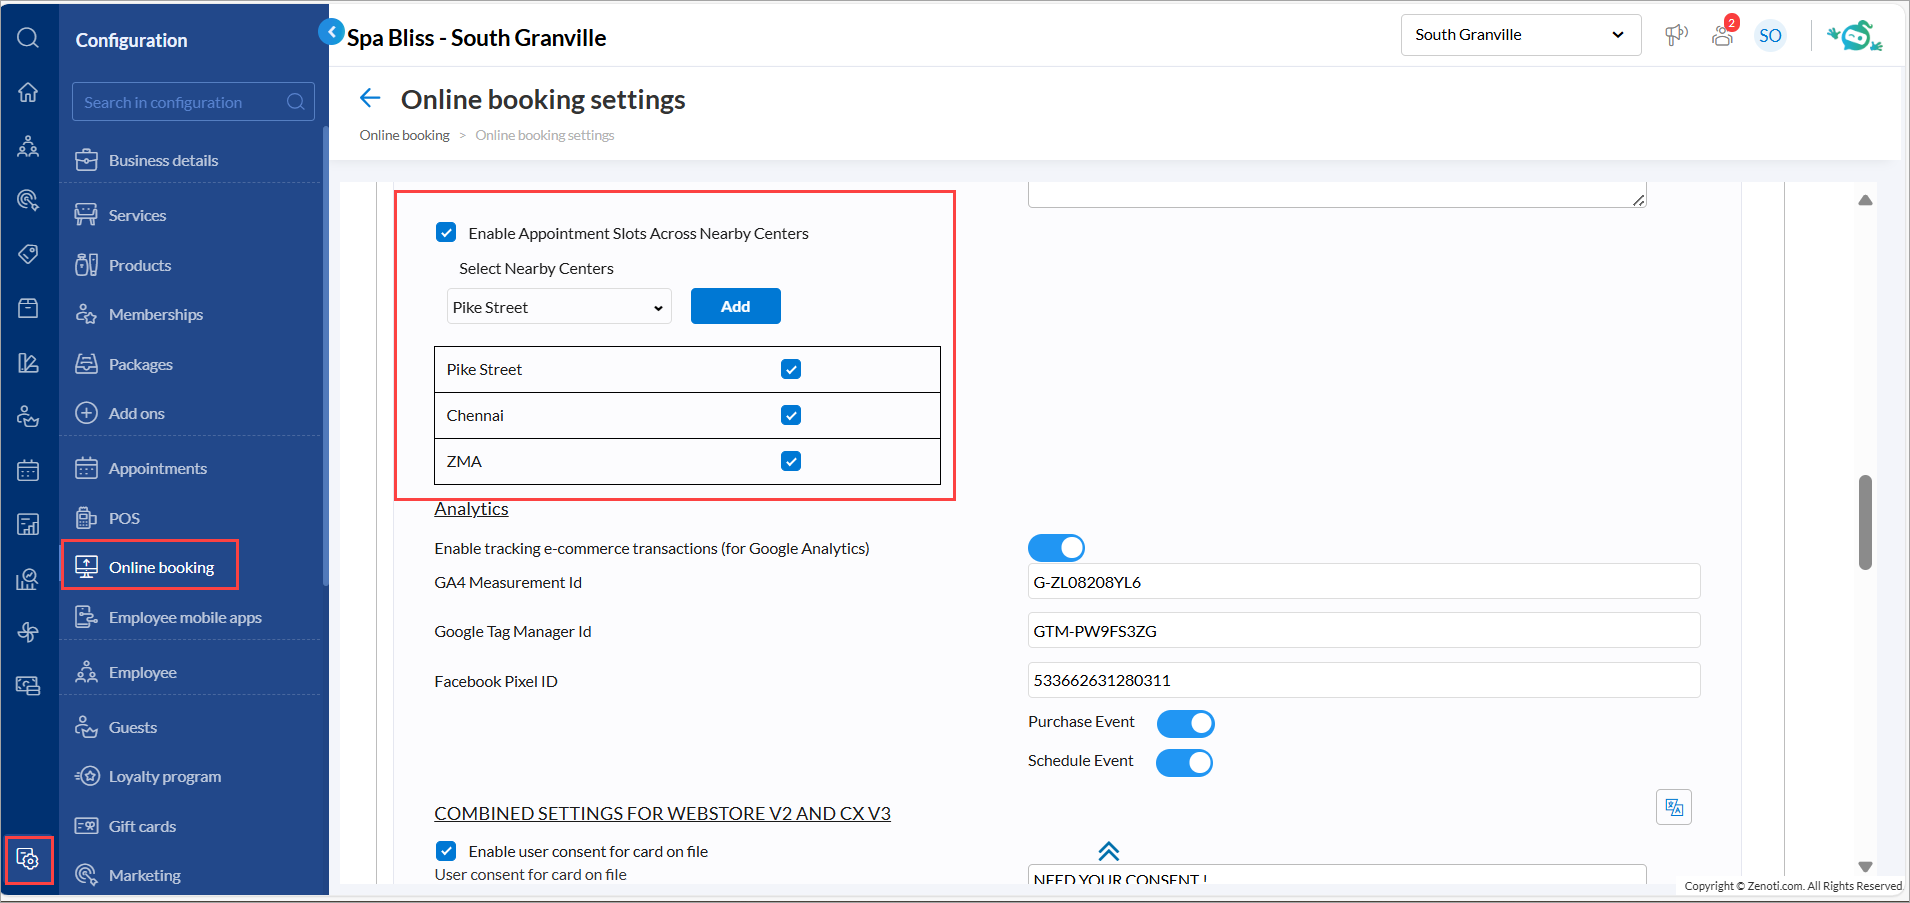
Click Publish to save all center-level changes.
Note
This feature is not enabled by default. Reach out to your administrator to enable this feature.
Introductory pricing does not apply to group or couple bookings.
When setting up nearby centers, each center’s list is configured independently. For instance, if Center A includes Centers B, C, and D as nearby centers, that does not automatically add Center A to the nearby list for Centers B, C, or D. Each center must manually set up its own nearby center preferences.
Learn more: For more information, refer to the Nearby Availability and Introductory pricing for first time guests articles.
Module: Zenoti Mobile
 Guests, Business Owners
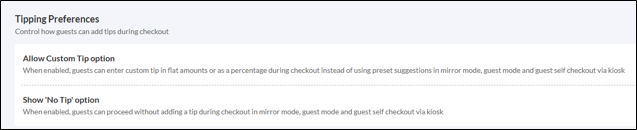
We’ve introduced enhanced tipping controls to help businesses ensure fair tips for service providers while making checkout smoother for guests.
Key updates
Businesses can enable or disable Custom Tipping and No Tip options at the organization or center level under the Zenoti mobile app section.
Note: This feature is enabled by default.
Custom Tipping and No Tip options are enabled by default, allowing guests to either enter a custom tip amount or opt out.
These updates improve guest self-checkout on kiosks, mirror mode, and guest mode on Zenoti Mobile v2 on phones, iPads, and tablets.
Learn more: For more information, refer to the Optimize tipping options to boost service provider earnings in ZMA v2 article.
Add-On Product
Optional, specialized tools and integrations that extend the functionality of the core product. These add-ons cater to specific needs such as advanced marketing, e-prescriptions, digital forms, or integrations with platforms like Shopify and accounting systems. They help businesses scale operations and address industry-specific challenges. Contact your Customer Success Manager (CSM) to find out more about these paid features.
Module: Photo Manager
Admin, Business Owners, Service Providers
Photo Manager on ZMA tablets now allows you to download images directly from the patient gallery and the newly introduced global gallery, provided you have obtained guest consent to use their photos.
This enhancement saves you time and effort by ensuring easier access to high quality photos for use outside of the Zenoti system. Download and use your best treatment result images to boost marketing efforts and enhance client engagement.
This feature is not enabled by default. Reach out to your administrator to enable this feature.
Learn more: For more information, refer to the Capture and Manage Treatment Photos with Photo Manager & Curate and Showcase Treatment Photos with Global Gallery articles.
Module: Accounting Integrations
Administrators, Business Owners
This enhancement introduces an option to export financial data in QuickBooks Desktop format, improving compatibility and ease of data transfer. The existing export option will remain available under custom export settings.
This update enhances financial reporting accuracy, ensuring seamless data mapping and streamlined QuickBooks Desktop integration.
This feature is enabled by default for all QuickBooks Desktop users.
How to use:
At the organization or center level, click Configuration.
Navigate to Integrations > Integration Settings.
Click Accounting > Export.
Under Account > Export format section, select QuickBooks Desktop.
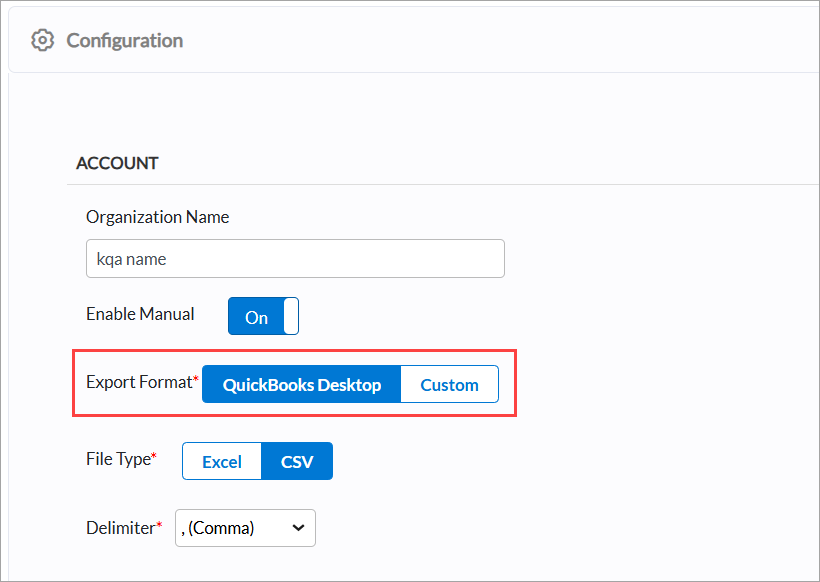
Note
The data can be exported only in CSV format.
Click Save.
Learn more: To learn more, refer to the Export data in QuickBooks Desktop format article.
Additional Resources
This section includes recently published patch release notes and a comprehensive up to date glossary for your reference.
Document type | Release date | Significant enhancements |
|---|---|---|
January 07, 2025 | ||
N/A | N/A |