Book appointments using unified booking interface
This article explains how front desk staff can use Zenoti's new booking experience to schedule single, group, and virtual appointments seamlessly. It outlines setup steps, booking workflows, and tips for using the new interface efficiently
Overview
The new booking experience allows staff to use a single, intuitive screen for all appointment bookings. By centralizing multiple booking entry points, Zenoti simplifies scheduling, helps fill appointment gaps, and improves operational flow.
Prerequisites
To work with the unified booking feature, you must enable the following settings:
Switch on the Unified booking experience toggle at the center level from Configuration > Zenoti Labs.
Switch on the New booking experience toggle from the booking wizard.
Switch on the Enable redesigned appointment book toggle at the center level from Configuration > Appointment and Queue management.
Limitations
The booking experience for single bookings is live. The booking experience for group and bulk bookings is coming soon.
The new booking experience is currently in Beta. Contact your Zenoti Customer Success Manager (CSM) or send a mail to Zenoti Beta signups <betasignups@zenoti.com> to enable this feature for your business.
Shifts support will be available starting February 2026.
Key Benefits
Unified booking offers a quick way for front desk staff to book appointments. Staff can switch over completely from the bottom panel and the booking wizard as it offers the following benefits:
Streamlined booking experience: Use the unified interface to view schedules and book appointments. Staff need not choose between Appointment Book, Bottom Panel, and Booking Wizard – they can just look and book. This helps fill appointment gaps and improve operational efficiency. Note: The booking experience for single bookings is live. The booking experience for group and bulk bookings is coming soon.
Flexible booking options: Choose a provider-first or a service-first approach. Customize time slots, providers, services, and add-ons to suit guest preferences.
Faster bookings through multiple launch points: Front desk staff can book from the following launch points:
Book button on the redesigned Appointment Book
Rebook button from the New Guest Profile
Empty calendar slots
Enable New Booking Experience
To enable the new booking experience, you must first enable the redesigned Appointment Book and then configure the booking experience settings at the organization level.
At the organization level, click Configuration.
Navigate to Appointment and Queue Management > Interface.
Switch on the Enable New Booking Experience toggle.
Click Save.
New Booking Experience Channels
To select the channels where the Unified Booking Experience should be available, follow these steps:
At the organization level, click Configuration.
Navigate to Appointment and Queue Management > Interface.
Under New Booking Experience Channels, select one or more of the following options:
Web – Enables the Unified Booking Experience when accessed through the web.
ZMA – Enables the Unified Booking Experience when accessed through the Zenoti Mobile App.
Click Save.
Sync appointment book and new booking experience on date changes
Use this setting to control how the Appointment Book and the New Booking Experience stay in sync when the date is changed.
At the organization level, click Configuration.
Navigate to Appointment and Queue Management > Interface.
Under Sync appointment book and new booking experience on date changes, configure one or both of the following options:
Sync appointment book changes to new booking experience – When the date is changed in the Appointment Book, the same date is automatically updated in the New Booking Experience.
Sync new booking experience changes to appointment book – When the date is changed in the New Booking Experience, the same date is automatically updated in the Appointment Book.
Click Save.
Note
If a user changes the center during the Edit and Assign stage, Zenoti displays an alert notifying them of the center change and retains relevant information across centers. This includes guest details, selected services (only if they are available at the newly selected center), the selected time slot (with availability refreshed based on the new center), and the assigned provider, if available; otherwise, the provider defaults to Any.
Launch New Booking
Queue
To launch new booking from Queue, follow these steps:
At the center level, click Queue.
Click the Booking Wizard icon. The New Booking Experience opens.
Waitlist
To launch new booking from waitlist, follow these steps:
From the center level, open the Appointment book.
Click the Waitlist icon.
From the waitlist, click the Book button next to the guest’s name. The New Booking Experience opens.
Quotes
To launch new booking from Quotes, follow these steps:
From the center level, open the Appointment book.
Click the Quotes icon.
From the Quotes screen, search for the guest and click Create Quote.
After creating the quote, click Create invoice. The New Booking Experience opens.
ZMA
To launch new booking from ZMA, follow these steps:
Launch ZMA.
Click the Booking Wizard icon. The New Booking Experience opens.
Book Single Appointments using the Book Button
To book an appointment for a single guest from the Book button from the unified booking interface, follow these steps:
In the redesigned Appointment Book, click Book.
Note
The term Book is configurable. For example, a business may configure this term as Appointment or Bookings.
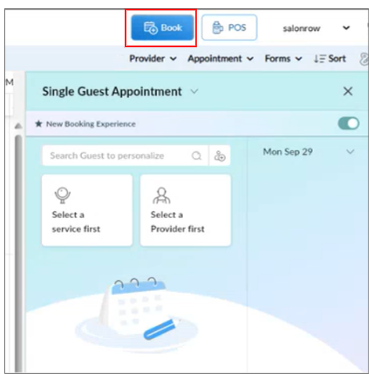
In the Single guest appointment window:
Use the Search guest to personalize field to find an existing guest by name, phone number, or email.
To book a new guest, click the new guest icon, and enter their details.
Click Select a service first or Select a service provider first.
Note
The term Service provider is configurable. Each business can configure this term to suit their context.
Tip
If you start with a service, you can narrow down the best provider for that service. If you select a provider first, you can quickly check their availability.
Click the date shown on the right panel to open the calendar.
Modify the appointment date as required.
Under Services, search for and select one or more services for the appointment.
After a service is selected, on the Add-ons screen you can include:
Add-ons with additional time
Add-ons with extra charges
To replace a service, click the edit (pencil) icon. Click the replace icon. From the list, select the replacement service. Each option shows the duration and price.
Select a suitable provider based on availability.
Note
The time slots on the right panel get updated based on provider availability and duration of services.
Click View providers and select a suitable provider.
Click Proceed.
An editable summary showing all selected services, time slots, and assigned providers appears.
Click the edit icon to:
Reassign services to different providers
Change time slots
Add or remove services or add-ons
Click Done editing.
Click Review.
A countdown timer appears to complete the booking. You must complete the booking within this time.
Click Book to confirm your booking.
The appointment appears on the Appointment Book.
Book Group Appointments in the New Booking Experience
Zenoti allows you to schedule small groups (2–6 guests) or bulk bookings (more than 6 guests) and proceed with bookings even when full guest details are not available.
To book group appointments in the new booking experience, follow these steps:
In the redesigned Appointment Book, click Book.
From the booking panel, select the Booking Type as Group booking.
Enter the group name and the number of guests.
Choose:
2–6 guests for small group bookings, or
More than 6 guests for bulk bookings.
Click Manage host and guests.
Search for and select the group Host (primary contact). If needed, update the host at any time during the booking process. The host will serve as the main reference for communication and tracking.
Search and select guest profiles and add them to the group booking. If attendee details are not available, proceed with the booking. Zenoti automatically creates virtual guests for unnamed attendees. This ensures faster booking during peak hours or when guest details are pending.
Click Proceed to select service and time slots.
Add services individually to each guest or use the Select services for - All guests option to assign a service to the entire group in one click.
Modify services for individual guests as needed.
You can add or edit services without restarting the booking.
Based on the available time slots, choose between shared or staggered time slots.
Review the Group size, Host, Services, Staff, and Time slots.
Click Book.
Note
Use Virtual Guests during busy periods to avoid delays.
Replace Virtual Guests with actual profiles before checkout for accurate reporting.
Verify capacity before confirming large bulk bookings.
Use the compact view to quickly validate guest distribution and services.
Book Single Appointments from the Rebook Option in the Guest Profile
To book an appointment for a single guest from the Rebook button from the guest profile, follow these steps:
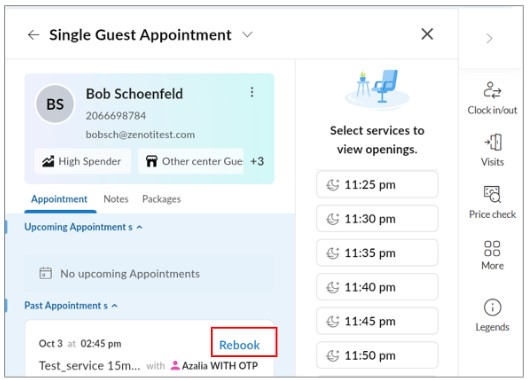
In the redesigned Appointment Book, from the guest profile, under Past Appointments, find the appointment you want to rebook.
Click Rebook.
Select the provider, appointment date and time, and room, as applicable.
Click Review.
To go back to making edits, click Keep editing.
After you are done with your edits, click Done editing.
Click Book.
The rebooked appointment appears on the appointment book.
To take payment and make the booking in one go, click Book and Proceed to Payment.
The POS screen appears.
Check the booking details and click Rebook.
The rebooked appointment appears on the appointment book.
Book Single Appointments from Empty Calendar Slots
To book an appointment for a single guest from empty calendar in the unified booking interface, follow these steps:
In the redesigned Appointment Book, right-click a time slot and select New appointment.
Alternatively, double-click an empty time slot.
In the Single appointment window, use the Search guest to personalize field to find an existing guest by name, phone number, or email.
Click Select a service first or Select a service provider first.
The term Service provider is configurable. Each business can configure this term to suit their context.
Tip
If you start with a service, you can narrow down the best provider for that service. If you select a provider first, you can quickly check their availability.
Click the date shown on the right panel to open the calendar.
Modify the appointment date as required.
Under Services, search for and select one or more services for the appointment.
After a service is selected, on the Add-ons screen you can include:
Add-ons with additional time
Add-ons with extra charges
Select a suitable provider based on availability.
The time slots on the right panel are updated based on provider availability and duration of services.
Click View providers and select a suitable provider.
The time slots on the right panel are updated based on provider availability and duration of services.
Click Proceed.
An editable summary showing all selected services, time slots, and assigned providers appears.
Click the edit icon to:
Reassign services to different providers
Change time slots
Add or remove services or add-ons
Click Done editing.
Click Review.
A countdown timer appears. You must complete the booking within this time.
Click Book to confirm your booking.
The appointment appears on the Appointment Book.
Book a Surprise Visit Using the New Booking Experience
To book a surprise visit using the new booking experience, follow these steps:
In the redesigned appointment book, click Book.
From the booking panel, select the Change Booking Type as Surprise Visit.
In the Manage host and Guest section, add a Host. Use the Search host to personalize field to find an existing guest by name, phone number, or email. Alternatively, click Add to create a new host profile.
Add a Guest (the recipient of the service). Use the Search guest to personalize field to find an existing profile. Alternatively, click Add to create a new guest profile.
Select the appointment date. Click the date shown on the right panel to open the calendar and modify the date as required.
Verify both Host and Guest are added. The Proceed button remains disabled until both roles are selected.
Click Proceed. The booking flow continues to service selection.
Under Services, search for and select one or more services for the Guest. After selecting a service, the Add-ons screen may appear, where you can include:
Add-ons with additional time
Add-ons with extra charges
Select a suitable provider based on availability. The available time slots update dynamically based on provider availability and service duration.
Click Review. An editable summary appears showing selected services, time slots, providers, and pricing.
You can click the edit icon to:
Reassign services to different providers
Change time slots
Add or remove services or add-ons
Click Book to confirm the surprise booking. The appointment is created and appears in the Appointment Book.
Book a Virtual Appointment Using the New Booking Experience
To book a virtual appointment using the new booking experience, follow these steps:
In the redesigned Appointment Book, click Book.
From the booking panel, select the Change Booking Type as Virtual booking.
In the Services section, search for and select a virtual service.
Selected services are highlighted and display the service duration and price.
Click View Provider to review provider-specific availability.
Select the appointment date.
Click the date shown on the right pane to open the calendar and modify the date as required.
Select an available time slot. The selected time is highlighted, and the system confirms that the date and time are available.
In Confirmation Settings, choose how the guest should receive the virtual appointment details. Enable one or both of the following options:
Text confirmation
Email confirmation
Paste the virtual appointment link and add any additional details in the message fields. Character limits and SMS credit usage are displayed below each field.
Click Select guest.
Search for and select an existing guest by name, phone number, or email, or add a new guest if required.
Review the Edit and Assign section.
Click Add note to include internal notes for the appointment.
Click Review. The Review and confirm screen displays the selected service, date and time, provider assignment, confirmation settings, and booking timer.
Click Book to confirm the virtual appointment. A confirmation message appears, and the appointment is created and shown in the Appointment Book.
Book Recurring Appointments in the New Booking Experience
To book recurring appointments in the new booking experience, follow these steps:
In the redesigned appointment book, click Book.
From the booking panel, search for and select a guest.
Select a service or provider.
Click Select a service first to choose a service, or
Click Select a service provider first to begin with a provider.
Note
The term Service provider is configurable and may appear differently based on center terminology.
Choose the appointment date. Click the date shown on the right panel to open the calendar and select the start date for the recurring series.
Under Services, select one or more services. After selecting a service, the Add-ons screen may appear, where you can include:
Add-ons with additional time
Add-ons with extra charges
Define the recurrence pattern by clicking the date shown on the right panel (for example, Mon Jan 19).
From the recurrence menu, choose one of the following options:
Does not repeat (default)
Repeat daily
Repeat weekly
Repeat monthly
Repeat yearly
Verify date and time availability. A confirmation message indicates whether the selected date and time are available for the chosen recurrence.
Under Services, review the selected services.
Click Review. A summary appears showing all appointments created by the recurrence pattern, including dates, times, services, providers, and pricing.
If you want to edit the appointment series, use the edit icon to:
Change providers
Change time slots
Add or remove services or add-ons
Click Book to confirm. All appointments in the series are created and appear in the Appointment Book.
Edit Service Duration in the New Booking Experience
Ensure the following prerequisites are met before attempting to edit service duration:
A service provider must be selected for the appointment.
Resizing of appointment block must be enabled.
The selected service must not be a segmented service.
Service duration can be edited only when:
A service provider is selected or
The service supports Guest-specific duration.
If these conditions are not met, the option to edit service duration will not be available.
To edit the service durations in the new booking experience, follow these steps:
From the Appointment Book, click an existing appointment block to open the appointment summary.
Click the edit icon on the appointment block to open the Edit and Assign panel.
Click the edit icon.
Click the duration selector to open the update duration panel, then use the duration controls to adjust the service length and save. Zenoti validates service provider’s availability based on the updated duration.
Click Review and then Book to update the service duration for the appointment.
Add a Service or Provider in the New Booking Experience
To add a service in the new booking experience, follow these steps:
From the Appointment Book, click an existing appointment block to open the appointment summary.
Click the edit icon on the appointment block to open the Edit and Assign panel.
Click Add service.
Under Services, search for and select one or more services for the Guest. After selecting a service, the Add-ons screen may appear, where you can include:
Add-ons with additional time
Add-ons with extra charges
Select a suitable provider based on availability. The available time slots update dynamically based on provider availability and service duration.
Click Review. An editable summary appears showing selected services, time slots, providers, and pricing.
Click Book to update the appointment with the newly added service.
To update the provider in the new booking experience, follow these steps:
From the Appointment Book, click an existing appointment block to open the appointment summary.
Click the edit icon on the appointment block to open the Edit and Assign panel.
Click the plus (+) icon next to Add service.
Click Add Provider.
From the provider list, select the required provider.
From the provider’s service list, select the service you want to book.
Click Proceed.
Click Review. An editable summary appears showing selected services, time slots, providers, and pricing.
Click Book to update the appointment with the newly added service.
Add a Note to the Appointment in the New Booking Experience
From the Appointment Book, click an existing appointment block to open the appointment summary.
Click the edit icon on the appointment block to open the Edit and Assign panel.
Click the plus (+) icon next to Add service.
Click Add note.
Enter the relevant information. Use notes to capture internal context or special instructions related to the appointment or services.
Click Add. The note is attached to the appointment once booking is updated.
Redeem Packages in the New Booking Experience
To redeem packages in the new booking experience, follow these steps:
In the Redesigned Appointment Book, click Book.
Search for and select the guest whose package you want to redeem.
Click the Packages tab. The guest’s available packages and the remaining credits for each package are displayed.
Click Redeem next to the package you want to use. A list of services included in the package appears. Services are shown with credits instead of price.
Select the service you want to redeem and click Proceed. If applicable, add-ons included in the package also follow the same credit-based selection behavior.
Review the services selected for redemption.
Click Review to continue.
Note
Services and add-ons that are part of a package always display credits, not prices, throughout the booking flow.
Credits are consumed as services are redeemed, and the remaining credit count updates accordingly.
Packages with 0 remaining credits may still appear, but redemption is limited by available credits.
When you book an appointment from HyperConnect, you will be redirected to the new booking experience.
Use this table to understand which conditions must be met to change a guest across each booking flow.
Condition | Appointment Book | Old Booking Wizard | New Booking Experience |
|---|---|---|---|
Permission to change guest is enabled | Yes | Yes | Yes |
Invoice is not locked | Yes | Yes | Yes |
Not in rebook mode | No | Yes | Yes |
Edit mode prerequisites are not active | No | Yes | Yes |
Credit card validation | No | Yes | Yes Solo/virtual only; skipped for multi-guest |
Booking source is not a store | No | Yes | No |
Guest is not a virtual guest | No | Yes | Yes |
Invoice is not closed | Yes | No | No |
Booking is not read-only | Yes | NA | NA |
Accessed from the context menu | Yes Hidden if outside context menu | NA | NA |