Release Notes - August 12, 2025 (DRAFT)
Caution
You’re viewing the draft version of the Patch Release Notes. This document is being shared in advance to provide early visibility into upcoming enhancements. Please note that the content is still under editorial review and is subject to change. The final version will be published on August 12, 2025, and will include any remaining updates or newly approved features. We recommend checking back closer to the release for the most accurate and complete information.
We’ve enhanced the structure of our release notes to better serve your needs. Updates are now categorized under clear headings based on Add-ons, Core Product, Product Edition, Personas, and Modules.
This new format ensures you can quickly find updates most relevant to your role, understand the value each change delivers, and seamlessly adopt new features or enhanced workflows.
This Release Notes contains the following sections:
Announcements: Key updates and important information related to the release.
New Features: Newly introduced functionalities designed to enhance the product experience.
Enhancements: Improvements made to existing features for better usability and performance. Categorized features as Core Product, Product Editions, and Add-ons.
Additional Resources: Links to supporting materials such as guides, training, and documentation. This also includes references to the release notes for the patches included in this update.
Icons used in this document
Icon | Description |
|---|---|
 | Automatic update for all users. |
 | Employee: Enhancements or features for employee and payroll. |
 | Admin: Features specifically enhanced for admin users who manage the system configuration, including user roles, permissions, and system integrations. |
 | Business Owner/Center Manager: Updates implemented for the business owners or managers who are responsible for overall business strategy, growth, and decision-making. |
 | Front Desk Operator/Service Provider: Features that enhance the usability for front-desk staff who handle appointments, customer queries, payments, and guest interactions. |
 | Guests: Improvements made for the end-users or customers of the business who interact with Zenoti through online booking systems, self-service kiosks, and branded mobile apps. |
New Features
Core Product
Module: Quotes
Business Owners, Administrators, Front-Desk Operators
We are excited to introduce Quotes, a new feature that helps you create, manage, and share personalized service estimates with your guests, directly within Zenoti.
Whether you’re building custom treatment plans or providing price transparency up front, Quotes help you:
Build trust: Share transparent and personalized service details.
Increase conversions: Help guests make confident, informed decisions.
Enhance the guest experience: Communicate proactively and professionally.
You can also convert a quote into an invoice when a guest chooses to proceed, streamlining the journey from consultation to payment.
Business Use Case:
Medspas often offer multi-session treatments such as laser therapy or weight management programs that involve significant investment. With Quotes, you can send clear, detailed treatment plans to guests, helping them compare options and choose what works best.
This transparency supports better decision making, builds trust, and improves conversion for high-value services.
How to Use:
To access Quotes, navigate to the Redesigned Appointment Book and click Quotes.
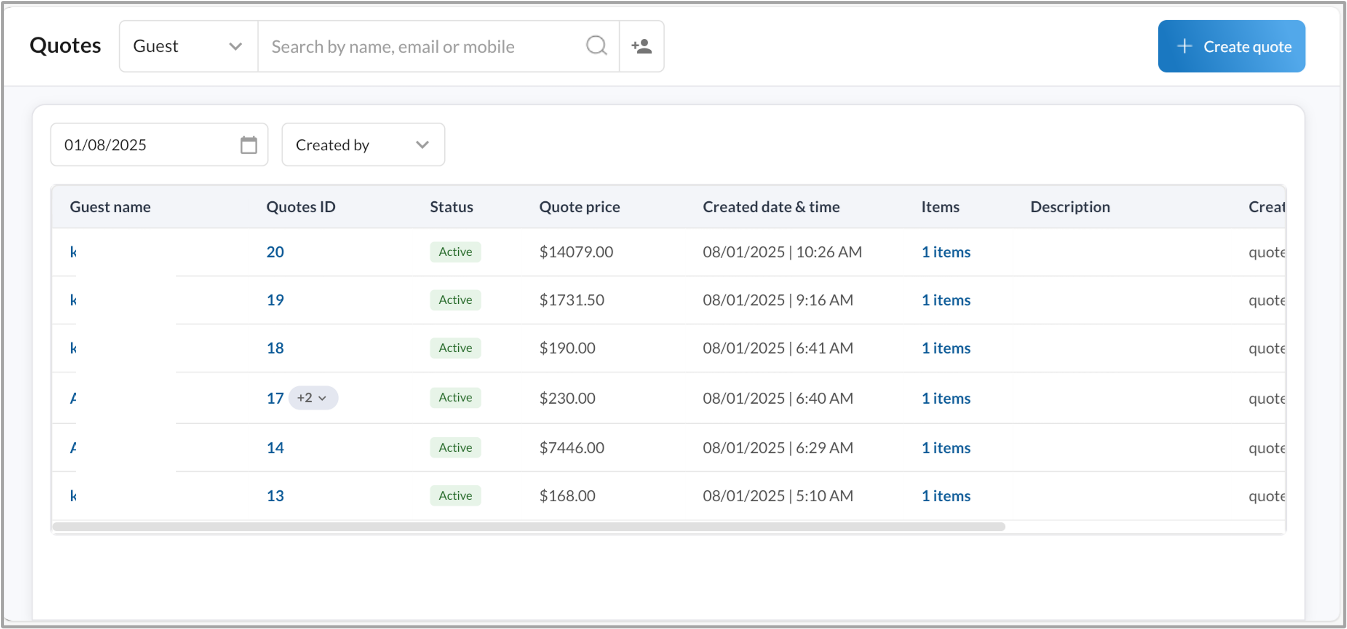
Note
This feature is not enabled by default. Reach out to your administrator to enable this feature.
Enhancements
Core Product
Module: Employee
Module: Appointments
A new column called Included in Package, has been added to the Appointments report. It shows whether a guest has an active package with unredeemed credits for the scheduled service. This enhancement gives front desk teams quick visibility into package eligibility, enabling better engagement and more strategic upsell opportunities.
Business Scenario
Front desk staff often need to determine if a guest's service is covered under an existing package. Without this visibility, staff may overlook upsell opportunities or repeat sales conversations with guests who already have active packages. The new column provides actionable insights, enabling more informed, timely interactions that enhance the guest experience.
How to Use:
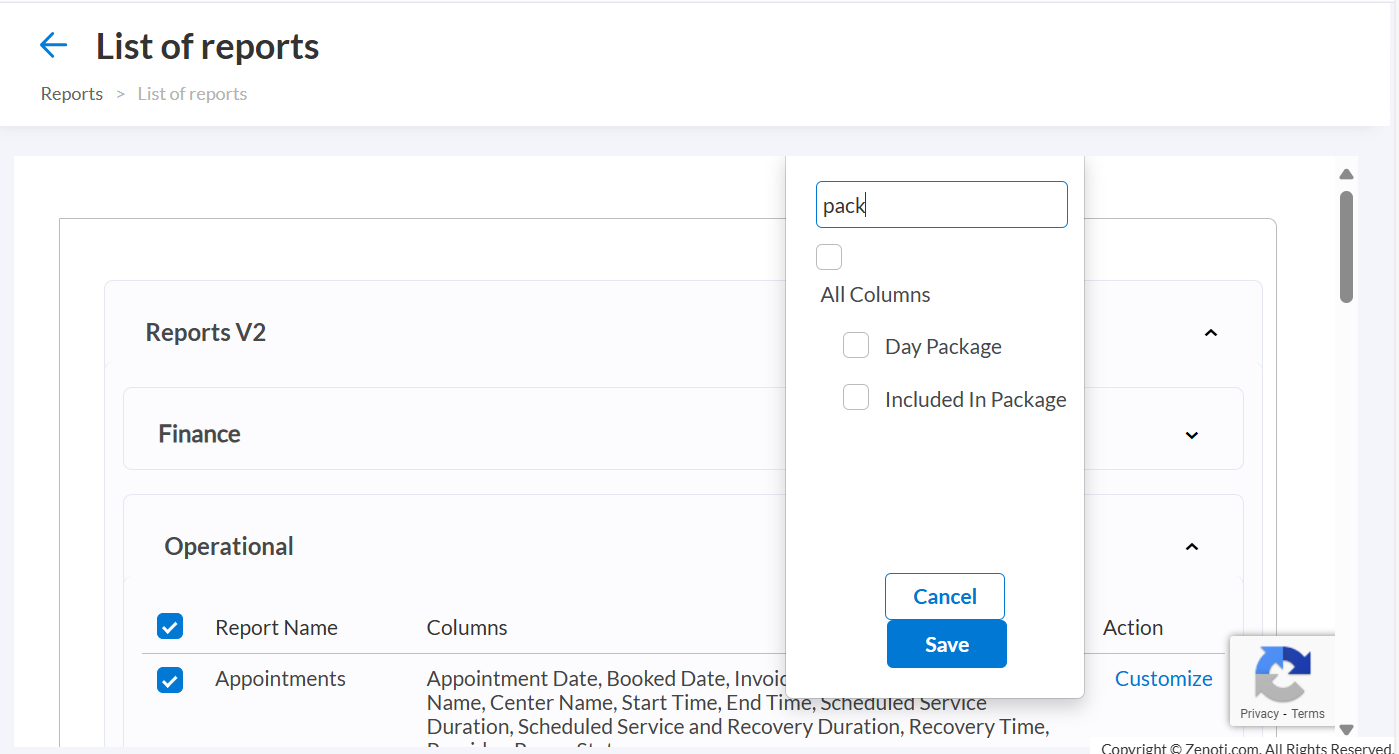
Enable the new column. Ensure Included in Package is selected at the organization level under the List of reports.
Note
If the column or its data is not visible, reach out to your Zenoti representative.
Navigate to Reports > Appointments Report.
Export the report if needed for operational planning or guest interaction purposes.
Front Desk Operators
Front desk operators can now preview the redesigned Appointment Book (Calendar V2) using a simple toggle. This feature allows users to explore the new interface during their current session, provide feedback, and switch back anytime, without impacting existing appointment settings or workflows.
Business Scenario:
The redesigned Appointment Book is available for preview, even before full onboarding is completed at the center level. This early access helps front desk teams become familiar with the updated interface, gather insights, and prepare for adoption without disrupting day-to-day operations.
How to Use:
Go to the Appointment Book.
Turn on the New version toggle in the top-right corner of the screen.
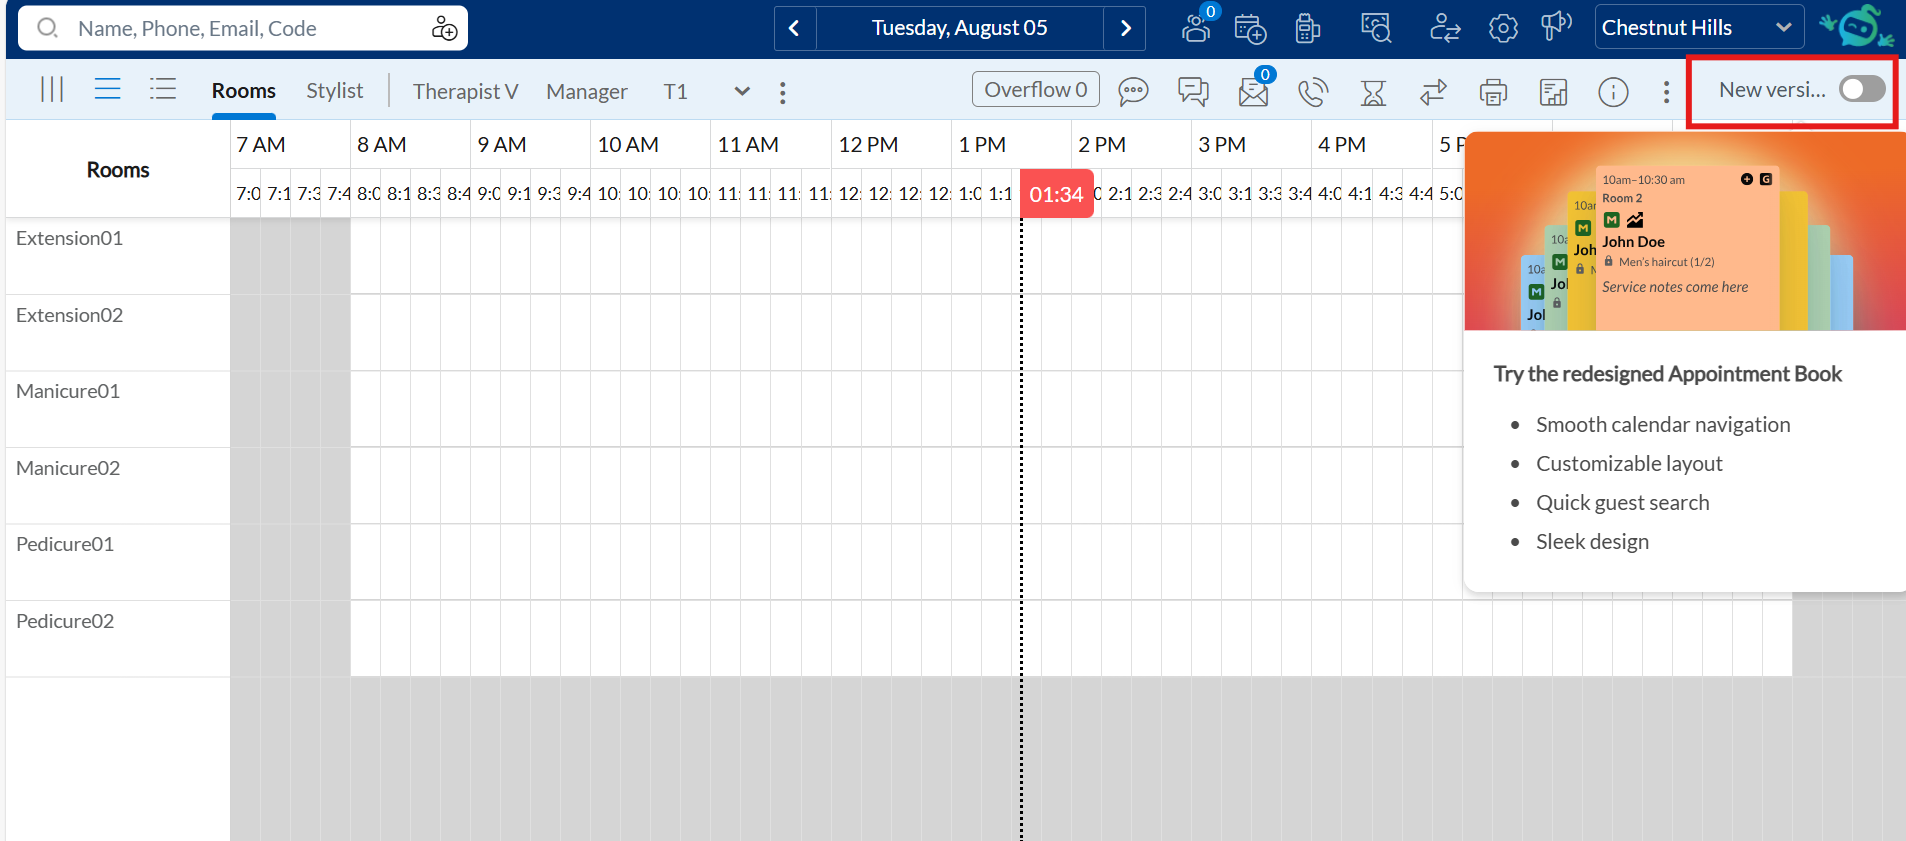
To return to the old version, just turn the toggle off.
When prompted, submit the feedback form to share your experience.
Front Desk Operators
This enhancement to Today's Sales report in the Appointment Book adds real-time visibility into posting statuses for Opera Cloud and HTNG integrations. Users can now view, identify, and retry failed postings directly, minimizing manual effort and reducing support dependencies.
Business Scenario:
The report now offers enhanced visibility and control over integrated transaction postings, enabling users to:
Instantly check posting status for all transactions
View detailed failure reasons by hovering over the status
Retry failed postings in real time, directly from the report
These improvements streamline workflows, reduce turnaround time for resolution, and empower staff to act without needing external support.
How to Use:
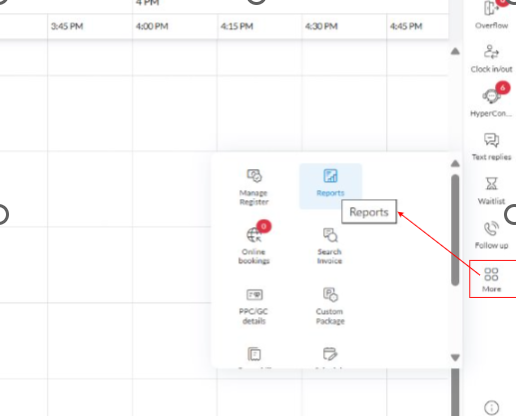
Open the Appointment Book, then click Reports from the More menu in the right panel.
Select Sales. Today’s Sales report appears.
In the report, review the Posting Status column for each transaction:
Success: Transaction posted successfully
Failed: Posting failed. Hover to view the reason.
Not Applicable: Posting not required (example, for cash payments).
(Optional) Use the Posting Status filter to view specific transactions.
For failed transactions, click Retry to attempt reposting.
Module: Queue
Module: WebPOS
Admin
Admins can now control whether mid-day cash counts and tip payouts are visible in the New Register interface. Two new settings, Enable mid-day cash counts in New Register and Enable Tips payout in New Register, give centers the flexibility to show or hide these options based on their operational needs.
A multi-location spa chain enables mid-day cash counts at high-traffic centers to catch discrepancies early. Smaller locations turn off the option to minimize interruptions. Similarly, some centers restrict tip payouts to payroll cycles and turn off in-register payouts for tighter control. These settings help standardize workflows across locations, improve financial oversight, and reduce unnecessary register interactions where not required.
How-to use:
At the center level, click Configuration.
Navigate to POS > Register management.
Switch on the following toggles:
Enable tips payout in New Register
Enable mid-day cash counts in New Register
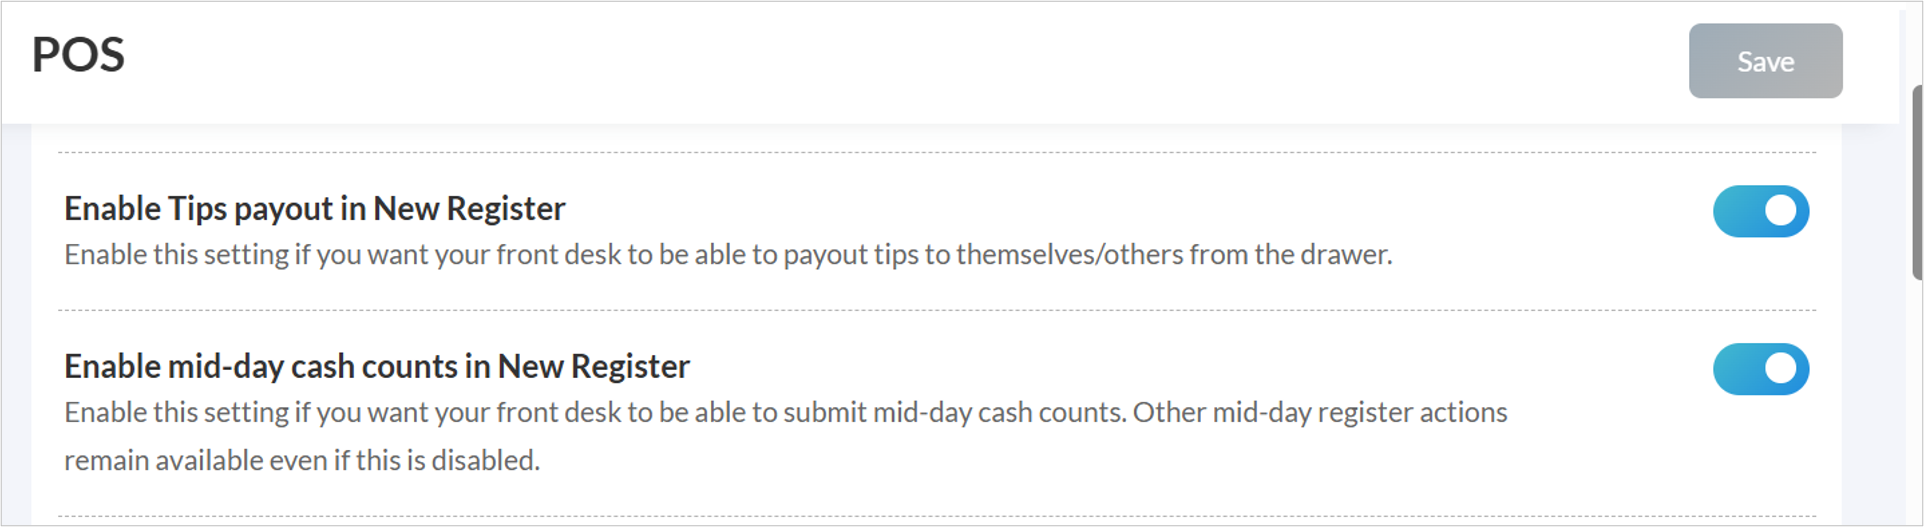
Click Save.
The Register Cash Count report gives managers clear visibility into all cash count submissions, helping to streamline cash handling and improve accountability across centers.
Key updates:
Track all cash counts: View opening, mid-day, and closing cash counts recorded by the front desk.
Review denominations See denomination breakdowns for each cash count.
Flexible filtering: Filter by date, center, register, and count type (opening, mid-day, closing).
Drill-down insights: Click into individual entries for detailed information.
Direct editing: Edit past entries from within the report using the updated Register UI
How-to use:
At the organization level, click Reports.
Click Finance > Accounting.
Click Register Cash Count report.
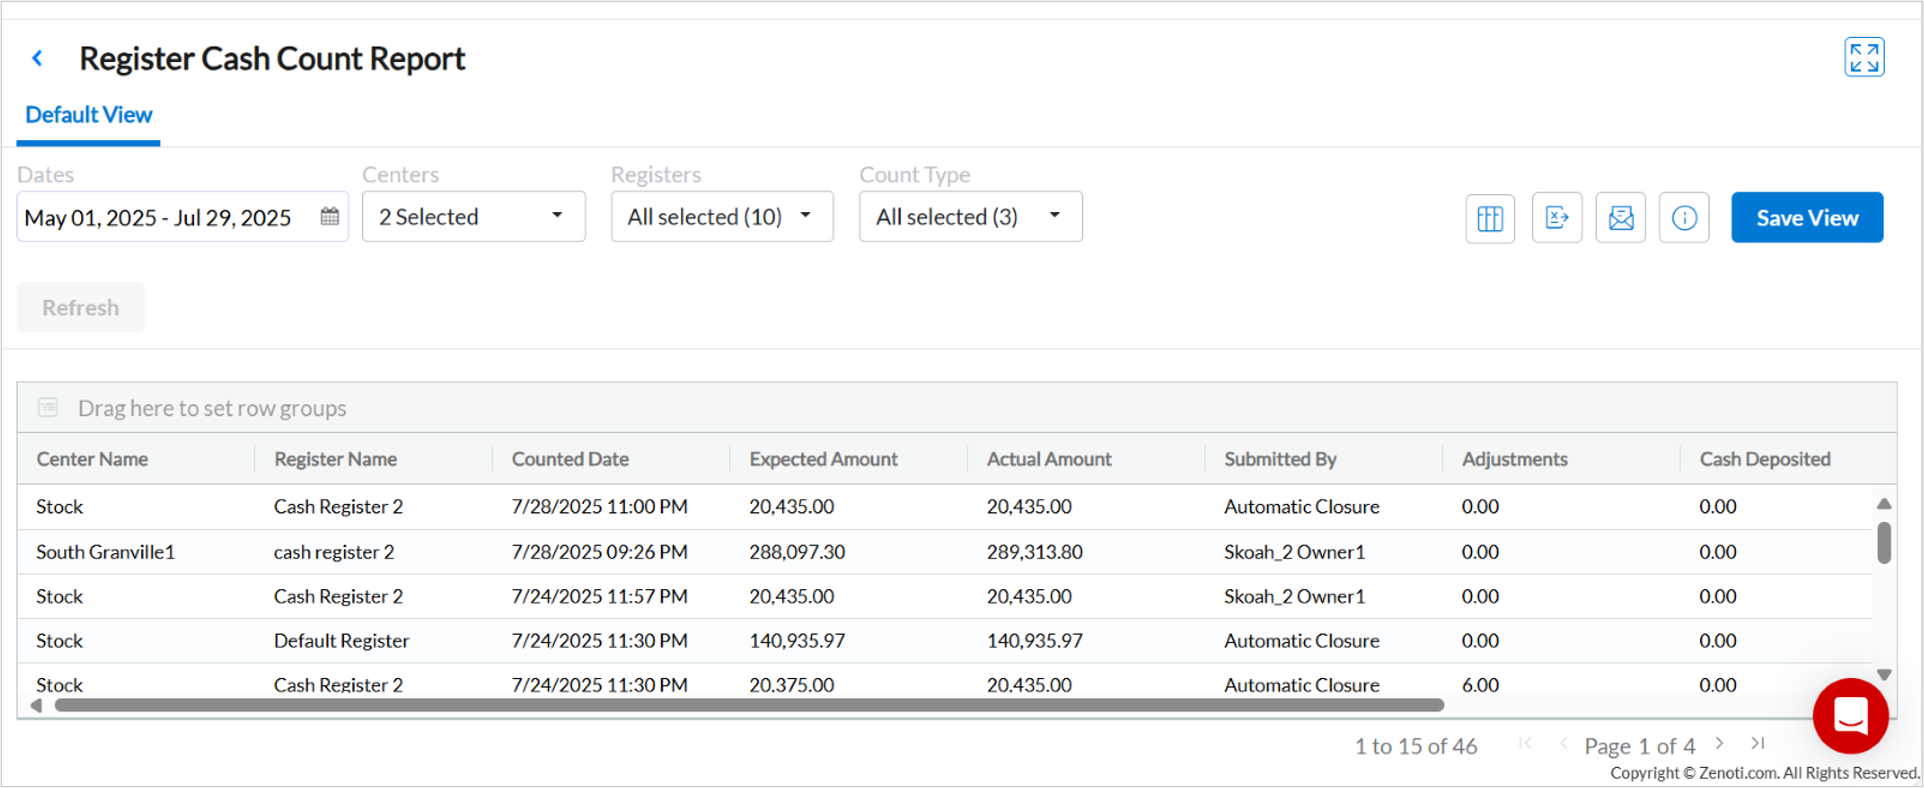
Note
This is only available if you have the new register management feature enabled.
Module: Reports
Business Owners/Center Manager
Zenoti introduces the Definitions panel to simplify complex report data by showing column descriptions in one place. This feature helps you interpret metrics accurately, make quicker decisions, and reduce reliance on external support. You can also click the Help Article link to open a detailed guide for the specific report.
How-to use:
At the organization or center level, click Reports.
Click to open the report of your choice.
Click Definitions to open the slide-out-panel.
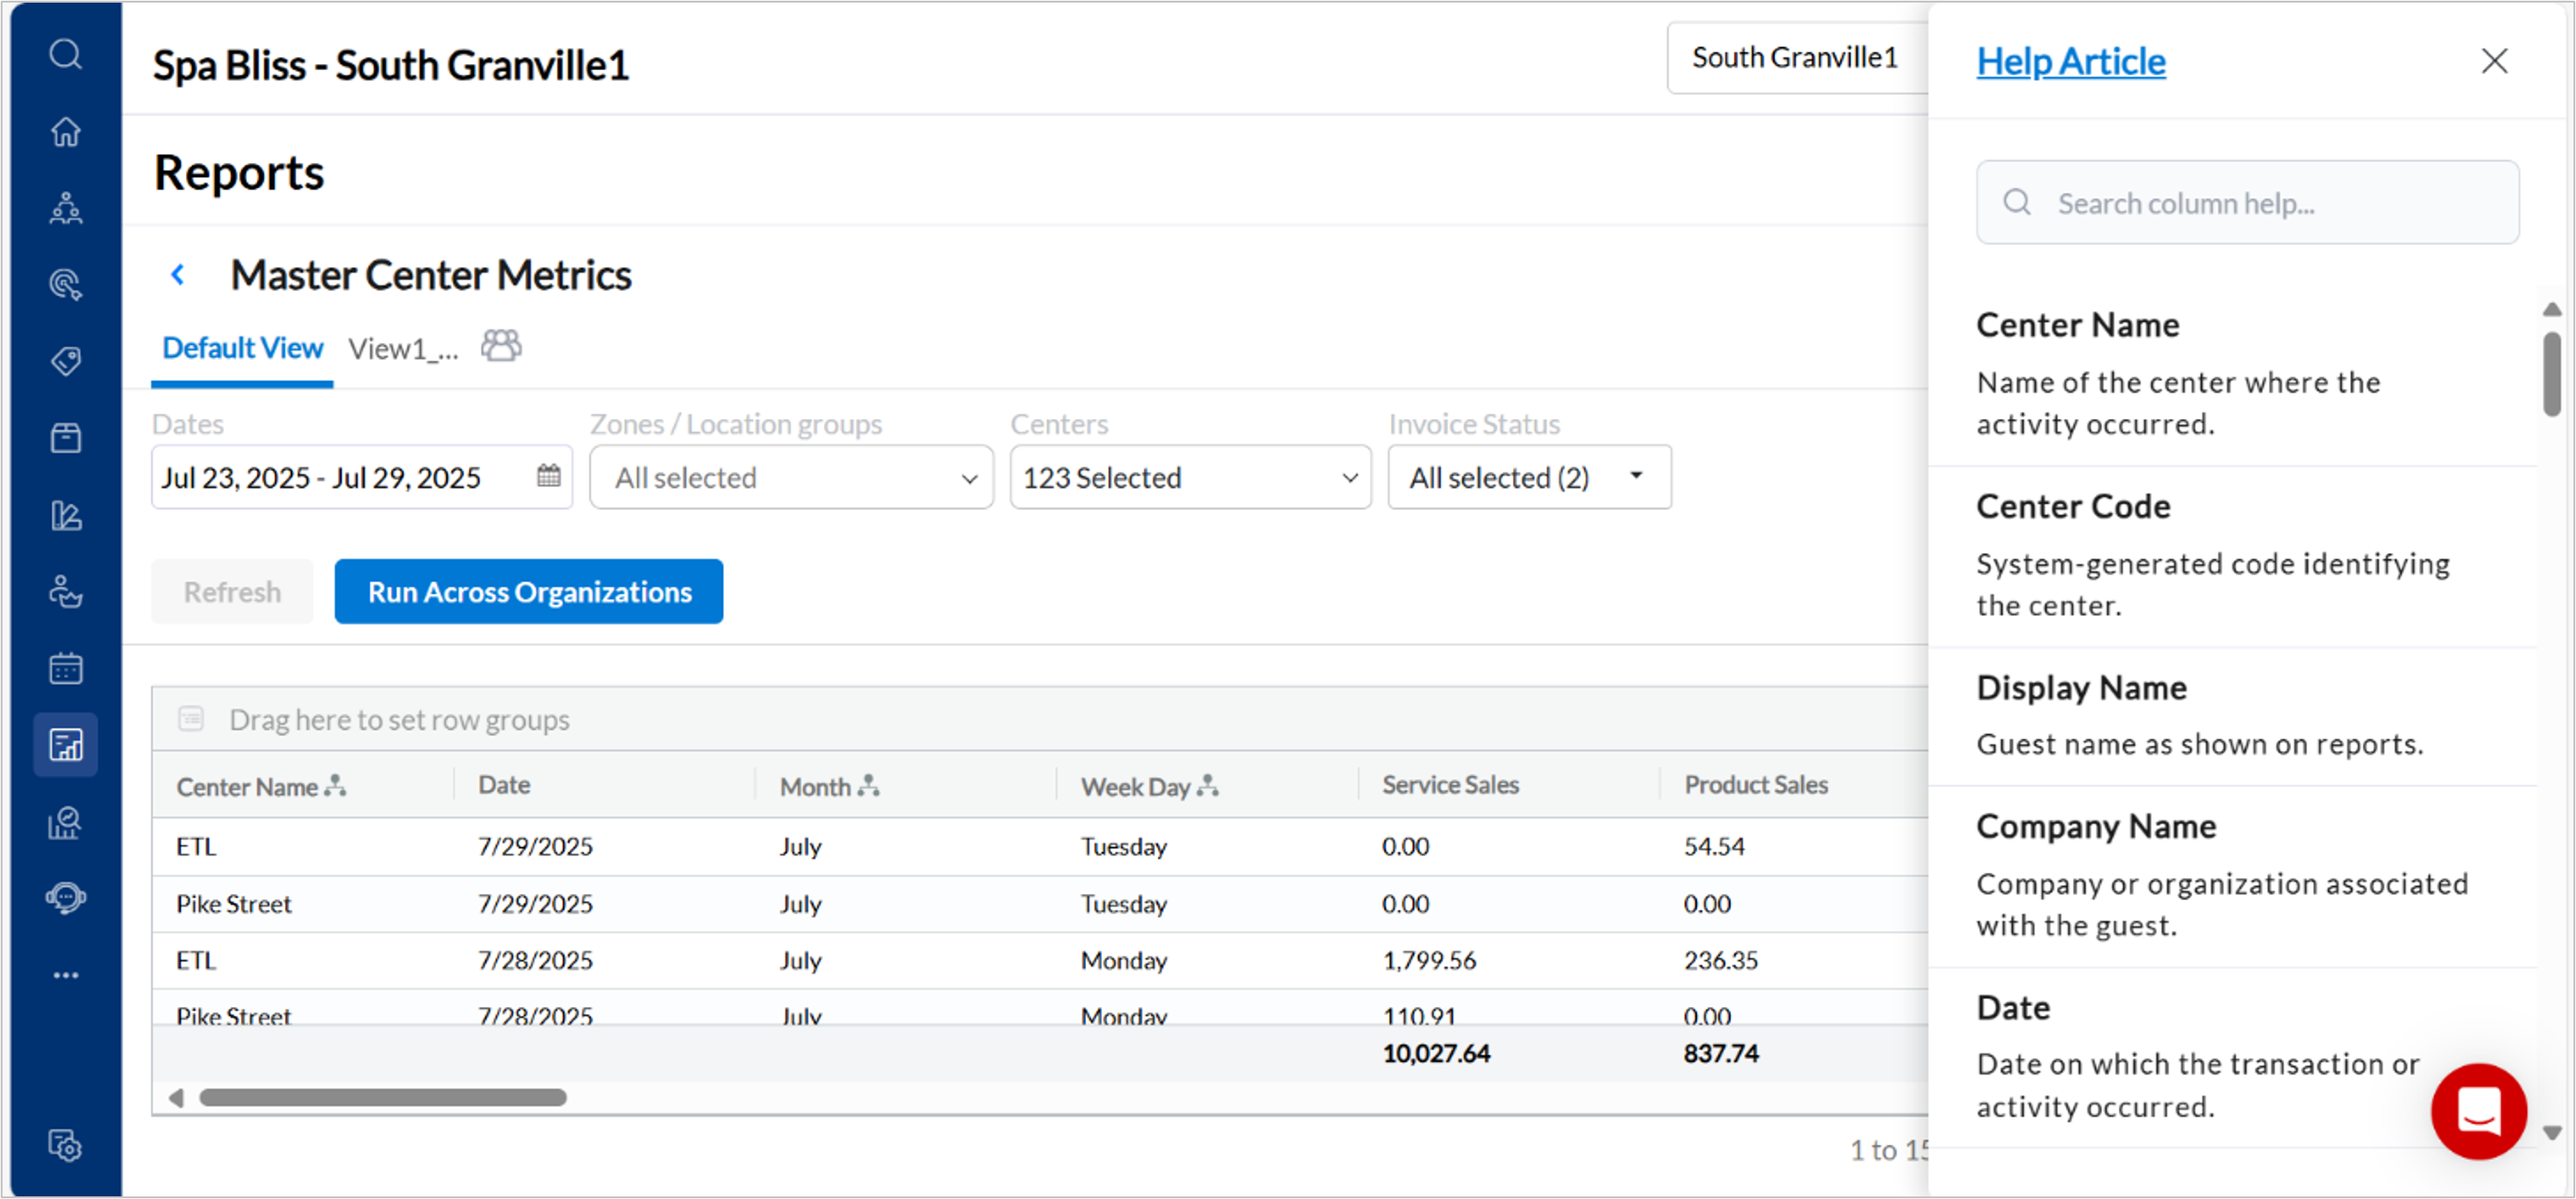
Click Help Article to open the detailed article for the report.
Business Owners, Center Manager
Zenoti has enhanced the Sales Accrual report with a No payment type filter. This option helps users quickly identify transactions without an assigned payment type, improving accuracy during audits and reconciliation.
While reviewing financial reports, a center manager finds inconsistencies in revenue totals due to missing payment details. With the new filter option, the manager can quickly filter and review such transactions, ensuring data completeness and simplifying reconciliation.
Key updates:
Identify and audit transactions without a payment type.
Ensure complete and accurate financial records.
How-to use:
At the organization or center level, click Reports.
Navigate to Finance > Sales Accrual.
In the Payment Type filter dropdown, select No payment type.
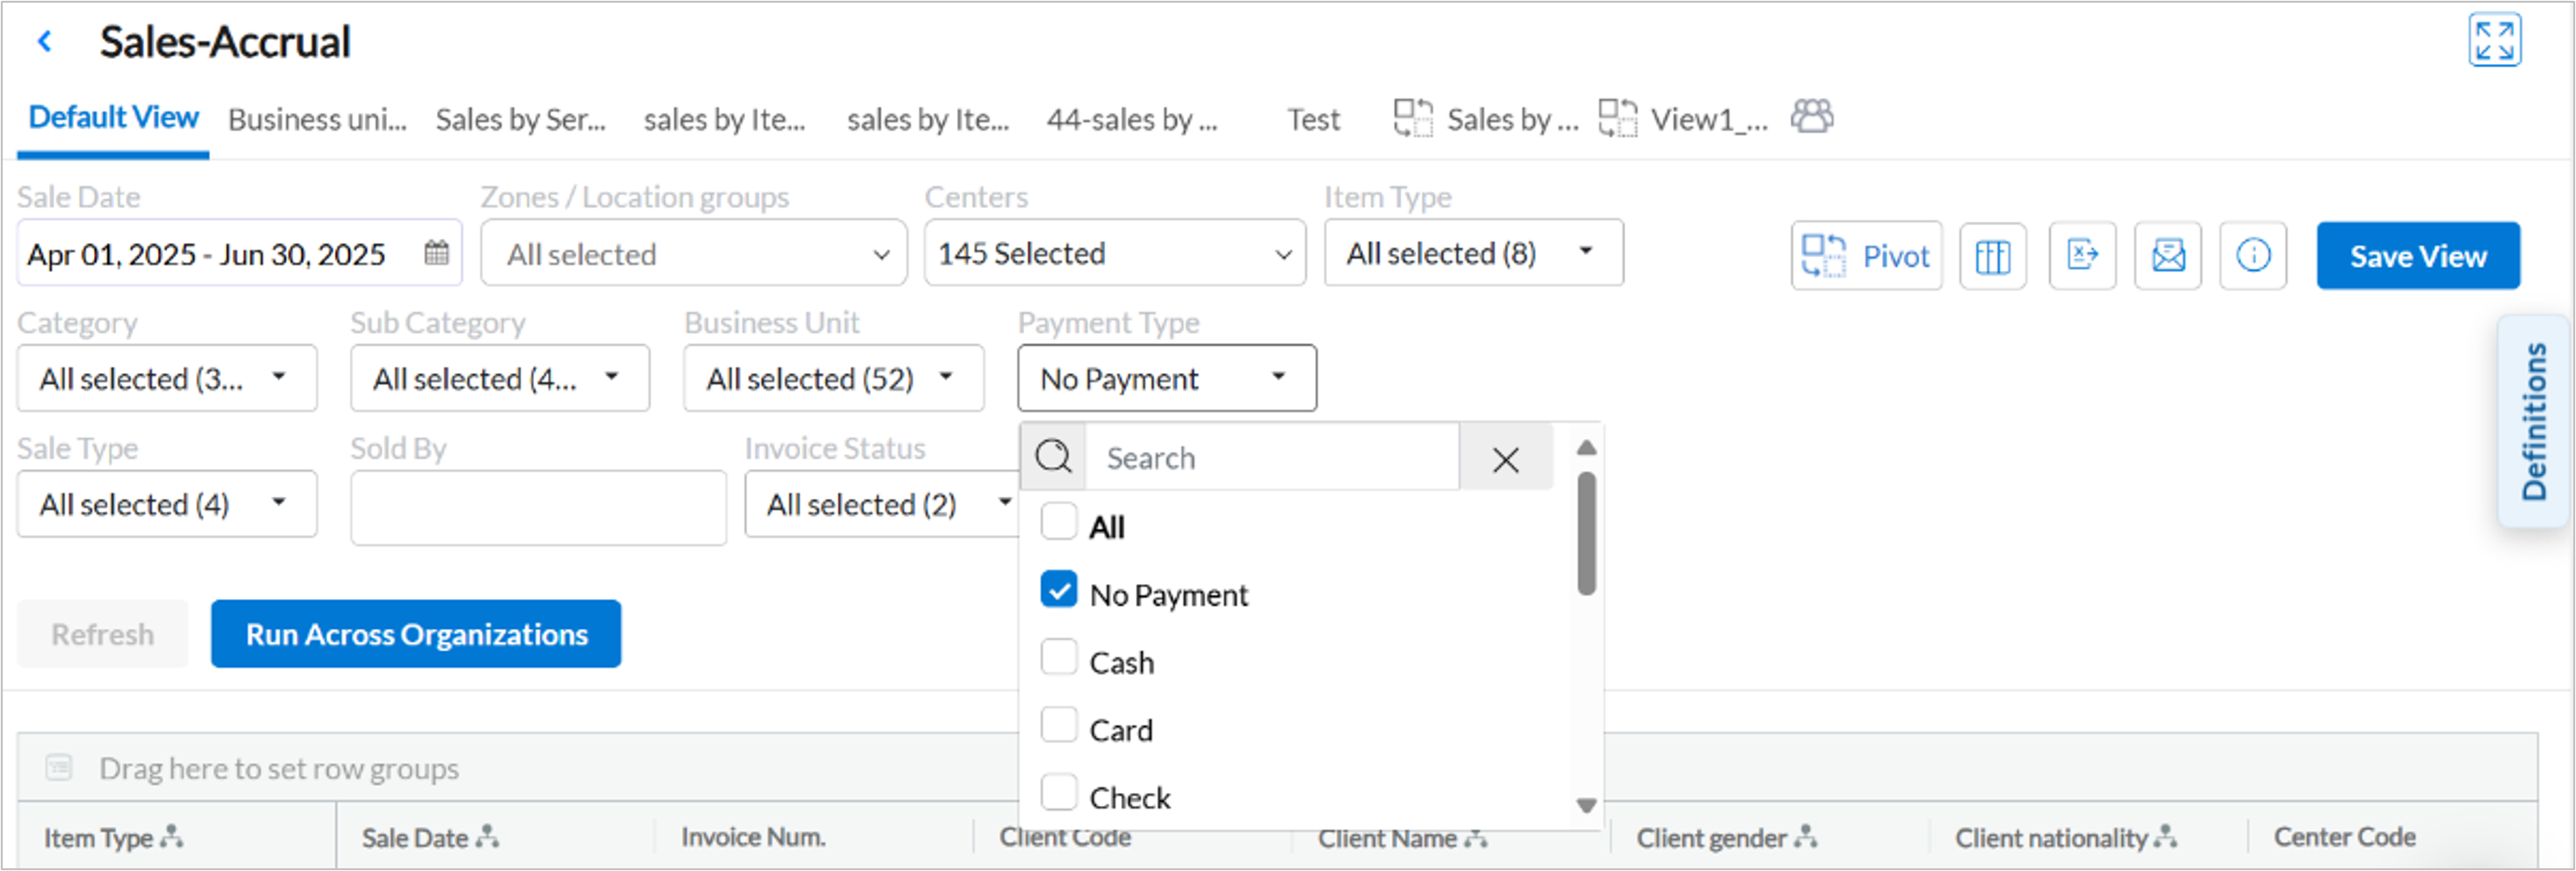
Click Refresh to apply the filter and view relevant transactions.
Module: Payments
Product Edition
Module: Analytics
Business Owners, Center Managers
Zenoti Driven Growth has been enhanced to give businesses a clearer view of how growth features contribute to revenue.
The Admin Dashboard now shows the total value generated by Zenoti's growth features for your business over the last 12 months.

The Zenoti Driven Growth dashboard now includes a new filter that allows you to view either the overall or average value per center, enabling deeper performance analysis.
The dashboard is now also available at the zone level, allowing you to track feature performance across all centers in a region.
These enhancements make it easier to report, analyze, and act on the value delivered by Zenoti’s growth features.
Note
This feature is enabled by default.
Module: Online Booking
Add-On Product
Module: Digital Forms/Medspa Compliance
Module: Shopify Integration
Additional Resources
This section includes recently published patch release notes and a comprehensive up to date glossary for your reference.
Release date | Document type |
|---|---|
July 22, 2025 | |
N/A |