Basic Admin Tasks for online booking
Required configurations for online booking in Zenoti
Webstore V2 allows your guests to book appointments by selecting services, providers, and choosing a convenient date and time for appointments.
For the Webstore V2 to display services, providers, and the date and time slots, you must configure the following settings in Zenoti:
Employee Schedule: You must set up employee schedules for your service providers as Zenoti uses this information to show their availability in the Appointment Book and in the Webstore.
Employee Catalog: Employee catalog allows you to display the available providers in the Webstore.
Service Catalog: You must set up the service catalog as this helps to display the services on your Webstore.
Center Hours-Online Booking Start Time and End Time: Use this setting to define the start and end times during which guests can book online.
Enforce Room Selection for Every Service: There may be cases where a specific service requires a room to perform the service. If you are displaying such services on your Webstore, you must ensure you turn ON the Enforce Room Selection for Every Service setting
Block Out Time: You must set up the Block Out times for the providers to allow them to take personal or other breaks.
Webstore V2 supported browsers
Zenoti Webstore V2 is supported with the most recent stable versions of Microsoft Edge, Mozilla Firefox, Apple Safari, and Google Chrome.
Supported browsers

Unsupported browser
Microsoft – Internet Explorer
Platform requirements for mobiles and tablets
You can access the Zenoti Webstore V2 from mobile phones and tablets that meet the following platform requirements:

Configure the Customer Mobile Application booking template
You must configure the CMA template before you proceed to set up the Webstore template.
At the organization level, click the Admin icon and navigate to Organization > Organizations.
Click the Online booking tab and select the CX v3 template.
Select Online booking.
Configure the settings described below.
Click Save.
Setting name | Description |
|---|---|
Limit guest from booking | To avoid last-minute bookings from guests, you might want to limit guests from booking appointments a few minutes before the appointment slot. Example: The number of minutes is set to 10 and the guest wants to book an appointment for 3:00 PM. They can only book the appointment before 2:50 PM. |
Social Login Settings | To let your guests use their Facebook or Google credentials to log in to the Webstore, select the Enable Social Login check box, and then enter the following information:
|
Require Credit Card for Appointment Booking | Configure this setting, if as per your business policy a credit card is required for booking appointments in the Webstore. Select any one of the following options:
|
Restrict Process Time Segment Outside Employee Schedule Hours | When a guest books a service with segments, the service is divided into segments. Example: A service may have three segments - Service Time, Process Time, and Finishing Time. There may be cases when the Process Time of the service falls outside of the employee schedule hours. Select this check box to ensure that the Process Segment of the service does not fall outside the employee schedule hours. |
Verify the recipient's email address on gift card balance check | Select this checkbox to make it mandatory to verify the recipient's email address to check gift card balance. This checkbox appears only if the Auto-generate gift card number checkbox is enabled at the organization level. |
Book Multiple Services with a Single Therapist | Select this checkbox if you want a therapist to perform multiple services in a single booking. |
Display allocated therapist name to guests for 'Any therapist' selection | When a guest schedules a future appointment without selecting a specific service provider, they can choose to know the assigned therapist's name. Select this checkbox to allow guests to see the name of the assigned therapist on the upcoming appointments page if the guests select Any Therapist" while booking. Note: The therapist's name will not be displayed on the booking confirmation screen on Webstore if the Display Therapist Name In Confirmation Screen setting is enabled in Webstore. |
Referral Program | With the referral marketing feature of Zenoti, you can allow your guests to refer their friends or family to any of the services that you provide. Select the Enable Referrals for CMA and the Enable Referrals for Webstore options to make the referral program available for your guests who book online. Learn more |
Enable efficient booking | Select the Enable efficient booking checkbox to display the available portion of a partly booked appointment slot as open for online booking. For example, your business has appointment slots based on the hour, such as 8 AM, 9 AM. When a guest books a 30-minute service at 8 AM, the 8:30 AM slot appears open on Webstore and CMA. |
Enable waitlist | Select the Enable waitlist checkbox to allow your guests to join waitlists for a service instead of booking appointments using the regular flow. If you enable this feature, guests can book appointments using both the waitlist, and the regular appointment booking flow on Webstore, Kiosk, and FDO. |
Announcement banner | Select the Enable Announcement Banner check box to enable Announcement Banner on your Webstore and CMA. Select the Allow Center Override for Announcement Banner option if you want your centers to configure their individual announcement banners. Learn how to Display an announcement bannerWebstore and CMA |
Content to display
At the center level, click the Configuration icon.
Go to the Online Booking > Online booking settings.
Expand the Content to display section, and make the required changes.
If you want to make changes under other sections, go to Settings, Online booking setup, and Integrations.
Click Save.
Configure the following:
Action | Perform these steps |
|---|---|
Apply the online booking settings defined at the organization level to your center | Select the Apply same settings as defined under the organization catalog settings check box. |
Display menu items on webstore | Next to the Menu bar and screens section, select all the menu items that should appear on the Webstore. For example: If an organization with multiple centers wants the option of memberships to be available at some centers only, then the center can opt out of the memberships page by not selecting the Memberships check box in this section. NoteThe menu bar items and the screens depend upon your organization. You can have multiple pages and screens based on your requirement. |
Online booking setup
At the center level, click the Configuration icon
Go to the Online booking > Online booking settings and select Online booking setup.
Make the changes described below.
If you want to make changes under other sections, go to Settings, Content to display, and Integrations.
Click Save.
Online booking setup
Configure the following:
Apply same settings as defined under organization catalog - V2 settings: Select this check box if you want the organization level Webstore v2 settings to be applied on your webstore.
Apply same settings as defined under organization catalog - V3 settings: Select this check box if you want organization level CX v3 settings to be applied on your webstore.
Enable Deals Select this check box to display deals at the center level.
To ensure that the sidebars for deals, series packages, and memberships are visible in the Webstore
At the organization level, click the Configuration icon.
Search and select Online booking and click Webstore v2.
Expand Display settings, enable the relevant menu items, and integrate a payment processor.
Action | Perform these steps |
|---|---|
Enable Queue mode on Webstore for your center | Select the Enable queue checkbox. |
Display a custom header for Webstore | In the Custom header (HTML) field, enter the HTML code for your custom header. |
Display terms and conditions on the guest's end NoteThe terms and conditions appear on the Confirm Booking page of your Webstore. The guest must accept the terms to book a service. | In the Booking page T&Cs field, enter your terms and conditions. |
Display an announcement banner on the top of every page The Announcement banner setting is available only when you enable it at the organization level.
| Select the Enable Announcement Banner check box. |
Display a title for the announcement banner | In the Title box, enter the title. |
Display text on the announcement banner | In the Body field, enter the message or the text of the banner. You can format the text as per your needs. |
Display a label for the membership sidebar | In the Membership side bar label box, enter a label. The sidebar is the plain area on the screen next to the booking and purchase panel that can be used to display text and images to convey information. There are sidebars on services, memberships, packages, and deals screens to convey relevant information. |
Display information on the membership sidebar | In the Membership side bar field, enter a text or an HTML code for the information you want to display. You can also use this field to display promotions and offers. |
Display a label for the series package sidebar | In the Series package side bar label box, enter a label. |
Display information on the series package sidebar | Series package side bar |
Display a label for the services sidebar | In the Side bar label box, enter a label. |
Display information on the services sidebar | In the Side bar field, enter a text or an HTML code for the information you want to display. |
Display a label for the deals sidebar | In the Deals side bar label box, enter a label. |
Display information on the deals sidebar | In the Deals side bar label field, enter a text or an HTML code for the information you want to display. |
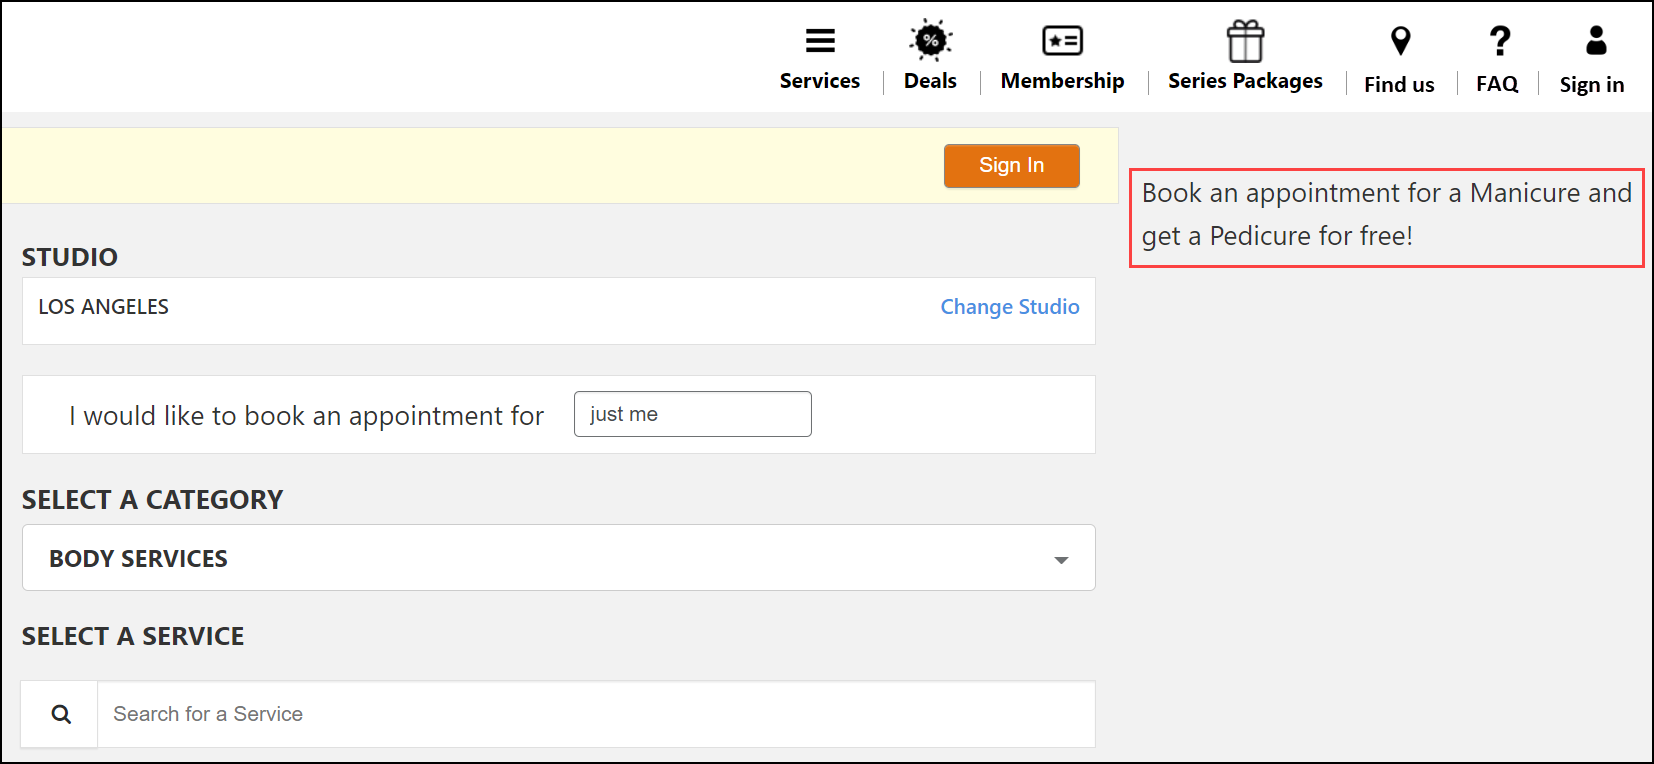 Sidebar - Desktop view. | 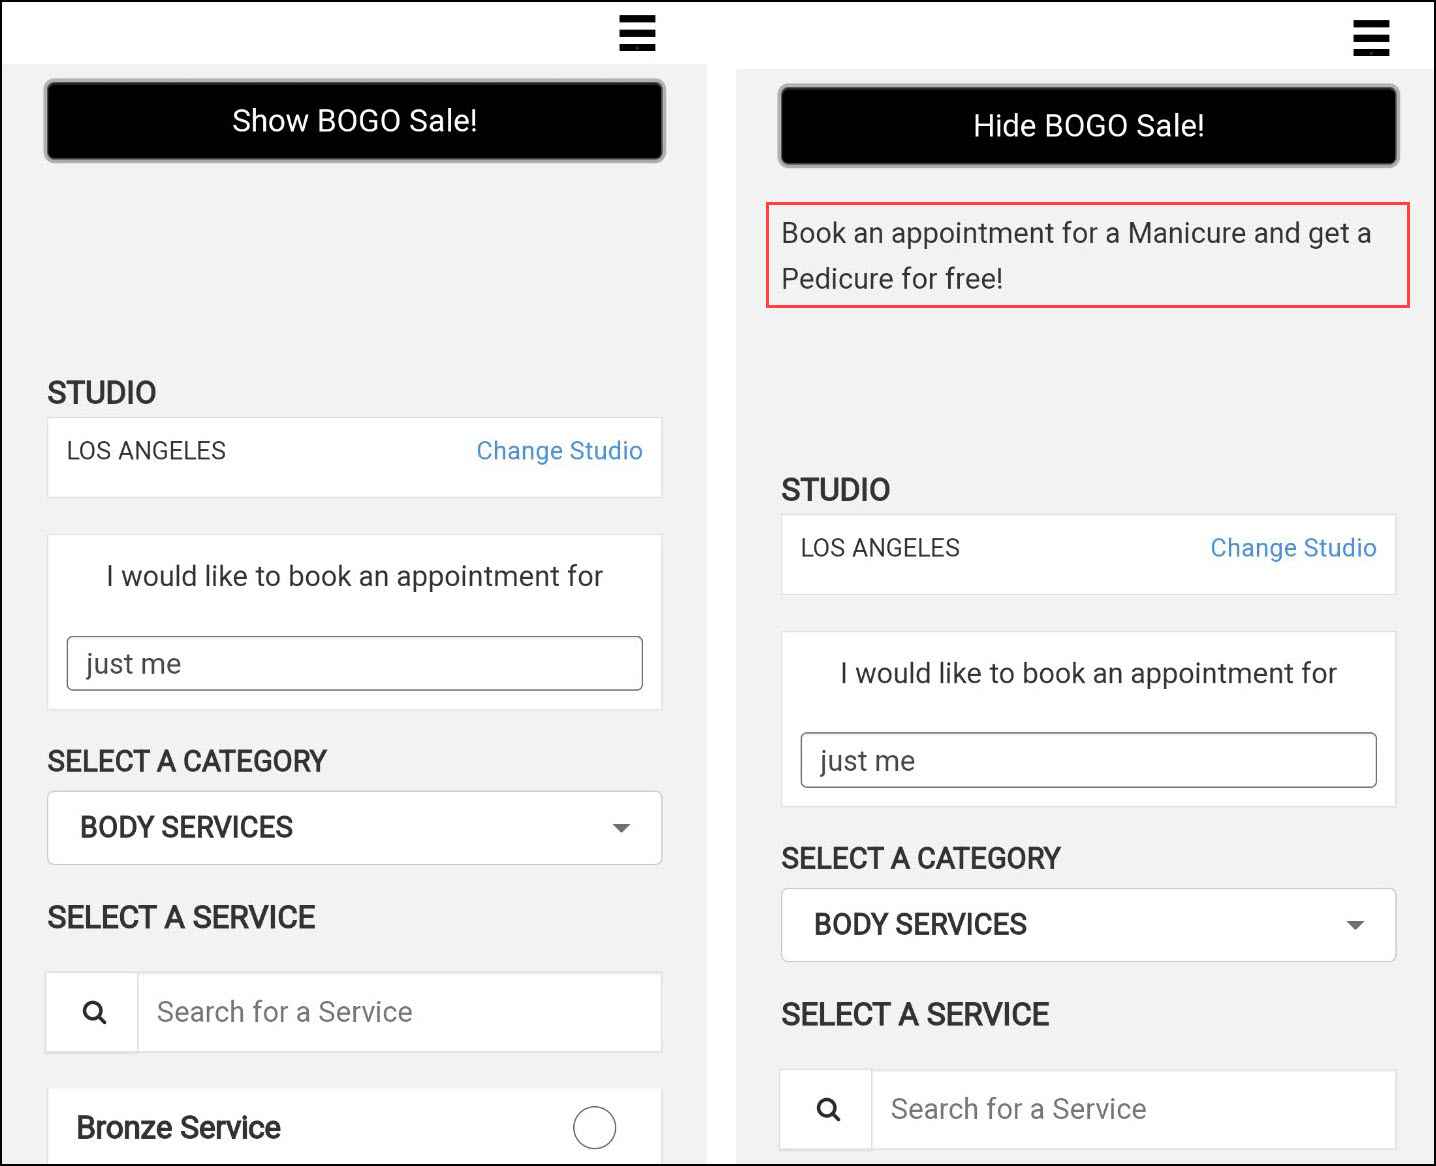 Sidebar - Mobile view. |
Impacts and considerations
Enable Deals setting is available for your center when you enable deals at the organization level.
You can also use the sidebar fields to display promotions and offers. To display or hide offers for the selected sidebar, enter text in the show/hide fields.
The show/hide feature appears only while browsing a website from a mobile device. It appears when the side banner contains information while setting up your webstore.
To check how your sidebar promotion appears online, click the magnifying glass icon on the right of the sidebar text field. This displays the preview of your sidebar on your online store.
Action | Perform these steps |
|---|---|
Capture the guest's consent each time their card on file is used | Select the Enable user consent for card on file check box. |
Display terms for taking the user consent for saving the card on file | Enable the User consent for card on file check box. Example: I understand that my card details will be saved and used in accordance with the cancellation and no-show policy. |
Display a disclaimer on the screen when a service with a Deposit fee is selected | Select the Enable deposits disclaimer check box and in the Deposits disclaimer field, enter the text that displays when a service with a Deposit fee is selected. |
Display cancellation policy on webstore | In the Cancellation policy field, enter the text for cancellation policy. If your business allows the cancellation of appointments on the Webstore, you can display a disclaimer text to your guests stating the terms and conditions for the appointment cancellation. |
Collect deposits from guests at center level | NoticeThese settings are available only if deposits are enabled at the organization level. In large organizations, when different centers have different target guests and payment rules, collection of deposits must also cater to the center's requirements. You can choose if you want to follow the organization settings to collect deposits by selecting the Apply organization settings or configure center-specific settings by clearing the Apply organization settings checkbox and selecting the Enable deposits.
|
Setting name | Description |
|---|---|
Online booking | |
Display an announcement banner on top of every page | Select the Enable announcement banner check box. NoteThe Announcement banner setting is available only when you enable it at the organization level.
|
Display a title for the announcement banner | In the Title box, enter the title. |
Set a background color to your announcement banner | In the Background color field, select a color or enter the color code in available formats (RGB, HSL, and Hex) For example, you can set the color by selecting the color from the panel or set the code in color codes, like entering RGB(128,128,128), HSL(0°, 0%, 50.2%), or #808080 for gray. |
Set a text color to your announcement banner | In the Foreground color field, select a color or enter the color code in available formats (RGB, HSL, and Hex) For example, you can set the color by selecting the color from the panel or set the code in color codes, like entering RGB(0,0,0), HSL(0°, 0%, 0%), or #000000 for black. |
Display text on the announcement banner | In the Body field, enter the message or the text of the banner. You can format the text as per your needs. |
Branding | |
Set different colors for light and dark mode 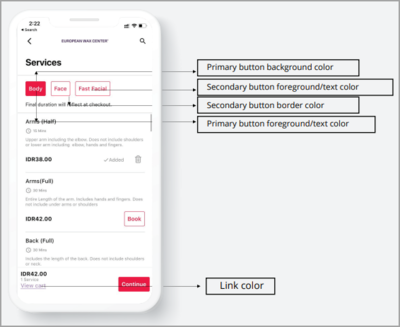 | Under the Colors section, select appropriate colors for light and dark modes. |
| Under the Brand logos/ Symbols/ Typefaces section:
|
Homescreen | |
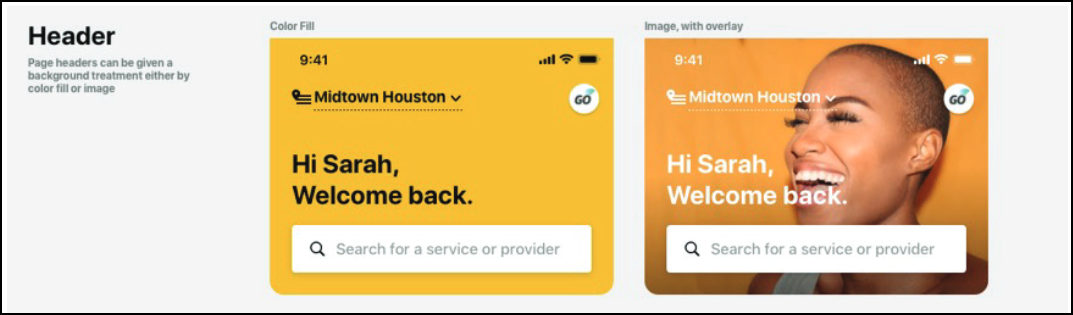 | Under the Header Section
|
Display announcements on the app | To feature your important announcements, use the Spotlight section.
|
Add your shops to the app | Under the Shop section, perform the following steps
|
General | |
| Under the Appointments section:
|
User profile | |
Allow users to use the app in dark mode | Switch on the Enable dark mode setting. |
Labels | |
Display the basic details of your business on the app | In the About us field, enter a description of the values, culture, and vision of your business. |
