Edit services
Inline edits and bulk updates for services
After adding services in Zenoti, you can quickly edit their details from the Manage services page. If you have a large number of services, you can use filters to narrow down your search and quickly locate specific services.
Inline edits
You can quickly edit some service attributes with inline edits. Editable fields like Code, Duration, Price, Tax included, Tax group, and Online booking are indicated by dotted lines when you place the mouse pointer over them.
You can edit Code and Duration only at the organization level.
You can edit Price, Tax included, Tax group, and Online booking only at the center level.
Bulk update
The bulk update feature is accessible only at the center level. This option allows you to adjust tax details and manage the availability of multiple services for online booking.
At the center level, click the Master data icon.
From the Manage services page, select the services for which you want to adjust tax details and manage online availability.
To adjust tax details, click the Manage taxes button. Change the Tax group and switch on or switch off the Tax included toggle as required. Click Update to save the changes.
To manage the availability of services for online booking, switch on or switch off the Online booking toggle as required.
Edit properties of a service
Required roles: Any role with access to the Administrator mode
Required permissions: Services (Add, Edit, Delete)
At the organization level, click the Master data icon.
Click Services.
Click the name of the service you wish to edit.
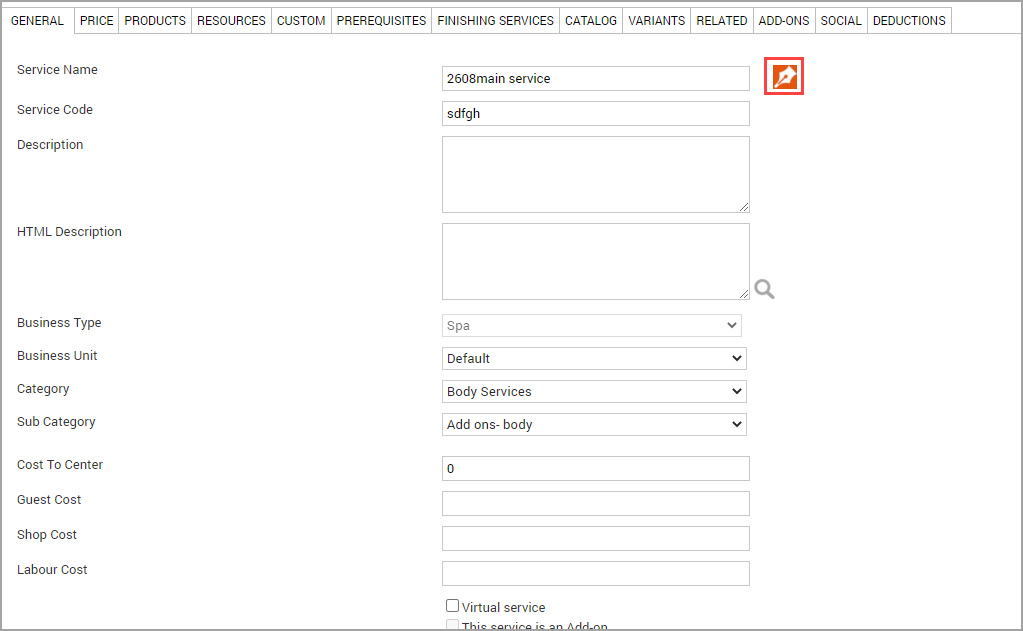
In the General tab, edit any of these properties:
Add pre-care and post-care instructions. Locate Pre-care instruction and Post-care instruction and select the appropriate instructions. Providing pre-care and post-care instructions helps ensure safety, minimizes risks, educates guests about treatments, and gets optimal results. Such instructions may also be legal requirements in some regions.
Charge cancellation fee. Select the Allow cancellation fee checkbox. You can charge a cancellation fee to guests who cancel their appointments within a specified time range such as less than 24 hours before a scheduled appointment. This option is now also available for add-on services.
Charge a no-show fee. Select the Allow no show fee checkbox. You can charge a no-show fee to guests who fail to cancel their scheduled appointments. This option is now also available for add-on services.
Enable commission on cancellations for service providers. Select the Allow cancellation commission checkbox. This checkbox will appear only if the Allow cancellation fee checkbox is selected. You can pay staff a commission for appointments that are cancelled. This option is available for add-on services as well.
Pay no-show commission to service providers. Select the Allow no show commission checkbox. This checkbox will appear only if the Allow no show fee checkbox is selected. You can pay staff a commission for appointments where the guests do not show up. This option is available for add-on services as well.
Collect an upfront payment from guests to secure an appointment, select the Enforce deposit for this service checkbox. You can charge a deposit fee, especially for services that are time-consuming or involve a significant commitment of resources. If you select the Allow centers to override option, then you must navigate to the Centers tab and select the Deposit Type and enter the deposit value against a specific center or all centers. This can be overridden at the center level.
Enter product consumption for a service manually. Locate and select the Allow product consumption entry in appointment book checkbox. If you want to allow front-desk staff to enter product consumption for services that have automatic tracking enabled, select the Allow to override automatic product consumption in appointment book checkbox.
Format the description for the service that appears in online booking channels (Webstore v2 and CMA v2 and CMA v3). Locate HTML Description, and enter a description using HTML tags.
Add tags to categorize services for quick identification. Locate Tags and add the relevant tags.
Print the name of the service on receipts as part of package benefits. Locate and select the Show this service in package benefits printed on receipt checkbox.
Make the service available for a limited time. Locate and select the Enable Service Validity checkbox and enter the number of days for which the service will be available.
To enter a fee or amount paid by the center for the service, enter a value in the Cost to Center field. This value is defined at the service level. Change the Cost To Center value to the desired amount or set it to zero to indicate no cost to the center.
Click Next.
In the Centers tab, edit the properties such as the centers where the service is available, the sale price, the demand price group, whether the service is available for online booking and more.
Click Next.
In the Products tab edit properties such as the product and the amount used for the service.
Click Next.
In the Resources tab, edit the employees who can perform the service and the rooms where the service is provided. You can also set the order of the rooms assigned based on the service being performed.
For example, in a center equipped with both nail stations and treatment rooms, a manicure service can be linked to both types of facilities. However, nail stations can be given booking priority over treatment rooms. This means that if a nail station is available, it will be booked first before considering a treatment room.
Click Next.
In the Custom tab, select or enter details for the forms you wish to associate with the service. You can also specify if you wish to email the link to the form to guests.
Click Next.
In the Prerequisitestab, select or enter details if the service is a prerequisite service.
Click Next.
In the Finishing Services tab, select or enter details of the finishing services - services needed to finish the main service.
Click Next.
Enter or select the relevant details across the different tabs in the setup wizard.
Click Save.
Impacts and considerations
To modify or update multiple services for your center or organization at once, you must fill out the Bulk Upload Service template and send the filled template to support@zenoti.com.
If your account is still in the implementation phase, please share the completed bulk upload template with the Customer Success Manager or other point of contact assigned for your enterprise.
Mandatory fields in the template are highlighted in green. Ensure all mandatory columns are completed and filled properly before sharing. The remaining or optional fields can be empty.
Store additional metadata on services using additional data fields
Many organizations want to store information against their services that doesn't fit into the standard Zenoti fields — internal tracking codes, vendor references, regulatory identifiers, or operational notes specific to how a service is delivered.
Zenoti provides additional data fields on the General tab of every service for exactly this purpose. By default, every service has two additional data fields, Additional Data 1 and Additional Data 2. Organizations that need more can enable up to 10 extra fields, bringing the total to 12 per service. For example, a med spa chain can use these fields to tag each service with a regulatory code, an internal tracking ID, and a vendor reference — all stored directly on the service record and kept consistent across centers.
Each additional data field is also exposed as a notification macro: [ServiceAddlData1] through [ServiceAddlData12]. You can drop these macros into email and SMS notification templates to pull the stored values into guest or staff communications.
Note
The field labels (Additional Data 1, Additional Data 2, and so on) are fixed and cannot be renamed. Decide in advance what each numbered field will be used for and apply the same convention across all services in your organization.
Enable extended additional data fields
The first two additional data fields are available to every service by default. To use fields 3 through 12, turn on the extended fields setting at the organization level.
Required roles: Any role with access to the Administrator mode
Required permissions: None
Note
The Enable extended additional data fields setting cannot be turned off once enabled. Before you activate it, confirm that your organization needs the additional fields.
At the organization level, click the Configuration icon.
Select Services.
Scroll to the Extended additional data fields section and switch on the Enable extended additional data fields toggle.
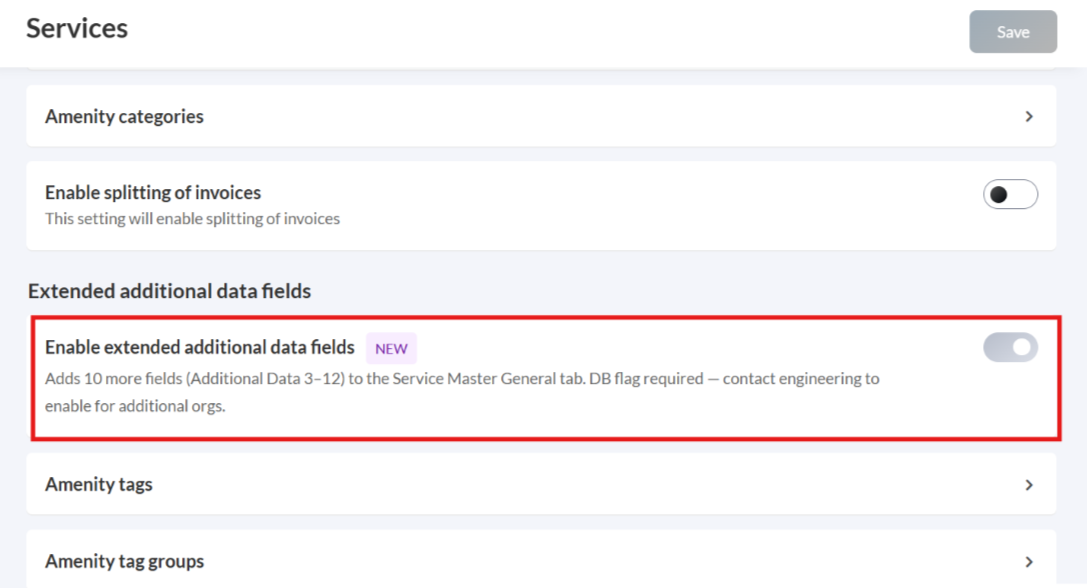
Click Save.
The additional fields are available the next time someone opens a service in Master Data.
Populate additional data fields on a service
After the extended fields are enabled, anyone with permission to edit services can populate them just like any other service property.
At the organization level, click the Master data icon.
Click Services.
Click the name of the service you want to edit.
On the General tab, enter a value in Additional Data 1 and Additional Data 2, as needed. The macro name shown below each label (for example, [ServiceAddlData1]) is the token you use in notification templates to reference the value.
To view the additional fields, click More Additional Fields. The section expands and displays Additional Data 3 through Additional Data 12.
Enter values in the fields your organization uses. You do not need to populate every field.
Click Save.
Automatic product consumption tracking for services
Businesses can choose to automatically monitor the consumption of products, eliminating the need for manual tracking. This is particularly advantageous for services where the provider may use products to perform certain services, providing a comprehensive overview without the burden of manual input. By automating this process, businesses can save time, reduce errors, and allocate resources more effectively. For example, imagine a spa that offers various beauty treatments. With automated consumption tracking, the spa can effortlessly keep track of the skincare products used during facials, ensuring accurate inventory levels and reducing the chances of product shortages during peak times.
Required roles: Any role with access to the Administrator mode
Required permissions: Services (Add, Edit)
Note
You can enable the required settings both while creating and editing a service.
At the organization level, click the Master data icon.
Click Services.
Click Add.
To create a new service enter the required information.
To allow the front-desk staff to manually record or enter details related to the consumption of products for services directly within the appointment book, in the General tab select the Allow product consumption entry in appointment book checkbox. In our spa example, this ensures that the front desk can note any additional skincare products used during the facial.
To allow front-desk staff to manually adjust the automatic product consumption for services that have automatic tracking enabled, in the General tab select the Allow to override automatic product consumption in appointment book checkbox. This flexibility is useful in situations where a specific client may require variations in the standard product usage, perhaps due to allergies or preferences.
To specify the products and amount used for this service, in the Products tab enter the value in the Product and Amount fields.
To automatically track this product's consumption, select the Track consumption automatically checkbox.
If this checkbox is not enabled, the front desk is expected to specify whether the product was consumed as part of the service.
To proceed with the creation of the service, enter the relevant details across different tabs in the setup wizard.
Click Save.
If appointments were scheduled before the products were associated with the corresponding services, the system may not display product consumption details, even if the services are configured to automatically track product usage.
In such instances, delete and rebook the services in the appointment to track product consumption. By deleting and rebooking services in appointments created before product association, you initiate a synchronization process that allows the system to apply the updated product consumption configurations. This ensures that the product usage details are accurately recorded and reflected in the appointment information.
Configure commissions and deductions for services
A commission or payout is a payment from a business to a service provider. It can be a fixed amount or a percentage of generated revenue. Commissions serve as extra income and act as an incentive to providers.
Deductions are expenses that are deducted from a service provider's commission earnings as a way to offset the operating costs of the business. These may include costs such as product costs, rental fees, and marketing fees.
At the organization level, click the Master data icon.
Click Services.
Click the name of the service you wish to edit.
To award commissions, in the General tab, select the Allow commission on this service checkbox. Enter or select other details such as Commission Adjustment and Commission Type.
To configure deductions, in the Deductions tab, select or enter the relevant details.
Click Save.
Add service variants to the main service
Variants allow you to club similar services in the Webstore and CMA. For example, you could have a Haircut service with variants such as Long hair, Mid-length hair, and Short hair.
Precondition: You should have already created the variants as standalone services. From our example above, you should have already created services named Long hair, Mid-length hair, and Short hair.
At the organization level, click the Master data icon.
Click Services.
Click the name of the service you wish to edit. This is the main service to which you wish to add the variants. From our example above, click the Haircut service.
Click the Variants tab.
Enter the name of the variant (say, Long hair) and click Add.
Repeat this step to add more variants.
Click Save.
Restriction: If there are multiple service variants, guests can select only one service variant. From our example, this means that guests can select only one variant from Long hair, Mid-length hair, or Short hair because all these are variants of the same main service (Haircut).
Configure the catalog of services for online bookings
To boost revenue, businesses must enable booking through online channels such as Webstore and CMA (Consumer Mobile Application) with informative service catalogs to help guests choose services.
At the organization level, click the Master data icon.
Click Services.
Click the name of the service you wish to edit.
To make services available for online booking, in the Centers tab, select the Online booking checkbox for the appropriate centers.
Go to the Catalog tab.
To configure the catalog of services that will be available online, in the Catalog tab take these actions among others:
Allow customers to book the service online. Select the Allow customers to book this service checkbox.
Enter the order in which this service should appear in the online catalog in the Display Order field.
Define the days guests must wait before they can take the same service again. Select the Enable Service Visit Frequency checkbox and enter the number of days.
Show the service in the New Services category in your Webstore and CMA. Select the Show in New Services checkbox.
Show the service in the Recommended Services category in your Webstore and CMA. Select the Show in Recommended Services checkbox.
Allow the guest to skip selecting a provider. Select the Skip therapist selection checkbox.
Show YouTube videos of the service. Enter the Tag Name and Video ID.
Help search engines locate your service. Enter Meta Keywords and Meta Description.
Go to the Variants tab.
To enter service variants in the Webstore and CMA, in the Variants tab, select the names of services. For example, you could display a Haircut service with variants such as Long hair, Mid-length hair, and Short hair.
Go to the Related tab.
To select which products and services to show as related services or related products in Webstore v1, select and enter the details in the Related tab.
Click Save.
Considerations for Service Catalog
Display Order
If no display order is set, services and categories appear alphabetically on the Webstore for online bookings.
Incorrect or missing values cause services to appear in the wrong sequence on the Webstore and Customer Mobile App.
Deposits can change the display sequence, overriding the configured order. To maintain consistency, assign a display order to every service and category.
Use simple, sequential numbers (1, 2, 3) for clarity.
Review display order whenever services are added, updated in bulk, or deposits are enabled. After changes, check the Webstore and Customer Mobile App to confirm the correct sequence.
Disable Online Booking for a Service
Some services are intended for in-center use only; these services require consultation or cannot be booked online by guests. In these cases, you can hide the service from the Webstore and CMA while still allowing staff to book it directly at the center.
To remove a service from online booking, follow the steps below.
At the organization level, navigate to Master Data > Services.
Select the required service from the Manage Services page.
Go to the Centers tab and unselect the Online Booking checkbox for the center or centers. This prevents the service from being displayed in any online booking channels for the selected center.
Click Save.
Navigate to the Catalog tab of the same service and disable the following settings:
Unselect the Allow customer to book this service option to disable the choice for customers to request or schedule the service online.
Disable the Show Price option so pricing is not displayed online.
Remove the value in Display Order to ensure the service does not appear in the catalog structure online.
Click Save after each change to apply the updates.
Set up member pricing for services
Important
This feature is not available to all customers.
Businesses typically offer services at a discount to members. This is done by configuring discounts for each applicable service at the individual membership level.
Member discounts model: In this model, a business offers services at different discounted rates for different memberships. For example, a facial at 10% off with a monthly membership versus the same facial at 8% off for a quarterly membership.
Member pricing model: In this model, centers can configure member pricing for each location. For example, a facial could be offered to members at a certain price at one location and the same facial for the same membership might be offered at a different price at another location. For instance, $30 at Ascot Street center and $35 at Brent Street center, both for members with the Signature membership.
Important
You must choose the membership model you want to use before you create any memberships. You cannot have both models active at the same time.
Note
To switch from one model to the other, you must not have any memberships using the model from which you want to switch. For example, if you want to switch from the Member discounts model to the Member pricing model, you must not have any memberships that use the Member discounts model. If you do, you must delete those memberships.
At the organization level, click the Master data icon.
Click Services.
Click the name of the service for which you want to set up the member pricing.
Go to the Centers tab.
In the Member Price column, for each center, enter the member price for the service.
Click Save.
Repeat steps 3 to 6 for each service for which you want to set up member pricing.
Impacts and considerations
If the member price is not configured for a service, the sale price will be considered as the member price. Where the member price is configured, it replaces the sale price for the service when availed by a member.
After you set up member pricing, it will appear at all locations where the sale price appears, such as the bottom panel of Appointment Book, Book Multiple Services page, Employee details page, Active membership page, and Update price check page. For example, in the Chestnut Hill center, the Member Price for the Bridal Makeup service is $300, while the Sale price is $346.98. When you make the sale to a non-member, Zenoti shows the Sale Price ($346.98) and when you make the sale to a member, Zenoti shows the Member price ($300).
Set up member pricing for day packages
Important
This feature is not available to all customers.
Businesses can offer day packages and day package gift cards at different prices for members. This is done by configuring the Member price for each applicable day package.
In the Member pricing model, centers can configure member pricing for each location. For example, a facial could be offered to members at a certain price at one location and the same facial for the same membership might be offered at a different price at another location. For instance, $30 at Ascot Street center and $35 at Brent Street center for members.
Prerequisite: Ensure the Member pricing setting is enabled. Contact Zenoti if it's not.
At the organization level, click the Master data icon.
Click Packages.
Click the name of the day package for which you want to set up the member pricing.
Go to the Centers tab.
In the Member Price column, for each center, enter the member price for the day package.
Click Save.
Impacts and considerations
The membership price is only applicable if the guest has at least one active membership.
After you set up member pricing, it will appear at all locations where the sale price appears, such as the bottom panel of Appointment Book, Booking wizard, Webstore V2, and CMA V3.
Translate service names and descriptions to a supported language
Ensure that you have added your preferred language as a supported language.
Create or edit a service
On the General tab, navigate to the Service Name field.
Click the pen icon.
Expand the language of your preference.
Enter the Name, Display Name, Description, and HTML description in the supported language.
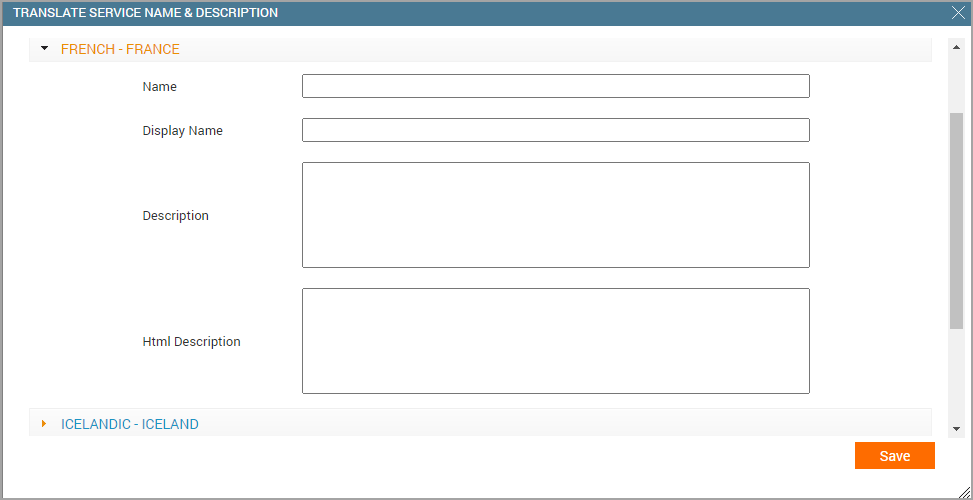
Click Save.
You have successfully translated the form details to a supported language.