Configure Message Settings
This article explains how to configure messaging settings in HyperConnect to enhance customer communication. You’ll learn how to set up auto-responses, appointment confirmations, marketing messages, keyword triggers, and Facebook Messenger integration, all of which contribute to a streamlined guest experience.
Overview
HyperConnect's messaging settings help businesses automate responses, confirm bookings, and manage customer interactions efficiently. With capabilities to auto-respond during non-business hours, confirm appointments via keywords, and connect Facebook Messenger, you can centralize and automate communications to reduce manual effort.
Key Terms:
Auto-Response: An automated message sent when the front-desk staff is unavailable.
Confirmation Response: Message sent when a booking is successfully made.
Cancellation Failure Response: Message sent when cancellation fails.
Marketing Messages: Promotional content shown in chat.
Keywords: Custom phrases that trigger appointment confirmation or cancellation.
Auto-Respond to Messages after Business Hours and Holidays
To promptly acknowledge customer inquiries and set expectations for follow-up responses, you can automatically send a response to customer messages received outside of business hours or during holidays.
Launch HyperConnect.
Click the Settings icon.
From the Messaging tab enable the Auto-respond to messages after business hours or holidays setting.
In the Edit Message textbox, enter a personalized message. You can also include emojis to customize the message.
For example: Thank you for your message. We are closed right now and will respond in the morning. Our salon hours are 8:00 AM to 8:00 PM. For questions about our services or to book online, please visit our website.

Click Save.
Once configured, the front-desk staff can disable the autoresponder from the Conversations screen during work hours. It will remain deactivated for the working hours and automatically switch on again during the center's non-working hours.
Impacts and considerations
If the Auto-respond to messages after business hours or holidays setting is enabled, the autoresponder text message cannot be blank.
Once enabled, the autoresponder will activate automatically during non-operational hours and holidays.
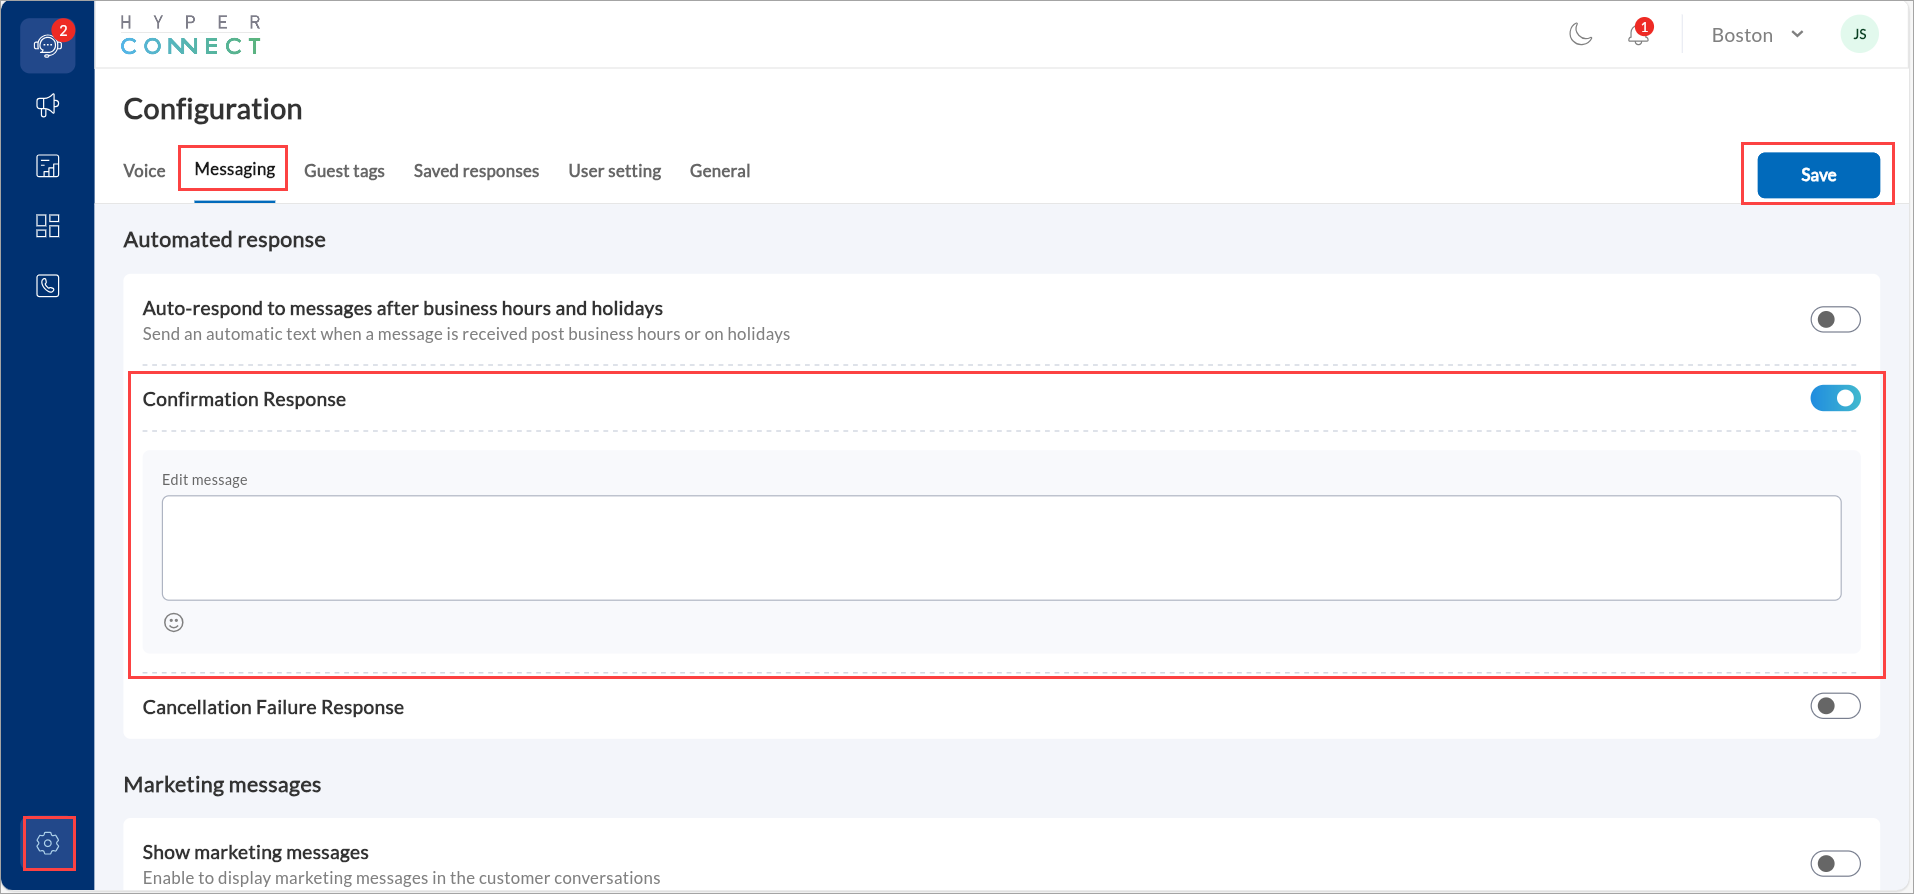
Configure Appointment Confirmation Response
To provide customers with a confirmation message when an appointment is successfully booked, you can enable an automatic appointment confirmation response.
Launch HyperConnect.
Click the Settings icon.
From the Messaging tab enable the Confirmation Response setting.
In the Edit Message textbox, enter a personalized message. You can also include emojis to customize the message.
For example: "Your appointment is booked. We look forward to seeing you."
Click Save.
Impacts and considerations
If the Appointment Confirmation Response setting is enabled, the message field cannot be left blank.
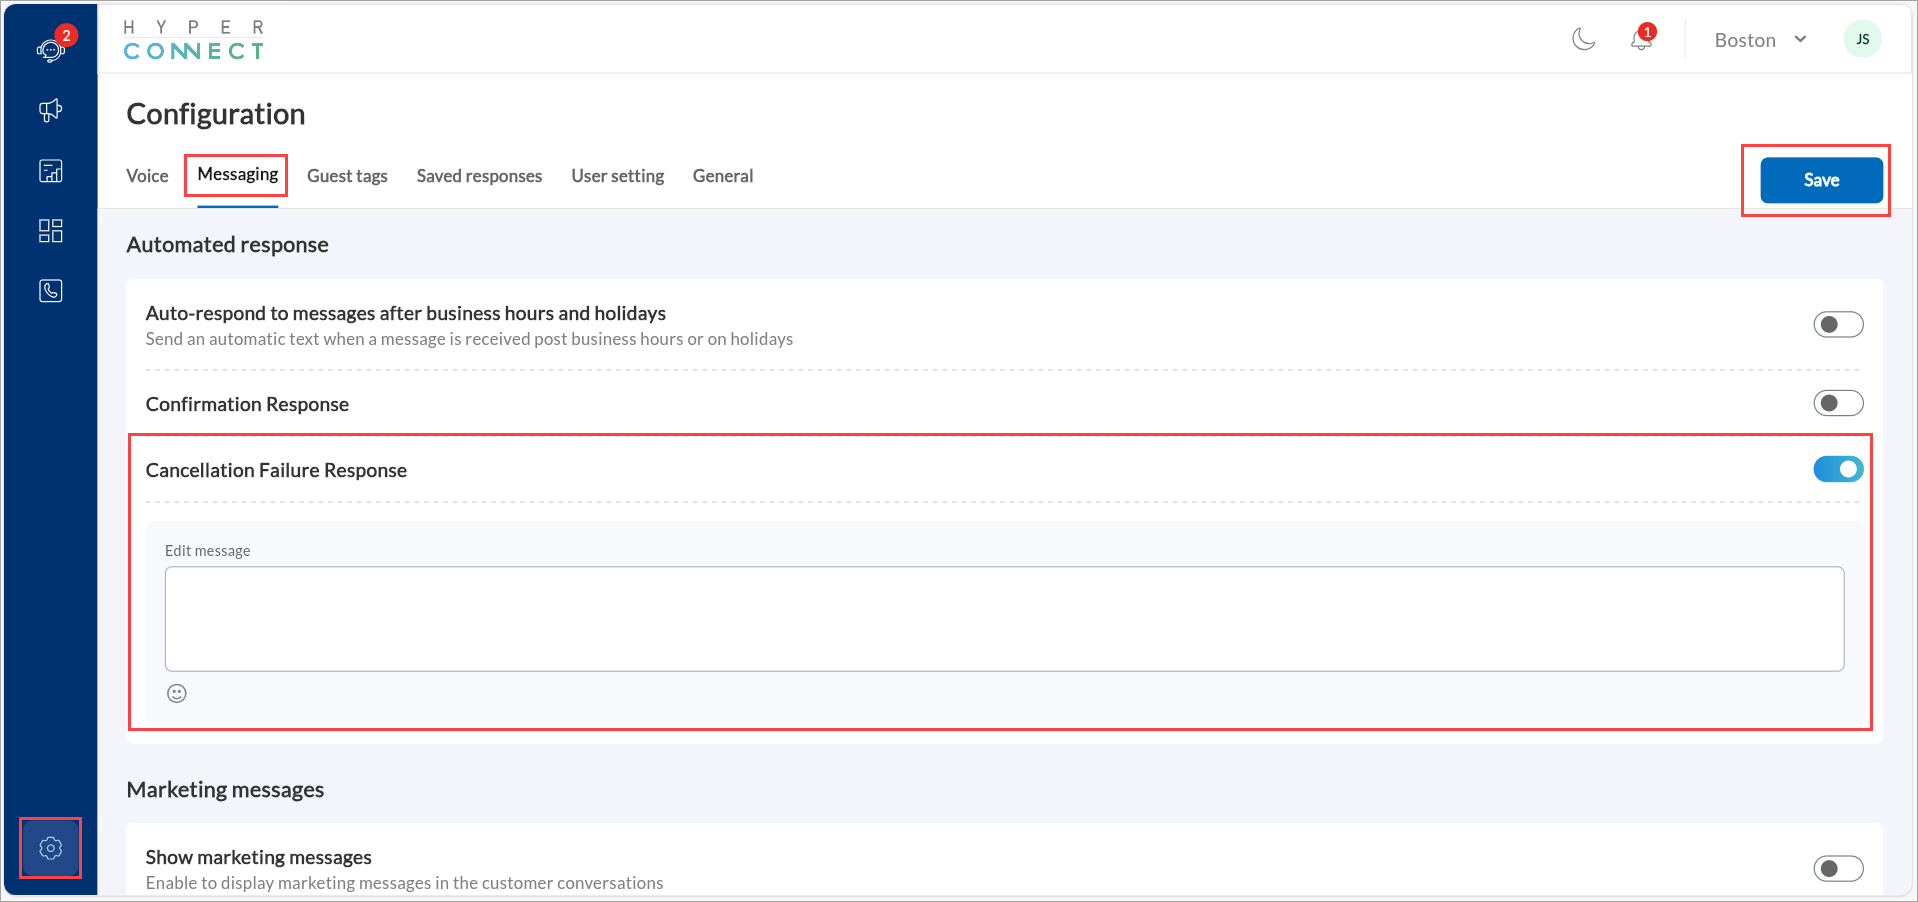
Configure Appointment Cancellation Failure Response
To ensure customers receive clear guidance when an appointment cancellation fails, you can enable an automatic cancellation failure response.
Launch HyperConnect.
Click the Settings icon.
From the Messaging tab enable the Cancellation Failure Response setting.
In the Edit Message textbox, enter a personalized message. You can also include emojis to customize the message.
For example: "We were unable to process your cancellation request. Please try again or contact us for assistance."
Click Save.
Impacts and considerations
If the Cancellation Failure Response setting is enabled, the message field cannot be left blank.
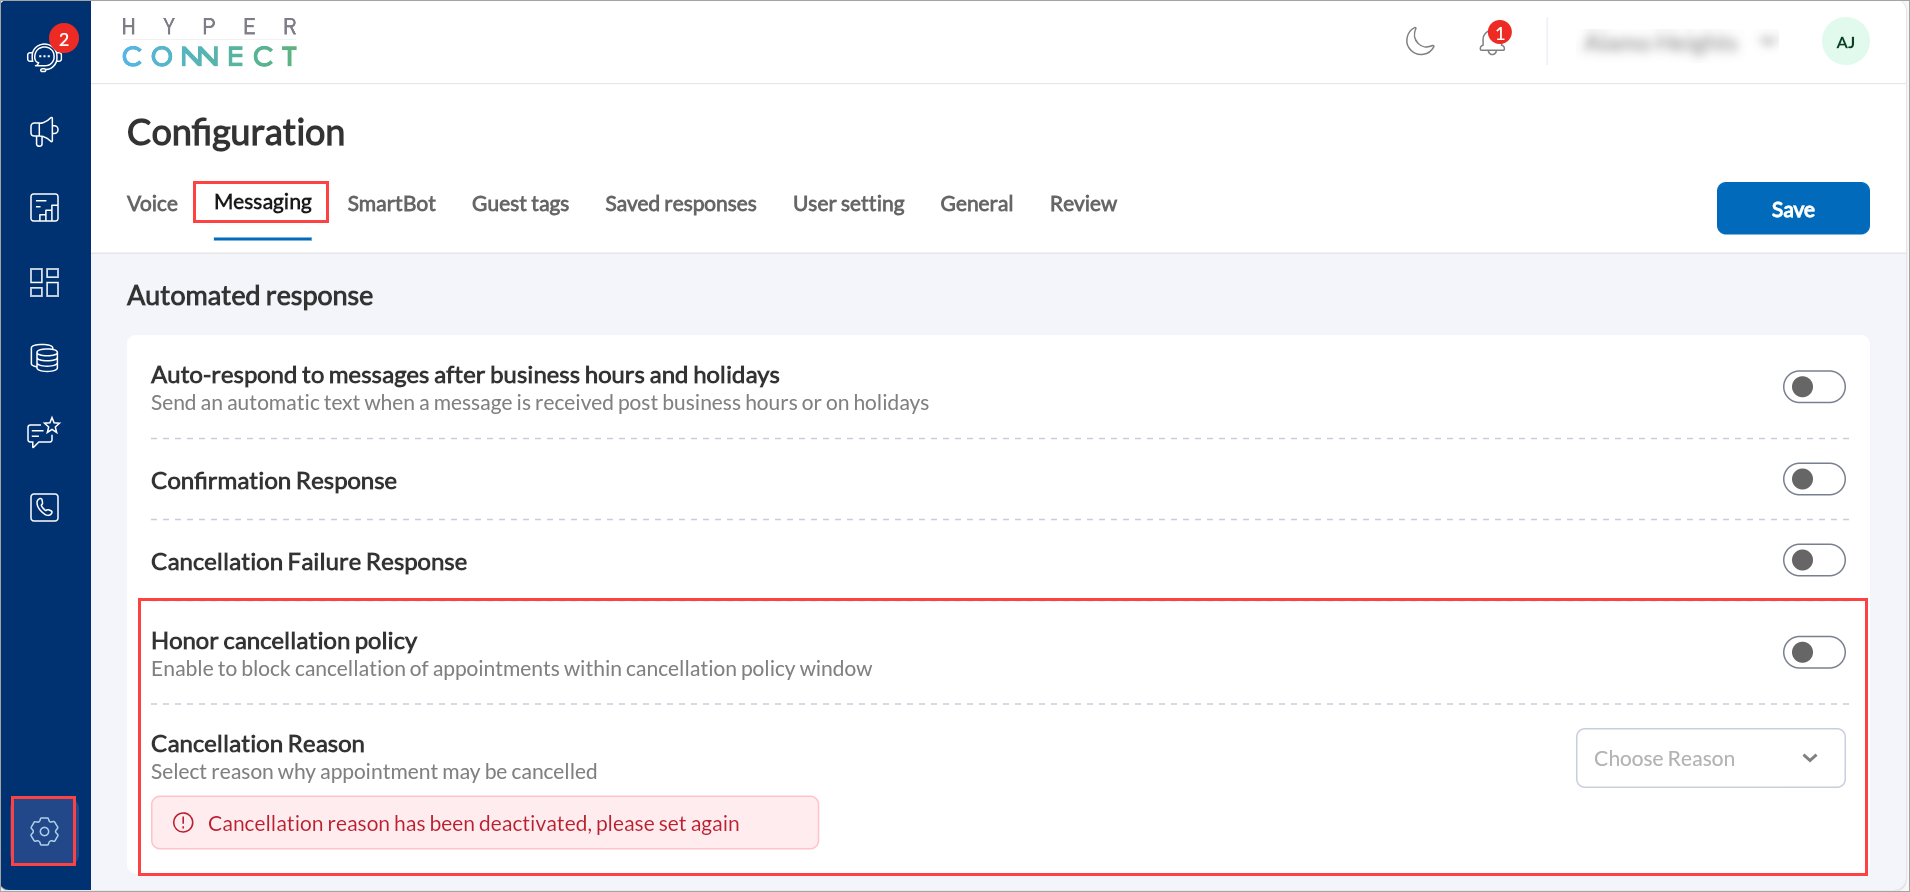
Honor Cancellation Policy
The Honor cancellation policy setting allows you to enforce appointment cancellation rules by selecting a specific Cancellation Reason. This reason is pulled from a list of active cancellation reasons set at the center level in the core system. However, if the selected reason is later deactivated, the system cannot recognize it as valid. In such cases, you will see a red error message prompting you to update the selection. Until a new active reason is chosen, the deactivated reason will continue to be used, which may impact how cancellations are processed.
Launch HyperConnect.
Click the Settings icon.
From the Messaging tab enable the Honor cancellation policy setting.
In the Cancellation Reason section, click the dropdown menu next to Choose Reason.
Select a new active reason from the list that aligns with your policy.
The dropdown will only show currently active reasons for your center.
Click Save.
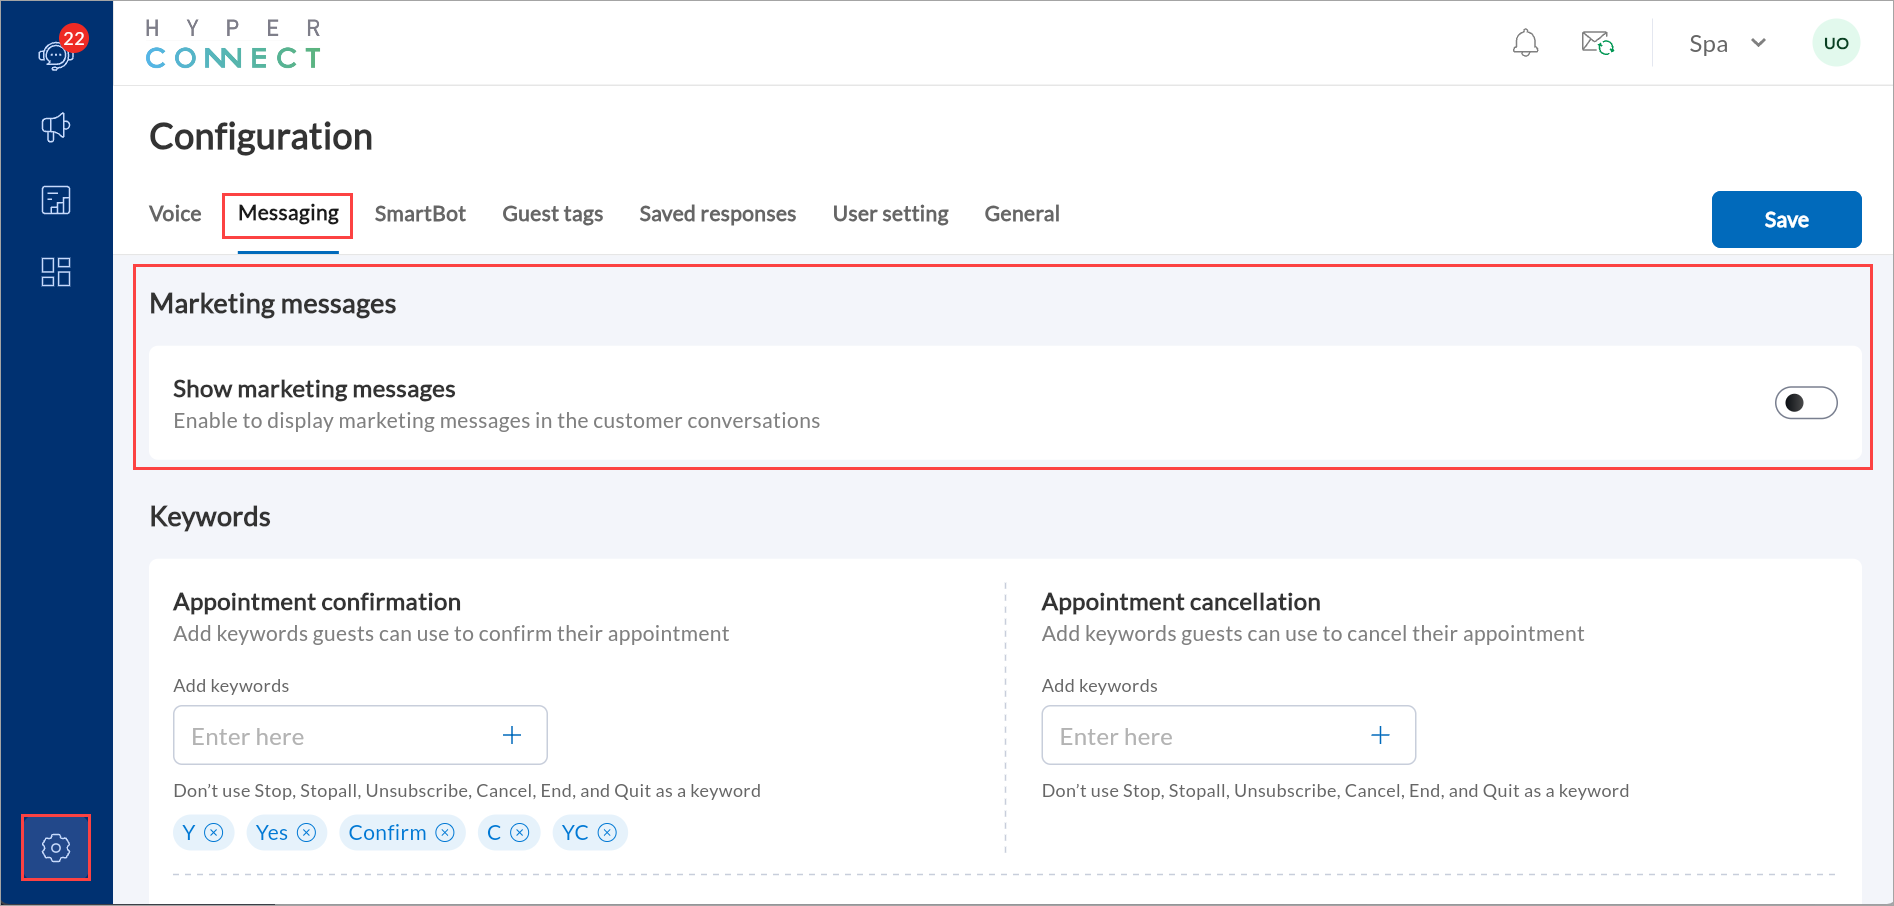
Display Marketing Messages in Customer Conversations
By enabling this setting, businesses can display promotional content in customer conversations, increasing sales opportunities during interactions.
Launch HyperConnect.
Click the Settings icon.
From the Messaging tab, enable Show marketing messages.
Click Save.
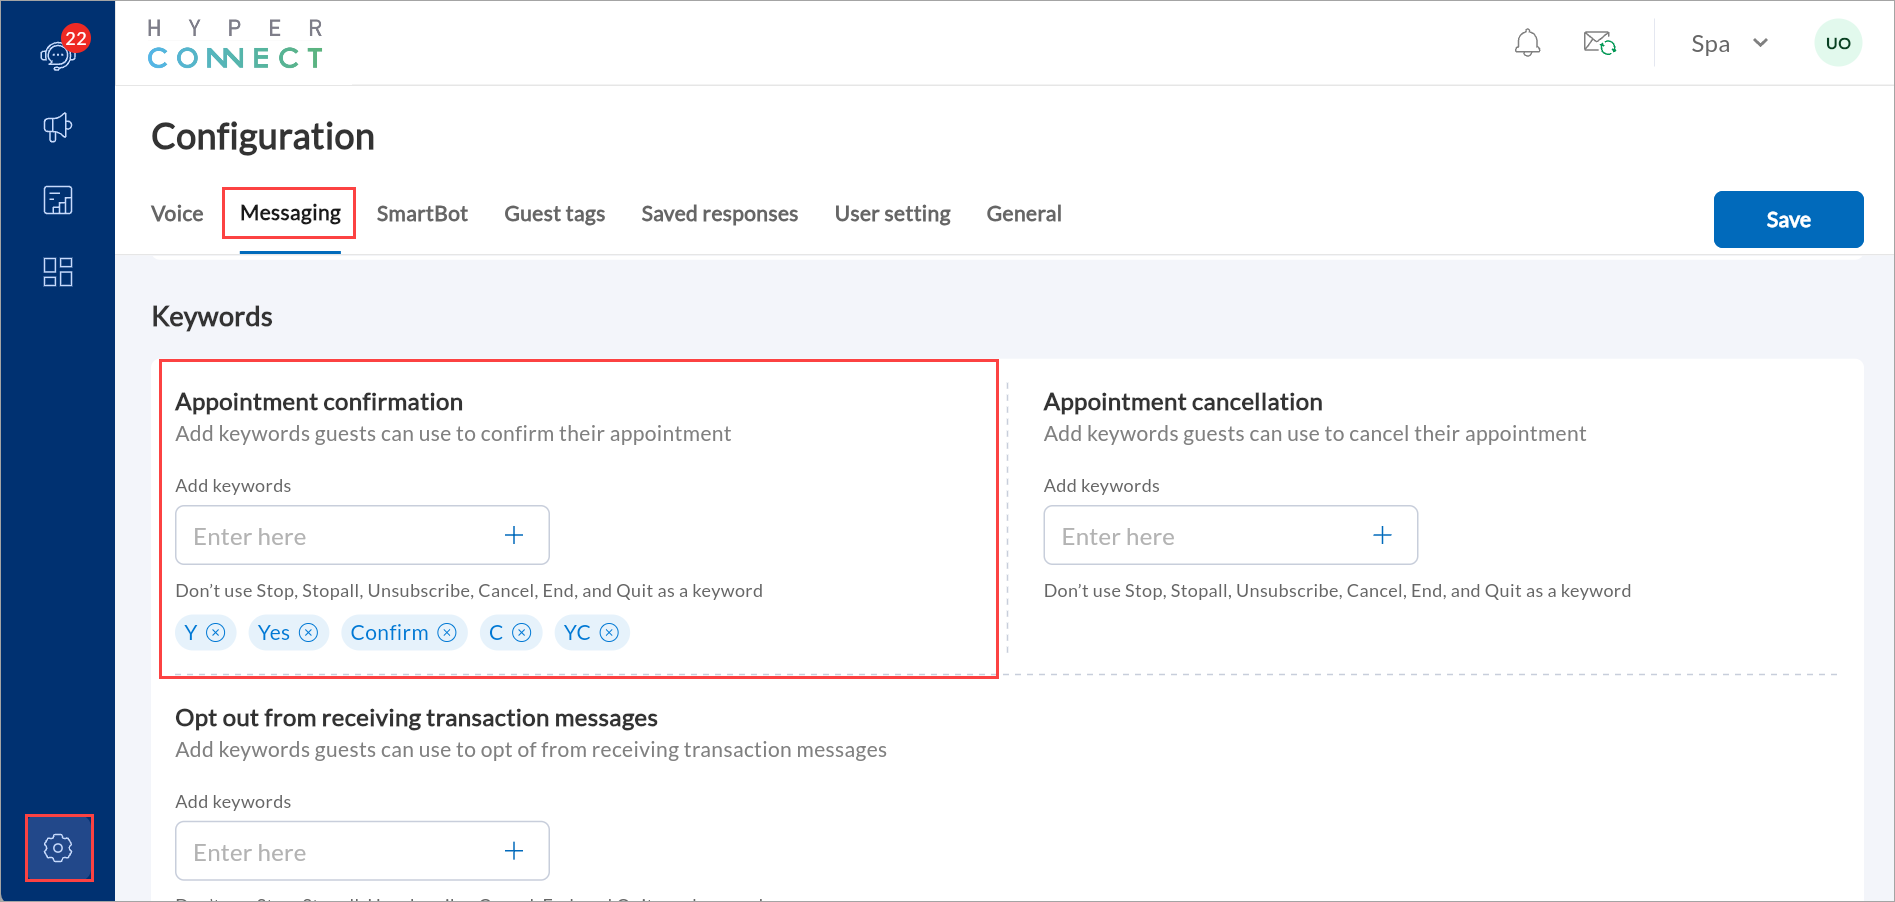
Configure Keywords for Appointment Confirmation
Allow guests to confirm appointments using multiple keywords or phrases, enhancing convenience by acknowledging different ways of confirmation. This flexibility acknowledges that different guests may express their confirmation in various ways, such as "Yes sure", "Definitely", or other similar phrases that convey the same meaning.
Required roles: Any role with access to the Settings screen
Launch HyperConnect
Click the Settings icon.
In the Messaging tab, navigate to the Keywords section.
In the Appointment confirmation box, enter the words or phrases you wish to add. For example: "Yes sure", "Definitely"
To add a keyword, click the + symbol.
To add multiple keywords, repeat the same process. You can add a total of five keywords.
Click Save.
Configure Keywords for Appointment Cancellation
Allow guests to cancel appointments using customizable keywords or phrases such as"Need to reschedule" or "Can't make it." This flexibility makes it simple for guests to communicate their cancellation requests effectively.
Required roles: Any role with access to the Settings screen
Launch HyperConnect.
Click the Settings icon.
In the Messaging tab, navigate to the Keywords section.
In the Appointment cancellation box, enter the words or letters you wish to add.
To add a keyword, click the + symbol.

Click Save.
Impacts and considerations
Only one cancellation keyword can be used.
You cannot use Stop, Stopall, Unsubscribe, Cancel, End, and Quit as a keyword for appointment cancellation.
When the guests cancel their appointments using a keyword, Zenoti does the following automatically, which saves the front-desk staff time:
Removes the appointment from the appointment book.
Applies cancellation fee and charges the guest for the same. This can only happen if the Appointment cancellation policy and cancellation fee are enabled and the guest has a saved card on file.
Updates the Appointment Details report.
While sending the appointment cancellation message specify the keyword that guests must use. For example: Please respond by stating "N" to cancel the appointment. The keyword will take effect only if the last message was the appointment notification. Let's say the system sent a reminder for an appointment with a keyword "N" to confirm the appointment at 10 am EST and the guest initiated a question at 10:30 EST and responded with a keyword "N" at 11 am EST. The keyword will not take effect and cancel the appointment.
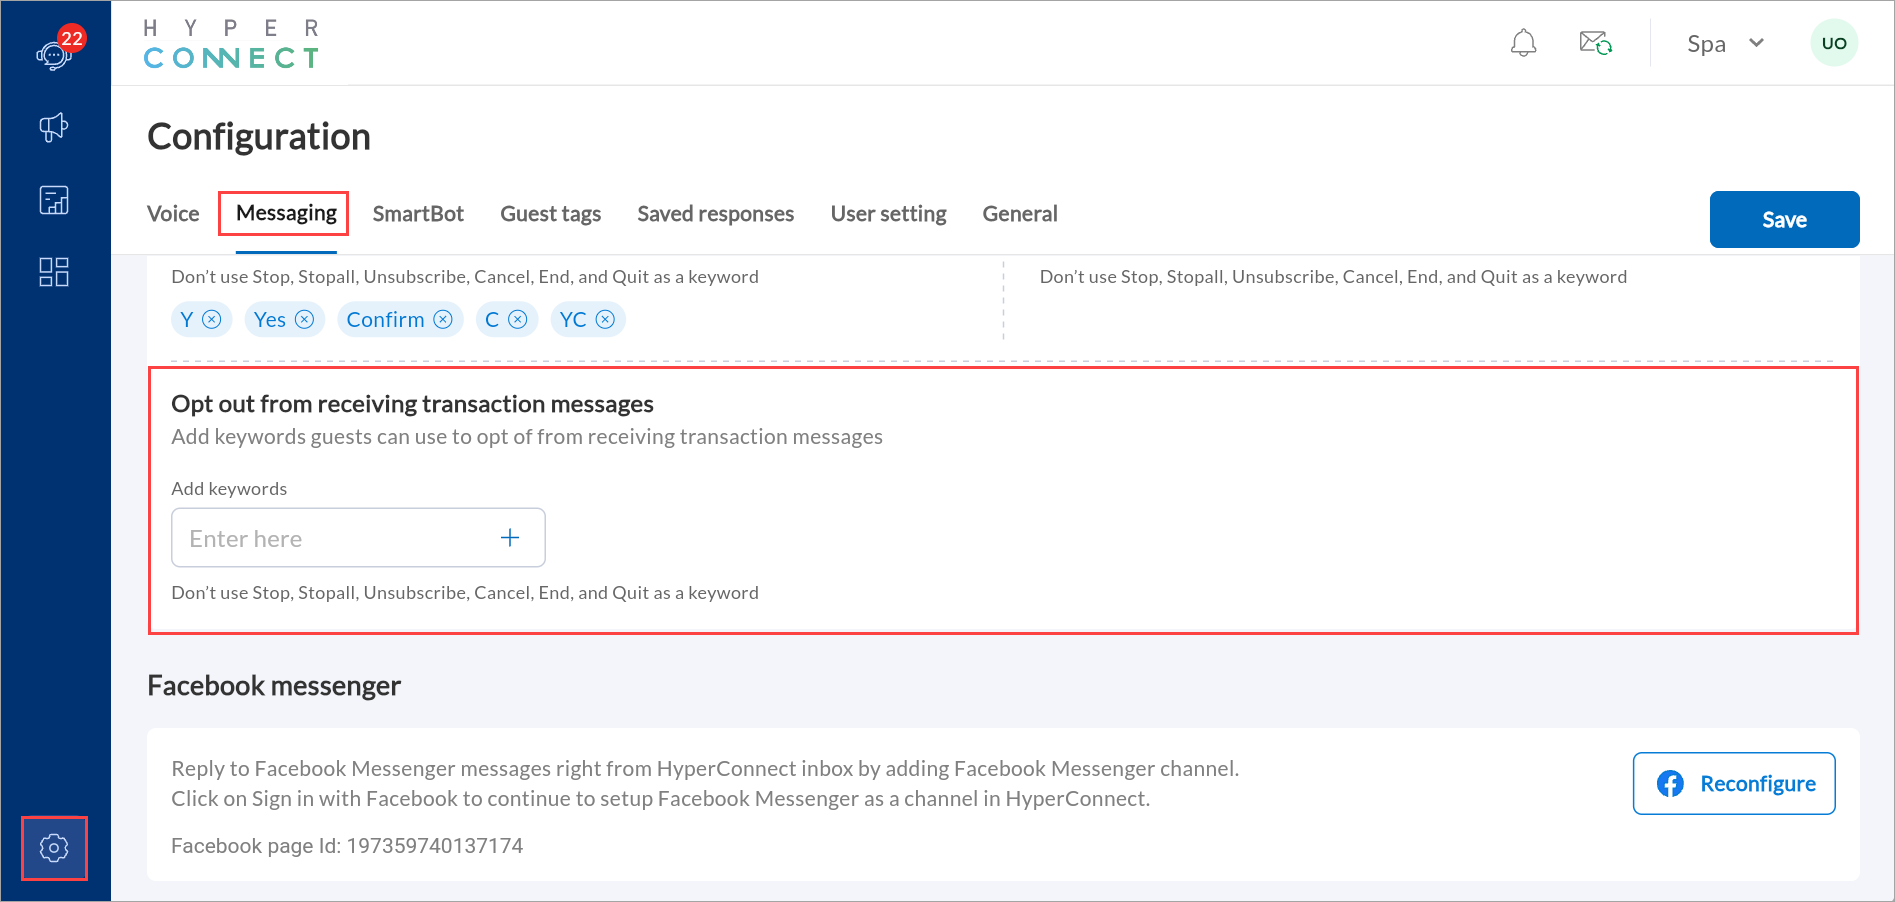
Opt Out from Receiving Transaction Messages
You can provide guests control over their communication preferences by allowing them to opt-out of transaction-related messages, such as reminders or updates on bookings.
Launch HyperConnect.
Click the Settings icon.
In the Messaging tab, navigate to the Keywords section.
In the Opt out from receiving transaction messages box, enter the words or phrases that you wish to add.
To add a keyword, click the + symbol.
Click Save.
Impacts and considerations
Only one keyword can be added for opt-out.
You cannot use Stop, Stopall, Unsubscribe, Cancel, End, and Quit as a keyword for appointment cancellation.
Configure Facebook Messenger
By linking your Facebook page to HyperConnect, you can manage all Messenger conversations directly from your HyperConnect inbox, centralizing communication across channels.
Required roles: Any role with access to the Settings screen
Launch HyperConnect.
Click the Settings icon.
To log in using your Facebook credentials, from the Messages tab, click Sign in with Facebook.
Click Continue.
Alternatively, if you are already signed into a Facebook account from your browser, click Continue as <Your Account Name> to proceed.
Select the pages to link and click Next.
To permit the HyperConnect application to manage and access page conversations, enable the required permission settings and click Done.
Note
All the permissions will be toggled to Yes by default and while not all are mandatory, they are recommended for a successful set-up.
A prompt informing you that the Page is successfully linked to HyperConnect is displayed.
Click OK.
You will be redirected to the HyperConnect settings page. You can select which Facebook Page you want to connect to a particular center. You can select which Facebook Page you want to connect to a particular center. Conversations from Facebook will appear in your HyperConnect inbox. When a guest starts a conversation with your Facebook Page, you will see the new conversations appear with the Messenger icon displayed.