Plutus
Pre-requisites
Before you can start using Zenoti-Plutus integration, ensure the following are in place:
You must have subscribed to Plutus facility and set up your device in the Plutus cloud. Contact Pine Labs Support for more information.
Plutus integration is available as a part of Zenoti’s Enterprise plan. Contact Zenoti for more information.
The Zenoti account for your center needs to be configured with Plutus.
Integrate Plutus with Zenoti
Integrating Plutus with Zenoti, consists of the following steps:
Install Plutus device drivers and Pad Controller
To use Plutus device and POS from your computer, you first need to install the following software:
Plutus USB cable device drivers
Plutus Pad Controller application
If you do not have access to these applications, contact Pine Labs Support.
Depending on which version of Windows you are using, you need to install the corresponding Plutus device drivers in the computers that you are accessing Zenoti from.
Zenoti has been tested for compatibility with the following versions of device drivers:
Windows 8 X64 and X86
Windows XP or Windows 7 x64 and x86
Note
X64 refers to 64-bit and X86 refers to 32-bit version of Windows. If your Windows operating system doesn't list either 32-bit or 64-bit, it implies you are running 32-bit operating system.
After you download the device drivers into your local machine, follow these steps to install the driver:
Double click the Setup_X64 or Setup_X86 depending on the version of your Windows.
On the installation wizard that opens, click Next.
On the License Agreement screen, select I accept this agreement, and click Next. The driver installation begins now.
When the drivers are installed and the success message is displayed in the wizard, click Finish.
Navigate to the folder where you have downloaded the Plutus Pad Controller software, and click the Setup file.
On the installation wizard that opens, click Next.
On the next screen, select whether you want to restrict the use of Pad Controller for only your account or anyone who uses the computer. We recommended you to select Everyone.
Click Next.
The Pad Controller is installed on your machine. Once it is complete, the following icon appears on your Desktop. Double click the icon to open the Pad Controller application. You must keep this application open to take any payments using Plutus devices.

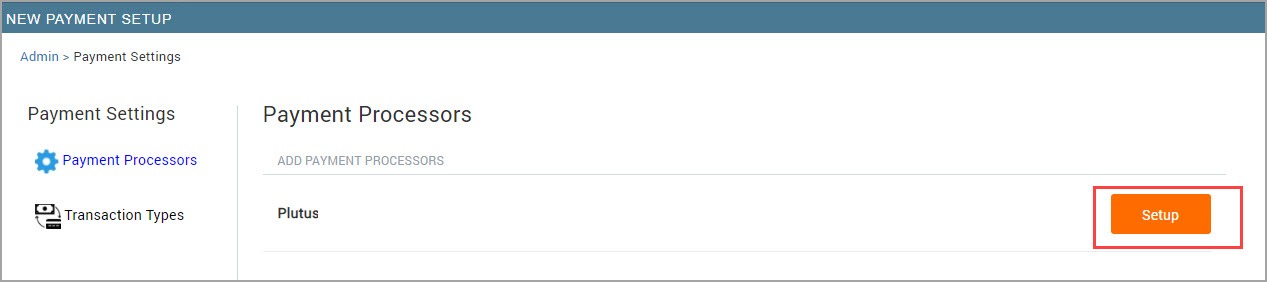
Configuring Plutus in Zenoti
After you've subscribed to Plutus, you need to configure the Plutus processing in Zenoti. The Plutus integration needs to be set up for each center separately, at the center level settings of your software.
To configure Plutus in Zenoti
If you are configuring Plutus at the organization level, click on the Configuration icon and navigate to Payments > Settings.
If you are configuring Plutus at the center level, click on the Configuration icon and navigate to Payments > Settings.
Recommended processors for your location appear.
The New Payment Setup screen opens.
Recommended processors for your location appear.
Locate Plutus and click Setup.
The Plutus configuration page appears.
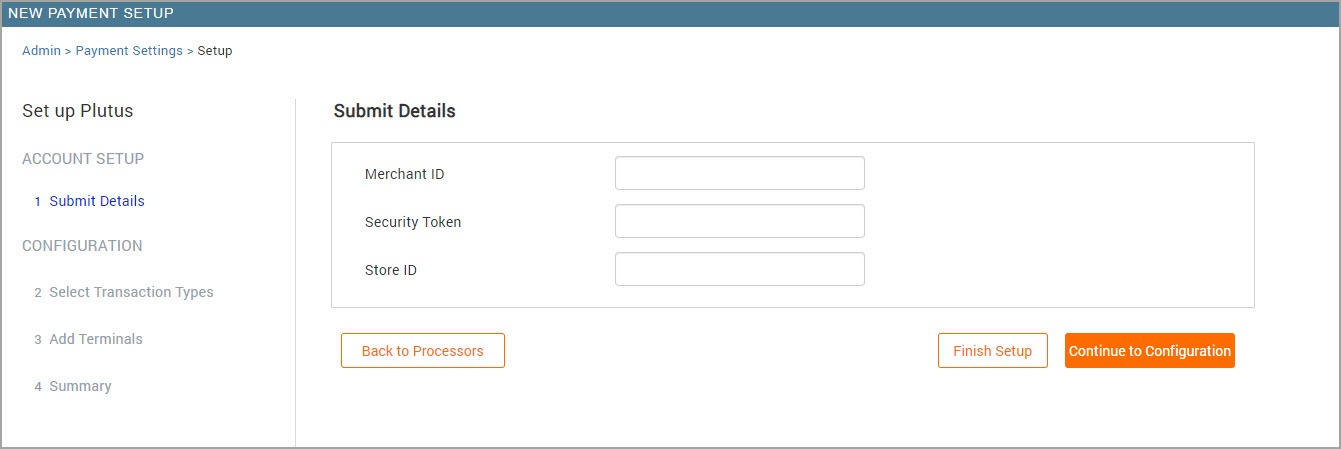
Complete the following fields:
Merchant ID: Enter the four-digit Merchant ID provided to your organization by Pine Labs. For example, 1234.
Security Token: Enter the 32-character security token provided to you by Pine Labs. For example, 70D7509C-0A90-4938-A7F9-DB99B9B841D9
StoreID: Enter the five-character Merchant Store Code assigned to this center. For example, MP123.
Click Continue to Configuration to proceed with setting up payment options, transaction types, and terminals. If you wish to configure these settings later, click Finish Setup.
Configure transaction types
Configure the following settings:
Terminal: Select this checkbox to allow terminal transactions (card reader transactions) on Plutus for your center or organization.
Online: Select this checkbox to allow online transactions for Webstore and CMA on Plutus.
Add terminals
Configure the following settings:
Hardware ID: Enter the Hardware ID of the Plutus device.
DeviceIMEI: Enter the IMEI number of the Plutus device. For example,
123456789009876.
MerchantStorePosCode:The combination of 5-character merchant store code and 3 digit POS registration ID. For example,MP123015. If you do nothave the POS registration ID, enter 000 as the last three digits.
Click Add and click Save.
Zenoti adds the card reader to the terminals list.
Note
These details are provided by Pine Labs when you subscribe for the Plutus Payment service.
Taking card payments using Plutus device
Open the invoice for which you want to take the payment.
On the right hand side of the POS, under the Collect Payment section, click Credit/Debit.
Click Add Payment. The TXN Uploaded alert is displayed now along with the Transaction Reference ID.
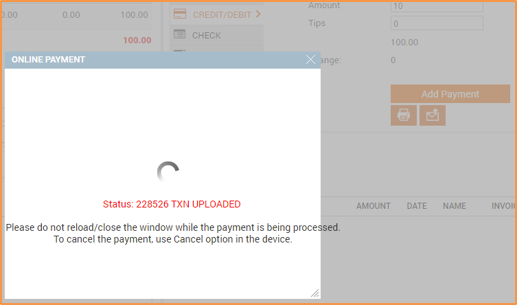
Note
After the Online Payment window appears, if you want to cancel the transaction, do so by clicking the Cancel button on the Plutus device. Do not cancel the transaction by closing this window because the transactionstill goes through the terminal, resulting in inconsistent data between Zenotiand Plutus.
On the Plutus devices' User Menu screen, click Run Application.
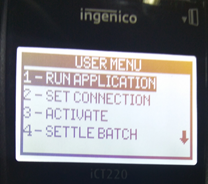
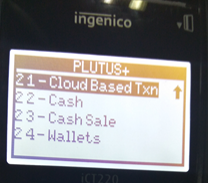
On the next screen that opens, scroll to Cloud Based Txn and click it.
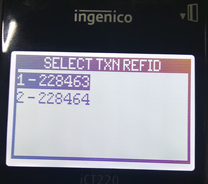
Click Get Open Txn.

The device now shows the Transaction Reference ID of the sale submitted by Zenoti. If multiple transactions are submitted by Zenoti, all of them are listed here. Select the relevant TXN REF ID.
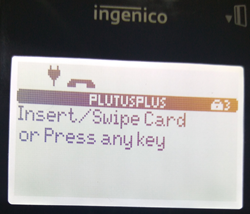
Swipe the card.
Select Proceed to complete the charge.
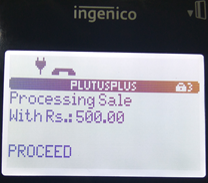
After the transaction is complete, the transaction details are updated in Zenoti.
FAQs on Plutus integration
Why am I not able to modify a transaction such as voiding or refunding an invoice?
The Zenoti-Plutus integration doesn't support the following:
Refund processing
Voiding a transaction
Storing a credit card
Recurring charges
Buying from webstore
I cannot access Zenoti in my center currently. How can I take a card payment using Plutus?
If you are not able to access Zenoti in your center for some reason, but need to take a card payment, you can do so using one of the following alternatives:
Complete the credit card transaction offline, and when you are able toaccess Zenoti, add the transaction as a custom payment.
If you are able to access Zenoti in any of your other centers, you can initiate the transaction in there by selecting the appointment book for this center, and then adding the required data in the POS.
You can go ahead and complete the transaction using the Plutus device in your center.
The Plutus device at my center doesn't work. How can I complete the transaction?If your Plutus device isn't working, you can complete the credit card transaction in any stand by device, and then add the transaction details in Zenoti as a Custom payment.
A transaction is completed in the Plutus device, but doesn't reflect in Zenoti. What can I do?
Check the status of the Credit Card transaction in theCollections - Online Transactions report (Configuration > Reports > Collections > Collections - Online Transactions).
Reopen and modify the invoice based on the status
Point of Sale terminal is not connecting to Zenoti. What should I do?
If the POS terminal is not connecting to Zenoti, then it is likely that the WiFi password was reset. In this case, enter the 4-digit access code when the terminal asks for it.