Admin tasks for setting up Zenoti Go
Overview of Zenoti GO
Zenoti GO allows for a convenient and contactless check-in and checkout experience for your guests. Guests can self check-in and self checkout for their appointments, thereby eliminating any intervention by the front desk. This frees up valuable front desk time and delivers a new age experience to your guests.
Guests can enable Zenoti GO via the Consumer Mobile App (CMA) and avail the following convenient and contactless experiences:
Check-in Experience
Self Check-in
The self check-in feature intelligently prompts the guests to check-in to their appointments when they arrive at the salon or the center. As soon as guests check-in, the providers are notified about their arrival. This helps the business in quicker service delivery and better guest management.
Self Check-in benefits for the business:
No manual intervention of the front desk
Faster service turnaround as no time is wasted at the front desk for checking in
Self Check-in benefits for the guests:
Convenient check-in from the mobile device
Contactless and touch less check-in experience
Learn more about Self Check-in
Checkout Experiences
Auto-pay
Auto-pay allows you to provide a contactless payment experience to your guests. After the services are completed, the front-desk staff or the therapist collects the payment by selecting the Complete Auto-payment option from the Appointment Book or the POS. The amount is charged to the saved card of the guest.
Auto-pay benefits for the business:
Auto-pay, being a contactless checkout system, frees up time for the front desk. This allows them to focus more on building rapport with the guests and allows for a better guest service.
Automation of tips collection. The guests specify the tips on their mobile device. Service charges along with tips are automatically charged to saved card of the guest.
Auto-pay benefits for the guests:
Convenient touchless payment experience.
Truly contactless and time-saving. The guests are not required to wait in queues for making payment. The payment for services and tips is made from the guest's mobile device and charged to the saved card.
Learn more about Auto-pay
Self-pay
Self-pay allows your guests to make payments for the services online, without any assistance from the front desk or without the requirement of any physical terminal. Guests can add tips and make payment immediately after the services begin. The payment is collected from the saved card of the guest.
Self-pay benefits for the business:
No manual intervention by the front desk.
Self-pay benefits for the guests:
Self-service payment module.
Truly contactless and time-saving. Guests can pay for the appointment (services + tips) anytime after the beginning of the service.
Set up Zenoti Go
Zenoti GO allows for a convenient and contactless check-in and checkout experience for your guests. Guests can self check-in and self-checkout for their appointments, thereby eliminating any intervention by the front desk. This frees up valuable front desk time and delivers a new age experience to your guests.
Guests can use Zenoti GO via the Consumer Mobile App (CMA) which consists of the following:
Check-in Experience
Self Check-in
Checkout Experiences
Automated touchless payments using Auto-pay
Self-initiated payments using Self-pay
Prerequisites
You must first enable Zenoti Go for your organization.
After Zenoti Go is enabled for your organization, you can configure the images, text, and set up your branding through the CMA template.
At the organization level, click the Configuration icon.
Search for and select the Online booking setting from the Online booking settings section.
Click CX V3 > Online Booking.
From Categories, select Zenoti Go.
Configure the following:
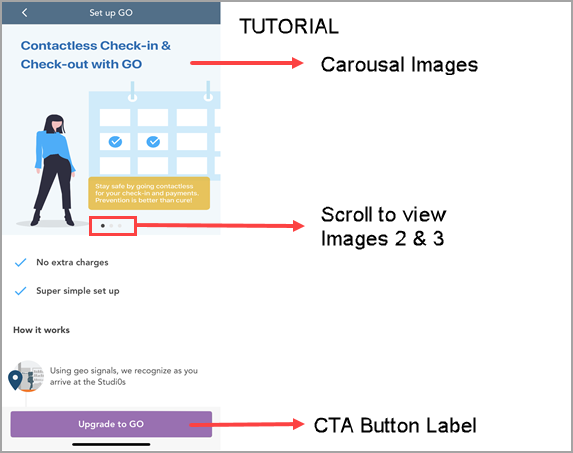
Tutorial: The intention of this tutorial is to let your guests know about the advantages of Zenoti Go and how its touchless framework works.
GO icon when guest has not enabled GO: Use the default Zenoti Go inactive logo or upload a custom inactive logo.
GO Icon when guest has enabled GO: Use the default Zenoti Go active logo or upload a custom active logo.
Carousel Image 1: Use a default Zenoti Go tutorial image or upload a custom image. The default image specifies the importance of contactless check-in and checkout.
Carousel Image 2: Use a default Zenoti Go tutorial image or upload a custom image. The default image specifies the importance of self-check-in as soon as the guest enters the center.
Carousel Image 3: Use a default Zenoti Go tutorial image or upload a custom image. The default image specifies the ease of automating payments on the CMA using the Auto-pay.
GO Label: Enter a text for the Zenoti Go label. This label will appear in different locations in the application, including tutorial, tooltips, user account screen, call to action buttons, and settings.
CTA Button Label: Enter a text for the Call-To-Action button. This button will appear in the tutorial.
Example: Upgrade to Z-GO.
Terms and Conditions: Enter the text for your business terms and conditions.
Important
This is important as there is no default text for Terms and Conditions on Auto-pay, Self-pay, and Self Check-in. Your business must create Terms and Conditions suited to your business needs.
Check the below image for reference.
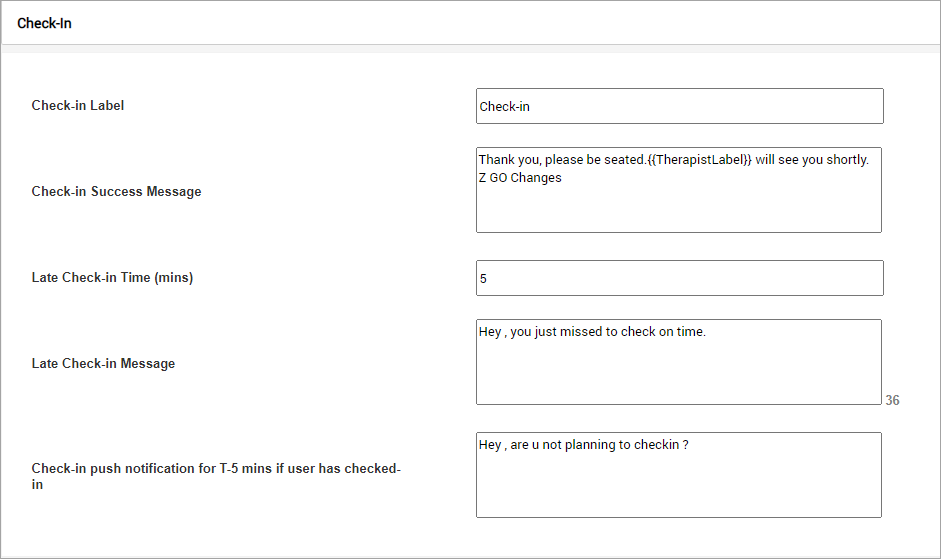
Check-In: The settings in this section allow you to customize the language that appears on the app, as per your business needs.
Check-in Label: You can customize the text label for check-in as per your marketing communications.
Check-In Success Message: Enter a text for the message that will appear after guests check-in successfully.
Late Check-in Time (mins): Enter the late check-in time in minutes. You can set the late check-in time to up to 15 minutes.
Late Check-in Message: Enter a text for the message that will appear when a guest is late for an appointment.
Check-in push notification for T-5 mins if user has checked-in: Enter a text for the push notification that will appear on the guest's phone 5 minutes before the appointment time.
Checkout: The settings in this section allow you to customize the language that appears on the app, as per your business needs.
Check-Out Label: You can customize the text label for check-out as per your marketing communications.
Auto-Pay Label: Auto-pay is a quick way of allowing your guests to checkout after they take their services. You can customize the way you want to call Auto-pay. If you call Auto-pay as “Fast Pay”, enter the text here in the Auto-pay label field. This will replace the word “Auto-pay” everywhere on the app.
Automatic Payment Type Description: Enter the text for the Auto-pay description. This text is displayed to the guests who enable Auto-pay as their preferred payment method.
Click Save.
You have successfully configured the Consumer Mobile App using the template.
Allow Guests to self check-In
Usually, when your guests enter your salon or center, the front desk has to manually check them in for an appointment.
The Self Check-in feature of the Consumer Mobile App allows your guests to self check-in when they are within 100 meter radius of your center, thereby eliminating the dependency on the front-desk staff to check-in guests.
Allowing your guests to self check-in on the CMA is a four-step process:
Step 1: Enable Self Check-in for your organization.
Who does this step?: Reach out to the Zenoti team to enable the Self Check-in feature for your organization.
Step 2: Enable Self Check-in for the centers.
Who does this step?: Reach out to the Zenoti team to enable the Self Check-in feature for the centers.
Step 3: Update the geo-coordinates of your center.
Who does this step?: This step must be performed by the admin on the customer side
At the center level, click the Configuration icon.
Search for and select the Online booking setting from the Online booking settings section.
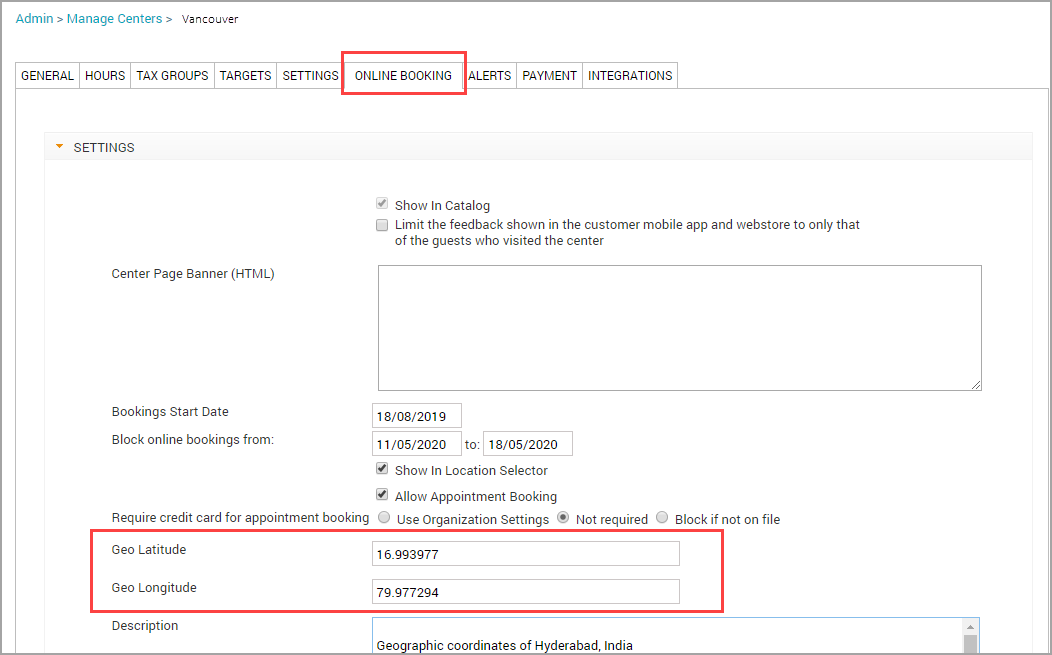
Click CX V3 > Online Booking.
Expand the Settings section.
Enter your center’s coordinates in the Geo Latitude and Geo Longitude fields.
CMA will allow your guests to self check-in only when they are within 100 meters (non-configurable) of these coordinates. Learn how to add your center’s coordinates.
Step 4: Enable the Self Check-in feature on the CMA.
Who does this step?: This action is to be taken by the guest. Ensure they have the latest version of the app. (The version number is available at the bottom of the menu. To access the menu, tap the hamburger icon.) The guests will have to perform the following steps to enable Self Check-in.
Log in to CMA.
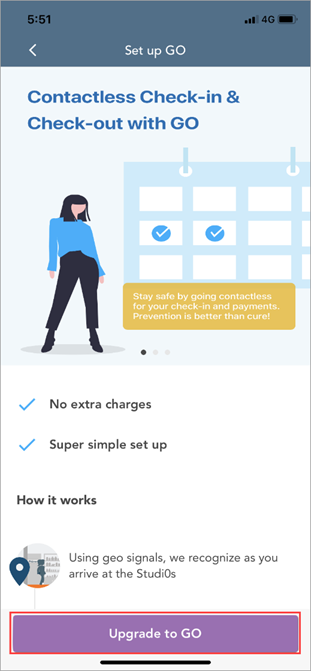
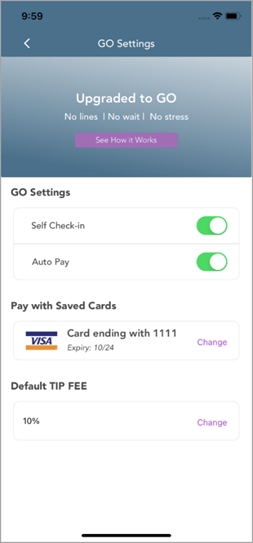
Tap the GO icon on the top right to open Set up GO.
Tap Upgrade to GO.
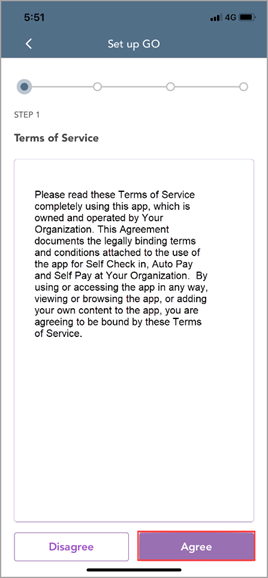
The terms and conditions open.
Tap Agree.
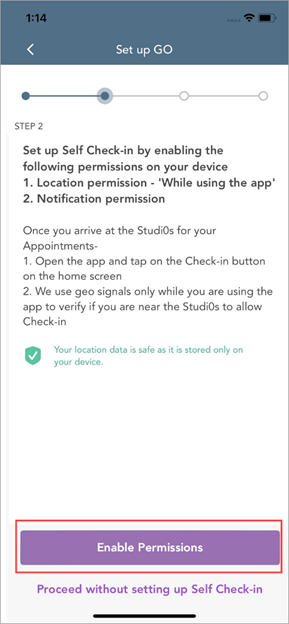
Self Check-in set up opens.
Tap Enable Permissions, and then enable the following permissions:
Location: The Location setting allows the CMA to determine if the guest is within 100 meters of the center’s coordinates and allows them to check-in. Guests must provide ‘While Using the App’ location permission.
Notification: Enable this setting to receive check-in push notifications.
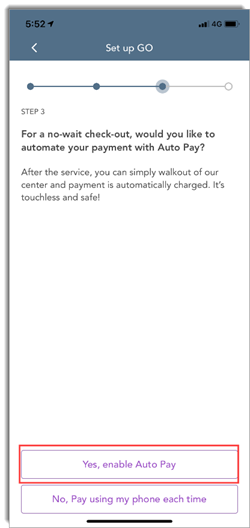
After the guest enables self check-in, proceed to set up check out options.
Choose to enable Auto Pay or to pay using your phone every time. If you want to enable Auto Pay, tap Yes, enable Auto Pay.
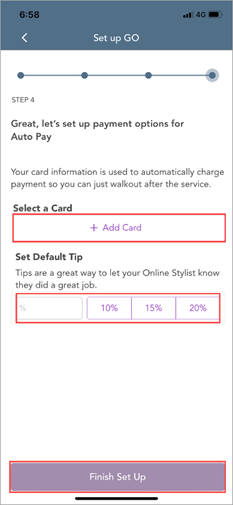
Payment options set up opens.
Add card details, set default tip, and then tap Finish Set up.
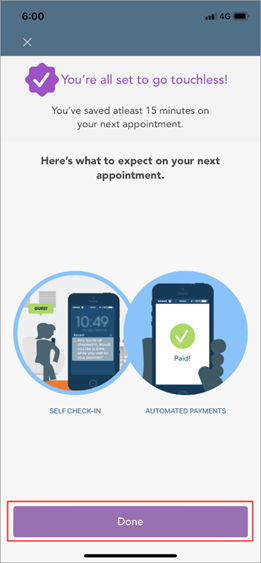
A confirmation screen appears, letting you know what you can expect in the next appointment.
Tap Done.
You are upgraded to Zenoti GO.
How does it work?
On the day of the appointment, the guest will receive two notifications:
Check-in notification: This notification asks the guest to open the app and check-in if they are within the geofence.
Check-in reminder: This reminder prompts the guest to open the app and check-in 5 minutes before the appointment start time.
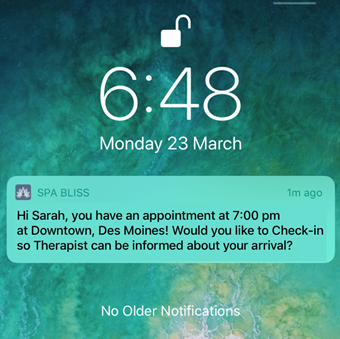
The guest taps on the notification and the Appointment Details screen opens with the option to Check-in.
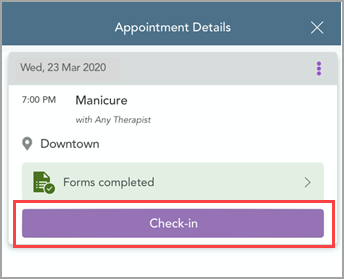
The guest taps Check-in and the provider is immediately notified about the guest’s arrival.
Configure center coordinates to allow guests to self check-in
Self check-in allows your guests to skip queues and check-in to their appointment as soon as they enter your center’s premises. Self-check-in also ensures minimum contact with the front-desk staff and allows for quick service fulfillment.
For your guests to self check-in, you must first enter the coordinates of your center in Zenoti. These coordinates allow the CMA to detect your center’s location accurately and guide the guest to your center. Once the guest is inside the center or within 100 meters of the center, the CMA prompts the guest to do a self check-in.
To ensure that guests get this prompt to self check-in accurately, you must add the coordinates of your center with precision.
You can configure the coordinates for your center in two steps:
Step 1: Get the coordinates of your center
You must first get the coordinates of your center from Google Maps.
Note
You may use other map applications too, but the steps detailed in this article pertain to Google Maps.
Option 1: If your center’s address is visible in Google Map’s search results.
Navigate to maps.google.com on a PC/Mac.
In the search bar, enter your center’s address.
Google displays search results.
Ensure you select the appropriate address.
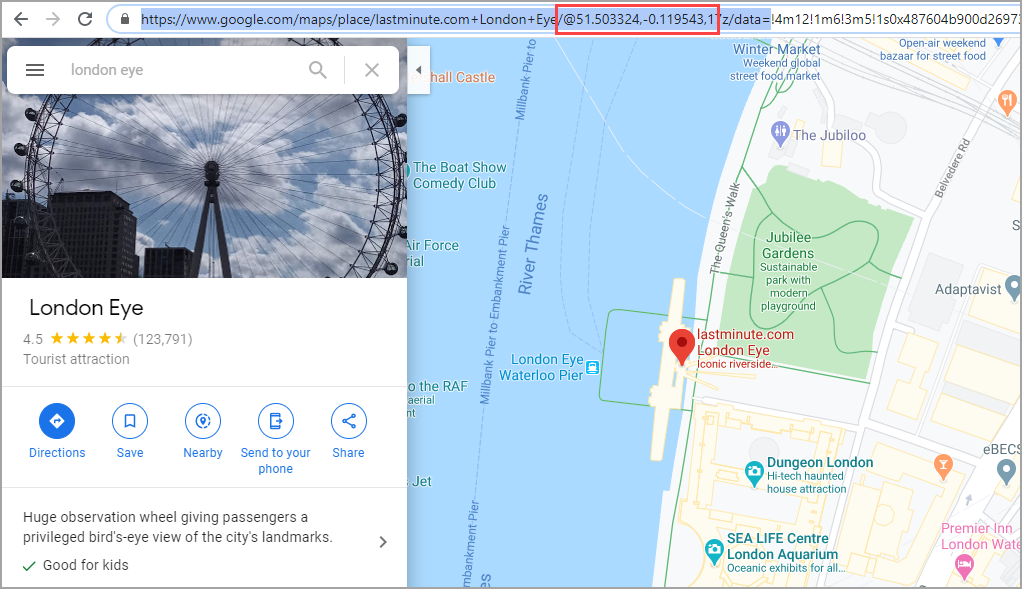
Copy the coordinates from the URL of your center address.
For example, the URL for the London Eye in Google Maps is as follows: https://www.google.com/maps/place/lastminute.com+London+Eye/@51.503324,-0.119543,17z/data=
In this URL, the coordinates begin after the “@” symbol and end before the alphanumeric text “,17z”. The latitude in the above example is 51.503324 and the longitude is -0.119543.
Option 2: If your center’s address is not visible in Google Map’s search results.
Navigate to maps.google.com on a PC/Mac.
In the search bar, enter a landmark closest to your center.
Google displays the results.
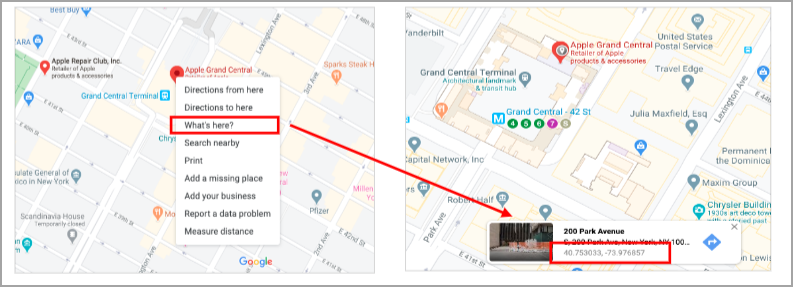
Locate your center on the map manually.
Right-click your location and select What’s here?
Google Maps displays the address and coordinates.
Verify the address and copy the coordinates.
Note
If the address does not match, retry, and locate your address manually.
Step 2: Update the coordinates in Zenoti
After you get the coordinates of your center, you must add them in Zenoti.
At the center level, click the Configuration icon.
Search for and select the Online booking setting from the Online booking settings section.
Click CX V3.
Expand the Settings section.
Scroll down to locate the settings Geo Latitude and Geo Longitude.
Enter your center’s coordinates in the Geo Latitude and Geo Longitude fields.
Tip
Refer to the example of the London Eye coordinates explained earlier to enter the information for your center.
Click Save.
You have successfully added your center’s coordinates in Zenoti. Guests can now self-check-in to their appointments.
Configure app notifications for self-pay
Zenoti allows you to configure app notifications that are sent to your guests when they enable the Self-pay feature of the Consumer Mobile App (CMA).
These notifications inform the guest about the due amount after taking a service or after adding a retail item to the invoice.
At the organization level, click the Configuration icon.
Search for and select the Email/Text setting from the Notifications section.
Scroll down to locate Zenoti Go.
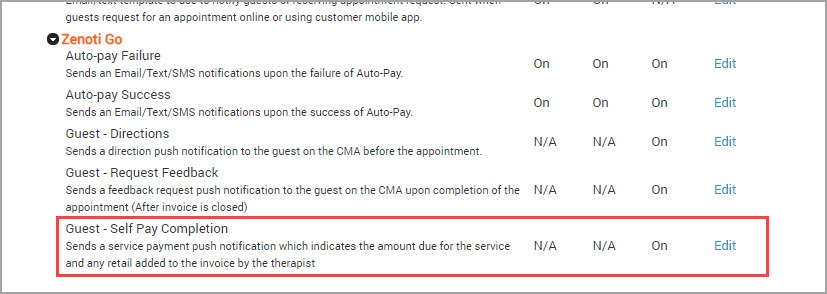
Beside Guest - Self Pay Completion, click Edit.
Select the “Turn this automated push message on” checkbox.
Use the following available macros to define a notification template:
Center State: State where the center is located.
Center City: This macro will display the name of the city where the center is located.
App Cost: This macro will display the total charges for the services.
Center Name: This macro will display the name of the center where the services were taken.
Visits: Number of times the guest has visited the base center.
Download Link: Link to download the Customer Mobile Application (if the Organization has it enabled).
Day of Appointment: Day on which the appointment was scheduled.
Center Zip: Zip code/postal code of the guest's base center location.
First Name: First name of the guest.
Start Time: Time when the appointment was scheduled to start.
Note
When you add this macro, the time zone is also appended to the time as per center time zone.
Center Phone: Primary phone number of the guest's base center (corresponds to the Phone 1 field in the center’s settings).
Center Phone 2: Secondary phone number provided for the guest's base center (corresponds to the Phone 2 field in the center’s settings).
Center Addl Data1: Additional information about the center, provided in the Additional Text field in the guest's base center (Settings>Invoice& Receipts)
Center Address: Complete address of the guest's base center (corresponds to the Address 1 and Address 2 fields in the center’s settings).
End Time: Time when the appointment was scheduled to end.
Note
When you add this macro, the time zone is also appended to the time as per center time zone.
Duration: Duration of the appointment.
Treatment List: List of services scheduled for the appointment.
Service Therapist List: List of therapists who were scheduled to perform the services in the appointment; also shows the service name.
Service Therapist Time List: Scheduled time for the service and the service name; includes the therapist’s name.
Center Country: Country where the guest's base center is located.
App Date: Date on which the appointment was scheduled.
Last Name: Last name of guest.
Org Name: Name of the organization.
Name: First name followed by the last name of the guest.
Invoice Comments: Any notes or information about the invoice that you want to share with your guests.
Center E-mail: Email address of the guest's base center.
Mail Unsubscribe Link: Link to unsubscribe and stop receiving marketing and campaign emails.
Service Custom Data Link: Link to the service data form. Email can be triggered from the Guest profile > Appointment tab. Click View or enter custom data related to this service icon and click Send custom data link button
Guest Data Link: Link to user data form. Link can be triggered from Appointment book > Guest profile > Send Guest Data Link.
The Send Guest Data Link button appears only if you have the Guest Data Form template activated.
Service Data Link: Link to the service data form that your guests can use to specify any additional data related to service. For example, to effectively administer a hair spa service, you may need to know the guest’s hair type, or for a customized facial you would want to know and store the guest’s skin type.
Confirm Link: Link to receive the guest’s confirmation of the appointment.
Video URL: Businesses that have service-specific videos for say, pre and post care instructions, would like guests to watch videos related to before/after treatment. In such cases, they can use this macro. The macros get replaced with the Video ID entered in the service-catalog tab.
Gender: Gender of the provider.
Due Amount: This macro will display the pending amount in the current invoice.
Click Save.
You have successfully configured the app notifications for self-pay.